35. Graphics View Framework
The Graphics View Framework is a system in Qt for creating and managing interactive 2D scenes. Its main components are:
QGraphicsScene- the container that holds all graphical items.QGraphicsView- the widget that displays the scene.QGraphicsItem- the base class for all objects in the scene.
You can add thousands of items (rectangles, images, text, lines, or custom shapes) to a scene, and the framework efficiently handles rendering, transformations, and user interaction like mouse clicks and dragging. The framework supports features like zooming, panning, and coordinate transformations between scene, view, and item levels.
In this chapter we present some of these features using a sticky note board application as an example: a board where th user places, arranges, and removes colored notes. We start with the basic scene, view, and coordinate-mapping fundamentals, then then build up the notes themselves (first as built-in graphics items, then as custom-painted QGraphicsItems) before adding item-level interaction and, finally, the transformations that let a note expand and tilt as it is dragged.
35.1 The Canvas: QGraphicsScene and QGraphicsView
QGraphicsScene holds items while QGraphicsView renders a viewport into it. A single scene can be observed by multiple views simultaneously, each with its own position and zoom level.
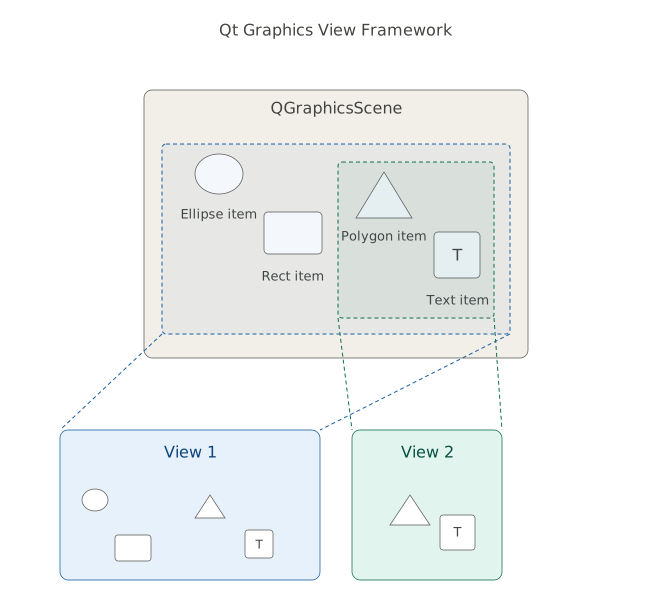
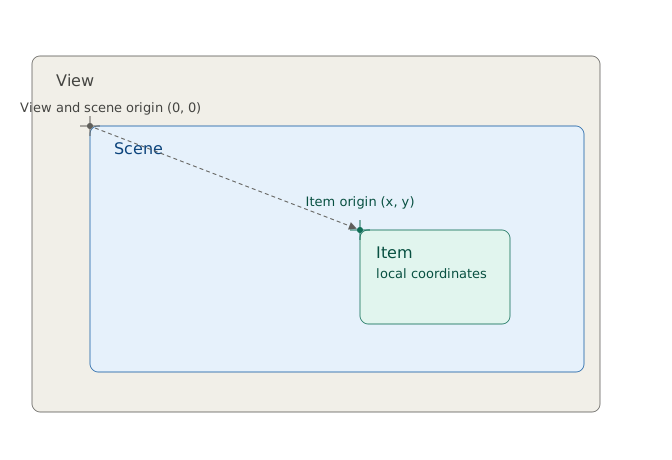
Connecting them correctly requires understanding three distinct coordinate spaces (scene, view, and item-local) that the framework keeps separate.
 |
To evaluate the Qt Graphics View Framework’s suitability for your sticky notes application, you create a custom |
To create a basic Qt Graphics View Framework application:
 1 from PySide6.QtGui import QTransform
 2 from PySide6.QtWidgets import QGraphicsScene
 3
 4
 5 # 1. Create a custom graphics scene
 6 #    that supports  reordering items.
 7
 8 class Scene(QGraphicsScene):
 9
10     def mousePressEvent(self, event):
11
12         item = self.itemAt(event.scenePos(), QTransform())
13         if item:
14             max_z = max(i.zValue() for i in self.items())
15             item.setZValue(max_z + 1)
16         super().mousePressEvent(event)
- Create a custom graphics scene subclass (
Scene) to support changing its child items’ z values. EveryQGraphicsItemdefaults to a Z-value of 0, though in this demo, each rectangle is instead given an explicit, ascending Z-value (0 through 5, one per color) as it’s created. InmousePressEvent(), get a reference to the clicked item, if any, then enumerate the Z-values of all items in the scene and set the clicked item’s Z-value tomax_z + 1.
 1 from PySide6.QtGui import QTransform
 2 from PySide6.QtWidgets import QGraphicsView
 3
 4
 5 # 2. Create a custom graphics view and implement
 6 #    zooming in and out on mouse wheel scroll,
 7 #    and logging mouse pointer position changes
 8 #    in scene, view, and item-local coordinates.
 9
10 class GraphicsView(QGraphicsView):
11
12     def wheelEvent(self, event):
13         factor = 1.15
14         if event.angleDelta().y() > 0:
15             self.scale(factor, factor)
16         else:
17             self.scale(1 / factor, 1 / factor)
18
19     def mouseMoveEvent(self, event):
20
21         scene_pos = self.mapToScene(event.position().toPoint())
22         view_pos = self.mapFromScene(scene_pos)
23
24         text = f'Scene ({scene_pos.x():.0f}, {scene_pos.y():.0f})  ' \
25                f'View ({view_pos.x()}, {view_pos.y()})  '
26
27         item = self.scene().itemAt(scene_pos, QTransform())
28         if item is not None:
29             item_pos = item.mapFromScene(scene_pos)
30             text += f'Item ({item_pos.x():.0f}, {item_pos.y():.0f})'
31
32         self.window().status_label.setText(text)
33         super().mouseMoveEvent(event)
-
Create a custom graphics view subclass and implement:
Zooming in and out on mouse wheel scroll. In
wheelEvent()check theQWheelEvent.angleDelta().y()value. The value is positive when the wheel was rotated forwards (away from the user), in which case we zoom in the view by a factor of 1.15 viaQGraphicsView.scale(). A negative value indicates the wheel was rotated toward the user, in which case we zoom out the view by the same factor.Logging mouse pointer position changes in scene, view, and item-local coordinates. In
mouseMoveEvent(), get the mouse pointer’s current position in view coordinates (view_pos), map that position to scene coordinates withQGraphicsView.mapToScene()and, if the pointer is currently over a note, get the note’s item-local coordinates withQGraphicsItem.mapFromScene(). Emit all three coordinates as the custommouse_position_changedsignal’s arguments.
 1 import sys
 2 from random import randint
 3 from PySide6.QtGui import QPen, QColor, QBrush
 4 from PySide6.QtWidgets import QApplication, QWidget, QVBoxLayout, QLabel
 5
 6 from graphicsview import GraphicsView
 7 from customscene import Scene
 8
 9
10 COLORS = {
11     'yellow':   ('#FED900', '#C9A800'),
12     'green':    ('#B4E4A2', '#6DBF5B'),
13     'pink':     ('#FFB8CE', '#E0658A'),
14     'purple':   ('#C8B0E0', '#8E6BBF'),
15     'blue':     ('#A8D8F8', '#3B8FCC'),
16     'grey':     ('#C8C8C8', '#8C8C8C')
17 }
18
19 WIDTH = 150
20 HEIGHT = 150
21 SCENE_WIDTH = 600
22 SCENE_HEIGHT = 500
23
24
25 class Window(QWidget):
26
27     def __init__(self):
28
29         super().__init__()
30         layout = QVBoxLayout()
31         self.setLayout(layout)
32
33         # 3. Create a Scene and add items to it.
34
35         self.scene = Scene()
36         self.scene.setSceneRect(0, 0, SCENE_WIDTH, SCENE_HEIGHT)
37
38         z = 0
39         for _, (fill, border) in COLORS.items():
40             x = randint(1, SCENE_WIDTH - WIDTH)
41             y = randint(1, SCENE_HEIGHT - HEIGHT)
42             pen = QPen(QColor(border), 2)
43             brush = QBrush(QColor(fill))
44             rect = self.scene.addRect(0, 0, WIDTH, HEIGHT, pen, brush)
45             rect.setPos(x, y)
46             rect.setZValue(z)
47             z += 1
48
49         # 4. Create the GraphicsView
50         #    and add it to the main window layout.
51
52         self.view = GraphicsView(self.scene)
53         self.view.setMouseTracking(True)
54         layout.addWidget(self.view)
55
56         self.status_label = QLabel()
57         layout.addWidget(self.status_label)
58
59
60 if __name__ == '__main__':
61
62     app = QApplication(sys.argv)
63     window = Window()
64     window.show()
65     sys.exit(app.exec())
In the main window, create a
Sceneand add items to it. We define six note colors, and for each color, we add aQGraphicsRectItemto the scene at random coordinates.Create a
GraphicsViewand add it to the main window layout with mouse tracking enabled.
Create a status label and connect the view’s mouse_position_changed signal to the update_status_label() slot that reads the scene, view, and item-local coordinates it receives and formats them into the label’s text. Now, when you run the application and hover the mouse over a rectangle, you should get all three coordinates displayed in the status label, as seen here:
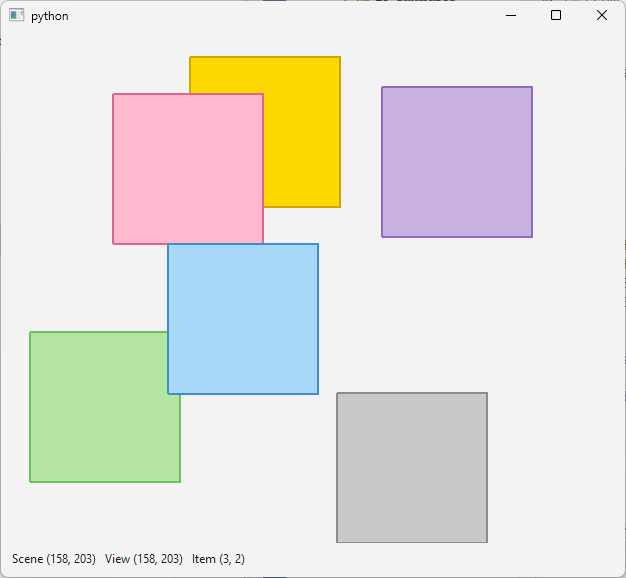
Initially, the scene and view coordinates are the same. If you zoom out the view and point near its edges, scene coordinates can go negative - the view is now showing area outside the scene’s (0, 0) - (600, 500) bounds, and mapToScene() reports coordinates in that surrounding margin. Item-local coordinates can range from -1 to 151 (1 pixel past either edge of the 150x150 rectangle) due to the 2px pen. The stroke is centered on the shape’s outline, se it extends half its width (1px) to either side of the rectangle’s edge.
Scene coordinates are the framework’s fixed frame of reference. They don’t change no matter how the view is zoomed or panned, since they describe locations in the scene itself. View coordinates are pixels on the widget, no matter what the view is showing. QGraphicsView.mapToScene() turns a view pixel into the scene position behind it. In this example, item coordinates have (0, 0) at the note’s top-left corner. They stay the same no matter where the item is or how far you have zoomed. QGraphicsItem.mapFromScene() converts a scene position into these coordinates.
35.2 Populating the Board: Built-in Graphics Items
Qt provides ready-made QGraphicsItem subclasses for the common shapes (rectangles, ellipses, lines, polygons, text, and pixmaps) which can be made movable and selectable by setting their ItemIsMovable and ItemIsSelectable flags.
|
You need to build a proof-of-concept sticky notes application using built-in items: |
To use built-in graphics items in your application:
 1 from PySide6.QtGui import QTransform
 2 from PySide6.QtWidgets import QGraphicsScene
 3
 4
 5 # 1. Create a custom graphics scene class.
 6
 7 class Scene(QGraphicsScene):
 8
 9     def mousePressEvent(self, event):
10
11         item = self.itemAt(event.scenePos(), QTransform())
12         if item:
13             max_z = max(i.zValue() for i in self.items())
14             group = item.group()
15             if group:
16                 group.setZValue(max_z + 1)
17         super().mousePressEvent(event)
- Create a custom scene class. As in the previous section, items are brought to the foreground by giving them a new Z-value, but with one difference: each note’s rectangle and text label are two separate graphical items, yet need to be treated as a single unit when clicked. A click can land on either the rectangle or the label, and only the item actually under the mouse pointer is returned by
itemAt(). Without grouping, raising the rectangle would leave its label behind, or vice versa. So each pair is added to aQGraphicsItemGroupon creation, and callinggroup()on whichever child was hit resolves both back to the same group, so it’s the group’s Z-value that we need to change.
  1 import sys
  2 from random import randint
  3 from PySide6.QtCore import Qt
  4 from PySide6.QtGui import QPen, QColor, QBrush
  5 from PySide6.QtWidgets import (QApplication, QWidget, QVBoxLayout,
  6     QHBoxLayout, QPushButton, QLineEdit, QComboBox, QGraphicsItem,
  7     QGraphicsView)
  8
  9 from customscene import Scene
 10
 11
 12 COLORS = {
 13     'yellow':   ('#FFF4B2', '#FED900'),
 14     'green':    ('#E1FDD6', '#B4E4A2'),
 15     'pink':     ('#FFD9E5', '#FFB8CE'),
 16     'purple':   ('#EEDCFF', '#C8B0E0'),
 17     'blue':     ('#D4EEFF', '#A8D8F8'),
 18     'grey':     ('#E8E8E8', '#C8C8C8')
 19 }
 20
 21 WIDTH = 150
 22 HEIGHT = 150
 23 SCENE_WIDTH = 600
 24 SCENE_HEIGHT = 500
 25
 26
 27 class Window(QWidget):
 28
 29     def __init__(self):
 30
 31         super().__init__()
 32         layout = QVBoxLayout()
 33         self.setLayout(layout)
 34
 35         # 2. Create the scene and view objects.
 36
 37         self.scene = Scene()
 38         self.scene.setSceneRect(0, 0, SCENE_WIDTH, SCENE_HEIGHT)
 39
 40         self.view = QGraphicsView(self.scene)
 41         layout.addWidget(self.view)
 42
 43         inner_layout = QHBoxLayout()
 44         layout.addLayout(inner_layout)
 45
 46         # 3. Add a line edit to enter note text, a combo box
 47         #    to select note color, and a push button
 48         #    to add note to the board.
 49
 50         self.note_edit = QLineEdit()
 51         self.note_edit.setMaxLength(180)
 52         self.note_edit.setPlaceholderText('Note text...')
 53
 54         self.color_combo = QComboBox()
 55         for i, (name, colors) in enumerate(COLORS.items()):
 56             self.color_combo.addItem(name)
 57             self.color_combo.setItemData(
 58                 i, colors, Qt.ItemDataRole.UserRole)
 59             self.color_combo.setItemData(i, QBrush(colors[0]),
 60                 Qt.ItemDataRole.BackgroundRole)
 61
 62         self.add_button = QPushButton('Add Note')
 63         self.add_button.clicked.connect(self.add_note)
 64
 65         inner_layout.addWidget(self.note_edit)
 66         inner_layout.addWidget(self.color_combo)
 67         inner_layout.addWidget(self.add_button)
 68
 69     def get_random_coords(self):
 70         return (randint(1, SCENE_WIDTH - WIDTH),
 71                 randint(1, SCENE_HEIGHT - HEIGHT))
 72
 73     # 4. Add the note to the board.
 74
 75     def add_note(self):
 76
 77         x, y = self.get_random_coords()
 78         colors = self.color_combo.currentData(Qt.ItemDataRole.UserRole)
 79
 80         rect = self.scene.addRect(
 81             0, 0, WIDTH, HEIGHT,
 82             QPen(QColor(colors[1]), 2),
 83             QBrush(QColor(colors[0])))
 84         rect.setPos(x, y)
 85
 86         label = self.scene.addText(self.note_edit.text())
 87         label.setDefaultTextColor(QColor('#333333'))
 88         label.setPos(x + 10, y + 10)
 89         label.setTextWidth(WIDTH - 20)
 90         self.note_edit.clear()
 91
 92         group = self.scene.createItemGroup([rect, label])
 93         group.setFlag(QGraphicsItem.GraphicsItemFlag.ItemIsMovable)
 94         group.setFlag(QGraphicsItem.GraphicsItemFlag.ItemIsSelectable)
 95
 96
 97 if __name__ == '__main__':
 98
 99     app = QApplication(sys.argv)
100     window = Window()
101     window.show()
102     sys.exit(app.exec())
Create the scene and view objects as in the previous section Note that we use a plain
QGraphicsViewhere as we don’t need to work with coordinates directly.Add a line edit to enter the note text, a combobox to select the note color, and a button to add the note to the board.
-
Add the note to the board. On the Add Note button click:
- Get two random coordinates (
xandy) within the scene bounds, - Get the note’s pen and brush color pair,
- Add a rectangle with a pen and brush built from that color pair to the scene.
- Set the rectangle’s position with
QGraphicsItem.setPos(x, y). - Add
QGraphicsTextItemwith the line edit’s text to the scene, giving it a 10-pixel padding inside the rectangle, then clear the line edit. - Group the rectangle and the text using
QGraphicsScene.createItemGroup(), which returns aQGraphicsItemGroupsized to enclose both children. The group itself is a graphics item and needsItemIsMovableandItemIsSelectableset explicitly.
Now, when you run the application, the scene is empty. You can enter note text in the line edit, select a note color, and add it to the scene with the button. Each rectangle-text pair is treated as a single unit: dragging either the rectangle or its label moves both together, and selecting one draws a selection outline around their combined bounding box.
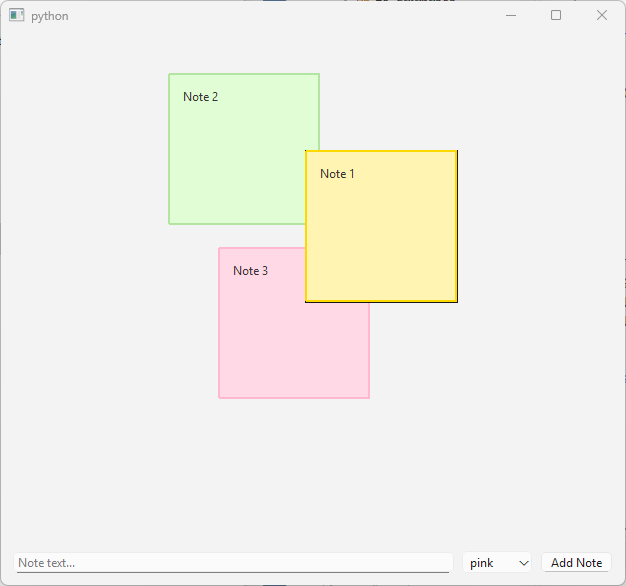
Note that the order in which items are added to a group matters: among items with equal Z-value, the one added later stacks on top, so adding the rectangle first and the text second guarantees the label renders above the note’s fill. Adding them in the opposite order would leave the text hidden behind the rectangle.
These two pieces of code:
1 rect = self.scene.addRect(
2    0, 0, WIDTH, HEIGHT,
3    QPen(QColor(colors[1]), 2),
4    QBrush(QColor(colors[0])))
5 rect.setPos(x, y)
1 rect = self.scene.addRect(
2    x, y, WIDTH, HEIGHT,
3    QPen(QColor(colors[1]), 2),
4    QBrush(QColor(colors[0])))
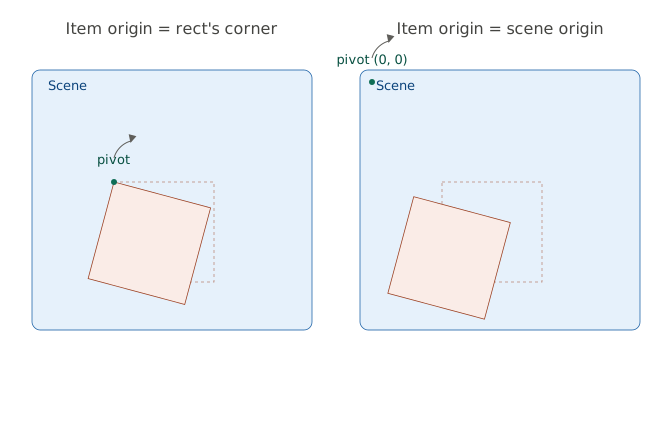
can produce identical results on screen - both put the rectangle at the same spot in the scene. But they don’t put the item’s origin in the same place. The first leaves the origin on the rectangle’s top-left corner, while the second places it at the scene’s origin, with the rectangle drawn some distance away from it.
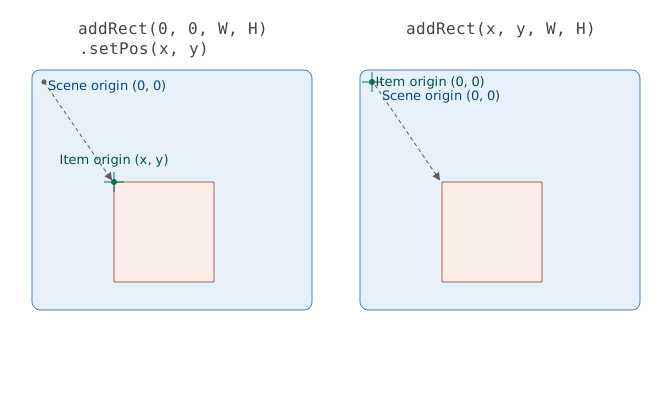
The difference is invisible until something rotates or scales the item. An item origin coinciding with the shape spins the shape in place. An item origin far from the shape swings it through a wide arc instead.
35.3 A Proper Note: Custom QGraphicsItem Painting
Built-in items cover simple shapes but not compound or domain-specific visuals. Subclassing QGraphicsItem and implementing boundingRect() and paint() gives you complete control.
|
You decide to replace the plain |
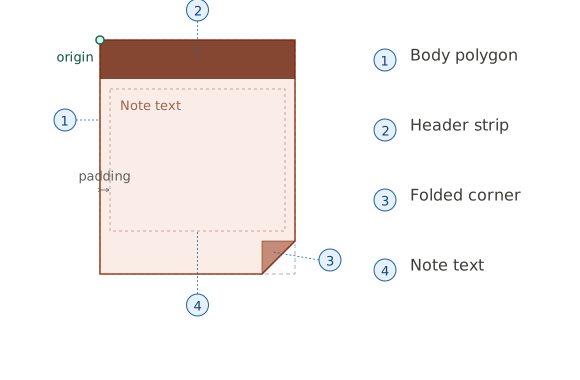
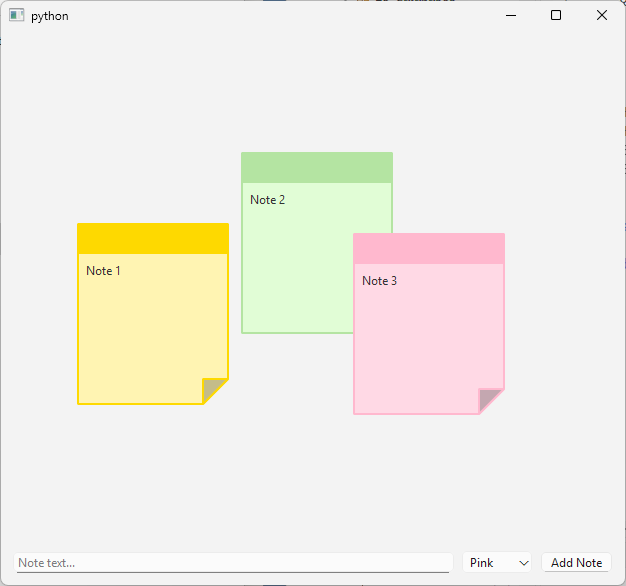
Our custom notes will look like this:
To create a custom graphical item:
 1 from PySide6.QtCore import QRectF, QPointF, Qt
 2 from PySide6.QtGui import (QPainter, QBrush, QPen, QColor,
 3     QPolygonF, QPainterPath)
 4 from PySide6.QtWidgets import QGraphicsItem
 5 from enum import Enum
 6
 7
 8 DOG_EAR = 25
 9
10 class Color(Enum):
11
12     YELLOW = ('#FFF4B2', '#FED900')
13     GREEN = ('#E1FDD6', '#B4E4A2')
14     PINK = ('#FFD9E5', '#FFB8CE')
15     PURPLE = ('#EEDCFF', '#C8B0E0')
16     BLUE = ('#D4EEFF', '#A8D8F8')
17     GREY = ('#E8E8E8', '#C8C8C8')
18
19     @property
20     def light(self):
21         return self.value[0]
22
23     @property
24     def dark(self):
25         return self.value[1]
26
27
28 class StickyNoteItem(QGraphicsItem):
29
30     def __init__(self, width=150, height=180,
31                  color=Color.YELLOW, text='', parent=None):
32         super().__init__(parent)
33         self.width = width
34         self.height = height
35         self.color = color
36         self.text = text
37
38     def boundingRect(self):
39         return QRectF(0, 0, self.width, self.height)
40
41     def body_polygon(self):
42         polygon = QPolygonF([
43             QPointF(0, 0), QPointF(self.width, 0),
44             QPointF(self.width, self.height - DOG_EAR),
45             QPointF(self.width - DOG_EAR, self.height),
46             QPointF(0, self.height)])
47         return polygon
48
49     def paint(self, painter, option, widget):
50
51         pen_width = 2
52         top_strip_height = 30
53
54         # 1. Draw the sticky note body.
55
56         painter.setRenderHint(QPainter.RenderHint.Antialiasing)
57         painter.setBrush(QBrush(QColor(self.color.light)))
58         painter.setPen(QPen(QColor(self.color.dark), pen_width))
59         painter.drawPolygon(self.body_polygon())
60
61         # 2. Draw the note header.
62
63         painter.setPen(Qt.PenStyle.NoPen)
64         painter.setBrush(QBrush(QColor(self.color.dark)))
65         painter.drawRect(0, 0, self.width, top_strip_height)
66
67         # 3. Draw the dog-ear triangle.
68
69         ear = QPolygonF([
70             QPointF(self.width - DOG_EAR, self.height - DOG_EAR),
71             QPointF(self.width, self.height - DOG_EAR),
72             QPointF(self.width - DOG_EAR, self.height)])
73         fold_color = QColor(self.color.light).darker(130)
74         painter.setBrush(fold_color)
75         painter.setPen(QPen(QColor(self.color.dark), pen_width))
76         painter.drawPolygon(ear)
77
78         # 4. Draw the text.
79
80         if self.text:
81             padding = 8
82             text_rect = QRectF(
83                 padding,
84                 top_strip_height + padding,
85                 self.width - padding * 2,
86                 self.height - top_strip_height - DOG_EAR - padding)
87             painter.setPen(QPen(QColor('#333333')))
88             flags = (Qt.AlignmentFlag.AlignLeft |
89                     Qt.AlignmentFlag.AlignTop |
90                     Qt.TextFlag.TextWordWrap)
91             painter.drawText(text_rect, flags, self.text)
92
93     def shape(self):
94         path = QPainterPath()
95         path.addPolygon(self.body_polygon())
96         path.closeSubpath()
97         return path
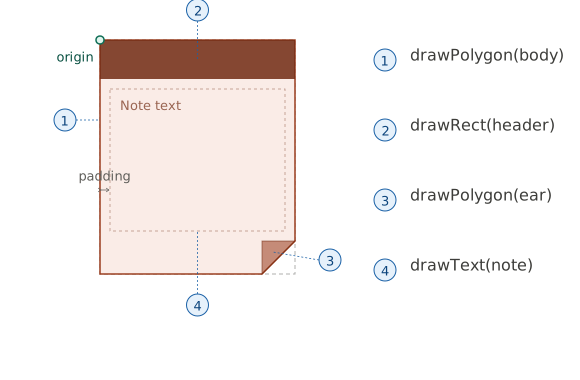
Draw the sticky note body. The body is a five-point polygon - four normal corners and a fifth point that cuts out the bottom-right corner, leaving room for the dog-ear fold.
body_polygon()builds this shape once so bothpaint()andshape()can use it. The fill uses the light color shade and the outline uses the darker shade.Draw the note header. This is the strip at the top, drawn with no outline and a solid brush using the dark color shade.
Draw the dog-ear triangle. The folded bottom-right corner in a darker color shade (
.darker(130)). The triangle’s three points reuse the sameDOG_EARoffset that was used for the note body polygon, so the fold lines up exactly with the cut corner.Draw the text. Finally, the note’s text is drawn into a padded rectangle that avoids both the header and the dog-ear, and uses word wrap so longer notes flow in multiple lines.
This diagram shows the QPainter method call sequence used in QGraphicsItem.paint():
Clicking a note’s missing bottom-right corner won’t bring it to the top. The note’s shape() returns its five-point polygon rather than the full bounding rectangle, so the cut-off corner is correctly treated as empty space outside the item.
When you run the example, you will be able to add notes, drag them around and bring them to the front by clicking on them:
35.4 Picking Up Notes: Interaction and Events
User interaction with a QGraphicsItem is managed through its event handler methods. This section demonstrates three of them on StickyNoteItem: a hover effect, a delete shortcut, and a click-to-lock toggle.
|
You add item-level event handling to sticky notes: |
- Hovering deepens the note’s drop shadow.
- Pressing Delete removes the note from the board.
- Clicking a lock icon in the note’s header locks or unlocks it for movement.
To add interactions to a custom graphical item:
1
2     # 1. Change note shadow on mouse hover events.
3
4     def hoverEnterEvent(self, event):
5         self.shadow.setColor(QColor(100, 100, 100))
6
7     def hoverLeaveEvent(self, event):
8         self.shadow.setColor(QColor(130, 130, 130))
9
- Change note shadow on mouse hover events. With
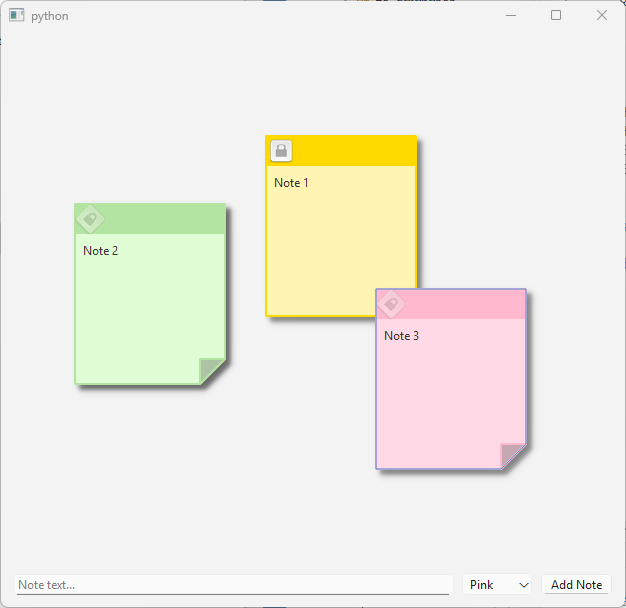
setAcceptHoverEvents(True)turned on, the item starts receivinghoverEnterEvent()andhoverLeaveEvent()calls as the cursor moves in and out of its shape. Both handlers just change the shadow effect color so the shadow becomes darker while the cursor is over it.
1
2     # 2. Delete the note on the Delete key press events.
3
4     def keyPressEvent(self, event):
5         if event.key() == Qt.Key.Key_Delete:
6             self.scene().remove_note(self)
7         else:
8             super().keyPressEvent(event)
9
- Delete the note on the Delete key press. For an item to receive key events, we need to give it keyboard input focus by setting its
ItemIsFocusableflag in__init__(). When a note is deleted, focus transfers to the most recently created note by maintaining an ordered list in the scene.
 1
 2     # 3. Lock/unlock the note on mouse press events.
 3
 4     def mousePressEvent(self, event):
 5         if self.lock_rect.contains(event.pos()):
 6             self.locked = not self.locked
 7             self.setFlag(QGraphicsItem.GraphicsItemFlag.ItemIsMovable, not self.locked)
 8             self.update()
 9             if self.scene():
10                 self.scene().clearSelection()
11         else:
12             self.setFocus()
13             super().mousePressEvent(event)
14
- Lock/unlock the note on mouse press events.
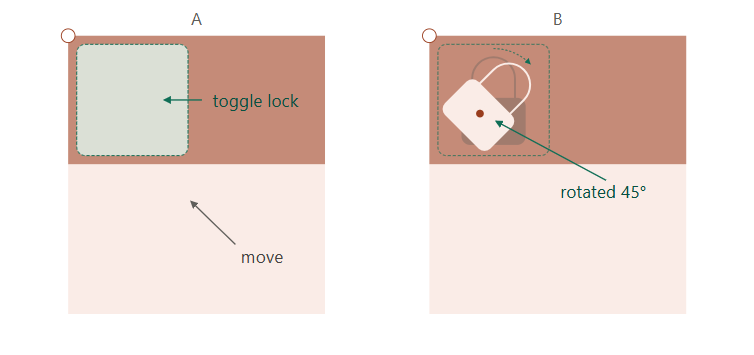
mousePressEvent()first checks whether the click landed insidelock_rect, the small square in the header reserved for the lock icon. If it did, the note flips thelockedflag, enables or disablesItemIsMovableto match, clears the scene’s selection, and callsupdate()to trigger the repaint. Anywhere else on the note, the click behaves normally - it grabs focus and falls through to the base class implementation, which handles selection and movement.
 1
 2     def paint(self, painter, option, widget):
 3
 4         pen_width = 2
 5         top_strip_height = 30
 6
 7         painter.setRenderHint(QPainter.RenderHint.Antialiasing)
 8         painter.setBrush(QBrush(QColor(self.color.light)))
 9         painter.setPen(QPen(QColor(self.color.dark), pen_width))
10         painter.drawPolygon(self.body_polygon())
11
12         painter.setPen(Qt.PenStyle.NoPen)
13         painter.setBrush(QBrush(QColor(self.color.dark)))
14         painter.drawRect(0, 0, self.width, top_strip_height)
15
16         ear = QPolygonF([
17             QPointF(self.width - DOG_EAR, self.height - DOG_EAR),
18             QPointF(self.width, self.height - DOG_EAR),
19             QPointF(self.width - DOG_EAR, self.height)])
20         fold_color = QColor(self.color.light).darker(130)
21         painter.setBrush(fold_color)
22         painter.setPen(QPen(QColor(self.color.dark), pen_width))
23         painter.drawPolygon(ear)
24
25         # 4. Update paint() to draw the lock icon.
26
27         painter.save()
28         cx = self.lock_rect.center().x()
29         cy = self.lock_rect.center().y()
30         if not self.locked:
31             painter.translate(cx, cy)
32             painter.rotate(45)
33             painter.translate(-cx, -cy)
34             painter.setOpacity(0.4)
35         painter.drawImage(self.lock_rect.toRect(), StickyNoteItem.lock_image)
36         painter.restore()
37
38         if self.text:
39             padding = 8
40             text_rect = QRectF(
41                 padding,
42                 top_strip_height + padding,
43                 self.width - padding * 2,
44                 self.height - top_strip_height - DOG_EAR - padding)
45             painter.setPen(QPen(QColor('#333333')))
46             flags = (Qt.AlignmentFlag.AlignLeft |
47                     Qt.AlignmentFlag.AlignTop |
48                     Qt.TextFlag.TextWordWrap)
49             painter.drawText(text_rect, flags, self.text)
50
51         if option.state & QStyle.StateFlag.State_Selected:
52             painter.save()
53             painter.setPen(QPen(QColor('#4A90D9'), 1))
54             painter.setBrush(Qt.BrushStyle.NoBrush)
55             painter.drawPolygon(self.body_polygon())
56             painter.restore()
57
- Update the
paint()method to draw the lock icon. The icon itself is a singleQImage. When the note is unlocked, the icon is drawn rotated 45 degrees and semi-transparent. When locked, the icon is drawn upright at full opacity.
When you run the application and add a note, it shows a deeper shadow on hover, and you can lock it to prevent it from being dragged:
35.5 Scaling Notes: Item Transformations
Every QGraphicsItem carries its own transformation matrix (accessible via transform()), which Qt combines with the item’s rotation(), scale(), and any additional transformations() into one composed transform applied when the item is drawn. Where the lock icon rotation from the previous section was painter-local, affecting only what QPainter draws inside paint(), item-level transforms affect the item as a whole: its rendered size, hit area, and position in the scene coordinate system.
|
You add two transform-driven behaviors to |
- Double-clicking note expands it to a larger size.
- Dragging a note tilts it a few degrees in the direction of movement.
To add transformations to a custom graphical item:
 1
 2     # 1. Set the transform origin to the note's center.
 3
 4     def mousePressEvent(self, event):
 5         if self.lock_rect.contains(event.pos()):
 6             self.locked = not self.locked
 7             self.setFlag(QGraphicsItem.GraphicsItemFlag.ItemIsMovable,
 8                          not self.locked)
 9             self.update()
10             if self.scene():
11                 self.scene().clearSelection()
12         else:
13             self.setFocus()
14             if not self.locked and not self.expanded:
15                 self.setTransformOriginPoint(self.boundingRect().center())
16             super().mousePressEvent(event)
17
- Set the transform origin to the note’s center. Before forwarding the event to the base class event handler,
mousePressEvent()checks that the note isn’t locked or already expanded, then callssetTransformOriginPoint(self.boundingRect().center()). This sets the pivot point for the tilt effect that follows inmouseMoveEvent()- by the time dragging starts, rotation is already set to pivot around the note’s center rather than its top-left corner.
 1
 2     # 2. Tilt the note as it's dragged.
 3
 4     def mouseMoveEvent(self, event):
 5         if not self.locked:
 6             dx = event.scenePos().x() - event.lastScenePos().x()
 7             if dx > 0:
 8                 self.setRotation(TILT_ANGLE)
 9             elif dx < 0:
10                 self.setRotation(-TILT_ANGLE)
11             else:
12                 self.setRotation(0)
13         super().mouseMoveEvent(event)
14
- Tilt the note as it’s dragged.
mouseMoveEvent()compares the current and previous scene positions (event.scenePos()andevent.lastScenePos()) to get the horizontal delta of the latest move. A positive delta (i.e. moving right) tilts the note a few degrees clockwise viasetRotation(TILT_ANGLE). A negative delta tilts it counter-clockwise. A delta of zero (vertical drag) leaves it flat.
1
2     # 3. Straighten the note back once it's released.
3
4     def mouseReleaseEvent(self, event):
5         self.setRotation(0)
6         super().mouseReleaseEvent(event)
7
- Straighten the note back once it’s released.
mouseReleaseEvent()resets rotation to zero before forwarding the event to the base class, so every note ends up flat after a drag.
 1
 2     # 4. Expand/collapse the note on double-click.
 3
 4     def mouseDoubleClickEvent(self, event):
 5         self.expanded = not self.expanded
 6         if self.expanded:
 7             self.setTransformOriginPoint(event.pos())
 8             self.setScale(EXPANDED_SCALE)
 9         else:
10             self.setScale(1.0)
11         event.accept()
12
- Expand/collapse the note on double-click.
mouseDoubleClickEvent()toggles theexpandedflag and scales accordingly. When expanding, the transform origin is set toevent.pos(), meaning the note grows outward from wherever the user double-clicked. Collapsing just resets the scale to1.0.
 1
 2     # 5. Automatically collapse an expanded note
 3     #    once it loses focus.
 4
 5     def focusOutEvent(self, event):
 6         if self.expanded:
 7             self.expanded = False
 8             self.setScale(1.0)
 9         super().focusOutEvent(event)
10
- Automatically collapse an expanded note once it loses focus.
focusOutEvent()checks whether the note is currently expanded and, if it is, resets both the flag and the scale before passing the event to the base class.
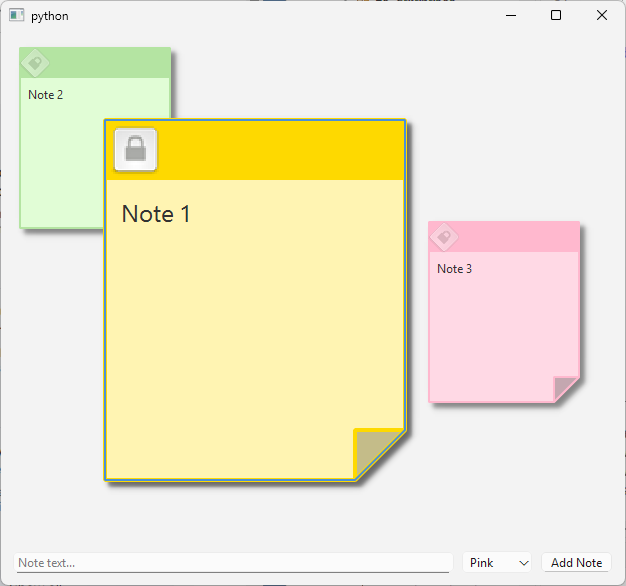
rotation(), scale(), and transformations() are tracked independently and composed into the item’s final transform - they don’t overwrite what ever matrix you might separately hand to setTransform().