3. Qt Widgets Layouts
When you create a Qt widget like QPushButton you need a way to position it inside a window or a container widget. It is possible, but quite uncommon, to position Qt widgets by setting their x and y coordinates. Most Qt applications use layouts to automatically arrange widgets in rows, columns grids, forms, or stacks, to achieve the desired layout. In contrast to manual positioning, layouts automatically position and resize widgets when the available space changes, ensuring that they are consistently aranged and remain usable.[^1]
This chapter introduces the four layout classes you will reach for in almost every Qt application you build. All of them inherit from the QLayout class:

QLayout provides a shared api for adding and removing widgets, and configuring layouts:
| Method | Description |
|---|---|
addWidget() |
Adds a widget to the layout |
addLayout() |
Nests a child layout inside this one |
removeWidget() |
Removes a widget, leaving it alive but hidden |
setContentsMargins() |
Sets the padding between the layout edge and its widgets |
setSpacing() |
Sets the gap between widgets |
QBoxLayout also adds these methods:
| Method | Description |
|---|---|
addStretch() |
Inserts flexible empty space that expands to fill available room |
addSpacing() |
Inserts a fixed-size gap in pixels |
setDirection() |
Reverses flow direction without switching layout class |
addSpacing() adds a fixed number of pixels, while addStretch() grows and shrinks as the layout resizes.
3.1 Stacking Widgets Vertically - QVBoxLayout
QVBoxLayout arranges widgets in a column. If you look up the QVBoxLayout parents in the Qt documentation, you’ll notice that QWidget is not a QVBoxLayout’s parent class. This means you cannot show a layout on the screen - it is not a visual element but a geometry manager.
 |
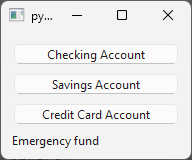
Your task is to bulid an account summary panel - a column of account push buttons (Checking, Savings, Credit Card) stacked top to bottom, with empty space below the last entry, and a label showing account details. |
To add a vertical layout to a QWidget:
1 # Demonstrate how to stack widgets vertically
2 # using QVBoxLayout.
3
4 import sys
5 from PySide6.QtCore import Slot
6 from PySide6.QtWidgets import (QApplication,
7 QWidget, QPushButton, QLabel, QVBoxLayout)
8
9
10 class Window(QWidget):
11
12 def __init__(self):
13
14 super().__init__()
15
16 # 1. Create the layout object
17 # and set it as the window layout.
18
19 layout = QVBoxLayout()
20 self.setLayout(layout)
21
22 # 2. Create widgets.
23
24 checking_button = QPushButton('Checking Account')
25 savings_button = QPushButton('Savings Account')
26 credit_card_button = QPushButton('Credit Card Account')
27
28 # 3. Add the widgets to the layout.
29
30 layout.addWidget(checking_button)
31 layout.addWidget(savings_button)
32 layout.addWidget(credit_card_button)
33
34 layout.addStretch()
35
36 self.details_label = QLabel()
37 layout.addWidget(self.details_label)
38
39 checking_button.clicked.connect(self.show_checking)
40 savings_button.clicked.connect(self.show_savings)
41 credit_card_button.clicked.connect(self.show_credit_card)
42
43 @Slot()
44 def show_checking(self):
45 self.details_label.setText('Everyday spending')
46
47 @Slot()
48 def show_savings(self):
49 self.details_label.setText('Emergency fund')
50
51 @Slot()
52 def show_credit_card(self):
53 self.details_label.setText('Monthly expenses')
54
55
56 if __name__ == '__main__':
57
58 app = QApplication(sys.argv)
59 main_window = Window()
60 main_window.show()
61 sys.exit(app.exec())
Create a
QVBoxLayoutinstance and set it as the main window layout withsetLayout(). This also works for anyQWidgetsubclass. You can nest layouts inside other layouts to achieve complex layouts.Create widgets you want to lay out. Here we create three
QPushButtoninstances.Add the widgets to the layout using
addWidget(). For nested layouts you would useaddLayout()instead.
If you run the script and resize the window, the buttons stack vertically and expand horizontally to fill the width, but their height stays fixed, creating gaps between them. There are two ways you can handle this:
- Add stretchable space with
addStretch()at the end of the layout - it pushes the widgets to the top while allowing empty space to grow This is what we do in our example. - Set a widget’s size
Expandingfor both directions, e.g.button_1.setSizePolicy(QSizePolicy.Expanding, QSizePolicy.Expanding). This lets it resize in both axes.
We’ve also connected each button’s clicked signals to a slot that updates the label text to the account details when its button is clicked.
When executed, the script shows a window like this:
3.2 Placing Widgets Side by Side - QHBoxLayout
|
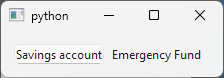
You are tasked with building a single account row - an account name button on the left and a view label on the right, pushed to opposite ends of the row. |
The use QVBoxLayout in your application:
1 # QHBoxLayout is the horizontal box layout.
2
3 import sys
4 from PySide6.QtCore import Slot
5 from PySide6.QtWidgets import (QApplication,
6 QWidget, QPushButton, QLabel, QHBoxLayout)
7
8
9 class Window(QWidget):
10
11 def __init__(self):
12
13 super().__init__()
14
15 # 1. Create the layout
16 # and set it as the window layout
17
18 layout = QHBoxLayout()
19 self.setLayout(layout)
20
21 # 2. Create the widgets
22
23 button = QPushButton('Savings account')
24 self.label = QLabel('')
25 self.label.setMinimumWidth(100)
26
27 # 3 - Add widgets to the layout
28
29 layout.addWidget(button)
30 layout.addStretch()
31 layout.addWidget(self.label)
32
33 button.clicked.connect(self.show_account_details)
34
35 @Slot()
36 def show_account_details(self):
37 self.label.setText('Emergency Fund')
38
39
40 if __name__ == '__main__':
41
42 app = QApplication(sys.argv)
43 main_window = Window()
44 main_window.show()
45 sys.exit(app.exec())
Create the layout and assign it to a
QWidgetwithsetLayout()Create child widgets. Here, a
QPushButtonandQLabel. We set the label’s minimum width to fit its text.Add them to the layout using
addWidget()in the desired order.
We also connect the button’s clicked signal to update the label with the account details.
After execution, you’ll see a window like this:
Both layout classes arrange widgets in the order you add them with addWidget(), QVBoxLayout top to bottom, and QHBoxLayout left to right. You can change this via their setDirection() method with the QBoxLayout.BottomToTop or QBoxLayout.RightToLeft. You can achieve dynamic layouts by using removeWidget() to remove a widget from a layout or insertWidget() to insert a widget out of order.
If you create a widget without setting its parent (button = QPushButton('Savings Acount') instead of button = QPushButton('Savings Acount', self)), as we do in the above examples, adding them to a widget’s layout reparents them to that widget.
Note that the buttons in both examples are local variables. Once added to a layout, Qt’s parent-child ownership system keeps them alive even after __init__() returns. The labels, on the other hand, are instance fields (self.label) because they need to be accessed by slot methods after initialization.
3.3 Nesting Layouts
Nesting layouts within one another allows you to build complex and flexible user interfaces. It is universally used in real-world Qt Widgets applications.
|
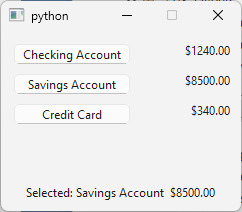
Your task is to build the account list panel where each row shows a selectable account button on the left and its current balance balance on the right. Clicking an account updates a details label at the bottom of the panel. |

To use nested Qt layouts in your application:
1 import sys
2 from PySide6.QtCore import Qt
3 from PySide6.QtWidgets import (QApplication, QWidget,
4 QPushButton, QLabel, QVBoxLayout, QHBoxLayout)
5
6
7 ACCOUNTS = [
8 ("Checking Account", 1240.00),
9 ("Savings Account", 8500.00),
10 ("Credit Card", 340.00)
11 ]
12
13
14 class Window(QWidget):
15
16 def __init__(self):
17
18 super().__init__()
19 self.setFixedSize(240, 180)
20
21 # 1. Create the parent layout.
22
23 layout = QVBoxLayout()
24 self.setLayout(layout)
25
26 for name, balance in ACCOUNTS:
27
28 # 2. Create child layouts.
29
30 row_layout = QHBoxLayout()
31
32 account_button = QPushButton(name)
33 account_button.setMinimumWidth(120)
34 account_button.clicked.connect(
35 lambda checked, name=name, balance=balance:
36 self.show_account_details(name, balance))
37
38 balance_label = QLabel(f'${balance:.2f}')
39 balance_label.setAlignment(Qt.AlignmentFlag.AlignRight)
40 balance_label.setMinimumWidth(80)
41
42 row_layout.addWidget(account_button)
43 row_layout.addStretch()
44 row_layout.addWidget(balance_label)
45
46 # 3. Add child layouts to the parent layout.
47
48 layout.addLayout(row_layout)
49
50 layout.addStretch()
51
52 self.details_label = QLabel()
53 self.details_label.setAlignment(Qt.AlignmentFlag.AlignHCenter)
54 layout.addWidget(self.details_label)
55
56 def show_account_details(self, name, balance):
57 self.details_label.setText(
58 f'Selected: {name} ${balance:.2f}')
59
60
61 if __name__ == '__main__':
62
63 app = QApplication(sys.argv)
64 main_window = Window()
65 main_window.show()
66 sys.exit(app.exec())
Create the outer layout. Create a
QVBoxLayoutand set it as the window layout usingsetLayout().Create a row layout for each account. The account data lives in the
ACCOUNTSlist. Iterate over it and for each entry create aQHBoxLayout. Add aQPushButtonfor the account name and a QLabelfor the balance. Connect each button’sclickedsignal toshow_account_details()which updates the details label with the selected account’s name and balance.Add each row layout to the outer layout. Use
addLayout()rather thanaddWidget().
When you run the application and click one of the account buttons, its details appear in the label at the bottom of the panel:
3.4 Arranging Widgets in a Grid - QGridLayout
QGridLayout positions widgets in a grid. Unlike the box layouts, you specify each widget’s row and column explicitly when adding it and the layout handles all sizing and spacing automatically.
|
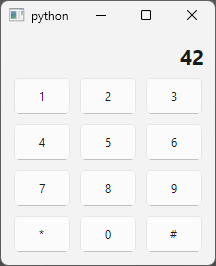
Your task is to build an entry pad for logging transaction amounts. The pad is a 3x4 grid of digit buttons where |
To use a grid layout in your application:
1 import sys
2
3 from PySide6.QtCore import Qt
4 from PySide6.QtWidgets import (QApplication, QWidget,
5 QPushButton, QLabel, QVBoxLayout, QGridLayout)
6
7
8 KEYS = [
9 ('1', 0, 0), ('2', 0, 1), ('3', 0, 2),
10 ('4', 1, 0), ('5', 1, 1), ('6', 1, 2),
11 ('7', 2, 0), ('8', 2, 1), ('9', 2, 2),
12 ('*', 3, 0), ('0', 3, 1), ('#', 3, 2)
13 ]
14
15
16 class Window(QWidget):
17
18 def __init__(self):
19
20 super().__init__()
21
22 layout = QVBoxLayout()
23 self.setLayout(layout)
24
25 self.display_label = QLabel()
26 font = self.display_label.font()
27 font.setPointSize(16)
28 font.setBold(True)
29 self.display_label.setFont(font)
30 self.display_label.setAlignment(Qt.AlignmentFlag.AlignRight)
31 layout.addWidget(self.display_label)
32
33 # 1. Create a QGridLayout`.
34
35 keypad_layout = QGridLayout()
36
37 for key, row, col in KEYS:
38
39 # 2. Create the buttons.
40
41 button = QPushButton(key)
42 button.setFixedSize(60, 40)
43
44 button.clicked.connect(
45 lambda checked, key=key:
46 self.update_display(key))
47
48 # 3. Add each button to the grid.
49
50 keypad_layout.addWidget(button, row, col)
51
52 layout.addLayout(keypad_layout)
53
54 def update_display(self, key):
55 if key == '*':
56 self.display_label.clear()
57 elif key == '#':
58 self.display_label.setText('DONE')
59 else:
60 text = self.display_label.text()
61 if text == 'DONE':
62 text = ''
63 self.display_label.setText(text + key)
64
65
66 if __name__ == '__main__':
67
68 app = QApplication(sys.argv)
69 main_window = Window()
70 main_window.show()
71 sys.exit(app.exec())
Create the layouts. Since the pad needs a display label above the grid, the window layout is a
QVBoxLayout. AQGridLayoutis created separately and added to it withaddLayout().Create the buttons. The
KEYSlist holds each key’s label and its row and column position in the grid. Iterate over it and create aQPushButtonfor each entry. All buttons are given uniform fized size, and eachclickedsignal is connected toupdate_display()via a lambda that captures the key label.Add each button to the grid.
QGridLayouthas twoaddWidget()overloads:
| Method | Description |
|---|---|
addWidget(widget, row, column) |
Adds a widget at the specified grid position |
addWidget(widget, fromRow, fromColumn, rowSpan, columnSpan) |
Adds a widget spanning multiple rows and/or columns |
The example uses the first overload in which each button occupies exactly one cell. The row and column come directly from the KEYS data so no manual coordinate tracking is needed.
In update_display(), pressing a digit appends it to the display label. * clears the display, and # sets it to DONE.
After execution, the window looks like this:
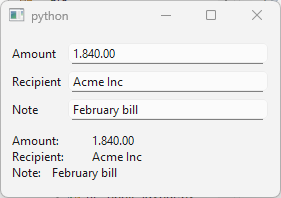
3.5 Laying Out Forms - QFormLayout
QFormLayout arranges widgets in a two-column rows with a label on the left and an entry field on the right. It can be used for data entry forms where fields need a descriptive label to their left side. You can conveniently add both the label and the field in a single step using one of the addRow() overloads:
| Method | Description |
|---|---|
addRow(labelText, widget) |
Adds a label string and a field widget as a new row |
addRow(labelText, layout) |
Adds a label string and a nested layout as a new row |
addRow(widget) |
Adds a full-width widget spanning both columns |
We use the first overload in the example. The second lets you add an inner layout instead of a field (an edit field with a button beside it for example). The third can be used to add separators and section headers inside a form.
|
You need to build a transaction entry form for logging payments. The form has three fields, Amount, Category and Description, with a summary label that updates as the user fills them in. |
To use a form layout in your application:
1 import sys
2 from PySide6.QtCore import Slot
3 from PySide6.QtWidgets import (QApplication, QWidget,
4 QFormLayout, QVBoxLayout, QLineEdit, QLabel)
5
6
7 class Window(QWidget):
8
9 def __init__(self):
10
11 super().__init__()
12
13 layout = QVBoxLayout()
14 self.setLayout(layout)
15
16 form_layout = QFormLayout()
17
18 self.fields = {
19 'Amount': QLineEdit(),
20 'Recipient': QLineEdit(),
21 'Note': QLineEdit(),
22 }
23
24 for label, edit in self.fields.items():
25 form_layout.addRow(label, edit)
26 edit.editingFinished.connect(self.update_summary)
27
28 self.summary_label = QLabel()
29 self.summary_label.setFixedHeight(60)
30
31 layout.addLayout(form_layout)
32 layout.addStretch()
33 layout.addWidget(self.summary_label)
34
35 @Slot()
36 def update_summary(self):
37 self.summary_label.setText('\n'.join(
38 f'{label}:\t{edit.text()}'
39 for label, edit in self.fields.items()))
40
41
42 if __name__ == '__main__':
43
44 app = QApplication(sys.argv)
45 main_window = Window()
46 main_window.show()
47 sys.exit(app.exec())
Create the layouts. The window layout is a
QVBoxLayoutholding the form and the summary label. The form is aQFormLayoutadded to the outer layout withaddLayout().Create the fields. The fields are stored in a dict mapping each label name to a
QLineEdit, a simple one-line text editor. Iterate over the dict and add each item to the form layout usingaddRow(label, field).Connect the fields. Each field’s
editingFinishedsignal is connected toupdate_summary()inside the loop. The slot reads all three fields from the dict and updates the summary label below the form.
In this chapter you have seen how Qt’s layout managers, QVBoxLayout, QHBoxLayout, QGridLayout, and QFormLayout, handle widget positionong and resizing automatically. You have also seen how layouts can be nested to build complex user interfaces, and how data-driven widget creation with loops keeps the repetitive code clean and maintainable.
The next several chapters focus on widgets themselves, starting with display widgets and buttons, then moving through various input widgets and beyond.