22. Model-View Programming with QAbstractListModel
This chapter introduces custom Qt models using QAbstractListModel through a series of simple demonstrations manipulating a list of company clients.
The Qt model-view architecture is Qt’s variant of the model-view-controller (MVC) design pattern where, per the documentation, the controller and view are combined. The model and view are decoupled, allowing the same model to be used with multiple views.
Qt provides several abstract classes you can subclass for custom models, such as:
QAbstractItemModelQAbstractTableModelQAbstractListModel
Qt also offers ready-to-use concrete models, including:
QStandardItemModelQFileSystemModelQSqlQueryModel
Earlier examples demonstrated some of these with Qt view classes. Here, we focus on creating custom models.
22.1 Read-only List Model
[TODO: QAbstractListModel inheritance tree]
Of the three abstract model classes above, QAbstractListModel is the easiest to subclass. It provides default implementations for several QAbstractItemModel methods and offers a specialized interface for simple, non-hierarchical sequences of items (lists).
Like other model classes, a QAbstractListModel subclass acts as an intermediary between a data source and a view:
[TODO: DATA-MODEL-VIEW DIAGRAM]
A data source can range from a simple Python list or structured text file, relational database data, and anything in between. The model’s role is to supply data in a format that a Qt view can read and display.
To create a read-only list model you must implement at least two methods:
rowCount(): Returns the number of rows in the model. (e.g.,len(lst)for a Python list, line count for a file, orcount(*)for a SQL query). Theparentparameter is for hierarchical model and unused here.data(index, role): Returns the data for the given role and item referenced by the index. For list models,indexis aQModelIndexobject withcolumn()as zero androw()indicating the position in the underlying data. Theroleis one of theQt.ItemDataRoleenumeration values(default:DisplayRole).
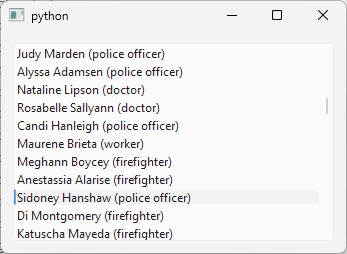
 |
You have a text file listing company clients (‘data.txt’) and you need to display them in a list view. |
To achieve this:
1 from PySide6.QtCore import QAbstractListModel, Qt
2
3 # 1. Create a QAbstractListModel subclass.
4 # The data is read from a text file
5 # and stored in a Python list.
6
7 class TxtFileModel(QAbstractListModel):
8
9 def __init__(self, source, parent=None):
10
11 super().__init__(parent)
12
13 self.txt_data = []
14 self.header = 'Clients'
15 with open(source) as txt_file:
16 for line in txt_file:
17 self.txt_data.append(line.strip())
18
19 # 2. Implement the rowCount() method
20
21 def rowCount(self, parent) -> int:
22 return len(self.txt_data)
23
24 # 3. Implement the data() method
25
26 def data(self, index, role=Qt.ItemDataRole.DisplayRole) -> object|None:
27 if role == Qt.ItemDataRole.DisplayRole:
28 return self.txt_data[index.row()]
29 return None
30
31 # 4. Optionally, implement the headerData() method
32 # QListView does not have a header
33 # so this is never executed!
34
35 def headerData(self, section, orientation, role) -> object | None:
36 if orientation == Qt.Orientation.Horizontal:
37 if role == Qt.ItemDataRole.DisplayRole:
38 return self.header
1 import sys
2 from PySide6.QtWidgets import (QApplication,
3 QWidget, QListView, QVBoxLayout)
4 from PySide6.QtTest import QAbstractItemModelTester
5 from txtfilemodel import TxtFileModel
6
7
8 class Window(QWidget):
9
10 def __init__(self):
11
12 super().__init__()
13 layout = QVBoxLayout()
14 self.setLayout(layout)
15
16 model = TxtFileModel('data.txt')
17 QAbstractItemModelTester(model)
18 view = QListView()
19 view.setModel(model)
20 layout.addWidget(view)
21
22
23 if __name__ == '__main__':
24
25 app = QApplication(sys.argv)
26 main_window = Window()
27 main_window.show()
28 sys.exit(app.exec())
Subclass
QAbstractListModeland provide access to the data source. Here, read the text file entirely in__init__()and store lines in a Python list (txt_data), where each element is a single string (a client’s name and profession). For other types of data sources you can retrieve data dynamically instead.Implement
rowCount(). View classes call this method to determine the model’s length. Here, returnlen(self.txt_data). Qt list models default to one column.Implement
data(). This returns model data for a given index and role. Useindex.row()to accesstxt_data. Return data only forDisplayRole(the text for display); returnNoneotherwise.Optionally, implement
headerData()for row or column headers. Here, the single column header is ‘Clients’.QListViewdoes not display headers butQTableViewwould.
QModelIndex:This class helps views locate model items. Qt models are table-based - think of the model in this example as a one-column table with
nrows. Userow()andcolumn()to reference cells.
QAbstractItemModelTesterThis class aids model development. Pass your model instance to its constructor - it logs implementation errors to the console, helping catch issues early.
This demo is read-only; next sections cover editable and resizable models.
22.2 Editable List Model
As shown in the read-only list model example, creating a basic list model requires implementing at least rowCount() and data(). To make it editable, add two more methods:
setData(index, value, role): Sets the data for the given role (typicallyEditRole) and index, and returnsTrueif successful; otherwise returnsFalse. If set successfully, emit thedataChanged()signal.flags(index): Returns the item flags for the index. The base implementation enables and selects items. To allow editing, addQt.ItemFlags.ItemIsEditable.
|
You have implemented a read-only model of a company clients backed by a text file (‘data.txt’) and you need to make it editable. |
To create an editable list model:
1 from PySide6.QtCore import QAbstractListModel, Qt
2
3 # 1. Create a QAbstractListModel subclass
4 # and make the data available to it.
5
6 class TxtFileModel(QAbstractListModel):
7
8 def __init__(self, source, parent=None):
9
10 super().__init__(parent)
11
12 self.txt_data = []
13 self.header = 'Clients'
14 with open(source) as txt_file:
15 for line in txt_file:
16 self.txt_data.append(line.strip())
17
18 # 2. Implement the rowCount() and data() methods
19
20 def rowCount(self, parent) -> int:
21 return len(self.txt_data)
22
23 def data(self, index, role=Qt.ItemDataRole.DisplayRole) -> object|None:
24 if role in [Qt.ItemDataRole.DisplayRole, Qt.ItemDataRole.EditRole]:
25 return self.txt_data[index.row()]
26 return None
27
28 # 3. Implement the setData() method
29
30 def setData(self, index, value, role) -> bool:
31 if not index.isValid():
32 return False
33 if role == Qt.ItemDataRole.EditRole:
34 if self.txt_data[index.row()] != value:
35 self.txt_data[index.row()] = value
36 self.dataChanged.emit(index, index, [role])
37 return True
38 return False
39 return False
40
41 # 4. Implement the flags() method
42
43 def flags(self, index) -> Qt.ItemFlags:
44 return super().flags(index) | Qt.ItemFlags.ItemIsEditable
45
46 def headerData(self, section, orientation, role) -> object | None:
47 if orientation == Qt.Orientation.Horizontal:
48 if role == Qt.ItemDataRole.DisplayRole:
49 return self.header
Create a
QAbstractListModelsubclass and the access to the data source.Implement the
rowCount()anddata()methods just as you did for the read-only model.Implement the
setData()method.setData()accepts three arguments:index,valueandrole. In the method we check if the role is equal toQt.ItemDataRole.EditRoleand, if it is, we set the model data for theindex.row()tovalueusingself.txt_data[index.row()] = value. If the data is set successfully we emit thedataChangedsignal and the method returnsTrue. Otherwise it returnsFalse.Implement the
flags()method. In this method we signal to views that the model data is editable by addingQt.ItemFlags.ItemIsEditableto the flags. Note that we can make the model items editable selectively by using theindexparameter. In the example we ignoreindexwhich means that all the model items are editable.
1 import sys
2 from PySide6.QtWidgets import (QApplication,
3 QWidget, QListView, QVBoxLayout)
4 from PySide6.QtTest import QAbstractItemModelTester
5 from txtfilemodel import TxtFileModel
6
7
8 class Window(QWidget):
9
10 def __init__(self, parent=None):
11
12 super().__init__(parent)
13 layout = QVBoxLayout()
14 self.setLayout(layout)
15
16 model = TxtFileModel('data.txt')
17 QAbstractItemModelTester(model)
18 view = QListView()
19 view.setModel(model)
20 layout.addWidget(view)
21
22 model.dataChanged.connect(self.on_data_changed)
23
24 # Handle the dataChanged signals
25
26 def on_data_changed(self, topLeft, bottomRight, roles):
27 print('Model changed, row:', topLeft.row())
28
29
30 if __name__ == '__main__':
31
32 app = QApplication(sys.argv)
33 main_window = Window()
34 main_window.show()
35 sys.exit(app.exec())
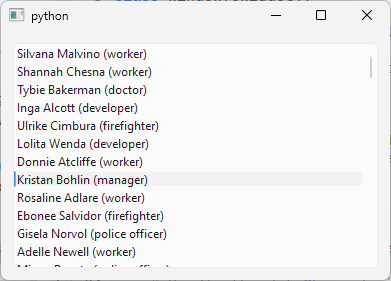
Now if you double-click any of the list view lines you are able to edit it and the changes are saved in the model (ie. to the TxtFileModel.txt_data list and signaled by the dataChanged signal. You can also implement the logic to update the text file from the txt_data values which we omit in this example.
22.3 Editable List Model with Data-Widget Mapping
The QDataWidgetMapper class lets you map a data model row (or column) to a set of widgets, making them data-aware. When the model’s current index changes, mapped widgets are updated with data from the model. This is useful for creating forms enhancing user experience in viewing and editing data.
|
You have an editable model of a list of company clients. Editing is enabled by double-clicking a client row in the list view. Your task is to make editing more user-friendly. |
1 import csv
2 from PySide6.QtCore import QAbstractListModel, QModelIndex, Qt
3
4 # 1. Create the model class
5
6 class TxtFileModel(QAbstractListModel):
7
8 def __init__(self, source, parent=None):
9
10 super().__init__(parent)
11
12 self.txt_data = []
13 self.header = 'Clients'
14 with open(source) as txt_file:
15 for line in txt_file:
16 self.txt_data.append(line.strip())
17
18 def rowCount(self, parent=QModelIndex()) -> int:
19 return len(self.txt_data)
20
21 def data(self, index, role=Qt.ItemDataRole.DisplayRole) -> object|None:
22 if role == Qt.ItemDataRole.DisplayRole \
23 or role == Qt.ItemDataRole.EditRole:
24 return self.txt_data[index.row()]
25
26 def setData(self, index, value, role) -> bool:
27 if not index.isValid():
28 return False
29 if role == Qt.ItemDataRole.EditRole:
30 if self.txt_data[index.row()] != value:
31 self.txt_data[index.row()] = value
32 self.dataChanged.emit(index, index, [role])
33 return True
34 return False
35 return False
36
37 def flags(self, index) -> Qt.ItemFlags:
38 return super().flags(index) | Qt.ItemFlags.ItemIsEditable
39
40 def headerData(self, section, orientation, role) -> object|None:
41 if orientation == Qt.Orientation.Horizontal:
42 if role == Qt.ItemDataRole.DisplayRole:
43 return self.header
- Create a
QAbstractListModelsubclass to represent your model. Then, in the main window class:
1 import sys
2 from PySide6.QtWidgets import (QApplication,
3 QWidget, QListView, QLineEdit, QPushButton,
4 QHBoxLayout, QVBoxLayout, QDataWidgetMapper)
5 from PySide6.QtTest import QAbstractItemModelTester
6 from txtfilemodel import TxtFileModel
7
8
9 class Window(QWidget):
10
11 def __init__(self, parent=None):
12
13 super().__init__(parent)
14
15 layout = QVBoxLayout()
16 self.setLayout(layout)
17
18 self.model = TxtFileModel('data.txt')
19 QAbstractItemModelTester(self.model)
20
21 self.view = QListView()
22 self.view.setModel(self.model)
23 self.view.selectionModel().currentChanged.connect(
24 self.sync_model_with_mapper)
25
26 # 2. Create the widgets for displaying
27 # and editing the data
28
29 self.lineedit = QLineEdit()
30 self.lineedit.returnPressed.connect(self.submit_new_value)
31 self.view.activated.connect(self.lineedit.setFocus)
32
33 self.submit_button = QPushButton('Submit')
34 self.submit_button.clicked.connect(self.submit_new_value)
35
36 # 3. Create the mapper object and set its model
37
38 self.mapper = QDataWidgetMapper()
39 self.mapper.setModel(self.model)
40
41 # 4. Add the mappings
42
43 self.mapper.addMapping(self.lineedit, 0)
44
45 self.mapper.setSubmitPolicy(
46 QDataWidgetMapper.SubmitPolicy.ManualSubmit)
47 self.mapper.toFirst()
48
49 horizontal_layout = QHBoxLayout()
50 horizontal_layout.addWidget(self.lineedit)
51 horizontal_layout.addWidget(self.submit_button)
52
53 layout.addWidget(self.view)
54 layout.addLayout(horizontal_layout)
55
56 # 5. Synchronize the model with the mapper
57
58 def sync_model_with_mapper(self, current, previous):
59 self.mapper.setCurrentIndex(current.row())
60
61 def submit_new_value(self):
62 self.mapper.submit()
63 self.view.setFocus()
64
65
66 if __name__ == '__main__':
67
68 app = QApplication(sys.argv)
69 main_window = Window()
70 main_window.show()
71 sys.exit(app.exec())
Create your model object and the widgets for displaying and editing your model data.
Create the mapper object and use
QDataWidgetMapper.setModel()to connect your model to it.Use
QDataWidgetMapper.addMapping()to map your model columns with the widgets. The example model has only one column, which we map to aQLineEditwidget.Synchronize the view’s current item with the model’s current index so both update when the user changes the view’s selection.

In the example, we use manual submit policy, updating the model via a ’Submit` button. This syncs the line edit with the current view item, allowing easy updates by editing the line edit value and clicking ‘Submit’.
22.4 Resizable List Model
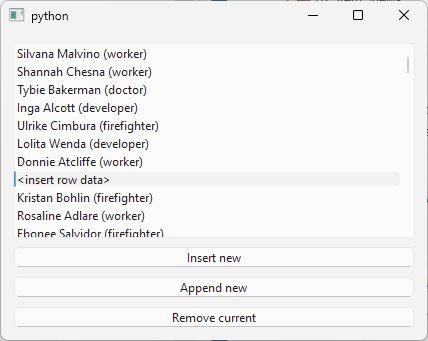
For a basic QAbstractListModel subclass, you need to implement at least two methods: rowCount() and data(). To make the model editable, you need to implement two more: setData() and flags(). To be able to add or remove rows, you need to implement insertRows() and removeRows().
|
You have an editable model of a list of company clients. You need to enable the user to insert or remove clients from it. |
To make a resizable QAbstractListModel subclass:
1 import csv
2 from PySide6.QtCore import QAbstractListModel, QModelIndex, Qt
3
4 # 1. Create a QAbstractListModel subclass
5
6 class TxtFileModel(QAbstractListModel):
7
8 def __init__(self, source, parent=None):
9
10 super().__init__(parent)
11
12 self.txt_data = []
13 self.header = 'Clients'
14 with open(source) as txt_file:
15 for line in txt_file:
16 self.txt_data.append(line.strip())
17
18 def rowCount(self, parent=QModelIndex()) -> int:
19 return len(self.txt_data)
20
21 def data(self, index, role=Qt.ItemDataRole.DisplayRole) -> object|None:
22 if role == Qt.ItemDataRole.DisplayRole \
23 or role == Qt.ItemDataRole.EditRole:
24 return self.txt_data[index.row()]
25
26 def setData(self, index, value, role) -> bool:
27 if not index.isValid():
28 return False
29 if role == Qt.ItemDataRole.EditRole:
30 if self.txt_data[index.row()] != value:
31 self.txt_data[index.row()] = value
32 self.dataChanged.emit(index, index, [role])
33 return True
34 return False
35 return False
36
37 def flags(self, index) -> bool:
38 return super().flags(index) | Qt.ItemFlags.ItemIsEditable
39
40 # 2. Implement the insertRows() method
41
42 def insertRows(self, row, count, parent=QModelIndex()):
43 if 0 <= row <= self.rowCount():
44 self.beginInsertRows(parent, row, row )
45 self.txt_data.insert(row, '<insert row data>')
46 self.endInsertRows()
47 return True
48 return False
49
50 # 3. Implement the removeRows() method
51
52 def removeRows(self, row, count, parent=QModelIndex()):
53 if 0 <= row < len(self.txt_data):
54 self.beginRemoveRows(parent, row, row)
55 self.txt_data[row:row + 1] = []
56 self.endRemoveRows()
57 return True
58 return False
59
60 # QListView does not have a header
61 # so this is never executed!
62
63 def headerData(self, section, orientation, role):
64 if orientation == Qt.Orientation.Horizontal:
65 if role == Qt.ItemDataRole.DisplayRole:
66 return self.header
Create a subclass of the
QAbstractListModelclass. As in previous examples, read the data from a text file and store it in a Python list namedself.txt_data.Implement the
insertRows()method. For simplicity, the example inserts rows filled with template text (“<insert row data>”). Guard the data insertion withbeginInsertRows()(to signal connected views that rows are about to be inserted) andendInsertRows(). This pair of methods ensures that views remain in a valid state.beginInsertRows()takes three arguments:parent(an invalidQModelIndex()in our case),first(the starting row number post-insertion) andlast(the ending row number post-insertion). The method returnsTrueon success orFalseotherwise.Implement the
removeRows()method. This removes rows from theself.txt_data, enclosed bybeginRemoveRows()andendRemoveRows(), and returnsTrueon success orFalseotherwise.
Then, in your main class
1 import sys
2 from PySide6.QtWidgets import (QApplication,
3 QWidget, QListView, QLineEdit, QPushButton,
4 QHBoxLayout, QVBoxLayout, QDataWidgetMapper)
5 from PySide6.QtTest import QAbstractItemModelTester
6 from txtfilemodel import TxtFileModel
7
8
9 class Window(QWidget):
10
11 def __init__(self):
12
13 super().__init__()
14
15 layout = QVBoxLayout()
16 self.setLayout(layout)
17
18 self.model = TxtFileModel('data.txt')
19 QAbstractItemModelTester(self.model)
20 self.model.rowsInserted.connect(self.on_rows_inserted)
21
22 self.view = QListView()
23 self.view.setModel(self.model)
24 self.view.selectionModel().currentChanged.connect(
25 self.on_current_changed)
26
27 self.lineedit = QLineEdit()
28 self.lineedit.returnPressed.connect(self.submit_new_value)
29 self.view.activated.connect(self.lineedit.setFocus)
30
31 self.mapper = QDataWidgetMapper()
32 self.mapper.setModel(self.model)
33 self.mapper.setSubmitPolicy(
34 QDataWidgetMapper.SubmitPolicy.ManualSubmit)
35 self.mapper.addMapping(self.lineedit, 0)
36 self.mapper.toFirst()
37
38 self.submit_button = QPushButton('Submit')
39 self.submit_button.clicked.connect(self.submit_new_value)
40
41 self.insert_button = QPushButton('Insert new')
42 self.insert_button.clicked.connect(self.on_insert)
43
44 self.append_button = QPushButton('Append new')
45 self.append_button.clicked.connect(self.on_append)
46
47 self.remove_button = QPushButton('Remove current')
48 self.remove_button.clicked.connect(self.on_remove)
49
50 input_layout = QVBoxLayout()
51 input_layout.addWidget(self.lineedit)
52 input_layout.addWidget(self.submit_button)
53
54 buttons_layout = QVBoxLayout()
55 buttons_layout.addWidget(self.insert_button)
56 buttons_layout.addWidget(self.append_button)
57 buttons_layout.addWidget(self.remove_button)
58
59 controls_layout = QHBoxLayout()
60 controls_layout.addLayout(input_layout)
61 controls_layout.addLayout(buttons_layout)
62
63 layout.addWidget(self.view)
64 layout.addLayout(controls_layout)
65
66 def on_current_changed(self, current, previous):
67 self.mapper.setCurrentIndex(current.row())
68
69 def submit_new_value(self):
70 self.mapper.submit()
71 self.view.setFocus()
72
73 def on_insert(self):
74 row = self.view.selectionModel().currentIndex().row()
75 if self.model.insertRows(row, 1):
76 self.mapper.setCurrentIndex(row)
77 self.lineedit.setFocus()
78
79 def on_append(self):
80 row = self.model.rowCount()
81 self.model.insertRows(row, 1)
82 index = self.model.index(row, 0)
83 self.view.scrollTo(index)
84 self.lineedit.setFocus()
85
86 def on_remove(self):
87 index = self.view.currentIndex()
88 self.model.removeRows(index.row(), 1)
89
90 def on_rows_inserted(self, parent, first, last):
91 index = self.model.index(first, 0)
92 if index.isValid():
93 self.view.setCurrentIndex(index)
94 self.lineedit.setFocus()
95
96
97 if __name__ == '__main__':
98
99 app = QApplication(sys.argv)
100 main_window = Window()
101 main_window.show()
102 sys.exit(app.exec())
- Create three
QPushButtons:insert_button,append_buttonandremove_button. Handle the insert button’sclicked()signal with a slot namedon_insert()callinginsertRow()to insert a single row by invokinginsertRows(). Similarly, handle the append button’sclicked()signal withon_append()to insert a row at the end.