33. Databases
Working with databases in Qt is supported by the QtSql module, which divides its APIs into three layers:
The driver layer acts as an intermediary between your Python code and the specific database engine. Note that while SQLite (QSQLITE) is almost always available out of the box, drivers for other databases may require additional setup.
The SQL API layer gives you direct access to the database, allowing you to execute queries, and manipulate data using classes like
QSqlDatabaseandQSqlQuery.The user interface layer lets you connect database data to widgets using models such as
QSqlTableModelorQSqlQueryModelwith views likeQTableViewto display and edit query results in your GUI.
Here’s a table of supported Qt SQL drivers:
| Driver | Database | Description |
|---|---|---|
QDB2 |
IBM DB2 | Enterprise database system from IBM |
QIBASE |
Borland InterBase | Lightweight, embeddable relational database |
QMYSQL |
MySQL | Popular open-source relational database |
QOCI |
Oracle Call Interface | Oracle database driver |
QODBC |
Open Database Connectivity (ODBC) | Generic driver supporting any ODBC-compliant database |
QPSQL |
PostgreSQL | Advanced open-source relational database |
QSQLITE |
SQLite | Lightweight, file-based database (no server required) |
QMIMER |
Mimer SQL | High-performance relational database |
QSQLITE is typically included by default with Qt installations and is usefull for getting started, as it requires no separate database server installation (with some caveats).
You can easily list available database drivers with the following code:
1 from PySide6.QtCore import QCoreApplication
2 from PySide6.QtSql import QSqlDatabase
3
4 app = QCoreApplication()
5
6 # Get list of available drivers
7 available_drivers = QSqlDatabase.drivers()
8
9 print("Available SQL drivers:")
10 for driver in available_drivers:
11 print(f" - {driver}")
In practice, working with databases in PySide6 follows a simple pattern:
- Create a connection with
QSqlDatabase, - Execute queries using
QSqlQuery(or higher-level models), - Display/edit the results via Qt’s views and models.
In the examples we will be using a small SQLite database that you can generate from this SQL script:
1 -- Drop tables if they exist to reset the database
2 DROP TABLE IF EXISTS Transactions;
3 DROP TABLE IF EXISTS Categories;
4 DROP TABLE IF EXISTS Accounts;
5 DROP TABLE IF EXISTS Users;
6
7 -- Create Users table
8 CREATE TABLE Users (
9 user_id INTEGER PRIMARY KEY AUTOINCREMENT,
10 username TEXT NOT NULL,
11 email TEXT UNIQUE NOT NULL
12 );
13
14 -- Create Accounts table
15 CREATE TABLE Accounts (
16 account_id INTEGER PRIMARY KEY AUTOINCREMENT,
17 user_id INTEGER NOT NULL,
18 account_name TEXT NOT NULL,
19 balance REAL DEFAULT 0.0,
20 FOREIGN KEY (user_id) REFERENCES Users(user_id)
21 );
22
23 -- Create Categories table
24 CREATE TABLE Categories (
25 category_id INTEGER PRIMARY KEY AUTOINCREMENT,
26 category_name TEXT NOT NULL UNIQUE,
27 description TEXT
28 );
29
30 -- Create Transactions table
31 CREATE TABLE Transactions (
32 transaction_id INTEGER PRIMARY KEY AUTOINCREMENT,
33 account_id INTEGER NOT NULL,
34 category_id INTEGER NOT NULL,
35 amount REAL NOT NULL,
36 transaction_date DATE NOT NULL,
37 description TEXT,
38 FOREIGN KEY (account_id) REFERENCES Accounts(account_id),
39 FOREIGN KEY (category_id) REFERENCES Categories(category_id)
40 );
41
42 -- Populate Users
43 INSERT INTO Users (username, email) VALUES ('john_doe', 'john@example.com');
44 INSERT INTO Users (username, email) VALUES ('jane_smith', 'jane@example.com');
45
46 -- Populate Accounts
47 INSERT INTO Accounts (user_id, account_name, balance) VALUES (1, 'Checking Account', 1500.00);
48 INSERT INTO Accounts (user_id, account_name, balance) VALUES (1, 'Savings Account', 5000.00);
49 INSERT INTO Accounts (user_id, account_name, balance) VALUES (2, 'Business Account', 10000.00);
50
51 -- Populate Categories
52 INSERT INTO Categories (category_name, description) VALUES ('Income', 'Salary or other earnings');
53 INSERT INTO Categories (category_name, description) VALUES ('Expenses', 'Daily spending');
54 INSERT INTO Categories (category_name, description) VALUES ('Investments', 'Stock or asset purchases');
55 INSERT INTO Categories (category_name, description) VALUES ('Transfers', 'Internal transfers');
56
57 -- Populate Transactions
58 INSERT INTO Transactions (account_id, category_id, amount, transaction_date, description) VALUES (1, 1, 2000.00, '2025-09-01', 'Salary deposit');
59 INSERT INTO Transactions (account_id, category_id, amount, transaction_date, description) VALUES (1, 2, -500.00, '2025-09-05', 'Groceries');
60 INSERT INTO Transactions (account_id, category_id, amount, transaction_date, description) VALUES (2, 3, -1000.00, '2025-09-10', 'Stock purchase');
61 INSERT INTO Transactions (account_id, category_id, amount, transaction_date, description) VALUES (3, 1, 5000.00, '2025-09-15', 'Client payment');
62 INSERT INTO Transactions (account_id, category_id, amount, transaction_date, description) VALUES (1, 4, -200.00, '2025-09-20', 'Transfer to savings');
63 INSERT INTO Transactions (account_id, category_id, amount, transaction_date, description) VALUES (2, 4, 200.00, '2025-09-20', 'Transfer from checking');
using this simple PySide6 application:
1 import sys
2 from PySide6.QtCore import Slot
3 from PySide6.QtWidgets import (QApplication,
4 QWidget, QPushButton, QVBoxLayout)
5 from PySide6.QtSql import QSqlDatabase, QSqlQuery
6
7
8 class Window(QWidget):
9
10 def __init__(self):
11
12 super().__init__()
13
14 layout = QVBoxLayout()
15 self.setLayout(layout)
16
17 with open('finance_demo.sql', 'r') as f:
18 self.query_string = f.read()
19
20 self.button = QPushButton('(Re)generate database')
21 self.button.clicked.connect(self.on_button_clicked)
22 layout.addWidget(self.button)
23
24 self.db = QSqlDatabase.addDatabase('QSQLITE')
25 self.db.setDatabaseName('finance_demo.sqlite')
26
27 result = self.db.open()
28 if result:
29 print('Connected!')
30 else:
31 self.button.setDisabled(True)
32 print('Failed to connect to the database')
33
34 @Slot()
35 def on_button_clicked(self, checked):
36 statements = [s.strip() for s in self.query_string.split(';') if s.strip()]
37
38 for statement in statements:
39 query = QSqlQuery()
40 if not query.exec(statement):
41 print(f"Error in statement:\n{statement}")
42 print(query.lastError().text())
43 return
44
45 print('Database generated')
46
47
48 if __name__ == '__main__':
49
50 app = QApplication(sys.argv)
51 main_window = Window()
52 main_window.show()
53 sys.exit(app.exec())
If the execution is successfull, the database will be contained in a file named finance_demo.sqlite. All the examples in this chapter expect this file to be located in the same directory in which they reside. You can verify that the database is generated properly using an open source GUI application named DB Browser for SQLite[^1]. You can also use this to reacreate the database and load the initial data after experimenting.
33.1 Database Connections
If you have experience working with databases, you may have noticed that many Python database APIs implement PEP 249 where a database connection is represented with a Connection object. This is not the case with the PySide6 QtSql module - you establish a connection using the QSqlDatabase.open() method, setting the connection options before calling it. Unlike PEP 249, where your code holds an explicit reference to the connection object, QtSql maintains a global registry of named connections, allowing you to retrieve a connection by name from anywhere in your application, with an implicit default connection available when no name is specified[^2].
 |
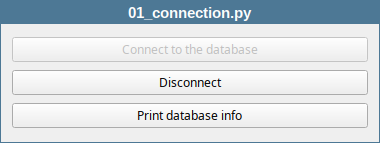
You are building a budgeting app where users can view their financial data stored in a local database. Implement a connection to the SQLite database and display basic connection details like the database name and available tables. |
1 import sys
2 from PySide6.QtCore import Slot
3 from PySide6.QtWidgets import (QApplication,
4 QWidget, QPushButton, QVBoxLayout)
5 from PySide6.QtSql import QSqlDatabase
6
7
8 class Window(QWidget):
9
10 def __init__(self):
11
12 super().__init__()
13
14 layout = QVBoxLayout()
15 self.setLayout(layout)
16
17 self.connect_button = QPushButton('Connect to the database')
18 self.connect_button.clicked.connect(self.connect_to_db)
19
20 self.disconnect_button = QPushButton('Disconnect')
21 self.disconnect_button.setEnabled(False)
22 self.disconnect_button.clicked.connect(self.disconnect_from_db)
23
24 self.info_button = QPushButton('Print database info')
25 self.info_button.setEnabled(False)
26 self.info_button.clicked.connect(self.print_db_info)
27
28 layout.addWidget(self.connect_button)
29 layout.addWidget(self.disconnect_button)
30 layout.addWidget(self.info_button)
31
32 # 1. Create a QSqlDatabase object
33 # and set the connection options.
34
35 self.db = QSqlDatabase.addDatabase('QSQLITE')
36 self.db.setDatabaseName('finance_demo.sqlite')
37 self.db.setConnectOptions('QSQLITE_OPEN_READONLY')
38
39 @Slot()
40 def connect_to_db(self):
41
42 # 2. Connect to the database
43
44 result = self.db.open()
45 if result:
46 print('Connected!')
47 self.connect_button.setEnabled(False)
48 self.info_button.setEnabled(True)
49 self.disconnect_button.setEnabled(True)
50 else:
51 self.info_button.setEnabled(False)
52 print('Failed to connect to the database')
53 print(self.db.lastError().text())
54
55 @Slot()
56 def disconnect_from_db(self):
57 if self.db.isOpen():
58 self.connect_button.setEnabled(True)
59 self.disconnect_button.setEnabled(False)
60 self.info_button.setEnabled(False)
61 self.db.close()
62
63 # 3. Print database information
64
65 @Slot()
66 def print_db_info(self):
67 print('Name: ', self.db.databaseName())
68 print('Driver: ', self.db.driverName())
69 print('Tables: ')
70 for table in self.db.tables():
71 print(f'\t{table}')
72
73
74 if __name__ == '__main__':
75
76 app = QApplication(sys.argv)
77 main_window = Window()
78 main_window.show()
79 sys.exit(app.exec())
To connect to a SQLite database:
Create a
QSqlDatabaseobject and set the connection options. In the main window__init__(), create a database object by calling theaddDatabase()factory method, passing it the database driver name (QSQLITE) and, optionally, the connection name. If the connection name is not specified, like in our case, the connection becomes the default connection for the application.addDatabase()returns aQSqlDatabaseobject and we assign it to theself.dbinstance member. Set the database name tofinance_demo.sqliteand the database as read-only so that SQLite does not create an empty database file if it doesn’t exist.Use
QSqlDatabase.open()to connect to the database.open()returns true if the connection is opened successfully and false otherwise. You can get the error information usingQSqlDatabase.lastError().Print the database information. To confirm that opening the connection was successful, print the database name, the driver name and the list of the tables. The output should be:
1 Connected!
2 Name: finance_demo.sqlite
3 Driver: QSQLITE
4 Tables:
5 Users
6 sqlite_sequence
7 Accounts
8 Categories
9 Transactions
You can get the list of all connections using connectionNames(); you can also check if a connection is in the list using the QSqlDatabase.contains() static method.
33.2 Executing Simple Queries
With a connection established, you can retrieve the data using a QSqlQuery object[^3].
|
In your expense tracking software, users need to retrieve lists of records. Add a simple query execution feature to fetch and display data from selected tables. |
To execute a simple SQL query:
1 import sys
2 from PySide6.QtCore import Slot
3 from PySide6.QtWidgets import (QApplication,
4 QWidget, QPushButton, QComboBox, QVBoxLayout)
5 from PySide6.QtSql import QSqlDatabase, QSqlQuery, QSql
6
7
8 class Window(QWidget):
9
10 def __init__(self):
11
12 super().__init__()
13
14 layout = QVBoxLayout()
15 self.setLayout(layout)
16 self.query_string = ''
17 self.tables = QComboBox()
18 self.tables.currentIndexChanged.connect(self.update_query_string)
19
20 self.button = QPushButton('Execute query')
21 self.button.clicked.connect(self.execute_query)
22
23 layout.addWidget(self.tables)
24 layout.addWidget(self.button)
25
26 # 1. Connect to the database
27
28 self.db = QSqlDatabase.addDatabase('QSQLITE')
29 self.db.setDatabaseName('finance_demo.sqlite')
30 self.db.setConnectOptions('QSQLITE_OPEN_READONLY')
31
32 # 2. Populate the combobox with table names.
33
34 result = self.db.open()
35 if result:
36 print('Connected!')
37 self.tables.addItems(
38 [table for table in self.db.tables(QSql.TableType.Tables)
39 if not table.startswith('sqlite_')])
40 else:
41 self.button.setDisabled(True)
42 print('Failed to connect to the database')
43
44 @Slot()
45 def execute_query(self):
46
47 # 3. Execute the query and process the results.
48
49 query = QSqlQuery()
50 result = query.exec(self.query_string)
51
52 if result:
53 while query.next():
54 record = query.record()
55 for i in range(record.count()):
56 print(f'{query.value(i)}\t', end='')
57 print()
58 else:
59 print(query.lastError().text())
60
61 @Slot()
62 def update_query_string(self):
63 table_name = self.tables.currentText()
64 self.query_string = f'Select * From {table_name}'
65 print(f'Current query: {self.query_string}')
66
67
68 if __name__ == '__main__':
69
70 app = QApplication(sys.argv)
71 main_window = Window()
72 main_window.show()
73 sys.exit(app.exec())
Connect to the database the same way as in the previous example.
Populate the combobox with table names. Use
QSqlDatabase.tables()to populate a combobox with all the user tables from the database (excluding thesqlite_sequencetable).Execute a query and process the results. When the user selects a table from the combobox, the query string is updated to select all its records. When the user presses the Execute query button, create a
QSqlQueryobject and call itsexec()method with the current query string. Ifexec()returnsTrue, iterate through the returned records callingnext()and each record’s field values. FOr each record, retreive aQSqlRecordobject by callingquery.record(). This gives you the field fount viacount(), and the value of each field by index usingquery.value(i).
Now, when you start the application a window is shown:
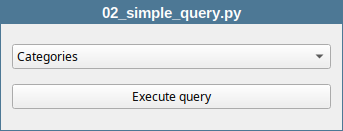
and when you press the Execute query button query results are printed in the terminal:
1 Current query: Select * From Users
2 1 john_doe john@example.com
3 2 jane_smith jane@example.com
33.3 Inserting Data
Inserting, updating, and deleting data are common database operations. You can perform then using QSqlQuery with parameterized queries to handle data supplied by users.
|
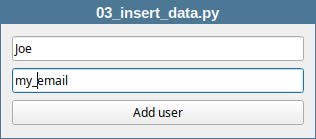
For your banking dashboard app, users should be able to add new accounts easily. Develop an insert operation to add records to the database using basic SQL commands. |
To insert data in a SQLite database:
1 import sys
2 from PySide6.QtCore import Slot
3 from PySide6.QtWidgets import (QApplication,
4 QWidget, QPushButton, QVBoxLayout, QLineEdit)
5 from PySide6.QtSql import QSqlDatabase, QSqlQuery
6
7
8 class Window(QWidget):
9
10 def __init__(self):
11
12 super().__init__()
13
14 layout = QVBoxLayout()
15 self.setLayout(layout)
16
17 self.name_edit = QLineEdit()
18 self.name_edit.setPlaceholderText('Enter user name')
19 self.email_edit = QLineEdit()
20 self.email_edit.setPlaceholderText('Enter e-mail')
21
22 self.button = QPushButton('Add user')
23 self.button.clicked.connect(self.on_button_clicked)
24
25 layout.addWidget(self.name_edit)
26 layout.addWidget(self.email_edit)
27 layout.addWidget(self.button)
28
29 # 1. Connect to the database
30
31 self.db = QSqlDatabase.addDatabase('QSQLITE')
32 self.db.setConnectOptions('QSQLITE_OPEN_URI')
33 self.db.setDatabaseName('file:finance_demo.sqlite?mode=rw')
34
35 result = self.db.open()
36 if result:
37 print('Connected!')
38 else:
39 self.button.setDisabled(True)
40 print('Failed to connect to the database')
41
42 @Slot()
43 def on_button_clicked(self):
44
45 # 2. Get and validate user-entered data
46
47 username = self.name_edit.text().strip()
48 email = self.email_edit.text().strip()
49
50 if not username:
51 print('Username cannot be empty')
52 return
53 if not email:
54 print('Email cannot be empty')
55 return
56
57 query = QSqlQuery()
58 query.prepare('''
59 Insert Into Users (username, email)
60 Values (:username, :email)
61 ''')
62
63 query.bindValue(':username', username)
64 query.bindValue(':email', email)
65
66 # 3. Execute the query and display the outcome
67
68 if query.exec():
69 print('User added successfully')
70 self.name_edit.clear()
71 self.email_edit.clear()
72 else:
73 print(query.lastError().text())
74
75
76 if __name__ == '__main__':
77
78 app = QApplication(sys.argv)
79 main_window = Window()
80 main_window.show()
81 sys.exit(app.exec())
Connect to the database. In the first two examples the we needed only read-only access so we used the
QSQLITE_OPEN_READONLYconnection option. To insert data we need read/write access and still don’t want an empty database file to be created if one doesn’t exist already. Unfortunately, the SQLite Qt driver does not support theSQLITE_OPEN_READWRITEoption so we open the database file as an URI with therwmode as a workaround.-
Get and validate user-entered data. The user needs to enter a username and an email so we add two
QLineEditwidgets to the main window. When the user presses the Add user button, ensure neither field is empty. If the data is valid:- Create a
QSqlQueryobject. - Prepare an insert query with two parameters: username and email.
- Bind the values from the line edits to the query parameters.
Execute the query and display the result. If the query executed successfully, print a message, otherwise print the execution error. For instance, an error will occur if the user enters a duplicate email.
You would follow the same pattern when updating and deleting data. While QSqlQuery offers flexibility when working with databases, Qt’s SQL module also provides several model classes for use with the model-view framework, reducing the mount of code you need to write, covered in the following sections:
QSqlTableModelQSqlRelationalTableModelQSqlQueryModel
33.4 Displaying and Editing Data with QSqlTableModel
The QSqlTableModel class provides an editable data model for a single database table[^4]. It is a QAbstractItemModel subclass which which means that you can use it with Qt’s view classes.
|
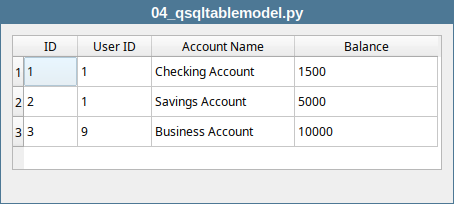
You are designing a view for account summaries in your finance app. Use |
To use QSqlTableModel in your application:
1 import sys
2 from PySide6.QtCore import Slot, QModelIndex, Qt
3 from PySide6.QtWidgets import (QApplication, QTableView,
4 QWidget, QVBoxLayout, QLabel)
5 from PySide6.QtSql import QSqlDatabase, QSqlTableModel, QSqlQuery
6
7
8 class Window(QWidget):
9
10 def __init__(self):
11
12 super().__init__()
13 self.resize(450, 200)
14
15 layout = QVBoxLayout()
16 self.setLayout(layout)
17
18 # 1. Connect to the database.
19
20 self.db = QSqlDatabase.addDatabase('QSQLITE')
21 self.db.setConnectOptions('QSQLITE_OPEN_URI')
22 self.db.setDatabaseName('file:finance_demo.sqlite?mode=rw')
23
24 if not self.db.open():
25 print(f'Database error : {self.db.lastError().text()}')
26 return
27
28 QSqlQuery().exec('PRAGMA foreign_keys = ON;')
29
30 # 2. Create the model.
31
32 self.model = QSqlTableModel()
33 self.model.setTable('Accounts')
34 self.model.setEditStrategy(
35 QSqlTableModel.EditStrategy.OnManualSubmit)
36
37 headers = [
38 'ID', 'User ID', 'Account Name', 'Balance'
39 ]
40 for col, text in enumerate(headers):
41 self.model.setHeaderData(col, Qt.Horizontal, text)
42
43 self.model.select()
44
45 # 3. Create the view and set its model.
46
47 self.view = QTableView()
48 self.view.setModel(self.model)
49 layout.addWidget(self.view)
50
51 self.label = QLabel()
52 layout.addWidget(self.label)
53
54 self.view.selectionModel().currentChanged.connect(
55 self.save_changes)
56
57 # 4. Save the changes to the database
58 # when the current cell changes.
59
60 @Slot(QModelIndex, QModelIndex)
61 def save_changes(self, current, previous):
62
63 if not previous.isValid():
64 return
65
66 if self.model.isDirty():
67 if self.model.submitAll():
68 self.label.setStyleSheet('color: green')
69 self.label.setText('Changes saved')
70 self.view.setCurrentIndex(current)
71 else:
72 error_text = self.model.lastError().text()
73 self.label.setStyleSheet('color: red')
74 self.label.setText(error_text)
75 self.model.revertAll()
76 else:
77 self.label.clear()
78
79
80 if __name__ == '__main__':
81
82 app = QApplication(sys.argv)
83 main_window = Window()
84 main_window.show()
85 sys.exit(app.exec())
Connect to the database. As the data needs to be editable we open the database as a URI as we did in the previous section. Also turn on SQlite foreign key support by executing
PRAGMA foreign_keys = ON;. Without this, SQlite would allow you to enter User ID values that do not exist in the Users table.Create the model. Instantiate a
QSqlTableModelobject, set its table to ‘Accounts’, its edit strategy toOnManualSubmit, and set the horizontal header labels for each column. Callselect()to load data from the database into the model.Create the view and set its model. Instantiate a
QTableViewand assign the model to it. Connect the selection model’scurrentChanged()signal to thesave_changes()slot so that edits are submitted whenever the user moves to a different cell.Save the changes to the database when the current cell changes. In the slot, return early if the previous index is invalid (meaning no cell was previously selected). Otherwise check if the model has unsaved changes via
model.isDirty()and if so submit them withmodel.submitAll(). On success display a confirmation label. On error display the error text and revert all pending chages withrevertAll().
33.5 Handling Relational Data with QSqlRelationalTableModel
The QSqlRelationalTableModel class provides an editable data model for a single database table with foreign key support. To provide a combobox editor for foreign key fields, use QSqlRelationalDelegate with this model[^5].
|
For a relational view in your budgeting tool, show transactions with linked account and category names. Employ |
To use QRelationalTableModel in your application:
1 from PySide6.QtCore import Qt
2 from PySide6.QtSql import QSqlRelationalTableModel, QSqlRelation
3
4 # 1. Subclass the QSqlRelationalTableModel class
5
6 class TransactionsTableModel(QSqlRelationalTableModel):
7
8 def __init__(self, parent=None):
9 super().__init__(parent)
10 self.tablename = 'Transactions'
11 self.setTable(self.tablename)
12 self.setRelation(1,
13 QSqlRelation('Accounts', 'account_id', 'account_name'))
14 self.setRelation(2,
15 QSqlRelation('Categories', 'category_id', 'category_name'))
16
17 def flags(self, index):
18 flags = super().flags(index)
19 # We know PK is the first column.
20 if index.column() == 0:
21 flags &= ~Qt.ItemFlag.ItemIsEditable
22 return flags
- Create a
QSqlRelationalTableModelsubclass. Here we create a class namedTransactionsTableModel, set its table name to ‘Transactions’, and define two relations, to the ‘Accounts’ and ‘Categories’ tables, usingQSqlRelationobjects, each constructed with the related table name, its join column, and the column whose value should be displayed. We also overrideflags()to make the primary key column read-only.
1 import sys
2 from PySide6.QtCore import Qt
3 from PySide6.QtWidgets import (QApplication,
4 QWidget, QVBoxLayout, QTableView)
5 from PySide6.QtSql import (QSqlDatabase,
6 QSqlRelationalDelegate, QSqlQuery)
7 from models import TransactionsTableModel
8
9
10 class Window(QWidget):
11
12 def __init__(self):
13
14 super().__init__()
15 self.resize(650, 400)
16
17 layout = QVBoxLayout()
18 self.setLayout(layout)
19
20 self.db = QSqlDatabase.addDatabase('QSQLITE')
21 self.db.setConnectOptions('QSQLITE_OPEN_URI')
22 self.db.setDatabaseName('file:finance_demo.sqlite?mode=rw')
23
24 if not self.db.open():
25 print(f'Database error : {self.db.lastError().text()}')
26 return
27
28 QSqlQuery().exec('PRAGMA foreign_keys = ON;')
29
30 # 2. Create a model instance.
31
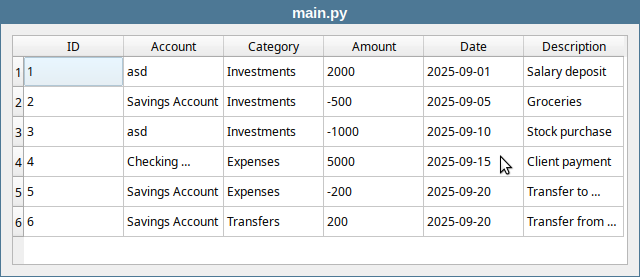
32 self.model = TransactionsTableModel()
33
34 headers = [
35 'ID', 'Account', 'Category',
36 'Amount', 'Date', 'Description'
37 ]
38 for col, text in enumerate(headers):
39 self.model.setHeaderData(col, Qt.Horizontal, text)
40
41 self.model.select()
42 # print(self.model.query().lastQuery())
43
44 # 3. Create a view instance.
45
46 self.view = QTableView()
47 self.view.setModel(self.model)
48
49 # 4. Provide comboboxes
50
51 delegate = QSqlRelationalDelegate(self.view)
52 self.view.setItemDelegate(delegate)
53 layout.addWidget(self.view)
54
55
56 if __name__ == '__main__':
57
58 app = QApplication(sys.argv)
59 main_window = Window()
60 main_window.show()
61 sys.exit(app.exec())
Create a model instance, set its header data, and call
model.select()to load data from the database.Create a
QTableViewinstance and assign the model to it.Provide combobox editors for foreign key columns. Instantiate a
QSqlRelationalDelegateand set it as the view’s delegate - this automatically adds comboboxes to the ‘Account’ and ‘Category’ columns, displaying names instead of raw IDs.
Curiously, if you inspect the SQL statement the model generates to join the Transactions, Accounts, and Categories tables (via model.query().lastQuery()), you will find it uses an implicit (“old-style”) join, a hint at the age of the underlying API.
33.6 Custom Queries with QSqlQueryModel
The QSqlQueryModel class provides a read-only data model for SQL result sets[^6]. It is a high-level interface for executing SQL statements, built on top of the lower-level QSqlQuery API, and lets you execute arbitrary SQL queries like this one, for instance:
1 -- Account Summary Report (September 2025)
2 SELECT
3 a.account_id,
4 a.account_name,
5 u.username AS owner,
6 COALESCE(c.category_name, 'N/A') AS category_name,
7 COUNT(t.transaction_id) AS transaction_count,
8 COALESCE(SUM(t.amount), 0) AS total_amount,
9 COALESCE(AVG(t.amount), 0) AS avg_transaction,
10 COALESCE((
11 SELECT SUM(t2.amount)
12 FROM Transactions t2
13 WHERE t2.account_id = a.account_id
14 AND t2.transaction_date LIKE '2025-09%'
15 ), 0) AS net_balance
16 FROM
17 Accounts a
18 INNER JOIN Users u ON a.user_id = u.user_id
19 LEFT JOIN Transactions t ON a.account_id = t.account_id
20 AND t.transaction_date LIKE '2025-09%'
21 LEFT JOIN Categories c ON t.category_id = c.category_id
22 GROUP BY
23 a.account_id, a.account_name, u.username, c.category_name
24
25 UNION ALL
26
27 -- Per-account totals
28 SELECT
29 a.account_id,
30 a.account_name,
31 u.username AS owner,
32 'Total' AS category_name,
33 COUNT(t.transaction_id) AS transaction_count,
34 COALESCE(SUM(t.amount), 0) AS total_amount,
35 COALESCE(AVG(t.amount), 0) AS avg_transaction,
36 COALESCE(SUM(t.amount), 0) AS net_balance
37 FROM
38 Accounts a
39 INNER JOIN Users u ON a.user_id = u.user_id
40 LEFT JOIN Transactions t ON a.account_id = t.account_id
41 AND t.transaction_date LIKE '2025-09%'
42 GROUP BY
43 a.account_id, a.account_name, u.username
44
45 UNION ALL
46
47 -- Grand total
48 SELECT
49 NULL AS account_id,
50 'Grand Total' AS account_name,
51 NULL AS owner,
52 NULL AS category_name,
53 COUNT(t.transaction_id) AS transaction_count,
54 COALESCE(SUM(t.amount), 0) AS total_amount,
55 COALESCE(AVG(t.amount), 0) AS avg_transaction,
56 COALESCE(SUM(t.amount), 0) AS net_balance
57 FROM
58 Transactions t
59 WHERE
60 t.transaction_date LIKE '2025-09%'
61
62 ORDER BY
63 account_id, category_name;
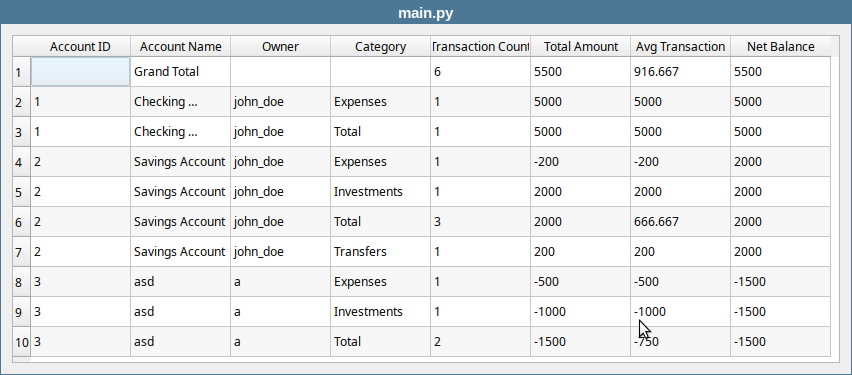
The above query is a bit involved and shows a September 2025 spending report that shows, for each account, a breakdown by category, followed by a subtotal for that account, with a grand total at the end.
|
In your financial reporting app, generate custom summaries like monthly totals. Utilize |
To use a QSqlQueryModel in your application:
1 import sys
2 from PySide6.QtCore import Qt
3 from PySide6.QtWidgets import (QApplication,
4 QWidget, QVBoxLayout, QTableView)
5 from PySide6.QtSql import (QSqlDatabase, QSqlQueryModel, QSqlQuery)
6
7
8 class Window(QWidget):
9
10 def __init__(self, parent=None):
11
12 super().__init__(parent)
13 self.resize(850, 350)
14 layout = QVBoxLayout()
15 self.setLayout(layout)
16
17 self.db = QSqlDatabase.addDatabase('QSQLITE')
18 self.db.setConnectOptions('QSQLITE_OPEN_URI')
19 self.db.setDatabaseName('file:finance_demo.sqlite?mode=rw')
20
21 if not self.db.open():
22 print(f'Database error : {self.db.lastError().text()}')
23 return
24
25 QSqlQuery().exec('PRAGMA foreign_keys = ON;')
26
27 # 1. Get the query text.
28
29 with open('account_summary.sql', 'r') as f:
30 query_str = f.read()
31
32 # 2. Create the model and query the database.
33
34 self.model = QSqlQueryModel()
35 self.model.setQuery(query_str)
36
37 if self.model.query().lastError().isValid():
38 print(f'Query error: {self.table_model.query().lastError().text()}')
39 return
40
41 headers = [
42 'Account ID', 'Account Name', 'Owner',
43 'Category', 'Transaction Count', 'Total Amount',
44 'Avg Transaction', 'Net Balance'
45 ]
46
47 for col, text in enumerate(headers):
48 self.model.setHeaderData(
49 col, Qt.Orientation.Horizontal, text)
50
51 # 3. Create the view and assign the model to it.
52
53 self.view = QTableView()
54 self.view.setModel(self.model)
55 self.view.setAlternatingRowColors(True)
56
57 layout.addWidget(self.view)
58
59
60 if __name__ == '__main__':
61
62 app = QApplication(sys.argv)
63 main_window = Window()
64 main_window.show()
65 sys.exit(app.exec())
Get the SQL query text. Here, we load it from an external ‘.sql’ file using a standard
open()Python call.Create the model and query the database. Instantiate a
QSqlQueryModeland pass the query string tosetQuery()to execute the query. Checkmodel.query().lastError()to datect any errors, then set the horizontal header labels for each column.Create the view and assign the model to it. Instantiate a
QTableView, set its model, and enablealternating row colors for readability.
QSqlQueryModel objects are read-only by default - to make it read-write, you need to subclass it and reimplement setData() and flags() methods.
33.7 The Single Record Form
A single record form form displays one database record at a time, allowing the user to navigate between the records, edit fields, and add or delete new records.
|
Your finance app needs an interface for managing categories one record at a time. You are asked to implement a reusable single record form with navigation controls. |
To create a single record form:
1 from PySide6.QtCore import Qt
2 from PySide6.QtSql import QSqlTableModel
3
4 # 1. Create a QSqlTableModel subclass.
5
6 class CategoriesTableModel(QSqlTableModel):
7
8 def flags(self, index):
9 flags = super().flags(index)
10 if index.column() == 0:
11 flags &= ~Qt.ItemFlag.ItemIsEditable
12 return flags
13
14 def record(self):
15 rec = super().record()
16 rec.setGenerated(0, False)
17 return rec
- Create a
QSqlTableModelsubclass.CategoriesTableModeloverridesflags()to make the primary key column read-only, and overridesrecord()to exclude the primary key so SQLite can generate it automatically on insert.
1 from PySide6.QtCore import Signal, Slot
2 from PySide6.QtGui import QAction
3 from PySide6.QtWidgets import QToolBar, QLabel
4
5
6 # 2. Create the navigation toolbar.
7
8 class NavBar(QToolBar):
9
10 save = Signal()
11 toFirst = Signal()
12 toPrevious = Signal()
13 toNext = Signal()
14 toLast = Signal()
15 new = Signal()
16
17 def __init__(self, parent=None):
18
19 super().__init__(parent)
20
21
22 self.save_action = QAction('💾')
23 self.addSeparator()
24 self.first_action = QAction('◀◀')
25 self.prev_action = QAction('â—€')
26 self.record_label = QLabel()
27 self.record_label.setFixedWidth(60)
28 self.next_action = QAction('â–¶')
29 self.last_action = QAction('▶▶')
30 self.addSeparator()
31 self.new_action = QAction('✚')
32
33 self.save_action.triggered.connect(self.save.emit)
34 self.first_action.triggered.connect(self.toFirst.emit)
35 self.prev_action.triggered.connect(self.toPrevious.emit)
36 self.next_action.triggered.connect(self.toNext.emit)
37 self.last_action.triggered.connect(self.toLast.emit)
38 self.new_action.triggered.connect(self.new.emit)
39
40 self.addAction(self.save_action)
41 self.addAction(self.first_action)
42 self.addAction(self.prev_action)
43 self.addWidget(self.record_label)
44 self.addAction(self.next_action)
45 self.addAction(self.last_action)
46 self.addAction(self.new_action)
47 self.setStyleSheet(
48 ' QAction { font-size: 14px; color: black;}')
49
50 @Slot(str)
51 def update_record_label(self, text):
52 self.record_label.setText(text)
- Create the navigation toolbar.
NavBaris aQToolBarsubclass that lets the user navigate to the first, previous, next and last records. It also lets the user save the current record changes and create new records.
1 from PySide6.QtCore import Slot
2 from PySide6.QtWidgets import (QWidget, QFormLayout,
3 QLineEdit, QDataWidgetMapper, QMessageBox)
4 from categoriestablemodel import CategoriesTableModel
5 from navbar import NavBar
6
7 # 3. Create the detail form.
8
9 class SingleRecordForm(QWidget):
10
11 def __init__(self, model, mappings, parent=None):
12
13 super().__init__(parent)
14
15 layout = QFormLayout()
16 self.setLayout(layout)
17 self.model = model
18
19 self.widgets = {}
20 for col, label in mappings.items():
21 widget = QLineEdit()
22 if col == 0:
23 widget.setDisabled(True)
24 layout.addRow(f'{label}: ', widget)
25 self.widgets[col] = widget
26
27 self.model.select()
28 self.mapper = QDataWidgetMapper(self)
29 self.mapper.setModel(self.model)
30 for col, widget in self.widgets.items():
31 self.mapper.addMapping(widget, col)
32 self.mapper.toFirst()
33
34 self.nav_bar = NavBar()
35 self.nav_bar.save.connect(self.save_data)
36 self.nav_bar.toFirst.connect(self.mapper.toFirst)
37 self.nav_bar.toPrevious.connect(self.mapper.toPrevious)
38 self.nav_bar.toNext.connect(self.mapper.toNext)
39 self.nav_bar.toLast.connect(self.mapper.toLast)
40 self.nav_bar.new.connect(self.add_new_record)
41 layout.addWidget(self.nav_bar)
42
43 self.update_record_label(self.mapper.currentIndex())
44 self.mapper.currentIndexChanged.connect(self.update_record_label)
45
46 # 4. Save and add records.
47
48 @Slot()
49 def save_data(self):
50 current_row = self.mapper.currentIndex()
51 if not self.mapper.submit():
52 QMessageBox.critical(
53 self, 'Error', self.model.lastError().text())
54 return
55 if not self.model.submitAll():
56 QMessageBox.critical(
57 self, 'Error', self.model.lastError().text())
58 return
59 self.model.select()
60 self.mapper.setCurrentIndex(current_row)
61
62 @Slot()
63 def add_new_record(self):
64 self.mapper.submit()
65 row = self.model.rowCount()
66 self.model.insertRow(row)
67 self.mapper.toLast()
68
69 @Slot()
70 def update_record_label(self, index):
71 total = self.model.rowCount()
72 if total == 0:
73 self.nav_bar.update_record_label('No Records')
74 else:
75 self.nav_bar.update_record_label(
76 f'{index + 1} of {total}')
Create the single record form.
SingleRecordFormaccepts a model and column to label mappings, and dynamically creates aQLineEditfor each mapped column. Set up aQDataWidgetmapper, map each line edit to its corresponding model column, and connect theNavBarsignals to the mapper’s navigation slots.Save and add records. The
save_data()slot callsmapper.submit()to push line edit values into the model, thenmodel.submitAll()to write them to the database, refreshing viaselect()on success. Theadd_new_record()slot submits any pending changes, appends a new row to the model, and navigates the mapper to it.
1 import sys
2 from PySide6.QtWidgets import QApplication, QWidget, QVBoxLayout
3 from PySide6.QtSql import QSqlDatabase
4 from singlerecordform import SingleRecordForm
5 from categoriestablemodel import CategoriesTableModel
6
7
8 class Window(QWidget):
9
10 def __init__(self):
11
12 super().__init__()
13 layout = QVBoxLayout()
14 self.setLayout(layout)
15 self.setWindowTitle('Edit Categories')
16 self.db = QSqlDatabase.addDatabase('QSQLITE')
17 self.db.setDatabaseName('finance_demo.sqlite')
18
19 result = self.db.open()
20 if result:
21 print('Connected!')
22 else:
23 print('Failed to connect to the database')
24
25 table_model = CategoriesTableModel()
26 table_model.setTable('Categories')
27
28 mappings = {
29 0: 'Category Id',
30 1: 'Category Name',
31 2: 'Description'}
32
33 # 5. Add the form to the main window.
34
35 detail_form = SingleRecordForm(table_model, mappings)
36 layout.addWidget(detail_form)
37
38 if __name__ == '__main__':
39
40 app = QApplication(sys.argv)
41 main_window = Window()
42 main_window.show()
43 sys.exit(app.exec())
- Add the form to the main window. Instantiate
CategoriesTableModel, define the column mappings, and pass both toDetailForm.
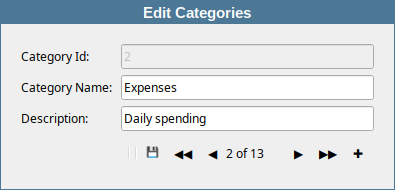
The SingleRecordForm class is generic - it accepts any QSqlTableModel subclass and a column mapping, making it reusable. The final section builds on this, implementing the classic master-detail pattern.
33.8 The Master-Detail Form
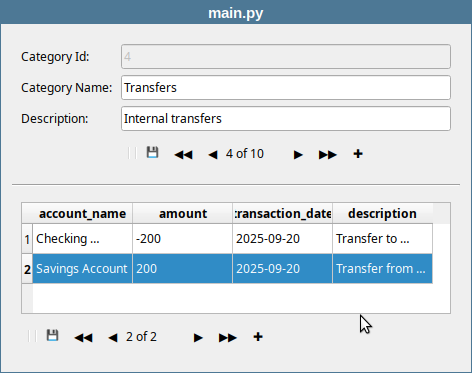
The master-detail pattern links two forms so that the detail form always shows records related to the currently selected master record.
|
Your finance app needs to display transactions grouped by category. You decide to build a master-detail form that links a categories form to a filtered transactions view using |
In this example, selecting a category in the master form filters the transactions shown in the detail form. The example reuses CategoriesTableModel, NavBar and SingleRecordForm from the previous section and introduces two new classes: DateDelegate and TransactionForm.
To create a master-detail form:
1 from PySide6.QtCore import QModelIndex, QDate, Qt, Slot
2 from PySide6.QtWidgets import (QWidget, QVBoxLayout,
3 QTableView, QDateEdit, QStyledItemDelegate)
4 from PySide6.QtSql import QSqlRelationalDelegate
5 from navbar import NavBar
6
7
8 class DateDelegate(QStyledItemDelegate):
9
10 def createEditor(self, parent, option, index):
11 editor = QDateEdit(parent)
12 editor.setCalendarPopup(True)
13 editor.setDisplayFormat("yyyy-MM-dd")
14 return editor
15
16 def setEditorData(self, editor, index):
17 value = index.model().data(index, Qt.ItemDataRole.EditRole)
18 if value:
19 date = QDate.fromString(value, "yyyy-MM-dd")
20 editor.setDate(date)
21
22 def setModelData(self, editor, model, index):
23 date = editor.date()
24 model.setData(index, date.toString("yyyy-MM-dd"),
25 Qt.ItemDataRole.EditRole)
26
27
28 class TransactionsForm(QWidget):
29
30 def __init__(self, model, category_id=None, parent=None):
31
32 super().__init__(parent)
33 self.category_id = category_id
34 layout = QVBoxLayout()
35 self.setLayout(layout)
36 self.model = model
37
38 self.view = QTableView()
39 self.view.setModel(self.model)
40 self.view.hideColumn(0)
41 self.view.hideColumn(2)
42
43 self.view.setSelectionBehavior(
44 QTableView.SelectionBehavior.SelectRows)
45 self.view.setSelectionMode(
46 QTableView.SelectionMode.SingleSelection)
47 if self.model.rowCount() > 0:
48 self.view.selectRow(0)
49
50 delegate = QSqlRelationalDelegate()
51 self.view.setItemDelegate(delegate)
52 date_delegate = DateDelegate()
53 self.view.setItemDelegateForColumn(4, date_delegate)
54 layout.addWidget(self.view)
55
56 self.nav_bar = NavBar()
57 self.nav_bar.toFirst.connect(self.to_first)
58 self.nav_bar.toPrevious.connect(self.to_previous)
59 self.nav_bar.toNext.connect(self.to_next)
60 self.nav_bar.toLast.connect(self.to_last)
61 self.nav_bar.new.connect(self.add_new_record)
62 self.nav_bar.save.connect(self.save_changes)
63 layout.addWidget(self.nav_bar)
64
65 self.to_first()
66 self.update_record_label(
67 self.view.selectionModel().currentIndex())
68 self.view.selectionModel().currentChanged.connect(
69 self.update_record_label)
70
71 @Slot()
72 def to_first(self):
73 if self.model.rowCount() > 0:
74 self.view.selectRow(0)
75 self.view.setFocus()
76
77 @Slot()
78 def to_previous(self):
79 row = self.view.currentIndex().row()
80 if row > 0:
81 self.view.selectRow(row - 1)
82 self.view.setFocus()
83
84 @Slot()
85 def to_next(self):
86 row = self.view.currentIndex().row()
87 if row < self.model.rowCount() - 1:
88 self.view.selectRow(row + 1)
89 self.view.setFocus()
90
91 @Slot()
92 def to_last(self):
93 if self.model.rowCount() > 0:
94 self.view.selectRow(self.model.rowCount() - 1)
95 self.view.setFocus()
96
97 @Slot()
98 def add_new_record(self):
99 row = self.model.rowCount()
100 if self.model.insertRow(row):
101 category_index = self.model.index(row, 2)
102 self.model.setData(category_index, self.category_id)
103 self.view.selectRow(row)
104 self.view.setFocus()
105
106 @Slot()
107 def save_changes(self):
108 if self.model.submitAll():
109 self.model.select()
110 else:
111 print(f'{self.model.lastError().text()}')
112
113 @Slot(int)
114 def update_record_label(self, current):
115 total = self.model.rowCount()
116 if total == 0:
117 self.nav_bar.update_record_label('No Records')
118 else:
119 self.nav_bar.update_record_label(
120 f'{current.row() + 1} of {total}')
Create a custom date delegate. DateDelegate is a
QStyledItemDelegatesubclass that provides aQDateEditeditor with a calendar popup for date columns. It overridescreateEditor()to return the configuredQDateEdit,setEditorData()to parse the stored date string into aQDate, andsetModelData()to write the selected date back to the model as a formatted string. SQLite has no native date type - it stores dates as plain strings. WithoutDateDelegate, the default editor for that column would be a plain line edit, leaving the user to type dates manually in the correct format.Build the transactions form.
TransactionsFormdisplays transactions in a table view. It hides the primary key and category ID columns (columns 0 and 2), sets single-row selection, and applies both aQSqlRelationalDelegatefor the foreign key columns and theDateDelegatefor the date column.
1 from PySide6.QtCore import Signal, Slot
2 from PySide6.QtGui import QAction
3 from PySide6.QtWidgets import QToolBar, QLabel
4
5
6 class NavBar(QToolBar):
7
8 save = Signal()
9 toFirst = Signal()
10 toPrevious = Signal()
11 toNext = Signal()
12 toLast = Signal()
13 new = Signal()
14
15 def __init__(self, parent=None):
16
17 super().__init__(parent)
18
19
20 self.save_action = QAction('💾')
21 self.addSeparator()
22 self.first_action = QAction('◀◀')
23 self.prev_action = QAction('â—€')
24 self.record_label = QLabel()
25 self.record_label.setFixedWidth(60)
26 self.next_action = QAction('â–¶')
27 self.last_action = QAction('▶▶')
28 self.addSeparator()
29 self.new_action = QAction('✚')
30
31 self.save_action.triggered.connect(self.save.emit)
32 self.first_action.triggered.connect(self.toFirst.emit)
33 self.prev_action.triggered.connect(self.toPrevious.emit)
34 self.next_action.triggered.connect(self.toNext.emit)
35 self.last_action.triggered.connect(self.toLast.emit)
36 self.new_action.triggered.connect(self.new.emit)
37
38 self.addAction(self.save_action)
39 self.addAction(self.first_action)
40 self.addAction(self.prev_action)
41 self.addWidget(self.record_label)
42 self.addAction(self.next_action)
43 self.addAction(self.last_action)
44 self.addAction(self.new_action)
45 self.setStyleSheet(
46 ' QAction { font-size: 14px; color: black;}')
47
48 @Slot(str)
49 def update_record_label(self, text):
50 self.record_label.setText(text)
Implement navigation. Unlike
SingleRecordForm,TransactionsFormis a tabular view - all records are visible simultaneously and the view itself manages which row is current (there is nothing to map), so the navigation slots are moved from the nav bar to the form.Handle new records. The
add_new_record()slot inserts a new row at the end of the model and sets the category ID column tocategory_idpassed to the form’s constructor, ensuring new transactions are always linked to the current category.
1 import sys
2 from PySide6.QtCore import Slot
3 from PySide6.QtWidgets import (QApplication, QWidget,
4 QVBoxLayout, QFrame)
5 from PySide6.QtSql import (QSqlDatabase,
6 QSqlRelationalTableModel, QSqlRelation)
7 from categoriestablemodel import CategoriesTableModel
8 from singlerecordform import SingleRecordForm
9 from transactionsform import TransactionsForm
10
11 class Window(QWidget):
12
13 def __init__(self):
14
15 super().__init__()
16 layout = QVBoxLayout()
17 self.setLayout(layout)
18 self.db = QSqlDatabase.addDatabase('QSQLITE')
19 self.db.setDatabaseName('finance_demo.sqlite')
20
21 result = self.db.open()
22 if result:
23 print('Connected!')
24 else:
25 print('Failed to connect to the database')
26
27 self.categories_model = CategoriesTableModel()
28 self.categories_model.setTable('Categories')
29
30 mappings = {
31 0: 'Category Id',
32 1: 'Category Name',
33 2: 'Description'}
34
35 master_form = SingleRecordForm(self.categories_model, mappings)
36 layout.addWidget(master_form)
37
38 separator = QFrame()
39 separator.setFrameShape(QFrame.Shape.HLine)
40 separator.setFrameShadow(QFrame.Shadow.Sunken)
41 layout.addWidget(separator)
42
43 self.transactions_model = QSqlRelationalTableModel()
44 self.transactions_model.setTable('Transactions')
45 self.transactions_model.setRelation(1,
46 QSqlRelation('Accounts', 'account_id', 'account_name'))
47 master_form.mapper.currentIndexChanged.connect(self.filter_transactions)
48
49 self.details_form = TransactionsForm(self.transactions_model)
50 layout.addWidget(self.details_form)
51
52 self.filter_transactions(master_form.mapper.currentIndex())
53
54 @Slot(int)
55 def filter_transactions(self, row):
56 index = self.categories_model.index(row, 0)
57 category_id = self.categories_model.data(index)
58 self.transactions_model.setFilter(f'category_id = {category_id}')
59 self.transactions_model.select()
60 self.details_form.category_id = category_id
61 row_count = self.transactions_model.rowCount()
62 self.details_form.view.clearSelection()
63 if row_count > 0:
64 self.details_form.view.selectRow(0)
65 self.details_form.update_record_label(
66 self.details_form.view.currentIndex())
67
68
69 if __name__ == '__main__':
70
71 app = QApplication(sys.argv)
72 main_window = Window()
73 main_window.show()
74 sys.exit(app.exec())
- Put the master and the detail forms together. In the main window, connect the master form’s
currentIndexChangedsignal to a slot that reads the selected category ID and passes it to the transactions model as a filter viasetFilter(), then callsselect()to refresh the view.
Note that you can easily make TransactionsForm generic by replacing its hardcoded values with constructor parameters: a list of columns indices to hide, a dictionary of column-to-delegate mappings for custom editors like DateDelegate, and a dictionary of column-to-default-value pairs to fill on new rows. This would give you a reusable tabular form class you could pair with SingleRecordForm in your application.