16. Creating Custom Widgets
When standard Qt components cannot fulfill your requirements - particularly if you plan to reuse the widget in multiple places - you should create a custom widget rather than using ad-hoc solutions.
Qt has several ways to build custom widgets. In this chapter, we explore the two most common approaches using a tag input widget as the example:
Composition. The most convenient way is to build your widget from standard Qt components adding custom properties, signals, and slots to it. This approach is quick and easy to maintain.
Subclassing and custom painting. When you need more control, you can subclass
QWidgetdirectly and draw everything yourself usingQPainterin thepaintEvent().
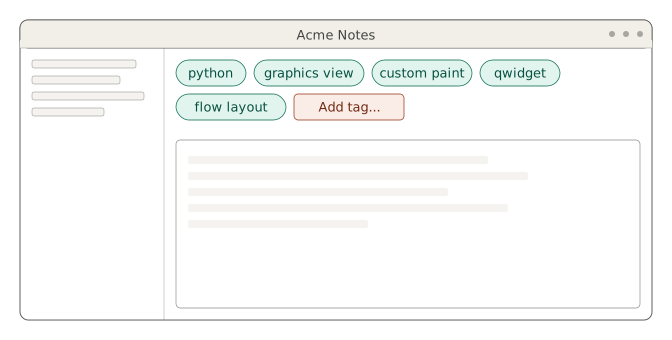
16.1 Subclassing QWidget - The Minimal TagBar
The fastest way to create a custom widget is by composing existing Qt widgets. In this section we build a simple and functional TagBar that nonetheless has some drawbacks.
 |
You are tasked with creating tag input widget as quickly as possible. Given the tight deadline, you decide to build a custom widget using the available standard Qt widgets. |
We will design the TagBar as two cooperating classes:
- A
TagChipwidget representing a single tag pill, built from aQFramecontaining aQLabeland aQToolButton. - A
TagBarcontainer that arranges chips in aQHBoxLayoutalongside aQLineEdit. The result is fully functional - chips appear, signal their removal, and the input field accepts new tags - with no custom painting yet.
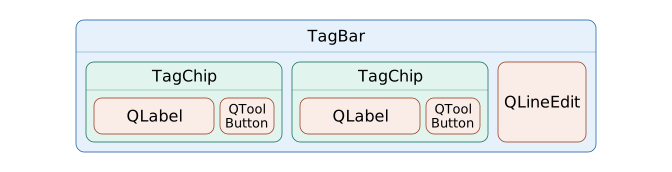
To build a custom tag bar widget:
 1 from PySide6.QtCore import Signal, Qt
 2 from PySide6.QtWidgets import QFrame, QHBoxLayout, QLabel, QToolButton
 3
 4
 5 # 1. Create the TagChip widget.
 6
 7 class TagChip(QFrame):
 8
 9     closed = Signal(str)
10
11     def __init__(self, tag, parent=None):
12
13         super().__init__(parent)
14
15         self.bg_color = '#e0d4f5'
16         self.border_color = '#c4a4e8'
17         self.close_color = '#4a2c8f'
18         self.btn_hover_color = '#ebe2fa'
19
20         self.tag = tag
21
22         layout = QHBoxLayout(self)
23         layout.setContentsMargins(10, 2, 4, 2)
24         layout.setSpacing(4)
25
26         label = QLabel(tag)
27
28         close_button = QToolButton()
29         close_button.setText('\u2715')
30         close_button.setCursor(
31             Qt.CursorShape.PointingHandCursor)
32         close_button.setAutoRaise(True)
33
34         close_button.clicked.connect(
35             lambda: self.closed.emit(self.tag))
36
37         layout.addWidget(label)
38         layout.addWidget(close_button)
39
40         self.setStyleSheet(f'''
41             TagChip {{
42                 background-color: {self.bg_color};
43                 border: 1px solid {self.border_color};
44                 border-radius: 10px;
45             }}
46             QToolButton {{
47                 border: none;
48                 background: transparent;
49                 padding: 0px;
50                 color: {self.close_color};
51                 font-weight: bold;
52                 border-radius: 7px;
53             }}
54             QToolButton:hover {{
55                 background: {self.btn_hover_color};
56             }}
57         ''')
- Create the
TagChipwidget. Start by building a single tag “pill”.TagChipis a small composite widget implemented as aQFramesubclass that contains aQLabelfor the tag text, and aQToolButtonfor the close button. Use a stylesheet to give it a rounded appearance and a matching color scheme. Clicking the Close button emits the customclosedsignal with the clicked tag text.
 1 from PySide6.QtCore import Signal, Slot
 2 from PySide6.QtWidgets import (QWidget, QHBoxLayout, QLineEdit)
 3 from tagchip import TagChip
 4
 5
 6 # 2. Create the TagBar container.
 7
 8 class TagBar(QWidget):
 9
10     tagsChanged = Signal(set)
11
12     def __init__(self, parent=None):
13
14         super().__init__(parent)
15
16         self._tags = set()
17         self.buttons = {}
18
19         self.h_layout = QHBoxLayout(self)
20         self.h_layout.setContentsMargins(2, 2, 2, 2)
21         self.h_layout.setSpacing(4)
22
23         self.tag_edit = QLineEdit()
24         self.tag_edit.setPlaceholderText('Add tag...')
25         self.tag_edit.setFixedWidth(80)
26         self.tag_edit.returnPressed.connect(self.on_return_pressed)
27
28         self.h_layout.addWidget(self.tag_edit)
29         self.h_layout.addStretch()
30
31         self.setFocusProxy(self.tag_edit)
32
33     # 3. Implement tag management.
34
35     @property
36     def tags(self):
37         return set(self._tags)
38
39     @tags.setter
40     def tags(self, new_tags):
41         if new_tags == self._tags:
42             return
43         self.blockSignals(True)
44         self.clear_buttons()
45         self._tags = set(new_tags)
46         for tag in sorted(self._tags):
47             self.create_button(tag)
48         self.blockSignals(False)
49
50     @Slot()
51     def add_tag(self, tag):
52         tag = tag.strip()
53         if not tag or tag in self._tags:
54             self.tag_edit.clear()
55             return
56         self._tags.add(tag)
57         self.create_button(tag)
58         self.tag_edit.clear()
59         self.tagsChanged.emit(set(self._tags))
60
61     def remove_tag(self, tag):
62         if tag not in self._tags:
63             return
64         self._tags.discard(tag)
65         button = self.buttons.pop(tag, None)
66         if button:
67             self.h_layout.removeWidget(button)
68             button.deleteLater()
69         self.tagsChanged.emit(set(self._tags))
70
71     def create_button(self, tag):
72         chip = TagChip(tag)
73         chip.closed.connect(self.remove_tag)
74         self.buttons[tag] = chip
75         insert_index = self.h_layout.indexOf(self.tag_edit)
76         self.h_layout.insertWidget(insert_index, chip)
77
78     def clear_buttons(self):
79         for button in self.buttons.values():
80             self.h_layout.removeWidget(button)
81             button.deleteLater()
82         self.buttons.clear()
83
84     @Slot()
85     def on_return_pressed(self):
86         self.add_tag(self.tag_edit.text())
87         self.tag_edit.setFocus()
Create the
TagBarcontainer. Next, create theTagBarwidget. It uses a horizontal layout to arrange multipleTagChips and aQLineEditat the end, which allows the user to type and add new tags.-
Implement tag management logic.
- Maintain an internal set of tags.
- Prevent duplicate tags.
add_tag()adds a new tag on Enter.- Clicking the
TagChip’s Close button removes the tag.
  1 import sys
  2 from PySide6.QtCore import Qt, Slot
  3 from PySide6.QtGui import QAction
  4 from PySide6.QtWidgets import (QApplication, QMainWindow,
  5     QTextEdit, QWidget, QHBoxLayout, QVBoxLayout,
  6     QListWidget, QListWidgetItem, QStyle, QAbstractItemDelegate)
  7
  8 from tagbar import TagBar
  9
 10
 11 class Note:
 12
 13     def __init__(self):
 14         self.title = 'New Note'
 15         self.text = ''
 16         self.tags = set()
 17
 18
 19 class NoteEditor(QMainWindow):
 20
 21     def __init__(self, parent=None):
 22
 23         super().__init__(parent)
 24         self.setWindowTitle('Acme Notes')
 25         self.resize(660, 420)
 26
 27         central = QWidget()
 28         self.setCentralWidget(central)
 29         h_layout = QHBoxLayout(central)
 30
 31         self.note_list = QListWidget()
 32         self.note_list.setFixedWidth(150)
 33         h_layout.addWidget(self.note_list)
 34
 35         editor_panel = QWidget()
 36         v_layout = QVBoxLayout(editor_panel)
 37         v_layout.setContentsMargins(0, 0, 0, 0)
 38         v_layout.setSpacing(2)
 39         h_layout.addWidget(editor_panel)
 40
 41         # 4. Integrate with the main window.
 42
 43         self.tag_bar = TagBar()
 44         self.text_edit = QTextEdit()
 45         v_layout.addWidget(self.tag_bar)
 46         v_layout.addWidget(self.text_edit)
 47
 48         self.tag_bar.setEnabled(False)
 49         self.text_edit.setEnabled(False)
 50
 51         self.note_list.currentItemChanged.connect(self.on_note_changed)
 52         self.note_list.itemChanged.connect(self.on_item_changed)
 53         self.tag_bar.tagsChanged.connect(self.on_tags_changed)
 54         self.note_list.itemDelegate().closeEditor.connect(
 55             self.on_title_editor_closed)
 56
 57         new_action = QAction('New', self)
 58         new_action.setIcon(self.style().standardIcon(
 59             QStyle.StandardPixmap.SP_FileIcon))
 60         new_action.triggered.connect(self.add_note)
 61
 62         toolbar = self.addToolBar('Main')
 63         toolbar.addAction(new_action)
 64         toolbar.setToolButtonStyle(
 65             Qt.ToolButtonStyle.ToolButtonTextBesideIcon)
 66
 67     @Slot()
 68     def add_note(self):
 69
 70         note = Note()
 71
 72         item = QListWidgetItem(note.title)
 73         item.setFlags(item.flags() | Qt.ItemFlag.ItemIsEditable)
 74         item.setData(Qt.ItemDataRole.UserRole, note)
 75
 76         self.note_list.addItem(item)
 77         self.note_list.setCurrentItem(item)
 78         self.note_list.editItem(item)
 79
 80     @Slot()
 81     def on_note_changed(self, current, previous):
 82
 83         if previous:
 84             note = previous.data(Qt.ItemDataRole.UserRole)
 85             if note:
 86                 note.text = self.text_edit.toPlainText()
 87                 note.tags = self.tag_bar.tags
 88
 89         if current:
 90             note = current.data(Qt.ItemDataRole.UserRole)
 91             if note:
 92                 self.text_edit.setPlainText(note.text)
 93                 self.tag_bar.tags = note.tags
 94         else:
 95             self.text_edit.clear()
 96             self.tag_bar.tags = set()
 97
 98         has_note = current is not None
 99         self.tag_bar.setEnabled(has_note)
100         self.text_edit.setEnabled(has_note)
101
102         if not has_note:
103             self.text_edit.clear()
104             self.tag_bar.tags = set()
105
106     @Slot()
107     def on_item_changed(self, item):
108         note = item.data(Qt.ItemDataRole.UserRole)
109         if note:
110             note.title = item.text().strip() or 'Untitled'
111
112     @Slot(set)
113     def on_tags_changed(self, tags):
114         item = self.note_list.currentItem()
115         if not item:
116             return
117         note = item.data(Qt.ItemDataRole.UserRole)
118         if note:
119             note.tags = tags
120
121     @Slot()
122     def on_title_editor_closed(self, editor, hint):
123         if hint == QAbstractItemDelegate.EndEditHint.SubmitModelCache:
124             self.tag_bar.setFocus()
125
126
127 if __name__ == '__main__':
128
129     app = QApplication(sys.argv)
130     editor = NoteEditor()
131     editor.show()
132     sys.exit(app.exec())
- Integrate with the main editor. Finally, we connect the
Tagbarto theNoteEditorso that tags are properly saved and loaded when the user switches between notes.
Now we have a working tag bar and are able to add and remove tags, but with one major flaw: the TagBar widget does not wrap tags when their total length exceeds its lenght, it just expands.
16.2 Drawing Tags with QPainter and paintEvent()
Although the composite TagChip built from QFrame, QLabel, and QToolButton works, it difficult to achieve a perfectly balanced pill shape with consistent proportions, padding, and hover feedback across different fonts and DPI settings.
Painting the chip ourselves with QPainter gives us precise visual control, clean hover states, lower memory overhead when many tags are present, and easier future customizations.
|
Due to the limitations of the composite approach you decide to replace the |
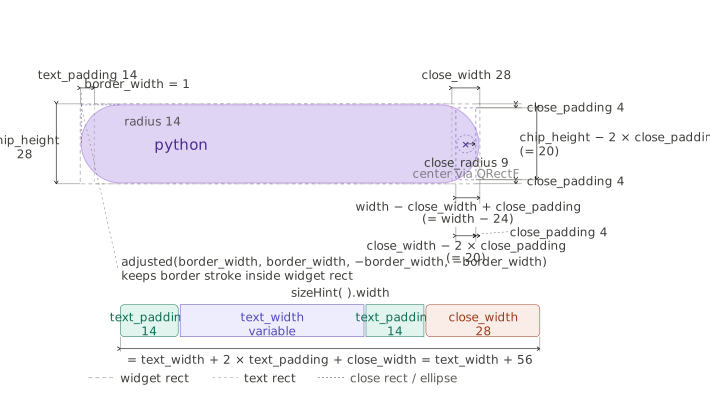
The diagram above illustrates the geometry and constants used in the painted TagChip. The main widget rectangle (dashed outer border) defines the chip’s total bounds. Inside it the filled rounded rectangle (the visible tag pill), ofset by border_width.
Text is drawn with text_padding on the left and space reserved on the right for the Close button (close_width). The Close button consists of a circular area (close_radius) positioned using close_padding. The sizeHint() calculation combines the variable text width with fixed spacing (2 * text_padding + close_width) to make sure the widget reports the correct size to layouts.
To implement a Qt widget using custom painting:
 1 from PySide6.QtCore import Signal, QSize, QRect, Qt
 2 from PySide6.QtGui import QPainter, QColor, QBrush, QPen, QFont
 3 from PySide6.QtWidgets import QWidget
 4
 5
 6 class TagChip(QWidget):
 7
 8     closed = Signal(str)
 9
10     def __init__(self, tag, parent=None):
11
12         super().__init__(parent)
13
14         self.chip_height = 28
15         self.border_width = 1
16         self.radius = 14
17         self.text_padding = 14
18         self.close_width = 28
19         self.close_radius = 9
20         self.close_padding = 4
21
22         self.bg_color = '#e0d4f5'
23         self.border_color = '#c4a4e8'
24         self.close_color = '#4a2c8f'
25         self.btn_hover_color = '#ebe2fa'
26
27         self.tag = tag
28
29         self.setMinimumHeight(self.chip_height)
30         self.setMaximumHeight(self.chip_height)
31
32     def sizeHint(self):
33         font_metrics = self.fontMetrics()
34         text_width = font_metrics.horizontalAdvance(self.tag)
35         total_width = text_width + 2 * self.text_padding + self.close_width
36         return QSize(total_width, self.chip_height)
37
38     def get_close_rect(self):
39         return QRect(
40             self.width() - self.close_width + self.close_padding,
41             self.close_padding,
42             self.close_width - 2 * self.close_padding,
43             self.chip_height - 2 * self.close_padding)
44
45     def paintEvent(self, event):
46
47         painter = QPainter(self)
48         painter.setRenderHint(QPainter.RenderHint.Antialiasing, True)
49
50         rect = self.rect()
51
52         painter.setBrush(QBrush(self.bg_color))
53         painter.setPen(QPen(QColor(self.border_color)))
54
55         # 1. Draw the widget shape.
56
57         painter.drawRoundedRect(
58             rect.adjusted(self.border_width,
59                           self.border_width,
60                           -self.border_width,
61                           -self.border_width),
62             self.radius, self.radius)
63
64         painter.setPen(QColor(self.close_color))
65         font = QFont()
66         font.setPointSize(9)
67         font.setBold(False)
68         painter.setFont(font)
69
70         # 2. Draw the widget text.
71
72         text_rect = rect.adjusted(self.text_padding, 0, -self.close_width, 0)
73         painter.drawText(text_rect, Qt.AlignmentFlag.AlignVCenter, self.tag)
74
75         # 3. Draw the widget user interaction area.
76
77         close_rect = self.get_close_rect()
78         painter.setBrush(QColor(Qt.GlobalColor.transparent))
79         painter.setPen(Qt.PenStyle.NoPen)
80         painter.drawEllipse(close_rect.center(), self.close_radius, self.close_radius)
81
82         painter.setPen(QColor(self.close_color))
83         font = QFont()
84         font.setPointSize(8)
85         font.setBold(True)
86         painter.setFont(font)
87
88         painter.drawText(close_rect, Qt.AlignmentFlag.AlignCenter, '\u2715')
Draw the widget shape. Use
QPainterto draw a rounded rectangle that forms the pill-shaped background. Adjust the rectangle by the border width so the stroke sits neatly inside the widget bounds, giving the chip its pill appearance.Draw the widget text. Render the tag name using
drawText(). Position the text with a left padding and leave space on the right for the Close button. Align it vertically in the center.Draw the widget user interaction area (Close button). Draw a transparent circular area to mark where the close button will be, then render the
×symbol on top. At this point the button is purely visual: clicking and hovering aren’t implemented yet.
16.3 Handling Events
The painted TagChip from 16.2 looks correct but is completely unresponsive. Clicks are ignored and there is no visual feedback when hovering over the Close button. Because the × is drawn with QPainter the widget must handle its own mouse interactions and hit-testing.
|
You need to add events handling to |
To make a custom-painted widget interactive:
  1 from PySide6.QtCore import Signal, QSize, QRect, QRectF, Qt
  2 from PySide6.QtGui import QPainter, QColor, QBrush, QPen, QFont
  3 from PySide6.QtWidgets import QWidget
  4
  5
  6 class TagChip(QWidget):
  7
  8     closed = Signal(str)
  9
 10     def __init__(self, tag, parent=None):
 11
 12         super().__init__(parent)
 13
 14         self.chip_height = 28
 15         self.border_width = 1
 16         self.radius = 14
 17         self.text_padding = 14
 18         self.close_width = 28
 19         self.close_radius = 9
 20         self.close_padding = 4
 21
 22         self.bg_color = '#e0d4f5'
 23         self.border_color = '#c4a4e8'
 24         self.close_color = '#4a2c8f'
 25         self.btn_hover_color = '#ebe2fa'
 26
 27         self.hover = False
 28         self.close_hover = False
 29
 30         self.tag = tag
 31
 32         # 1. Enable mouse tracking.
 33
 34         self.setMouseTracking(True)
 35
 36         self.setMinimumHeight(self.chip_height)
 37         self.setMaximumHeight(self.chip_height)
 38
 39     def sizeHint(self):
 40         font_metrics = self.fontMetrics()
 41         text_width = font_metrics.horizontalAdvance(self.tag)
 42         total_width = text_width + 2 * self.text_padding + self.close_width
 43         return QSize(total_width, self.chip_height)
 44
 45     def get_close_rect(self):
 46         return QRect(
 47             self.width() - self.close_width + self.close_padding,
 48             self.close_padding,
 49             self.close_width - 2 * self.close_padding,
 50             self.chip_height - 2 * self.close_padding)
 51
 52     def paintEvent(self, event):
 53
 54         painter = QPainter(self)
 55         painter.setRenderHint(QPainter.RenderHint.Antialiasing, True)
 56
 57         rect = self.rect()
 58
 59         painter.setBrush(QBrush(self.bg_color))
 60         painter.setPen(QPen(QColor(self.border_color)))
 61         painter.drawRoundedRect(
 62             rect.adjusted(self.border_width,
 63                           self.border_width,
 64                           -self.border_width,
 65                           -self.border_width),
 66             self.radius, self.radius)
 67
 68         painter.setPen(QColor(self.close_color))
 69         font = QFont()
 70         font.setPointSize(9)
 71         font.setBold(False)
 72         painter.setFont(font)
 73
 74         text_rect = rect.adjusted(self.text_padding, 0, -self.close_width, 0)
 75         painter.drawText(text_rect, Qt.AlignmentFlag.AlignVCenter, self.tag)
 76
 77         close_rect = self.get_close_rect()
 78         if self.close_hover:
 79             painter.setBrush(QColor(self.btn_hover_color))
 80         else:
 81             painter.setBrush(QColor(Qt.GlobalColor.transparent))
 82         painter.setPen(Qt.PenStyle.NoPen)
 83         painter.drawEllipse(QRectF(close_rect).center(), self.close_radius, self.close_radius)
 84
 85         painter.setPen(QColor(self.close_color))
 86         font = QFont()
 87         font.setPointSize(10)
 88         font.setBold(True)
 89         painter.setFont(font)
 90
 91         painter.drawText(close_rect, Qt.AlignmentFlag.AlignCenter, '\u2715')
 92
 93     def enterEvent(self, event):
 94         self.hover = True
 95         self.update()
 96         super().enterEvent(event)
 97
 98     def leaveEvent(self, event):
 99         self.hover = False
100         self.close_hover = False
101         self.update()
102         super().leaveEvent(event)
103
104     # 2. Detect hover states.
105
106     def mouseMoveEvent(self, event):
107         close_rect = self.get_close_rect()
108         new_close_hover = close_rect.contains(event.pos())
109         if new_close_hover != self.close_hover:
110             self.close_hover = new_close_hover
111             self.update()
112         super().mouseMoveEvent(event)
113
114     # 3. Handle clicks.
115
116     def mousePressEvent(self, event):
117         if event.button() == Qt.MouseButton.LeftButton:
118             close_rect = self.get_close_rect()
119             if close_rect.contains(event.pos()):
120                 self.closed.emit(self.tag)
121                 return
122         super().mousePressEvent(event)
123
124     def mouseReleaseEvent(self, event):
125         super().mouseReleaseEvent(event)
Enable mouse tracking. Call
setMouseTracking(True)so the widget receives mouse move events even when no button is pressed.Detect hover states. Reimplement
mouseMoveEvent()to check whether the mouse is over the close button area (using the sameget_close_rect()as in painting). Update theclose_hoverflag and trigger a repaint when the state changes. Also handleenterEvent()andleaveEvent()to reset hover states.Handle clicks. Reimplement
mousePressEvent()to test if the left click occurred inside the close button rectangle. If it did, emit theclosedsignals with the tag text.
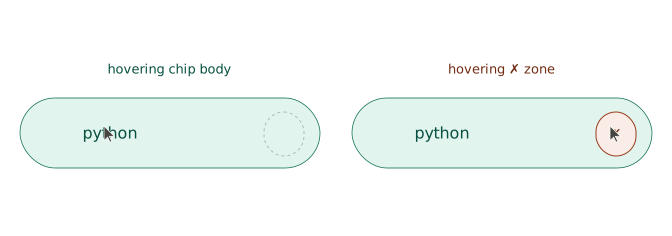
Note that, although the Close button is circular, we still use the rectangular close_rect for hit-testing. This is for practicality and performance reasons: rectangle checks (QRect.contains()) are fast and simple. The slightly larger rectangular area provides a more forgiving click target without a noticeable downside.
With this, the TagChip provides visual feedback and responds to clicks like the original composite version. However, the pill wrapping problem is still present.
16.4 Flow Layout, Size Hints, and Layout Integration
TagChip widgets are now properly painted and interactive but the pill-wrapping problem still remains. When too many tags are added, they expand the TagBar instead of wrapping to new rows. Standard layouts like QHBoxLayout cannot handle flowing/wrapping items while keeping a trailing QLineEdit.
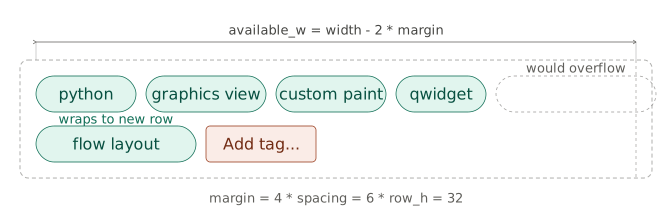
The diagram above illustrates the core compute_rects() algorithm: a left-to right cursor advances across the chips, wrapping to a new row when the next item would ovewrflow the available width. The QLineEdit follows the same cursor after the last chip.
|
To enable wrapping of |
To create a flowing tag bar:
  1 from PySide6.QtCore import Signal, Slot, QSize, Qt
  2 from PySide6.QtWidgets import QWidget, QLineEdit
  3 from tagchip import TagChip
  4
  5
  6 class TagBar(QWidget):
  7
  8     tagsChanged = Signal(set)
  9
 10     def __init__(self, parent=None):
 11
 12         super().__init__(parent)
 13
 14         self._tags = set()
 15         self.buttons = {}
 16
 17         self.tag_edit = QLineEdit(self)
 18         self.tag_edit.setPlaceholderText('Add tag...')
 19         self.tag_edit.setFixedWidth(100)
 20         self.tag_edit.returnPressed.connect(self.on_return_pressed)
 21
 22         self.setFocusPolicy(Qt.FocusPolicy.StrongFocus)
 23         self.setMinimumHeight(40)
 24         self.setFocusProxy(self.tag_edit)
 25
 26     @property
 27     def tags(self):
 28         return set(self._tags)
 29
 30     @tags.setter
 31     def tags(self, new_tags):
 32         if new_tags == self._tags:
 33             return
 34         self.blockSignals(True)
 35         self.clear_buttons()
 36         self._tags = set(new_tags)
 37         for tag in sorted(self._tags):
 38             self.create_button(tag)
 39         self.blockSignals(False)
 40         self.update_geometry()
 41
 42     # 1. Implement the wrapping logic.
 43
 44     def compute_rects(self):
 45         margin = 4
 46         spacing = 6
 47         row_h = 32
 48         available_w = max(100, self.width() - 2 * margin)
 49
 50         x = margin
 51         y = margin
 52
 53         positions = []
 54         widgets = []
 55
 56         for chip in self.buttons.values():
 57             w = max(chip.sizeHint().width(), 60)
 58
 59             if x + w > available_w and x > margin:
 60                 x = margin
 61                 y += row_h + spacing
 62
 63             positions.append((x, y, w, row_h))
 64             widgets.append(chip)
 65             x += w + spacing
 66
 67         edit_w = 100
 68         if x + edit_w > available_w and x > margin:
 69             x = margin
 70             y += row_h + spacing
 71
 72         positions.append((x, y, edit_w, row_h))
 73         widgets.append(self.tag_edit)
 74
 75         total_h = y + row_h + 2 * margin
 76         return positions, widgets, total_h
 77
 78     # 2. Update widget positions and height.
 79
 80     def update_geometry(self):
 81         if self.width() < 50:
 82             return
 83
 84         positions, widgets, needed_h = self.compute_rects()
 85
 86         for (x, y, w, h), widget in zip(positions, widgets):
 87             widget.setGeometry(x, y, w, h)
 88             widget.show()
 89
 90         self.setMinimumHeight(needed_h)
 91         self.updateGeometry()
 92
 93     # 3. Coordinate with Qt's layout system.
 94
 95     def resizeEvent(self, event):
 96         super().resizeEvent(event)
 97         self.update_geometry()
 98
 99     def showEvent(self, event):
100         super().showEvent(event)
101         self.update_geometry()
102
103     def sizeHint(self):
104         _, _, h = self.compute_rects()
105         return QSize(500, max(40, h))
106
107     def create_button(self, tag):
108         if tag in self.buttons:
109             return
110         chip = TagChip(tag, parent=self)
111         chip.closed.connect(self.remove_tag)
112         self.buttons[tag] = chip
113         self.update_geometry()
114
115     def clear_buttons(self):
116         for chip in list(self.buttons.values()):
117             chip.deleteLater()
118         self.buttons.clear()
119
120     def remove_tag(self, tag):
121         if tag not in self._tags:
122             return
123         self._tags.discard(tag)
124         chip = self.buttons.pop(tag, None)
125         if chip:
126             chip.deleteLater()
127         self.tagsChanged.emit(set(self._tags))
128         self.update_geometry()
129
130     @Slot()
131     def add_tag(self, tag):
132         tag = tag.strip()
133         if not tag or tag in self._tags:
134             self.tag_edit.clear()
135             return
136         self._tags.add(tag)
137         self.create_button(tag)
138         self.tag_edit.clear()
139         self.tagsChanged.emit(set(self._tags))
140
141     @Slot()
142     def on_return_pressed(self):
143         self.add_tag(self.tag_edit.text())
144         self.tag_edit.setFocus()
Implement the wrapping logic. In
compute_rects(), walk through the chips from left to right, tracking a cursor position (x,y) that starts at the top-left margin. Each chip’s width comes from itssizeHint(), floored at a small minimum so very short tags don’t shrink below a usable size. Before placing a chip, check whether it would overflow the available width. If it would, and it isn’t already the first item on the current row, resetxto the margin and dropydown by one row height plus spacing. The ‘first item on the row’ check matters - without it, a single chip wider than the available width would trigger an endless wrap instead of just being on its own row. Place theQLineEditimmediately after the last chip using the same logic.Update widget positions and height. In
update_geometry(), callcompute_rects()and usesetGeometry()on every chip and the line edit. Also update theTagBars minimum height nd notify the parent layout withupdateGeometry().Coordinate with Qt’s layout system. Reimplement
resizeEvent()so the layout recalculates when the user resizes the window. ImplementsizeHint()and callupdate_geometry()inshowEvent()so the parent widget knows how tall theTagBarneeds to be.
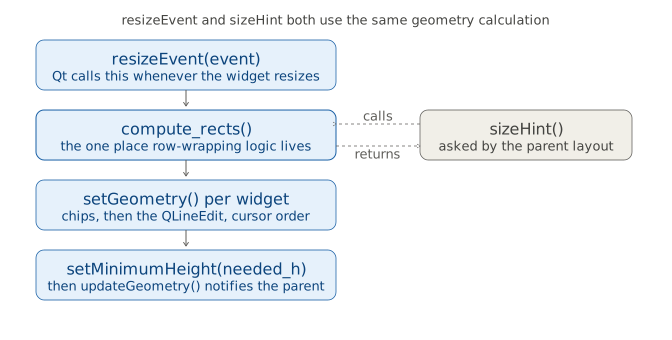
This diagram shows how resizeEvent() and sizeHint() both go through the same compute_rects() function. We keep all geometry logic in one place so the widget behaves correctly both when resized by the user and when Qt’s layout system asks for its preferred size.
As mentioned, in addition to composition and custom painting, there are other ways to make a custom widget. A third option is specialization: subclassing an existing widget like QLabel or QPushButton and overriding just the behavior or appearance you need. Style sheets, QStyle/QProxyStyle, QGraphicsView, and item delegates are all custom-widget techniques too, covered elsewhere in this book.