26. Model-View Programming - Sorting, Filtering and Selection
There are two ways to sort data in the model-view architecture:
Implement the sorting directly in the model by overriding the
sort()method. Any view connected to that model can then sort programmatically.Use a proxy model. The proxy sits between the model and the view and handles sorting transparently, with no changes to the source model. You can use a proxy when working with a model you do not own, or when using a list view, which has no headers to click.
26.1 Implementing In-Place Sorting in Custom Models
You may want to implement in-place (destructive) sorting when:
- Your model owns the data.
- The original order never needs to be restored.
 |
You are building a financial dashboard where users sort economic indicators by clicking column headers, and the sorted order should become the new permanent order of the data. |
To implement in-place sorting in custom models:
1 from PySide6.QtCore import QAbstractTableModel, QModelIndex, Qt
2
3
4 # 1. Create the model.
5
6 class CsvModel(QAbstractTableModel):
7
8 def __init__(self, parent=None):
9
10 super().__init__(parent)
11
12 self.header = ['Indicator', 'Value (%)',
13 'Aggregate', 'Include in report']
14
15 self.csv_data = [
16 ['GDP', 3, 1, True],
17 ['CPI', 6, 1, True],
18 ['Jobs', 5, 0, True],
19 ['Confidence', 75, 0, True],
20 ['Industry', 92, 0, True],
21 ['Retail', 4, 1, True],
22 ]
23
24 def rowCount(self, parent=QModelIndex()):
25 if parent.isValid():
26 return 0
27 return len(self.csv_data)
28
29 def columnCount(self, parent=QModelIndex()):
30 if parent.isValid():
31 return 0
32 return len(self.header)
33
34 def data(self, index, role):
35
36 value = self.csv_data[index.row()][index.column()]
37
38 if role == Qt.ItemDataRole.DisplayRole:
39 return value
40 if role == Qt.ItemDataRole.EditRole:
41 if index.column() == 2:
42 return value == 1
43 else:
44 return value
45
46 def setData(self, index, value, role):
47
48 if role == Qt.ItemDataRole.EditRole:
49 if index.column() == 2:
50 value = 1 if value else 0
51 if self.csv_data[index.row()][index.column()] != value:
52 self.csv_data[index.row()][index.column()] = value
53 self.dataChanged.emit(index, index)
54 return True
55 return False
56 return False
57
58 # 2. Reimplement the sort() method.
59
60 def sort(self, column, order):
61
62 self.layoutAboutToBeChanged.emit()
63
64 # backup
65 old_order = self.csv_data[:]
66
67 self.csv_data.sort(
68 key=lambda row: row[column],
69 reverse=(order == Qt.SortOrder.DescendingOrder)
70 )
71
72 new_position = {}
73 for i, row in enumerate(self.csv_data):
74 new_position[id(row)] = i
75
76 old_indices = self.persistentIndexList()
77 new_indices = []
78 for idx in old_indices:
79 new_row = new_position[id(old_order[idx.row()])]
80 new_indices.append(self.index(new_row, idx.column()))
81 self.changePersistentIndexList(old_indices, new_indices)
82
83 self.layoutChanged.emit()
84
85 def flags(self, index):
86 if not index.isValid():
87 return Qt.ItemFlags()
88 return (super().flags(index) |
89 Qt.ItemFlag.ItemIsEditable)
90
91 def headerData(self, section, orientation, role):
92 if orientation == Qt.Orientation.Horizontal:
93 if role == Qt.ItemDataRole.DisplayRole:
94 return self.header[section]
Create the model. For this exercise, we subclass
QAbstractTableModeland implementrowCount(),columnCount(),data(),setData(),flags()andheaderData()to create an editable table model. The backing data is a two-dimensional Python list assigned to theself.csv_datainstance field.-
Reimplement
sort(). The method signature is:1 sort(column: int, order: Qt.SortOrder=Qt.SortOrder.AscendingOrder) -> None
where
columnis the model column to sort by, andorderis aQt.SortOrder, ascending by default. In the method, we:- Emit
layoutAboutToBeChanged()to notify connected views to cache their current state before the layout changes, - Back up the data before sorting. Sort
csv_datain place using Python’s listsort(), passing it a lambda that extractsrow[column]as the sort key and settingreversebased on the order argument. - Call
changePersistentIndexList()to remap any liveQPersistentModelIndexobjecs held by views or external code. We build a lookup from the sorted list and use the pre-sort backup to map each old row position to its new position. - Emit
layoutChanged()to notify connected views that the layout change is complete.
1 import sys
2 from PySide6.QtWidgets import (QApplication, QWidget,
3 QTableView, QVBoxLayout)
4 from PySide6.QtTest import QAbstractItemModelTester
5 from csvmodel import CsvModel
6
7
8 class Window(QWidget):
9
10 def __init__(self):
11
12 super().__init__()
13
14 layout = QVBoxLayout()
15 self.setLayout(layout)
16
17 model = CsvModel()
18 QAbstractItemModelTester(model,
19 QAbstractItemModelTester.FailureReportingMode.Warning)
20
21 # Create the view, set its model and enable sorting.
22
23 view = QTableView()
24 view.setModel(model)
25
26 view.setSortingEnabled(True)
27
28 view.resizeColumnsToContents()
29 layout.addWidget(view)
30
31
32 if __name__ == '__main__':
33
34 app = QApplication(sys.argv)
35 main_window = Window()
36 main_window.show()
37 sys.exit(app.exec())
- Create the view, set its model, and enable sorting. In the main window, create a
CsvModelobject and aQTableView. Assign the model to the view and enable the sorting viaview.setSortingEnabled().
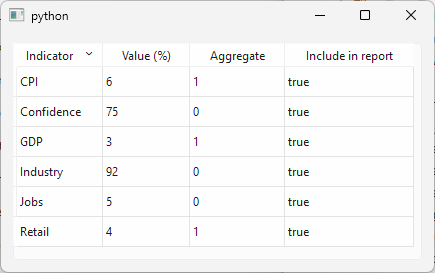
When you run the application, you will be able to sort the view by clicking the header of any of its columns. The model is sorted as well.
Note that when you change any cell value, the sort order does not automatically change.
26.2 Non-Destructive Sorting in Custom Models
You would use non-destructive sorting when:
- You must preserve the original data order.
- The data is read-only or shared between multiple models or views.
|
You are developing an analytics tool where users can sort economic indicators by value or aggregete for analysis, while the original indicator order is preserved for reporting. |
To implement non-destructive sorting in custom models:
1 from PySide6.QtCore import QAbstractTableModel, QModelIndex, Qt
2
3
4 class CsvModel(QAbstractTableModel):
5
6 def __init__(self, parent=None):
7
8 super().__init__(parent)
9
10 self.header = ['Indicator', 'Value (%)',
11 'Aggregate', 'Include in report']
12
13 self.csv_data = [
14 ['GDP', 3, 1, True],
15 ['CPI', 6, 1, True],
16 ['Jobs', 5, 0, True],
17 ['Confidence', 75, 0, True],
18 ['Industry', 92, 0, True],
19 ['Retail', 4, 1, True],
20 ]
21
22 self.row_indices = list(range(len(self.csv_data)))
23
24 def rowCount(self, parent=QModelIndex()):
25 if parent.isValid():
26 return 0
27 return len(self.csv_data)
28
29 def columnCount(self, parent=QModelIndex()):
30 if parent.isValid():
31 return 0
32 return len(self.header)
33
34 def data(self, index, role):
35
36 if not index.isValid():
37 return None
38
39 sorted_row = self.row_indices[index.row()]
40 value = self.csv_data[sorted_row][index.column()]
41
42 if role == Qt.ItemDataRole.DisplayRole:
43 return value
44 if role == Qt.ItemDataRole.EditRole:
45 if index.column() == 2:
46 return value == 1
47 else:
48 return value
49
50 def setData(self, index, value, role):
51
52 if role == Qt.ItemDataRole.EditRole:
53 if index.column() == 2:
54 value = 1 if value else 0
55 if self.csv_data[index.row()][index.column()] != value:
56 self.csv_data[index.row()][index.column()] = value
57 self.dataChanged.emit(index, index)
58 return True
59 return False
60 return False
61
62 def sort(self, column, order):
63
64 self.layoutAboutToBeChanged.emit()
65
66 old_row_indices = self.row_indices[:]
67
68 self.row_indices.sort(
69 key=lambda i: self.csv_data[i][column],
70 reverse=(order == Qt.SortOrder.DescendingOrder)
71 )
72
73 new_position = {}
74 for new_row, source_row in enumerate(self.row_indices):
75 new_position[source_row] = new_row
76
77 old_indices = self.persistentIndexList()
78 new_indices = []
79 for idx in old_indices:
80 source_row = old_row_indices[idx.row()]
81 new_row = new_position[source_row]
82 new_indices.append(self.index(new_row, idx.column()))
83 self.changePersistentIndexList(old_indices, new_indices)
84
85 self.layoutChanged.emit()
86
87
88 def flags(self, index):
89 if not index.isValid():
90 return Qt.ItemFlags()
91 return (super().flags(index) |
92 Qt.ItemFlag.ItemIsEditable)
93
94 def headerData(self, section, orientation, role):
95 if orientation == Qt.Orientation.Horizontal:
96 if role == Qt.ItemDataRole.DisplayRole:
97 return self.header[section]
Create the model. We reuse the model from the previous section with one addition: a
self.row_indiceslist is used to store the current sort order, leavingself.csv_datauntouched.Update
data()to read throughrow_indices. Instead of accessingcsv_data[index.row()]directly, we first look up the mapped row withrow_indices[index.row()]and then use it to access the data.Reimplement
sort(). Instead of sortingcsv_datadirectly, sortrow_indicesinstead.
26.3 Automatic Sorting on Data Changes
At times, you want the data to stay sorted automatically whenever it is modified or deleted.
|
You are creating a portfolio management app where the list of economic indicators must stay alphabetically sorted by name whenever an indicator is renamed. |
To sort the data automatically on data changes:
1 from PySide6.QtCore import QAbstractTableModel, QModelIndex, Qt
2
3
4 class CsvModel(QAbstractTableModel):
5
6 def __init__(self, parent=None):
7
8 super().__init__(parent)
9
10 self.header = ['Indicator', 'Value (%)',
11 'Aggregate', 'Include in report']
12 self.csv_data = [
13 ['GDP', 3, 1, True],
14 ['CPI', 6, 1, True],
15 ['Jobs', 5, 0, True],
16 ['Confidence', 75, 0, True],
17 ['Industry', 92, 0, True],
18 ['Retail', 4, 1, True],
19 ]
20
21 def rowCount(self, parent=QModelIndex()):
22 if parent.isValid():
23 return 0
24 return len(self.csv_data)
25
26 def columnCount(self, parent=QModelIndex()):
27 if parent.isValid():
28 return 0
29 return len(self.header)
30
31 def data(self, index, role):
32
33 value = self.csv_data[index.row()][index.column()]
34
35 if role == Qt.ItemDataRole.DisplayRole:
36 return value
37 if role == Qt.ItemDataRole.EditRole:
38 if index.column() == 2:
39 return value == 1
40 else:
41 return value
42
43 # 2. Sort the data whenever it is modified.
44
45 def setData(self, index, value, role):
46
47 if role == Qt.ItemDataRole.EditRole:
48 if index.column() == 2:
49 value = 1 if value else 0
50 if self.csv_data[index.row()][index.column()] != value:
51 self.csv_data[index.row()][index.column()] = value
52 if index.column() == 0:
53 self.sort(0)
54 self.dataChanged.emit(index, index)
55 return True
56 return False
57 return False
58
59 # 1. Implement the sort() method.
60
61 def sort(self, column, order=Qt.SortOrder.AscendingOrder):
62
63 self.layoutAboutToBeChanged.emit()
64
65 # backup
66 old_order = self.csv_data[:]
67
68 self.csv_data.sort(
69 key=lambda row: row[column],
70 reverse=(order == Qt.SortOrder.DescendingOrder)
71 )
72
73 new_position = {}
74 for i, row in enumerate(self.csv_data):
75 new_position[id(row)] = i
76
77 old_indices = self.persistentIndexList()
78 new_indices = []
79 for idx in old_indices:
80 new_row = new_position[id(old_order[idx.row()])]
81 new_indices.append(self.index(new_row, idx.column()))
82 self.changePersistentIndexList(old_indices, new_indices)
83
84 self.layoutChanged.emit()
85
86 def flags(self, index):
87 if not index.isValid():
88 return Qt.ItemFlags()
89 return (super().flags(index) |
90 Qt.ItemFlag.ItemIsEditable)
91
92 def headerData(self, section, orientation, role):
93 if orientation == Qt.Orientation.Horizontal:
94 if role == Qt.ItemDataRole.DisplayRole:
95 return self.header[section]
Implement
sort(). The method is identical to section 26.1: emitlayoutAboutToBeChanged(), sort the data, remap the persistent index list, and emitlayoutChanged().Call
sort()fromsetData()whenever the indicator name changes. Since all data modifications go throughsetData(), we check whether the edited column is column 0 and callsort()if so, right before emittingdataChaged().
1 import sys
2 from PySide6.QtCore import Qt
3 from PySide6.QtWidgets import (QApplication, QWidget,
4 QTableView, QVBoxLayout)
5 from PySide6.QtTest import QAbstractItemModelTester
6 from csvmodel import CsvModel
7
8
9 class Window(QWidget):
10
11 def __init__(self):
12
13 super().__init__()
14
15 layout = QVBoxLayout()
16 self.setLayout(layout)
17
18 self.model = CsvModel()
19 QAbstractItemModelTester(self.model,
20 QAbstractItemModelTester.FailureReportingMode.Warning)
21
22 # 3. Perform the initial sort.
23
24 self.model.sort(0, Qt.SortOrder.AscendingOrder)
25
26 self.view = QTableView()
27 self.view.setModel(self.model)
28
29 self.view.resizeColumnsToContents()
30 layout.addWidget(self.view)
31
32
33 if __name__ == '__main__':
34
35 app = QApplication(sys.argv)
36 main_window = Window()
37 main_window.show()
38 sys.exit(app.exec())
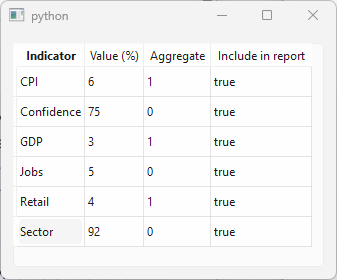
- Perform the initial sort. The backing data in
csv_datastart in insertion order, so we callsort()once on the model before showing the main window.
Now, when the user edits an indicator name and confirms the change, the list re-sorts automatically. Edits to other columns leave the sort order unchanged.
26.4 Sorting with Proxy Models
QSortFilterProxyModel sits between a source model and a view, mapping the source model’s indexes to its own indexes without modifying the underlying data. This makes it possible to sort or filter the view without touching the source model at all.
You can fine-tune the way sorting is performed with these methods:
| Method | Description |
|---|---|
setSortCaseSensitivity(sensitivity) |
Control case sensitivity when sorting strings |
setSortLocaleAware(bool) |
Use locale-aware collation when sorting strings |
setSortRole(role) |
Data role used when comparing items for sorting |
setDynamicSortFilter(bool) |
Re-sort and re-filter automatically when source data changes |
|
You are building a financial dashboard where a fixed reference view and a sortable analysis view display the same economic indicators side by side, and sorting in one must not affect the other. |
To use a proxy model to enable sorting:
1 import sys
2 from PySide6.QtCore import QSortFilterProxyModel
3 from PySide6.QtWidgets import (QApplication, QWidget,
4 QTableView, QVBoxLayout, QLabel)
5 from PySide6.QtTest import QAbstractItemModelTester
6 from csvmodel import CsvModel
7
8
9 class Window(QWidget):
10
11 def __init__(self):
12
13 super().__init__()
14
15 layout = QVBoxLayout()
16 self.setLayout(layout)
17
18 model = CsvModel()
19 QAbstractItemModelTester(model,
20 QAbstractItemModelTester.FailureReportingMode.Warning)
21
22 view = QTableView()
23 view.setModel(model)
24
25 # 1. Create the proxy model and set its source model.
26
27 proxy_model = QSortFilterProxyModel(self)
28 proxy_model.setSourceModel(model)
29
30 # 2. Create the view and assign the proxy model to it.
31
32 proxy_view = QTableView()
33 proxy_view.setModel(proxy_model)
34
35 # 3. Enable sorting in the view.
36
37 proxy_view.setSortingEnabled(True)
38
39 proxy_view.resizeColumnsToContents()
40 layout.addWidget(QLabel('Source Model View'))
41 layout.addWidget(view)
42 layout.addWidget(QLabel('Proxy Model View'))
43 layout.addWidget(proxy_view)
44
45
46 if __name__ == '__main__':
47
48 app = QApplication(sys.argv)
49 main_window = Window()
50 main_window.show()
51 sys.exit(app.exec())
Create the proxy model and set its source model. The source model is a standard editable table model with no
sort()implemented. In the main window, create aQSortFilterProxyModelinstance and callsetSourceModel()to connect it to the source model.Create the view and assign the proxy model to it. Create a
QTableModeland usesetModel()to assign the proxy model to it.Enable sorting in the proxy view. Call
setSortingEnabled()on the proxy view to allow sorting by clicking its column headers.
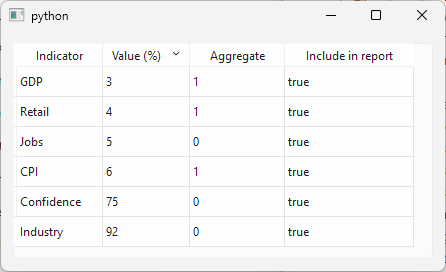
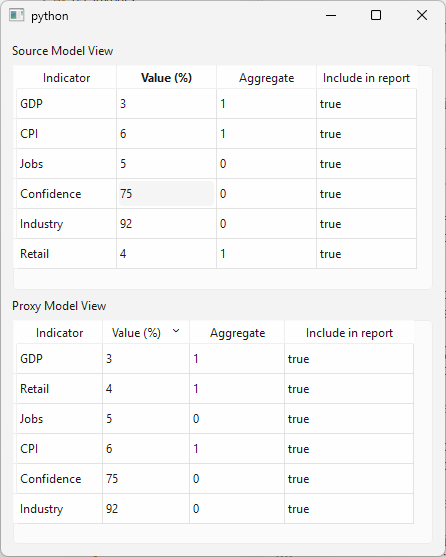
For comparison, this example places a source model view above the proxy model view. The source view has no sorting enabled. When you sort the proxy view, the source, the source view is not affected. Both views are editable and any change made through one is immediatelly reflected in the other.
Note that because the proxy keeps its sort order active, editing an cell value through the proxy view will cause the row to immediately jump to its new sorted position once the edit is confirmed.
26.5 Basic Filtering with Proxy Models
In addition to sorting, QSortFilterProxyModel supports filtering its source model with these methods:
| Method | Description |
|---|---|
setFilterFixedString(pattern) |
Filter by exact string match |
setFilterRegularExpression(pattern) |
Filter by regular expression pattern string |
setFilterRegularExpression(regularExpression) |
Filter by a QRegularExpression object |
setFilterWildcard(pattern) |
Filter by wildcard pattern string |
You can fine-tune the search with these methods:
| Method | Description |
|---|---|
setDynamicSortFilter(bool) |
Re-sort and re-filter automatically when source data changes |
setFilterCaseSensitivity(sensitivity) |
Control case sensitivity of string-based filters |
setFilterKeyColumn(column) |
Column to apply the filter to; -1 filters across all columns |
setFilterRole(role) |
Data role used when evaluating each item against the filter |
invalidateFilter() |
Force the proxy to re-evaluate the filter without changing filter parameters |
|
You are building a financial research tool where users need to locate economic indicators by searching through their descriptions. |
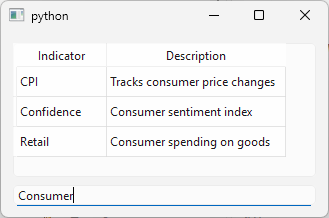
The source model in this section is the same as in the previous section, except that the data has only two columns, ‘Indicator’ and ‘Description’.
To use a proxy model for filtering:
1 import sys
2
3 from PySide6.QtCore import Qt, QSortFilterProxyModel
4 from PySide6.QtWidgets import (QApplication, QWidget,
5 QLineEdit, QTableView, QVBoxLayout)
6 from PySide6.QtTest import QAbstractItemModelTester
7 from csvmodel import CsvModel
8
9
10 class Window(QWidget):
11
12 def __init__(self):
13
14 super().__init__()
15
16 layout = QVBoxLayout()
17 self.setLayout(layout)
18
19 model = CsvModel()
20 QAbstractItemModelTester(model,
21 QAbstractItemModelTester.FailureReportingMode.Warning)
22
23 # 1. Create the proxy model and set its source.
24
25 self.proxy_model = QSortFilterProxyModel()
26 self.proxy_model.setSourceModel(model)
27
28 # 2. Set the proxy model options.
29
30 self.proxy_model.setFilterKeyColumn(1)
31 self.proxy_model.setFilterCaseSensitivity(
32 Qt.CaseSensitivity.CaseInsensitive)
33
34 # 3. Create the view and assign the proxy model to it.
35
36 view = QTableView()
37 view.setModel(self.proxy_model)
38 view.resizeColumnsToContents()
39 layout.addWidget(view)
40
41 # 4. Filter the model based on the text the user enters.
42
43 filter_edit = QLineEdit()
44 filter_edit.textChanged.connect(self.on_text_changed)
45 layout.addWidget(filter_edit)
46
47 def on_text_changed(self, text):
48 self.proxy_model.setFilterRegularExpression(text)
49
50
51 if __name__ == '__main__':
52
53 app = QApplication(sys.argv)
54 main_window = Window()
55 main_window.show()
56 sys.exit(app.exec())
Create the proxy model and set its source model. In the main window, create a
CsvModelobject, create aQSortFilterProxyModeland set theCsvModelas it source viasetSourceModel().Set the proxy model options. Filtering will be applied to column 1 (‘Description’) via
setFilterKeyColumn(), and will be case-insensitive viasetFilterCaseSensitivity().Create a
QTableViewand assign the proxy model to it withsetModel().Filter the source model based on the user input. Add a
QLineEditto the main window and connect itstextChangedsignal to a slot that callssetFilterRegularExpression()with the current text.
Because dynamicSortFilter is enabled by default, the filter is live - if you edit a row’s description so that it no longer matches the current filter text, the row disappears from the view immediately.
26.6 Custom Filtering in Proxy Models
In the previous section we saw that QSortFilterProxyModel provides built-in methods for filtering by string, wildcard, and regular expression. For more complex filters you can subclass it and reimplement filterAcceptsRow(). The method signature is:
1 def filterAcceptsRow(source_row: int, source_parent: QModelIndex) -> bool:
where source_row is the row number in the source model and source_parent is the parent index, which is always an invalud QModelIndex for flat table models and is only relevant for tree models.
|
You are building an economic monitoring tool that highlights aggregate indicators outside a normal operating range, flagging both unusually low and unusually high values among aggregated data for analyst review. |
The source model is the same as in the section 26.4, except the data has been updated:
1 self.header = ['Indicator', 'Value (%)',
2 'Aggregate', 'Include in report']
3 self.csv_data = [
4 ['GDP', 2.4, 1, True],
5 ['CPI', 8.7, 1, True],
6 ['Jobs', 0.3, 0, True],
7 ['Confidence',74.0, 0, True],
8 ['Industry', 91.5, 1, True],
9 ['Retail', 3.1, 1, True],
10 ['Inflation', 0.1, 1, True],
11 ['PMI', 62.3, 0, True],
12 ['Trade', 88.0, 1, True],
13 ]
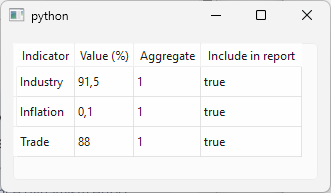
The goal show only rows where the ‘Aggregate’ 1, and ‘Value (%)’ falls outside the range (1.0, 50.0).
To apply a custom filter in a proxy model:

Subclass
QSortFilterProxyModel. In addition toparent, its__init()takeslowandhighparameters, defining the acceptable range.Reimplement
filterAcceptsRow(). For each row, retrieve ‘Value (%)’ from column 1 and ‘Aggregate’ from column 2 using the source model’sindex()anddata(). ReturnTrueonly ifaggregateequals1andvaluefalls outside(self.low, self.high), otherwise returnFalse.

- Create the custom proxy model object and assign it to the view. In the main window, create the source model, then an
OutlierProxyModelwith a range(1.0, 50.0). Create aQTableViewand assign the proxy model to it.
The table view shows only aggregate indicators with values outside the (1.0, 50.0) range: Industry, Inflation, and Trade.
Note that the filter range is fixed at construction time. To make it adjustable at runtime, you would expose a method that updates self.low and self.high and calls invalidateFilter() to trigger re-evaluation of all rows.
26.7 Selection Modes and Behaviors
Every view in the model/view architecture owns a QItemSelectionModel that holds the selection state and handles all selection operations. You rarely interact with it directly - instead, you configure how user actions translate into selection commands by setting the view’s selection mode and selection behavior. The selection mode controls how many items can be selected at once, while the selection behavior controls whether clicks select individual cells, entire rows, or entire columns.
|
You are building an economic indicators dashboard and need to understand how selection modes and behaviors affect user interaction. Configure a table view to switch between different selection modes and behaviors at runtime to explore their differences. |
To change a view’s selection mode or behavior:
1 import sys
2 from PySide6.QtWidgets import (QApplication, QWidget,
3 QTableView, QVBoxLayout, QComboBox, QLabel)
4 from csvmodel import CsvModel
5
6
7 class Window(QWidget):
8
9 def __init__(self):
10
11 super().__init__()
12
13 layout = QVBoxLayout()
14 self.setLayout(layout)
15
16 model = CsvModel()
17
18 # 1. Create the view and set the initial
19 # selection behavior and mode.
20
21 self.view = QTableView()
22 self.view.setModel(model)
23 self.view.setSelectionBehavior(
24 QTableView.SelectionBehavior.SelectItems)
25 self.view.setSelectionMode(
26 QTableView.SelectionMode.SingleSelection)
27 self.view.resizeColumnsToContents()
28 layout.addWidget(self.view)
29
30 # 2. Add a combobox to switch between selection modes.
31
32 self.mode_combo = QComboBox()
33 self.mode_combo.addItem('Single',
34 QTableView.SelectionMode.SingleSelection)
35 self.mode_combo.addItem('Contiguous',
36 QTableView.SelectionMode.ContiguousSelection)
37 self.mode_combo.addItem('Extended',
38 QTableView.SelectionMode.ExtendedSelection)
39 self.mode_combo.addItem('Multi',
40 QTableView.SelectionMode.MultiSelection)
41 self.mode_combo.addItem('No Selection',
42 QTableView.SelectionMode.NoSelection)
43
44 self.mode_combo.setCurrentIndex(0)
45 self.mode_combo.currentIndexChanged.connect(self.on_mode_changed)
46 layout.addWidget(QLabel('Choose Selection Mode'))
47 layout.addWidget(self.mode_combo)
48
49 # 3. Add the combobox to change selection behavior.
50
51 self.behavior_combo = QComboBox()
52 self.behavior_combo.addItem('Select Items',
53 QTableView.SelectionBehavior.SelectItems)
54 self.behavior_combo.addItem('Select Rows',
55 QTableView.SelectionBehavior.SelectRows)
56 self.behavior_combo.addItem('Select Columns',
57 QTableView.SelectionBehavior.SelectColumns)
58
59 self.behavior_combo.setCurrentIndex(0)
60 self.behavior_combo.currentIndexChanged.connect(
61 self.on_behavior_changed)
62 layout.addWidget(QLabel('Choose Selection Behavior'))
63 layout.addWidget(self.behavior_combo)
64
65 def on_mode_changed(self, index):
66 mode = self.mode_combo.itemData(index)
67 self.view.setSelectionMode(mode)
68
69 def on_behavior_changed(self, index):
70 behavior = self.behavior_combo.itemData(index)
71 self.view.setSelectionBehavior(behavior)
72
73
74 if __name__ == '__main__':
75
76 app = QApplication(sys.argv)
77 main_window = Window()
78 main_window.show()
79 sys.exit(app.exec())
-
Create the model and the view, and set the initial selection behavior and mode. In this section we use a read-only
CsvModeland a table view. Assign the model to the view and set the initial selection behavior toSelectItems, and the initial selection mode toSingleSelection. Available selecion behavior constants are:Constant Description SelectItemsClicks select individual cells SelectRowsClicks select entire rows SelectColumnsClicks select entire columns Available selection mode constants are:
Constant Description NoSelectionNothing can be selected SingleSelectionOnly one item selected at a time; selecting another deselects the previous ContiguousSelectionOnly a single unbroken block of items can be selected MultiSelectionAny combination of items can be selected; clicking toggles each one independently ExtendedSelectionLike MultiSelectionbut requires Ctrl to toggle individual items and Shift to select a rangeBoth enumerations are
QAbstractItemViewmembers and, by inheritance, alsoQTableViewmembers. Add a combobox to switch between selection modes. Populate it with all five mode constants as item data. When the user picks a mode, retrieve it with
itemData()and apply it withview.setSelectionMode().Add a combobox to switch between selection behaviors. Populate it with all three behavior constants as item data. When the user picks a behavior, retrieve it with
itemData()and apply it withview.setSelectionBehavior()
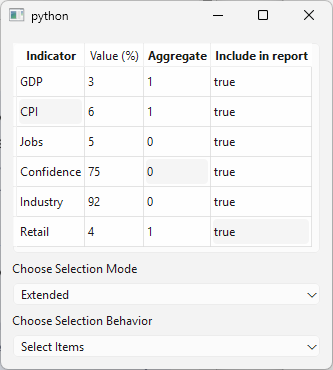
This lets the user run the application and try different combinations of modes and behaviors to see how they interact.
26.8 Responding to Selection Changes
Qt Widgets views use QItemSelectionModel to keep track of their selected items. The selected items are stored as a list of ranges retrievable via its selection() method, which returns a QItemSelection object:
[TODO insert QItemSelectionModel-QItemSelection diagram]
You can respont to selection changes using QItemSelectionModel’s signals:
| Signal | Description |
|---|---|
currentChanged(current, previous) |
Emitted when the current item changes |
currentRowChanged(current, previous) |
Emitted when the current item changes to an item in a different row |
currentColumnChanged(current, previous) |
Emitted when the current item changes to an item in a different column |
selectionChanged(selected, deselected) |
Emitted when the selection changes, with the newly selected and deselected items as deltas |
modelChanged(model) |
Emitted when the underlying model is replaced |
|
You are adding a detail panel to your indicators dashboard that shows additional information about whichever indicator the user clicks. Connect to the view’s selection model to read the currently selected row and update the panel accordingly. |
To respond to selection changes:
1 import sys
2 from PySide6.QtCore import QItemSelection, Slot
3 from PySide6.QtWidgets import (QApplication, QWidget,
4 QTableView, QVBoxLayout, QFormLayout, QGroupBox,
5 QLabel, QAbstractItemView)
6 from csvmodel import CsvModel
7
8
9 class Window(QWidget):
10
11 def __init__(self):
12
13 super().__init__()
14
15 layout = QVBoxLayout()
16 self.setLayout(layout)
17
18 # 1. Create the model and the view.
19
20 self.model = CsvModel()
21 self.view = QTableView()
22 self.view.setModel(self.model)
23 self.view.setSelectionBehavior(
24 QAbstractItemView.SelectionBehavior.SelectRows)
25 self.view.setSelectionMode(
26 QAbstractItemView.SelectionMode.SingleSelection)
27 self.view.resizeColumnsToContents()
28 layout.addWidget(self.view)
29
30 # 2. Create the detail panel.
31
32 group = QGroupBox('Selected Indicator')
33 form = QFormLayout()
34 group.setLayout(form)
35
36 self.name_label = QLabel('-')
37 self.value_label = QLabel('-')
38 self.aggregate_label = QLabel('-')
39
40 form.addRow('Indicator:', self.name_label)
41 form.addRow('Value (%):', self.value_label)
42 form.addRow('Aggregate:', self.aggregate_label)
43 layout.addWidget(group)
44
45 # 3. Connect the selection model selectionChange
46 # to the slot.
47
48 self.view.selectionModel().selectionChanged.connect(
49 self.on_selection_changed)
50
51 @Slot(QItemSelection, QItemSelection)
52 def on_selection_changed(self, selected, deselected):
53
54 indexes = selected.indexes()
55
56 if not indexes:
57 self.name_label.setText('-')
58 self.value_label.setText('-')
59 self.aggregate_label.setText('-')
60 return
61
62 row = indexes[0].row()
63
64 self.name_label.setText(
65 str(self.model.index(row, 0).data()))
66 self.value_label.setText(
67 str(self.model.index(row, 1).data()))
68
69 aggregate = self.model.index(row, 2).data()
70 self.aggregate_label.setText('Yes' if aggregate == 1 else 'No')
71
72
73 if __name__ == '__main__':
74
75 app = QApplication(sys.argv)
76 main_window = Window()
77 main_window.show()
78 sys.exit(app.exec())
Create the model and the view and assign the model to the view. We use the same read-only
CsvModelas in the previous section and a table view withSingleSelectionmode andSelectRowsbehavior.Create the detail panel. Create a
QGroupBoxwith aQFormLayoutcontaining threeQLabels, one each for indicator name, value, and aggregate flag, and add the group box to the main window.Connect the selection model’s
selectionChange()signal toon_selection_change(). The signal passes twoQItemSelectionarguments to the slot,selected, containingthe items that just became selected, anddeselected, containing the items that just became deselected (Both are deltas). In the slot, we callselected.indexes()to get the newly selected indexes and read the row data from the model to update the detail panel labels. Whenindexesis empty, reset the labels to-.
Note that using selected.indexes() works correctly here because the view is in SingleSelection mode, so selected always contains exacty the one row that was just picked. In multi-selection modes you would use view.selectionModel().selectedRows() instead, which returns the complete current selection.
When you click any row, the detail panel updates immediately with that indicator’s data. To enable clearing the view selection, call clearSelection() on the selection model programatically, for example from a button or a keyboard shortcut handler.

26.9 Sharing Selection Models Between Views
Sometimes you want multiple views to share the same selection state. For example, a compact navigation widget and a full detail view showing different aspects of the same data. In Qt, you can achieve this by attaching a view’s QItemSelectionModel to another view.
|
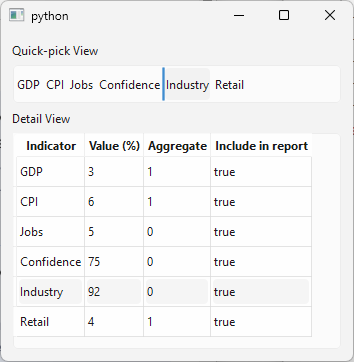
You are building an indicator dashboard with a detail table and a quick-pick list showing indicator names. Share a single selection model between them so that selecting a row in the table highlights the corresponding item in the list and vice versa. |
Every view creates its own QItemSelectionModel by default. To synchronize selection between two views, you simply replace one view’s selection model with the other’s using setSelectionModel().
To share a selection model between two views:
1 import sys
2 from PySide6.QtWidgets import (QApplication, QWidget, QTableView,
3 QListView, QVBoxLayout, QLabel, QAbstractItemView)
4 from csvmodel import CsvModel
5
6
7 class Window(QWidget):
8
9 def __init__(self):
10
11 super().__init__()
12
13 layout = QVBoxLayout()
14 self.setLayout(layout)
15
16 model = CsvModel()
17
18 # 1. Create the quick-pick view.
19
20 quick_pick_view = QListView()
21 quick_pick_view.setFlow(QListView.Flow.LeftToRight)
22 quick_pick_view.setModel(model)
23 quick_pick_view.setModelColumn(0)
24 quick_pick_view.setFixedHeight(40)
25 quick_pick_view.setSelectionBehavior(
26 QAbstractItemView.SelectionBehavior.SelectRows)
27
28 # 2. Create the detail view and share
29 # the first view's selection model.
30
31 detail_view = QTableView()
32 detail_view.setModel(model)
33 detail_view.setSelectionBehavior(
34 QAbstractItemView.SelectionBehavior.SelectRows)
35 detail_view.setSelectionModel(quick_pick_view.selectionModel())
36 detail_view.resizeColumnsToContents()
37
38 layout.addWidget(QLabel('Quick-pick View'))
39 layout.addWidget(quick_pick_view)
40 layout.addWidget(QLabel('Detail View'))
41 layout.addWidget(detail_view)
42
43
44 if __name__ == '__main__':
45
46 app = QApplication(sys.argv)
47 main_window = Window()
48 main_window.show()
49 sys.exit(app.exec())
Create the quick-pick view. Create a
QListView, set the model on it, and configure it to display only the first column viasetModelColumn(). Set the flow toLeftToRight` to lay the items out horizontally.Create the detail view and share the first view selection model. Create a
QTableView, set the same model on it, then callsetSelectionModel()passing the first view’s selection model. From this point both views share a singleQItemSelectionModelinstance.
Note that both views also use the same source model.
When you run the application, clicking an indicator name in the quick-pick view highlights the corresponding row in the detail table, and clicking a row in the detail table highlights the corresponding item in the quick-pick view.
26.10 Custom Selection Handling
QItemSelectionModel can be subclassed to enforce custom selection rules. All selection operations pass through its select() method and you need to override it to implement those rules.
|
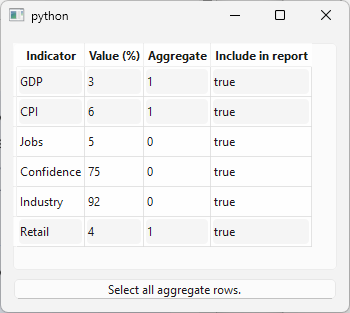
You are building an indicators review tool where only rows marked as aggregate may be selected for batch processing. Restrict selection so that clicking a non-aggregate row has no effect and allow the user to select all aggregate rows at once. |
To implement custom selection handling:
1 from PySide6.QtCore import (QItemSelectionModel,
2 QItemSelection, QModelIndex, Qt)
3
4
5 # 1. Create a QItemSelectionModel subclass
6 # and reimplement select().
7
8 class AggregateSelectionModel(QItemSelectionModel):
9
10 def is_aggregate(self, row):
11 index = self.model().index(row, 2)
12 data = self.model().data(index, Qt.ItemDataRole.DisplayRole)
13 return data == 1
14
15 def select(self, selection, command):
16
17 if isinstance(selection, QModelIndex):
18 if selection.isValid() and not self.is_aggregate(selection.row()):
19 return
20 super().select(selection, command)
21
22 else:
23 filtered = QItemSelection()
24 for item_range in selection:
25 top = item_range.top()
26 bottom = item_range.bottom()
27 for row in range(top, bottom + 1):
28 if self.is_aggregate(row):
29 index = self.model().index(row, 0)
30 filtered.select(index, index)
31 super().select(filtered, command)
- Create a
QItemSelectionModelsubclass and reimplementselect(). In C++,select()has two overloads, one that takes aQModelIndex, and one that takes aQItemSelection. In Python both overloads map to the same method, so we useisinstanceto check and handle each case separately. ForQModelIndex, we check whether the row is aggregate and return early if not. ForQItemSelection, we iterate over all ranges in the selection, collect the aggregate rows into a newQItemSelectionobject, and pass the filtered selection to the base class. THe helper methodis_aggregate()retrieves the value in column 2 for a given row and returnsTrueif it equals to1.
1 import sys
2 from PySide6.QtWidgets import (QApplication, QWidget,
3 QTableView, QVBoxLayout, QPushButton, QAbstractItemView)
4 from csvmodel import CsvModel
5 from selectionmodels import AggregateSelectionModel
6
7
8 class Window(QWidget):
9
10 def __init__(self):
11
12 super().__init__()
13
14 layout = QVBoxLayout()
15 self.setLayout(layout)
16
17 model = CsvModel()
18
19 self.view = QTableView()
20 self.view.setModel(model)
21 self.view.setSelectionBehavior(
22 QAbstractItemView.SelectionBehavior.SelectRows)
23 self.view.setSelectionMode(
24 QAbstractItemView.SelectionMode.ExtendedSelection)
25
26 # 2. Replace the view's default selection model.
27
28 self.view.setSelectionModel(
29 AggregateSelectionModel(model, self))
30
31 self.view.resizeColumnsToContents()
32 layout.addWidget(self.view)
33
34 # 3. Let the user select all aggregate rows.
35
36 self.select_button = QPushButton('Select all aggregate rows.')
37 self.select_button.clicked.connect(self.view.selectAll)
38 layout.addWidget(self.select_button)
39
40
41 if __name__ == '__main__':
42
43 app = QApplication(sys.argv)
44 main_window = Window()
45 main_window.show()
46 sys.exit(app.exec())
Replace the view’s default selection model with an
AggregateSelectionModelobject. The view is set toExtendedSelectionmodel so multiple aggregate rows can be selected at once.Let the user select all aggregate rows at once. Add a button and connect its
clicked()signal toview.selectAll(). The view’s selection model is anAggregateSelectionModelsoselectAll()selects only aggregate rows.
When you run the application, clicking on a non-aggregate row has no effect. Clicking aggregate rows selects them individually or in combination using Ctrl. Clicking the button selects all aggregate rows at once.