Linux Command Glossary
The following are commands used in the book and a short explanation of what they do.
apt-get
The apt part of apt-get stands for ‘Advanced Packaging Tool’. The program is a process for managing software packages installed on Linux machines, or more specifically Debian based Linux machines (Sine those based on ‘redhat’ typically use their rpm (red hat package management (or more lately the recursively named ‘rpm package management’) system). As Raspbian is based on Debian, so we are using apt-get.
APT simplifies the process of managing software on Unix-like computer systems by automating the retrieval, configuration and installation of software packages. This was historically a process best described as ‘dependency hell’ where the requirements for different packages could mean a manual installation of a simple software application could lead a user into a morass of despair.
Common apt-get usage that we will use when using the Raspberry Pi include (and bear in mind that in most of these cases we will be prefixing the command with sudo to give ourselves the appropriate permissions);
apt-get update
This will resynchronize our local list of packages files, updating information about new and recently changed packages. If an apt-get upgrade is planned, an apt-get update (see below) should always be performed first.
apt-get upgrade
The apt-get upgrade command will install the newest versions of all packages currently installed on the system. If a package is currently installed and a new version is available, it will be retrieved and upgraded. Any new versions of current packages that cannot be upgraded without changing the install status of another package will be left as they are.
As mentioned above, an apt-get update should always be performed first so that apt-get upgrade knows which new versions of packages are available.
apt-get install
The apt-get install command installs or upgrades one (or more) packages. All additional (dependency) packages required will also be retrieved and installed.
cat
The cat command is used for a range of functions. The name ‘cat’ is short for ‘catenate’, which is to say to connect things in a series. This is certainly one of it’s common uses, but a better overview would be to say that the cat command is used to;
- Display text files at the command line
- Copy text files into a new document
- Join one text file to the end of another text file, combining them
For example, to display a text file (foo.txt) on the screen we can use the following command;
As a result the contents of the file ‘foo.txt’ will be sent to the screen (be aware, if the file is sufficiently large, it will simple dump the contents in a long scrolling waterfall of text).
We could just as easily display two files one after the other (catenated) as follows;
Instead of having the file sent to the screen, we can specify that cat send our file to a new (renamed) file as follows;
This could be thought of an a equivalent to a file copy action and uses the redirection symbol >.
But taking the process one step further we can take our original two files and combine them into a single file with;
Finally we could use cat to append a file to an already existing file similar to the following;
Here we use the redirection operator >> to add the contents of the file another.txt to the already existing file existing.txt.
cd
The cd command is one of the commands used most often in Linux. It is used to move around in the directory structure of the file system.
For example, when we first log into the Raspberry Pi as the ‘pi’ user we will find ourselves in the /home/pi directory. If we wanted to change into the /home directory (go up a level) we could use the command;
Alternatively, since this change was only one level up, we could have used the following shorthand method of going up a level;
Now that we are in the /home directory, to change back into the pi directory we can either use the following command (which fully qualifies the directory location);
Or, since we are already in the home directory and the pi directory is also in the home directory, we can simply provide the destination without the full structure as follows;
Take some time to get familiar with the concept of moving around the directory structure from the command line as it is an important skill to establish early in Linux.
chmod
The chmod command allows us to set or modify a file’s permissions.
Every file on the computer has an associated set of permissions. Permissions tell the operating system what can be done with that file and by whom. There are three things you can (or can’t) do with a given file:
- read it,
- write (modify) it and
- execute it.
Linux permissions specify what can the owner do, what can the owner group do and what everybody else can do with the file. For any given owner, we need three bits to specify access permissions: the first to denote read (r) access, the second to denote (w) access and the third to denote execute (x) access.
We also have three levels of ownership: ‘owner’, ‘group’ and ‘all’ so we need a triplet for each, resulting in nine bits. Each bit can be set or clear. (not set) We mark a set bit by it’s corresponding operation letter (r, w or x) and a clear bit by a dash (-) and put them all on a row. An example might be rwxr-xr--. This means is that the owner can do anything with the file (rwx), the group owners can read and execute the file (r-x) and the rest of the world can only read it (r--) (Usually in Linux there is also another bit that leads this 9-bit pattern, but we will ignore this in the mean time.).
Permission              Symbolic 3-bit Octal
read, write and execute rwx      111   7
read and write          rw-      110   6
read and execute        r-w      101   5
read only               r--      100   4
write and execute       -wx      011   3
write only              -w-      010   2
execute only            --x      001   1
none                    ---      000   0
Another interesting thing to note is that permissions take a different slant for directories. Here’s what they mean:
- read determines if a user can view the directory’s contents, i.e. do ls in it.
- write determines if a user can create new files or delete file in the directory. (Note here that this essentially means that a user with write access toa directory can delete files in the directory even if he/she doesn’t have write permissions for the file! So be careful with this.)
- execute determines if the user can cd into the directory.
As an example, consider the following command (which would most likely be prefixed with sudo);
Here the permissions for the /var/www directory are set so that the owner can read from, write to and change into the directory. Group owners can also read from, write to and change into the directory. All others can read from and change into the directory, but they cannot create or delete a file within it.
Remembering that only the owner of a file may use chmod to alter a file’s permissions.
chown
The chown command changes the user and/or group ownership of given files. If only a user name is given, that user is made the owner of each given file, and the files’ group is not changed. If the owner is followed by a colon and a group name (with no space in between them) the group ownership of the files is changed as well. If a colon but no group name follows the user name, that user is made the owner of the files and the group of the files is changed to that user’s login group. If the colon and group are given, but the owner is omitted, only the group of the files is changed.
As an example, consider the following command (which would most likely be prefixed with sudo);
Here the user www-data is made the owner of the directory www (in the /var directory). Additionally, the group ownership of that directory is given to the group www-data.
crontab
The crontab command give the user the ability to schedule tasks to be run at a specific time or with a specific interval. crontab is a concatenation of “cron table” because it uses the job scheduler cron to execute tasks. cron is named after “Khronos,” the Greek personification of time. The schedule is called the crontab, which is also the name of the program used to edit that schedule.
As an example, consider that we wish to run a Python script every day at 6am. The following command will let us edit the crontab;
Once run it will open the crontab in the nano editor. The file will look as follows;
# Edit this file to introduce tasks to be run by cron.
#
# Each task to run has to be defined through a single line
# indicating with different fields when the task will be run
# and what command to run for the task
#
# To define the time you can provide concrete values for
# minute (m), hour (h), day of month (dom), month (mon),
# and day of week (dow) or use '*' in these fields (for 'any').#
# Notice that tasks will be started based on the cron's system
# daemon's notion of time and timezones.
#
# Output of the crontab jobs (including errors) is sent through
# email to the user the crontab file belongs to (unless redirected).
#
# For example, you can run a backup of all your user accounts
# at 5 a.m every week with:
# 0 5 * * 1 tar -zcf /var/backups/home.tgz /home/
#
# For more information see the manual pages of crontab(5) and cron(8)
#
# m h  dom mon dow   command
The default file obviously includes some explanation of how to format an entry in the crontab. In our case we wish to add in an entry that told the script to start at 6 hours and 0 minutes each day. The crontab accepts six pieces of information that will allow that action to be performed. each of those pieces is separated by a space.
- A number (or range of numbers), m, that represents the minute of the hour;
- A number (or range of numbers), h, that represents the hour of the day;
- A number (or range of numbers), dom, that represents the day of the month;
- A number (or list, or range), or name (or list of names), mon, that represents the month of the year;
- A number (or list, or range), or name (or list of names), dow, that represents the day of the week; and
- command, which is the command to be run, exactly as it would appear on the command line.
Assuming that we want to run a Python script called ‘m_temp.py` which was in the ‘pi’ home directory the line that we would want to add would be as follows;
0 6 * * * /usr/bin/python /home/pi/m_temp.py
So at minute 0, hour 6, every day of the month, every month, every day of the week we run the command /usr/bin/python /home/pi/m_temp.py (which if we were at the command line in the pi home directory we would run as python m_temp.py, but since we can’t guarantee where we will be when running the script, we are supplying the full path to the python command and the m_temp.py script.
If we want to run the same command every 2 hours we can use the */2 notation, so that our line in the crontab would look like the following;
* */2 * * * /usr/bin/python /home/pi/m_temp.py
ifconfig
The ifconfig command can be used to view the configuration of, or to configure a network interface.
Used with no arguments it will display information about all the operational interfaces. For example running;
Will produce something similar to the following on a simple Raspberry Pi.
eth0      Link encap:Ethernet  HWaddr 76:12:45:56:47:53
          UP BROADCAST MULTICAST  MTU:1500  Metric:1
          RX packets:0 errors:0 dropped:0 overruns:0 frame:0
          TX packets:0 errors:0 dropped:0 overruns:0 carrier:0
          collisions:0 txqueuelen:1000
          RX bytes:0 (0.0 B)  TX bytes:0 (0.0 B)

lo        Link encap:Local Loopback
          inet addr:127.0.0.1  Mask:255.0.0.0
          UP LOOPBACK RUNNING  MTU:65536  Metric:1
          RX packets:0 errors:0 dropped:0 overruns:0 frame:0
          TX packets:0 errors:0 dropped:0 overruns:0 carrier:0
          collisions:0 txqueuelen:0
          RX bytes:0 (0.0 B)  TX bytes:0 (0.0 B)

wlan0     Link encap:Ethernet  HWaddr 09:87:65:54:43:32
          inet addr:10.1.1.8  Bcast:10.1.1.255  Mask:255.255.255.0
          UP BROADCAST RUNNING MULTICAST  MTU:1500  Metric:1
          RX packets:3978 errors:0 dropped:898 overruns:0 frame:0
          TX packets:347 errors:0 dropped:0 overruns:0 carrier:0
          collisions:0 txqueuelen:1000
          RX bytes:859773 (839.6 KiB)  TX bytes:39625 (38.6 KiB)
The output above is broken into three sections; eth0, lo and wlan0.
-
eth0is the first Ethernet interface and in our case represents the RJ45 network port on the Raspberry Pi (in this specific case on a B+ model). If we had more than one Ethernet interface, they would be namedeth1,eth2, etc. -
lois the loopback interface. This is a special network interface that the system uses to communicate with itself. You can notice that it has the IP address 127.0.0.1 assigned to it that we have described as designating the ‘localhost’. -
wlan0is the name of the first wireless network interface on the computer. This reflects our wireless USB adapter. Any additional wireless interfaces would be namedwlan1,wlan2, etc.
To view the configuration of all the network interfaces (not just the active ones), we can specify the -a option, as follows;
Or to view a specific interface we can name it directly;
If we wanted to disable a network interface we can use ifconfig to configure it as so;
If we were to run ifconfig after disabling the interface as above it would no longer be reported as ‘active’.
ls
The ls command lists the contents of the directory that we are currently in. This is another important Linux command to understand and use well and there are a large number of options that can be used.
To demonstrate, after logging into the Pi as the ‘pi’ user, if we change directory to the /var directory with the command…
If we then execute the ls command …
… we should see the following;

ls commandThis is the default listing of the contents of the /var directory.
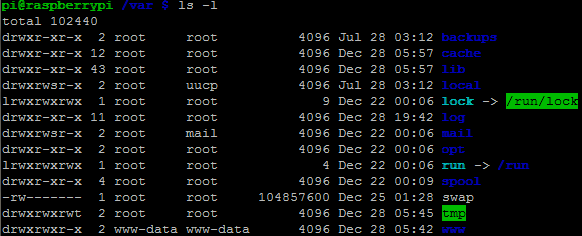
If we use the -l option we can show the total files in the directory and subdirectories, the names of the files in the current directory, their permissions, the number of subdirectories in directories listed, the size of the file, and the date of last modification.
ls -l commandOr, we could use a combination of options such as -ltr to list files sorted by the time they were last modified in reverse order (most recently modified files last).
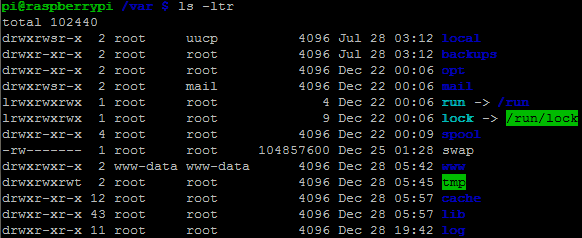
ls -l commandTake the opportunity to Google the ls command and to example and play with some of the options presented on the internet. There are a large number and they are worth becoming familiar with.
modprobe
The modprobe command allows us to add (or remove) modules to the Linux Kernel (The code that forms the core of the Linux operating system). The Linux kernel is designed with a monolithic structure, but with the ability to be able to change kernel modules while running. In the case of the command…
… the module w1-therm is added to support measurement of temperature via the 1-Wire bus (it is necessary to do this as the superuser via sudo).
sudo
The sudo command allows a user to execute a command as the ‘superuser’. This allows the user to run programs or give commands that should only be executed with a degree of caution as they could potentially affect the normal operation of the computer. However, a user can only use this command if they have the correct permissions to do so. In the case of the user ‘pi’, it has those permissions. ‘sudo’ is shorthand for ‘superuser do’.
Under normal situations the use of sudo would require a user to enter their password, but by default the Raspbian operating system has the ‘pi’ user configured in the `/etc/sudoers’ file to avoid entering the password every time.
usermod
The usermod command is used by a superuser (typically via sudo) to change a user’s system account settings. There are a wide range of options available for use. The following example is one used in the early stages of setting up the Raspberry Pi;
The -a option adds the user to an additional ‘supplementary’ group (-a must only be used in a situation where it is followed by the use of a -G option). The -G option lists the supplementary group to which a user will be added. In this case the group is www-data. Finally the user which is getting added to the supplementary group is pi.