Chapter 7: Including Servlets/JSP output in JSF page
There is no need to introduce the Servlet/JSP terms, so we will directly discuss the main topic of this chapter, which consists of including the output from a Servlet/JSP in a JSF page (PrimeFaces component). There are at least three important aspects here:
- Including the Servlet/JSP output “directly” in the page.
- Including the Servlet/JSP output in the page via a managed bean.
- Including the Servlet/JSP output in the page via a custom component (or other custom artifact).
Basically, these three approaches have the same effect in the JSF page (for the end user) but their implementations are quite different. In order to add the output “directly”, you can write the JSF page using JSP syntax, and include the Servlets via <jsp:include page="servlet_path" />. In order to keep the JSF page in Facelets style, you can try to find a workaround based on JavaScript, as an auto-submit form or use a managed bean to interact with the Servlet and serve its output in page.
Including a Servlet output in a PrimeFaces component
But if you are thinking of a custom component capable of including the Servlet/JSP output in a JSF page (PrimeFaces component) then you have to take into account the OmniFaces ResourceInclude component. This component can be used to “catch” the output from a Servlet/JSP resource and render it via the JSF default response writer. This component is available to the JSF page authors via the <o:resourceInclude/> tag. It has a single attribute, named path. Obviously, the value of this attribute represents the Servlet/JSP resource path and it is required. For example, let’s consider the following simple Servlet (DataServlet):
@WebServlet("/DataServlet")
public class DataServlet extends HttpServlet {

protected void processRequest(HttpServletRequest request,
                              HttpServletResponse response)
                              throws ServletException, IOException {

 // Set the response message's MIME type
 response.setContentType("text/html;charset=UTF-8");

 // Allocate a output writer to write the response message
 PrintWriter out = response.getWriter();

 // Write the response message
 out.write("<p><strong>Tags</strong>:<code>Transformers: 1, RIA: 3, AJAX: 2,
            jQuery: 5, NextGen: 4, JSF 2.0: 2, FCB: 5, Mobile: 3, Themes: 4,
            Rocks: 1</code></p>");
 }

 @Override
 protected void doGet(HttpServletRequest request, HttpServletResponse response)
                throws ServletException, IOException {
  processRequest(request, response);
 }

 @Override
 protected void doPost(HttpServletRequest request, HttpServletResponse response)
           throws ServletException, IOException {
  processRequest(request, response);
 }
}
Now, we can easily include this Servlet output in a PrimeFaces component (e.g. in an OutputPanel):
<p:outputPanel>
 <o:resourceInclude path="/DataServlet"/>
</p:outputPanel>
The output reveals the result from figure below:

The complete application is named, IncludeServletOutputInPage.
Decorating the Servlet output
Sometimes the Servlet output cannot be used directly. For example, let’s check out the below Servlet which produces a JSON like string:
@WebServlet("/DataServlet")
public class DataServlet extends HttpServlet {

protected void processRequest(HttpServletRequest request,
                              HttpServletResponse response)
                              throws ServletException, IOException {

 // Set the response message's MIME type
 response.setContentType("text/plain");
 response.setCharacterEncoding("utf-8");

 // Allocate a output writer to write the response message
 PrintWriter out = response.getWriter();

 // Write the response
 out.print("{\"Tags\":[\"Transformers\",\"1\",\"RIA\",\"3\",\"AJAX\",\"2\",
          \"jQuery\",\"5\",\"NextGen\",\"4\",\"JSF 2.0\",\"2\",\"FCB\",\"5\",
          \"Mobile\",\"3\",\"Themes\",\"4\",\"Rocks\",\"1\"]}");
 }

 @Override
 protected void doGet(HttpServletRequest request, HttpServletResponse response)
                throws ServletException, IOException {
  processRequest(request, response);
 }

 @Override
 protected void doPost(HttpServletRequest request, HttpServletResponse response)
                throws ServletException, IOException {
  processRequest(request, response);
 }
}
Now, if we include the output of this Servlet, exactly as we have done in the previous section, we will obtain something like the figure below:

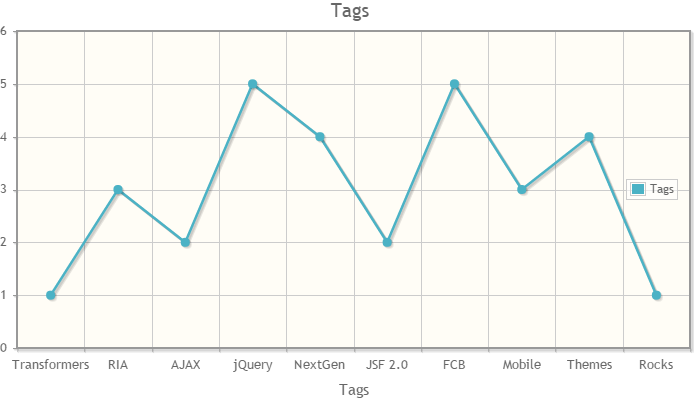
This is working as expected, but we may need to alter/decorate this JSON string to use it for creating different kinds of models (or any other stuff). For example, we may want to transform this JSON string into a PrimeFaces LineChartModel (for creating a line chart) or a TagCloudModel (for creating a collection of tags with different strengths).
A nice trick (inspired by Arjan Tijms) will consist of using another OmniFaces component named, OutputFormat. This component extends the standard <h:outputFormat/> with support for capturing the output and exposing it to the request scope through the variable name as specified by the var attribute. For example, we can capture the DataServlet output and expose it via <o:outputFormat/> as below:
<o:outputFormat var="_data">
 <o:resourceInclude path="/DataServlet"/>
</o:outputFormat>
This time the DataServlet output is not displayed on the screen. This output was stored in the request scope and it is available via _data anywhere in page. This means that we can pass this output to an action method which decorates it accordingly. For example, we can pass it to an action method capable of creating a PrimeFaces LineChartModel:
<p:chart type="line" model="#{dataBean.createCategoryModels(_data)}"
         style="height:400px; width:700px;"/>
Or, we can pass it to an action method capable of producing a PrimeFaces TagCloudModel:
<p:tagCloud model="#{dataBean.createTagModels(_data)}"/>

Of course, you can still display _data without decorations (e.g. in an OutputPanel):
<p:outputPanel>
 #{_data}
</p:outputPanel>
The complete application is named, DecorateDataFromIncludedServlet.