Chapter 5: Referencing, rendering and moving PrimeFaces components
In the first part of this chapter, we will discuss referencing components. Programmatically speaking, JSF comes with a powerful API that allows us to access and reference the component tree. In addition, OmniFaces provides a comprehensive API for dealing with the component tree (e.g. check the Components utilities). Besides the OmniFaces Showcase, you also may try the examples accessible via the following ZEEF page. On the other hand, as a JSF page author, you may need to reference components in page. For these tasks, we don’t have many approaches. Basically we can use the binding attribute and for current component, #{component}. Furthermore, we will introduce the OmniFaces approach for referencing components in the page.
In the second part of this chapter, we will discuss about rendering components. By default, JSF renders all components (transforms the component tree in HTML markup). We can control this process by switching the rendered flag attribute from true to false. All JSF components support this attribute and by default is set to true. When is false, the corresponding component (and its children) will not be rendered, which means that it will not appear in the client side DOM. In this part, you will see another approach for controlling the rendering process.
In the last part of this chapter, we will discuss about moving components, facets and behaviors at runtime to a target component in various ways. This allows for simple programmatic composition of components using a declarative page author centric approach.
Access a component by using a reference to it
As a JSF page author, you may need to access a component by using a reference to it. Essentially, this means you want to refer a component from another component as shown in the figure below:
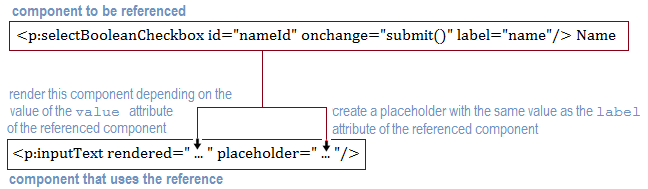
In code lines, we have also added the surnameId:
<h:form>
 <p:selectBooleanCheckbox id="nameId"
                          onchange="submit()" label="name"/> Name
 <p:selectBooleanCheckbox id="surnameId"
                          onchange="submit()" label="surname"/> Surname
</h:form>

<h:form>
 <p:inputText rendered="..." placeholder="..."/>
 <p:inputText rendered="..." placeholder="..."/>
</h:form>
As you can see in the above figure, the most important part which is the “reference” itself ("...") is missing. Well, there are several approaches to accomplish this task (e.g. using the binding attribute, write a lambda function based on findComponent() method, use #{component} for referencing current component, etc), but none of these methods is dedicated to this goal.
Starting with version 2.0, OmniFaces comes with a utility component named ResolveComponent. The ResolveComponent is exposed to JSF page authors as <o:resolveComponent/>, and is capable of creating a reference to a component indicated by ID. Moreover, the reference is stored by default in the “facelet scope” but it can be alternatively stored in the request scope (this option can be set via the optional attribute; scope). The name attribute is required and it represents the name under which the referenced component will be made available to EL. The for attribute is also required and it represents the ID of the referenced component. So, we can re-write the above code as shown below:
Storing reference in the “facelet scope”:
 <h:form>
  <p:selectBooleanCheckbox id="nameId"
                           onchange="submit()" label="name"/> Name
  <p:selectBooleanCheckbox id="surnameId"
                           onchange="submit()" label="surname"/> Surname
 </h:form>

 <o:resolveComponent name="nameRef" for="nameId" />
 <o:resolveComponent name="surnameRef" for="surnameId" />

 <h:form>
  <p:inputText rendered="#{nameRef.value}" placeholder="#{nameRef.label}"/>
  <p:inputText rendered="#{surnameRef.value}" placeholder="#{surnameRef.label}"/>
 </h:form>
Storing reference in the request scope (use the optional attribute named scope):
<h:form>
 <p:selectBooleanCheckbox id="nameId"
                          onchange="submit()" label="name"/> Name
 <p:selectBooleanCheckbox id="surnameId"
                          onchange="submit()" label="surname"/> Surname
</h:form>

<o:resolveComponent scope="request" name="nameRef" for="nameId" />
<o:resolveComponent scope="request" name="surnameRef" for="surnameId" />

<h:form>
 <p:inputText rendered="#{nameRef.value}" placeholder="#{nameRef.label}"/>
 <p:inputText rendered="#{surnameRef.value}" placeholder="#{surnameRef.label}"/>
</h:form>
Whenever you need to “link” two (or more) components by a reference, you can use the OmniFaces ResolveComponent. The complete application is named, ResolveComponent.
Controlling the rendering of components
Letʹs suppose that we want to pick just a few components (even just one component) to be rendered, while the rest of them should not be rendered. Since they are all rendered by default, we need to “populate” the page with several rendered="false" (or <c:if>). This becomes pretty annoying, if the page has many components. In such a case, it would be much simpler to say which one(s) should be rendered, instead of saying which ones shouldnʹt be rendered. But how about rendering only a row in a table? Or in some specific cases, render only the parent component and omit any children? Or load a component in another place on the page? What do we do in order to create simple mashups from various JSF based views, or scripts that need to obtain markup for specific components on an initial (non‐faces) request? Well, these kind of issues are solved by utilizing OmniFaces via the ComponentIdParam component.
Let’s have an example. First, we write a simple page as shown below:
<br/>
<p:graphicImage id="myPlayerId" library="default"
name="images/#{playerBean.favorite}.png"/>
<h:form id="myFormId">
<p:panelGrid id="panelId">
<h:panelGroup id="div1Id" layout="block">
Player Name:
<h:outputText id="myPlayerNameId"
value="#{playerBean.players[playerBean.favorite-1].player}" />
</h:panelGroup>
<h:panelGroup id="div2Id" layout="block">
Favorite Player Rank:
<p:inputText id="myPlayerRankId" value="#{playerBean.favorite}"/>
<p:commandButton id="myButtonId" value="See" ajax="false"/>
</h:panelGroup>
</p:panelGrid>
</h:form>
<hr/>
Top 5 players:
<h:form id="tableFormId">
<p:dataTable id="playersTableId" value="#{playerBean.players}"
var="t" style="width:650px;">
<p:column>
<f:facet name="header">Ranking</f:facet>
<h:outputText id="rankingId" value="#{t.ranking}"/>
</p:column>
<p:column>
<f:facet name="header">Name</f:facet>
<h:panelGroup id="playerDivId" layout="block"
style="height:20px; width:200px;background-color:lightgray;">
<h:outputText id="playerId" value="#{t.player}"/>
</h:panelGroup>
</p:column>
<p:column>
<f:facet name="header">Age</f:facet>
<h:outputText id="ageId" value="#{t.age}"/>
</p:column>
<p:column>
<f:facet name="header">Birthplace</f:facet>
<h:outputText id="birthplaceId" value="#{t.birthplace}"/>
</p:column>
</p:dataTable>
</h:form>
This code produces the HTML markup from the figure below (we have decorated the image with components IDs and client IDs):
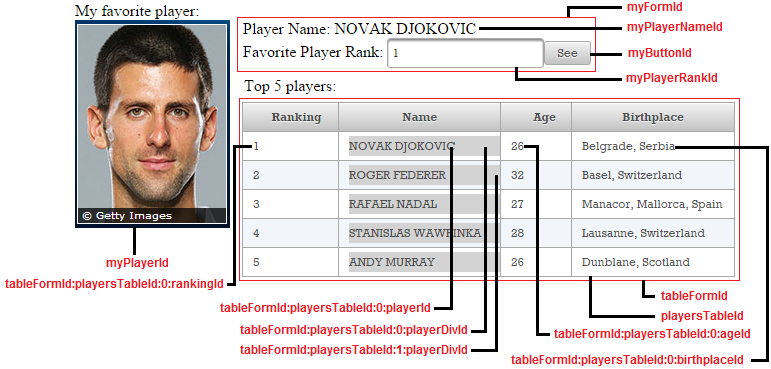
Now, imagine that you want to render a subset of these components by indicating the corresponding IDs or client IDs. For components like the table or the form, we can use the rendered="false", but what about rendering only a row in the table? As we have said earlier, OmniFaces comes with a dedicated component for such tasks. The ComponentIdParam is accessible to page authors via the <o:componentIdParam/> tag. There are several attributes for shaping the behavior of this component. First, we have two ValueExpressions (evaluated to Strings), componentIdName and clientIdName:
- The
componentIdNamevalue indicates the name of the request parameters (<f:param/>), while the values of these parameters represent the component IDs of the components that should be rendered. On initial request, the components whose component IDs are not present in the values of these request parameters will not be rendered. - The
clientIdNameis the same ascomponentIdName, only that we are talking about client IDs instead of component IDs. As you will see in the next examples, this approach allows us to have more control over the rendered components (e.g. render only a row of a table). - A third attribute, named
renderChildren, can accompany the above two. This is a flag attribute (defaulttrue) that indicates whether children of the components identified byclientIdNameorcomponentIdNameare rendered in addition to the component itself.
Well, let’s define two <o:componentIdParam/>:
<f:metadata>
 <o:componentIdParam componentIdName="component" clientIdName="client" />
 <o:componentIdParam componentIdName="component_wc"
                     clientIdName="client_wc" renderChildren="false" />
</f:metadata>
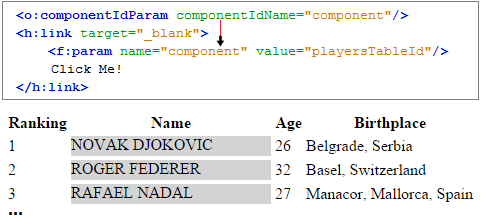
Further, letʹs see some examples of using the <o:componentIdParam/> with renderChildren and component IDs:
Rendering table with children example:
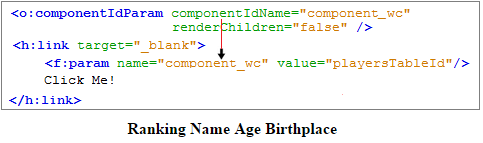
Rendering table without children example:
Render only the image (myPlayerId):
<p:link target="_blank">
 <f:param name="component" value="myPlayerId"/>
 Click Me!
</p:link>
Render only the first form (myFormId):
<p:link target="_blank">
 <f:param name="component" value="myFormId"/>
 Click Me!
</p:link>
Render only the player name and the second form (myPlayerNameId, tableFormId):
<p:link target="_blank">
 <f:param name="component" value="myPlayerNameId"/>
 <f:param name="component" value="tableFormId"/>
 Click Me!
</p:link>
Render only the player rank input and button (myPlayerRankId, myButtonId):
<p:link target="_blank">
 <f:param name="component" value="myPlayerRankId"/>
 <f:param name="component" value="myButtonId"/>
 <f:param name="client" value="tableFormId:playersTableId:0:playerDivId"/>
 Click Me!
</p:link>
Render only the players table (playersTableId) ‐ sketched in the figure above:
<p:link target="_blank">
 <f:param name="component" value="playersTableId"/>
 Click Me!
</p:link>
Render only the players table without children (playersTableId) ‐ sketched in the figure above:
<p:link target="_blank">
 <f:param name="component_wc" value="playersTableId"/>
 Click Me!
</p:link>
Further, letʹs see three examples using the clientIdName (first two examples are sketched in the figure below):
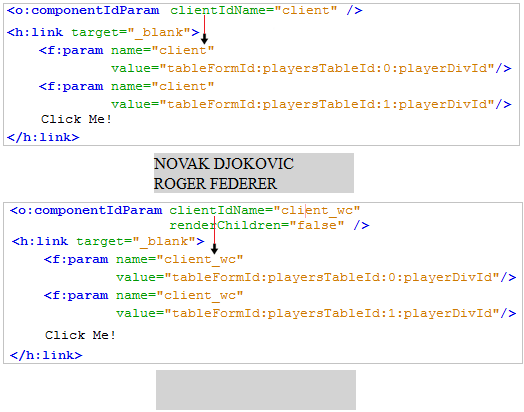
Render the divs that contains the players names only for the first two players in the table. The client IDs of the players divs are:
tableFormId:playersTableId:0:playerDivId and tableFormId:playersTableId:1:playerDivId:
<p:link target="_blank">
 <f:param name="client" value="tableFormId:playersTableId:0:playerDivId"/>
 <f:param name="client" value="tableFormId:playersTableId:1:playerDivId"/>
 Click Me!
</p:link>
Render without children the divs that contain the players names for the first two players in the table. The client IDs of the players divs are: tableFormId:playersTableId:0:playerDivId and tableFormId:playersTableId:1:playerDivId:
<p:link target="_blank">
 <f:param name="client_wc" value="tableFormId:playersTableId:0:playerDivId"/>
 <f:param name="client_wc" value="tableFormId:playersTableId:1:playerDivId"/>
 Click Me!
</p:link>
Render the first player (tableFormId:playersTableId:0:rankingId, ...:playerId, ...:ageId, ...:birthplaceId):
<p:link target="_blank">
 <f:param name="client_wc" value="tableFormId:playersTableId:0:rankingId"/>
 <f:param name="client_wc" value="tableFormId:playersTableId:0:playerId"/>
 <f:param name="client_wc" value="tableFormId:playersTableId:0:ageId"/>
 <f:param name="client_wc" value="tableFormId:playersTableId:0:birthplaceId"/>
 Click Me!
</p:link>
The complete application is named, PFAndComponentIdParamFormAndTable.
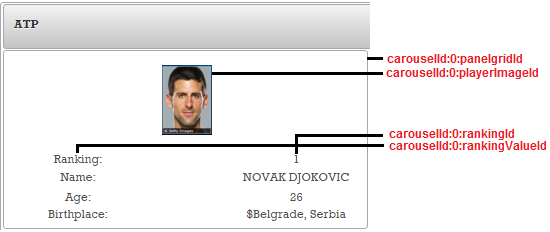
Here is another example. First, we render a PrimeFaces Carousel:
<p:carousel id="carouselId" value="#{playerBean.players}"
            headerText="ATP" var="t"
            itemStyle="text-align:center" responsive="true">
 <p:panelGrid id="panelgridId" columns="2" style="width:100%;margin:10px 0px"
              columnClasses="label,value" layout="grid"
              styleClass="ui-panelgrid-blank">
  <f:facet name="header">
   <p:graphicImage id="playerImageId" library="default"
                   name="images/#{t.ranking}.png"
                   width="50" height="70"/>
  </f:facet>

  <h:outputText id="rankingId" value="Ranking:" />
  <h:outputText id="rankingValueId" value="#{t.ranking}" />

  <h:outputText id="nameId" value="Name:" />
  <h:outputText id="nameValueId" value="#{t.player}" />

  <h:outputText id="ageId" value="Age:" />
  <h:outputText id="ageValueId" value="#{t.age}"/>

  <h:outputText id="birthplaceId" value="Birthplace:" />
  <h:outputText id="birthplaceValueId" value="$#{t.birthplace}" />
 </p:panelGrid>
</p:carousel>
Furthermore, we define two <o:componentIdParam/>:
<f:metadata>
 <o:componentIdParam componentIdName="component" clientIdName="client" />
 <o:componentIdParam componentIdName="component_wc"
                     clientIdName="client_wc" renderChildren="false" />
</f:metadata>
Now, let’s have some use cases.
Render only the first player’s image (carouselId:0:playerImageId):
<p:link>
 <f:param name="client" value="carouselId:0:playerImageId"/>
 Click Me!
</p:link>
Render only the first player’s rank and name (carouselId:0:rankingId, carouselId:0:rankingValueId):
<p:link target="_blank">
 <f:param name="client" value="carouselId:0:rankingId"/>
 <f:param name="client" value="carouselId:0:rankingValueId"/>
 Click Me!
</p:link>
Render the first and the last players (carouselId:0:panelgridId, carouselId:4:panelgridId):
<p:link target="_blank">
 <f:param name="client" value="carouselId:0:panelgridId"/>
 <f:param name="client" value="carouselId:4:panelgridId"/>
 Click Me!
</p:link>
The complete application is named, PFAndComponentIdParamMore.
Moving components, facets and behaviors at runtime to a target component
By default, JSF/PrimeFaces doesnʹt provide any built‐in artifact dedicated to moving components in the component tree from one place to another. Programmatically speaking, we can combine several methods to achieve such tasks at runtime (e.g. in the proper places, we can use findComponent() with getChildren() and java.util.List methods for manipulating the list items). But, this is not always “comfortable” from a page author’s
perspective, and there is no component or attribute that can be used declaratively to influence the runtime in such manner. Nevertheless, moving
components through component tree is not a day by day task; but as you will see, OmniFaces facilitates this by allowing a JSF page author to shape the component tree in a declarative manner. Of course, there are some limitations; but we can actually instruct JSF to move a component before, after, as first/last child of another component.
The OmniFaces component, MoveComponent is accessible to page authors via the <o:moveComponent/> tag. We can use this component to move components, facets and behaviors at runtime to a target component in various ways.
The <o:moveComponent/> has two important attributes. First, we have the required for attribute, which allows us to indicate the ID of the target component for which the component moving will be done. Second, we have the optional destination attribute, which indicates the destination relative to the target component where the source component(s) are moved to. The values of this attribute can be:
-
BEFORE‐ Component will be moved right before target component (as a sibling with an index thatʹs 1 position lower). -
ADD_FIRST‐ Component is added as the first child of the target component, any other children will have their index increased by 1. -
ADD_LAST‐ Component is added as the last child of the target component, any other children will stay in their original location. -
FACET‐ Component will be moved to the facet section of the target component under the name denoted by “facet”. -
BEHAVIOR‐ A Behavior will be moved to the behavior section of the target component. -
AFTER‐ Component is moved right after the target component, i.e. as a sibling with an index thatʹs 1 position higher.
Beside the for and destination, <o:moveComponent/> supports three more attributes as follows:
- When the
destinationis set toFACET, the name of the facet in the target component to which the components should be moved, must be indicated via thefacetattribute. - When the
destinationis set toBEHAVIOR, the comma separated list of events that the target component is “supposed” to support can be indicated via thebehaviorEventsattribute. - When the
destinationis set toBEHAVIOR, the name of the default event that the target component is “supposed” to have can be indicated via thebehaviorDefaultEventattribute.
In order to have an example, let’s focus on PrimeFaces DataTable component. The PrimeFaces data table component is very hard to modify when it comes to the built-in filter/search capabilities. Required components with fixed IDs (globalFilter) and the fact that filtering is applied in the render stage are among the things that make this surprisingly difficult in practice. With the help of the <o:moveComponent/> the required modification actions can be packed up in a Facelets tag file for reuse.
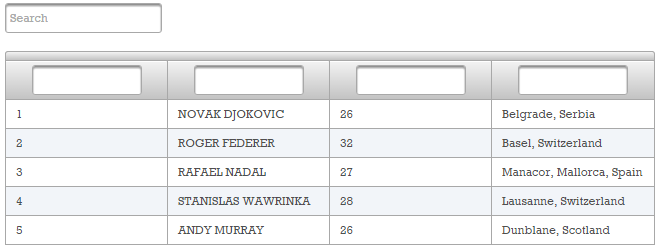
First, let’s have a simple data table with searching and filtering capabilities:
<h:form id="myForm">
 <p:dataTable id="myTable" value="#{playerBean.players}" var="player"
              filteredValue="#{playerBean.filteredPlayers}"
              widgetVar="myTableVar" style="width: 650px;">
  <p:column filterBy="#{player.ranking}" filterMatchMode="contains">
   #{player.ranking}
  </p:column>

  <p:column filterBy="#{player.player}" filterMatchMode="contains">
   #{player.player}
  </p:column>

  <p:column filterBy="#{player.age}" filterMatchMode="contains">
   #{player.age}
  </p:column>

  <p:column filterBy="#{player.birthplace}" filterMatchMode="contains">
   #{player.birthplace}
  </p:column>
 </p:dataTable>
</h:form>
Further we have the custom tag (<demo:globalSearch/>) that represents a global search:
<demo:globalSearch forx="myTable"/>
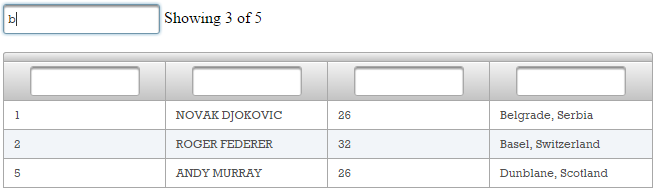
The following image shows an example:
No search:
Search, b:
The global search (globalSearch.xhtml) is obtained from three instances of <o:moveComponent/>, like below:
1.First, the data table is made available in the globalSearch.xhtml page via the <o:resolveComponent/>. Now, the data table is available via tableComponent variable:
<o:resolveComponent name="tableComponent" for="#{forx}" />
2.Furthermore, the search input is created via <p:inputText/>:
<p:inputText id="search"
onkeyup="$(document.getElementById('#{tableComponent.clientId}:
globalFilter')).val(this.value);
PF('#{tableComponent.widgetVar}').filter();"
placeholder="Search" />
<h:outputText value="&nbsp;" escape="false"/>
<h:panelGroup id="resultCountPlaceholder" binding="#{resultCountPlaceholder}" />
3.Moving a script to reside after the table
The first MoveComponent instance has a JavaScript surrounded by a named panel group as its children. These components are moved in the tree to sit right after the table component. This script takes the number of elements that appear in the so-called filtered collection and updates another panel group with that number. The script needs to be placed AFTER the table component, because the number we need is only available when the table is actually rendered, so it’s only available to components (and EL expressions within those) that are rendered after the table is rendered. This somewhat defeats the purpose of phases in JSF (an important reason for which is to prevent just this location’s dependency), but with the <o:moveComponent/> we can hide this somewhat nasty detail for the tag user:
<o:moveComponent for="#{forx}" destination="AFTER">
<h:panelGroup id="resultCount" binding="#{resultCount}" >
<!-- Mojarra has issues with dynamically changing UIInstructions -->
<h:outputText value="<script type='text/javascript'>" escape="false" />
<h:panelGroup rendered="#{not empty tableComponent.filteredValue}">
<h:outputText value="document.getElementById('#{resultCountPlaceholder.
clientId}').innerHTML = 'Showing #{tableComponent.filteredValue.size()}
of #{of:evalAttribute(tableComponent, 'value').size()}';"
escape="false" />
</h:panelGroup>
<h:panelGroup rendered="#{empty tableComponent.filteredValue or
(tableComponent.filteredValue.size() eq
of:evalAttribute(tableComponent, 'value').size())}">
<!-- MyFaces is not able to re-render text and expressions directly put
on a Facelet, so wrap in output text as well -->
<h:outputText value="document.getElementById('#{resultCountPlaceholder.
clientId}').innerHTML = '';" escape="false"/>
</h:panelGroup>
<h:outputText value="</script>" escape="false" />
</h:panelGroup>
</o:moveComponent>
4.Moving an AJAX event listener into the table
The second MoveComponent instance has an AJAX event listener as its child. The event listener makes sure the JavaScript that we defined above is updated after each filtering operation. An AJAX event listener is not a component but a behavior. It therefore needs some extra handling (among others to fool it into believing that it’s temporarily a child of the MoveComponent which does not have the events a behavior can be checking for) It’s moved to the special behavior section components have:
<o:moveComponent for="#{forx}" destination="BEHAVIOR">
 <p:ajax event="filter" update=":#{resultCount.clientId}" />
</o:moveComponent>
5.Moving a component into the facet section of the table
The third MoveComponent instance has a placeholder component with the fixed ID globalFilter as its child. This component is used by PrimeFaces to read the input used by the filtering operation. This placeholder component is needed for this example, since we wanted to have the real input component just above the table, not inside the table. The standard PrimeFaces approach with the facet tightly couples the location of the input component, which we here thus decouples. The real input component updates the placecholder using its onkeyup attribute:
<o:moveComponent for="#{forx}" destination="FACET" facet="header">
 <h:inputHidden id="globalFilter" />
</o:moveComponent>
The complete application is named, PFMoveComponent.