Chapter 11: Let’s validate data with PrimeFaces and OmniFaces
In this chapter we will explore the facilities provided by PrimeFaces and OmniFaces for validating data. We start with a section on customizing Bean Validation error messages, continue on with PrimeFaces validation features (including client-side validation) and we end it with OmniFaces powerful set of validators, including cross-field and class level validators. Moreover, we will also cover injection in validators and converters.
Display the label of the component where a constraint violation originated from
Starting with the Java EE 6 platform a new server‐side validation model is available. It is known as JavaBeans Validation (or ‘Bean Validation’ for short), and it consists of a set of constraints applicable via annotations at field, method or class level of a JavaBeans
component (e.g. managed bean). The validation API is in the javax.validation package and the constraints are grouped under the javax.validation.constraints package (e.g. @NotNull, @Min, @Max, @Size, etc). We can use multiple constraints on a single JavaBeans component object and any validation failures will be displayed by the <p:messages/> tag.
The default messages for built‐in constraints (Bean Validation also supports user defined constraints) can be found in a resource bundle named ValidationMessages. Commonly, this is a properties file named, ValidationMessages.properties and resides in the default package of the application (class-path root). Locale variants of this are added by appending an underscore and the locale prefix to the base name of the file (e.g. ValidationMessages_de.properties). These messages can be customized, and localized as you wish.
As you know, JSF comes with its own validation error messages which can be customized pretty easily using several techniques specific to JSF. Bean Validation is also a very flexible API that comes with its own techniques for customizing error messages. It is important to know these techniques, especially when you want to obtain error messages that cannot be produced by the default Bean Validation implementation. For example, if a component causes a validation failure, then the label associated with this component can appear only in the front or behind the error message. This is possible thanks to the bundle key, javax.faces.validator.BeanValidator.MESSAGE (exemplified in the next subsection). But, how about placing the label anywhere in the message body? Well, this is a job for OmniFaces because by default, Bean Validation cannot do this!
We can start from a simple form that contains two fields, name and surname. Both of these will be validated using Bean Validation annotations ‐ the messages will be displayed via <p:messages/> and <p:growl/>:
<h:form>
 <p:messages/>
 <p:growl/>
 <p:panelGrid columns="2">
  <p:outputLabel for="name" value="First Name"/>
  <p:inputText id="name" label="name" value="#{dataBean.name}" />

  <p:outputLabel for="surname" value="Last Name" />
  <p:inputText id="surname" label="surname" value="#{dataBean.surname}" />

  <p:commandButton value="Register" update="@form"/>
 </p:panelGrid>
 <h:outputText value="Thank you !" rendered="#{facesContext.postback
                                    and not facesContext.validationFailed}" />
</h:form>
The DataBean uses the Bean Validation constraints for restricting the size of the name and surname to between 2 and 25 characters. For this, we simply annotate the name and surname fields with @Size constraint:
@Named
@RequestScoped
public class DataBean {

 @Size(min = 2, max = 25)
 private String name;

 @Size(min = 2, max = 25)
 private String surname;

 // getters and setters
 ...
}
Now, if the validation fails, you will see these two messages (these are default messages, and you cannot say which belongs to name and which to surname):
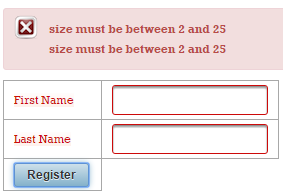
We can fix this by adding the label of the component that causes the validation constraint violation. Configure a message bundle that contains the key javax.faces.validator.BeanValidator.MESSAGE:
Notice that this is a parameterized message with two placeholders. The placeholder {0} represents the error message (e.g. size must be between 2 and 25) as created by the Bean Validation runtime, while {1} refers to the label of the component that caused the
validation constraint violation. So, we can drop to any of these two placeholders, or combine them to place the label in front of behind the message. Below, shows them placed behind the message:
Now, the messages will look like below:
But, how about shaping a message into a more human readable shape, as below:
Well, this is not easy to obtain, because even if we override the default Bean Validation messages file (ValidationMessages.properties) we still cannot simply “slip” the component label in there. Something like below will not work (in
ValidationMessages.properties, override the javax.validation.constraints.Size.message):
In order to accomplish this task we can use the OmniFaces the JsfLabelMessageInterpolator custom message interpolator. There are two steps that must be accomplished to use it:
1.Create a /META-INF/validation.xml file in WAR with the following content:
<?xml version="1.0" encoding="UTF-8"?>
<validation-config xmlns="http://jboss.org/xml/ns/javax/validation/configuration"
                   xmlns:xsi="http://www.w3.org/2001/XMLSchema-instance"
                   xsi:schemaLocation="http://jboss.org/xml/ns/javax/validation/
                       configuration validation-configuration-1.0.xsd">

 <message-interpolator>
  org.omnifaces.validator.JsfLabelMessageInterpolator
 </message-interpolator>
</validation-config>
For Java EE 7, it is possible that you would need to update the version from below:
<validation-config xmlns="http://jboss.org/xml/ns/javax/validation/configuration"
                   xmlns:xsi="http://www.w3.org/2001/XMLSchema-instance"
                   xsi:schemaLocation="http://jboss.org/xml/ns/javax/validation/
                       configuration validation-configuration-1.1.xsd"
                       version="1.1">
 <message-interpolator>
  org.omnifaces.validator.JsfLabelMessageInterpolator
 </message-interpolator>
</validation-config>
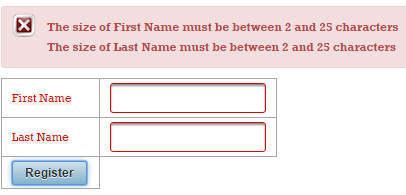
2.In the class-path root (the default package of the application), add the ValidationMessage.properties file, and override the desired messages. Use the OmniFaces, {jsf.label}, placeholder for indicating the place(s) in message where you expect to see the label. In the below example, the {jsf.label} placeholder will be replaced by text, name or surname ‐ the two labels from our form:
This will produce the messages from the figure below:
<context-param>
 <param-name>
  javax.faces.INTERPRET_EMPTY_STRING_SUBMITTED_VALUES_AS_NULL
 </param-name>
 <param-value>true/false</param-value>
</context-param>
The complete application is named, OFLabelMessageInterpolator.
Customize the PrimeFaces client-side bean validation error messages
As you probably know, PrimeFaces supports Bean Validation. Actually, PrimeFaces comes with a client side validation framework integrated with Bean Validation Specification. Basically, PrimeFaces obtains via a set of classes (located in org.primefaces.validate.bean) the server side validation constraints for each type of supported validators. These constrains will be used in a JavaScript file named beanvalidation.js to perform the validation on client side and generate the corresponding messages.
For example, let’s suppose that we have our bean that uses @size. PrimeFaces extracts the constraints for @Size via org.primefaces.validate.bean.SizeClientValidationConstraint, like below:
package org.primefaces.validate.bean;

import java.util.HashMap;
import java.util.Map;
import javax.validation.constraints.Size;
import javax.validation.metadata.ConstraintDescriptor;
import org.primefaces.util.HTML;

public class SizeClientValidationConstraint
             implements ClientValidationConstraint {

 private static final String MESSAGE_METADATA = "data-p-size-msg";
 private static final String MESSAGE_ID =
                "{javax.validation.constraints.Size.message}";

 public Map<String, Object> getMetadata(ConstraintDescriptor
                                         constraintDescriptor) {

  Map<String, Object> metadata = new HashMap<String, Object>();
  Map attrs = constraintDescriptor.getAttributes();
  Object message = attrs.get("message");

  metadata.put(HTML.VALIDATION_METADATA.MIN_LENGTH, attrs.get("min"));
  metadata.put(HTML.VALIDATION_METADATA.MAX_LENGTH, attrs.get("max"));

  if (!message.equals(MESSAGE_ID)) {
      metadata.put(MESSAGE_METADATA, message);
  }

  return metadata;
 }

 public String getValidatorId() {
  return Size.class.getSimpleName();
 }
}
Now, the extracted constrains are used in beanvalidation.js, as below:
if (window.PrimeFaces) {
    ...
    PrimeFaces.locales.en_US.messages["javax.validation.constraints.
                       Size.message"] = "size must be between {0} and {1}";

    PrimeFaces.validator.Size = {
    MESSAGE_ID: "javax.validation.constraints.Size.message",
      validate: function(d, f) {
       if (f !== null) {
           var e = d.val().length,
           c = d.data("p-minlength"),
           a = d.data("p-maxlength"),
           b = PrimeFaces.util.ValidationContext;

           if (e < c || e > a) {
               throw b.getMessageBV(d, this.MESSAGE_ID,
                                    d.data("p-size-msg"), c, a)
           }
       }
      }
    };
    ...
};
So this will produce the default Bean Validation error message. Now, let’s suppose that we want to change this message and involve more information in it. For example, let’s suppose that we want to provide in the error message the label of the invalid component exactly as the OmniFaces JsfLabelMessageInterpolator does.
In order to accomplish this task we have several approaches. One of these approaches consists of overriding the SizeClientValidationConstraint for extracting the validated input label and overriding the client-side implementation to take this label into account.
So, first we will write a new SizeClientValidationConstraint like below:
import static org.omnifaces.util.Components.getCurrentComponent;
import static org.omnifaces.util.Components.getLabel;
...

public class SizeClientValidationConstraint
             implements ClientValidationConstraint {

 private static final String MESSAGE_METADATA = "data-p-size-msg";
 private static final String MESSAGE_ID =
                      "{javax.validation.constraints.Size.message}";

 public Map<String, Object> getMetadata(ConstraintDescriptor
                                        constraintDescriptor) {

  Map<String, Object> metadata = new HashMap<String, Object>();
  Map attrs = constraintDescriptor.getAttributes();
  Object message = attrs.get("message");

  metadata.put(HTML.VALIDATION_METADATA.MIN_LENGTH, attrs.get("min"));
  metadata.put(HTML.VALIDATION_METADATA.MAX_LENGTH, attrs.get("max"));
  metadata.put(HTML.VALIDATION_METADATA.LABEL, getLabel(getCurrentComponent()));

  if (!message.equals(MESSAGE_ID)) {
      metadata.put(MESSAGE_METADATA, message);
  }

  return metadata;
 }

 public String getValidatorId() {
  return Size.class.getSimpleName();
 }
}
Thanks to OmniFaces utilities, we can obtain the label of the current validated input component via Components#getCurrentComponent() and Components#getLabel(). This save us from writing a good chunk of code! Further, we simply add the label in the metadata under HTML.VALIDATION_METADATA.LABEL.
Now, on client-side, we adjust the JavaScript code to use this label in error validation messages for @Size:
<script type="text/javascript">
 //<![CDATA[
 PrimeFaces.locales.en_US.messages["javax.validation.constraints.Size.message"] =
  "The size of {0} must be between {1} and {2} characters";
 PrimeFaces.validator.Size = {
  MESSAGE_ID: "javax.validation.constraints.Size.message",
  validate: function (d, f) {
  if (f !== null) {
      var e = d.val().length,
          c = d.data("p-minlength"),
          a = d.data("p-maxlength"),
          l = d.data("p-label");
          b = PrimeFaces.util.ValidationContext;

          if (e < c || e > a) {
              throw b.getMessageBV(d, this.MESSAGE_ID,
                                   d.data("p-size-msg"), l, c, a)
          }
   }
  }
 };
 //]]>
</script>
Done! The complete application is named, PFAlterClientValidationMsg.
“Force” the user to tick a checkbox
The PrimeFaces <p:selectBooleanCheckbox/> tag is an elegant approach for dealing with tasks that can be resolved via a boolean value (e.g. check if the user has accepted the terms and conditions, ask the user if he wants to be kept logged in for a period of time, ask the user if his password should be remembered, etc). In such cases, when the user doesnʹt tick the checkbox, we need to render an error/warning message to inform him that is mandatory to tick that checkbox. For example, if the user must tick the checkbox signaling that he consents to the terms and conditions, then we need a validation layer before the business logic. Obviously, if we ask the user to inform us about remembering his password, we can deal with it without the validation layer, by supposing that an unticked checkbox ergo, “donʹt remember my password”. Furthermore, we are interested in the case when we need to “force” the user to tick the checkbox.
Now, we add the built‐in required="true" attribute to the <p:selectBooleanCheckbox/>. We need this attribute for ensuring that the user will tick the terms and conditions checkbox. As we said, if the user doesnʹt tick the checkbox then we will return an error message of type You must accept terms and conditions!. The problem is that this will not work as expected! The error message never appears because the built‐in required validator will not cause a validation failure, no matter if the checkbox was ticked or not. So, in case of <p:selectBooleanCheckbox/>, the presence of the required validator is pointless.
The below snippet of code should follow a simple scenario: if the checkbox (termsId) is unticked, then the message, You must accept terms and conditions! should appear. Until the user ticks this checkbox, JSF should stop processing the current request in the Process Validations phase.
<h:form>
 <p:panelGrid columns="3">
  <p:outputLabel for="termsId" value="Tick terms and conditions:" />
  <p:selectBooleanCheckbox id="termsId" required="true"
     requiredMessage="You must accept terms and conditions!"/>
  <p:commandButton value="Submit" update="@form"/>
 </p:panelGrid>
 <p:message for="termsId" />
 <h:outputText value="Thank you !"
               rendered="#{facesContext.postback
                           and not facesContext.validationFailed}" />
</h:form>
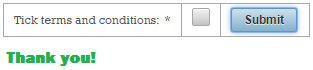
Unfortunately, the required validator has no effect. Check the below figure (notice that the checkbox is not ticked):
OmniFaces comes with a custom validator especially for filling up this JSF gap named, RequiredCheckboxValidator. This validator is available via, omnifaces.RequiredCheckboxValidator ID, and it can be used as any JSF built‐in validator, via <f:validator/> tag or validator attribute. Both of the below examples are correct:
<p:selectBooleanCheckbox id="termsId" required="true"
validator="omnifaces.RequiredCheckboxValidator"
requiredMessage="You must accept terms & conditions!"/>
// using "<f:validator/>" tag
<p:selectBooleanCheckbox id="termsId" required="true"
requiredMessage="You must accept terms & conditions!">
<f:validator validatorId="omnifaces.RequiredCheckboxValidator" />
</p:selectBooleanCheckbox>
Now, the result will look like in the figure below:

The complete application is named, PFOFSelectBooleanCheckbox.
Passing through validation only the modified values
In a nutshell, JSF custom validation is a straightforward process that validates submitted EditableValueHolders along with their attached custom validators, when an EditableValueHolder value violates the applied validation constraints, throws a ValidatorException. This exception encapsulates an error message signaling to the user that the validation has failed (the error messages are typically rendered via <p:message/>/<p:messages/>). By default, this process is applied in the Process Validations phase, which is executed for each postback.
Sometimes, custom validation implies more than checking if a value is a valid e‐mail, phone number, respect a regular expression, etc. For example, you may need to validate the submitted data against a database, which is usually a time consuming task that should take place as fast as possible and with a minimum impact on communication with the database.
Imagine that we submit a bulk of data that is successfully validated against a database, and is stored in managed beans (e.g. in view scope). Further, via another postback, we submit the same bulk of data, but this time with several values modified (not all), and the validation takes place again.
Now, you might think that only those modified values will pass through validation, since you already know that the rest of values are valid (they successfully passed through validation on the previous request). Well, this is not true, because JSF doesnʹt distinguish between modified and unmodified values; it simply validates all of them again (both requests will spend the same time in the Process Validations phase, and they will ʺhitʺ the database equally!). If the unmodified values are quite many and/or the validation process is pretty difficult, then this phase will take longer than necessary.
Let’s see the below simple example. First, we have an input that has attached a custom validator:
<h:form id="myFormId">
 Name:
 <p:inputText id="nameId" value="#{myBean.name}" validator="myValidator"/>
 <p:commandButton value="Send" action="#{myBean.nameAction()}" update=":msgs"/>
</h:form>
<p:messages id="msgs"/>
The custom validator simply simulates some validation failures and report them via a faces message:
@FacesValidator("myValidator")
public class MyValidator implements Validator {

 @Override
 public void validate(FacesContext context, UIComponent component,
                           Object value) throws ValidatorException {

  // simulate validation failure
  Random random = new Random();
  if (random.nextInt(10) < 5) {
      // use OmniFaces shortcut
      throw new ValidatorException(Messages.
       createError("The validation has randomly failed. Submit again ..."));
  }
 }
}
Furthermore, MyBean reports the success of storing the submitted (and validated) value:
@Named
@SessionScoped
public class MyBean implements Serializable {

 private static final long serialVersionUID = 1L;

 private String name;

 // getter/setter

 public void nameAction() {
  // use OmniFaces shortcut
  Messages.addGlobalInfo("Submitted value was successfully saved in bean ...");
 }
}
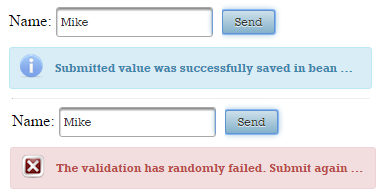
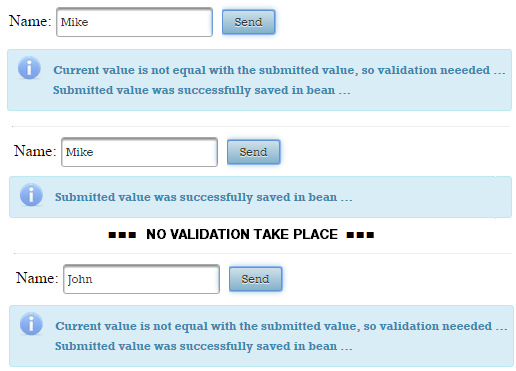
In the figure below, you can see that the same value passes through validator at each submit. Since we randomly force the validation failure, you will see the error message from time to time, depending on the random flag value:
Especially for fixing this issue, OmniFaces provides a custom validator named, ValueChangeValidator. In order to use it, let’s suppose that we have the following generic custom validator:
public class MyValidator implements Validator {
 @Override
 public void validate(FacesContext context, UIComponent component,
                           Object value) throws ValidatorException {
 // ...
 }
}
Next, we will replace the implements Validator with extends ValueChangeValidator, and rename the method from validate() to validateChangedObject():
public class MyValidator extends ValueChangeValidator {
 @Override
 public void validateChangedObject(FacesContext fc, UIComponent uic,
                                 Object o) throws ValidatorException {
  // ...
 }
}
Now, in the validateChangedObject() method we write exactly the same code that you have written in the validate() method. The difference consists of the fact that the validateChangedObject() method will be invoked by OmniFaces only when the submitted value is not equal to the model value of the validated component. In the page, attach your validator, MyValidator, to any EditableValueHolder component:
@FacesValidator("myValidator")
public class MyValidator extends ValueChangeValidator {

 @Override
 public void validateChangedObject(FacesContext fc,
                   UIComponent uic, Object o) throws ValidatorException {

  // use the OmniFaces shortcut
  Messages.addGlobalInfo("Current value is not equal with the submitted value,
                                                    so validation neeeded ...");

  // simulate validation failure
  Random random = new Random();
  if (random.nextInt(10) < 5) {

      // use the OmniFaces shortcut
      throw new ValidatorException(Messages.
       createError("The validation has randomly failed. Submit again ..."));
  }
 }
}
In the figure below, you notice that the validation takes place only when the submitted value is not equal to the model value:
The complete application is named, ValueChangeValidator.
Validating unique column in UIData
It is common practice to have a <h:form/> that contains a <p:dataTable/> for displaying a set of tabular data as a combination of plain text and UIInputs (for data that can be altered (e.g. edited) by the user). Furthermore, an UICommand is responsible for submitting the data table containing the user’s modifications and updating the model. Most probably, the data provided by the user must be validated, and in such cases we can attach built-in/custom validators using the validator attribute or the <f:validator/> tag to the corresponding UIInputs. In order to see the error messages next to the rows that contain invalid data, a column is especially reserved for displaying error messages via <p:message/> tag. At each postback, the data table is submitted and all UIInputs will be validated (one by one will pass through the indicated validator(s)) and the error messages (if any) will appear in the reserved column. I think that this is a common scenario that every JSF developer has implemented in his projects.
But, in our scenario, each submitted UIInput is validated independently (individually) of the rest of submitted UIInputs, which is not always the desired behavior. For example, if the user edits a list of names, ZIP codes, e‐mails, etc, then a validation constraint must ensure that the list contains only unique values. This means that each submitted UIInput must be validated with respect to the rest of the submitted UIInputs, and signal to the user when a duplicate value is found. This is a typical case of cross-field validation. In this section, you will see how OmniFaces validates if the given UIInput component in an UIData component has a unique value throughout all rows, also those not visible by pagination.
In the code lines, our scenario may look like below:
<h:form id="form">
 <p:panel style="text-align: center;">
  <p:dataTable id="custom" value="#{barcelonaSquadBean.players}" var="t">
   <p:column>
    <p:inputText id="playerNameId" value="#{t.name}" required="true"/>
   </p:column>
   <p:column>
    <p:message for="playerNameId"/>
   </p:column>
  </p:dataTable>
 </p:panel>

 <p:panel style="text-align: center; margin-top: 10px;">
  <p:commandButton actionListener="#{barcelonaSquadBean.someAction()}"
                   update="@form" value="Subscribe Team"/>
  <p:messages id="msgs"/>
 </p:panel>
</h:form>
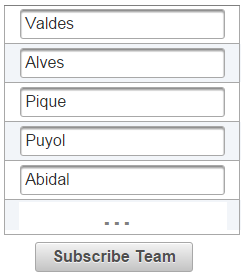
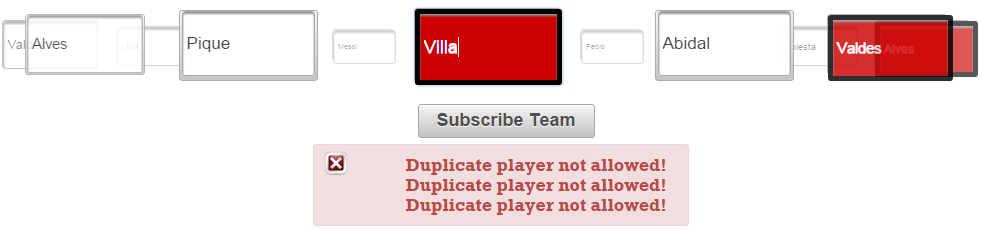
This snippet of code will work in conjunction with BarcelonaSquadBean to return the result from the image below (for brevity, we cropped the image but basically there are 11 different player names):
Now, let’s duplicate a player name. For example, let’s type Abidal in place of Pique and let’s submit the modified team. The result will be like in the figure below:
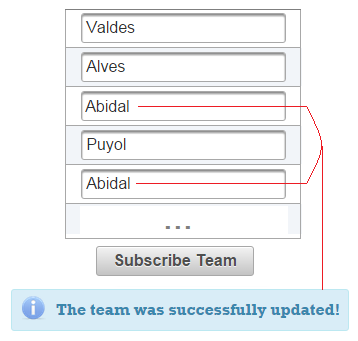
The issue consist off the fact that we have the same player name at positions three and five, Abidal. Obviously, we cannot have the same player twice, but as you can see the received message is an INFO that confirms that the team was successfully updated.
OmniFaces comes with a custom validator especially for filling up this JSF gap. This validator is named ValidateUniqueColumn and is exposed to page authors via <o:validateUniqueColumn/> tag. The main characteristics of this validator are:
- It validates if the given
UIInputcomponent in anUIDatacomponent has a unique value throughout all rows. - It includes in the validation the data that is not visible in case of using pagination, as long as it is in the data model.
- It works directly on the data model (e.g. when lazy loading is used, the data model contains a subset of data; only this subset counts on validation).
- It signals only the first invalid row on which the value is actually changed.
- A faces message will be added on the client ID of the input component in this invalid row.
- Its default message is of type (the
{0}placeholder represents the label of the input component, while the{1}placeholder represents the 1‐based row index of the data model):
- If you need to include a custom message then just use the message attribute:
<o:validateUniqueColumn message="custom message here" />
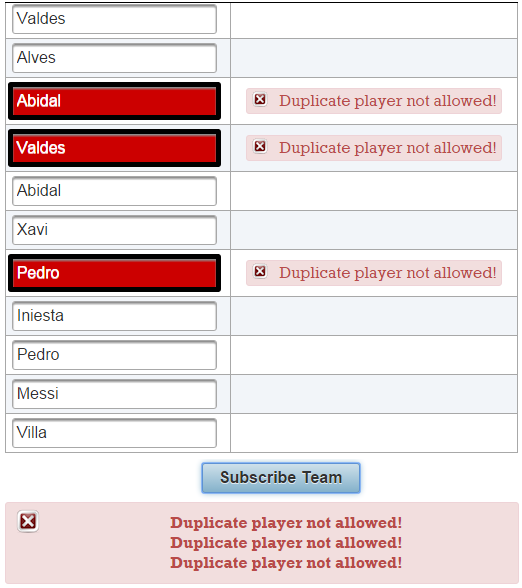
So, we can use <o:validateUniqueColumn/> in our case like below:
<p:dataTable id="custom" value="#{barcelonaSquadBean.players}" var="t">
 <p:column>
  <p:inputText id="playerNameId" value="#{t.name}" required="true">
   <o:validateUniqueColumn message="Duplicate player not allowed!"/>
  </p:inputText>
 </p:column>
 <p:column>
  <p:message for="playerNameId"/>
 </p:column>
</p:dataTable>
This time we cannot submit the team with duplicate players. Check figure below:
The complete application is named, ValueUniqueColumnTable.
As we just said, the <o:validateUniqueColumn/> validates if the given UIInput component in an UIData component has a unique value throughout all rows. This means that we can use it for any other PrimeFaces component based on UIData. For example, we can also use it for <p:ring/>. We have adjusted the example above to use a <p:ring/> instead of <p:dataTable/>:
<p:panel>
 <p:ring id="custom" value="#{barcelonaSquadBean.players}" var="t">
  <p:outputPanel style="text-align: center; height:90%;" layout="block">
   <p:inputText value="#{t.name}" required="true"
                style="width: 90%; height: inherit;">
    <o:validateUniqueColumn message="Duplicate player not allowed!"/>
   </p:inputText>
  </p:outputPanel>
 </p:ring>
</p:panel>
Checkout the image from figure below:
The complete application is named, ValueUniqueColumnRing.
Validation control and cross-field validation (class level validation)
Starting with Java EE 6, the JavaBeans Validation (or shortly, Bean Validation, or JSR 303), represents a new validation model based on adding validation constrains as annotations attached to a field, method or class level of a JavaBeans component. For example, in a JSF bean, you just place the desired annotations (e.g. @Size, @NotNull, @Pattern, etc.) on a field level (by default, JSF cannot validate the class or method level constraints). At the end, you will obtain a centralized place for bean validation constraints that works with no further adjustments.
Server-side validation control per-UICommand or UIInput
The <f:validateBean/> tag is optional, and its main goal is to provide a “fine tune” validation. Mainly, this tag provides validation control on a per‐form or a per‐request basis. It allows groups (subsets) of constraints to be indicated via the validationGroups attribute as a comma‐separated list of fully‐qualified class names, and allows per‐input disabling of validation via a disabled flag attribute. Do not fall into the trap of using <f:validateBean/> without attributes, because it is simply useless. Use it only when you need to modify the default values of its attributes.
You have to be aware that, from a JSF perspective, there are several limitations to using Bean Validation. One of them involves the fact that JSF cannot validate class or method level constraints (so called, cross‐field validation), only field constrains. Another one consists of the fact the <f:validateBean/> allows validation control on per‐form or a per‐request basis, not on a per‐UICommand or UIInput. In order to achieve more control, you have to be open to writing boilerplate code, and to shape custom solutions that works only on specific scenarios. Except the part that has to do with validating the method level constrains, the rest of the problems listed here are solved by OmniFaces, ValidateBean (<o:validateBean/>).
Letʹs suppose that we have a simple form that contains two input fields representing the name and e‐mail of a website member or admin. Next to these inputs, we have two buttons, one with label Contact Member and another one with label Contact Admin. When the user clicks on the first button, he will “contact” the specified website member, and when he clicks on the second button, he will “contact” the specified website admin.
<h:form>
 <p:panelGrid columns="2">
  <p:outputLabel for="nameId" value="Name"/>
  <p:inputText id="nameId" value="#{contactBean.name}"/>

  <p:outputLabel for="emailId" value="E-mail"/>
  <p:inputText id="emailId" value="#{contactBean.email}"/>

  <p:commandButton value="Contact Member" action="contact_member" ajax="false"/>
  <p:commandButton value="Contact Admin" action="contact_admin" ajax="false"/>
 </p:panelGrid>
 <p:messages/>
</h:form>
For a website member/admin, the name input should not violate any of the constraints defined in a group named, MemberContactValidationGroup. Moreover, for a website member/admin the email input should not violate any of the constrains defined in a group AdminContactValidationGroup. Even more noteworthy, we have a constraint over email in the default group (applicable to members and admins).
Next, we should attach these constraints to the name and email inputs, but, we need to obtain the following functionality:
- If the user clicks on the
Contact Memberbutton, then the validation should take into account only constraints from the default group and from theMemberContactValidationGroup, and ignore the constraints from theAdminContactValidationGroup. - If the user clicks on the
Contact Adminadmin button, then the validation should take into account only constraints from the default group and from theAdminContactValidationGroup, and ignore the constraints from theMemberContactValidationGroup.
First, in order to accomplish this we need to annotate the ContactBean properly. So, here it is:
@Named
@RequestScoped
public class ContactBean implements Serializable {

 private static final long serialVersionUID = 1L;
 @Size.List({
  @Size(min = 3, max = 20,
        message="(member)# please enter a valid name (between 3-20 characters)",
        groups=beans.MemberContactValidationGroup.class),
  @Size(min = 6, max = 10,
        message="(admin)# please enter a valid name (between 6-10 characters)",
        groups=beans.AdminContactValidationGroup.class)
  })
  @Pattern(regexp = "(admin)[a-zA-Z0-9]*",
           message="(admin)# please enter a valid name (start with admin)",
           groups=beans.AdminContactValidationGroup.class)
  private String name;

  @Size(min = 1, message = "Please enter the e-mail !")
  @Pattern.List({
   @Pattern(regexp = "[a-zA-Z0-9]+@[a-zA-Z0-9]+\\.[a-zA-Z0-9]+",
            message = "(member)# please enter a valid formated e-mail",
            groups = beans.MemberContactValidationGroup.class),
   @Pattern(regexp = "(admin)+@[a-zA-Z0-9]+\\.[a-zA-Z0-9]+",
            message = "(admin)# please enter a valid e-mail (start with admin@)",
            groups = beans.AdminContactValidationGroup.class)
   })
   private String email;

 // getters and setters
}
Furthermore, we need OmniFaces help. The features brought by OmniFaces via <o:validateBean/> tag are exactly what we need to solve our use case. While the standard <f:validateBean/> only allows validation control on a per‐form or a per‐request basis, the <o:validateBean/> allows us to control bean validation on a per‐UICommand or UIInput component basis.
For example, we can obtain the claimed functionality via <o:validateBean/>, like below:
<h:form>
 <p:panelGrid columns="2">
  <p:outputLabel for="nameId" value="Name"/>
  <p:inputText id="nameId" value="#{contactBean.name}"/>

  <p:outputLabel for="emailId" value="E-mail"/>
  <p:inputText id="emailId" value="#{contactBean.email}"/>

  <p:commandButton value="Contact Member" action="contact_member" ajax="false">
   <o:validateBean validationGroups="javax.validation.groups.Default,
                                     beans.MemberContactValidationGroup"/>
  </p:commandButton>
  <p:commandButton value="Contact Admin" action="contact_admin" ajax="false">
   <o:validateBean validationGroups="javax.validation.groups.Default,
                                     beans.AdminContactValidationGroup"/>
  </p:commandButton>
 </p:panelGrid>
 <p:messages/>
</h:form>
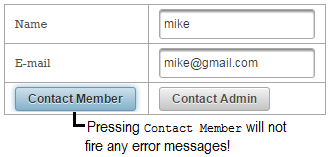
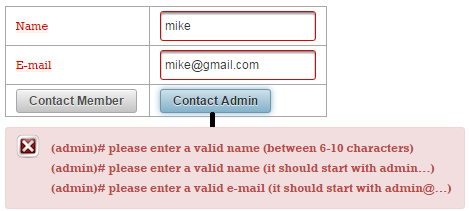
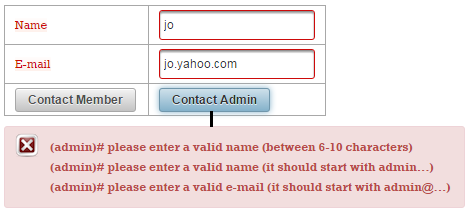
In the below screenshots you can see two tests. In the first test the Contact Member will not cause any error messages, while the Contact Admin will cause error messages specific to AdminContactValidationGroup:
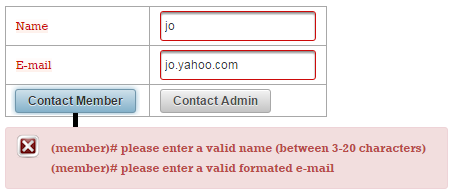
In the second test, both buttons will cause error messages specific to the corresponding group:
The complete application is named OFValidateBeanUICommand.
Server-side cross-field validation (class level validation)
Furthermore, letʹs suppose that the provided email should always start with the provided name (respect the condition: getEmail().startsWith(getName()). This is basically a cross‐field constraint that can be applied via a class level constraint. But, JSF doesnʹt support this kind of constraints. We can name
the annotation specific to this constraint @ValidContact and assign it to ContactBean as below:
@Named
@RequestScoped
@ValidContact(groups = ContactGroup.class)
public class ContactBean implements Serializable {
 ...
}
The <f:validateBean/> does not provide anything related to bean validation, so we can “jump” directly to <o:validateBean/>. Right from the start, you should know that <o:validateBean/> supports an attribute named method, which indicates if this is a copy bean validation (default) or an actual bean validation:
-
Copy bean validation ‐ When the
methodattribute is not present, this is the default validation method (method="validateCopy"). Basically, the idea is to make a copy of the object to validate at the end of the Process Validations phase, set the values retrieved from the input components on it, and perform class level validation on the copy. If the validation is a success, then the original bean is updated and a potential action method is invoked, otherwise “jump” directly to Render Response phase ‐ does not update the model if validation errors occur. Of course, making a copy can be considered a drawback to this approach. -
Actual bean validation ‐ This method must be explicitly set via
method="validateActual". In this case, the validation happens at the end of the Update Model Values, so the original bean is first updated with the values retrieved from the input components, afterwards validated. The main drawback here consists of the fact that we may pollute the model with invalid values, so the bean developer must perform a “manual” check. A potential action method will be invoked independently on the validation result, because the flow continues with the Invoke Application phase.
In case of using copy bean validation, OmniFaces tries a suite of strategies for determining the copy mechanism. By default, OmniFaces comes with an interface (Copier) that is to be implement by classes that know how to copy an object, and provides four implementations (strategies) of it:
-
CloneCopier‐ This is an implementation ofCopiercapable of dealing with beans that implementsCloneableinterface and provides cloning support. -
SerializationCopier‐ This is an implementation ofCopiercapable of dealing with beans that implement theSerializableinterface and support serialization according to the rules of that interface. -
CopyCtorCopier‐ This is an implementation ofCopiercapable of dealing with beans that have an additional constructor (next to the default constructor) taking a single argument of its own type that initializes itself with the values of that passed in type. -
NewInstanceCopier‐ This is an implementation ofCopiercapable of dealing with beans that have a public no arguments (default) constructor. Every official JavaBean satisfies this requirement. Note that in this case no copy is made of the original bean, but just a new instance is created.
Besides these four implementations (strategies), OmniFaces comes with another one named, MultiStrategyCopier, which basically defines the order of applying the above copy strategies: CloneCopier, SerializationCopier, CopyCtorCopier, NewInstanceCopier. When one of these strategies obtains the desired copy, the process stops. If you already know the strategy that should be used (or, you have your own Copier strategy (e.g. a partial object copy strategy), then you can explicitly specify it via copier attribute (e.g. copier="org.omnifaces.util.copier.CopyCtorCopier").
Now, letʹs focus on our cross‐field validation: (getEmail().startsWith(getName()). In order to obtain a class level constraint based on this condition, we need to follow several steps.First, wrap this constrains in a custom Bean Validation validator (e.g. ContactValidator):
@Override
public boolean isValid(ContactBean value, ConstraintValidatorContext context) {
 return value.getEmail().startsWith(value.getName());
}
Second, define a proper annotation for it (e.g. ValidContact, used as @ValidContact). Furthermore, annotate the desired bean (optionally, add it in a group(s)):
@Named
@RequestScoped
@ValidContact(groups = ContactGroup.class)
public class ContactBean implements Serializable {
 ...
 private String name;
 private String email;
 ...
 // getters/setters
}
Finally, use the <o:validateBean/> to indicate the bean to be validated via the value attribute (javax.el.ValueExpression that must evaluate to java.lang.Object), and the corresponding groups (this is optional). Additionally, you can specify the actual bean validation, via the method attribute, and a Copier, via the copier attribute:
<h:form>
 ...
 <o:validateBean value="#{contactBean}" validationGroups="beans.ContactGroup" />
</h:form>
In the figure below, you can see an example when the cross-field validation fails:
The complete application is named, OFValidateBeanCrossField.
PrimeFaces cross-field client side validation
PrimeFaces comes with an out-of-the-box example of cross-field validation for the Password component. Basically, for the input password you need to use the match attribute and point to the ID of the confirmation input password. Further, PrimeFaces will ensure that the validation will succeed only if the two passwords are the same. But, this is an “isolated” case, because we cannot do this for other cases (e.g. like getEmail().startsWith(getName()).
On the other hand, PrimeFaces comes with a very useful support for client side validation based on JSF validation API and Bean Validation. Further we will focus on Bean Validation, and say that this can be successfully used as long as we don’t need cross-field validation or class level validation. This means that the validation constraints placed on the class level will not be recognized by PrimeFaces client side validation.
But, for accomplishing this task, we will slightly adapt the PrimeFaces custom client side validation. First, we create ValidContact annotation:
@Documented
@Constraint(validatedBy = {ContactValidator.class})
@ClientConstraint(resolvedBy=ValidContactClientConstraint.class)
@Target({ANNOTATION_TYPE, METHOD, FIELD})
@Retention(RUNTIME)
public @interface ValidContact {

 String message() default "Invalid contact !";

 Class<?>[] groups() default {};

 Class<? extends Payload>[] payload() default {};
}
Further, in our bean we annotate the proper fields (name and email) with this annotation - we need to do this to indicate the fields that enter in cross-field validation; so, annotate each such field:
@Named
@RequestScoped
public class ContactBean implements Serializable {
private static final long serialVersionUID = 1L;
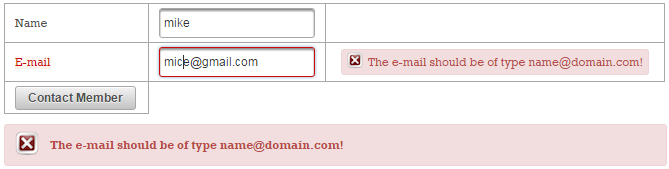
@ValidContact(message = "The name should be used in e-mail as name@domain.com!")
private String name;
@ValidContact(message = "The e-mail should be of type name@domain.com!")
private String email;
// getters and setters
public void someAction() {
// OmniFaces approach
Messages.addGlobalInfo("Thank you for your contacts!");
}
}
Now, we write the validator. Here, we need to also keep the name until the validator gets the e-mail. For this, we can use the faces context attributes, as below:
public class ContactValidator
             implements ConstraintValidator<ValidContact, String> {

 @Override
 public void initialize(ValidContact constraintAnnotation) {
  // NOOP
 }

 @Override
 public boolean isValid(String value, ConstraintValidatorContext context) {
  if (Faces.getContextAttribute("NAME_VALUE") == null) {
      Faces.setContextAttribute("NAME_VALUE", value);
  } else {
      return value.startsWith(String.valueOf(
             Faces.getContextAttribute("NAME_VALUE")));
  }
  return true;
 }
}
Now, we have to accomplish the client-side validation. Again, notice that we store the name into an array (you can add more fields here) and wait for the e-mail:
<script type="text/javascript">
 var data = [];
 PrimeFaces.validator['ValidContact'] = {
  MESSAGE_ID: 'org.primefaces.examples.validate.contact.message',
  validate: function (element, value) {
   if (data.length == 0) {
       data.push(value);
   } else {
       if (!value.startsWith(data[0])) {
           var msgStr = element.data('p-contact-msg'),
           msg = msgStr ? {summary: msgStr, detail: msgStr} :
            vc.getMessage(this.MESSAGE_ID);
           throw msg;
       }
   }
  }
 };
</script>
Finally, we ensure the presence of ClientValidationConstraint implementation:
public class ValidContactClientConstraint implements ClientValidationConstraint {

 public static final String MESSAGE_METADATA = "data-p-contact-msg";

 public Map<String, Object> getMetadata(ConstraintDescriptor
                                        constraintDescriptor) {
  Map<String, Object> metadata = new HashMap<String, Object>();
  Map attrs = constraintDescriptor.getAttributes();
  Object message = attrs.get("message");

  if (message != null) {
      metadata.put(MESSAGE_METADATA, message);
  }

  return metadata;
 }

 public String getValidatorId() {
  return ValidContact.class.getSimpleName();
 }
}
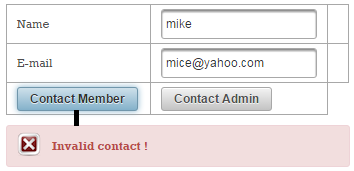
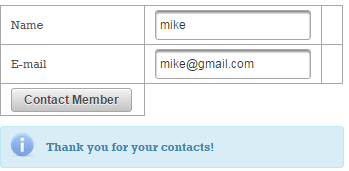
Here it is a valid case:
And an invalid case:
The complete application is named, PFValidateBeanCrossField.
Multiple field validators
By its construction and usage, the JSF validation model is not applicable for cross‐field validation. You already saw the mighty OmniFaces ValidateBean, so is time to check a list with more cross‐field validators that are not available in JSF:
-
<o:validateAll/>validates if ALL of the givenUIInputcomponents have been filled out. -
<o:validateAllOrNone/>validates if at least ALL of the givenUIInputcomponents have been filled out or that NONE of the givenUIInputcomponents have been filled out. -
<o:validateEqual/>validates if ALL of the givenUIInputcomponents have the same value. -
<o:validateOne/>validates if ONLY ONE of the givenUIInputcomponents have been filled out. -
<o:validateOneOrMore/>validates if at least ONE of the givenUIInputcomponents has been filled out. -
<o:validateOneOrNone/>validates if ONLY ONE of the givenUIInputcomponents has been filled out or that NONE of the givenUIInputcomponents have been filled out. -
<o:validateOrder/>validates if the values of the givenUIInputrespects a specified order. -
<o:validateUnique/>validates if ALL of the givenUIInputcomponents have a unique value. -
<o:validateMultiple/>validate multiple fields by either a custom validator method.
In order to use this bunch of validators you need to know several general usage rules. Each of these validators must be placed in the same form with the inputs that they validate. You must choose the right place in the form depending on your needs and with respect to the fact that the components will be validated in the order as they appear in the form. Most probably, you will place them at the beginning (before the components to validate) or at the end (after the components to validate) of the form, which means that you have two distinct cases: if you place them at the beginning then they will be executed before any of the component’s own validators. If this validator fails, then the component’s own validators will not be fired; if they are placed at the end, then it will be executed after any of the component’s own validators. If any of them fails, then these validators will not be executed. Obviously, placing the validator somewhere between components is not a good practice and may lead to weird behaviors.
All these validators require an attribute named components. The value of this attribute is a string of client IDs separated by space referencing the UIInputs that need to be validated. You will shortly see it at work, but before that let’s say that, by default, in an invalidating case, all of the referenced components will be marked invalid and a faces message will be added on the client ID of this validator component. The default message can be changed by the optional message attribute. Any {0} placeholder in the message will be substituted with a comma separated string of labels of the referenced input components. You can also change the default message in the message bundle file as identified by <message-bundle/> in faces-config.xml. The messages keys are:
// ValidateAll
org.omnifaces.component.validator.ValidateAll=
    {0}: Please fill out all of those fields

// ValidateAllOrNone
org.omnifaces.component.validator.ValidateAllOrNone=
    {0}: Please fill out all or none of those fields

// ValidateEqual
org.omnifaces.component.validator.ValidateEqual=
    {0}: Please fill out the same value for all of those fields

// ValidateMultiple
org.omnifaces.component.validator.ValidateMultiple=
    {0}: Invalid value

// ValidateOne
org.omnifaces.component.validator.ValidateOne=
    {0}: Please fill out only one of those fields

// ValidateOneOrMore
org.omnifaces.component.validator.ValidateOneOrMore=
    {0}: Please fill out at least one of those fields

// ValidateOneOrNone
org.omnifaces.component.validator.ValidateOneOrNone=
    {0}: Please fill out only one or none of those fields

// ValidateOrder
org.omnifaces.component.validator.ValidateOrder=
    {0}: Please fill out the values of all those fields in order

// ValidateUnique
org.omnifaces.component.validator.ValidateUnique=
    {0}: Please fill out a unique value for all of those fields
We also have the following optional attributes:
- We can use
invalidateAll="false"to only mark those components which are actually invalid as invalid. In case of for example “input all” or “input all or none” validation, that would only be the fields which are left empty. - The faces message can also be shown for all of the referenced components using
showMessageFor="@all". - The faces message can also be shown for only the invalidated components using
showMessageFor="@invalid". - The faces message can also be shown for specific components referenced by a space separated collection of their client IDs in
showMessageForattribute. - The
showMessageForattribute defaults to@this. The validator can be disabled by thedisabledattribute. It accepts a request based EL expression.
Validating if ALL UIInputs have been filled out
The ValidateAll validates if ALL of the given UIInput components have been filled out. For example, the below form will be valid only if you fill each input:
<h:form>
 <p:messages/>
 <p:panelGrid columns="2">
  <p:outputLabel for="nameId" value="Name:"/>
  <p:inputText id="nameId" value="#{playerBean.name}"/>

  <p:outputLabel for="surnameId" value="Surname:"/>
  <p:inputText id="surnameId" value="#{playerBean.surname}"/>

  <p:outputLabel for="emailId" value="E-mail:"/>
  <p:inputText id="emailId" value="#{playerBean.email}"/>

  <p:outputLabel for="addressId" value="Address:"/>
  <p:inputTextarea id="addressId" value="#{playerBean.address}"/>

  <p:outputLabel for="handId" value="Hand:"/>
  <p:selectOneRadio id="handId" value="#{playerBean.hand}">
   <f:selectItem itemLabel="Left" itemValue="Left" />
   <f:selectItem itemLabel="Right" itemValue="Right" />
  </p:selectOneRadio>

  <p:commandButton value="Submit" update="@form"/>
 </p:panelGrid>

 <o:validateAll id="all"
                components="nameId surnameId emailId addressId handId" />
</h:form>
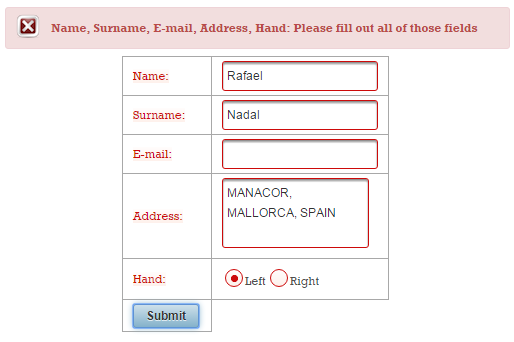
The complete application is named, ValidateAllInputs_1.
Or, if you want to display a custom error message next to each component via <p:message/>, then you need to use the message and showMessageFor="@all" attributes:
<h:form>
 <p:panelGrid columns="3">
  <p:outputLabel for="nameId" value="Name:"/>
  <p:inputText id="nameId" value="#{playerBean.name}"/>
  <p:message for="nameId"/>

  <p:outputLabel for="surnameId" value="Surname:"/>
  <p:inputText id="surnameId" value="#{playerBean.surname}"/>
  <p:message for="surnameId"/>

  <p:outputLabel for="emailId" value="E-mail:"/>
  <p:inputText id="emailId" value="#{playerBean.email}"/>
  <p:message for="emailId"/>

  <p:outputLabel for="addressId" value="Address:"/>
  <p:inputTextarea id="addressId" value="#{playerBean.address}"/>
  <p:message for="addressId"/>

  <p:outputLabel for="handId" value="Hand:"/>
  <p:selectOneRadio id="handId" value="#{playerBean.hand}">
   <f:selectItem itemLabel="Left" itemValue="Left" />
   <f:selectItem itemLabel="Right" itemValue="Right" />
  </p:selectOneRadio>
  <p:message for="handId"/>

  <p:commandButton value="Submit" update="@form"/>
 </p:panelGrid>

 <o:validateAll id="all" components="nameId surnameId emailId addressId handId"
                message="Please fill out all fields" showMessageFor="@all" />
</h:form>
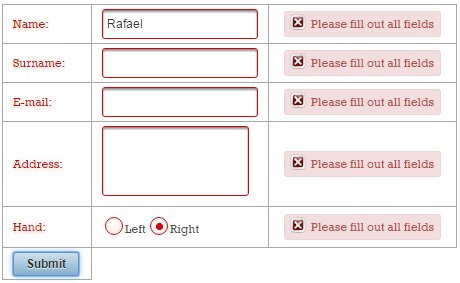
The complete application is named, ValidateAllInputs_2.

Validating if at least ALL or that NONE of UIInputs components have been filled out
The ValidateAllOrNone validates if at least ALL of the given UIInput components have been filled out or that NONE of the given UIInput components have been filled out. For example, the below form will be valid only if you fill all inputs or none of them:
<h:form>
...
<o:validateAllOrNone id="allornone"
components="nameId surnameId emailId addressId handId" />
</h:form>
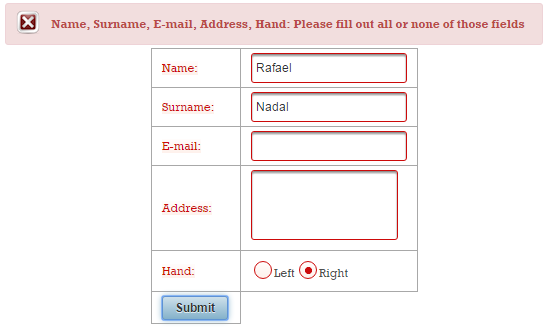
The complete application is named, ValidateAllOrNone_1.
You can also invalidate only the empty fields and show message message only on invalid fields as below:
<h:form>
 ...
 <o:validateAllOrNone id="allornone"
                      components="nameId surnameId emailId addressId handId"
                      invalidateAll="false" showMessageFor="@invalid"
                      message="Please fill up all fields or none"/>
</h:form>
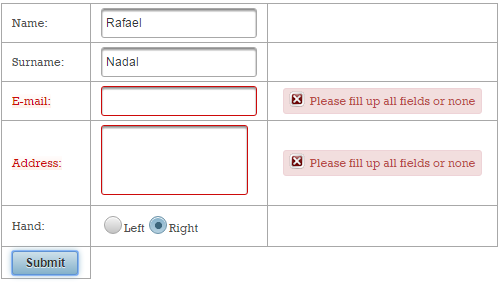
The complete application is named, ValidateAllOrNone_2.
Validating if ALL of the given UIInput components have the same value
The <o:validateEqual/> validates if ALL of the given UIInput components have the same value. PrimeFaces has such a behavior for the <p:password/> component for allowing the user to confirm the provided password. The OmniFaces approach is more general, and ideally it works for any number of inputs and all kinds of inputs. For example, we can ensure that the user enters/selects the same player name in the below form like this:
<h:form>
 <p:messages/>
 <p:panelGrid columns="2">
  <p:outputLabel for="name1Id" value="Name:"/>
  <p:inputText id="name1Id" value="#{playerBean.name1}"/>

  <p:outputLabel for="name2Id" value="Confirm name:"/>
  <p:inputText id="name2Id" value="#{playerBean.name2}"/>

  <p:outputLabel for="name3Id" value="Name:"/>
  <p:selectOneRadio id="name3Id" value="#{playerBean.name3}">
   <f:selectItem itemLabel="Roger Federer" itemValue="Roger Federer" />
   <f:selectItem itemLabel="Rafael Nadal" itemValue="Rafael Nadal" />
  </p:selectOneRadio>

  <p:commandButton value="Submit" update="@form"/>
 </p:panelGrid>

 <o:validateEqual id="allequal" components="name1Id name2Id name3Id" />
</h:form>
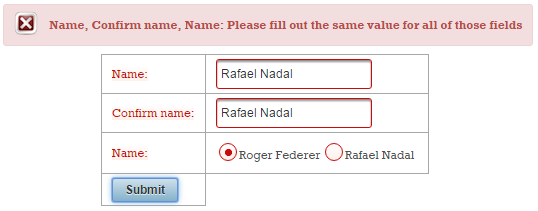
By selecting the Rafael Nadal radio button you will successfully validate the form.
The complete application is named, ValidateEqual.
Validating if ONLY ONE of the given UIInput components has been filled out
The <o:validateOne/> validates if ONLY ONE of the given UIInput components has been filled out. For example, let’s suppose that you want to collect player’s Facebook, Twitter or Instagram id:
<h:form>
 <p:messages/>
 <p:panelGrid columns="2">
  <p:outputLabel for="twitterId" value="Twitter:"/>
  <p:inputText id="twitterId" value="#{playerBean.twitter}"/>

  <p:outputLabel for="facebookId" value="Facebook:"/>
  <p:inputText id="facebookId" value="#{playerBean.facebook}"/>

  <p:outputLabel for="instagramId" value="Instagram:"/>
  <p:inputText id="instagramId" value="#{playerBean.instagram}"/>

  <p:commandButton value="Submit" update="@form"/>
 </p:panelGrid>

 <o:validateOne id="one" components="twitterId facebookId instagramId" />
</h:form>
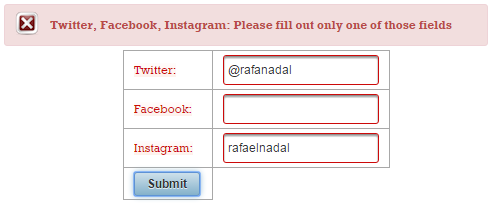
By typing a single id (Facebook, Twitter or Instagram) you will successfully validate the form.
The complete application is named, ValidateOne.
Validating if ONLY ONE or NONE of the given UIInput components has been filled out
The <o:validateOneOrNone/> validates if ONLY ONE of the given UIInput components has been filled out or that NONE of the given UIInput components has been filled out. If in the previous section we require only one of the Facebook, Twitter or Instagram id, now let’s require one or accept none:
<h:form>
 ...
 <o:validateOneOrNone id="oneornone"
                      components="twitterId facebookId instagramId" />
</h:form>
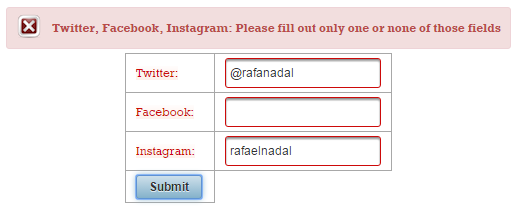
By typing a single id (Facebook, Twitter or Instagram) or none you will successfully validate the form.
The complete application is named, ValidateOneOrNone.
Validating if ALL of the given UIInput components have a unique value
The <o:validateUnique/> validates if ALL of the given UIInput components have a unique value. Again, we can use the Facebook, Twitter or Instagram example from above. This time we “force” the user to provide at least two ids and to be, as it should, unique values.
<h:form>
 ...
 <o:validateUnique id="unique" components="twitterId facebookId instagramId" />
</h:form>
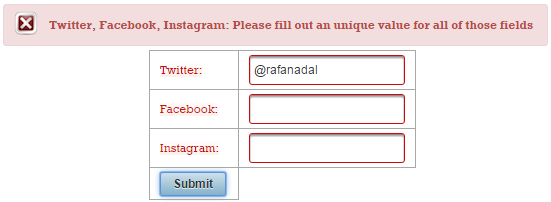
Since Facebook and Instagram are both empty spaces they are practically considered the same. In order to obtain a valid form, the user must also at least provide Facebook’s or Instagram’s id which should be different by than Twitter’s id.
The complete application is named, ValidateUnique.
Validating if at least ONE of the given UIInput components has been filled out
The <o:validateOneOrMore/> validates if at least ONE of the given UIInput components has been filled out. For example, below we allow the user to provide some ratings; he/she must provide at least one rating:
<h:form>
 <p:messages/>
 Rating Rafael Nadal favorite shots:
 <p:panelGrid columns="2">
  <p:outputLabel for="serveId" value="Serve:"/>
  <p:rating id="serveId" value="#{playerBean.serve}" />

  <p:outputLabel for="forehandId" value="Forehand:"/>
  <p:rating id="forehandId" value="#{playerBean.forehand}"/>

  <p:outputLabel for="backhandId" value="Backhand:"/>
  <p:rating id="backhandId" value="#{playerBean.backhand}"/>

  <p:commandButton value="Submit" update="@form"/>
 </p:panelGrid>

 <o:validateOneOrMore id="oneormore"
                      components="serveId forehandId backhandId" />
</h:form>
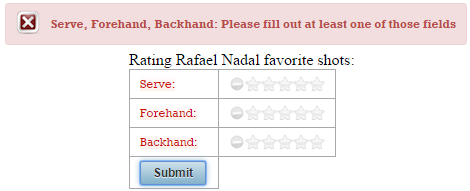
By providing at least one rating you will successfully validate the form.
The complete application is named, ValidateOneOrMore.
Validating if the given UIInput components are specified in a certain order
The <o:validateOrder/> validates if the values of the given UIInput components, as specified in the components’s attribute, are in the order specified by the type attribute which accepts the following values:
-
lt(defaults): from least to greatest, without duplicates. -
lte: from least to greatest, allowing duplicates (equal values next to each other). -
gt: from greatest to least, without duplicates. -
gte: from greatest to least, allowing duplicates (equal values next to each other).
For example, let’s suppose that we submit the career prize money of a tennis player for 2014, 2015 and 2016. Obviously, the three inserted values must be entered after the lte rule. Below we have shaped this scenario via three PrimeFaces Sliders and ValidateOrder:
<h:form>
 <p:messages/>
 <p:panelGrid columns="3">
  <p:panelGrid columns="1" style="margin-bottom: 10px">
   <h3 style="margin-top: 0">Rafa career prize money until 2014:</h3>
   <h:outputText id="output2014" value="#{playerBean.prizemoney2014}">
    <f:convertNumber currencySymbol="$" type="currency" />
   </h:outputText>
   <p:inputText id="value2014" value="#{playerBean.prizemoney2014}"/>
   <p:slider for="value2014" display="output2014" minValue="10000"
             maxValue="100000000" style="width: 200px"/>
  </p:panelGrid>

  <p:panelGrid columns="1" style="margin-bottom: 10px">
   <h3 style="margin-top: 0">Rafa career prize money until 2015:</h3>
   <h:outputText id="output2015" value="#{playerBean.prizemoney2015}">          \

    <f:convertNumber currencySymbol="$" type="currency" />
   </h:outputText>
   <p:inputText id="value2015" value="#{playerBean.prizemoney2015}"/>
   <p:slider for="value2015" display="output2015" minValue="10000"
             maxValue="100000000" style="width: 200px"/>
  </p:panelGrid>

  <p:panelGrid columns="1" style="margin-bottom: 10px">
   <h3 style="margin-top: 0">Rafa career prize money until 2016:</h3>
   <h:outputText id="output2016" value="#{playerBean.prizemoney2016}">
    <f:convertNumber currencySymbol="$" type="currency" />
   </h:outputText>
   <p:inputText id="value2016" value="#{playerBean.prizemoney2016}"/>
   <p:slider for="value2016" display="output2016" minValue="10000"
             maxValue="100000000" style="width: 200px"/>
  </p:panelGrid>
 </p:panelGrid>

 <o:validateOrder id="order" type="lte"
                  components="value2014 value2015 value2016"
                  message="Please provide the prize money in order." />

 <p:commandButton value="Submit" update="@form"/>
</h:form>
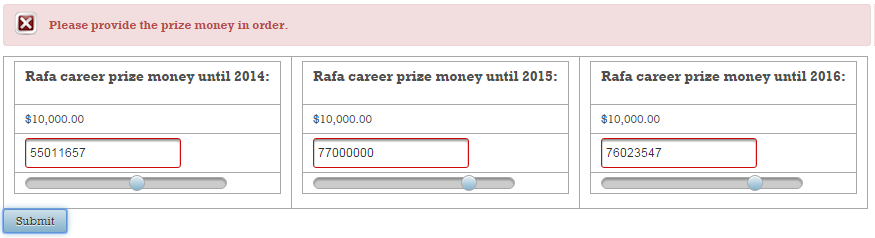
Since the career prize money in 2015 is smaller than in 2016 the validation failed.
The complete application is named, ValidateOrderSlider.
Let’s have another scenario! Let’s suppose that we need to schedule the matches that will play in a day. We practically have three matches per day and we need to submit the time of each match will begin at in ascending order:
<h:form>
 <p:messages/>
 <p:panelGrid columns="3">
  <h3 style="margin-top: 0">First match of the day starts at:</h3>
  <p:outputLabel for="firstMatchId" value="Time:" />
  <p:calendar id="firstMatchId" value="#{playerBean.firstMatch}"
              pattern="HH:mm" timeOnly="true"  />

  <h3 style="margin-top: 0">Second match of the day starts at:</h3>
  <p:outputLabel for="secondMatchId" value="Time:" />
  <p:calendar id="secondMatchId" value="#{playerBean.secondMatch}"
              pattern="HH:mm" timeOnly="true"  />

  <h3 style="margin-top: 0">Third match of the day starts at:</h3>
  <p:outputLabel for="thirdMatchId" value="Time:" />
   <p:calendar id="thirdMatchId" value="#{playerBean.thirdMatch}"
               pattern="HH:mm" timeOnly="true"  />
  </p:panelGrid>
  <o:validateOrder id="order" type="lt"
                   components="firstMatchId secondMatchId thirdMatchId"
                   message="Please fill out the times of the matches in order"/>

 <p:commandButton value="Submit" update="@form"/>
</h:form>
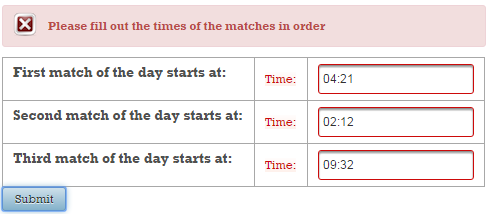
The second match of the day cannot start after the third match of the day, so validation fails.
The complete application is named, ValidateOrderTime.
This validator has the additional requirement that the to-be-validated values must implement Comparable. This validator throws an IllegalArgumentException when one or more of the values do not implement.
Let’s suppose that we have a simple UI for setting matches of type player 1 vs player 2. We impose a rule conforming to the player 2 must have a higher rank than player 1. A player is represented by the Player class (wraps the player rank and name), which means that the <o:validateOrder/> will not know how to compare two Players and how to check the specified order. In order to “help” this validator, we need to implement the Comparable interface and provide the desired comparison rule to the compareTo() method - the validator will use rule:
public class Player implements Serializable, Comparable<Player> {

 private static final long serialVersionUID = 1L;

 private int rank;
 private String name;

 public Player(int rank, String name) {
  this.rank = rank;
  this.name = name;
 }

 // getters and setters

 @Override
 public int compareTo(Player p) {
  int rank = p.getRank();
  return this.rank - rank;
 }

 @Override
 public String toString() {
  return "Player{" + "rank=" + rank + ", name=" + name + '}';
 }
}
<h:form>
 <p:messages/>
 Next match: #{playerBean.selectedOne.name} vs. #{playerBean.selectedTwo.name}
 <p:panelGrid columns="2">
  <p:panelGrid columns="2">
   <p:outputLabel for="selectFirstId" value="Choose first player" />
   <p:selectOneMenu id="selectFirstId" value="#{playerBean.selectedOne}"
                    converter="omnifaces.SelectItemsConverter">
    <f:selectItem itemLabel="Select first player for this game" itemValue="" />
    <f:selectItems value="#{playerBean.players}" var="t"
                   itemLabel="#{t.rank}.#{t.name}" itemValue="#{t}" />
   </p:selectOneMenu>
  </p:panelGrid>

  <p:panelGrid columns="2">
   <p:outputLabel for="selectSecondId"
                  value="Choose second player (choose a better rank)" />
   <p:selectOneMenu id="selectSecondId" value="#{playerBean.selectedTwo}"
                    converter="omnifaces.SelectItemsConverter">
    <f:selectItem itemLabel="Select second player for this game" itemValue="" />
    <f:selectItems value="#{playerBean.players}" var="t"
                    itemLabel="#{t.rank}.#{t.name}" itemValue="#{t}" />
   </p:selectOneMenu>
  </p:panelGrid>
 </p:panelGrid>

 <o:validateOrder components="selectFirstId selectSecondId" type="gt"
    message="Second player must have a better rank than the first"/>

 <p:commandButton value="Submit" update="@form"/>
</h:form>
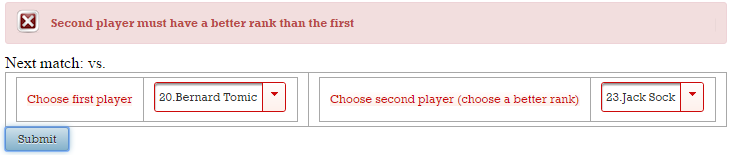
The second player rank is 23. Since this is bigger than 20 the validation has failed.
The complete application is named, ValidateOrderComparable.
Validating multiple fields by a custom validator method or by a managed bean instance which implements the MultiFieldValidator interface
The <o:validateMultiple/> allows the developer to validate multiple fields by either a custom validator method or, by a managed bean instance which implements the MultiFieldValidator interface. In the first approach, the method that performs the validation must respect the following signature:
public class FooBean {
 // ...
 public boolean fooMethod(FacesContext context,
                          List<UIInput> components, List<Object> values) {
  // ...
 }
 // ...
}
And, it is referenced from <o:validateMultiple/> like below:
<o:validateMultiple ... validator="#{fooBean.fooMethod}" />
In the second approach, we implement the MultiFieldValidator interface and override the validateValues() method:
@Override
public class FooBean implements MultiFieldValidator {
 // ...
 public boolean validateValues(FacesContext context,
                               List<UIInput> components, List<Object> values) {
  // ...
 }
 // ...
}
And, it is referenced from <o:validateMultiple/> like below:
<o:validateMultiple ... validator="#{fooBean}" />
Let’s have an examples that uses the second approach. For this let’s suppose that we have a PrimeFaces PickList and a SelectManyCheckbox. Both components will be populated with the same data and our validation constraint imposes that the selected data from the PickList should contain the data checked in the SelectManyCheckbox. Before we add the validation constrains, let’s have some preparations. So, let’s say that the used data are instances of the Player class listed below:
public class Player implements Serializable {

 private static final long serialVersionUID = 1L;

 private int rank;
 private String name;

 public Player(int rank, String name) {
  this.rank = rank;
  this.name = name;
 }

 // getters and setters

 // This method is needed for using the OmniFaces ListConverter
 // and SelectItemsConverter. Both need  that our entity has a
 // good toString() implementation
 @Override
 public String toString() {
  return "Player{" + "rank=" + rank + ", name=" + name + '}';
 }
}
Furthermore, let’s create a few Players and let’s prepare the data accordingly to PickList and SelectManyCheckbox requirements:
@Named
@ViewScoped
public class PlayerBean implements Serializable {

 private static final long serialVersionUID = 1L;

 private List<Player> players;
 private List<Player> selectedviaCheckbox;
 private DualListModel<Player> model;

 @PostConstruct
 public void init() {
  selectedviaCheckbox = new ArrayList<>();
  players = asList(
   new Player(8, "Tomas Berdych"),
   new Player(20, "Jurgen Melzer"),
   ...
  );

  model = new DualListModel<>(
              new ArrayList<>(players),
              new ArrayList<Player>()
  );
 }

 // getters and setters

 // some dummy action
 public void playersAction(){
  Messages.addGlobalInfo("The selected players are valid");
 }
}
Next, we can expose this data to the user (notice that we have used the omnifaces.ListConverter for PickList and omnifaces.SelectItemsConverter for SelectManyCheckbox - these converters have been detailed in Chapter 10):
<h:form>
 <p:messages id="msgs"/>
 <p:pickList id="playersList" value="#{playerBean.model}" var="t"
             itemLabel="#{t.rank}.#{t.name}" itemValue="#{t}">
  <o:converter converterId="omnifaces.ListConverter"
               list="#{playerBean.players}" />
 </p:pickList>

 <p:selectManyCheckbox id="playersCheckbox"
                       value="#{playerBean.selectedviaCheckbox}"
                       converter="omnifaces.SelectItemsConverter"
                       layout="responsive"
                       style="width: 435px; margin-top: 5px;"
                       columns="3">
  <f:selectItems value="#{playerBean.players}" var="t"
                 itemLabel="#{t.rank}.#{t.name}" itemValue="#{t}" />
 </p:selectManyCheckbox>

 <p:commandButton value="Submit" action="#{playerBean.playersAction()}"
                  update="msgs" style="margin-top:5px" />
</h:form>
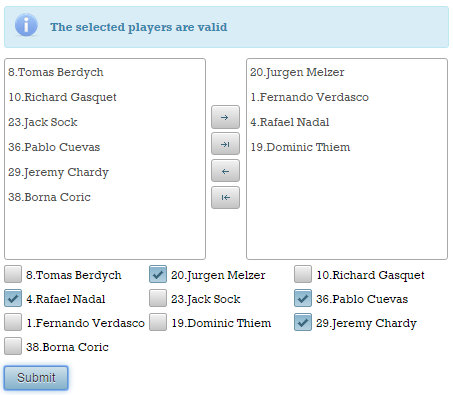
At this moment any combination of selections will be valid, as you can see in the figure below:
It is time for ValidateMultiple to enter in the scene! As we said earlier, we will implement the MultiFieldValidator interface and override the validateValues() method. This method receives a list of UIInputs representing the input components that enter in validation and a list of Objects representing the local values of these components (these are the values that should be validated). Now, we need to provide the code specific to our validation constraint. We can accomplish this in multiple ways, but notice that our list of components contains two instances: one instance of org.primefaces.component.picklist.PickList and one instance of org.primefaces.component.selectmanycheckbox.SelectManyCheckbox; moreover, the list of values should contain an instance of org.primefaces.model.DualListModel and an instance of List):
@Named
@ApplicationScoped
public class ValidatePlayers implements MultiFieldValidator {

 @Override
 public boolean validateValues(FacesContext fc,
                               List<UIInput> components, List<Object> values) {

  List<Player> fromModel;

  if (values.get(0) instanceof DualListModel) {
      fromModel = ((DualListModel) values.get(0)).getTarget();
      return fromModel.containsAll((List) values.get(1));
  } else {
      fromModel = ((DualListModel) values.get(1)).getTarget();
      return fromModel.containsAll((List) values.get(0));
  }
 }
}
Finally, we need to use <o:validateMultiple/> in the page. This is pretty straightforward:
<h:form>
...
<o:validateMultiple id="validateMultiple"
components="playersList playersCheckbox"
validator="#{validatePlayers}"
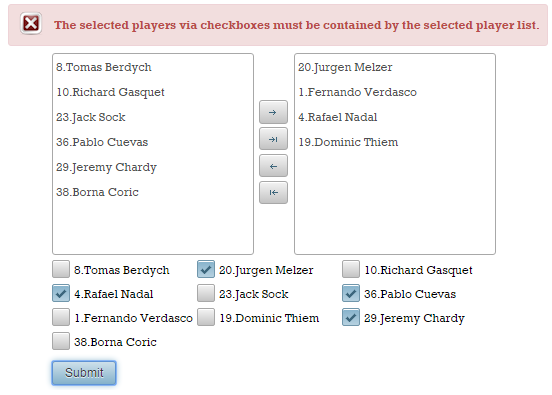
message="The selected players via checkboxes must be
contained by the selected player list." />
</h:form>
This time the selection from the above picture is not valid. Checkout the figure below:
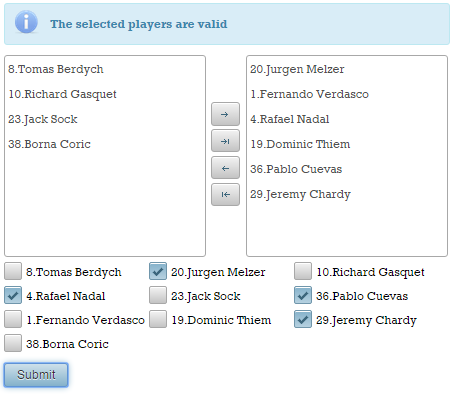
But, if in the PickList, we also select the Pablo Cuevas and Jeremy Chardy players then the submission will become valid:
The complete application is named ValidateMultiple.
Working with a validator in an iterating component (e.g. <p:dataTable/>)
Since <f:validateXxx>/<f:validator> are tag handlers, they are evaluated during construction/restoration of the component tree (in the Restore View phase). This means that the attributes of tag handlers are evaluated during view build time. On the other hand, UIComponents are executed during view render time (in the Render Response phase). This means that the attributes of UIComponents are evaluated during the view render time. So, JSF validators and UIComponents donʹt run at the same time, and their attributes are not evaluated at the same time, at least not the ones we want to discuss in this section (e.g. the id and binding attributes of UIComponents are evaluated during the view build time, but are not relevant here).
But, letʹs suppose that we are using a JSF validator inside an iterating component (e.g. <p:pickList/>, <p:dataTable/>, <h:dataTable/>, <ui:repeat/>). You may expect that, at every iteration, the validator is re‐evaluated and that its attributes are getting new values, specific to the iteration step. For example, if the validator is used in a data table, you may expect that the validatorʹs attributes are set every time a data table row is rendered. But, if you read carefully the above subsection, you realize that this is not true. The expected behavior should be based on the fact that JSF will only create one validator instance per UIComponent (in the Restore View phase), and will not re‐create or reset the validatorʹs attributes each time the row is rendered. So, if we are using deferred value expressions for validatorʹs attributes values, we obtain undesirable behaviors or even exceptions.The solution consists of an artifact that will provide render time evaluation of validators attributes. So, instead of an
evaluation on a per view build time basis, we want an evaluation on every access, like the UIComponents and bean properties. Another issue, specific to validators, implies the case when multiple <f:validator/> are used for the same input, because the validatorMessage attribute of the parent input component applies to all validators. Even if each validator has certain tasks, they will produce the same error message.
Furthermore, letʹs see an example that uses a validator in an iterating component. The aim is to apply a different pattern for each input (at each iteration), and for this we have used the built‐in <f:validateRegex/> validator with a ValueExpression for the pattern attribute:
public class Player implements Serializable {

 private static final long serialVersionUID = 1L;

 private String pattern;
 private String field;
 private String label;

 public Player(String pattern, String field, String label) {
  this.pattern = pattern;
  this.field = field;
  this.label = label;
 }
 ...
 // getters and setters
 ...
}

@Named
@SessionScoped
public class PlayerBean implements Serializable {

 private static final long serialVersionUID = 1L;

 private List<Player> players;

 @PostConstruct
 public void init() {
  players = Arrays.asList(
   new Player("([^.@]+)(\\.[^.@]+)*@([^.@]+\\.)+([^.@]+)",
                                                     "mike@gmail.com", "E-mail"),
   new Player("^\\+(?:[0-9] ?){6,14}[0-9]$", "+1 1234567890123", "Phone Number"),
   new Player("^[0-9]{5}(?:-[0-9]{4})?$", "12345-4423", "Zip Code"),
   new Player("^[a-zA-Z\\\\s]+", "MikeTorn", "Full Name"));
 }

 public List<Player> getPlayers() {
  return players;
 }
}
Now, let’s apply the <f:validateRegex/> as below:
<h:form>
 <p:dataTable value="#{playerBean.players}" var="player">
  <p:column headerText="Player">
   <p:outputLabel value="#{player.label}" for="inputId"/>
  </p:column>
  <p:column headerText="Details">
   <p:inputText id="inputId" value="#{player.field}">
    <f:validateRegex pattern="#{person.pattern}"/>
   </p:inputText>
  </p:column>
  <p:column>
   <p:message for="inputId" />
  </p:column>
 </p:dataTable>
 <p:commandButton value="Submit" update="@form"/>
 <h:outputText value="Thanks!" rendered="#{facesContext.postback and not
                                           facesContext.validationFailed}" />
</h:form>
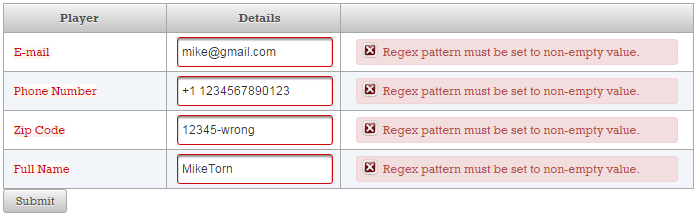
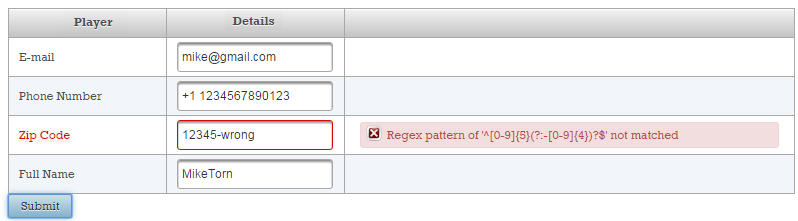
Now, we intentionally provide an invalid pattern (e.g. for the zip code). This will cause the result in the figure below (obviously this is not the expected result):
Now, letʹs see the OmniFaces approach for solving these problems/issues. In order to support deferred value expressions in all of the validators attributes, OmniFaces extended the built‐in <f:validator/> with a tag handler that can be evaluated on a per‐iteration basis inside an iterating component. The <o:validator/> extends <f:validator/> with support for the deferred value expressions in all off tha validators attributes of validators. In order to use it, simply follow these steps:
- Replace your validator with
<o:validator/>. - Use the
validatorIdattribute to indicate theVALIDATOR_ID(e.g.javax.faces.LongRange,javax.faces.RegularExpression,javax.faces.DoubleRange, etc). For standard validators, you can find theVALIDATOR_IDin the official documentation. - Place deferred value expressions in the desired attributes.
For example, in our case replace <f:validateRegex/> with <o:validator/> like below:
<p:column headerText="Details">
<p:inputText id="inputId" value="#{player.field}">
<o:validator validatorId="javax.faces.RegularExpression"
pattern="#{player.pattern}"/>
</p:inputText>
</p:column>
...
Or, if there are several invalid fields we will obtain something like in the figure below:

The complete application is named, ValidatorIteratingComponent.
Discussing validators dependency injection
JSF 2.0 provides a very modest support for injection in JSF artifacts. In JSF 2.1 very few JSF artifacts were injection targets. Starting with JSF 2.2, injection is possible in many more artifacts (check Mastering JavaServer Faces 2.2), but as the specification says, converters, validators and behaviors are still not injection targets. It seems that this will be available from JSF 2.3. Until JSF 2.3, there were a few tricks to obtain validators eligible for injection. First approach, was to provide the validator as a managed bean as in the below skeleton:
// Until JSF 2.3 - custom validator eligible for @Inject

@Named(value="fooValidator")
@RequestScoped
public class FooValidator implements Validator {

 @Inject
 // artifact

 @Override
 public void validate(FacesContext context,
        UIComponent component, Object value) throws ValidatorException {
  ...
  // use the injected artifact
  ...
 }
}
Usage example:
<p:inputText value="#{bean_property}" validator="#{fooValidator.validate}" />
Another approach consists of relying on OmniFaces support. This approach brings @Inject and @EJB into custom validators (@FacesValidator) as if it were there forever. There is nothing to configure, no additional annotations, no need to modify your exiting validators. Simply by using OmniFaces you get the bonus of having your custom validators eligible for injection. For example, the below code represents a typical JSF custom validator. Since OmniFaces is around, this custom validator supports @Inject and @EJB:
@FacesValidator("fooValidator")
public class FooValidator implements Validator {

 @EJB
 private FooEJB fooejb;

 @Inject
 private fooCDI foocdi;

 @Override
 public void validate(FacesContext context,
        UIComponent component, Object value) throws ValidatorException {
  ...
  // work here with fooejb and foocdi
  ...
 }
}
Nevertheless, if you are using JSF 2.3 then you don’t need the above two approaches or any other workaround because JSF 2.3 comes with this feature out of the box. In order to test this facility you need to:
- specify a new attribute called
managedon the corresponding annotations; - add in the
WEB-INFfolder thefaces-config.xmlwith the JSF 2.3 XSD;
So, in JSF 2.3 we have:
@FacesValidator(value = "fooValidator", managed = true)
public class FooValidator implements Validator {

 @Inject
 // artifact

 @Override
 public void validate(FacesContext fc,
             UIComponent uic, Object o) throws ValidatorException {
  ...
  // use the injected artifact
  ...
 }
}
Further details are available here.
Entirely skip validation
OmniFaces 2.3 comes with a new tag handler named SkipValidators. As its name suggest, this tag handler allows us to entirely skip validation when executing an UICommand or ClientBehaviorHolder action. Simply place the <o:skipValidators/> tag inside a UICommand or ClientBehaviorHolder component. For example, in the below code, the button labeled Hard Submit will take validation into account, while the button labeled Soft Submit will entirely skip validation and the submitted data end up in the data model:
<h:form>
 <p:messages/>
 <p:panelGrid columns="2">
  <p:outputLabel for="nameId" value="Name:"/>
  <p:inputText id="nameId" value="#{dataBean.name}" required="true"/>
  <p:outputLabel for="emailId" value="E-mail:"/>
  <p:inputText id="emailId" value="#{dataBean.email}"
               required="true" validator="emailValidator"/>
  <p:commandButton value="Hard Submit" update="@form"/>
  <p:commandButton value="Soft Submit" update="@form">
   <o:skipValidators />
  </p:commandButton>
 </p:panelGrid>
 Name: #{dataBean.name} | E-mail: #{dataBean.email}
</h:form>
In the figure below you can see the effect produced by the two buttons (figure from the right takes advantage of <o:skipValidators />):
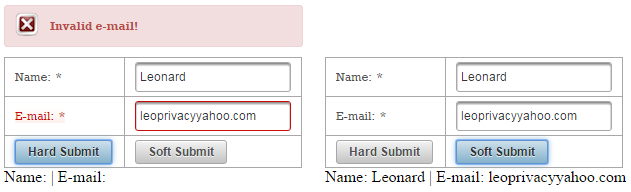
This can be useful in different scenarios including debugging, testing, dynamically adding/removing items from a form, etc. You can temporarily disable the validation for large forms and perform different checks with respect to data model. Instead of removing validators one by one, you simply add this tag handler.
The complete application is named EntirelySkipValidation.
Handling view parameters validation failure
As a quick reminder, view parameters extend UIInput and they support built‐in/custom converters and validators. These artifacts can be attached via <f:converter/>/<f:validator/>, <f:convertXxx/>/ <f:validateXxx/> and converter, validator attributes.
In this section, we think of solving the following tasks:
- Handle a view parameter validation failure with either a redirect or an HTTP error status.
- Optionally add a flash message to redirect or an HTTP error message to HTTP error status.
- Place the validation failure handling “locally”, per view parameter, or “globally” in
<f:metadata/>, as a validation failure handling for all view parameters.
So, letʹs see an example meant to highlight this problem/issue. Letʹs suppose that the following <f:metadata/> section (you can also use the built‐in validator, required="true"):
<f:metadata>
 <f:viewParam id="nameId" name="name"
              validatorMessage="The name is not valid!">
  <f:validateRegex pattern="^[a-zA-Z\\\\s]+"/>
 </f:viewParam>
 <f:viewParam id="ageId" name="age"
              validatorMessage="The age is not valid!">
  <f:validateRegex pattern="^(\d?[1-9]|[1-9]0)$"/>
 </f:viewParam>
</f:metadata>
Validating the <f:metadata/> view parameters
If the validation failed (FacesContext#isValidationFailed() returns true) we need to verify the validation status for all view parameters (check UIInput#isValid() for each view parameter) until we find the first invalid one (if any). When we found an invalid view parameter (UIInput#isValid() return false) we send a HTTP error status with a custom message (ExternalContext#responseSendError()). We can accomplish this via lambda expressions and JSF API, like below:
<h:body>
 #{facesContext.validationFailed ?
   (vdl = facesContext.application.viewHandler.
          getViewDeclarationLanguage(facesContext, view.viewId);
    viewMetadata = vdl.getViewMetadata(facesContext, view.viewId);
    allViewParams = viewMetadata.getViewParameters(view);
    allViewParams.size() gt 0 ?
     (allViewParams.stream().forEach((t) -> (t.valid ?
       '' : (facesContext.externalContext.responseCommitted ?
       '' : facesContext.externalContext.
            responseSendError(400, "One of your view parameters is invalid !");
            facesContext.responseComplete())))):''):''}

 <h:outputText value="Everything works perfect!"/>

</h:body>
Validating each view parameter
As you can see, we have two view parameters. Letʹs suppose that we want to perform a redirect, if the first view parameter (nameId) validation fails, and to send a HTTP error status, if the second view parameter (ageId) validation fails. We can easily adjust the above approach to obtain a general solution, but we can also use a particular approach and do something like this:
<h:body>
 #{facesContext.validationFailed ?
   (facesContext.viewRoot.findComponent('nameId').valid ?
     '' : facesContext.externalContext.
           redirect('https://leanpub.com/PrimeFaces-OmniFaces-Powers-Combined');
          facesContext.viewRoot.findComponent('ageId').valid ?
     '' : facesContext.externalContext.
           responseSendError(400, 'Please, provide a valid age !');
    facesContext.responseComplete()):''}

 <h:outputText value="Everything works perfect!"/>
</h:body>
Introducing the OmniFaces viewParamValidationFailed
Now, letʹs see the OmniFaces approach for solving these problems/issues. OmniFaces comes with a tag handler named, ViewParamValidationFailed. This tag handler can be used in page via <o:viewParamValidationFailed/> tag and allows us to handle a view parameter validation failure with either a redirect or an HTTP error status, optionally with respectively a flash message or HTTP error message. It can be applied to <f:param/>, <o:param/> and <f:metadata/>, and it supports three optional attributes as follows:
-
sendRedirect‐ Indicates the URL to send redirect to on validation failure. This attribute is required when thesendErrorattribute is not present, and it relies on theFaces#redirect()utility method. -
sendError‐ Indicates the HTTP status code. Donʹt use this attribute andsendRedirectin the same time. This attribute relies on theFaces#responseSendError()utility method. -
message‐ Indicates a custom message to send along with the redirect or error. By default, the validation error message will be used.
Use viewParamValidationFailed for validating the <f:metadata/> view parameters
In this case, we need to attach the <o:viewParamValidationFailed/> to <f:metadata/>. So, we have:
<h:head>
 <f:metadata>
  <f:viewParam id="nameId" name="name" required="true"
                   validatorMessage="The name is not valid!">
   <f:validateRegex pattern="^[a-zA-Z\\\\s]+"/>
  </f:viewParam>
  <f:viewParam id="ageId" name="age" required="true"
               validatorMessage="The age is not valid!">
   <f:validateRegex pattern="^(\d?[1-9]|[1-9]0)$"/>
  </f:viewParam>
  <o:viewParamValidationFailed sendError="400"
     message="One of your view parameters is invalid !" />
 </f:metadata>
</h:head>
<h:body>
 <h:outputText value="Everything works perfect!"/>
</h:body>
Now, let’s suppose that we run the code from the following URLs:
- a valid name and surname:
http://.../?name=rafaelnadal&age=29
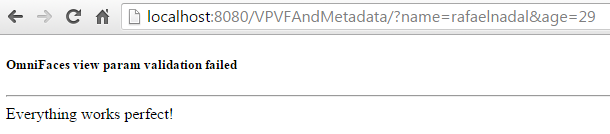
- an invalid age (or/and name):
http://.../?name=rafaelnadal&age=29d

The complete application is named VPVFAndMetadata.
Use viewParamValidationFailed for validating each view parameter
In this case, we need to attach the <o:viewParamValidationFailed/> to each view parameter. So, we have:
<h:head>
 <f:metadata>
  <f:viewParam id="nameId" name="name"
               validatorMessage="The name is not valid!">
   <f:validateRegex pattern="^[a-zA-Z\\\\s]+"/>
   <o:viewParamValidationFailed sendRedirect=
    "https://leanpub.com/PrimeFaces-OmniFaces-Powers-Combined" />
  </f:viewParam>
  <f:viewParam id="ageId" name="age" validatorMessage="The age is not valid!">
   <f:validateRegex pattern="^(\d?[1-9]|[1-9]0)$"/>
   <o:viewParamValidationFailed sendError="400"
                                message="Please, provide a valid age !" />
  </f:viewParam>
 </f:metadata>
</h:head>
<h:body>
 <h:outputText value="Everything works perfect!"/>
</h:body>
Now, let’s suppose that we run the code from the following URLs:
- a valid name and surname:
http://.../?name=rafaelnadal&age=29
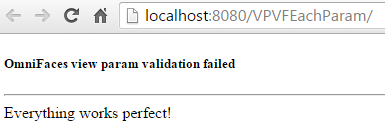
- an invalid age:
http://.../?name=rafaelnadal&age=29d
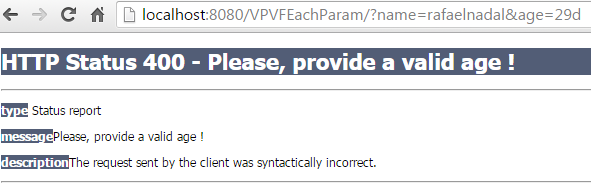
- an invalid name (and/or age):
http://.../?name=29rafaelnadal&age=29
The complete application is named VPVFEachParam.
That’s more
You can customize HTTP error pages via <error-page/> entries in web.xml. Otherwise the server‐default one will be displayed instead. If we skip the message attribute, then OmniFaces will use the default error messages (e.g. in the above use cases, the messages indicated via validatorMessage attribute). If we attach <o:viewParamValidationFailed/> “locally” to view parameters and “globally” to <f:metadata/> also, then the “global” <o:viewParamValidationFailed/> will be evaluated only if none of the “local” <o:viewParamValidationFailed/> has already handled the validation error.
Do not forget to check out the OmniFaces Showcase. There, you can read more details (e.g. design notes) and test more examples.