Overview of Image Generation
I have never used deep learning image generation at work but I have fun experimenting with both code and model examples, as well as turn-key web apps like DALL·E. In this chapter we look at two approaches to generating images from text prompts.
The examples for this chapter are in the directory source-code/deep_learning_image_generation.
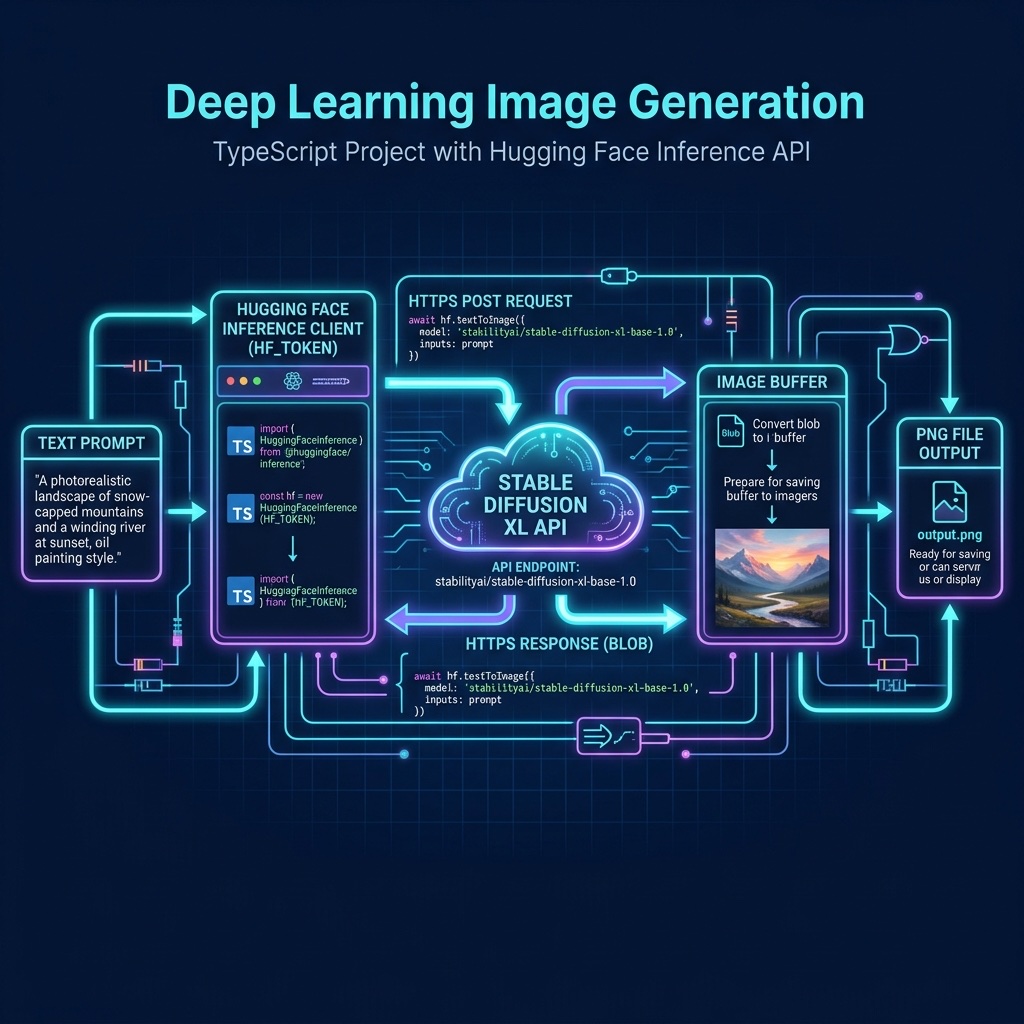
Image Generation Using the Hugging Face Inference API
While running full Stable Diffusion models locally in TypeScript is not yet as straightforward as in Python (due to the large model sizes and GPU requirements), the Hugging Face Inference API provides a clean way to generate images from text prompts using their hosted models. This approach sends your prompt to Hugging Face’s servers and returns the generated image.
1 npm install @huggingface/inference
 1 // image_generation.ts - Generate images via Hugging Face Inference API
 2
 3 import { HfInference } from "@huggingface/inference";
 4 import { writeFileSync } from "node:fs";
 5
 6 const token = process.env.HF_TOKEN;
 7 if (!token) { console.error("Please set the HF_TOKEN environment variable"); process.exit(1); }
 8
 9 const prompt = "a serene mountain landscape at sunset, oil painting style";
10 console.log(`Generating image for prompt: '${prompt}'`);
11
12 const image = await new HfInference(token).textToImage({
13   model: "stabilityai/stable-diffusion-xl-base-1.0",
14   inputs: prompt,
15   parameters: { num_inference_steps: 25 },
16 });
17
18 writeFileSync("generated_landscape.png", Buffer.from(await image.arrayBuffer()));
19 console.log("Image saved to: generated_landscape.png");
The code sends the text prompt to Hugging Face’s hosted model, which runs inference on their GPU infrastructure and returns the generated image. You need a free Hugging Face account and API token (set as the HF_TOKEN environment variable).
Here is sample output:
1 $ tsx image_generation.ts
2 Generating image for prompt: 'a serene mountain landscape at sunset, oil painting style'
3 Image saved to: generated_landscape.png
Image Generation Using Local Ollama Models
If you have Ollama installed with a vision-capable model, you can also generate image descriptions and use Ollama for image-related tasks. For actual image generation from text prompts on your local machine, consider using the Stable Diffusion web UI or ComfyUI which provide REST APIs that you can call from TypeScript.
Understanding the Diffusion Process
Stable Diffusion works by a process called denoising diffusion:
- Start with pure random noise (a tensor of random values).
- Gradually remove noise over many steps, guided by the text prompt.
- The result is an image that matches the prompt description.
The text prompt is converted to an embedding vector using a text encoder (CLIP), which guides the denoising process at each step. This is why the same prompt can generate different images with different random seeds.
Recommended Reading for Image Generation
You can get more information on DALL·E and later versions from https://openai.com/blog/dall-e/. You will get much higher quality images using OpenAI’s DALL·E web service.
For more advanced image generation, explore:
- The Hugging Face diffusers documentation for Stable Diffusion variants, ControlNet, and image-to-image generation.
- Stable Diffusion XL (SDXL) for higher quality image generation.
- The Hugging Face Inference API for running models without local GPU requirements.
Optional Practice Problems
- Dynamic Command-Line Prompts: Modify the
image_generation.tsscript to accept the image generation prompt as a command-line argument usingprocess.argv. Fall back to a default prompt if the user does not provide one. - Parameter Exploration: The example uses
num_inference_steps: 25and the modelstabilityai/stable-diffusion-xl-base-1.0. Experiment with changing the model (for example, tryingrunwayml/stable-diffusion-v1-5) and adjusting the number of inference steps (e.g., 10 vs. 50). How do these changes affect the execution time and the details in the generated image? - Dynamic Output Naming: To avoid overwriting
generated_landscape.pngon each run, update the code to generate unique filenames automatically. You could slugify the prompt (e.g., converting spaces to hyphens) or append a timestamp/random seed to the filename. - Explore Image-to-Text: Using the
@huggingface/inferenceSDK, write a new script that performs image-to-text inference (image captioning). Read a local image file and send it to a model likeSalesforce/blip-image-captioning-largeto print a description of the image to the console.