Web Application in 5 Minutes (or Less)
Aling Nena’s Request
Imagine one month from now you’re walking down your street. Passing by your neighborhood sari-sari store, its owner, Aling Nena, calls you over.
“You know how to make websites, right?”
Now, you’ve known Aling Nena since childhood so you know that she’s not your typical sari-sari store owner. Instead of a TV, she’s got a desktop computer with broadband connection to occupy herself while waiting for customers. It’s not uncommon to see her browsing social networking sites or chatting with her children and grandchildren abroad whenever you buy something from her store.
“I’d like to have a website for tracking the debts of my customers. I’m using a spreadsheet now, but it’s getting more and more of a hassle to open the spreadsheet file when I could just open a new tab in my browser. Think you could do it? I’ll give you a week-long supply of cornik for your trouble…”
Once you heard the last part, you immediately accepted the request. I mean, who could turn down such an irresistible offer like a week-long supply of cornik?
And so Aling Nena enumerated what she wants the website to do:
- It must be able to list all of the her customers’ debts.
- It must be able to create a new debt record.
- It must be able to retrieve and display the details of a single debt.
- It must be able to update the details of a debt.
- It must be able to delete a debt record.
Also, a debt record should have the following details:
- name – the name of the customer with the debt
- item – contains the items bought under credit; can be much longer than the name field
- amount – the amount the customer owes Aling Nena; should allow cents.
“Sure, no problem,” you replied after seeing the requirements.
You take out your laptop from your bag, booted it up, and then entered the following commands in the command line:
$ rails new alingnena-app
$ cd alingnena-app
$ rails generate scaffold debt name:string item:text amount:decimal
$ rake db:migrate
$ rails server
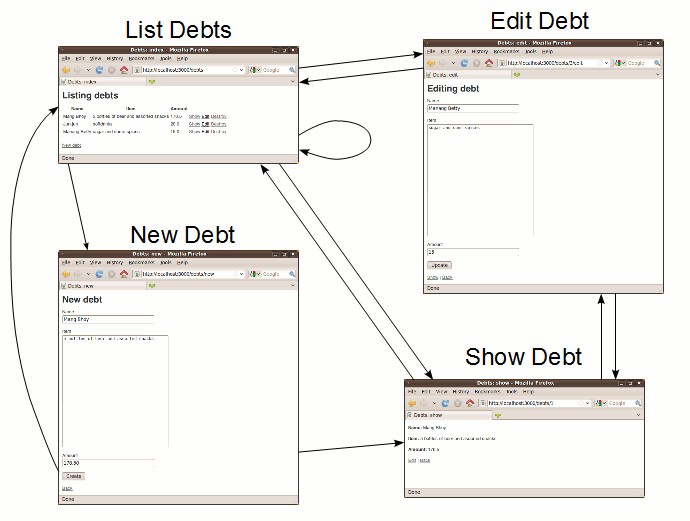
After running these commands, you open your browser to http://localhost:3000/debts and showed the results to Aling Nena.
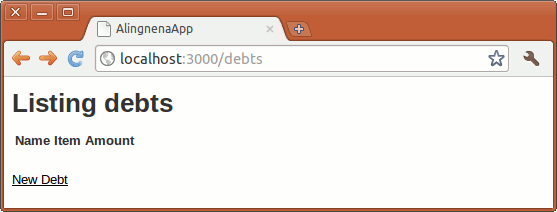
Clicking the New Debt Link will open the New Debt page.
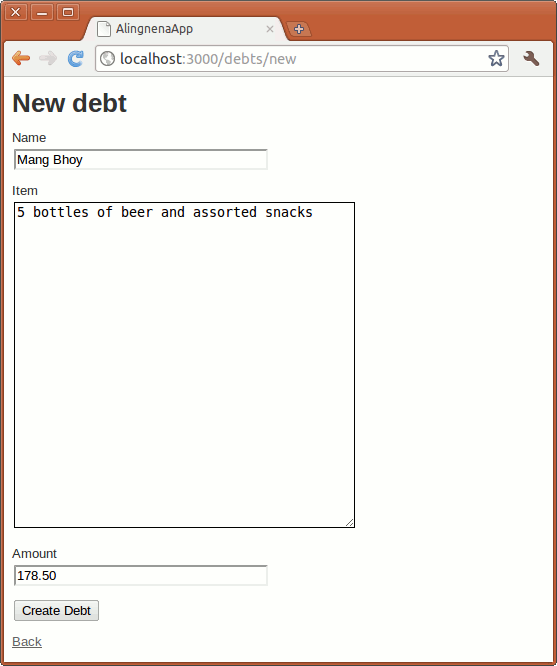
Clicking Create will save the new debt.
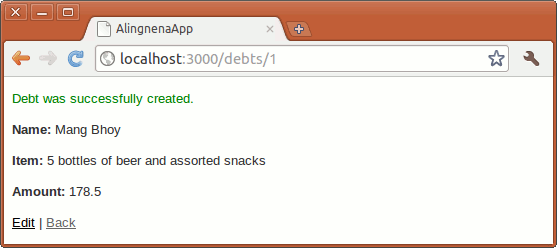
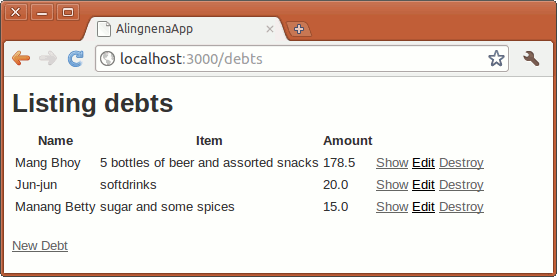
Finally, clicking the Back link will return you to the List Debts page. Each existing record has Show, Edit, and Destroy links so that Aling Nena can view, update, and delete the records, respectively.
If you’re like Aling Nena, who’s staring speechlessly at the screen amazed at how fast you created the web application, you might be wondering, “That’s it?!?”
Yes, that’s all you need to do to create a working Ruby on Rails application. In the next few sections, we shall discuss what just happened here.
Creating the Application
The first command tells Rails to create the directory structure and the files needed by the application.
$ rails new alingnena-app
In this case, we named our application “alingnena-app” and the following directory structure was created by rails:

Here’s a brief explanation for each item in the application folder (copied from the Rails Guides):
| File/Folder | Purpose |
|---|---|
app/ |
Contains the controllers, models, views, helpers, mailers and assets for your application. You’ll focus on this folder for the remainder of this guide. |
bin/ |
Contains the rails script that starts your app and can contain other scripts you use to deploy or run your application. |
config/ |
Configure your application’s routes, database, and more. |
config.ru |
Rack configuration for Rack based servers used to start the application. |
db/ |
Contains your current database schema, as well as the database migrations. |
Gemfile <br /> Gemfile.lock
|
These files allow you to specify what gem dependencies are needed for your Rails application. These files are used by the Bundler gem. For more information about Bundler, see the Bundler website. |
lib/ |
Extended modules for your application. |
log/ |
Application log files. |
public/ |
The only folder seen by the world as-is. Contains static files and compiled assets. |
Rakefile |
This file locates and loads tasks that can be run from the command line. The task definitions are defined throughout the components of Rails. Rather than changing Rakefile, you should add your own tasks by adding files to the lib/tasks directory of your application. |
README.rdoc |
This is a brief instruction manual for your application. You should edit this file to tell others what your application does, how to set it up, and so on. |
test/ |
Unit tests, fixtures, and other test apparatus. These are covered in Testing Rails Applications. |
tmp/ |
Temporary files (like cache, pid, and session files). |
vendor/ |
A place for all third-party code. In a typical Rails application this includes vendored gems. |
At this point, we can already test if the application is setup properly by skipping the 3rd and 4th commands above i.e.:
$ cd alingnena-app
$ rails server
Opening your browser to http://localhost:3000/ will result in the following screen:

If you’ve read the table above thoroughly (which I bet you didn’t), you’ll realize that http://localhost:3000/ points to the public/ folder. In many web servers, the default HTML file returned by the server is index.html when you don’t specify the page. Rails, however, provides a default page when public/index.html is not found. You can verify this by putting a dummy index.html file in that folder.
The welcome screen above is basically “home page” of the application. Later in this course, we shall discuss how to replace this page with a dynamic one.
Generating the Scaffolding
The next command generates everything needed for the debt application: the code for setting up the database tables, the code to handle the user’s actions, the web pages displayed to the user, etc. The command is a bit complicated so let’s dissect the command part-by-part:
$ rails generate scaffold debt name:string item:text amount:decimal
-
rails generate– tells ruby to run the “generate” script -
scaffold– tells the generate script to create a scaffolding. Like its construction counterpart, a scaffold is just a temporary structure where we start building our applications. -
debt– the name of this part of the application. In the next chapter, we shall discuss the concept ofConvention Over Configuration and this is a prime example of that approach. Take note of how Ruby on Rails uses this single word as aconvention throughout the application:- “Debts” will become the name of the resource i.e. the table in the database.
- The model class that will handle the database operations for that resource will be named “Debt.”
- The debt handling application will be accessed via http://localhost/debts.
- “Debts” will be the name of the debt handling application as we shall later see in the Action Controllers.
-
name:string item:text amount:decimal– these define the fields for the Debts table. As you may have guessed, this part tells the script that the table will have a “name” field containing strings, an “item” field containing text (longer than a string), and an “amount” field containing a decimal value. Convention Over Configuration is also active here, by looking at the type of field, the script knows that “name” should use an<input type="text">element in the web page while “item” would use<textarea>.
The command generates the following files:
| File | Purpose |
|---|---|
app/models/debt.rb |
The Debt model. The Model-View-Controller architecture will be discussed in the next chapter. |
db/migrate/2014xxxxxxxxxx_create_debts.rb |
Migration to create the debts table in your database (your name will include a different timestamp). |
app/views/debts/index.html.erb |
A view to display an index of all debts. |
app/views/debts/index.json.jbuilder |
A view to display an index of all debts in JSON format. |
app/views/debts/show.html.erb |
A view to display a single debt. |
app/views/debts/show.json.jbuilder |
A view to display a single debt in JSON format. |
app/views/debts/new.html.erb |
A view to create a new debt. |
app/views/debts/edit.html.erb |
A view to edit an existing debt. |
app/views/debts/_form.html.erb |
A partial to control the overall look and feel of the form used in edit and new views. |
app/assets/stylesheets/debts.css.scss |
Cascading style sheet (in SCSS) with styles for the debts views. |
app/assets/stylesheets/scaffold.css.scss |
Cascading style sheet (in SCSS) to make the scaffolded views look better. |
app/assets/javascripts/debts.js.coffee |
JavaScript (in CoffeeScript) describing behavior of the debts views. |
app/controllers/debts_controller.rb |
The Debts controller. |
test/functional/debts_controller_test.rb |
Functional testing harness for the debts controller. |
app/helpers/debts_helper.rb |
Helper functions to be used from the debts views. |
config/routes.rb |
Edited to include routing information for debts. |
test/fixtures/debts.yml |
Dummy debts for use in testing. |
app/helpers/debts_helper.rb |
Unit testing harness for the debts model. |
test/unit/helpers/debts_helper_test.rb |
Unit testing harness for the debts helper. |
One thing to note here is that generated scaffolding only has one flow:
While this might be sufficient for simple applications, this flow is rarely used in typical real world applications. Being a temporary structure, it’s very likely that you will modify the scaffolding to the point that the finished product is very different from where you started. That said, many experienced Ruby on Rails developers avoid scaffolding entirely, preferring to write all or most of their source code from scratch.
Setting Up the Database
The final command deals with setting up the database:
$ rake db:migrate
Database migrations are Ruby classes that are designed to make it simple to create and modify database tables. The rake command above applies all migrations not yet applied to the target database.
In our example, the command above applies the migration that was part of the generated scaffolding, 2014xxxxxxxxxx_create_debts.rb. Let’s take a look at the contents of that file:
class CreateDebts < ActiveRecord::Migration
  def change
    create_table :debts do |t|
      t.string :name
      t.text :item
      t.decimal :amount

      t.timestamps
    end
  end
end
This is an example of a real working Ruby code. You might notice how high-level Ruby code is; even if this is the first Ruby code you’ve seen in your life, it doesn’t take much effort to see that this file defines (“def”) the “change” behavior wherein it creates a table named “debt” along with the fields we’ve specified before. Later in the course, we shall discuss how to do other things with migrations like modifying tables and rolling back changes.
Frequently Asked Questions
Did Ruby on Rails compile the generated code?
No. Ruby is an interpreted language like JavaScript and so it isn’t compiled. You could even edit your code while the server is running – you would immediately see the changes the next time you access the updated application.
Can I use a different web server aside from the bundled one?
For most cases, the built in web server (WEBrick) is sufficient for development. You can just switch to more full fledged servers like Apache and nginx once you deploy the live version of your application.
However, if you feel WEBrick is somewhat slow, you can also try using Thin as a replacement. To install Thin, add the following line at the end of your Gemfile:
gem 'thin'
Then install it by running bundle install.
Once installed, starting the server with rails server will now use Thin instead of WEBrick.
$ rails s
=> Booting Thin
=> Rails 4.0.5 application starting in development on http://0.0.0.0:3000
=> Run `rails server -h` for more startup options
=> Ctrl-C to shutdown server
Thin web server (v1.6.2 codename Doc Brown)
Maximum connections set to 1024
Listening on 0.0.0.0:3000, CTRL+C to stop
Some commands start with rails, others with rake. What’s the difference?
- rails – the command used to create an application and run Rails scripts.
- rake – similar to C’s “
make” (rake = Ruby + make), it’s a tool that allows more complicated scripts for tasks like database migration and running unit tests.