Deployment
This final chapter deals with the various issues and concerns behind deploying your applications.
Configuration
Convention over Configuration means that, in Rails, we don’t have to configure most of the settings that need to be configured in a typical web application. However, we still need to configure some settings, especially those settings that change depending on the environment where the application is deployed to or executed.
Rails Settings
You can find the global configuration settings for your Rails application at config/application.rb. Here’s the default configuration file when you create an application:
require File.expand_path('../boot', __FILE__)

require 'rails/all'

# Require the gems listed in Gemfile, including any gems
# you've limited to :test, :development, or :production.
Bundler.require(*Rails.groups)

module AlingnenaApp
  class Application < Rails::Application
    # Settings in config/environments/* take precedence over those specified here.
    # Application configuration should go into files in config/initializers
    # -- all .rb files in that directory are automatically loaded.

    # Set Time.zone default to the specified zone and make Active Record auto-...
    # Run "rake -D time" for a list of tasks for finding time zone names. Default...
    # config.time_zone = 'Central Time (US & Canada)'

    # The default locale is :en and all translations from config/locales/*.rb,yml...
    # config.i18n.load_path += Dir[Rails.root.join('my', 'locales', '*.{rb,yml}')...
    # config.i18n.default_locale = :de
  end
end
The first few lines simply loads all of the available packages before running Rails. Here we see how Rails loads the gems defined in Gemfile via Bundler.
The bulk of the file contains global configuration settings. You might remember config.time_zone that we already discussed back in the Active Support lesson.
Environment specific settings exist in our applications. For example, verbose debugging errors may not be as useful in production as it is in development so we set it in the latter and disable it in the former. We can set environment specific settings inside the config/environments folder. By default, a Rails application has 3 environments:
-
development– the default environment, built for development. This is the environment where we’ve been working on before we went to testing -
test– this is the environment where our tests are executed against -
production– the environment that the users will eventually use
Each of these environments have a .rb file in the config/environments folder containing their settings i.e. development.rb, test.rb, and production.rb.
Looking at development and production, we could see some significant differences. Here’s the default development.rb contents:
AlingnenaApp::Application.configure do
  # Settings specified here will take precedence over those in config/application.rb.

  # In the development environment your application's code is reloaded on
  # every request. This slows down response time but is perfect for development
  # since you don't have to restart the web server when you make code changes.
  config.cache_classes = false

  # Do not eager load code on boot.
  config.eager_load = false

  # Show full error reports and disable caching.
  config.consider_all_requests_local       = true
  config.action_controller.perform_caching = false

  # Don't care if the mailer can't send.
  config.action_mailer.raise_delivery_errors = false

  # Print deprecation notices to the Rails logger.
  config.active_support.deprecation = :log

  # Raise an error on page load if there are pending migrations
  config.active_record.migration_error = :page_load

  # Debug mode disables concatenation and preprocessing of assets.
  # This option may cause significant delays in view rendering with a large
  # number of complex assets.
  config.assets.debug = true
end
while here is production.rb:
AlingnenaApp::Application.configure do
  # Settings specified here will take precedence over those in config/application.rb.

  # Code is not reloaded between requests.
  config.cache_classes = true

  # Eager load code on boot. This eager loads most of Rails and
  # your application in memory, allowing both thread web servers
  # and those relying on copy on write to perform better.
  # Rake tasks automatically ignore this option for performance.
  config.eager_load = true

  # Full error reports are disabled and caching is turned on.
  config.consider_all_requests_local       = false
  config.action_controller.perform_caching = true

  # Enable Rack::Cache to put a simple HTTP cache in front of your application
  # Add `rack-cache` to your Gemfile before enabling this.
  # For large-scale production use, consider using a caching reverse proxy like...
  # config.action_dispatch.rack_cache = true

  # Disable Rails's static asset server (Apache or nginx will already do this).
  config.serve_static_assets = false

  # Compress JavaScripts and CSS.
  config.assets.js_compressor = :uglifier
  # config.assets.css_compressor = :sass

  # Do not fallback to assets pipeline if a precompiled asset is missed.
  config.assets.compile = false

  # Generate digests for assets URLs.
  config.assets.digest = true

  # Version of your assets, change this if you want to expire all your assets.
  config.assets.version = '1.0'

  # Specifies the header that your server uses for sending files.
  # config.action_dispatch.x_sendfile_header = "X-Sendfile" # for apache
  # config.action_dispatch.x_sendfile_header = 'X-Accel-Redirect' # for nginx

  # Force all access to the app over SSL, use Strict-Transport-Security, and use...
  # config.force_ssl = true

  # Set to :debug to see everything in the log.
  config.log_level = :info

  # Prepend all log lines with the following tags.
  # config.log_tags = [ :subdomain, :uuid ]

  # Use a different logger for distributed setups.
  # config.logger = ActiveSupport::TaggedLogging.new(SyslogLogger.new)

  # Use a different cache store in production.
  # config.cache_store = :mem_cache_store

  # Enable serving of images, stylesheets, and JavaScripts from an asset server.
  # config.action_controller.asset_host = "http://assets.example.com"

  # Precompile additional assets.
  # application.js, application.css, and all non-JS/CSS in app/assets folder are...
  # config.assets.precompile += %w( search.js )

  # Ignore bad email addresses and do not raise email delivery errors.
  # Set this to true and configure the email server for immediate delivery to raise...
  # config.action_mailer.raise_delivery_errors = false

  # Enable locale fallbacks for I18n (makes lookups for any locale fall back to
  # the I18n.default_locale when a translation can not be found).
  config.i18n.fallbacks = true

  # Send deprecation notices to registered listeners.
  config.active_support.deprecation = :notify

  # Disable automatic flushing of the log to improve performance.
  # config.autoflush_log = false

  # Use default logging formatter so that PID and timestamp are not suppressed.
  config.log_formatter = ::Logger::Formatter.new
end
We can see here why we don’t need to restart the server every time we make a change to our application; in development, the classes and templates are not cached. On the other hand, in production, all classes and templates are cached to improve performance.
Configuration settings for internationalization (i18n) will be discussed in the Internationalization section below. Other configuration settings can be found at the API docs under Rails::Application.
Database Settings
We already discussed in the previous chapter where the database settings are located: config/database.yml. Here’s a sample from an SQLite based application:
# SQLite version 3.x
#   gem install sqlite3
development:
  adapter: sqlite3
  database: db/development.sqlite3
  pool: 5
  timeout: 5000

# Warning: The database defined as "test" will be erased and
# re-generated from your development database when you run "rake".
# Do not set this db to the same as development or production.
Test:
  adapter: sqlite3
  database: db/test.sqlite3
  pool: 5
  timeout: 5000

production:
  adapter: sqlite3
  database: db/production.sqlite3
  pool: 5
  timeout: 5000
And here’s one from a MySQL based application (rails new app_name -d mysql):
# MySQL.  Versions 4.1 and 5.0 are recommended.
#
# Install the MySQL driver:
#   gem install mysql2
#
# And be sure to use new-style password hashing:
#   http://dev.mysql.com/doc/refman/5.0/en/old-client.html
development:
  adapter: mysql2
  encoding: utf8
  reconnect: false
  database: mysql_development
  pool: 5
  username: root
  password:
  host: localhost

# Warning: The database defined as "test" will be erased and
# re-generated from your development database when you run "rake".
# Do not set this db to the same as development or production.
test:
  adapter: mysql2
  encoding: utf8
  reconnect: false
  database: mysql_test
  pool: 5
  username: root
  password:
  host: localhost

production:
  adapter: mysql2
  encoding: utf8
  reconnect: false
  database: mysql_production
  pool: 5
  username: root
  password:
  host: localhost
Like in our configuration files, the three default environments are also defined in database.yml, each as a YAML entry.
Each environment entry in database.yml must at least have an adapter and database value. All the other values are database specific. You can refer to Rails wiki on database support for the latest information on installing adapters for different databases as well as the properdatabase.yml settings for those adapters. For example, here’s a possible entry for MS SQL Server:
development:
  adapter: sqlserver
  mode: ODBC
  dsn: YOUR_DB_DEFINITION_NAME
  username:YOUR_DB_USERNAME
  password:YOUR_DB_PASSWORD
You can actually define different databases for each environment, say, SQLite for development, MySQL for testing, and Oracle for production. This is discouraged, however, as the inconsistencies between database implementations might create bugs that won’t be detected in development or testing.
Internationalization
Rails provides support for translating text and localizing time through its internationalization (i18n) library. We’ve already seen the basic settings for this module in config/environment.rb:
# The default locale is :en and all translations from config/locales/*.rb,yml are...
# config.i18n.load_path += Dir[Rails.root.join('my', 'locales', '*.{rb,yml}').to_s]
# config.i18n.default_locale = :de
The first commented setting provides an example of how to add an additional translation path for the translation files. In this case, all *.rb and *.yml files from the my/locales folder are loaded along with the files from config/locales/ folder.
The second commented setting is an example of how to set the default locale for the application, in this case, German.
There are many ways for setting the user’s locale. The simplest would be to have a filter in ApplicationController that checks for a locale parameter and assigns it to I18n.locale:
  before_action :set_locale
  private
    def set_locale
      I18n.locale = params[:locale]
    end
Once this is set, going to any page with the locale parameter, say http://localhost:3000/products?locale=de, would render a page using the provided locale.
Now that we’ve set up locale handling, let’s move on with the actual internationalization of our application. There are two basic helpers for i18n:
-
t– alias of translate. Looks up text from the translation files -
l– alias of localize. Localizes date and time to local formats
We use these helpers to translate text and localize time in cases where Rails doesn’t do the translation and localization for us. For example, field labels and form error messages are automatically translated, but flash messages are not.
Let’s start with a simple example, applying i18n to our New Product page.
<h1><%=t 'views.product.header.new' %></h1>
<%= render "form", product: @product, button_label: t('views.button.create') %><%= link_to t('views.link.back'), products_path %>Opening http://localhost:3000/products/new would result in:
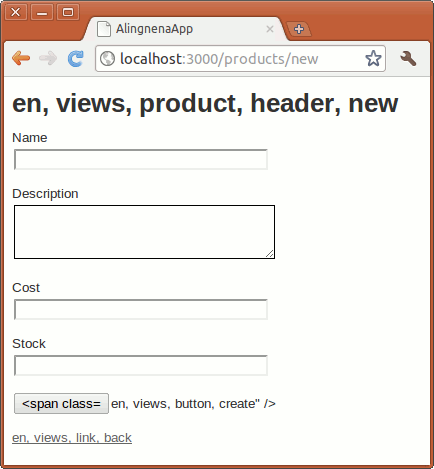
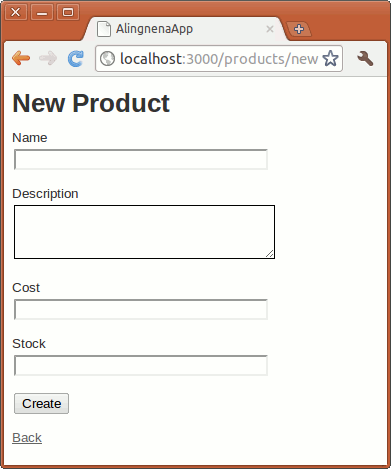
We’re missing translations for views.product.header.new, views.button.create, and views.link.back. Let’s add these to English translation file at config/locales/en.yml:
en:
  hello: "Hello world"
  views:
    button:
      create: "Create"
    link:
      back: "Back"
    product:
      header:
        new: "New Product"
The translation should now work:
Let’s try translating the page to Tagalog. Create a new translation file config/locales/tl.yml:
tl:
  views:
    button:
      create: "Likhain"
    link:
      back: "Bumalik"
    product:
      header:
        new: "Bagong Produkto"
Restart the server then go to http://localhost:3000/products/new?locale=tl:
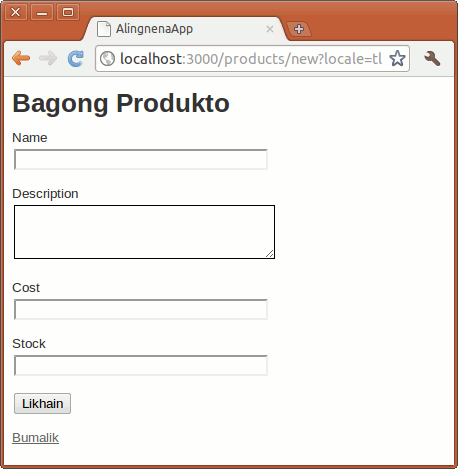
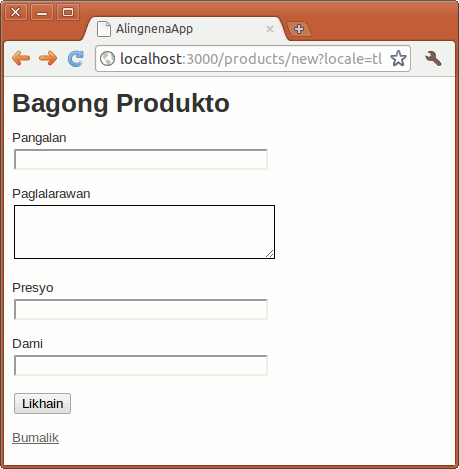
We’re still missing the translations for the fields (let’s ignore the title bar). To translate them, we’re going to need to add entries for Active Record:
tl:
  views:
    button:
      create: "Likhain"
    link:
      back: "Bumalik"
    product:
      header:
        new: "Bagong Produkto"
  activerecord:
    models:
      product: "Produkto"
    attributes:
      product:
        name: "Pangalan"
        description: "Paglalarawan"
        cost: "Presyo"
        stock: "Dami"
the activerecord entry allows us to set the name of the model as well as its attributes/fields.
It looks ok, but if you store the locale into the session in our filter like so:
def set_locale
  I18n.locale = params[:locale] || session[:locale]
  session[:locale] = params[:locale] if params.has_key? :locale
end
and save a blank product, you’ll see that we’re missing translations for our errors.
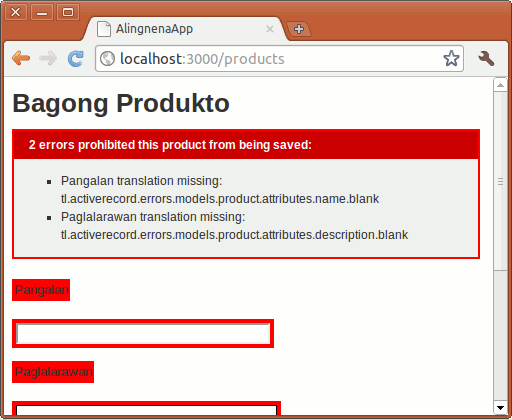
First off, we need to internationalize our error header. This can be done by modifying the line in app/views/products/_form.html.erb to:
  <% if product.errors.any? %>
    <div id="error_explanation">
      <h2><%= t "activerecord.errors.template.header", count: product.errors.count,
                model: product.class.model_name.human.downcase %>:</h2>
      <ul>
And we need to add the following line to config/locales/en.yml:
en:
...
  activerecord:
    errors:
      template:
        header:
          one:    "1 error prohibited this %{model} from being saved"
          other:  "%{count} errors prohibited this %{model} from being saved"
Here we see two i18n features: pluralization and interpolation.
The pluralization part only requires you to define two translations: one to format the singular message, another to format the plural message. You then pass the :count option to determine if the message is plural or not.
The interpolation feature allows you to interpolate variables inside the messages. You pass these variables as options to t() (:count included) and the method inserts them to sections defined by “%{}”.
Now we are done discussing the header, lets move on to the field errors. Fortunately, they have namespaces to allow you to define the error messages in generic or specific ways.
For example, validates :presence uses the :blank error message. You can define this error message under:
activerecord.errors.models.[model_name].attributes.[attribute_name].blank
activerecord.errors.models.[model_name].blank
activerecord.errors.messages.blank
That is, Rails will first check if the error message is defined for the specific attribute, then it would check the model, then it would check if a generic message was defined.
Rails i18n provides three values which you can interpolate with your messages, model (the model name), attribute (the field name), and count. For example, our blank message in Tagalog would be:
blank: "Dapat ipuno ang %{attribute}"
The count value is only available for some messages. Here is a list of the default error messages in Rails:
| validation | with option | message | default message |
|---|---|---|---|
:confirmation |
:confirmation |
doesn’t match confirmation | |
:acceptance |
:accepted |
must be accepted | |
:presence |
:blank |
can’t be blank | |
:length |
:within, :in
|
:too_short |
is too short (minimum is %{count} characters) |
:length |
:within, :in
|
:too_long |
is too long (maximum is %{count} characters) |
:length |
:is |
:wrong_length |
is the wrong length (should be %{count} characters) |
:length |
:minimum |
:too_short |
is too short (minimum is %{count} characters) |
:length |
:maximum |
:too_long |
is too long (maximum is %{count} characters) |
:uniqueness |
:taken |
has already been taken | |
:format |
:invalid |
is invalid | |
:inclusion |
:inclusion |
is not included in the list | |
:exclusion |
:exclusion |
is reserved | |
validates_associated |
:invalid |
is invalid | |
:numericality |
:not_a_number |
:not_a_number |
is not a number |
:numericality |
:greater_than |
:greater_than |
must be greater than %{count} |
:numericality |
:greater_than_or_equal_to |
:greater_than_or_equal_to |
must be greater than or equal to %{count} |
:numericality |
:equal_to |
:equal_to |
must be equal to %{count} |
:numericality |
:less_than |
:less_than |
must be less than %{count} |
:numericality |
:less_than_or_equal_to |
:less_than_or_equal_to |
must be less than or equal to %{count} |
:numericality |
:odd |
:odd |
must be odd |
:numericality |
:even |
:even |
must be even |
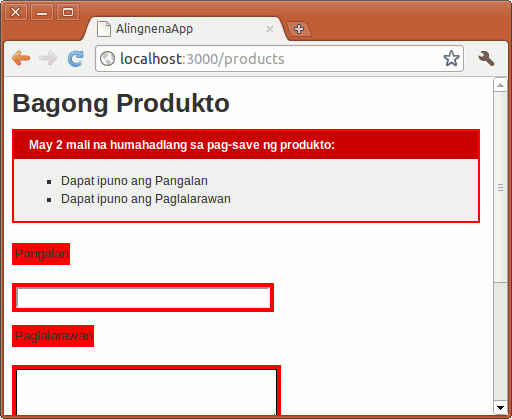
Our updated tl.yml file would be:
...
        stock: "Dami"
    errors:
      template:
        header:
          one:   "May isang mali na humahadlang sa pag-save ng %{model}"
          other: "May %{count} mali na humahadlang sa pag-save ng %{model}"
      messages:
        blank: "Dapat ipuno ang %{attribute}"
There’s still one problem with our error message:

By default, the full error message is in the form “%{attribute} %{message}”. We can change that format by through the tl.errors.format entry:
tl:
...
  errors:
    format: "%{message}"
Now our final message would be:
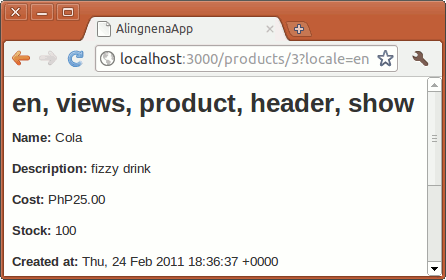
To demonstrate the time localization, let’s modify Show Product to add the created_at field along with the other i18n changes:
<h1><%=t "views.product.header.show" %></h1>
<p>
<strong><%= label(:product, :name) %>:</strong>
<%= @product.name %></p>
<p>
<strong><%= label(:product, :description) %>:</strong>
<%= @product.description %></p>
<p>
<strong><%= label(:product, :cost) %>:</strong>
<%= number_to_currency @product.cost, unit: "PhP" %></p>
<p>
<strong><%= label(:product, :stock) %>:</strong>
<%= number_with_deliimiter @product.stock %></p>
<p>
<strong><%= label(:product, :created_at) %>:</strong>
<%=l @product.created_at %></p>
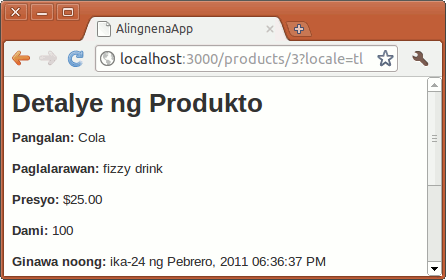
Going to http://localhost:3000/products/3?locale=en will give us (assuming 3 is the id of the Cola entry):
But trying http://localhost:3000/products/3?locale=tl will give us an error:
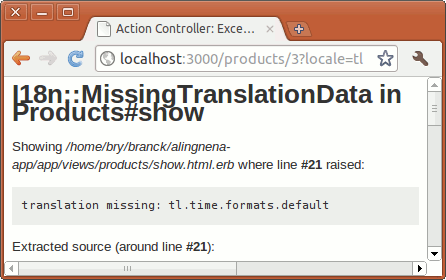
This is becausel looks for time.formats.default for the default time and datetime format (it looks for date.formats.default for date). Let’s add the necessary changes to our translation file as well (as some other entries we might need in the future):
tl:
  date:
    formats:
      default: "%Y-%m-%d"
      short: "%b %d"
      long: "ika-%d ng %B, %Y"
    day_names: [Linggo, Lunes, Martes, Miyerkules, Huwebes, Biyernes, Sabado]
    abbr_day_names: [Lin, Lun, Mar, Mye, Huw, Bye, Sab]
    # Don't forget the nil at the beginning; there's no such thing as a 0th month
    # Also, the line below is a single line
    month_names: [~, Enero, Pebrero, Marso, Abril, Mayo, Hunyo, Hulyo, Agosto,
Setyembre, Oktubre, Nobyembre, Disyembre]
    abbr_month_names: [~, Ene, Peb, Mar, Abr, May, Hun, Hul, Ago, Set, Okt, Nob, Dis]
  time:
    formats:
      default: "ika-%d ng %B, %Y %I:%M:%S %p"
      short: "%d %b %H:%M"
      long: "ika-%d ng %B, %Y %I:%M %p"
    am: "AM"
    pm: "PM"
  views:
    button:
      create: "Likhain"
    link:
      back: "Bumalik"
    product:
      header:
        new: "Bagong Produkto"
        show: "Detalye ng Produkto"
  activerecord:
    models:
      product: "Product"
    attributes:
      product:
        name: "Pangalan"
        description: "Paglalarawan"
        cost: "Presyo"
        stock: "Dami"
        created_at: "Ginawa noong"
...
The date and time formatting options can be found in the API docs under Time.strftime(). Applying the changes above produces:
(We removed the :unit => "PhP" in preparation for the next section )
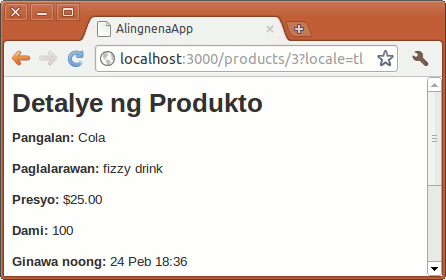
The other date and time formats can be specified in the l call. For example, if we change the created_at l call to:
<%=l @product.created_at, :format => :short %>We get:
Localization is not limited to time. Currency and numbers are also affected when you use the helper functions number_to_currency, number_with_delimiter, number_to_percentage, number_to_precision, and number_to_human_size. Note that the text in Cost no longer has a currency symbol and the scale is reduced to 1. Let’s fix that by adding the following entries:
tl:
  number:
    format:
      # Sets the separator between the units, for more precision (e.g. 1.0 / 2.0 == 0.5)
      separator: "."
      # Delimits thousands (e.g. 1,000,000 is a million) (always in groups of three)
      delimiter: ","
      # Number of decimals, behind the separator (1 with a precision of 2 gives: 1.00)
      precision: 3
    currency:
      format:
        # Where is the currency sign? %u is the currency unit, %n the number (default...
        format: "%u%n"
        unit: "PhP"
        # These three are to override number.format above and are optional
        separator: "."
        delimiter: ","
        precision: 2
  date:
...
Opening the page again gives us:

Deployment Options
We’ve already discussed the different environments available in Rails so running the server in the production environment should be easy. All we need is to change the port number to the default HTTP port (80) and we should be all set:
$ rake db:migrate RAILS_ENV=production
$ rails server -e production -p 80
However, there’s one big problem to this approach: Ruby, and by extension Rails and WEBrick, is practically single-theaded.
Try this experiment: modify the index action of Debt to make it sleep for 30 seconds, simulating an I/O or processing intensive task.
  def index
    @debts = Debt.all
    sleep 30
    respond_to do |format|
      format.html # index.html.erb
      format.xml  { render :xml => @debts }
    end
  end
Then open http://localhost:3000/debts. As expected, the page takes 30 seconds to open.
But try opening http://localhost:3000/products in another window while waiting for that page to load. You’ll see that the process is blocked.
For years, the “industry-level” solution was to maintain a cluster of Mongrel servers (a faster alternative to WEBrick) and proxy the requests via a proxy server like Apache or lighttpd.
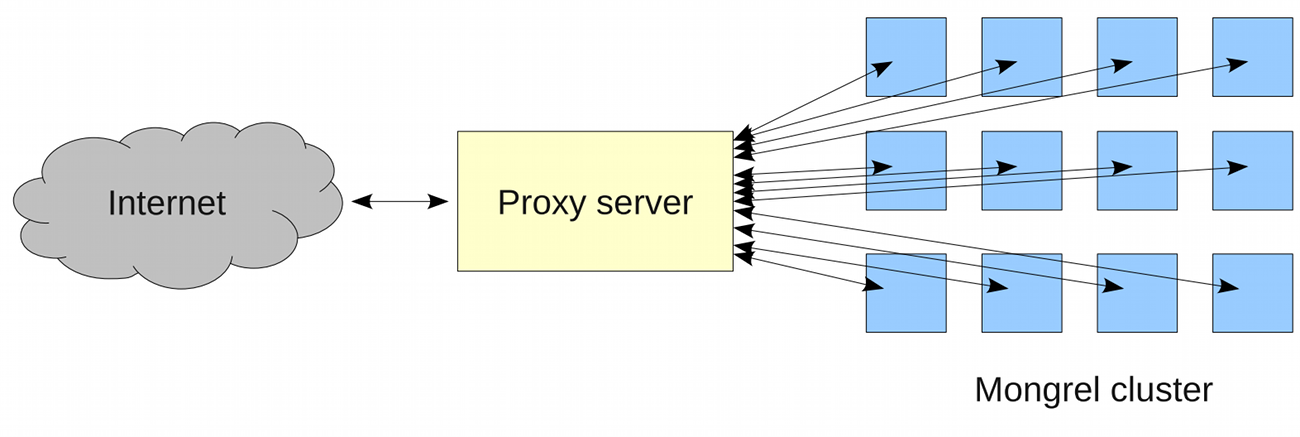
Scaling is easy with this setup; just add additional servers and you’re done.
Setup and maintenance, however, was not so easy. You have to configure each of the servers along with the proxy server. You also have to setup mechanisms to handle the rare event that some of the servers crash. It was as if all the ease of development in Rails was offset by the difficulty of setting up the production server.
Then came Phusion Passenger.
Phusion Passenger is a module for the industry standard Apache web server and the fast and lightweight Nginx web server. It handles the Rails process spawning as well as the proxying to these Rails processes.
Basically what that means is that if you’ve got Passenger installed and configured inside your Apache or Nginx server, deploying your application is as simple as deploying PHP applications i.e. just upload the files to the server and you’re done. No need to worry about clustering or the problems that come with it.
Installing and setting up Phusion Passenger is not included in this course. You can, however, refer to the documentation on the website for more details.
Asset Pipeline
After mentioning it multiple times througout the manual, we finally get to talk about the Asset Pipeline.
The Asset Pipeline is a framework for preprocessing assets powered by the sprockets gem. As mentioned before, it provides 2 main preprocessing features:
- It allows the preprocessing of CSS and JS assets, with the most frequently used being concatenation and minification.
- It fingerprints all assets CSS, JS, as well as images, audio, video, and fonts.
To see this in action, let’s go back to the “run Rails in production mode” code in the previous section:
$ rake db:migrate RAILS_ENV=production
$ rails server -e production -p 80
If you (or the trainer) tried that, you’ll see 404 errors for your JS and CSS files. This is because your app missed the asset compilation step. Let’s enable that now in the config/environments/production.rb:
AlingnenaApp::Application.configure do
  # Settings specified here will take precedence over those in config/application.rb.
...
  # Do not fallback to assets pipeline if a precompiled asset is missed.
  config.assets.compile = true
...
This will enable compiling of assets on the fly and caching it to memory. Restart your server and try again. You will now see the asset pipeline in action:
<!DOCTYPE html>
<html>
<head>
  <title>AlingnenaApp</title>
  <link data-turbolinks-track="true"
    href="/assets/application-8a207ac03ffb312395f89c5044da2bc5.css" media="all"
    rel="stylesheet" />
  <script data-turbolinks-track="true"
    src="/assets/application-32646e7627bb1a025ad3bdddc1e385c7.js"></script>
  <meta content="authenticity_token" name="csrf-param" />
Compare this with running the app in development mode:
<!DOCTYPE html>
<html>
<head>
  <title>AlingnenaApp</title>
  <link data-turbolinks-track="true" href="/assets/application.css?body=1"
    media="all" rel="stylesheet" />
  ...
  <link data-turbolinks-track="true" href="/assets/suppliers.css?body=1"
    media="all" rel="stylesheet" />
  <script data-turbolinks-track="true" src="/assets/jquery.js?body=1"></script>
  ...
  <script data-turbolinks-track="true" src="/assets/application.js?body=1"></script>
In production the CSS and JS files are concatenated and minified to single files significantly reducing the amount of requests required to load the page. The MD5 hash is added to the file name as a fingerprint to get browsers to cache these assets more reliably compared to the old query string style (e.g. application.js?135443523).
The Asset Pipeline supports chaining of preprocessors. For example, you want to use an image asset in your CSS file, you can add an .erb extension to the file to give you access to helpers like asset_path. So instead of just, say, custom.css it will now be custom.css.erb e.g.:
.class { background-image: url(<%= asset_path 'image.png' %>) }
Upon processing, the Asset Pipeline will convert it to custom.css which would probably contain something like:
.class { background-image: url(/assets/image-0d599f0ec05c3bda8c3b8a68c32a1b47.png) }
Apart from ERB, by default a new Rails application will have support for these additional file types via gems in the Gemfile:
-
Sass/SCSS - CSS extension languages. Sass is more concise by being whitespace dependent, while SCSS is an extension to CSS3, adding features but maintaining most of the look-and-feel. Both can be complied to CSS files e.g.
custom.css.scss. -
CoffeeScript - A language that looks and feels like Ruby and Python, and compiles to mostly idiomatic JavaScript (automatically hoists variables and adds IIFE, etc). For some people, this makes writing good quality JS easier. Uses the
.coffeeextension e.g.user.js.coffee
(By the way, the uglifier gem in between the sass-rails and coffee-rails gem is what Rails uses by default to Uglify the JavaScript files.)
With these, you can even get files like page.js.coffee.erb. Looking at the bigger picture, though, you should be able to see how all this preprocessing chains lead to the Asset Pipeline being called by that term. Say you have an application that uses the Sass version of Bootstrap as well some other custom SCSS files:

Precompilation
Apart from compiling the assets on the fly, Rails also supports asset precompilation. Not only does this save you server memory and processing power, it also allows you to offload the serving of assets to your web server (e.g. nginx), reverse proxy (e.g. Varnish), or even push the assets to a CDN. We can do this in our app now by running:
$ rake assets:precompile RAILS_ENV=production
Rails will precompile the assets and place them in the public/assets folder. This would let our static servers (or reverse proxies) serve the files without having to run a line of Ruby code.
Since we do not have a static server, we should tell Rails to let our application server (WEBrick) handle the serving of assets before we can test it out on our own. (And also disable the on-the-fly compilation we set earlier.)
AlingnenaApp::Application.configure do
  # Settings specified here will take precedence over those in config/application.rb.
...
  # Disable Rails's static asset server (Apache or nginx will already do this).
  config.serve_static_assets = true
...
  # Do not fallback to assets pipeline if a precompiled asset is missed.
  config.assets.compile = false
...
Run the server in production mode now to check if your app runs fine in this precompiled asset setup.
There are still a couple of other topics related to the Asset Pipeline like switching preprocessors and setting a custom asset domain, but we’ll stop the discussion at this point and leave the rest for you to explore on your own.
Rake
Out last lesson will be a short overview on Rake, the build tool written in Ruby and used extensively by Rails and its plugins.
At the heart of Rake are the rakefiles, files where you specify the processing tasks in Ruby syntax. The simplest way of declaring a task is using the task method. Create a rakefile named rakefile in an empty directory (so as not to overwrite your Rails apps) and put the following code there:
    task :first_task do
      puts "this is the first task"
    end
Running the command “rake first_task” on the same folder will print out “this is the first task”.
Like other build tools like ant, these tasks can be declared as dependent on each other so that executing one task will call the other required tasks. You can declare dependencies by converting the string parameter to the task method to a hash:
    task :first_task do
      puts "this is the first task"
    end

    task :second_task => :first_task do
      puts "this is the second task"
    end
Running rake second_task here will produce:
$ rake second_task
(in /home/user)
this is the first task
this is the second task
You can also use an array as the value of the hash to declare multiple dependencies:
    task :first_task do
      puts "this is the first task"
    end

    task :second_task do
      puts "this is the second task"
    end

    task :third_task => [:first_task, :second_task] do
      puts "this is the third task"
    end
Running rake third_task will now print the three tasks. Note that when a dependency is already satisfied, it is no longer processed the next time another task requires it. For example:
    task :first_task do
      puts "this is the first task"
    end

    task :second_task => :first_task do
      puts "this is the second task"
    end

    task :third_task => [:first_task, :second_task] do
      puts "this is the third task"
    end
Running rake third_task here would produce the same results instead of printing “this is the first task” twice.
By the way, “task :third_task => [:first_task, :second_task] do” is essentially shorthand for:
    task :third_task
    task :third_task => [:first_task]
    task :third_task => [:second_task] do
    task :third_task do
    end
That is, you can add dependencies (and even processing logic) to a task even after the task is initially declared through anothertask call.
Another type of task is thefile task. Instead of simply checking the dependencies, these tasks also check the existence and the timestamps of the specified files. For example, here’s the sample code from the Rake documentation for compiling 3 C files:
    file 'main.o' => ["main.c", "greet.h"] do
      sh "cc -c -o main.o main.c"
    end
    file 'greet.o' => ['greet.c'] do
      sh "cc -c -o greet.o greet.c"
    end
    file "hello" => ["main.o", "greet.o"] do
      sh "cc -o hello main.o greet.o"
    end
On the first run of rake hello, it will first compile main.o, then greet.o, then finally the hello executable. All three files were created because they did not yet exist; going through the dependencies eventually created them.
Now if you modify the main.c and run rake hello again, rake will go through the dependencies again, checking each for changes in the timestamp. Since main.c was changed, the file task main.o was re-run and the file recompiled. When Rake goes back to the hello file task, the main.o file changed its timestamp so the task is similarly re-executed. Note that since neither greet.c nor greet.o was changed since the last rake execution, the greet.o task was not executed again.
You can describe tasks using the desc method on top of the task:
    desc "prints out the first line"
    task :first_task do
      puts "this is the first task"
    end

    desc "prints out the first two lines"
    task :second_task do
      puts "this is the second task"
    end

    desc "prints out the three lines"
    task :third_task => [:first_task, :second_task] do
      puts "this is the third task"
    end
Running “rake -T” will list out the tasks with a proper desc description.
$ rake -T
(in /home/user)
rake first_task   # prints out the first line
rake second_task  # prints out the first two lines
rake third_task   # prints out the three lines
Since desc is the standard way of documenting tasks, you can use this command to list the rake tasks for Rails:
$ rake -T
rake about                              # List versions of all Rails frameworks and the\
 ...
rake assets:clean[keep]                 # Remove old compiled assets
rake assets:clobber                     # Remove compiled assets
rake assets:environment                 # Load asset compile environment
rake assets:precompile                  # Compile all the assets named in config.assets\
....
rake cache_digests:dependencies         # Lookup first-level dependencies for TEMPLATE \
(...
rake cache_digests:nested_dependencies  # Lookup nested dependencies for TEMPLATE (like\
 ...
rake db:create                          # Create the database from DATABASE_URL or conf\
i...
rake db:drop                            # Drops the database using DATABASE_URL or the \
c...
rake db:fixtures:load                   # Load fixtures into the current environment's \
d...
rake db:migrate                         # Migrate the database (options: VERSION=x, VER\
B...
...
The default task for Rake is the “default” task. Usually you just point it to another task or tasks to define which tasks should be run ifrake is executed without arguments.
task :default => :third_task
Other tasks and tips on using Rake are found at the online documentation.