Rails Applications Without Scaffold (part 2: Delete and Search)
Deleting a Record
Our next task is deleting a record. Deleting is similar to showing a record, the only differences being the HTTP verb involved and that instead of rendering the specified record, we destroy it.
That said, this task has three steps that we need to code:
- Provide a way to call the controller action for deleting a product
- Delete the product record in the controller action
- Display the “list products” page after deleting the product
Creating a DELETE link
We already know how to create a GET link. In this part, we shall discuss how to create a DELETE link.
First off, let’s create a new route for delete based on the conventions:
AlingnenaApp::Application.routes.draw do
  resources :debts

  get 'products' => 'products#index', :as => 'products'
  get 'products/:id' => 'products#show', :as => 'product'
  delete 'products/:id' => 'products#destroy'

end
Here we see how Rails can differentiate between the HTTP methods. The destroy action will only be used when the HTTP method is DELETE.
With the route set, we can now modify our controller to add our new destroy action.
  def destroy
    # destroy the specified record
    redirect_to products_path
  end
The redirect_to method can be used to replace a view. Instead of rendering a view, it tells the user’s browser to redirect to another page, resulting in a fresh new request to the target page. In this case, we redirect the user to the “list products” page after deleting the record.
The parameters for redirect_to is the same as the 2nd parameter for link_to (they use the same helper method, url_for) so you can use string for direct URLs, hash for route based URLs, or objects for shortcuts.
Now that we’ve finished setting up the route and the controller, it’s time to make the actual link. Add the following to app/views/products/show.html.erb:
...
</p>
<%= link_to('Delete this record', @product,
    { :data => { :confirm => 'Are you sure?'}, :method => :delete }) %> <br>
<%= link_to 'Back to List of Products', products_path %>
As you can see, this is practically the same as the “Show” link; we only added some new html_options to change the behavior of the link.
link_to has 3 special html_options:
-
:data– This option can be used to add custom data attributes. For example, with:confirm => "question?"you can set a confirmation question which will be prompted to the user on click of the link. The link is processed normally if the user accepts. -
:method– this accepts an HTTP verb symbol, either:post,:put, or:delete. With this set, clicking the link will call a JavaScript function which will submit a request to the specified URL with the specified method. If JavaScript is disabled, the link will fall back to GET. -
:popup– This will force the link to open in a popup window. By passingtrue, a default browser window will be opened with the URL. You can also specify an array of options to pass to JavaScript’swindow.openmethod.
By using :data => { :confirm } and :method, we create a link that both prompts the user if he wants to continue and sends a request using the DELETE method.
Trying this out results in:
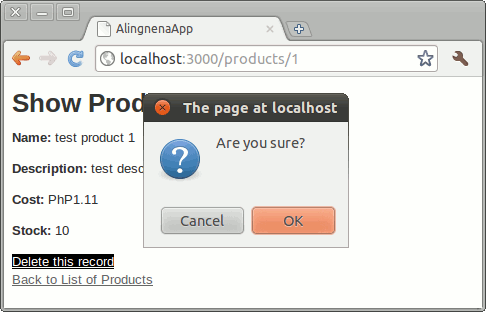
Clicking OK will redirect us to the “list products” screen, confirming that the link and route works.
Deleting the Product
Now it’s time to add the missing lines in our destroy method:
  def destroy
    @product = Product.find(params[:id])
    @product.destroy
    redirect_to products_path
  end
The first line retrieves the record in from the database. We’ve already seen this in our show method.
The second line deletes the record using the Active Record destroy method. Simple, huh?
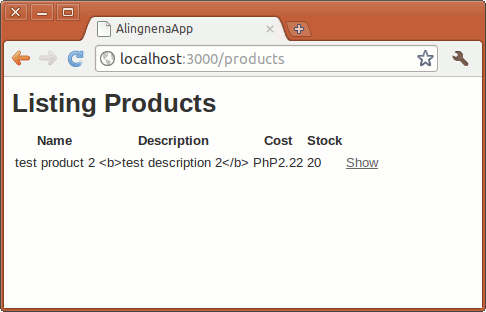
Trying this out, we see:
Re-running a Migration
We’re still going to add another feature to our destroy action, but before that, we’re going to have to deal with a certain problem first: running out of test data. We only have two test records so we’re bound to end up with an empty database when we continuously test our destroy action.
Thankfully, there’s a command for re-running a migration:
$ rake db:migrate:redo
This command rolls back the previous migration and runs it again. You can also specify the number of migrations to roll back and re-run by using the STEP environment variable:
$ rake db:migrate:redo STEP=3
Note that re-running a migration will reverse the migration first by converting calls in the self.change method of the migration to their exact opposite (e.g. from create_table to drop_table). This may or may not damage your data, but it’s something to keep in mind.
Displaying a Message using Flash
The missing feature we’re talking about earlier is the lack of confirmation messages. Right now, our program simply deletes the record and redirects the user without telling her if the operation was successful or not.
We use instance variables to pass data from the controller to the view. However, data in the instance variables are only present in the current request. A new request is generated when we useredirect_to so all of our instance variables are cleared. So for messages to be displayed after a redirect, we have to use another controller specific container: the flash hash.
Like the params hash, the flash hash is available for use in both the controller and the view. What’s different is that items put inside the flash hash last until the next request.
Here’s how to modify our destroy action to include a flash message:
def destroy
@product = Product.find(params[:id])
@product.destroy
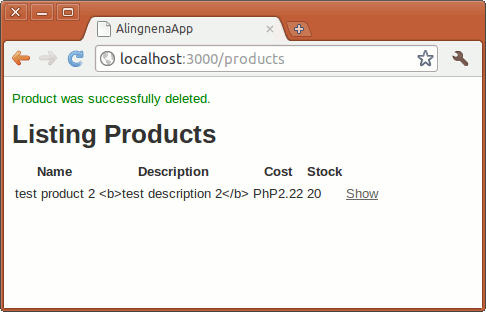
flash[:notice] = "Product was successfully deleted."
redirect_to products_path
end
Then we add an additional line at the top of app/views/products/index.html.erb to display the message (the scaffold stylesheet already includes #notice):
<p id="notice"><%= flash[:notice] %></p>

<h1>Listing Products</h1>
...
Trying the destroy link now results in:
Note that items in the flash hash last until the next request. If you don’t redirect, a message will be present in both the current request and the next request. You can use flash.now instead of flash to set messages that are only available in the current request.
By the way, the most common types of flash messages are :notice (information messages, often in green) and :alert (error messages, often in red). We shall see these two again later.
Adding a Search Screen
Just as deleting records is similar to showing records, filtering records is also similar to listing records.
Here’s the process for searching / filtering product records:
- Submit a query to a search action
- The search action retrieves records based on the query
- Render the retrieved records using the view
In this part, we introduce two new concepts: generating HTML forms in the view, and using an Active Record dynamic finder for searching records. These two concepts deal with step 1 and 2, respectively, while we already know how to do the third step.
Preparation
The choice for the action name is arbitrary so let’s just stick to “search”. With that in mind, let’s modify our controller and view accordingly. Let’s start off with a new route:
AlingnenaApp::Application.routes.draw do
  resources :debts
  get 'products' => 'products#index', :as => 'products'
  get 'products/search' => 'products#search', :as => 'search_products'
  get 'products/:id' => 'products#show', :as => 'product'
  delte 'products/:id' => 'products#destroy'

end
We added a named route “search_products” pointing to our new action so that we could simply use search_products_path in our form later.
Let’s add the search action to app/controllers/products_controller.rb:
  def search
    @products = Product.all
  end
We’re not doing any filtering yet; we’re just copying the approach in the index action. We’ll continue with the index-cloning with app/views/products/search.html.erb:
<h1>Listing Products</h1>

<table>
  <thead>
    <tr>
      <th>Name</th>
      <th>Description</th>
      <th>Cost</th>
      <th>Stock</th>
    </tr>
  </thead>
  <tbody>
    <% @products.each do |product| %>
      <tr>
        <td><%= product.name %></td>
        <td><%= product.description %></td>
        <td><%= number_to_currency product.cost, unit: 'PhP' %></td>
        <td><%= product.stock %></td>
        <td><%= link_to 'Show', product %></td>
      </tr>
    <% end %>
  </tbody>
</table>
Yes, it’s basically a copy of app/views/products/index.html.erb.
Adding the Search Form to List Products
As web developers, we already know how to tinker with the URL to pass query strings to the server. Our users obviously don’t know how to do that manually so we have to provide a search form for them to use.
Insert the following lines to app/views/products/index.html.erb:
<%= form_tag(search_products_path, {:method => :get} ) do %> <%= label_tag("name", "Search by product name:") %> <%= text_field_tag("name") %> <%= submit_tag("Search") %><% end %>If you view the source of the updated form, you will realize that every helper we used corresponds to an HTML form element.
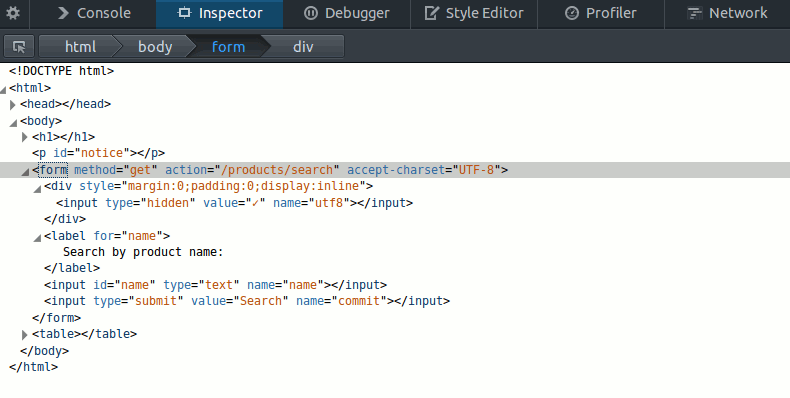
The form_tag helper generates a form element, enclosing everything inside the block inside the form. Its syntax is (note that the tag must be in an expression, not a scriptlet):
<%= form_tag(url_for_options = {}, options = {}, *parameters_for_url) do %>
  ...
<% end %>
The url_for_options are the same as the options used in link_to and redirect_to (the string, hash, or object parameter in case you forgot). Like link_to, the second hash allows you to set HTML attributes for the form along with two additional options: you can set :multipart to true if you want to set the enctype to “multipart/form-data” (useful for submitting files), and you can set the :method to either :get, :put, :post, or :delete (:post is used by default). The parameters_for_url is simply a hash.
Here’s a quick rundown on the other form helpers we used in the search form:
-
label_tag– creates a label. It has 3 parameters:- first parameter sets the for attribute
- second parameter sets the text inside the label. Uses the value of the first argument if not specified.
- third parameter is a hash for setting HTML attributes
-
text_field_tag– creates a standard text field. Also has 3 parameters- first parameter sets the name attribute
- second parameter sets the value of the field
- third parameter is a hash for setting HTML attributes. You can also set additional options: you can set :disabled to true to disable the field, you can also set the :size to set the number of visible characters that will fit in the input, and you can also set the :maxlength which is the maximum number of characters that the browser will allow the user to enter.
-
submit_tag– creates an HTML submit button. It only has two parameters: the first sets the text inside the button (default is “Save changes”) and the second is an options hash for setting HTML attributes. Like withlink_to,form_tagandtext_fieldtag, this parameter has some special options:-
:confirm– behaves the same way as the:confirm in link_to -
:disabled– disables the button if set to true -
:disabled_with– if this is set and the user clicks the button, the button will be disabled and the provided text (e.g. “Please wait…”) will replace the button’s original text while the form is being submitted. Useful for preventing the user from clicking the button twice on submit.
-
We only used one field in our form, the name field. Our plan is for this search module to return all records with a name that matches our submitted name. But enough talk, let’s see our newly coded form in action:
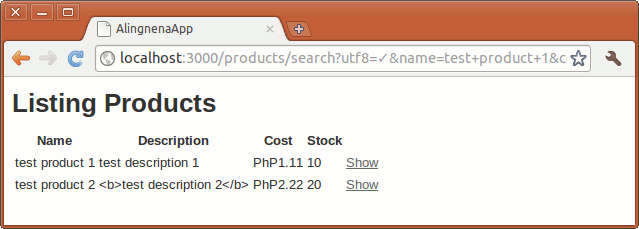
As you can see, the get method puts the query string in the URL. We could verify that the parameters were passed by looking at the web server logs.

With this we know that we could access the search parameter “name” through the params hash entry params[:name].
Filtering Results
So now we have the search parameter available in our controller. Let’s now add the code which will filter the results accordingly. Replace the line in the search action with:
  def search
    @products = Product.find_all_by_name(params[:name])
  end
Here we used a dynamic finder. In addition to providing accessors for each field in the database, Active Record also provides class methods for retrieving filtered for each field. These methods are in the form of:
-
.find_by_xxxx()– returns a record whose fieldxxxxmatches the provided argument. Like.find(), it throws an error if no record is found. (When you think about it,findequivalent tofind_by_id) -
.find_all_by_xxxx()– returns an array of records whose fieldxxxxmatches the provided argument.
Unfortunately, these methods are already deprecated and will be removed in Rails 4.1. Later we shall discuss a more flexible method for filtering, the where method.
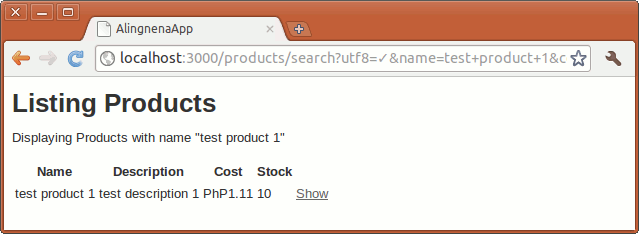
The search function should work properly at this point. Try using the search form at http://localhost:3000/products to see if it works.
Finishing Touches to the View
Let’s make some minor changes to our search results screen to make it more functional.
<h1>Listing Products</h1>

<p>Displaying Products with name "<%= params[:name] %>"</p>

<table>
  <thead>
    <tr>
      <th>Name</th>
      <th>Description</th>
      <th>Cost</th>
      <th>Stock</th>
    </tr>
  </thead>
  <tbody>
    <% @products.each do |product| %>
      <tr>
        <td><%= product.name %></td>
        <td><%= product.description %></td>
        <td><%= number_to_currency product.cost, unit: 'PhP' %></td>
        <td><%= product.stock %></td>
        <td><%= link_to 'Show', product %></td>
      </tr>
    <% end %>
  </tbody>
</table>

<p><%= link_to "Back to original list", products_path %></p>
The first change displays the current search criteria, while the next change links back to the original list, basically resetting the filter.