Modifying the Application
Aling Nena’s Follow-Up
After being astounded by how fast you build the program, Aling Nena suddenly remembered something.
“Can you add another field where I can put remarks like ‘This was partially paid’ or ‘He promised to pay for it before the end of March’ and so on?”
This is a common sight in software development. Software (being soft) are often subject to changes. Fortunately for us, Rails provides ways to easily handle changes in the requirements.
Looking at this change request, it is clear that we need to do two things:
- update the table in the database to add the new field, and
- update our application to accommodate the new field.
Rails Migrations
As mentioned in the previous chapter, Rails uses migrations to simplify database tasks. Before we move on to how to use migrations to meet our task (i.e. add a new field to the database), let’s discuss why there are migrations in Rails.
In other more traditional software development platforms, when you want to add a new field to the database, you’ll need to write an SQL statement like
ALTER TABLE debts ADD remarks VARCHAR(255);
and give it to someone who is responsible for maintaining the databases in order for it to be applied to all those databases. Now, granted SQL isn’t that hard to learn, and having a DBA managing the database changes can be a somewhat efficient way of handling the data, but there are some reasons why migrations have the upper hand over this approach.
The first benefit of migrations is that it simplifies the whole database management process. Rails includes scripts to apply changes to different databases allowing any developer (or even a batch script) to deploy changes without the need for a database administrator.
Rails migrations also have a limited set of data types which are internally converted to the appropriate data type for different kinds of databases. In other words, unlike with manual SQL wherein you have to take into account the differences between Oracle, MySQL, IBM DB2, etc., you don’t need to worry about these things in migrations.
Another benefit of migrations is that it provides ways to migrate to a certain snapshot of the database structure. As there are timestamps in the file name, anyone can use a command to choose which timestamp to roll back to. This is useful when you’re testing old builds which require an older version of database schema to work. (We will discuss this command in a later chapter.)
Generating the Migration
As migrations have timestamps in their file names, it may not be practical to create them from scratch, with the developer defining the current timestamp in the file name. A better approach would be to use the built in migration generator which creates an empty migration file with a proper timestamp.
The format of the command to generate the migration is:
$ rails generate migration [MigrationName]
MigrationName can be in camel case or lower case separated by underscores (Rails converts the former to the latter in the actual file name, and the latter to the former in the class name). Here is a sample file produced by the command:
class MigrationName < ActiveRecord::Migration
  def change
  end
end
The generated file, as mentioned above, is empty, and it is up to the developer to define the changes to be applied to the database using migration commands.
Rails provides a shortcut for creating migrations that add or remove columns from tables. When you name your migrations as Add[ColumnName]To[TableName] or Remove[ColumnName]From[TableName] followed by a series of field_name:data_type pairs, Rails will automatically create the add column or remove column statements, respectively, in the migration. For example, we can perform the required change to our application without having full knowledge of the migration commands:
$ rails generate migration AddRemarksToDebt remarks:text
This command will create the following migration file:
class AddRemarksToDebt < ActiveRecord::Migration
  def change
    add_column :debts, :remarks, :text
  end
end
Rails supports the following data types:
| Data Type | Description |
|---|---|
:string |
A relatively short string field. |
:text |
An unbounded string field, used for longer text. |
:integer |
A number with no fractional part. |
:float |
A floating point number. May or may not be precise depending on the database. |
:decimal |
A number with a fractional part. Always precise. |
:datetime |
A date and time field. |
:timestamp |
Same as datetime, but with fractional seconds. |
:time |
A time field. |
:date |
A date field. |
:binary |
Field for storing binary data e.g. image files. |
:boolean |
A field that stores either true or false. |
We’ll discuss the other possible migration options in a later chapter. For now, let us just stick with add_column.
An Introduction to the Model-View-Controller Architecture
With the database side of the task out of the way, we can now move on to modifying the application itself. But before that, let’s take some time to understand how various components are organized in Rails via the Model-View-Controller (MVC) architecture.
MVC was originally created in the 1980s as a pattern to follow when creating graphical user interfaces in Smalltalk. It found a resurgence in the early 2000s when it became apparent that this model was also applicable for web applications.
In MVC, systems are divided into three parts: the model, the view and the controller. A typical flow through an MVC system would be as follows:
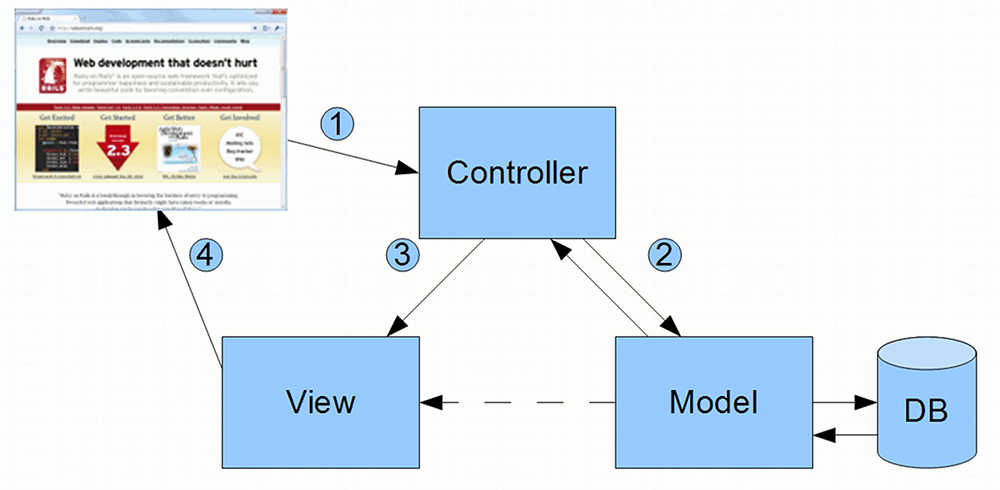
- User (in the form of a browser here) sends a request to the Controller
- Controller interacts with the Model
- Controller invokes the View
- View renders the information sent to the User.
Putting this in context of Rails applications, when a browser visits a Rails web page, it goes through the following steps:
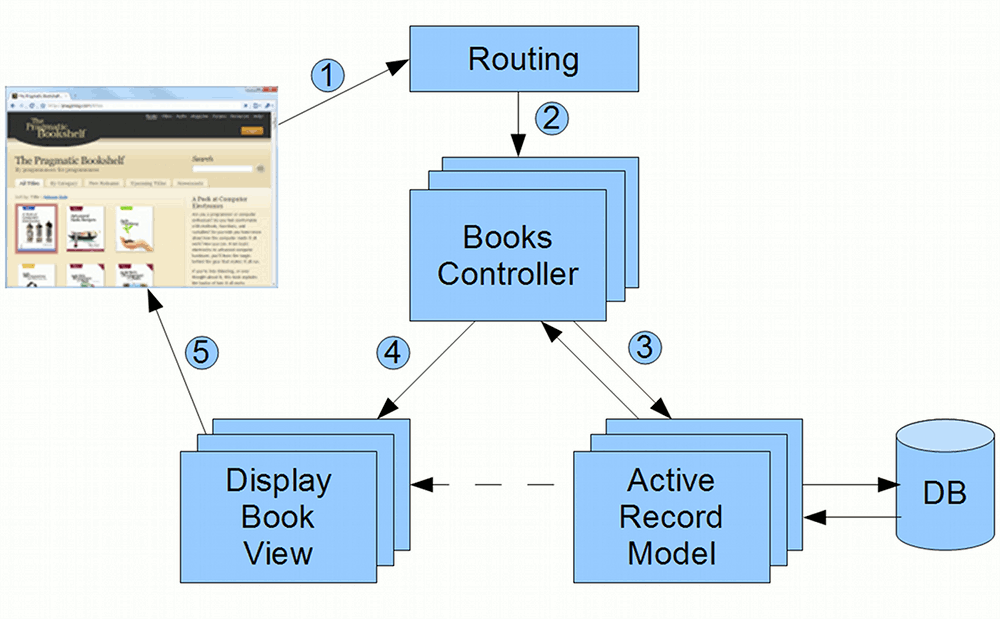
- Browser requests a page from the server e.g. http://my.url/books/123
- Routing finds the Books Controller
- Controller interacts with the Model
- Controller invokes the View
- View renders the page to be sent to the browser
Why use MVC?
In the early days of the web (and even up to now), many web applications were written with all of the processing logic (business processing, routing, rendering) concentrated in a single location. This approach didn’t scale well for some reasons:
- Maintenance was hard. Lack of structure meant that the dependencies between modules aren’t clear. Changing one part of the system might affect another part of the system without a programmer knowing it.
- Debugging was hard. As all of the processing logic were contained in single files, a programmer hunting for the code that caused a bug would have to scan through a lot of code which has nothing to do with the bug itself before finding it.
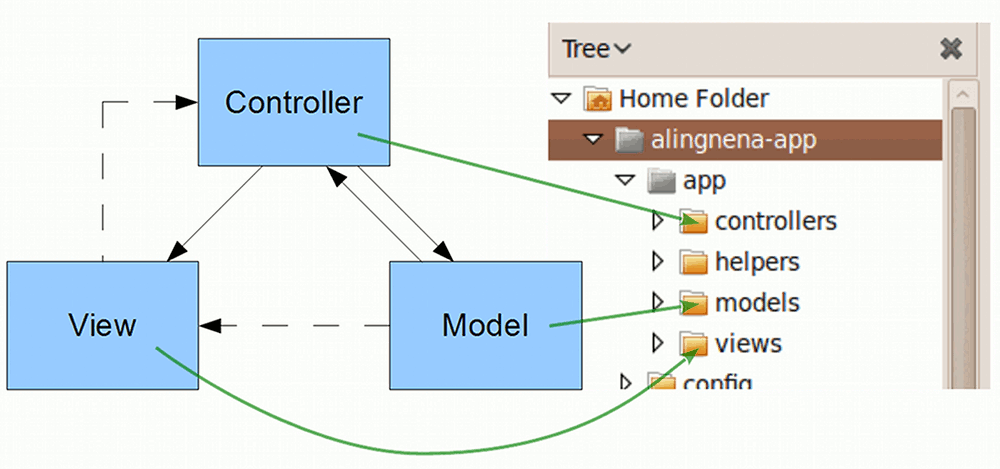
MVC addresses these problems. First off, the structure provides a degree of isolation between modules. Sure, changing a Model might still affect a lot of programs in the system, but at least the extent of the changes can be easily predicted.
When you encounter a bug in a Rails application, you also have a better idea where to look for the problem. This diagram shows where the source code for the MVC components are located:
MVC best practices
There are many best practices when it comes to using MVC. We’ll list down a few here, but we’ll also have to use an analogy to make it clearer to someone who hasn’t used MVC before.
Our analogy would be a restaurant analogy.
In a fine dining restaurant, you have your chefs (Models) which prepares the food for the customers (Views). There are also waiters (Controllers) that facilitate communication between the customers and the chefs.
Chefs are expected to do all of the preparing, cooking, and plate presentation on the dishes. Aside from very trivial changes to the dishes (e.g. offering to add pepper to the soup) the waiters do not do anything to the food. Here is the first best practice for MVC: Models should do most of the processing, controllers should only focus on the routing. Similarly: If you find your controllers doing a lot of processing, find a way to move those logic to the model. This is usually called the “fat model, skinny controller” approach.
Some dishes are so complicated that a single chef isn’t enough to handle it. In this case, it’s alright for multiple chefs to work on a single dish without having to go through the waiter. In other words, Related models can communicate with each other before passing their result to the controller.
As for our customers, they should not talk directly to the chef and vice versa i.e. Views should not directly call models directly, and vice versa. However, this does not mean that the customers should be mindless. It’s up to them how to eat their food. In MVC terms, Processing logic is allowed in views, as long as it’s related to the view or presentation.
Now that we understand the basic underpinnings of Rails, we now have a basic idea about what to modify in our system to meet the demands of the current task.
Modifying the Model
…or not.
Veterans of other MVC frameworks might think that we need to modify some model related files to reflect the changes to the database. In some frameworks, we might need to add additional fields to certain classes. In other frameworks, we might need to modify certain XML files to include the new fields.
Fortunately for Ruby on Rails, we don’t need to do any of those.
At the heart of Rails’ model components isActive Record, a Ruby package that handles the database related portion of Rails. Not only does Active Record provide functions for saving and retrieving data, it also provides other features that help simplify database management e.g. migration commands.
To make development easier, Active Record directly checks the database schema to determine the fields of the model. This is made possible thanks to Convention over Configuration (database fields and model fields should be named the same) and Ruby’s dynamic nature (methods can be defined on the fly). In short, there is no need to change any part of the model when the database is changed – the change is automatically applied to the model and we could access theremarks field via @debt.remarks.
Of course, if we would need to add some field validation (e.g. mandatory checking, field length checking), we will need to modify the app/models/debt.rb. We will leave that topic for a later chapter.
Modifying the Controller?
By looking at the flow of the MVC model, you could see that adding a new field to our screen wouldn’t affect our controller: the routing of data is still the same after the change.
However, adding a new field means we need to tweak the security settings in the controller to allow the controller to recognize it as a valid data input field. Change the third to the last line of app/controllers/debts_controller.rb:
    # Never trust parameters from the scary internet, only allow the white list through.
    def debt_params
      params.require(:debt).permit(:name, :item, :amount)
      params.require(:debt).permit(:name, :item, :amount, :remarks)
    end
end
(By the way, the Ruby package that handles the controller for Rails is ActionController.)
Modifying the View
In the end, the only files we have to modify to include the new field is in the View, namely the four view files for Listing, Show, Create, and Edit.
Insert the highlighted lines into app/views/debts/index.html.erb:
<h1>Listing debts</h1>
<table>
  <tr>
    <th>Name</th>
    <th>Item</th>
    <th>Amount</th>
    <th>Remarks</th>
    <th></th>
    <th></th>
    <th></th>
  </tr>
<% @debts.each do |debt| %>
  <tr>
    <td><%= debt.name %></td>
    <td><%= debt.item %></td>
    <td><%= debt.amount %></td>
    <td><%= debt.remarks %></td>
    <td><%= link_to 'Show', debt %></td>
...
Insert the highlighted lines into app/views/debts/show.html.erb:
...
<p>
<strong>Amount:</strong>
<%= @debt.amount %></p>
<p>
<strong>Remarks:</strong>
<%= @debt.remarks %></p>
...
And finally, insert the highlighted lines into app/views/debts/\_form.html.erb:
...
  <div class="field">
    <%= f.label :amount %><br>
    <%= f.text_field :amount %>
  </div>
  <div class="field">
    <%= f.label :remarks %><br>
    <%= f.text_area :remarks %>
  </div>
  <div class="actions">
...
(Just as in the controller, the Ruby package that handles the view for Rails is ActionView.)