Skimming through Rails
Rails is a simple but fairly large framework. We can’t cover everything in this course, so in this chapter, we will go through the features that you might have to use on a regular basis.
Rails Migrations
We’ve discussed the basics of migrations, namely, how to create or drop a table and how to add or remove columns from them. We also used generator scripts for the migrations instead of coding them manually.
In this part, we’ll discuss the various methods available to us in the migrations. We’ll also go deeper in the mechanisms behind migrations.
Creating Tables
The create_table method accepts a table name and a block where we define the fields in the table. Going back to our first migration:
  def change
    create_table :debts do |t|
      t.string :name
      t.text :item
      t.decimal :amount

      t.timestamps
    end
  end
This create_table call creates the table debts in the database with an integer primary key “id”, a string field “name”, a text field “item”, a decimal field “amount”, and two timestamp fields “created_at” and “updated_at”.
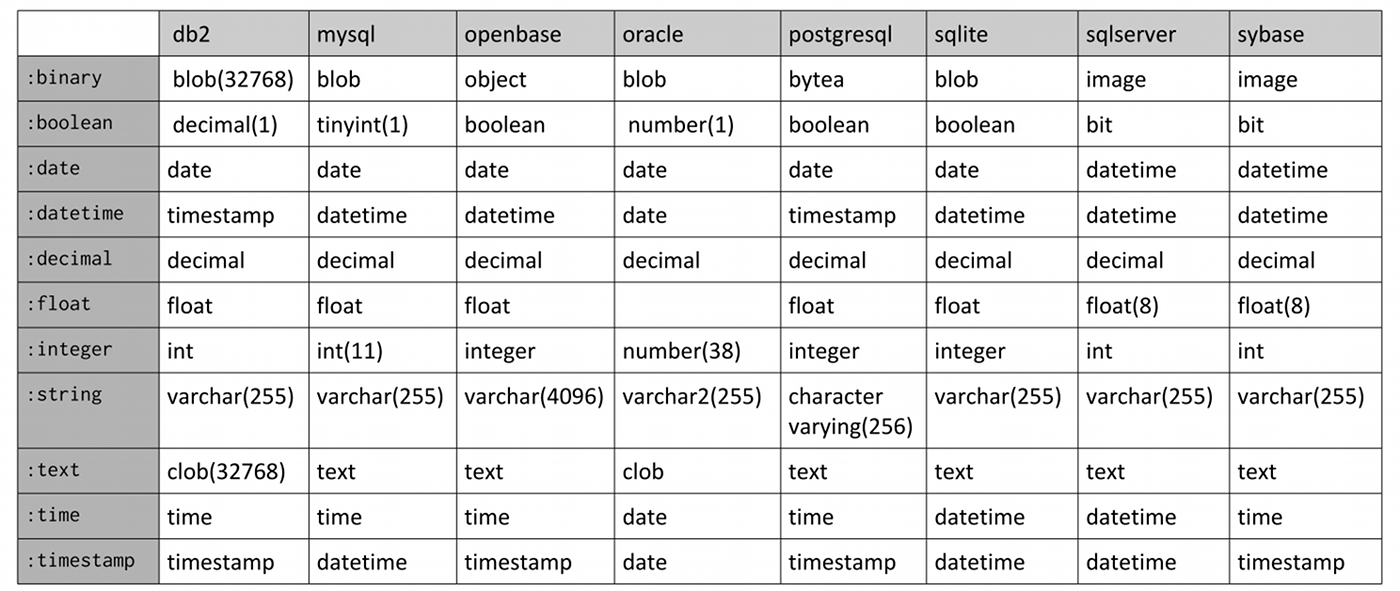
We’ve discussed before the possible data types for use in defining columns. Here’s the fields that would be created per database for those data types:
There are also shorthand data types e.g. the t.references from the previous lesson.
There are options you could specify to each column declaration to apply database-level constraints:
-
:null– set this option to true if nulls are allowed for this field, false otherwiset.string:name,:null=>false# sets name field to mandatory -
:default– set this option to make the database set a default value for the field if the field is left empty. If you want the field default to be NULL, usenil. -
:limit– set this option to the maximum size of the field This refers to the number of characters for:stringand:text, number of bytes for the:binaryand:integer.
The following options are for :decimal:
-
:precision– the precision of the decimal column, the number of significant digits in the number -
:scale– the scale of the decimal column, the number of digits after the decimal point. The number 123.45 has a precision of 5 and a scale of 2.
Note that these column options can also be used in the add_column method. For example:
add_column :debts, :remarks, :text, :limit => 200
You can also set options for the table by passing a hash of options after the table name:
-
id => false– this will prevent the automatic creation of the primary key -
:primary_key– if:idis is not set to false, you can set this option to change the name of the primary key from “id” e.g.create_table:debts,primary_key:"debt_no"do|t| -
:force => true– this will make the migration drop the table of the same name (if it exists) before creating the table -
:temporary => true– the table created is only temporary and will be dropped when the connection is closed. -
:options– the value specified in this option will be appended to the table definition SQL. For example:create_table:debts,:options=>"ENGINE=InnoDB DEFAULT CHARSET=utf8"do|t|will create
CREATETABLEdebts(...)ENGINE=InnoDBDEFAULTCHARSET=utf8
Other Migration Methods
Here are some other methods you can use in the migrations:
-
change_column(table_name, column_name, type, options = {})– changes a column to the specified type and options. The column options are the same fromcreate_tableandadd_column. For example, you want to change the maximum length of remarks, you could use:change_column:debts,:remarks,:text,limit:300 -
rename_column(table_name, column_name, new_column_name)– renames a column tonew_column_name -
add_index(table_name, column_name, options = {})– adds an index to the table. You can set the name of the index as well as the unique setting in the options. -
remove_index(table_name, options = {})– removes an index from the table -
rename_table(table_name, new_name)– renames tabletable_name tonew_name -
change_table(table_name)– changes columns in thecreate_table syntax.
Migration Mechanism
When you run rake db:migrate, Rails first checks theschema_migrations table for the list of migrations already applied to the database then it applies all migrations not already inside the table. For example, we have the following situation:
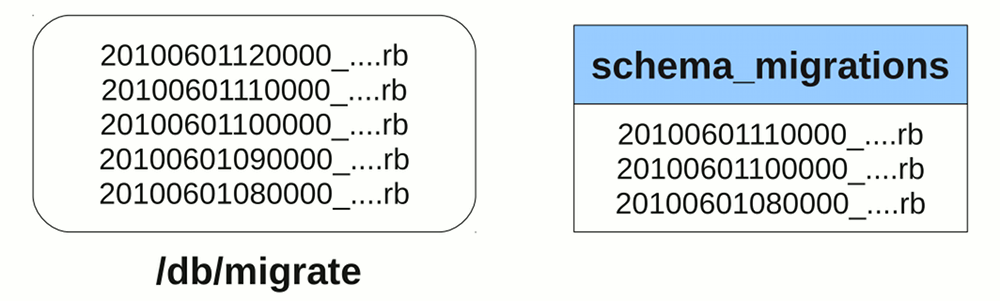
In this case, our schema_migrations table is missing the 12 noon and 9AM migrations. The missing 9AM migration is possible, you might have just updated your local version of the application and got that migration from another developer. Running rake db:migrate will apply the two migrations into your database and insert two new records to the schema_migrations table.
To rollback your database to an older version, you can use the VERSION environment variable to pass a timestamp:
$ rake db:migrate VERSION=2010060113000
This will rollback all migrations after the specified timestamp (if any; it’s possible to use this call for a “roll-forward”) and apply all migrations on or before the said timestamp.
Active Record
There are still a lot of important concepts in Active Record that we haven’t discussed in detail yet.
Querying
Aside from find() and all(), there are two other general methods for retrieving records:
-
first()– returns the first record retrieved from the table. -
last()– returns the last record retrieved from the table..
As we’ve seen in the includes() method in the previous lesson, these methods can be chained with other methods to modify their behavior. Note that all() is used by default so you don’t need to specify it in a chain with other methods.
Below are the methods that you can use for querying.
where
You can define the WHERE part of the SQL statement with thewhere method. It accepts either a string, an array that starts with a string, or a hash. Passing a string would simply make it use the string as the SQL WHERE clause of the query. For example:
User.where("user_name = '#{user_name}' AND password = '#{password}'").first
would find the record with a user name and password that matches the supplied credentials. Obviously this approach is prone to SQL injection attacks, so a better approach would be to use an array argument which creates a parameterized WHERE clause.
User.where("user_name = ? AND password = ?", user_name, password).first
The 2nd element onwards are assigned to the question marks after sanitizing the elements. The problem with this form of parameterized queries is that when the query becomes larger, it becomes difficult to determine which parameter is assigned to which question mark. Here we can use named parameters (symbols inside the string) and a hash for the second element:
User.where("user_name = :user_name AND password = :password",
           { :user_name => user_name, :password => password }).first
For simple queries like the one above, you can use a hash of values. Rails would automatically convert the key-value pairs into a series of ‘key = value’ entries in theWHERE clause, also sanitizing the input in the process.
User.where( :user_name => user_name, :password => password ).first
order, select, from
The order() method allows you to provide the contents of the ORDER BY clause in the query. For example:
LineItem.order("purchase_id DESC, id")
The select() method allows you to define the fields for SELECT clause. By default, ActiveRecord uses “*” to select all fields in the table but if your database incurs a performance hit when you query certain fields (e.g. BLOB fields), you might want to remove those fields from the SELECT clause. As the object’s attributes are dynamically assigned, the removed fields will not be available in the return objects.
>> d = Debt.select("id").first
=> #<Debt id: 1>
>> d.name
ActiveRecord::MissingAttributeError: missing attribute: name
Similar to select() and order(), from() allows you to specify the fragment for the FROM clause. You might want to do this if you’re using a different table or a view for the query.
:group, :having, Calculations
The group() and having() methods are also like order(), they allow you to provide the SQL fragments for GROUP BY and HAVING clauses in the query, respectively.
LineItem.group("product_id")
LineItem.group("purchase_id").having("purchase_id = 1")
Since HAVING only applies to GROUP BY, :having will only be applied to the query if there is a :group option specified.
Queries involving group() will only return one record per “group”. Because of this, group() and having() are better used with the aggregate functions under ActiveRecord::Calculations. The available functions are:
-
count– returns the number of records per groupLineItem.group("purchase_id").count -
average– returns the average value of a specified field per groupLineItem.group("purchase_id").average("cost") -
sumLine– returns the sum of the values of a specified field per groupItem.group("purchase_id").sum("cost") -
maximum,minimum– returns the maximum and minimum value of a specified field per groupLineItem.group("purchase_id").maximum("cost")LineItem.group("purchase_id").minimum("cost")
The return value for these methods will be a hash of the “field name used ingroup” ⇒ “calculated value”. Note that these aggregate functions only work for one grouping field name, using more than one (e.g. group("purchase_id, product_id")) would return unpredictable results.
Also note that the aggregate functions can be used without the group() method to calculate the value for the entire table (the result will be a single value, not a hash).
:limit, :offset
The :limit option allow you to specify how many records are retrieved by the query.
Debt.limit(10)
When the :limit option is used for paginating records, we often employ another option, :offset, to determine the “starting point” for the query. The number passed to :offset determines the number of records to skip in the query. For example:
Debt.offset(5)
This query skips the first 5 records retrieved and starts with the 6th record.
:readonly, :lock
Set readonly to true if you want to prevent updates to the retrieved records.
>> d = Debt.readonly(true).first
=> #<Debt id: 1, name: ...>
>> d.save
ActiveRecord::ReadOnlyRecord: ActiveRecord::ReadOnlyRecord
You can use lock() to add a fragment for locking in the query e.g. “FOR UPDATE” or “LOCK IN SHARE MODE”. Using lock(true) uses the default exclusive lock for the connection, usually “FOR UPDATE”.
find_by_sql
When all else fails, you can always specify an SQL query via the find_by_sql method. The attributes of the objects are dynamically assigned from the results of the query.
>> line_items = LineItem.find_by_sql("SELECT pu.description purchase_description,
pr.name, product_name FROM line_items li, purchases pu, products pr WHERE
li.purchase_id = pu.id AND li.product_id = pr.id")
=> [#<LineItem >, #<LineItem >, …]
>> line_items[0].purchase_description
=> "Cola delivery"
>> line_items[0].product_name
=> "Cola"
Scopes
ActiveRecord allows you to convert commonly used queries into scopes. Let’s use some trivial examples:
class Debt < ActiveRecord::Base
  scope :new_first, -> { order("created_at DESC")}
  scope :has_debt_greater_than, -> (x) { where("amount > ?", x).limit(5) }
end
The scope definition accepts a symbol to define the scope name and a Proc with ActiveRecord query calls.
You can call them directly:
Debt.new_first
Debt.has_debt_greater_than(20)
You can also merge them:
Debt.has_debt_greater_than(20).new_first
You can also set a default scope which is called every time a query is made to the model:
class Debt < ActiveRecord::Base
  scope :new_first, -> { order("created_at DESC")}
  scope :has_debt_greater_than, -> (x) { where("amount > ?", x).limit(5) }
  default_scope { new_first }
end
Here we also see chained scopes, with new_first being called inside the default scope.
If you want to skip the default scope, you can use the unscoped method:
Debt.unscoped.load
Validation
There are other validations aside from validates ... :presence listed in the API docs under ActiveRecord::Validations::ClassMethods. Here’s a list of the methods listed there:
-
:acceptance– validates if the specified field is accepted by the user, usually used in terms of service check boxes. -
validates_associated– validates if the objects in the specified associations are valid. -
:confirmation– validates if a copy of the specified field (appended with a_confirmation, e.g.email_confirmationforemail) is part of the submitted form and matches the specified field. This confirmation field is not saved along with the record though it can be accessed like any other field i.e. it’s a virtual field. -
validates_each– validates each attribute against a block -
:inclusion,:exclusion– validates if the value of the field is part of (inclusion) or not part of (exclusion) the specified collection -
:format– validates the field against a regular expression -
:length– validates the length of the field -
:numericality– validates the field if it’s a number. Can also check if it’s a float or an integer. -
:uniqueness– validates whether the field is unique in the table
These validation methods typically have the following options:
-
:message– allows you to replace the default message. For example you want to change the “can’t be blank” message forvalidates_presence_of, you can use:validates:name,presence:true,message:"is required" -
:on– specifies when this validation is active (default is:save, other options are:createand:update). -
:allow_nil– skips the validation if the attribute isnil -
:if,:unless– specifies a method, Proc or string to call to determine if the validation should (:if) or should not (:unless) occur. The method or Proc would be evaluated, while the string would be converted to ruby code then evaluated.
Aside from those validations, you can also use validate, validate_on_create, and validate_on_update to define your own validations. These methods are used just like before_filter is used in controllers.
class Employee < ActiveRecord::Base

  validate_on_create :check_status

  private
    def check_status
      if status == "Suspended"
        errors.add(:status, "can't be Suspended when creating a new Employee")
      end
    end
end
Each Active Record object has anerrors collection containing the errors collected during validation. In the case above, we added a new error to the name field. Not only will this determine the complete error message to be displayed (the field name is added at the beginning of the message), this will also mark the field as an error on the form as we shall see later.
For error messages that aren’t applicable to a single field, you can use errors[base]:
errors[base] << "You must specify a contact number or an e-mail address"
If you want to populate the errors collection without saving the object, you can call validate on the object. The methods for checking whether the object is valid or not, valid? and invalid?, also call validation.
Additional methods for errors can be found in the API docs under ActiveRecord::Errors. Here are some of the more commonly used errors methods:
-
[]– returns an array of errors for a specified field>>p=Product.new=>#<Productid:nil,name:nil,...>>>p.valid?=>false>>p.errors[:name]=>"can't be blank" -
size– returns the number of errors in the collection>>p=Product.new=>#<Productid:nil,name:nil,...>>>p.errors.size=>0>>p.valid?=>false>>p.errors.size=>2 -
clear– removes all errors in the collection
Transactions
You can group database actions into transactions by putting them inside a transaction block:
begin
  ActiveRecord::Base.transaction do
    source_account.withdraw(10000)
    dest_account.deposit(10000)
  end
rescue
  # some error handling
end
In this transaction method call, a rollback would be issued if an exception is thrown inside the block. Since this is a class method of ActiveRecord::Base, you can switch out the ActiveRecord::Base with any model class, for example:
Account.transaction do
  ...
end
You can also use a model object:
source_account.transaction do
  ...
end
The only problem with using this shorter form is that inexperienced developers might think that the transaction is in the Accounts table level. In reality, the transaction is in the database level; you can use different tables in the transaction:
Student.transaction do
  student.save!
  course.save!
end
You can also nest transactions. By default all database actions inside the nested transactions are part of the parent transaction. You can pass the option :requires_new => true to create a sub-transaction which would roll back only up to the start of the sub-transaction. Either way, the behavior still depends on the database used. For example, if we are using MySQL in the following nested transactions without :requires_new:
Product.transaction do
  Product.create(:name => 'Test')
  begin
    Product.transaction do
      Product.create('Test2')
      Product.create!()
    end
  rescue
  end
end
would not rollback any transaction i.e. “Test” and “Test2” are created. Using :requires_new => true would create a SAVEPOINT between “Test” and “Test2” so only “Test” is successfully committed after the exception at Product.create!:
Product.transaction do
  Product.create(:name => 'Test')
  begin
    Product.transaction(:requires_new => true) do
      Product.create('Test2')
      Product.create!()
    end
  rescue
  end
end
We enclosed the sub-transaction with a begin-rescue because all exceptions are still propagated upward after the rollback is processed. The only exception that is not propagated by the transactions is ActiveRecord::Rollback. For example, the following will behave the same as the previous example even without the rescue block:
Product.transaction do
  Product.create(:name => 'Test')
  Product.transaction(:requires_new => true) do
    Product.create('Test2')
    raise ActiveRecord::Rollback
  end
end
Action Controller
We’ve had extensive discussions on Action Controller so the topics below aren’t that complicated.
Root Routing
We’ve discussed almost everything about routing, from match to nested resources. The other options available for match and resources aren’t that important so just refer to the Routing API docs if you need to use them.
However, you might miss one important routing method while reading through references: the root method. For example:
root to: 'pages#main'
root 'pages#main'  # shortcut for the above
This method is basically just another named route so all of the options available formatch would work in it. What’s special about it is that it maps the root of your application to a controller action.
Going to http://localhost:3000/ won’t immediately direct you to themain action ofpages, though. As you may recall in the introduction and our asset tags lesson, the /public folder is mapped to the root, and like many web servers, WEBrick and Unicorn will serve you /public/index.html when you access the root.
To make your root route work, you must first delete/public/index.html. As a named route, you can also use the generated helpers root_url and root_path in your controllers and views.
Multiple Representations
You might be wondering about the purpose of this code fragment in our Debts program:
  def destroy
    @debt.destroy
    respond_to do |format|
      format.html { redirect_to debts_url }
      format.json { render :no_content }
    end
  end
The respond_to block is processed depending on the MIME type requested by the user, that is, the blocks inside the format.xxxx calls are processed when they mach the format requested by the user. In format.json, head :no_content was called: only a successful response with no content is returned.
In the absence of a block, the default rendering is performed. Thus, in the case of the empty show action, show.html.erb was used to render the Show Debt page. Similarly, since we did not provide the block for JSON, the show.json.jbuilder JSON builder would have been rendered as the response for a request for an JSON.
Typically, the MIME type request is determined through the Accept request header. A browser would typically send an Accept header like this:
Accept: text/html,application/xhtml+xml,application/xml;q=0.9,*/*;q=0.8
and Rails would determine the format as html. In the next chapter, we shall see a request with an “Accept: text/javascript, ...” that would be handled in a format.js block.
Most browsers don’t allow the user to define the Accept request header. Thus, Rails provides a way to define the format through the :format parameter in routes. For example:
get ':controller(/:action(/:id(.:format)))'
The parsed :format parameter overrides the Accept header and tells respond_to what format to render and return to the user. So going to http://localhost:3000/promos/show/1.xml would process the format.xml block inside theshow action of the promos controller, hopefully returning an XML version of the 1st promo in the database.
This format parameter is already added to your routes if you used resource or resources.
Cookies and Sessions
HTTP is a stateless protocol. Because of this, all web application platforms and web frameworks have their own means of storing the user’s state without having to go to the database. In this part, we will be discussing Rails’ implementation of the two most common state persistence schemes: cookies and sessions.
Cookies
You can set and retrieve cookies in the user’s browser using the cookies hash available in the controller. Accessing the hash would read the request while manipulating the hash would modify the response.
# returns the value of the "username" cookie
cookies[:username]
# sets the "theme" key to "blue"
cookies[:theme] = "blue"
Cookies can only store string keys and values. You can configure a cookie’s settings by passing a hash instead of a string for the value. (The available settings are listed at the API docs under ActionController::Cookies)
# Sets a cookie that expires in 1 hour.
cookies[:login] = { :value => "XJ-122", :expires => 1.hour.from_now }
The delete method can be used to manually delete cookie entries.
cookies.delete :theme
Session
Like other frameworks, Rails sessions differ from cookies in that while you can only store strings in cookies, you can store (serializable) objects in the session. Unlike other frameworks, however, Rails does not (by default) store the data in the server. Instead, it stores the data as cookies in the user’s browser.
While the idea of cookie based sessions might sound weird, there are important reasons behind it. First, the 4KB limit of cookies and the transparency of cookies promotes good practice: large session objects that contain sensitive data are avoided. Also, since the browser handles the cookie expiry, the server doesn’t need to waste processing cycles on session cleanup.
One valid concern about cookie based sessions is that cookies can easily be tampered with. To get around this, Rails cryptographically signs the session (you can find the Rails generated key at config/initializers/session_store.rb). The users can read the session values but they cannot tamper with them.
With the background out of the way, let’s proceed with using the session.
Using a session is easy; it’s simply a hash, session, available in the controller and the view (just like params and flash).
session[:current_user] = user
You can remove a session entry by setting it to nil. You can reset the entire session using the reset_session method.
Action View
We’ve already discussed almost all of the topics regarding Action View. Here, we’ll just wrap up the topic of form helpers and displaying form errors.
Other Form Helpers
We’ve already covered label, text_field, text_area, collection_select, and submit form helper tags. Here are the other form helper tags:
-
check_box– creates a check box for the specified field. It uses the default values for boolean form fields in Rails (“1” for true, “0” for false) so if you’re using the check box for non-boolean values, you can change the “checked” and “unchecked” values through the arguments. -
file_field– creates a file upload input tag. Uploading files is not part of the scope of this training course. -
radio_button– creates a radio button input tag. The radio buttons are grouped according to the specified field. -
hidden_field– creates a hidden input tag. -
password_field– creates a password-type input tag. -
date_select,datetime_select,time_select– produces a set of select tags (e.g. hour, month, etc) for the date/datetime/time field.
Full details can be found at the API under ActionView::Helpers::FormHelper and ActionView::Helpers::DateHelper.
Active Support Time Extensions
We encountered an Active Support extension to Ruby in the form of “blank?”. The rest of the Active Support extensions can be found in the API docs under ActiveSupport::CoreExtensions. In this section, we’ll focus on the changes made by Active Support related to numbers and time.
In Rails, all numbers have methods that make it look like they are being converted to time objects. Here are a few examples:
Time.now + 1.minute       # returns the time 1 minute from now
1.minute.since(Time.now)  # also returns the time 1 minute from now
1.minute.from_now         # still returns time 1 minute from now
Time.now   2.days         # returns the time 2 days ago –
2.days.ago                # also returns time 2 days ago
Rails also has support for time zones. The default time zone is set in config/application.rb in the line:
config.time_zone = 'UTC'
This assumes that the server, as well as the user, is using UTC. Typically, you set the time zone value per user programatically inside a filter:
class ApplicationController < ActionController::Base
...
  before_filter :set_time_zone
...
    def set_time_zone
      Time.zone = session[:time_zone]
    end
...
The time zone setting not only changes how the time zone is displayed (e.g. if you use the %Z format in Time.strftime), it also affects how records are stored in the database for the user. For example:
| Datetime entered by the user (Time Zone = UTC +08:00) | Datetime saved in the database (Time Zone = UTC +00:00) | Datetime displayed the next time the user views the record |
|---|---|---|
| 06/12/10 01:00 PM | 06/12/10 05:00 AM | 06/12/10 01:00 PM |
This handling saves us the hassle of manually converting time input from foreign users to UTC and back. Rails also handles daylight saving time, yet another possibly problematic issue for time zone handling.
Running rake time:zones:all returns all the possible values for the time zone. You can also use rake time:zones:local to view the possible values based on your computer’s region settings:
$ rake time:zones:local
(in /home/user/alingnena-app)

* UTC +08:00 *
Beijing
Chongqing
Hong Kong
Irkutsk
Kuala Lumpur
Perth
Singapore
Taipei
Ulaan Bataar
Urumqi
Most of the time, you’ll probably set the default setting at theconfig/application.rb to:
config.time_zone = 'Taipei'