Rails Applications Without Scaffold (part 1: Show and List)
Pleased with how you handled the “Debt Records” program, Aling Nena has decided to hire you part time in order to computerize every aspect of her shop.
Part of this job is to create a system to to handle the inventory of her shop’s goods. So for your next task, you need to create a program which maintains the list of products in her shop.
This is a good time to discuss how to create a program from scratch i.e. without using therails generate scaffold script.
The Plan
The Product Maintenance program has 6 different parts:
- User must be able to create a product record
- User must be able to view the product record
- User must be able to view a list of product records
- User must be able to modify a product record
- User must be able to delete a product record
- User must be able to search for a product record
In addition to this, we also need to setup the database for a Products table with the appropriate fields. In the end, we have 7 tasks to be done in the following order:
- Create the migration for Product
- Program the “Show Product” module
- Program the “List Products” module
- Program the “Delete Product” module
- Program the “Search Products” module
- Program the “Create Product” module
- Program the “Edit Product” module
We’ve chosen this order of tasks so that the tasks are done in increasing coding complexity. So without further ado, let’s proceed with the first 2 tasks.
Viewing a Record
First up is the “Show Product” module, a page that displays the details of a certain Product record. We’ve combined this step with the “generate migration” step because we’re going to generate the migration along the way anyway.
The basic flow for showing a single record from the user is as follows:
- User provides the id of the record via the URL
- Program retrieves the record from database
- Program renders the retrieved data into a web page and sends it to the user
In this lesson, we shall see how these steps are coded in Rails.
Generating a Model and adding test data
Instead of usingrails generate scaffold, we shall use rails generate model, a script that only generates the migration and the model for the specified model and fields. The syntax of the latter is the same as the former:
$ rails generate model Product name:string description:text cost:decimal stock:integer
We need to modify the generated migration to add some dummy data for our new screen. Add the highlighted lines to the migration file:
class CreateProducts < ActiveRecord::Migration
  def self.change
    create_table :products do |t|
      t.string :name
      t.text :description
      t.decimal :cost
      t.integer :stock

      t.timestamps
    end
    Product.create :name => "test product 1", :description => "test description 1",
                   :cost => 1.11, :stock => 10
    Product.create :name => "test product 2",
                   :description => "<b>test description 2</b>",
                   :cost => 2.22, :stock => 20
  end
end
Generating a Controller and View Page Templates
A controller action (not to be confused with Action Controller) is a public instance method inside the controller class that processes requests from the user. We can generate controller actions and their corresponding views with the use of therails generate controller script. The syntax for the script is:
rails generate controller controller_name action [action2 action3 ...]
Given the conventions, here’s the script for generating our controller and view:
$ rails generate controller products show
This script will create the controller app/controllers/products_controller.rb:
class ProductsController < ApplicationController
  def show
  end

end
and also the view app/views/products/show.html.erb:
<h1>Products#show</h1>
<p>Find me in app/views/products/show.html.erb</p>
You can now test the new controller and view by running the server (rails server) and going to http://localhost:3000/products/show. The following page should be displayed (you may have to restart the server through rails server):
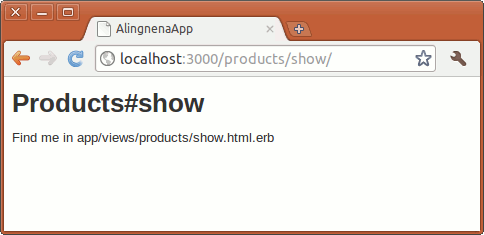
The show action in the controller automatically refers to the show.html.erb file even without additional code as mentioned in the Rails conventions above.
We still have 2 problems at this point:
- We still haven’t displayed the details of the record.
- The format of the URL is different from the convention used by the code generated fromrails generate scaffold i.e.
http://localhost:3000/products/1.
The 2nd problem is simpler and deals with routing so let’s tackle that first.
Routing
Routing deals with how different pages and controllers are linked to each other in a system. In Rails, there is a central configuration file that determines the available routes in the system. At first glance this may look like a violation of the Convention over Configuration mantra, but as we shall see much later, there are ways to let this routing file use convention to reduce the amount of configuration needed.
For this tutorial, we shall do away with the convention-related shortcuts so that you could understand how rails routes pages together. Take a look at the generated config/routes.rb file:
AlingnenaApp::Application.routes.draw do
  get "products/show"
  resources :debts

  # The priority is based upon order of creation: first created -> highest priority.
  # See how all your routes lay out with "rake routes".

  # You can have the root of your site routed with "root"
  # root 'welcome#index'

  # Example of regular route:
  #   get 'products/:id' => 'catalog#view'

  # Example of named route that can be invoked with purchase_url(id: product.id)
  #   get 'products/:id/purchase' => 'catalog#purchase', as: :purchase

  # Example resource route (maps HTTP verbs to controller actions automatically):
  #   resources :products

  # Example resource route with options:
  #   resources :products do
  #     member do
  #       get 'short'
  #       post 'toggle'
  #     end
  #
  #     collection do
  #       get 'sold'
  #     end
  #   end

  # Example resource route with sub-resources:
  #   resources :products do
  #     resources :comments, :sales
  #     resource :seller
  #   end

  # Example resource route with more complex sub-resources:
  #   resources :products do
  #     resources :comments
  #     resources :sales do
  #       get 'recent', on: :collection
  #     end
  #   end

  # Example resource route with concerns:
  #   concern :toggleable do
  #     post 'toggle'
  #   end
  #   resources :posts, concerns: :toggleable
  #   resources :photos, concerns: :toggleable

  # Example resource route within a namespace:
  #   namespace :admin do
  #     # Directs /admin/products/* to Admin::ProductsController
  #     # (app/controllers/admin/products_controller.rb)
  #     resources :products
  #   end
end
It can be a daunting file at first glance, but removing all of the comments, we can see that it’s a pretty simple file:
AlingnenaApp::Application.routes.draw do
  get "products/show"

  resources :debts
end
Before we proceed with creating our routes, let’s discuss first the idea behind the routing conventions in Rails: REST.
Representational State Transfer (REST)
Representational State Transfer (REST) is a scheme for communicating between clients and servers using HTTP. It was promoted as a stateless means of communication in a 2000 paper by Roy Fielding.
We will not go into detail about REST, and instead, we shall only focus on the parts that are relevant to us in Rails. In that regard, there are two main points about REST that we should know:
- All resources are uniquely identified by a URL. For example, a product record can be identified
with the following URL:
http://my.url/products/1In contrast, an item done in a non-REST framework might look like this
http://my.url/view_product.doIn this case, all product records share the same URL and are differentiated only based on the user’s state, either via session or cookie.
- Actions done on resources are defined by the HTTP verb of the request. Here are some examples:
- GET
http://my.url/products– get (a list of) all products - POST
http://my.url/products– post a new product to the list of products - GET
http://my.url/products/1– get the product with the id of 1 - PUT
http://my.url/products/1– put an updated product with the id of 1 to the database - DELETE
http://my.url/products/1– delete a product with the id of 1
- GET
The 5 HTTP commands in the 2nd point above are, by convention, how resources should be handled in Rails.
Now that we know the convention for the URL (http://localhost:3000/products/1) and the convention for the controller action (method must be namedshow for viewing records), we can now move on to connecting the two in our config/routes.rb.
Configuring Routing in routes.rb
Going back to the diagram in MVC, all browser requests to our Rails server goes to the routing component of the controller first. At this point, Rails checks entries inside the routes.rb file from top to bottom to see which controller and action to call.
We want to add a new “route” to the show action in theproducts controller and we can do this using the get declaration inside the routing block. The basic syntax of get is:
get(path_string, options_hash)
When Rails processes a GET request then reaches a get line in the routes.rb file, it first checks the path_string if it matches the request’s URL. The Ruby symbols in the path_string are placeholders and may match any part of the URL. When these symbols are matched to a part of the URL, they are converted into parameters inside aparams hash. (See Ruby Corner – Hash below for a discussion on hashes)
For example, if you added a catch-all get routing handler like:
get ':controller(/:action(/:id(.:format)))'
and then you called http://localhost:3000/products/show/1, Rails would match this request with the route get ':controller(/:action(/:id(.:format)))' producing the following parameters:
params = { :controller => 'products', :action => 'show', :id => 1 }
Based on this params hash, Rails can now route the request to the controller and action we created earlier.
We don’t need to define the :controller and :action symbols within a route. We can specify them as defaults using the => form of match:
get('products/show' => 'products#show')
Opening http://localhost:3000/products/show will make Rails use the controller and action defined in the right side, in this case, the show action of the products controller.
At this point, we can create a route that matches Rails’s conventions on “show record” pages:
AlingnenaApp::Application.routes.draw do
  resources :debts
  get('products/:id' => 'products#show')

end
Going to http://localhost:3000/products/1 will create the following parameters:
params = { :controller => 'products', :action => 'show', :id => 1 }
As you can see, while the whole URL is matched by the path (‘products/:id’) only the :id part is converted to a parameter. The rest of the parameters for controller and action are provided as defaults at the right of the => symbol.
Testing http://localhost:3000/products/1, we now see the following page:
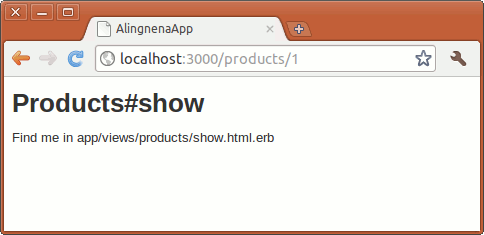
We’ve completed the routing setup. We can now proceed to building the rest of the “Show Record” program.
Putting it all together: Retrieving a Record
To recall, our basic flow for this program is:
- User provides the id of the record via the URL – already done
- Program retrieves the record from database
- Program renders the retrieved data into a web page and sends it to the user
Steps 2 and 3 can be better illustrated by the MVC diagram we had before for Rails:
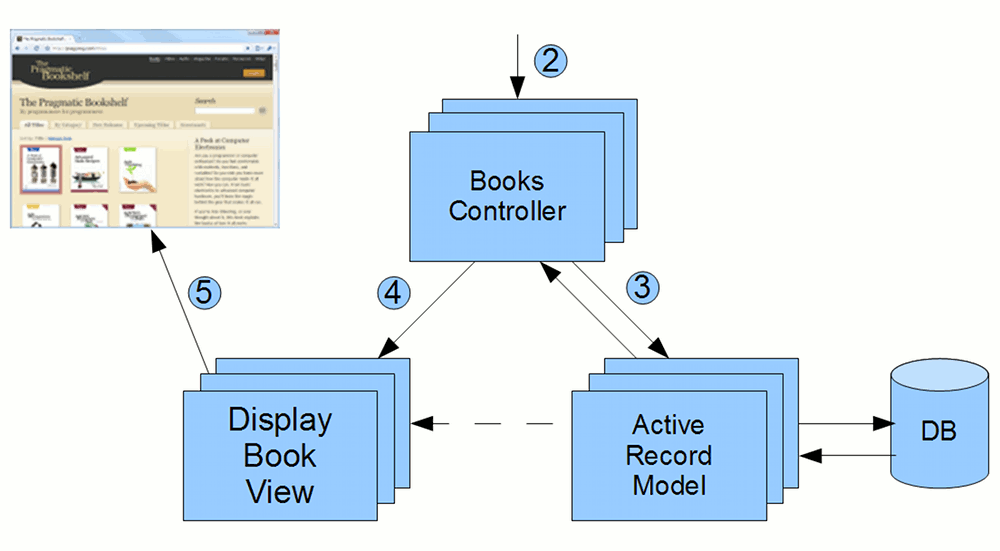
Retrieve Record in the Controller using Model
According to the diagram, retrieving the data has 3 steps:
- After the routing dispatches the request to the controller, the controller calls the model to retrieve the data.
- The model retrieves the data from the database.
- The model sends the data back to the controller.
The first half of the first step has already been done. All requests to 'products/:id' are now dispatched to the Products controller’s show method. All that is left to do is to actually utilize the model to retrieve data from the database. We can do the remaining steps by inserting the following line to theshow method:
class ProductsController < ApplicationController
  def show
    @product = Product.find(params[:id])
  end
end
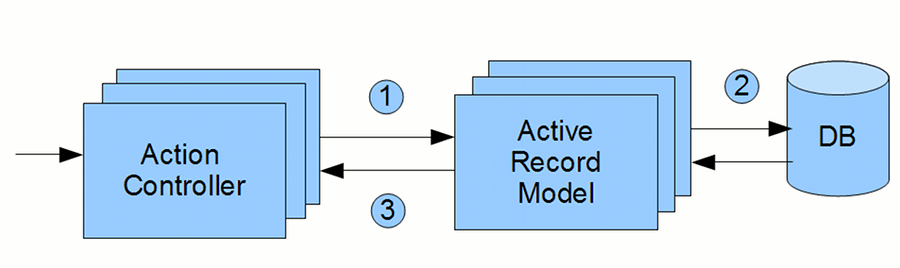
Retrieving the data is done using the Product.find(id) method, a class method in Active Record that retrieves a record with an id matching the passed id argument. In the statement above, this id argument is taken from the params hash passed to the controller via routing.
To pass the data to the controller, we store the result of the find method to an instance variable of the controller. This instance variable will be passed by the controller to the view in the next part of the process.
Display Model data using View
We only have 2 more steps in the Rails MVC diagram:
- The controller sends the data to the view.
- The view renders the web page based on the data and sends it to the user.
Rails automatically handles the first step: when you pass control over to the view at the end of the action method, Rails gives the view a bunch of variables to work on:
- special variables like the
paramshash are available in the view through accessor methods - all instance variables in the controller are created instance variable counterparts in the view i.e. when you put values in the
@productinstance variable in the controller, you can access it in the view as@product
Now that we know that we can access @product in the view, the contents of our view should be easy to code. Replace the contents of app/views/products/show.html.erb to:
<h1>Show Product</h1>
<p>
<strong>Name:</strong>
<%= @product.name %></p>
<p>
<strong>Description:</strong>
<%= @product.description %></p>
<p>
<strong>Cost:</strong>
<%= number_to_currency(@product.cost, {:unit => 'PhP'}) %></p>
<p>
<strong>Stock:</strong>
<%= @product.stock %></p>
Opening http://localhost:3000/products/1 will give us the following result:
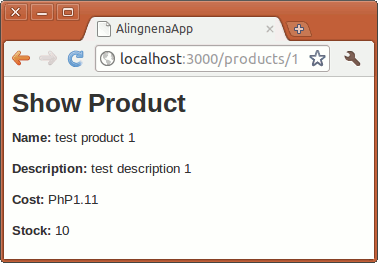
And with that, our “Show Product” page is now complete.
Ruby Corner – Escaping HTML characters
Rails automatically escapes HTML characters in views. Try visiting http://localhost:3000/products/2 and check the contents of the description field.
Rails provides a way of outputting raw data via theraw helper method. Try reloading the same page after enclosing the data with a raw method call:
<%= raw(@product.description) %>Escaping HTML important in web pages: if we do not escape text, malicious users can insert HTML code into our pages and attack our users with Cross-Site Scripting (XSS) and Cross-Site Request Forgery (CSRF) attacks. A simple example would be to go back into our Debts program and create a debt with “<script>alert('hello world!')</script>” as a customer or item, then add raw calls in either the index or the show pages.
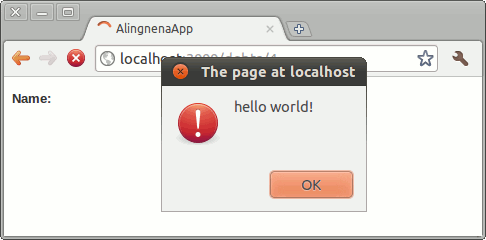
Every user who views the item now has a JavaScript code run in their browsers. At this point, hacking the user’s personal information should only take the hacker a few more lines of code. Therefore, one must always take care in using displaying raw output via the raw helper.
Adding a List Page
Let’s move on to our List Products page. The approach is similar to the Show Product page, namely, we retrieve the records then render them in the view.
Preparing the New Files
We don’t need to create or modify anything for the view so let’s proceed with the controller.
There’s no script for updating the controller so we have to do the changes by hand. First, let’s apply the first convention above to the controller and view. Insert a new action index to the controller (the order of the actions do not matter):
class ProductsController < ApplicationController
  def index
  end

  def show
    @product = Product.find(params[:id])
  end
end
Let’s also create a dummy view for the action, app/views/products/index.html.erb:
<h1>Listing Products</h1>

<table>
  <thead>
    <tr>
      <th>Name</th>
      <th>Description</th>
      <th>Cost</th>
      <th>Stock</th>
    </tr>
  </thead>

</table>
For the 2nd convention, we add a new route in config/routes.rb for routing the request to the controller action:
AlingnenaApp::Application.routes.draw do
  resources :debts

  get 'products' => 'products#index'
  get 'products/:id' => 'products#show'

end
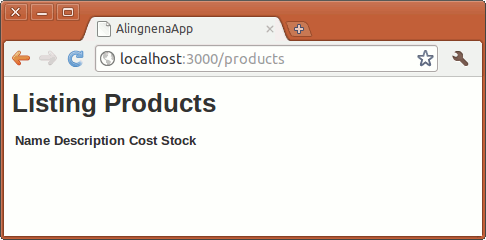
You can now verify the routing by going to http://localhost:3000/products.
Retrieving All Records
In “show product”, we used the Active Record method find() to find a single record. For “list products”, we shall use all(). Add the following line to the index action:
  def index
    @products = Product.all
  end
Using the all() class method instructs Active Record to retrieve all of records of the model. This variation of the method returns an array of objects instead of a single object.
Displaying the Records
All we need to do now is to display the @products array in the view. This part is slightly complicated so it’s OK to take a peek at how our Debts program handles it.
<tbody>
<% @debts.each do |debt| %> <tr>
<td><%= debt.name %></td>
<td><%= debt.item %></td>
<td><%= debt.amount %></td>
<td><%= debt.remarks %></td>
...
</tr>
<% end %></tbody>
There are three new concepts in this code snippet alone. Let’s discuss two of them before we proceed with adding the actual code our view.
Now that we are familiar with iteration and scriptlets, we can now code the rest of the app/views/products/index.html.erb file:
<h1>Listing Products</h1>

<table>
  <thead>
    <tr>
      <th>Name</th>
      <th>Description</th>
      <th>Cost</th>
      <th>Stock</th>
    </tr>
  </thead>
  <tbody>
    <% @products.each do |product| %>
      <tr>
        <td><%= product.name %></td>
        <td><%= product.description %></td>
        <td><%= number_to_currency(product.cost, :unit => "PhP")%></td>
        <td><%= product.stock %></td>
      </tr>
    <% end %>
  </tbody>
</table>
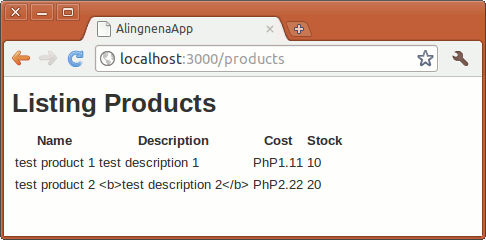
Once coded, we can now go to http://localhost:3000/products to view the “list products” page:
Since we’re done with the “list products” page, we now have time to discuss the third concept introduced in the above code: Ruby Blocks and Procs.
Linking the List Page with the Show Page
Before we proceed with deleting records, let’s add links between the index and show pages together first. It can be annoying to manually type http://localhost:3000/products and http://localhost:3000/products/1 just to go between these two pages.
For this, we can use the link_to helper method. This method returns a link based on the arguments you pass it. The syntax is as follows:
link_to(name, options = {}, html_options_hash = nil)
The name argument is the text used in the link. The options argument can be three different things:
- a string – this will be the URL used by the link. As this is brittle for internal use (paths can be easily changed in the
routes.rb), this is only used for external links. - a hash – the link will be based on both the hash and the
routes.rb. - a non-hash, non-string object – Rails will create a URL based on this object, usually an Active Record. This will be discussed after we finish the entire Product program.
Finally, the html_options_hash is simply a hash of HTML attributes you wish to assign to the link. For example, this link has the CSS class and the id set to “external-link” and “google-search”, respectively:
<%= link_to("Go to Google", "http://www.google.com",
            { :class => "hello world!", :id => "google-search"}) %>
The resulting link is:
<a href="http://www.google.com" class="hello world!" id="google-search">Go to Google</a>
If the text is too long, you can use the block form of link_to:
link_to(options = {}, html_options_hash = nil) do
  # name
end
To use it, just put the text inside the block:
<%= link_to("http://www.google.com") do %>
  <strong>This link goes to Google</strong>
<% end %>
Now that we know how to use link_to, let’s link the show and index pages. Insert the following line to index.html.erb:
...
<% @products.each do |product| %>
  <tr>
    <td><%= product.name %></td>
    <td><%= product.description %></td>
    <td><%= number_to_currency(product.cost, :unit => "PhP")%></td>
    <td><%= product.stock %></td>
    <td><%= link_to('Show', { :action => 'show', :id => product.id }) %></td>
  </tr>
<% end %>
...
And add the following line to the end of show.html.erb:
<%= link_to('Back to List of Products', { :action => 'index' }) %>Named Routes
There are a couple of problems with using an options hash in link_to. The most obvious problem is that it’s too long. Even if the :controller and :action options can be derived from the current page, it’s still too long for practical usage.
Another problem is that it’s brittle. Suppose we have a link scattered around our system, say an approve account link. Initially our link goes to the approve_account action in the users controller so our links were generated using:
<%= link_to 'Approve Account', :controller => 'users', :action => 'approve_account' %>Later, we changed the page that handles the account approval to theapprove action of the accounts controller. We would have to manually search all instances of the approve account link and modify it accordingly.
<%= link_to 'Approve Account', :controller => 'account', :action => 'approve' %>To remedy these two problems, Rails provides a way for us to name routes in theroutes.rb file.
Here’s how you modify our routes for index and show to become named routes:
AlingnenaApp::Application.routes.draw do
  resources :debts
  get 'products' => 'products#index'
  get 'products/:id' => 'products#show'
  get 'products' => 'products#index', :as => 'products'
  get 'products/:id' => 'products#show', :as => 'product'

end
By adding an :as option, we tell Rails to provide two new helper functions based on the route:
-
xxxx_path– returns the relative path of the matched route. For example, callingproducts_pathwill return/products -
xxxx_url– returns the complete URL of the matched route. For example, callingproducts_urlwill returnhttp://localhost:3000/products
The path and URL are interchangeable in almost all cases. For this manual, we shall use the xxxx_path methods due to it being used in generator scripts. Here’s the named route version of the link in show.html.erb:
<%= link_to 'Back to List of Products', products_path %>When the path in the route contains placeholder symbols, both methods accept arguments to fill up these placeholders. For example, if we want to generate the URL to a certain product, we can use:
...
    <td><%= product.stock %></td>
    <td><%= link_to 'Show', action: 'show', id: product.id %></td>
    <td><%= link_to 'Show', product_path(product.id) %></td>
  </tr>
<% end %>
...