Rails Applications Without Scaffold (part 4: RESTFul Routes, Callbacks, Filters, and Layout)
In this chapter, we will be discussing new Rails features from the Model, Controller, and the View that can make our Product maintenance program better.
Reduce Route Entries with Resource-Based Routing
Creating a new route entry for typical routes sort of defeats the purpose of following Convention over Configuration. Fortunately, most of the routing in this program was only done for educational purposes; there is a shortcut for telling Rails that a certain resource follows the REST conventions.
AlingnenaApp::Application.routes.draw do
  resources :debts

  get 'products/search' => 'products#search', :as => 'search_products'
  resources :products

end
Using resources :products adds the following routes and helpers to the system:
| helper | HTTP verb | URL | controller | action | use |
|---|---|---|---|---|---|
products_url, products_path
|
GET | /products |
Products |
index |
Display a list of all products |
new_product_url, new_product_path
|
GET | /products/new |
Products |
new |
Return a form for creating a new product |
| POST | /products |
Products |
create |
Create a new product | |
product_url, product_path
|
GET | /products/:id |
Products |
show |
Display a product |
edit_product_url, edit_product_path
|
GET | /products/:id/edit |
Products |
edit |
Return a form for editing a product |
| PATCH / PUT | /products/:id |
Products |
update |
Update a product | |
| DELETE | /products/:id |
Products |
destroy |
Delete a product |
You can define other routes under the resource by using the collection and member blocks. Use collection for routes that affect the entire collection. In our case, we can set the products search as a collection route:
AlingnenaApp::Application.routes.draw do
  resources :debts

  resources :products do
    collection do
      get 'search'
    end
  end

end
Doing this will also create search_products_xxxx route helpers (we manually set that named route before).
For actions that only affect one resource, use the member option. For example, if we want to add a “suspend” action for suspending a specific product (i.e. PUT /products/:id/suspend), we can use:
AlingnenaApp::Application.routes.draw do
  resources :debts
  resources :products do
    collection do
      get 'search'
    end
    member do
      put 'suspend'
    end
  end

end
The other options for resource-based routing will be discussed in a later chapter.
Perform Actions While A Model is Saved using Callbacks
Aling Nena has dozens, if not hundreds, of different products in stock. If she would encode all of them, she might not have time to enter detailed descriptions for each item. To help her in this task, we could just set the description to be the same as the product’s name every time she doesn’t enter a description.
At first glance, the solution to this problem would be in the controller, say, something like this:
 def create
    @product = Product.new(params[:product])

    if @product.description.blank?
      @product.description = @product.name
    end
...
However, if you would recall our discussion in MVC, most of the business logic must be placed inside the model instead of the controller. So how do we set the description without changing the controller?
For this, we need to understand how to use callbacks.
Callbacks
Callbacks are methods called by an Active Record object before and after the object is inserted, updated, or deleted from the database. Here is the list of callbacks performed in each of these operations:
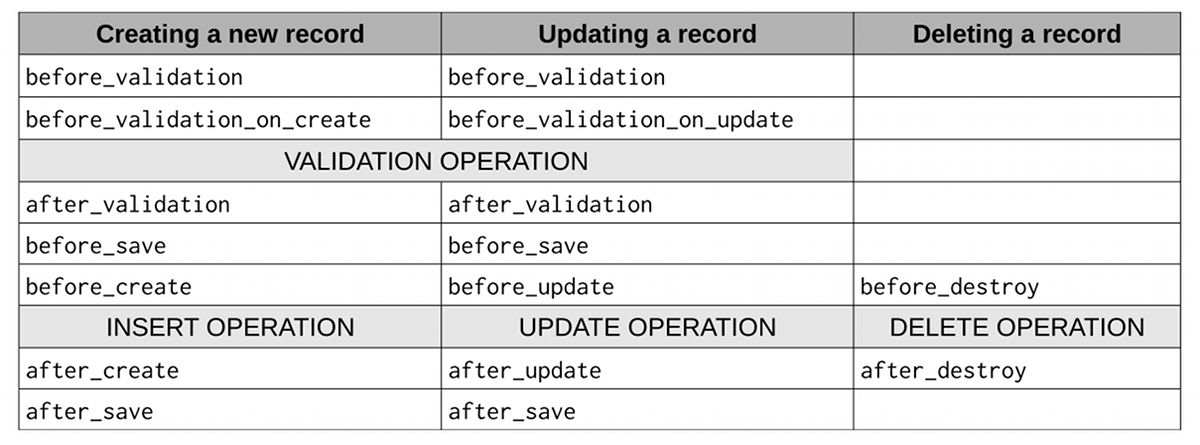
Based on this table, the before_validation callback is called before the validation of both record creation and update. After that, the before_validation_on_create and before_validation_on_update are called in creation and update, respectively.
Registering Callbacks
Registering callbacks is similar to setting validations. Instead of providing fields, however, we provide symbols referring to method names.
class Product < ActiveRecord::Base
  validates :name, presence: true
  validates :description, presence: true

  before_validation :assign_default_description

  private

    def assign_default_description
      if description.blank?
        self.description = name
      end
    end
end
Here we set the description field of the record before the record is validated (thus preventing an error in description validation).
Note that we set the callback method to be private. This prevents the method from being called outside the object. Another thing to note is the use of self to denote that we are modifying the instance attribute; if we didn’t use self.description, Ruby will think we are simply setting a local variable description.
Limiting User Access with Filters and Authentication
Aling Nena wants her customers to see the list of available products in her store. However, she doesn’t want them to create and edit the products, or worse, delete the products. In short, she wants to add an authentication mechanism in her site.
Controller Filters
Authentication is like validation; we want to validate whether the user has permission to do something in our application. Unlike validation, it is not done in the Model level but in the Controller level, with the help of the controller filters.
Controller filters are more like callbacks than validations. They are methods that we define to be executed before actions (using before_action) or after actions (using after_action). The syntax is also similar:
# app/controllers/products_controller.rb
class ProductsController < ApplicationController
  before_action :check_if_aling_nena

  ...
  private

   def check_if_aling_nena
     #checking here
   end
end
In this case, the method check_if_aling_nena is called before every action in the Products controller. If we want to limit the actions where the filter is applied, we can use the :only option.
before_action :check_if_aling_nena, :only => [:new, :create, :edit, :update, :destroy]
It might make sense to use the :except option here, though.
before_action :check_if_aling_nena, :except => [:index, :show, :search]
One important thing about before_action methods is that the processing will not continue to the action if the method renders or redirects. Here’s one way to test our new filter, by kicking everyone back to the list products page regardless of who they are:
   def check_if_aling_nena
     redirect_to products_path, notice: "You must be Aling Nena to access this page."
   end
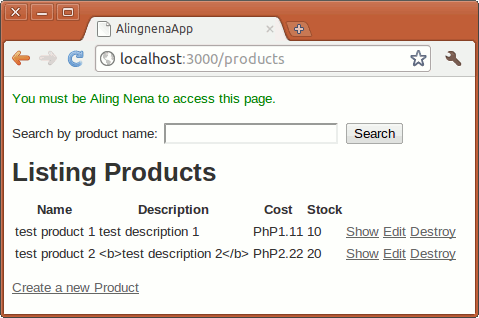
(You may want to change that flash message to :alert, just don’t forget to add the code to index that would display the message.)
HTTP Authentication
Having verified that the filter works, let’s now add the authentication.
Rails has built in methods that make applying basic HTTP authentication easy. Here’s the code to apply that authentication to our Product maintenance program (you can change the username and password as you like):
   def check_if_aling_nena
     authenticate_or_request_with_http_basic("Products Realm") do |username, password|
       username == "admin" and password == "sTr0NG_p4$swOrD"
     end
   end
You should see browser-specific pop-up prompting you for credentials:
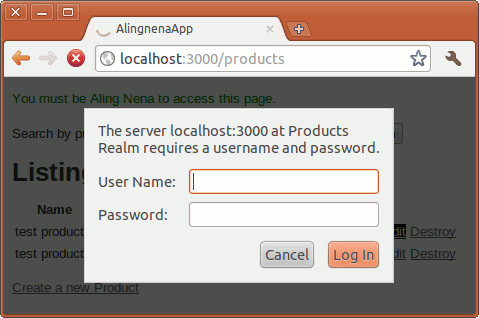
Entering the credentials will let you proceed to the pages. Since HTTP authentication is supported by all browsers, the server knows if you already provided your credentials so you don’t have to re-enter it again when you enter the other actions in the program.
Pressing Cancel will redirect you to an error page:
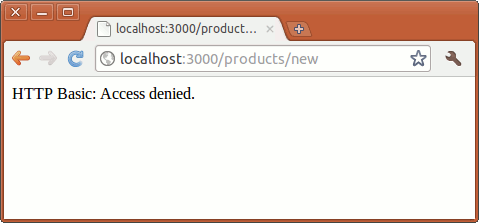
HTTP Authentication is the most basic of all authentications available to Rails. For larger applications with many users, you’re better off with full-fledged authentication solutions like the Authlogic or Devise gems.
Layouts and Rendering in the View
Asset Tags
Static files in our web application are stored in the public folder. Since this folder is mapped directly to the application root, going to http://locahost:3000/ will open public/index.html.
However, certain assets like JS, CSS, and image files are stored in the app/assets folder so that they can be processed by Rails’s Asset Pipeline. We’ll discuss the Asset Pipeline in further detail much later under the Deployment chapter; in the meantime, we’ll briefly show the view helper methods for stylesheets, JavaScript files, and images.
By convention, stylesheets, images, and JavaScript files are stored in the app/assets/stylesheets, app/assets/images, and app/assets/javascripts folder, respectively. Rails provides view helpers called asset tags for linking to these files.
We can use stylesheet_link_tag to link to CSS files under the app/assets/stylesheets folder. The syntax is as follows:
stylesheet_link_tag( *sources, options = {} )
You can pass one or more stylesheets to the method:
<%= stylesheet_link_tag("main") %><%= stylesheet_link_tag("sidebar", "admin") %>The code above creates the following links if the linked files are missing from the app/assets/stylesheets folder:
<link href="/stylesheets/main.css" media="screen" rel="stylesheet" type="text/css" />

<link href="/stylesheets/sidebar.css" media="screen" rel="stylesheet" type="text/css" />
<link href="/stylesheets/admin.css" media="screen" rel="stylesheet" type="text/css" />
Rails will fall back to the public/* folder in case the stylesheet is missing from the app/assets/* folder.
On the other hand, if you do use the Asset Pipeline (under development mode), here’s what it will look like:
<link href="/assets/main.css?body=1" media="screen" rel="stylesheet" type="text/css" />

<link href="/assets/sidebar.css?body=1" media="screen" rel="stylesheet" type="text/css"\
 />
<link href="/assets/admin.css?body=1" media="screen" rel="stylesheet" type="text/css" />
Before we go into the Asset Pipeline discussion, just note that you can also use relative paths:
<%= stylesheet_link_tag("red/main") %><link href="/stylesheets/red/main.css" media="screen" rel="stylesheet" type="text/css" \
/>
You can also use absolute or external paths:
<%= stylesheet_link_tag("http://example.com/main") %><link href="http://example.com/main.css" media="screen" rel="stylesheet" type="text/css\
" />
You can also override the link attributes by adding them as options. For example, you can change the media from screen to print using the following:
<%= stylesheet_link_tag("main", { :media => "print"}) %>Now to discuss the Asset Pipeline. The main reason behind the Asset Pipeline is to preprocess CSS and JS files, and one of those preprocessing methods is to concatenate the said files into single file. Concatinating CSS and JS will reduce the amount of requests to your server, and this can significantly improve loading times especially if you have a lot of files.
We can see this happening in the default app/assets/stylesheets/application.css file:
/*
 * This is a manifest file that'll be compiled into application.css, which will include\
 all the files
 * listed below.
 *
 * Any CSS and SCSS file within this directory, lib/assets/stylesheets, vendor/assets/s\
tylesheets,
 * or vendor/assets/stylesheets of plugins, if any, can be referenced here using a rela\
tive path.
 *
 * You're free to add application-wide styles to this file and they'll appear at the to\
p of the
 * compiled file, but it's generally better to create a new file per style scope.
 *
 *= require_self
 *= require_tree .
 */
We shal see a bit later that this file is referenced in all our pages via a <%= stylesheet_link_tag("application") %> call. When the asset is accessed, Rails will process the comments in the CSS file; Rails will insert the contents of the application.css file in the = require_self comment location, then it will insert all of the CSS files in the current directory at the = require_tree . comment.
Let’s move on to to JS. The asset tag for JavaScript is javascript_include_tag and it behaves the same way as the stylesheet_link_tag. Here’s an example of linking to an asset in the public/javascripts folder:
<%= javascript_include_tag(main) %>=> <script type="text/javascript" src="/javascripts/main.js"></script>
Similar to the stylesheet_link_tag, linking to an asset in the app/assets/javascripts folder will make Rails process its comments to create a concatenated JS file. Open app/assets/javascripts/application.js to see the default JS file:
// This is a manifest file that'll be compiled into application.js, which will include \
all the files
// listed below.
//
// Any JavaScript/Coffee file within this directory, lib/assets/javascripts, vendor/ass\
ets/javascripts,
// or vendor/assets/javascripts of plugins, if any, can be referenced here using a rela\
tive path.
//
// It's not advisable to add code directly here, but if you do, it'll appear at the bot\
tom of the
// compiled file.
//
// Read Sprockets README (https://github.com/sstephenson/sprockets#sprockets-directives\
) for details
// about supported directives.
//
//= require jquery
//= require jquery_ujs
//= require turbolinks
//= require_tree .
As you can see, jQuery and Turbolinks are added before the JavaScript files in the same folder. We shall discuss both under the Ajax chapter.
For images, the asset tag is image_tag. The basic use is similar to the two previous asset tags. Here’s what it would look like if the file exists in the app/assets/images folder:
<%= image_tag "banner.png" %>=> <img src="/assets/banner.png" />
In addition to the HTML attributes that you can set in the options hash parameter, image_tag has the following special options:
-
:alt– If no alt text is given, the file name part of the source is used (capitalized and without the extension) -
:size– Supplied as “{Width}x{Height}”, so “30x45” becomes width=”30” and height=”45”.:sizewill be ignored if the value is not in the correct format.
Layouts
We now know how to link to CSS files in our pages but having to add <%= stylesheet_link_tag "scaffold" %> (the CSS used in Debts) to all of our pages can be a hassle, not to mention that it violates the DRY (Don’t Repeat Yourself) principle that we’ve been following as we applied Convention over Configuration to our program. There must be a way for us to apply HTML code to all of our pages.
Thankfully, Rails already provides a way to do that through layouts.
Layouts, as you may have guessed, provide the general layout for our views. Rails combines the view and the layout when rendering the page to the user. An example of a layout is the default layout generated when we created our application, app/views/layouts/application.html.erb:
<!DOCTYPE html>
<html>
<head>
<title>AlingnenaApp</title>
<%= stylesheet_link_tag "application", media: "all", "data-turbolinks-track" => tr\
ue %> <%= javascript_include_tag "application", "data-turbolinks-track" => true %> <%= csrf_meta_tags %></head>
<body>
<%= yield %></body>
</html>
The yield section defines where the view will be inserted upon rendering. You can also use multiple yielding regions:
<html>
  <head>
  <%= yield :head %>
  </head>
  <body>
  <%= yield %>
  </body>
</html>
To render content in a named yield, you use the content_for method:
<% content_for :head do %> <title>A simple page</title>
<% end %><p>Hello, Rails!</p>
This would result in:
<html>
  <head>
  <title>A simple page</title>
  </head>
  <body>
  <p>Hello, Rails!</p>
  </body>
</html>
By default, Rails checks the app/views/layouts directory for a layout that matches the name of the controller. If the layout isn’t found, Rails will try app/views/layouts/application.html.erb.
There are two other ways to define layouts. First is through the controller:
class ProductsController < ApplicationController
  before_action :check_if_aling_nena, :except => [:index, :show, :search]

  layout "main"
...
This will apply app/views/layouts/main.html.erb to all actions in Products.
Layouts are shared downwards in the hierarchy, so applying
class ApplicationController < ActionController::Base
  # Prevent CSRF attacks by raising an exception.
  # For APIs, you may want to use :null_session instead.
  protect_from_forgery with: :exception

  layout "main"
...
will set the layout of every controller to app/views/layouts/main.html.erb because all controllers (at least the ones generated by rails generate controller and scaffold) are subclasses of `ApplicationController.
Another way of setting the layout is through the render method. Before, the only option we discussed for render is :action, so now we introduce a new option, :layout, which lets you define the layout of a rendered view:
render :layout => "main", :action => "new"
You can also remove a layout by setting it to `false. For example:
render :layout => false, :action => "new"
When multiple layouts are applied to a view, more specific layouts always override more general ones. For example:
class ProductsController < ApplicationController
  layout "main"
  def show
    @product = Product.find(params[:id])
    render :layout => false
  end
...
No layout is rendered for the show action above. (Recall that the :action option is automatically set by Rails according to the action name if it’s not defined.)
Partial Templates
When you look at app/views/products/new.html.erb and app/views/products/edit.html.erb, you will notice that both share almost the same code for the form. We can eliminate this redundancy by using partial templates, better known as partials.
Partials are fragments of pages that can be called by other pages. We use the render method to tell rails to render a partial inside a view. For example, if we call the following inside app/views/products/new.html.erb:
<%= render({:partial =>'form'})%>The call will insert the contents of app/views/products/_form.html.erb at that line inside the view.
We can use the :locals option to pass local variables to the partial. For example, we can eliminate the redundancy between new and edit by modifying the views:
<h1>New Product</h1>

<%= render({:partial => "form",
            :locals => { :product => @product, :button_label => "Create" } }) %>

<%= link_to 'Back', products_path %><h1>Edit Product</h1>
<%= render({:partial => "form",
:locals => { :product => @product, :button_label => "Update" } }) %>
<%= link_to 'Show Details', @product %> |
<%= link_to 'Back to List', products_path %>
and creating a new partial app/views/products/_form.html.erb:
<%= form_for product do |f| %>
  <% if product.errors.any? %>
    <div id="error_explanation">
      <h2><%= pluralize product.errors.count, "error" %> prohibited this product from
        being saved:</h2>
      <ul>
      <% product.errors.full_messages.each do |msg| %>
        <li><%= msg %></li>
      <% end %>
      </ul>
    </div>
  <% end %>

  <div class="field">
    <%= f.label :name %><br />
    <%= f.text_field :name %>
  </div>
  <div class="field">
    <%= f.label :description %><br />
    <%= f.text_area :description %>
  </div>
  <div class="field">
    <%= f.label :cost %><br />
    <%= f.text_field :cost %>
  </div>
  <div class="field">
    <%= f.label :stock %><br />
    <%= f.text_field :stock %>
  </div>
  <div class="actions">
    <%= f.submit button_label %>
  </div>
<% end %>
In this case, the product local variable was derived from the @product instance variables, while the button_label was supplied in the hash.
All partials have a local variable with the same name as the partial and you can pass an object to this by using the :object option. In other words, suppose we make a copy of the _form partial at _product_form.html.erb, and we replace the first line with:
<%= form_for product_form do |f| %>We would be able to do this in edit.html.erb:
<%= render({:partial => "product_form",
            :object => @product,
            :locals => { :button_label => "Update" } }) %>
The instance variable is placed inside the product_form variable.
We can also use partials to render a collection of objects using the :collection option. For instance, we can replace the iteration inside app/views/products/index.html.erb with the following:
...
  <thead>
    <tr>
      <th>Name</th>
      <th>Description</th>
      <th>Cost</th>
      <th>Stock</th>
    </tr>
  </thead>
  <tbody>
    <%= render({ :partial => "item", :collection => @products }) %>
  </tbody>
</table>
...
And create a new partial, _item.html.erb:
    <tr>
      <td><%= item.name %></td>
      <td><%= item.description %></td>
      <td><%= number_to_currency item.cost, unit: 'PhP' %></td>
      <td><%= item.stock %></td>
      <td><%= link_to 'Show', item %></td>
      <td><%= link_to 'Edit', edit_product_path(item) %></td>
    </tr>
The page would still display as it was originally displayed. Each item in the array is placed in a local variable that shares the same name as the partial. In this case, the partial and variable name is item.
We can even define a spacer template for the collection:
<%= render({ :partial => "item", :collection => @products,
    :spacer_template => "hr" }) %>
Here’s a sample _hr.html.erb:
<tr><td colspan="7"><hr></td></tr>
There is also a shorthand for partials. Assuming @product a single Product object the following code:
<%= render({ :partial => @product }) %>will render _product.html.erb and pass @product as the value of the local variable product. Similarly, assuming @products is a collection of Product objects, the following code:
<%= render({ :partial => @products }) %>will render the partial _product.html.erb for each Product object inside the collection, passing the object to the local variable product.
Using a collection with different object types can produce polymorphic results. For example, if employee1 and employee2 are Employee objects, while customer1 and customer2 are Customer objects, the following call:
<%= render({ :partial => [customer1, employee1, customer2, employee2] }) %>will call the following partials, either _customer.html.erb
<p>Name: <%= customer.name %></p>
or _employee.html.erb:
<p>Name: <%= employee.name %></p>