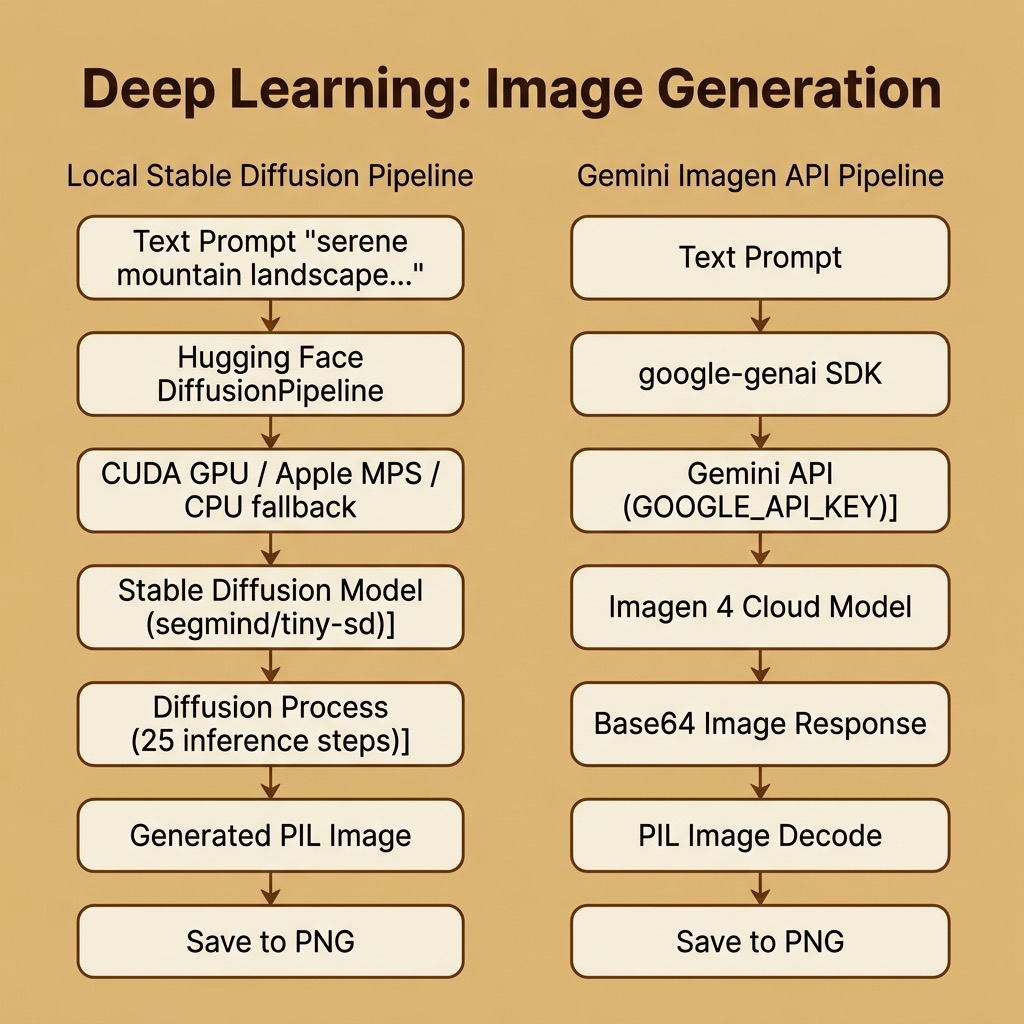
Overview of Image Generation
I have never used deep learning image generation at work but I have fun experimenting with both code and model examples, as well as turn-key web apps like DALL·E. In this chapter we look at two approaches to generating images from text prompts: running a model locally with PyTorch, and calling Google’s Imagen 4 cloud API.
The requirements for this chapter are:
1 uv add torch diffusers transformers accelerate google-genai Pillow
The examples for this chapter are in the directory source-code/deep_learning_image_generation.
Image Generation Using Stable Diffusion and PyTorch
Stable Diffusion is an open-source deep learning model for text-to-image generation. The Hugging Face diffusers library makes it straightforward to load and run Stable Diffusion models using PyTorch. Here is a complete example that generates an image from a text prompt:
 1 import torch
 2 from diffusers import DiffusionPipeline
 3
 4 # A smaller model (~1GB) for faster downloading
 5 model_id = "segmind/tiny-sd"
 6 print(f"Loading model: {model_id}")
 7
 8 # Use float16 for GPU/MPS, float32 for CPU
 9 if torch.cuda.is_available():
10     pipe = DiffusionPipeline.from_pretrained(
11         model_id, torch_dtype=torch.float16
12     )
13     pipe = pipe.to("cuda")
14 elif torch.backends.mps.is_available():
15     pipe = DiffusionPipeline.from_pretrained(
16         model_id, torch_dtype=torch.float16
17     )
18     pipe = pipe.to("mps")
19 else:
20     pipe = DiffusionPipeline.from_pretrained(model_id)
21
22 prompt = "a serene mountain landscape at sunset, oil painting style"
23 image = pipe(prompt, num_inference_steps=25).images[0]
24 image.save("generated_landscape.png")
The first time you run this code, the model weights (about 1.1 GB) will be downloaded to ~/.cache/huggingface in your home directory. Subsequent runs use the cached model.
The code automatically detects available hardware: NVIDIA GPU (CUDA), Apple Silicon (MPS), or CPU. GPU acceleration dramatically speeds up image generation — from minutes on CPU to seconds on a modern GPU.
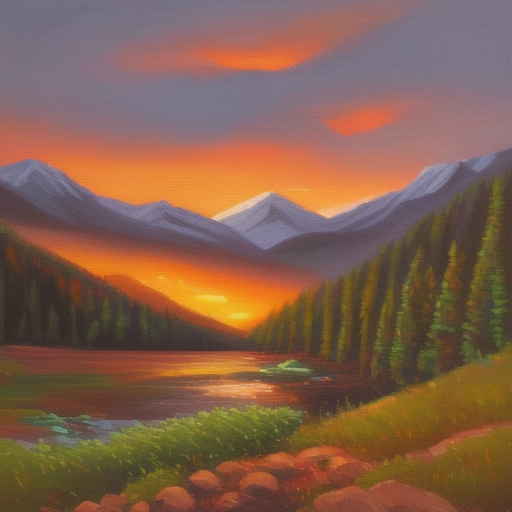
You can experiment with different prompts, and the num_inference_steps parameter controls the quality/speed tradeoff (higher = better quality, slower). Here is sample output running on Apple Silicon:
1 $ python image_generation.py
2 Loading model: segmind/tiny-sd
3 (First run will download about 1.1 GB of model weights)
4
5 Generating image for prompt: 'a serene mountain landscape at sunset, oil painting style'
6 Image saved to: generated_landscape.png
Understanding the Diffusion Process
Stable Diffusion works by a process called denoising diffusion:
- Start with pure random noise (a tensor of random values).
- Gradually remove noise over many steps, guided by the text prompt.
- The result is an image that matches the prompt description.
The text prompt is converted to an embedding vector using a text encoder (CLIP), which guides the denoising process at each step. This is why the same prompt can generate different images with different random seeds.
Image Generation Using Google’s Imagen API
While running models locally gives you full control and privacy, cloud-based image generation APIs offer higher quality results with virtually no setup. Google’s Imagen 4 model is accessible through the Gemini API using the google-genai SDK.
The entire example is remarkably concise:
 1 import io
 2 import os
 3
 4 from google import genai
 5 from google.genai import types
 6 from PIL import Image
 7
 8 client = genai.Client(
 9     api_key=os.getenv("GOOGLE_API_KEY")
10 )
11
12 prompt = (
13     "a serene mountain landscape at sunset,"
14     " oil painting style"
15 )
16 print(f"Generating image for prompt: '{prompt}'")
17
18 response = client.models.generate_images(
19     model="imagen-4.0-fast-generate-001",
20     prompt=prompt,
21     config=types.GenerateImagesConfig(
22         number_of_images=1,
23     ),
24 )
25
26 for generated_image in response.generated_images:
27     image = Image.open(
28         io.BytesIO(generated_image.image.image_bytes)
29     )
30     image.save("gemini_generated_landscape.png")
31     print("Image saved to: gemini_generated_landscape.png")
Compared to the local Stable Diffusion approach, the Gemini API example requires no GPU, no multi-gigabyte model downloads, and no hardware-specific configuration. You just need a GOOGLE_API_KEY (available free from Google AI Studio).
The generate_images method returns image data as raw bytes, which we decode using PIL’s Image.open with an io.BytesIO wrapper. The Imagen 4 model family includes three variants: Fast (optimized for speed), Standard (balanced), and Ultra (maximum fidelity up to 2K resolution). We use the Fast variant here since it produces good results with low latency.
Here is sample output:
1 $ python gemini_image_generation.py
2 Generating image for prompt: 'a serene mountain landscape at sunset, oil painting style'
3 Image saved to: gemini_generated_landscape.png
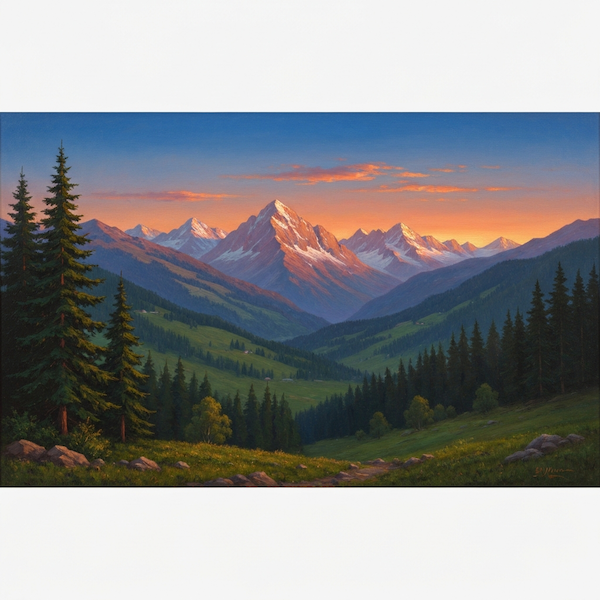
Here is a sample generated image using Imagen 4:
Mini-DALL·E: A Lightweight Alternative
For a lighter-weight alternative, Brett Kuprel’s Mini-Dalle model is a reduced size port of DALL·E Mini to PyTorch. It requires less GPU memory and can run on more modest hardware:
1 uv pip install min-dalle
 1 import torch
 2 from min_dalle import MinDalle
 3
 4 model = MinDalle(
 5     dtype=torch.float32,
 6     device='cuda',    # use 'cpu' if no GPU
 7     is_mega=True,
 8     is_reusable=True
 9 )
10
11 text = "parrot sitting on old man's shoulder"
12
13 image = model.generate_image(
14     text=text,
15     seed=-123,
16     grid_size=2,
17     temperature=1.5,
18     top_k=256,
19     supercondition_factor=12
20 )
21
22 image.save(text.replace(" ", "_") + ".png")
If is_mega is true then a larger model is constructed. If is_reusable is true then the same model is reused to create additional images.
You can try changing the temperature (increase for more randomness and differences from training examples), random seed, and text prompt.
Here is a sample generated image:
If you are interested in the implementation please read the original paper from Open AI Zero-Shot Text-to-Image Generation before reading the code for the models.
Recommended Reading for Image Generation
You can get more information on DALL·E and later versions from https://openai.com/blog/dall-e/. You will get much higher quality images using OpenAI’s DALL·E web service.
For more advanced image generation with PyTorch, explore:
- The Hugging Face diffusers documentation for Stable Diffusion variants, ControlNet, and image-to-image generation.
- Stable Diffusion XL (SDXL) for higher quality image generation.
- The PyTorch image generation tutorial for understanding GANs from scratch.
- The Google Imagen documentation for cloud-based image generation with the Gemini API.
Optional Practice Problems
To help reinforce and expand your understanding of deep learning image generation, try completing the following exercises. You can modify the scripts in the source-code/deep_learning_image_generation directory.
1. Easy: Parameter Tuning and Prompt Styling
Objective: Explore how style keywords and model hyperparameters affect generated images.
-
Tasks:
- Open image_generation.py. Modify the text prompt to compare three different artistic styles for the same subject (e.g., “a futuristic city skyline” in photorealistic, pixel art, and watercolor styles).
- For the local Stable Diffusion model, experiment with the
num_inference_stepsparameter. Run the script with values of5,15,30, and50. Measure the execution time for each run and visually inspect the output. What is the minimum number of steps required to produce a recognizable, high-quality image?
2. Medium: Batch Generation and Reproducibility
Objective: Control randomness and generate multiple image variations in a single run.
-
Tasks:
- Modify gemini_image_generation.py to request
3images instead of1in theGenerateImagesConfigobject. Update the loop to save all three images as separate files (e.g.,gemini_generated_landscape_1.png, etc.). -
Extend image_generation.py to make generation reproducible. Instantiate a PyTorch random number generator with a specific seed and pass it to the pipeline:
1 generator = torch.Generator(device=pipe.device).manual_seed(42)
2 image = pipe(prompt, num_inference_steps=25, generator=generator).images[0]
Verify that running the script multiple times with the same seed produces the exact same image, whereas changing the seed (e.g., to43) produces a distinct composition.
3. Hard: Image-to-Image Translation (Img2Img)
Objective: Use a local image as the starting point for a new generation.
-
Tasks:
- Create a new script
image_to_image.pyin the source directory. -
Instead of starting from random noise, load an existing image (like
generated_landscape.png) and use a text prompt to transform it. You will need to importAutoPipelineForImage2Image(orStableDiffusionImg2ImgPipeline) fromdiffusers.1 from diffusers import AutoPipelineForImage2Image 2 from diffusers.utils import load_image 3 4 # Load pipeline 5 pipe = AutoPipelineForImage2Image.from_pretrained( 6 "segmind/tiny-sd", torch_dtype=torch.float16 7 ) 8 # Send to GPU / MPS / CPU as in the original script
- Load your input image, resize it if necessary, and run the pipeline with a prompt like “a serene mountain landscape in winter with heavy snow, oil painting style”.
- Experiment with the
strengthparameter (which ranges from0.0to1.0). Observe how a strength of0.2keeps the image almost identical to the original, while a strength of0.8allows the model to completely reimagine the landscape.