MySQL Tips and Tricks for d3.js
Using a MySQL database as a source of data.
PHP is our friend
As outlined at the start of the book, PHP is commonly used to make web content dynamic. We are going to use it to do exactly that by getting it to glue together our d3.js JavaScript and a MySQL Database. The end result should be a web page that will leverage the significant storage capability of a MySQL database and the ability to vary different aspects of returned data.
phpMyAdmin
I’m not one to dwell on the command line for too long if it can be avoided (sorry). So in this section you’ll see me delving into a really neat program for managing your MySQL database called phpMyAdmin (http://www.phpmyadmin.net/home_page/index.php).
As the name would suggest, it’s been written in PHP and as we know, that’s a sign that we’re talking about a web based application. In this case phpMyAdmin is intended to allow a wide range of administrative operations with MySQL databases via a web browser. You can find a huge amount of information about it on the web as it is a freely available robust platform that has been around for well over a decade.
If you have followed my suggestion earlier in the book to install WAMP or you have phpMyAdmin installed already you’re in luck. If not, I’m afraid that I won’t be able to provide any guidance on its installation. I just don’t have the experience to provide that level of support.
Create your database
Assuming that you do have WAMP installed, you will be able to access a subset of its functions from the icon on your system tray in the lower right hand corner of your screen.

Clicking on this icon will provide you with a range of options, including opening phpMyAdmin.

Go ahead and do this and the phpMyAdmin page will open in your browser.
The page you’re presented with has a range of tabs, and we want to select the ‘Databases’ tab.
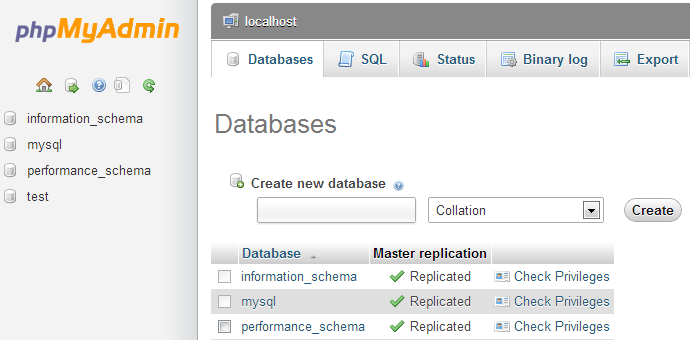
From here we can create ourselves a new database simply by giving it a name and selecting ‘Create’. I will create one called ‘homedb’.

That was simple!
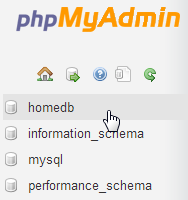
On the panel on the left hand side of the screen is our new database. Go on and click on it.
Cool, now we get to create a table. What’s a table? Didn’t we create our database already?
So, lets create a table called data2 with three columns.
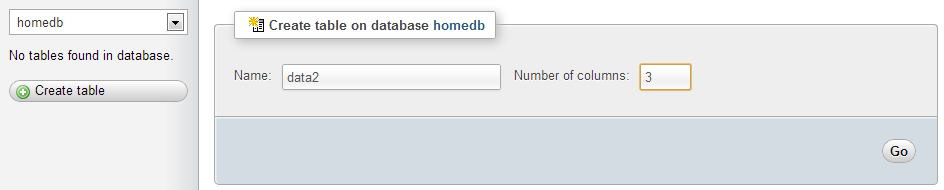
I’ve chosen data2 as a name since we will put the same data as we have in the data2.tsv file in there. That’s why there are three columns for the date, close and open columns that we have in the data2.tsv file.
So, after clicking on the ‘Go’ button, I get the following screen where I get to enter all the pertinent details about what I will have in my table.
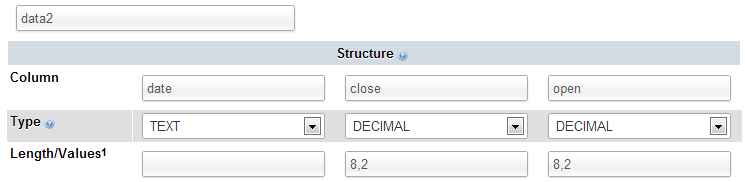
I’m keeping it really simple by setting the ‘date’ column to be plain text (I make the presumption that it could be a date format, but as it gets parsed into a date/time value when it’s ingested into D3, I’m fairly comfortable that we can get away with formatting it as ‘TEXT’), and the two numeric columns to be decimals with 8 digits overall and 2 of those places for the digits to the right of the decimal point.
Once entered, you can scroll down to the bottom of that window and select the ‘Save’ button.
Cool, now you are presented with your table (click on the table name in the left hand panel) and the details of it in the main panel.
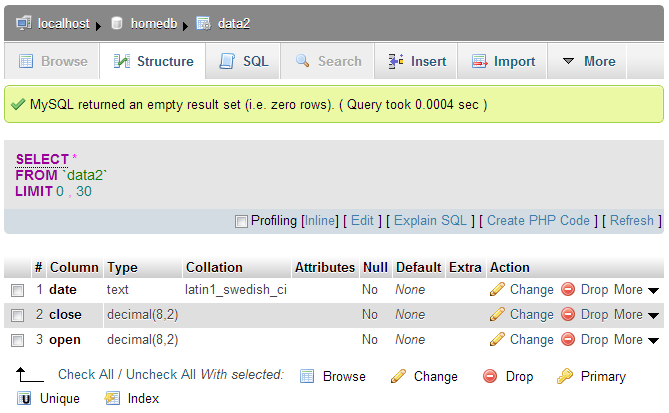
Sure it looks snazzy, but there’s something missing….. Hmm…..
Ah Ha! Data!
Importing your data into MySQL
So, you’ve got a perfectly good database and an impeccably set up table looking for some data.
It’s time we did something about that.
In the vein of “Here’s one I prepared earlier”, what we will do is import a csv (Comma Separated Value) file into our database. To do this I prepared our data2.tsv file by replacing all the tabs with commas and removing the header line (with date, close and open on it), so it looks like this;
1-May-12,58.13,34.12
30-Apr-12,53.98,45.56
27-Apr-12,67.00,67.89
26-Apr-12,89.70,78.54
25-Apr-12,99.00,89.23
24-Apr-12,130.28,99.23
23-Apr-12,166.70,101.34
20-Apr-12,234.98,122.34
19-Apr-12,345.44,134.56
18-Apr-12,443.34,160.45
17-Apr-12,543.70,180.34
16-Apr-12,580.13,210.23
13-Apr-12,605.23,223.45
12-Apr-12,622.77,201.56
11-Apr-12,626.20,212.67
10-Apr-12,628.44,310.45
9-Apr-12,636.23,350.45
5-Apr-12,633.68,410.23
4-Apr-12,624.31,430.56
3-Apr-12,629.32,460.34
2-Apr-12,618.63,510.34
30-Mar-12,599.55,534.23
29-Mar-12,609.86,578.23
28-Mar-12,617.62,590.12
27-Mar-12,614.48,560.34
26-Mar-12,606.98,580.12
I know it doesn’t look quite as pretty, but csv files are pretty ubiquitous which is why so many different programs support them as an input and output file type. (To save everyone some time and trouble I have saved the data.csv file into the D3 Tips and Tricks example files folder (under data)).
So armed with this file, click on the ‘Import’ tab in our phpMyAdmin window and choose your file.
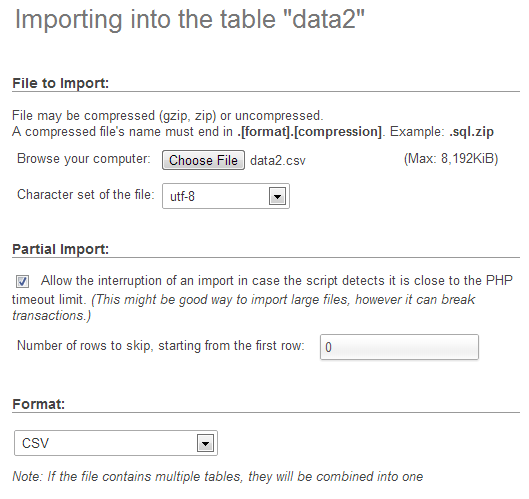
The format should be automatically recognised and the format specific options at the bottom of the window should provide sensible defaults for the input. Let’s click on the ‘Go’ button and give it a try.

Woo Hoo!
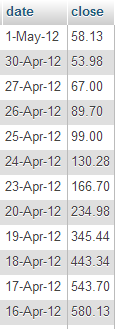
Now if you click on the browse tab, there’s your data in your table!
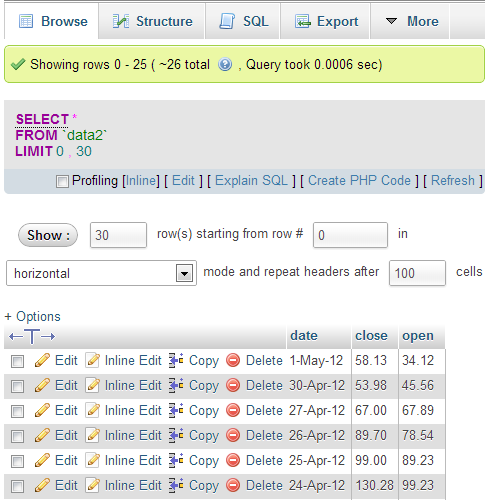
Sweet!
The last thing that we should do is add a user to our database so that we don’t end up accessing it as the root user (not too much of a good look).
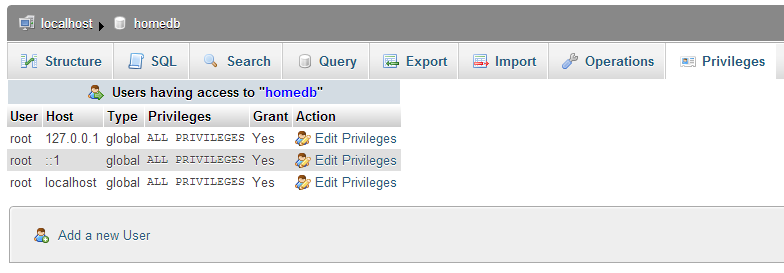
So select the ‘homedb’ reference at the top of the window (between ‘localhost’ and ‘data2’).

Then click on the ‘Privileges’ tab to show all the users who have access to ‘homedb’ and select ‘Add a new user’
Then on the new user create a user, use the ‘Local’ host and put in an appropriate password.
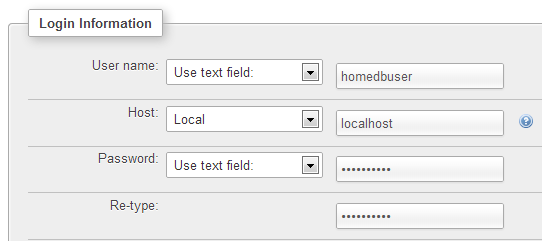
In this case, the user name is ‘homedbuser’ and the password is ‘homedbuser’ (don’t tell).
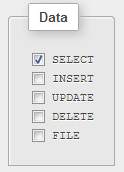
The other thing to do is restrict what this untrusted user can do with the database. In this case we can fairly comfortably restrict them to ‘SELECT’ only;
Click on ‘Go’ and you have yourself a new user.

Yay!
Believe it or not, that’s pretty much it. There were a few steps involved, but they’re hopefully fairly explanatory and I don’t imagine there’s anything too confusing that a quick Googling can’t fix.
Querying the Database
OK, are you starting to get excited yet? We’re just about at the point where we can actually use our MySQL database for something useful!
To do that we have to ask the database for some information and have it return that information in a format we can work with.
The process of getting information from a database is called ‘querying’ the database, or performing a ‘query’.
Now this is something of an art form in itself and believe me, you can dig some pretty deep holes performing queries. However, we’re going to keep it simple. All we’re going to do is query our database so that it returns the ‘date’ and the ‘close’ values.
We’ll start by selecting our ‘data2’ table and going to the ‘Browse’ tab.
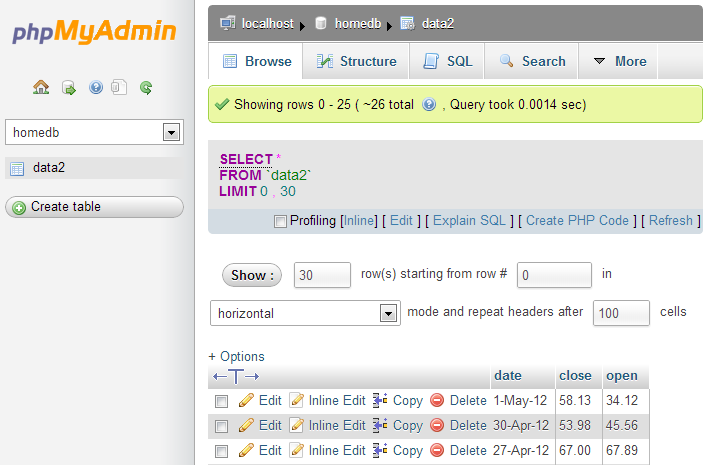
We actually already have a query operating on our table. It’s the bit in the middle that looks like;
SELECT *
FROM `data2`
LIMIT 0, 30
This particular query is telling the database homedb (since that’s where the query was run from) to SELECT everything (*) FROM the table data2 and when we return the data, to LIMIT the returned information to those starting at record 0 and to only show 30 at a time.
You should also be able to see the data in the main body of the window.
So, let’s write our own query. We can ask our query in a couple of different ways. Either click on the ‘SQL’ tab and you can enter it there, or click on the menu link that says ‘Edit’ in the current window. I prefer the ‘Edit’ link since it opens a separate little window which let’s you look at the returned data and your query at the same time.
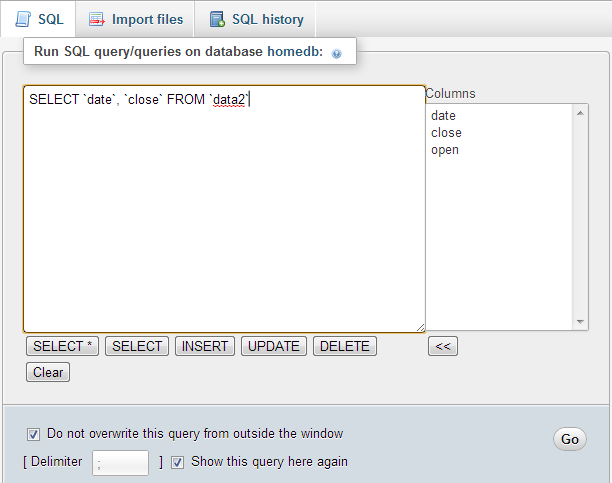
So here’s our window and in it I’ve written the query we want to run.
SELECT `date`, `close` FROM `data2`
You will of course note that I neglected to put anything about the LIMIT information in there. That’s because it gets added automatically to your query anyway using phpMyAdmin unless you specify values in your query.
So in this case, our query is going to SELECT all our values of date and close FROM our table data2.
Click on the ‘Go’ button and let’s see what we get.
There we go!
If you’re running the query as ‘root’ you may see lots of other editing and copying and deleting type options. Don’t fiddle with them and they won’t bite.
Righto… That’s the query we’re going to use. If you look at the returned information with a bit of a squint, you can imagine that it’s in the same type of format as the *.tsv or *.csv files. (header at the top and ordered data underneath).
All that we need to do now is get our MySQL query to output data into d3.js.
Enter php!
Using php to extract json from MySQL
Now’s the moment we’ve been waiting for to use php!
What we’re going to do is use a PHP script that performs the query that we’ve just identified to extract data out of the database and to format it in a way that we can input it into D3 really easily. The data format that we’re going to use for presenting to D3 is json (JavaScript Object Notation). You might remember it from the earlier chapter on types of data that could be ingested into D3.
Our PHP script is going to exist as a separate file which we will name data2.php and we will put it in a folder called php which will be in our web’s root directory (alongside the data directory).
Here’s the contents of our data.php file (This is reproduced in the appendices for those who prefer a stand alone version);
<?php
    $username = "homedbuser";
    $password = "homedbuser";
    $host = "localhost";
    $database="homedb";

    $server = mysql_connect($host, $username, $password);
    $connection = mysql_select_db($database, $server);

    $myquery = "
SELECT  `date`, `close` FROM  `data2`
";
    $query = mysql_query($myquery);

    if ( ! $query ) {
        echo mysql_error();
        die;
    }

    $data = array();

    for ($x = 0; $x < mysql_num_rows($query); $x++) {
        $data[] = mysql_fetch_assoc($query);
    }

    echo json_encode($data);

    mysql_close($server);
?>
This code can be found as the file php-mysql.php in the code samples bundled with this book on Leanpub.
It’s pretty short, but it packs a punch. Let’s go through it and see what it does.
The <?php line at the start and the ?> line at the end form the wrappers that allow the requesting page to recognise the contents as php and to execute the code rather than downloading it for display.
The following lines set up a range of important variables;
    $username = "homedbuser";
    $password = "homedbuser";
    $host = "localhost";
    $database="homedb";
Hopefully you will recognise that these are the configuration details for the MySQL database that we set up. There’s the user and his password (don’t worry, because the script isn’t returned to the browser, the browser doesn’t get to see the password and in this case our user has a very limited set of privileges remember). There’s the host location of our database (in this case it’s local, but if it was on a remote server, we would just include its address) and there’s the database we’re going to access.
Then we use those variables to connect to the server…
$server = mysql_connect($host, $username, $password);
… and then we connect to the specific database;
$connection = mysql_select_db($database, $server);
Then we have our query in a form that we can paste into the right spot and it’s easy to use.
    $myquery = "
SELECT  `date`, `close` FROM  `data2`
";
I have it like this so all I need to do to change the query I use is paste it into the middle line there between the speech-marks and I’m done. It’s just a convenience thing.
The query is then run against the database with the following command;
$query = mysql_query($myquery);
… and then we check to see if it was successful. If it wasn’t, we output the MySQL error code;
    if ( ! $query ) {
        echo mysql_error();
        die;
    }
Then we declare the $data variable as an array ($data = array();) and feed the returned information from our query into $data array;
    for ($x = 0; $x < mysql_num_rows($query); $x++) {
        $data[] = mysql_fetch_assoc($query);
    }
(that’s a fancy little piece of code that gets the information row by row and puts it into the array)
We then return (echo) the $data array in json format (echo json_encode($data);) into whatever ran the data2.php script (we’ll come back to this in a minute).
Then finally we close the connection to the server;
mysql_close($server);
Whew!
That was a little fast and furious, but I want to revisit the point that we covered in the part about echoing the data back to whatever had requested it. This is because we are going to use it directly in our d3.js script, but we can actually run the script directly by opening the file in our browser.
So if you can navigate using your browser to this file and run it (WAMP should be your friend here again) this is what you should see printed out on your screen;
[{"date":"1-May-12","close":"58.13"},
{"date":"30-Apr-12","close":"53.98"},
{"date":"27-Apr-12","close":"67.00"},
{"date":"26-Apr-12","close":"89.70"},
{"date":"25-Apr-12","close":"99.00"},
{"date":"24-Apr-12","close":"130.28"},
{"date":"23-Apr-12","close":"166.70"},
{"date":"20-Apr-12","close":"234.98"},
{"date":"19-Apr-12","close":"345.44"},
{"date":"18-Apr-12","close":"443.34"},
{"date":"17-Apr-12","close":"543.70"},
{"date":"16-Apr-12","close":"580.13"},
{"date":"13-Apr-12","close":"605.23"},
{"date":"12-Apr-12","close":"622.77"},
{"date":"11-Apr-12","close":"626.20"},
{"date":"10-Apr-12","close":"628.44"},
{"date":"9-Apr-12","close":"636.23"},
{"date":"5-Apr-12","close":"633.68"},
{"date":"4-Apr-12","close":"624.31"},
{"date":"3-Apr-12","close":"629.32"},
{"date":"2-Apr-12","close":"618.63"},
{"date":"30-Mar-12","close":"599.55"},
{"date":"29-Mar-12","close":"609.86"},
{"date":"28-Mar-12","close":"617.62"},
{"date":"27-Mar-12","close":"614.48"},
{"date":"26-Mar-12","close":"606.98"}]
There it is! The data we want formatted as json!
It looks a bit messy on the printed page, but it’s bread and butter for JavaScript.
I have included the data2.php file in the examples zip file that can be downloaded from d3noob.org.
Getting the data into d3.js
Let’s recap momentarily.
We have created a database, populated it with information, worked out how to extract a subset of that information and how to do it in a format that d3.js understands. Now for the final act! And you will find it slightly deflating how simple it is.
All we have to do is take our simple-graph.html file and make the following change;
d3.json("php/data2.php", function(error, data) {
	data.forEach(function(d) {
		d.date = parseDate(d.date);
		d.close = +d.close;
	});
Here we have replaced the part of the code that read in the data file as data.tsv with the equivalent that reads the php/data2.php file in as json (d3,json).
That’s it.
What it does is we tell d3.js to go and get a json file and when it strikes the data2.php file, it executes the script in the file and returns the encoded json information directly to d3.js.
How cool is that?
And here is the result.
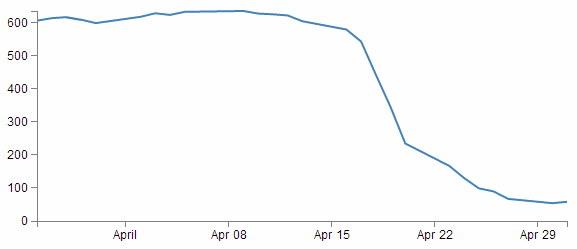
Sure, it looks kind of familiar, but it represents a significant ability for you to return data from a database and present it on a web page.
Manipulating Date / Time Ranges
What’s a standard format for a Date / Time value
The DATETIME and TIMESTAMP types are used for values that contain both date and time parts. MySQL retrieves and displays DATETIME and TIMESTAMP values in YYYY-MM-DD HH:MM:SS format.
The supported range for DATETIME is 1000-01-01 00:00:00 to 9999-12-31 23:59:59. TIMESTAMP has a range of 1970-01-01 00:00:01 UTC to 2038-01-19 03:14:07 UTC.
Creating a standard Date / Time from separate columns
The original data format had separate columns for the year (ORI_YEAR), month (ORI_MONTH), day (ORI_DAY), hour (ORI_HOUR), minute (ORI_MINUTE) and second (ORI_SECOND).
+--------+---------+-------+--------+----------+----------+
|ORI_YEAR|ORI_MONTH|ORI_DAY|ORI_HOUR|ORI_MINUTE|ORI_SECOND|
+--------+---------+-------+--------+----------+----------+
|    2010|        7|     12|       0|        15|   9.57643|
|    2010|        7|     12|       0|        23|  45.93486|
|    2010|        7|     12|       1|         3|  12.54922|
...
+--------+---------+-------+--------+----------+----------+
If we want to generate a standard date / time unit from MySQL we can do it by grouping the separate parts together using the CONCAT command like so;
SELECT CONCAT(`ORI_YEAR`,'-',`ORI_MONTH`,'-',`ORI_DAY`,',`ORI_HOUR`,
':',`ORI_MINUTE`,':',`ORI_SECOND`)
FROM `nzeq1012`
Notice that as well as grouping the columns we also put in appropriate separators to follow a good practice. The output looks like so.
2010-7-12 0:15:9.57643
2010-7-12 0:23:45.93486
2010-7-12 0:3:12.54922
This is pretty scruffy looking and certainly doesn’t conform to the standard format that we’re looking for (YYYY-MM-DD HH:MM:SS). So we can do something a little tricky and tell MySQL that the value that gets returned is a date / time value and it will automatically format it correctly. This is as simple as declaring the entire selection as a TIMESTAMP like so;
SELECT TIMESTAMP(CONCAT(`ORI_YEAR`,'-',`ORI_MONTH`,'-',`ORI_DAY`,
' ',`ORI_HOUR`,':',`ORI_MINUTE`,':',`ORI_SECOND`))
FROM `nzeq1012`
The output is now…
2010-7-12 00:15:09.57643
2010-7-12 00:23:45.93486
2010-7-12 00:03:12.54922
This is certainly much better, but we have a seconds value that includes a decimal component. To eliminate the decimal portion we use the ROUND function as follows;
SELECT TIMESTAMP(CONCAT(`ORI_YEAR`,'-',`ORI_MONTH`,'-',`ORI_DAY`,
' ',`ORI_HOUR`,':',`ORI_MINUTE`,':',ROUND(`ORI_SECOND`)))
FROM `nzeq1012`
Which results in the following output;
2010-7-12 00:15:10
2010-7-12 00:23:46
2010-7-12 00:03:13
Neat.
General MySQL titbits
Group parts of queries (and text) together with CONCAT
Sometimes when returning data from a query, you will want to group parts of it together. This can be achieved with the CONCAT function (CONCAT is an abbreviation of the word ‘concatenate’).
This is as simple as using it in the form CONCAT(foo, bar, 'text here', var) where foo, bar and var are variables or values returned from the query process and 'text here' is text that will be returned verbatim.
For example…
The table below represents data formatted in separate columns for the year (ORI_YEAR), month (ORI_MONTH) and day (ORI_DAY).
+--------+---------+-------+
|ORI_YEAR|ORI_MONTH|ORI_DAY|
+--------+---------+-------+
|    2010|        7|      2|
|    2010|       10|     12|
|    2011|        3|     26|
+--------+---------+-------+
If we want to generate a date (year-month-day) from MySQL we can do it by grouping the separate parts together using the CONCAT command like so;
SELECT CONCAT(`ORI_YEAR`, '-', `ORI_MONTH`, '-', `ORI_DAY`)
FROM `nzeq1012`
Notice that as well as grouping the year, month and day columns we also put in appropriate separators (dashes(-)) to make it look nice. The output looks like so.
2010-7-2
2010-10-12
2010-3-26
Working round reserved words in queries
When you name a column with a query using the AS operator, if you want to use a reserved word, place it in back ticks or single quote marks.
For example, when wanting to return a value of longitude with a column name long, the following query will cause an error;
SELECT  `LAT` AS lat, `LONG` AS long
FROM `nzeq1012`
This is because ‘long’ is a word reserved for other uses in MySQL, so using it as a variable is difficult. However, enclose the long in quotes (as follows) and it will work fine.
SELECT  `LAT` AS lat, `LONG` AS 'long'
FROM `nzeq1012`
Rounding numbers
Rounding numbers with a fractional component is a common requirement. The ROUND function can be used in a couple of ways to round numbers.
Firstly, by stating ROUND(x) (where x is the argument) the function will round a number to only the integer component. However you can also use ROUND(x,d), where d is the number of decimal places to round to.
For example, using the following data for earthquakes where ‘mag’ is the magnitude and ‘depth is the depth of the quake, we could reasonably want to massage the data so that the magnitude was represented by a number with a single decimal place and the depth was only the integer.
+------+--------+
|   mag|   depth|
+------+--------+
| 2.555| 56.2691|
| 2.226|  6.2300|
| 2.055| 33.1684|
| 1.411| 12.0000|
| 1.976|  6.3498|
+------+--------+
We can use the query…
SELECT  ROUND(`MAG`, 1) AS mag, ROUND(`DEPTH`) AS depth
FROM `nzeq1012`
…to get our desired result.
+----+------+
| mag| depth|
+----+------+
| 2.6|    56|
| 2.2|     6|
| 2.1|    33|
| 1.4|    12|
| 2.0|     6|
+-----------+