Chapter 5 - Coding with the Raspberry Pi
“Education is not preparation for life; education is life itself.”
–John Dewey
Computer programming (sometimes called “coding”) is rapidly becoming an essential skill in our modern digital world. In fact, a recent study found 90% of surveyed U.S. parents wanted schools to teach computer science/computer programming.16 The unfortunate truth is most schools do not. The reasons for this are varied. First, most schools do not have the requisite staff trained/certified to teach computer programming as a standalone course. Second, many educators know the benefits of coding in the classroom, but have trouble figuring out where to start. Third, there are many resources available online to “teach” coding, but educators often feel overwhelmed knowing where and how the topic fits within their curriculum. Since you have read this far, I assume you may fall into one of the above categories … until now! The Raspberry Pi computer is an excellent way to introduce coding to your students. Even if coding is not something you think will fit into your curriculum, I can guarantee you computational thinking does.
Computational Thinking
Computational Thinking is a problem solving approach geared toward understanding and learning in the 21st century. Computational thinking is a multi-faceted idea, but often involves skills such as algorithm design, pattern recognition, debugging, and problem decomposition. Computational thinking is essential to the process of computer programming, but it can also be used to support problem solving across all subject areas including math, language arts, the humanities, science, the arts, and health/PE. Students who learn computational thinking across the curriculum will begin to see a relationship between their school courses, as well as connections between real-world interactions they encounter outside of the classroom.17 One, but certainly not the only, method of teaching computational thinking is through computer programming. Learners begin to see how problems can be broken-down into smaller pieces. They see how patterns emerge to solve complex problems. I strongly believe teaching computational thinking skills, over straight computer programming/coding skills, can be extremely beneficial to a young learner’s ability to problem solve and think critically in ALL school subjects. In fact, some have suggested computational thinking IS the most important skill students can learn today in order to be successful for an unpredictable future.18
I often hear educators acknowledge the benefits of coding but assume there is no place for it in their curriculum. I understand that completely. I think it is quite natural since most educators may have never coded and/or have never learned about it in their teacher preparation programs. I argue educators do not have to have a background in coding to teach coding. In fact, educators really only need to spend a marginal amount of time learning how to use it in the classroom. I often suggest the Raspberry Pi as a possible solution. In particular, I think physical computing projects can be beneficial in almost all subject areas. These projects involve building a physical object and “bringing it to life” through computer code. Learn more about physical computing in Chapter 7.
Programming Choices
I will suggest five methods of coding using the Raspberry Pi:
- Scratch
- Python
- Sonic Pi
- Physical Computing with Scratch or Python
- Minecraft: Pi Edition using Python
This chapter will focus on Scratch, Python, and Sonic Pi. Chapter 7 will discuss physical computing. Chapter 8 will show how you can control and program Minecraft: Pi Edition on the Raspberry Pi.
Scratch and Python
The best places to start coding using the Raspberry Pi computer are with Scratch and Python. Scratch is a visual programming language with a drag-and-drop interface. It allows users to create their own computer games, interactive stories, and animations using programming techniques without actually having to write code. It’s a great way to get started programming on the Raspberry Pi with young people. Once students get comfortable with Scratch, they should move to Python. Python is professional text-based language used in many industries and by many companies, including NASA, Google, and Facebook. The “Pi” in Raspberry Pi comes from the Python programming language. They chose “Pi” instead of “Py” to make math geeks happy!
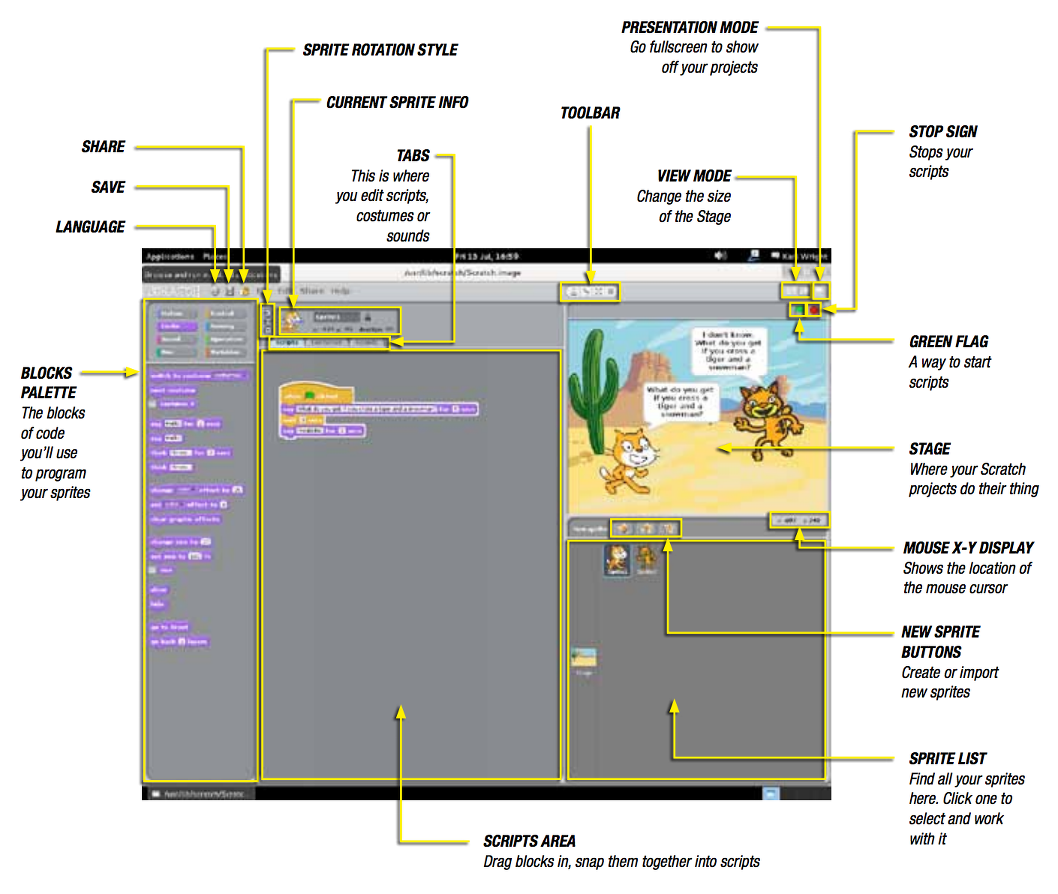
Scratch on the Raspberry Pi
Getting Started With Scratch by the Raspberry Pi Foundation is licensed under a Creative Commons Attribution 4.0 International License
Getting started
You’ll find Scratch in the Menu under Programming. Once opened you will see a window like this:
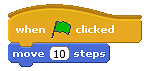
Make the Scratch cat move
The cat in the white preview window is an example of a sprite in Scratch. Currently the Scratch cat sprite is on a blank stage. Let’s get the cat to move.
- Click on the Scratch cat sprite.
- Then click on the blocks palette and select Control.
- Next drag a When green flag clicked block and place it on the scripts area in the middle of the screen.
- Add a blue Move 10 steps block from the Motion blocks palette and connect it to the When green flag clicked block.
- Now click the green flag icon in the top right hand side of the screen and see the cat move!
- How would you get the cat to move further?
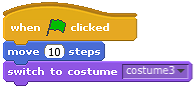
Changing the way the sprite looks
All sprites in Scratch can wear different costumes.
- Click on your sprite to select it. In the Scripts area in the middle of the screen, click on the Costumes tab.
- You will see that the cat has two costumes. Click on Copy to make a third costume and a new cat costume should appear.
- Select costume3 and click on Edit. This will open the Paint Editor. Experiment with all the buttons and tools to find out what they do.
- Next, draw some clothes on the costume and click OK.
- To switch between costumes, click on the Scripts tag. Add the purple Looks block, Switch to Costume, to the other blocks and connect it.
- Select costume3 from the drop-down menu on the purple block.
- Now run your program to see the costume change.
Add Sprites
If you feel that the Scratch cat sprite does not suit your needs then you can add other sprites, or even create your own!
- At the top of the Sprites palette are three icons to create a new sprite.
- The first allows you to Paint your own sprite. Click on this and it will open the Paint Editor window. Here you can use shapes, lines, and freehand drawings to make fun characters.
- The second icon allows you to Choose a new sprite from those already built into Scratch or saved on your Raspberry Pi. Click on this, and you will be able to navigate to the folders containing those sprites and select one you like.
- The third icon will, when clicked, give you a surprise sprite. Click this and see what happens!
What next?
- Now you know the basics of the Scratch, why not try completing the Robot Antenna Resource to make an LED blink.
- You could also try creating a button using candy sweets with the Sweet Shop Reaction Game
Python on the Raspberry Pi
Python is a text-based computer programming language designed to be relatively easy for new learners to learn. We call the text (or code) we type syntax. Python is considered a high-level programming language. High-level languages look more like English when you type them and are often better suited to new learners. The opposite is a low-level programming language. Low-level languages are more terse and often more difficult to learn. Computers can only execute programs written in a low-level language. Thus, programs written in a high-level language, like Python, have to be translated into low-level languages before they can be run.20
We will type our Python code in an application called an Integrated Development Environment (IDE). The IDE we will use for Python is called IDLE.
Exercise 5.0 - Interactive Interpreter/Shell
The best way to learn a text-based language is to start typing code in our IDE, run it, and observe what it does (or does not!) do. Before you begin typing the code, I want to highlight one feature of Python that makes it great for new learners - the Python module. See if you can identify the name of the module in this first program. Also, there are several new terms and concepts introduced here. It may be useful to look up the bolded words in the glossary. Ready… Let’s give it a try!
Exercise 5.1 - Fortune Teller
1 import random
2 fortunes=['Yes','Probably','Certainly','Maybe','Not sure','Ask again','Doubtful'\
3 ,'No']
4 how_many_fortunes=len(fortunes)
5 raw_input('Think of a question, press Enter for the answer')
6 which_fortune=random.randint(0,how_many_fortunes-1)
7 print fortunes[which_fortune]
How did it go? Did it work? Did you identify the Python module we used? Did you have to debug? Debugging a program involves finding mistakes in your program, whether they are mistakes in logic, mistakes in syntax, or mistakes while the program is running. Python is a great language for beginners because the code is very readable. Python is a high-level language and as such you can understand the code in Listing 5.1 without much prior knowledge. Let’s go through each line.
Line 1 - We use the import statement to load a Python module called random.
Line 2 - We setup a list of possible fortunes. We name the list “fortunes”
Line 3 - We use the len function to find how many fortunes are possible. We name this length “how_many_fortunes”.
Line 4 - We use raw_input function to ask the user a question.
Line 5 - We have the computer randomly pick one of the possible answers from the list we setup in line 2. We do this using the randint function from the random module.
Line 6 - We print out the fortune to the screen.
Easy, no? Just kidding. For a new coder, this can be a little daunting because of the many new concepts and terms. One of the many benefits of coding, however; is to try and figure out what this syntax means. In a sense, it is much like when we learn new words and concepts as a young child. We try to use context to figure out meaning, then we consult others to “fill in the gaps”. In lieu of having a professional programmer sitting next to you, what is one to do? Learning to code in a new programming language involves consulting the documentation - often called the “docs”. Even professional programmers have to consult documentation because they do not have every concept/syntax statement memorized. The idea is to learn some basic concepts and syntax, then use that foundational knowledge to learn more. Let’s try one more program. This one introduces a few new concepts.
Exercise 5.2 - Guess the Number
 1 import random
 2 num = random.randint(1,100)
 3 while True:
 4     print('Guess a number between 1 and 100')
 5     guess = input()
 6     i = int(guess)
 7     if i == num:
 8         print("You guessed right!")
 9         break
10     elif i < num:
11         print("Higher")
12     elif i > num:
13         print("Lower")
Can you follow the logic of this code? If not, do not worry. By typing, running, and thinking about several small programs you will quickly begin to see the logic and algorithms used to create programs. Let’s go through each line.
Line 1 - We use the import statement to load a Python module called random.
Line 2 - We ask the computer to choose a random integer between 1 and 100. An integer in Python just means a whole number (no fractional/decimal component). We then store that number in a variable called num.
Line 3 - We use a loop for the first time. A loop is simply a way to repeat something. Remember, computers are REALLY good at doing things over-and-over VERY, VERY quickly. Loops are one of the most fundamental building blocks of computer programming. In this case, we are saying repeat the following statements as along things are “True”. Well, since we never change “True” to “False”, we will always repeat the lines. We call this an infinite loop. Python uses this convention quite often.
Lines 4 & 5 - We ask the user to make a guess by typing a number between 1 and 100 and then we store that guess in a variable called “guess”.
Line 6 - We convert the user’s guess into an integer, using the int function, just in case they typed in a number with a decimal. This is called data validation in computer programming. We then store that converted number into a variable called “i”.
Line 7 - We use an if/else statement to see if the user’s guess evaluates to “True”, or the same number as the computer chose. An if/else statement is also called a conditional in computer programming.
Line 8 & 9- If it is the same, we tell the user “You guessed right!” and we end the program.
Line 10 - If Line 7 evaluates to “False”, or in other words the numbers are NOT the same, then we have to determine if the guess was too high or too low. In this line we are checking to see if the user’s guess is LESS THAN the computer’s number.
Line 11 - If it is LESS THAN the computer’s number, then we tell the user to guess a bigger number.
Line 12 - If it is GREATER THAN the computer’s number, then we tell the user to guess a smaller number.
Line 13 - Tell the user to guess a smaller number.
How was that? This program was a little more complex, but hopefully not too bad. So … how can you change it? Can you make a different guessing game using the same logic/algorithm? Can you create a new variable that keeps track of the number of guesses the user makes. Give it a try! Improving and iterating on your code is the essence of computational thinking.
Sonic Pi on the Raspberry Pi
Sonic Pi is a free application, included with the Raspberry Pi, used to program digital music. It uses the Ruby programming language. It is very easy to get started and allows learners to
Getting started with Sonic Pi
Getting Started With Sonic Pi by the Raspberry Pi Foundation is licensed under a Creative Commons Attribution 4.0 International Licence
Ever wanted to make funky music like Daft Punk or will.i.am but you’re not sure how to hold a cello, let alone play it? Sonic Pi could get you there.
First sounds with Sonic Pi
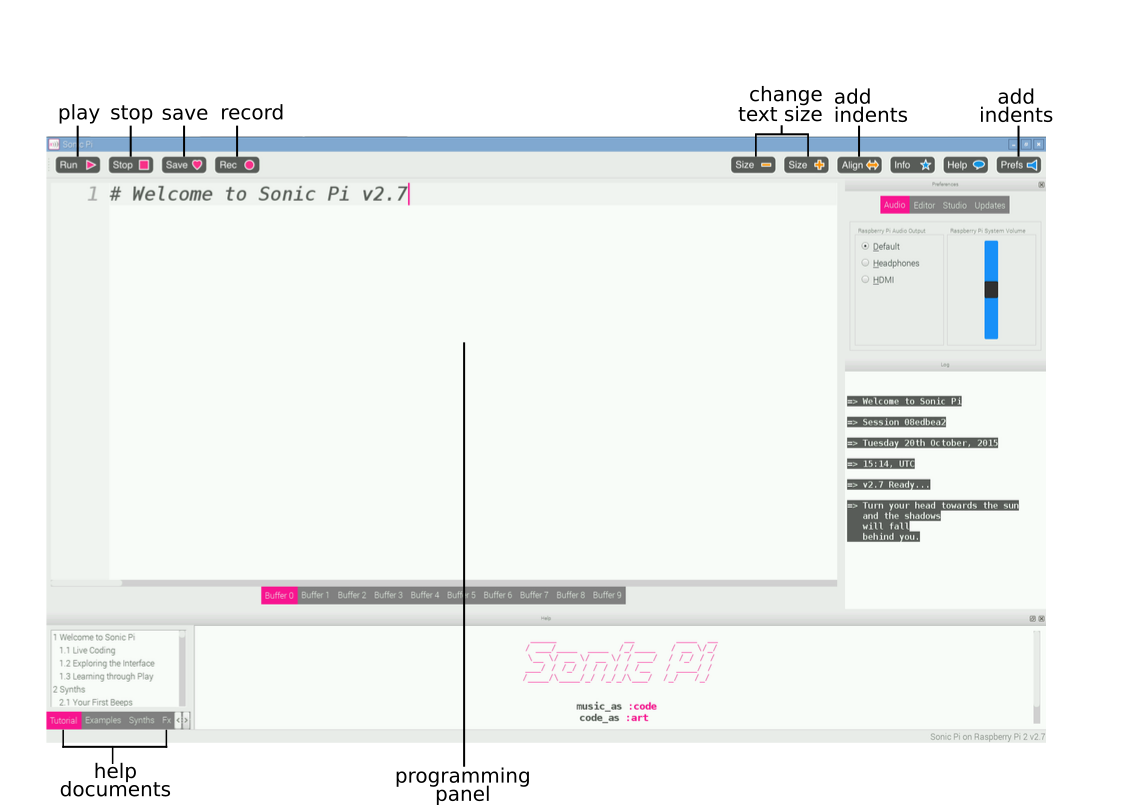
This is the Sonic Pi interface; it has three main windows. The largest one is for writing your code, and we call it the Programming Panel. There is also an output panel that displays information about your program as it runs. When you click on the help button at the top of the window, the third panel appears along the bottom displaying help documentation. This contains information about different code you can try and use, as well as different synth sounds, samples, and much more.
- Launch Sonic Pi from the Applications menu.
- Select Buffer 1 and type:
1play60 - Click on the play icon at the top of the screen. What happens?
- What happens if you type
pley 60and click on the play icon?This is an example of a bug in your code. In later activities, if the error panel displays text you will know that you have a bug that you need to fix. It could be that you have misspelt a word like
play. - Now type:
1play602play673play69 - Click on the play icon at the top of the screen. What happens?
- The computer is playing each note in sequence (one after the other), but it is happening so fast that to us they sound like they are playing at the same time.
We need to tell the computer to pause between each note. We can do this by typing the following after each
play:1sleep1The value entered after the word
sleeprepresents time in seconds. Using the value 1 represents one second. What would you type for half a second? - Now write a sequence of play and sleep to make a cool-sounding tune!
Loop a tune
Now you have mastered the basics of Sonic Pi, let’s code a tune!
- Select Buffer 2.
- Type the following code:
1play602sleep0.53play624sleep0.55play646sleep0.57play608sleep0.5 - Now click on the play icon at the top of the screen and it will play the first part of a tune. Can you tell what it is?
Answer: Frere Jacques!
This first section plays twice. How could you repeat it? You could type the same section out again, or we could start to introduce loops to your code.
- At the top of your code, above the first
play 60, type:12.timesdo - And at the bottom of your code, below
sleep 0.5, type:1end - Click on the play icon at the top of the screen. What happens?
Let’s play this part in Sonic Pi.
In the example below, you can see that some lines of code are indented. This makes it easier to read your code, and check for any bugs if it does not work when you press the play button. You can press the space bar twice to indent a line of code.
12.timesdo2play603sleep0.54play625sleep0.56play647sleep0.58play609sleep0.510end
Loop forever?
Looping notes for a set number of times is certainly useful, but what if you want to loop your tune forever?
Instead of using 2.times do and end you can use loop do and end, like this:
1 loop do
2   play 60
3   sleep 0.5
4 end
MIDI notes and music notes
The values that you have been typing after the word play represent notes; in fact, they are MIDI note numbers. This means we can translate songs played on a piano into Sonic Pi using a table like so:
C D E C or 60 62 64 60 in MIDI notes.
Music Notes to MIDI Note Values
| C | D | E | F | G | A | B |
|---|---|---|---|---|---|---|
| 60 | 62 | 64 | 65 | 67 | 69 | 71 |
This is quite a long process if you know the notes of the song you are trying to play. With Sonic Pi you are able to use standard sheet music notation too.
- In a new buffer tab type:
1play:c42sleep0.53play:d44sleep0.55play:e46sleep0.57play:c48sleep0.5 - Press play to hear your tune. Does it sound the same as when you used MIDI notes?
Change the sounds
It’s time to make your tune sound more interesting! We can do this by changing the synthesizer sounds it is using. The default Sonic Pi synth is called beep.
To use a different synth, you need to add the code use_synth :name of synth above the sequence of code you want to use it in.
In this example, fm is the name of the synth:
1 use_synth :fm
2 2.times do
3   play 60
4   sleep 0.5
5   play 67
6   sleep 0.5
7 end
Synths to try
There are lots of cool-sounding synths included with Sonic Pi. To find the names of them, click on the help icon at the top of the screen so that the help documents window appears. Then select Synths from the tabs along the left hand side of the help window. Click on any of the synth names to get more information on how to use it.
Use samples
Not only can you create music in Sonic Pi using single notes, you can also create music with samples. Samples are pre-recorded sounds or tunes that you can bring into your music. This is a really simple way to make your music sound amazing!
To use a sample, you need to add the code sample :name of sample in the sequence of your music program where you want it to play.
In this example, loop_amen is the name of the sample:
1 2.times do
2   sample :loop_amen
3   sleep 1.753
4 end
Samples to try
There are lots of samples included with Sonic Pi. To find the names of them, click on help followed by samples on the left hand side of the help window. Click on any of the sample names to get more information on how to use it.
Playing two tunes at the same time
Music often has a repeating backing track, with a separate melody played over the top. So far in Sonic Pi you have played one tune. Let’s try playing two tunes at the same time!
- Click on a new buffer tab.
- The code we use to play two tunes at the same time needs to be between
in_thread doandend. - Underneath
in_thread do, type your tune. Here I’ve used a sample for my backing track:1in_threaddo2loopdo3sample:loop_amen4sleep1.7535end6endThis first ‘thread’ will act as the melody of your music. Underneath, you can type the code for your backing track or baseline.
- Type:
1in_threaddo216.timesdo3play754sleep1.7535play746sleep0.257end8end - Now press play and you should hear both threads playing at the same time.
Live code!
Sonic Pi has been developed to be a platform for the live coding of music, so that the code can be manipulated, changed and adapted in real time; this means coders can perform their code rather than playing pre-written programs. Why not have a go?
- In a new buffer tab type:
1define:play_my_synthdo2use_synth:prophet3play50,attack:0.2,release:1.34sleep0.55end67loopdo8play_my_synth9end - Press play to start the program.
- Whilst the tune is playing, comment out the last three lines by adding a
#symbol to the start of each line like this:1# loop do2# play_my_synth3# end - Next change some of code in the function, and press play again. Now you are really rocking!
What next?
Explore more features of Sonic Pi.
Sonic Pi offers so much more functionality to both coders and musicians alike than has been mentioned here. If you want to try some more features then move onto the next tutorial here
Also, check out this really great free e-book - Code Music with Sonic Pi by Sam Aaron, the creator of Sonic Pi. He has written this book to complement the software’s built-in tutorial and to help you jump-start your live-coding career. The book is packed with fun, instantly rewarding examples designed to highlight many of the amazing things Sonic Pi enables you to do.