Appendix A - Headless Mode via SSH and VNC
Headless Mode
Sometimes it is not convenient to work directly on the Raspberry Pi. You can work on it from another computer by remote control in what is called “headless mode”. Operating your Raspberry Pi in headless mode may be a good option for your classroom. Headless mode simply means your Raspberry Pi will not have a monitor, keyboard, or mouse attached to it. You will use two technologies - SSH and VNC - to connect to your Raspberry Pi via the network.
SSH stands for Secure SHell. This technology allows you to securely connect to other devices via a network. It sounds daunting, but the Raspberry Pi makes the process fairly straight forward.
VNC stands for Virtual Network Computing. This technology is a graphical desktop sharing system that allows you to remotely control the desktop interface of one computer from another. It transmits the keyboard and mouse events from the controller, and receives updates to the screen over the network from the remote host. VNC is great because you will see the desktop of the Raspberry Pi inside a window on your host computer - be it a Windows or Mac computer. You’ll be able to control it as though you were working on the Raspberry Pi itself.
Turn on SSH
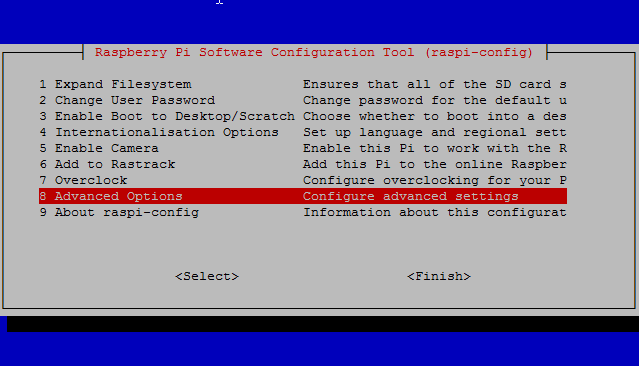
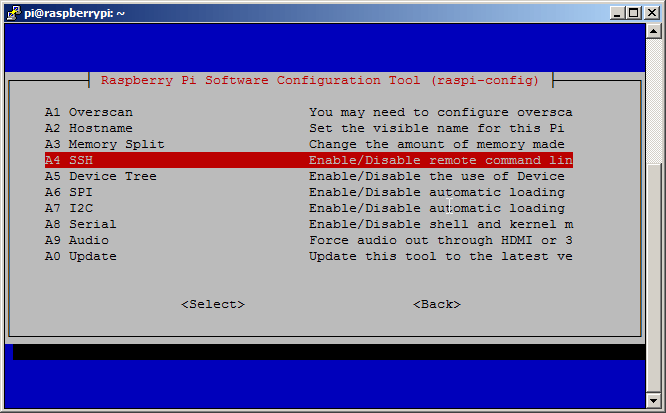
Type the command sudo raspi-config and navigate to the menus below. Save and reboot.
After a reboot, type ifconfig in the terminal application to find your IP address. You will need this to connect to your Raspberry Pi via SSH and VNC.
Downloading PuTTY
You will need a program on your Windows PC/laptop to connect to your Raspberry Pi via SSH. We will use a program called PuTTY. It’s free and allows you to connect to your Pi through SSH. Download PuTTY
Once you have downloaded PuTTY and installed it, type your IP address into PuTTY and click Open.

Now type your login and password (default login is: pi and the default password is: raspberry).
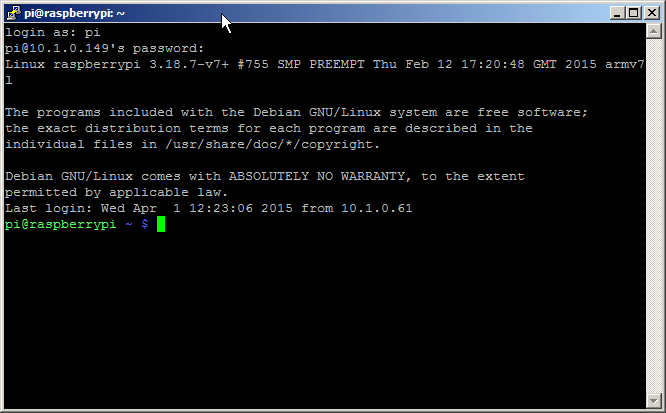
Congratulations! You have just connected to your Raspberry Pi from another computer via SSH!
Install VNC
- On your Pi (using a monitor or via SSH), install the TightVNC package:
1sudo apt-get install tightvncserver - Next, run TightVNC Server which will prompt you to enter a password and an optional view-only password:
1tightvncserver - Start a VNC server from the terminal: This example starts a session on VNC display one (
:1) with full HD resolution:1vncserver :1 -geometry 1920x1080 -depth 24Note that since by default an X session is started on display zero, you will get an error in case you use
:0. - Since there are now two X sessions running, which would normally be a waste of resources, it is suggested to stop the displaymanager running on
:0using1service lightdm stop - Now, on your computer, install and run the VNC client:
- On a Linux machine install the package
xtightvncviewer:
1sudo apt-get install xtightvncviewer- Otherwise, TightVNC is downloadable from tightvnc.com
- On a Linux machine install the package
Start VNC
You can create a simple file with the command to run the VNC server on the Pi, to save having to remember it:
- Create a file containing the following shell script:
1#!/bin/sh2vncserver :1 -geometry 1920x1080 -depth24-dpi 96 - Save this as
vnc.sh(for example) - Make the file executable:
1chmod +x vnc.sh - Then you can run it at any time with:
1./vnc.sh
Connecting to a Pi over VNC using Windows
On Windows you’ll need to download and install a VNC client program. A commonly used one is TightVNC which can be downloaded from tightvnc.com
Choose either the 32 or 64 bit download depending on which version of Windows you are using. If you don’t know then check by looking at System in Control Panel. Download the installer file and run it.
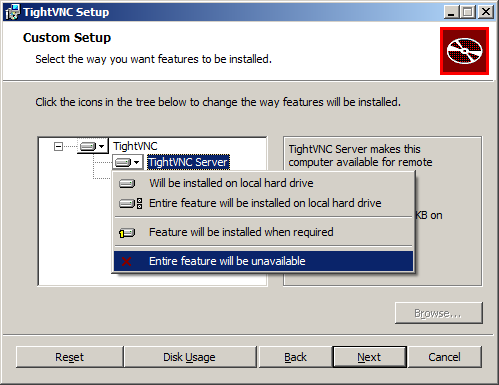
During installation you’ll be offered the choice of Typical, Custom or Complete. You only need the VNC client and not the server, so choose Custom. Then select TightVNC Server and choose Entire feature will be unavailable. Click Next. Uncheck the option about Windows Firewall and click Next again, then Install.
Once the installation is complete you should find TightVNC Viewer under the start menu. When you run it you’ll be presented with the dialog below. You will need to enter the IP address of the Raspberry Pi followed by the screen number (:0 or :1). For example: 192.168.0.6:1

Click the Connect button and you will be prompted for the password that was specified when configuring the VNC server on the Raspberry Pi earlier. You should then find yourself at the Raspberry Pi desktop.
This article uses content from the eLinux wiki page RPi VNC server, which is shared under the Creative Commons Attribution-ShareAlike 3.0 Unported license