Chapter 6 - Beginner Projects
"”There are those who look at things the way they are, and ask why… I dream of things that never were, and ask why not?”
–Robert Kennedy
Standards, Curriculum, Objectives … Oh My!
Before we begin, you may have looked at the Table of Contents and still be wondering how exactly you can incorporate these projects into your curriculum. If you are an English/Language Arts teacher, a Social Studies educator, or a teacher of “X” you might feel there is not much relevance here. While it may be stretch to connect these Beginner Projects directly to your curriculum and associated standards/objectives, there are - in fact - many non-cognitive skills students will be practicing while completing these projects. If you are in need of standards/objectives in order for you to even begin thinking about using these in your classroom, I would encourage you to look at the College and Career Readiness (CCR) Anchor Standards found within the Common Core State Standards (CCSS). (Note: I loathe educational acronyms). These standards focus on the skills necessary for post-secondary success. These include, among others, skills in reading, writing, and critical thinking.21 Whether you find value in the CCSS/CCR or not (the subject of a book of its own) is not the point here. The reality is many educators must conform to these standards in their lesson preparation. I think you will find crossover in these standards and the skills required to be successful with Raspberry Pi projects. Chapter 9 will discuss more curricular connections. As I argued in Chapter 5, I believe strongly in the benefits of computational thinking across all disciplines. As you complete these projects, I challenge you to think about how you and your students will use computational thinking to aid in the completion of these activities.
One of the best ways to get your students engaged with the Raspberry Pi computer in the classroom is for them to build a project straight away. Brand new learners should start with the “Getting Started” project found in Chapter 3. The following projects are great “next steps” and introduce basic building, thinking, and creating with the Raspberry Pi.
Project #1 - Sweet Shop Reaction Game
Sweet Shop Reaction Game by the Raspberry Pi Foundation is licensed under a Creative Commons Attribution 4.0 International Licence
Some penny sweets or candy can make great input devices for a game using a Raspberry Pi. Let’s turn a squidgy sweet into an input button for your Raspberry Pi. You will then create a quick reaction game in Scratch which counts how many times seconds a player can squeeze your sweet input device in ten seconds!
Create a sweet munching sprite
The sweet shop reaction game needs a munching face to entertain the player. You will draw a face using the paint editor in Scratch, and animate it to open and close its mouth.
- Open Scratch by clicking on Menu, Programming and Scratch. It is very important that you use this version of Scratch on Raspberry Pi to be able to control the GPIO pins.
- Once Scratch is running choose
Start GPIO Serverfrom the Edit menu. - If asked, click Ok to enable remote sensor connections.
- Delete the Scratch Cat sprite by right-clicking on it with your mouse and selecting delete.
- Click on the paint new sprite icon above the sprites palette, and draw a face with a closed mouth using the paint editor. When you are happy with your sprite click OK.
- Next, with your newly painted sprite selected, click on the Costumes tab. Rename the costume to face1 by clicking on the sprite name followed by the edit button, and typing the new name.
- Click the copy button to make an exact copy of the face. You will now have two identical faces on the costumes tab called face1 and face2.
- The next step is to edit face2 to change the mouth from closed to open. With face2 selected, click on the edit button to open the paint editor.
- Erase the mouth using a paintbrush tool or an erase tool and then replace it with an open mouth. When you are happy with your sprite costume click Ok.
- To animate your sprite to switch between costumes, you will need to click on the Scripts tab of your sprite. Drag the control block
when green flag clickedfrom the blocks palette to the scripts area. - Next, drag the look block
switch to costume face1and connect it to the control block. - Then add the control block
foreverunderneath the look block.The
foreverblock is a loop that will run the same sequence of blocks inside it over and over again. - Add the control block
wait 1 secsand the look blocknext costumeinside the forever loop. - Change the time from one second to half a second. How could you represent time as a value? If one is a whole, what would half of one be?
- Time to save your work so far and test that your script to animate a sprite works. Go to File and Save As. Name your file SweetShopGame and click Ok.
- Finally, click on the Green Flag in the top right hand of the screen and you should see your sprite face open and close its mouth.

Design a sweet shop background
To make the game a little more interesting, let’s set the scene by changing the background from the default white to something a little more exciting, like a gradient colour or sweets in a shop!
- Click on the stage icon next to the sprites palette to change the background.
- Next, locate the backgrounds tab and select it with your mouse.
- If you want to draw your own background, click on the edit button underneath the background1 label: this will open the paint editor. Use the drawing tools to make a more interesting and colourful background.
Or
- When you are happy with your background, click on sprite1 in the sprites palette, ready to program the reaction game mechanics in the next step.
Program the sweet shop reaction game mechanics
Many people enjoy testing their reaction time against a clock. Let’s create a reaction game using ScratchGPIO that we can connect to a squidgy sweet button later on. The object of the game is to see how many times you can squeeze the sweet button in ten seconds.
You will need to create two variables for this game: one to count the button presses, and one to count time.
- Click on variables from the blocks palette and select
make a variable. Name the first variable counter and click ok. - Repeat the first step to create another variable named timer.
- Click on the control blocks palette and drag the
When green flag clickedblock on to the scripts tab of your face sprite. - Next, add the variable block
set counter to 0so that at the start of each game the counter is reset to 0, ready to test the player’s button-pushing skills. - Add a
foreverlooping block, connect it and then place anifblock inside theforeverblock. - There is a small blank space on the
ifblock; this is so that you can add other blocks. In this space, you first need to add the operator block ` = `. - Blocks can be added on either side of the
=block. On the left hand side add the sensing blockslider sensor valueand on the right hand side type the value0. Using the drop-down menu change slider to pin3. - Inside the
ifblock add the variable blockchange counter by 1andplay drum 48 for 0.2 beats. You can select any drum noise that you like from the drop down menu.
To set a time limit that counts upwards for the game, you need to add two further scripts:
- Add
when green flag clickedblock to the scripts and connect the sensing blockreset timerto it. - Underneath, connect a
foreverlooping control block. - Inside the loop add the variable block
set control to 0and using the drop-down menu on the block, change control to timer so that the block readsset timer to 0. - Replace the value
0in theset timer to 0block with the operator blockround. - Then add the sensing block
timerinside the space on the `round’ block. The completed block should look like:
- Add another
when green flag clickedcontrol block to the scripts area and connect await untilblock to it. - Add the operators block
=to the space in thewait untilblock. In the left hand space, add the variable blocktimer. On the right hand side, type a value to represent time. If you want your game to last for ten seconds, type10. - Connect a
stop allcontrol block to the end of this script. - Finally, save your game by clicking on the save icon at the top of the screen.

Wire up your sweet button
You will need to connect a sweet or piece of candy to your Raspberry Pi to act as an input device and test it.
- If you are using metal paper clips, unfold them to make straight wires.
- Insert the paper clip wire or dress pin into the end of a female to female jumper cable.
- Do the same to the other jumper cable so that the two cables are identical.
- Insert the paper clips into a soft sweet so that they are close to each other but not touching.

You will be using pin 3 and a GNDpin. - Take the other end of one of the jumper cables (not connected to a paper clip) and push onto pin 3 of the General Purpose Input-Output (GPIO) header, which is connected to one of the GPIO channels.
- Take the end of the other jumper cable and push onto a pin labelled ‘GND’ which is connected to ground.
Warning! You can damage your Raspberry Pi if you do not use the GPIO pins correctly!
Remember that your sweet input device is not a real button and will not give accurate results for your game. It is just a bit of fun.
Put it all in a box
Congratulations on making your Sweet Shop Reaction Game! If you have time, why not make and decorate a box to put the Raspberry Pi and cables into?
What’s next?
- Can you add user input to your scratch program to find out the name of the player?
- Can you connect a real physical button instead of a sweet?
- Can you write a similar program using a text-based programing language like Python?
Project #2 - Burping Jelly Baby
Burping Jelly Baby by the Raspberry Pi Foundation is licensed under a Creative Commons Attribution 4.0 International Licence
In this silly project, you will make a jelly baby burp by pressing it!
Wire up a jelly baby
To turn a simple jelly baby into a switch, you will attach cables to it and then connect them to the GPIO pins on a Raspberry Pi. You will need some female to female jumper wires and paperclips for this project.

- Looking at the following GPIO diagram, compare it to your Raspberry Pi.
You’ll be using a single ground pin (marked
GND) and a GPIO pin (markedGPIO):
Note that if you have an older Raspberry Pi model you’ll only have 26 pins but they have the same layout, starting at the top row (3V3 and 5V and ending at GND and GPIO7).
- Take the metal paper clips and unfold them to make a straight wire.
- Take a female to female jumper wire and push the paper clip wire into one of the ends.
- Do the same to the other wire so that you have two identical jumper cables with paper clip wires in one end.
- Insert the paper clips into a jelly baby so that they are close to each other but not touching.
The diagram above the pins shows the GPIO pin numbers. You will be using
GPIO 3and anyGNDpin.Note that you will be only able to have one burping jelly baby button. Only use GPIO 3 and GND for this tutorial.
- Take the other end of one of the jumper leads and push it onto
GPIO 3of the General Purpose Input-Output (GPIO) header which is connected to one of the GPIO channels. - Take the end of the other jumper lead and push it onto the pin next to
GPIO 3labelledGND.Warning: You can damage your Raspberry Pi if you do not use the GPIO pins correctly!
- Make sure your Raspberry Pi has speakers or headphones so that you can hear your jelly baby burping. If you are using headphones or a speaker on the Raspberry Pi, you will need to type the following command to redirect sound to the headphone socket in the Terminal which can be opened by clicking on Menu and then Accessories:
amixer cset numid=3 1
Sound of a burp!
So far you have created your input device and have your Raspberry Pi set up and running. You now need to find a burping sound file and move it into a new folder. This can all be achieved in a Terminal window:
- Create a new folder called
jellybabywith the following command:1mkdir jellybaby - Enter the folder with
cd jellybabyWe’re going to need a burping sample sound file for this project so we’ll use one from Sonic Pi.
- Make a copy of Sonic Pi’s sound of a burp with the following command:
1cp /opt/sonic-pi/etc/samples/misc_burp.wav burp.wavThis will copy the misc_burp sound file from the sonic-pi folder into the jellybaby folder and rename it to burp.wav
- Now test that you can play the sound file using
omxplayerby typing:1omxplayerburp.wavomxplayerwill play the sound file and you should hear it from the speakers or headphones connected to your Pi.If you cannot hear anything, make sure that your headphones or speakers are connected correctly. If the jack/plug looks like the picture below (notice the three black bands) you may find that it will only work if you pull the plug out by a few millimetres.

Write a program in Python
The final step to make your jelly baby burp is to write a program in Python; it will detect when you press the jelly baby input device and output the burp sound.
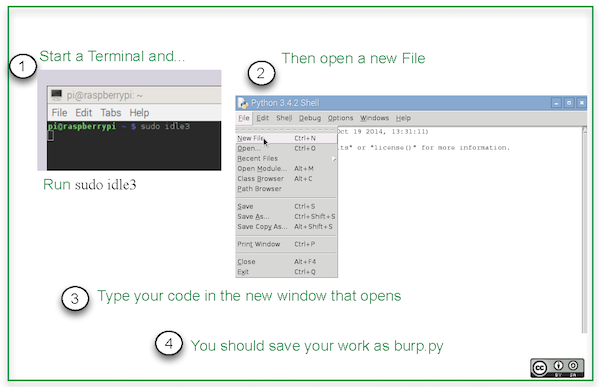
- This time we will open the Python 3 IDE - also called IDLE - from the command line. To do this type the following command in the Terminal:
1sudoidle3 - Once IDLE3 has opened, click on File and New File. This will open a blank file. Click on File and Save As and name the file
burp.py
- Begin your program by importing the modules and libraries needed to make it work. Type the following:
1importtime2importRPi.GPIOasGPIO3importos
The time library will be used to make the program pause for a fixed amount of time. The Raspberry Pi GPIO libraries will be used to connect the Raspberry Pi to other physical devices via the General Purpose Input-Output (GPIO) pins, in this case your jelly baby input device! The os library will allow you to play the burp sound in omxplayer, but this time from within your code.
- Now you will need to set up the GPIO pins to use GPIO board pin numbers. Leave a line empty by pressing Enter on your keyboard, then type:
1GPIO.setmode(GPIO.BCM) - To switch off the “Ports already in use” warnings, press Enter to give you a new line and type:
1GPIO.setwarnings(False) - Set
GPIO 3on the GPIO header to be an input with the following command:1GPIO.setup(3,GPIO.IN) - Create a loop that runs forever and plays the burping sound file when the two wires inside the jelly baby are touching by typing the following:
1whileTrue:2ifGPIO.input(3)==False:3os.system("omxplayer burp.wav")4time.sleep(1) - Save the file by clicking on File and Save.
- Finally, run the program by clicking on Run and Run Module
Congratulations! Now when you press the jelly baby, the wires will touch and the burp sound file will play.
What’s next?
- Using a real button or switch connected to a breadboard
- Changing the sound that plays when the device is pressed
- Why not create a whole music box with the GPIO Music Box tutorial.