Warming Up
Before we start building our game, we want to flex our skills little more, get to know Gosu better and make sure our tools will be able to meet our expectations.
Using Tilesets
After playing around with Gosu for a while, we should be comfortable enough to implement a prototype of top-down view game map using the tileset of our choice. This ground tileset looks like a good place to start.
Integrating With Texture Packer
After downloading and extracting the tileset, it’s obvious that
Gosu::Image#load_tiles
will not suffice, since it only supports tiles of same size, and there is a tileset in the package
that looks like this:
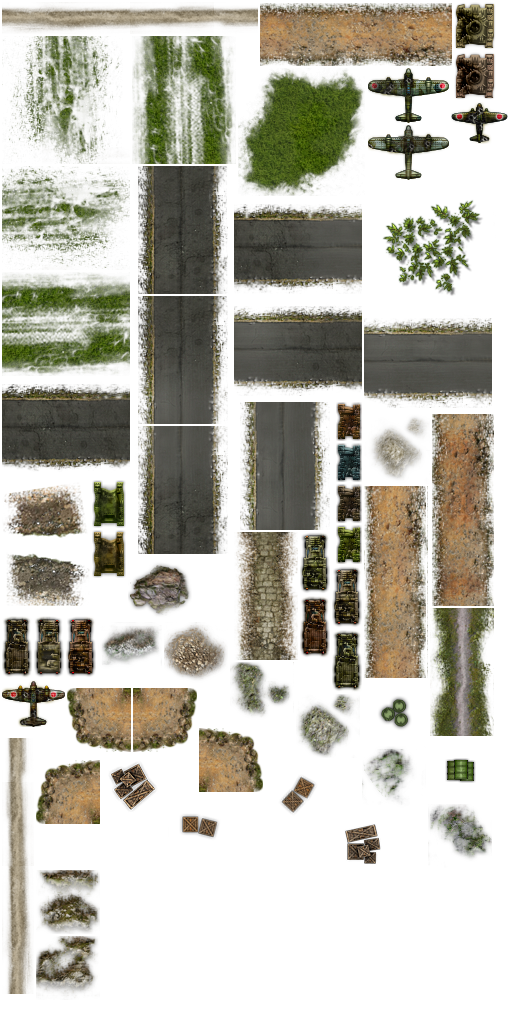
Tileset with tiles of irregular size
And there is also a JSON file that contains some metadata:
{"frames": {
"aircraft_1d_destroyed.png":
{
  "frame": {"x":451,"y":102,"w":57,"h":42},
  "rotated": false,
  "trimmed": false,
  "spriteSourceSize": {"x":0,"y":0,"w":57,"h":42},
  "sourceSize": {"w":57,"h":42}
},
"aircraft_2d_destroyed.png":
{
  "frame": {"x":2,"y":680,"w":63,"h":47},
  "rotated": false,
  "trimmed": false,
  "spriteSourceSize": {"x":0,"y":0,"w":63,"h":47},
  "sourceSize": {"w":63,"h":47}
},
...
}},
"meta": {
	"app": "http://www.texturepacker.com",
	"version": "1.0",
	"image": "decor.png",
	"format": "RGBA8888",
	"size": {"w":512,"h":1024},
	"scale": "1",
	"smartupdate": "$TexturePacker:SmartUpdate:2e6b6964f24c7abfaa85a804e2dc1b05$"
}
Looks like these tiles were packed with Texture Packer. After some digging I’ve discovered that Gosu doesn’t have any integration with it, so I had these choices:
- Cut the original tileset image into smaller images.
- Parse JSON and harness the benefits of Texture Packer.
First option was too much work and would prove to be less efficient, because loading many small files is always worse than loading one bigger file. Therefore, second option was the winner, and I also thought “why not write a gem while I’m at it”. And that’s exactly what I did, and you should do the same in such a situation. The gem is available on GitHub:
https://github.com/spajus/gosu-texture-packer
You can install this gem using gem install gosu_texture_packer. If you want to examine the code,
easiest way is to clone it on your computer:
$ git clone
Let’s examine the main idea behind this gem. Here is a slightly simplified version that does handles everything in under 20 lines of code:
02-warmup/tileset.rb
 1 require 'json'
 2 class Tileset
 3   def initialize(window, json)
 4     @json = JSON.parse(File.read(json))
 5     image_file = File.join(
 6       File.dirname(json), @json['meta']['image'])
 7     @main_image = Gosu::Image.new(
 8       @window, image_file, true)
 9   end
10
11   def frame(name)
12     f = @json['frames'][name]['frame']
13     @main_image.subimage(
14       f['x'], f['y'], f['w'], f['h'])
15   end
16 end
If by now you are familiar with Gosu documentation, you will wonder
what the hell is
Gosu::Image#subimage. At the point of writing it was not documented, and I
accidentally discovered
it while digging
through Gosu source code.
I’m lucky this function existed, because I was ready to bring out the heavy artillery and use RMagick to extract those tiles. We will probably need RMagick at some point of time later, but it’s better to avoid dependencies as long as possible.
Combining Tiles Into A Map
With tileset loading issue out of the way, we can finally get back to drawing that cool map of ours.
The following program will fill the screen with random tiles.
02-warmup/random_map.rb
 1 require 'gosu'
 2 require 'gosu_texture_packer'
 3
 4 def media_path(file)
 5   File.join(File.dirname(File.dirname(
 6     __FILE__)), 'media', file)
 7 end
 8
 9 class GameWindow < Gosu::Window
10   WIDTH = 800
11   HEIGHT = 600
12   TILE_SIZE = 128
13
14   def initialize
15     super(WIDTH, HEIGHT, false)
16     self.caption = 'Random Map'
17     @tileset = Gosu::TexturePacker.load_json(
18       self, media_path('ground.json'), :precise)
19     @redraw = true
20   end
21
22   def button_down(id)
23     close if id == Gosu::KbEscape
24     @redraw = true if id == Gosu::KbSpace
25   end
26
27   def needs_redraw?
28     @redraw
29   end
30
31   def draw
32     @redraw = false
33     (0..WIDTH / TILE_SIZE).each do |x|
34       (0..HEIGHT / TILE_SIZE).each do |y|
35         @tileset.frame(
36           @tileset.frame_list.sample).draw(
37             x * (TILE_SIZE),
38             y * (TILE_SIZE),
39             0)
40       end
41     end
42   end
43 end
44
45 window = GameWindow.new
46 window.show
Run it, then press spacebar to refill the screen with random tiles.
$ ruby 02-warmup/random_map.rb
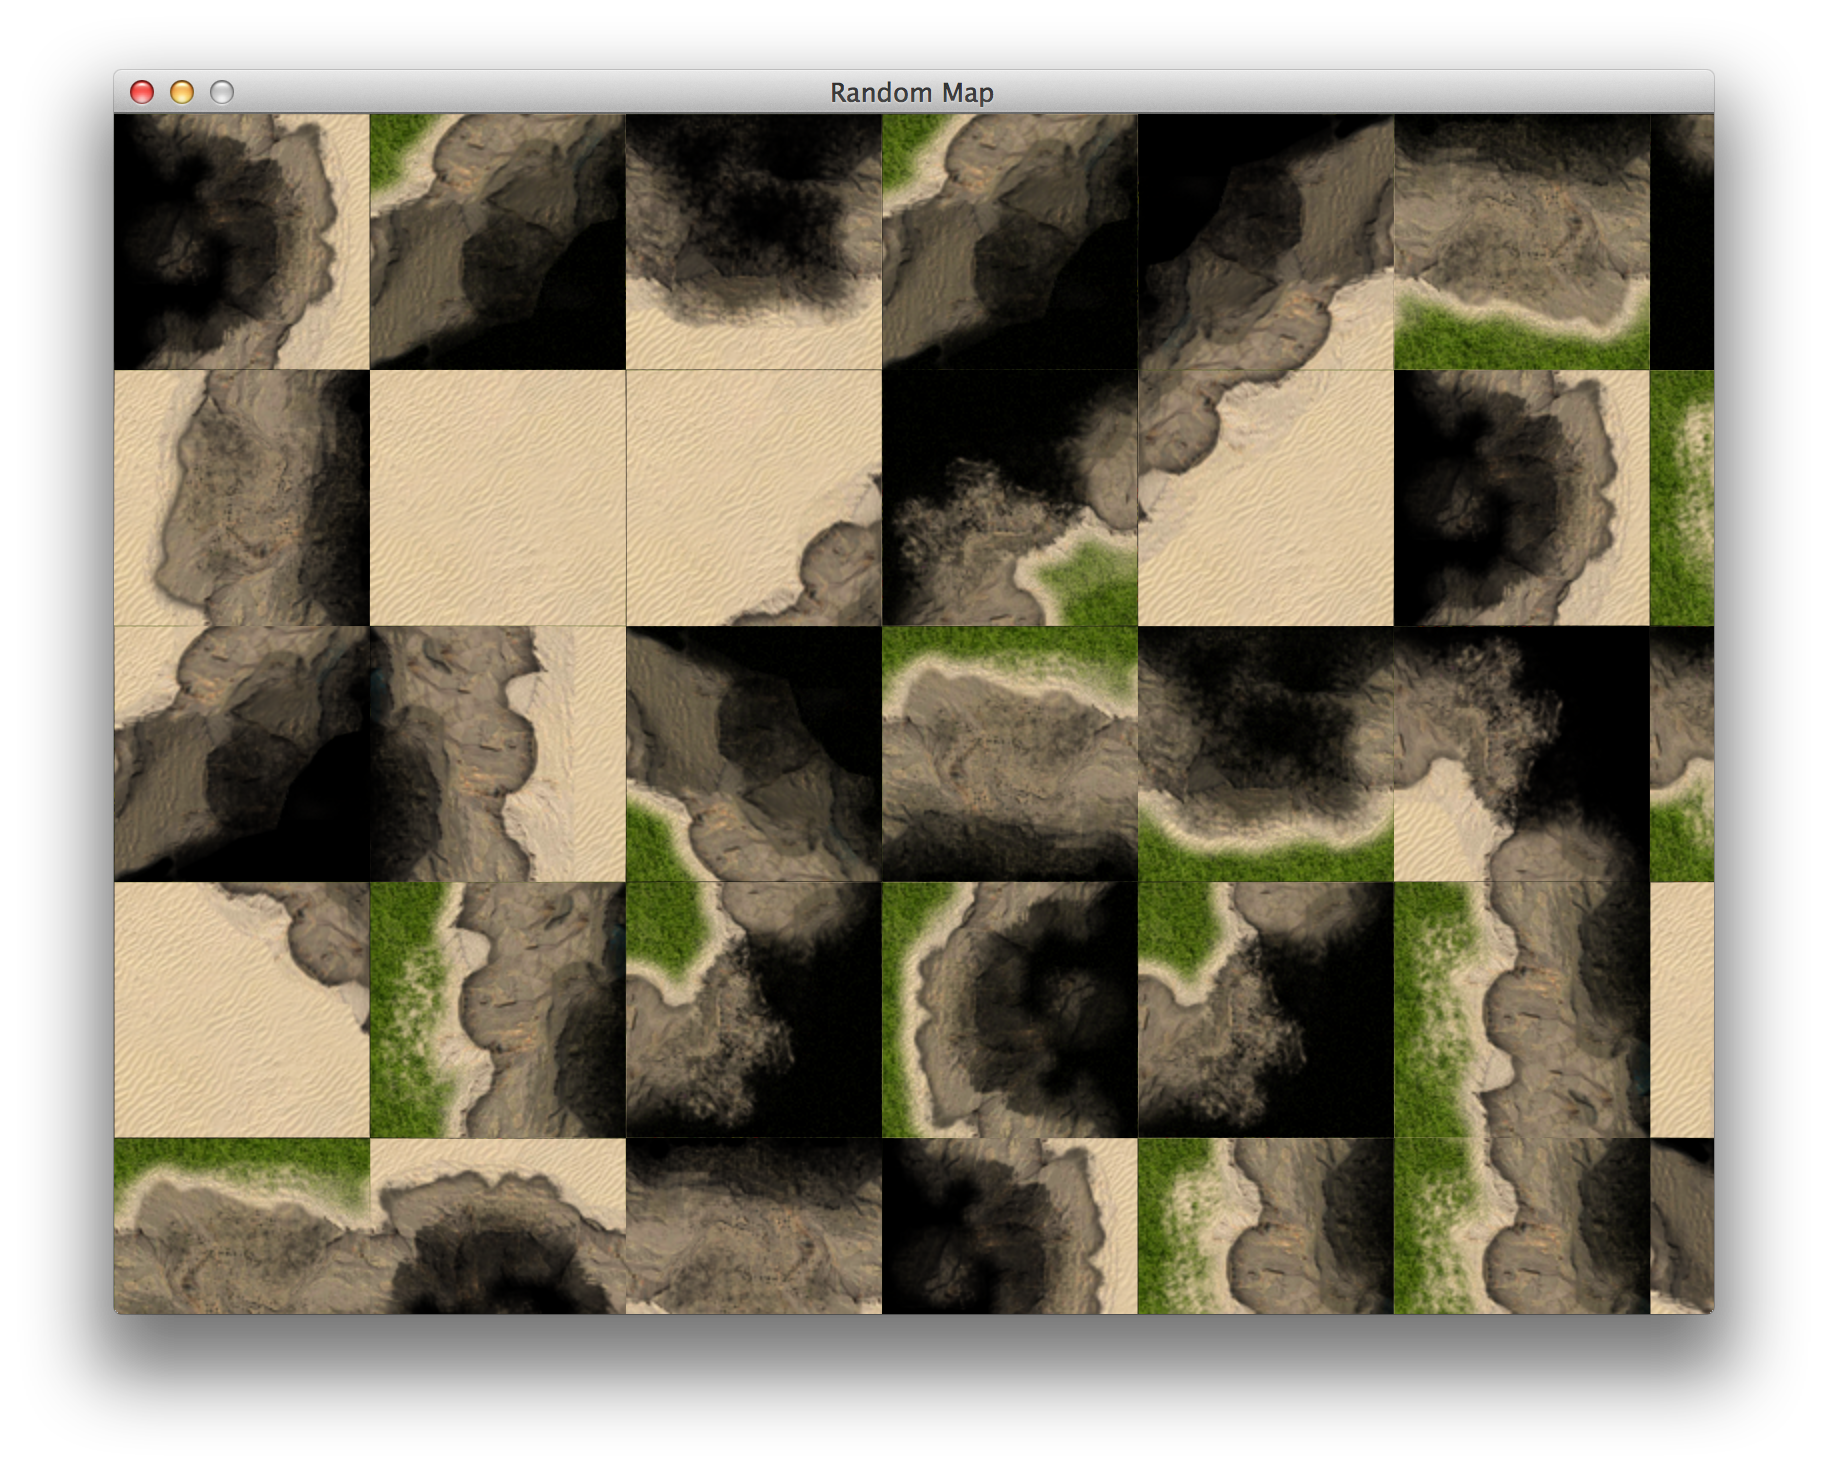
Map filled with random tiles
The result doesn’t look seamless, so we will have to figure out what’s wrong. After playing around
for a while, I’ve noticed that it’s an issue with Gosu::Image.
When you load a tile like this, it works perfectly:
Gosu::Image.new(self, image_path, true, 0, 0, 128, 128)
Gosu::Image.load_tiles(self, image_path, 128, 128, true)
And the following produces so called “texture bleeding”:
Gosu::Image.new(self, image_path, true)
Gosu::Image.new(self, image_path, true).subimage(0, 0, 128, 128)
Good thing we’re not building our game yet, right? Welcome to the intricacies of software development!
Now, I have reported my findings, but until it gets fixed, we need a workaround. And the workaround was to use RMagick. I knew we won’t get too far away from it. But our random map now looks gorgeous:
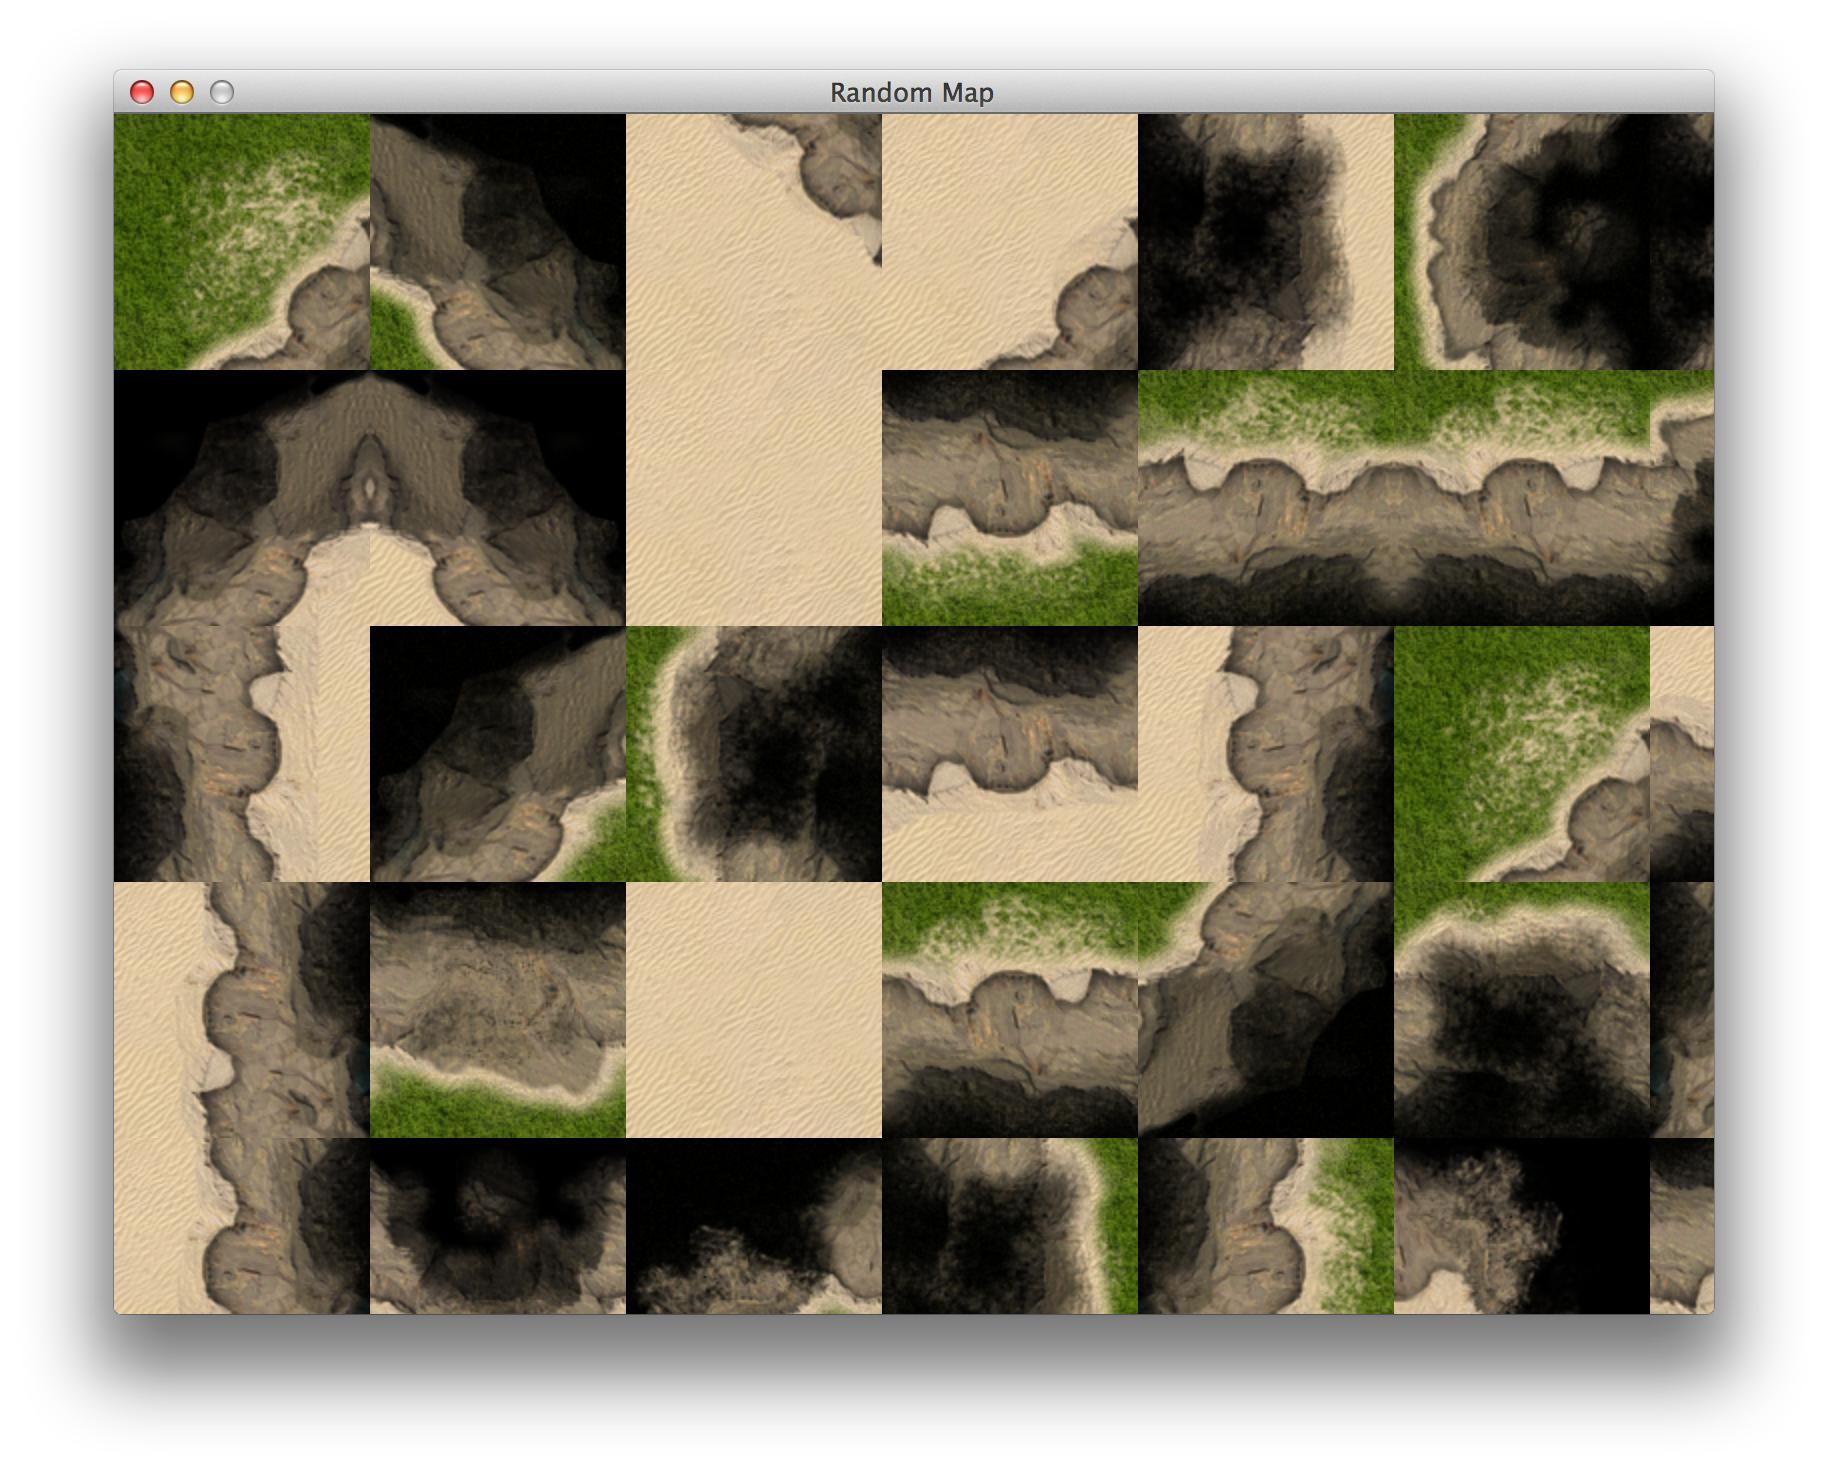
Map filled with seamless random tiles
Using Tiled To Create Maps
While low level approach to drawing tiles in screen may be appropriate in some scenarios, like randomly generated maps, we will explore another alternatives. One of them is this great, open source, cross platform, generic tile map editor called Tiled.
It has some limitations, for instance, all tiles in tileset have to be of same proportions. On the
upside, it would be easy to load Tiled tilesets with
Gosu::Image#load_tiles.
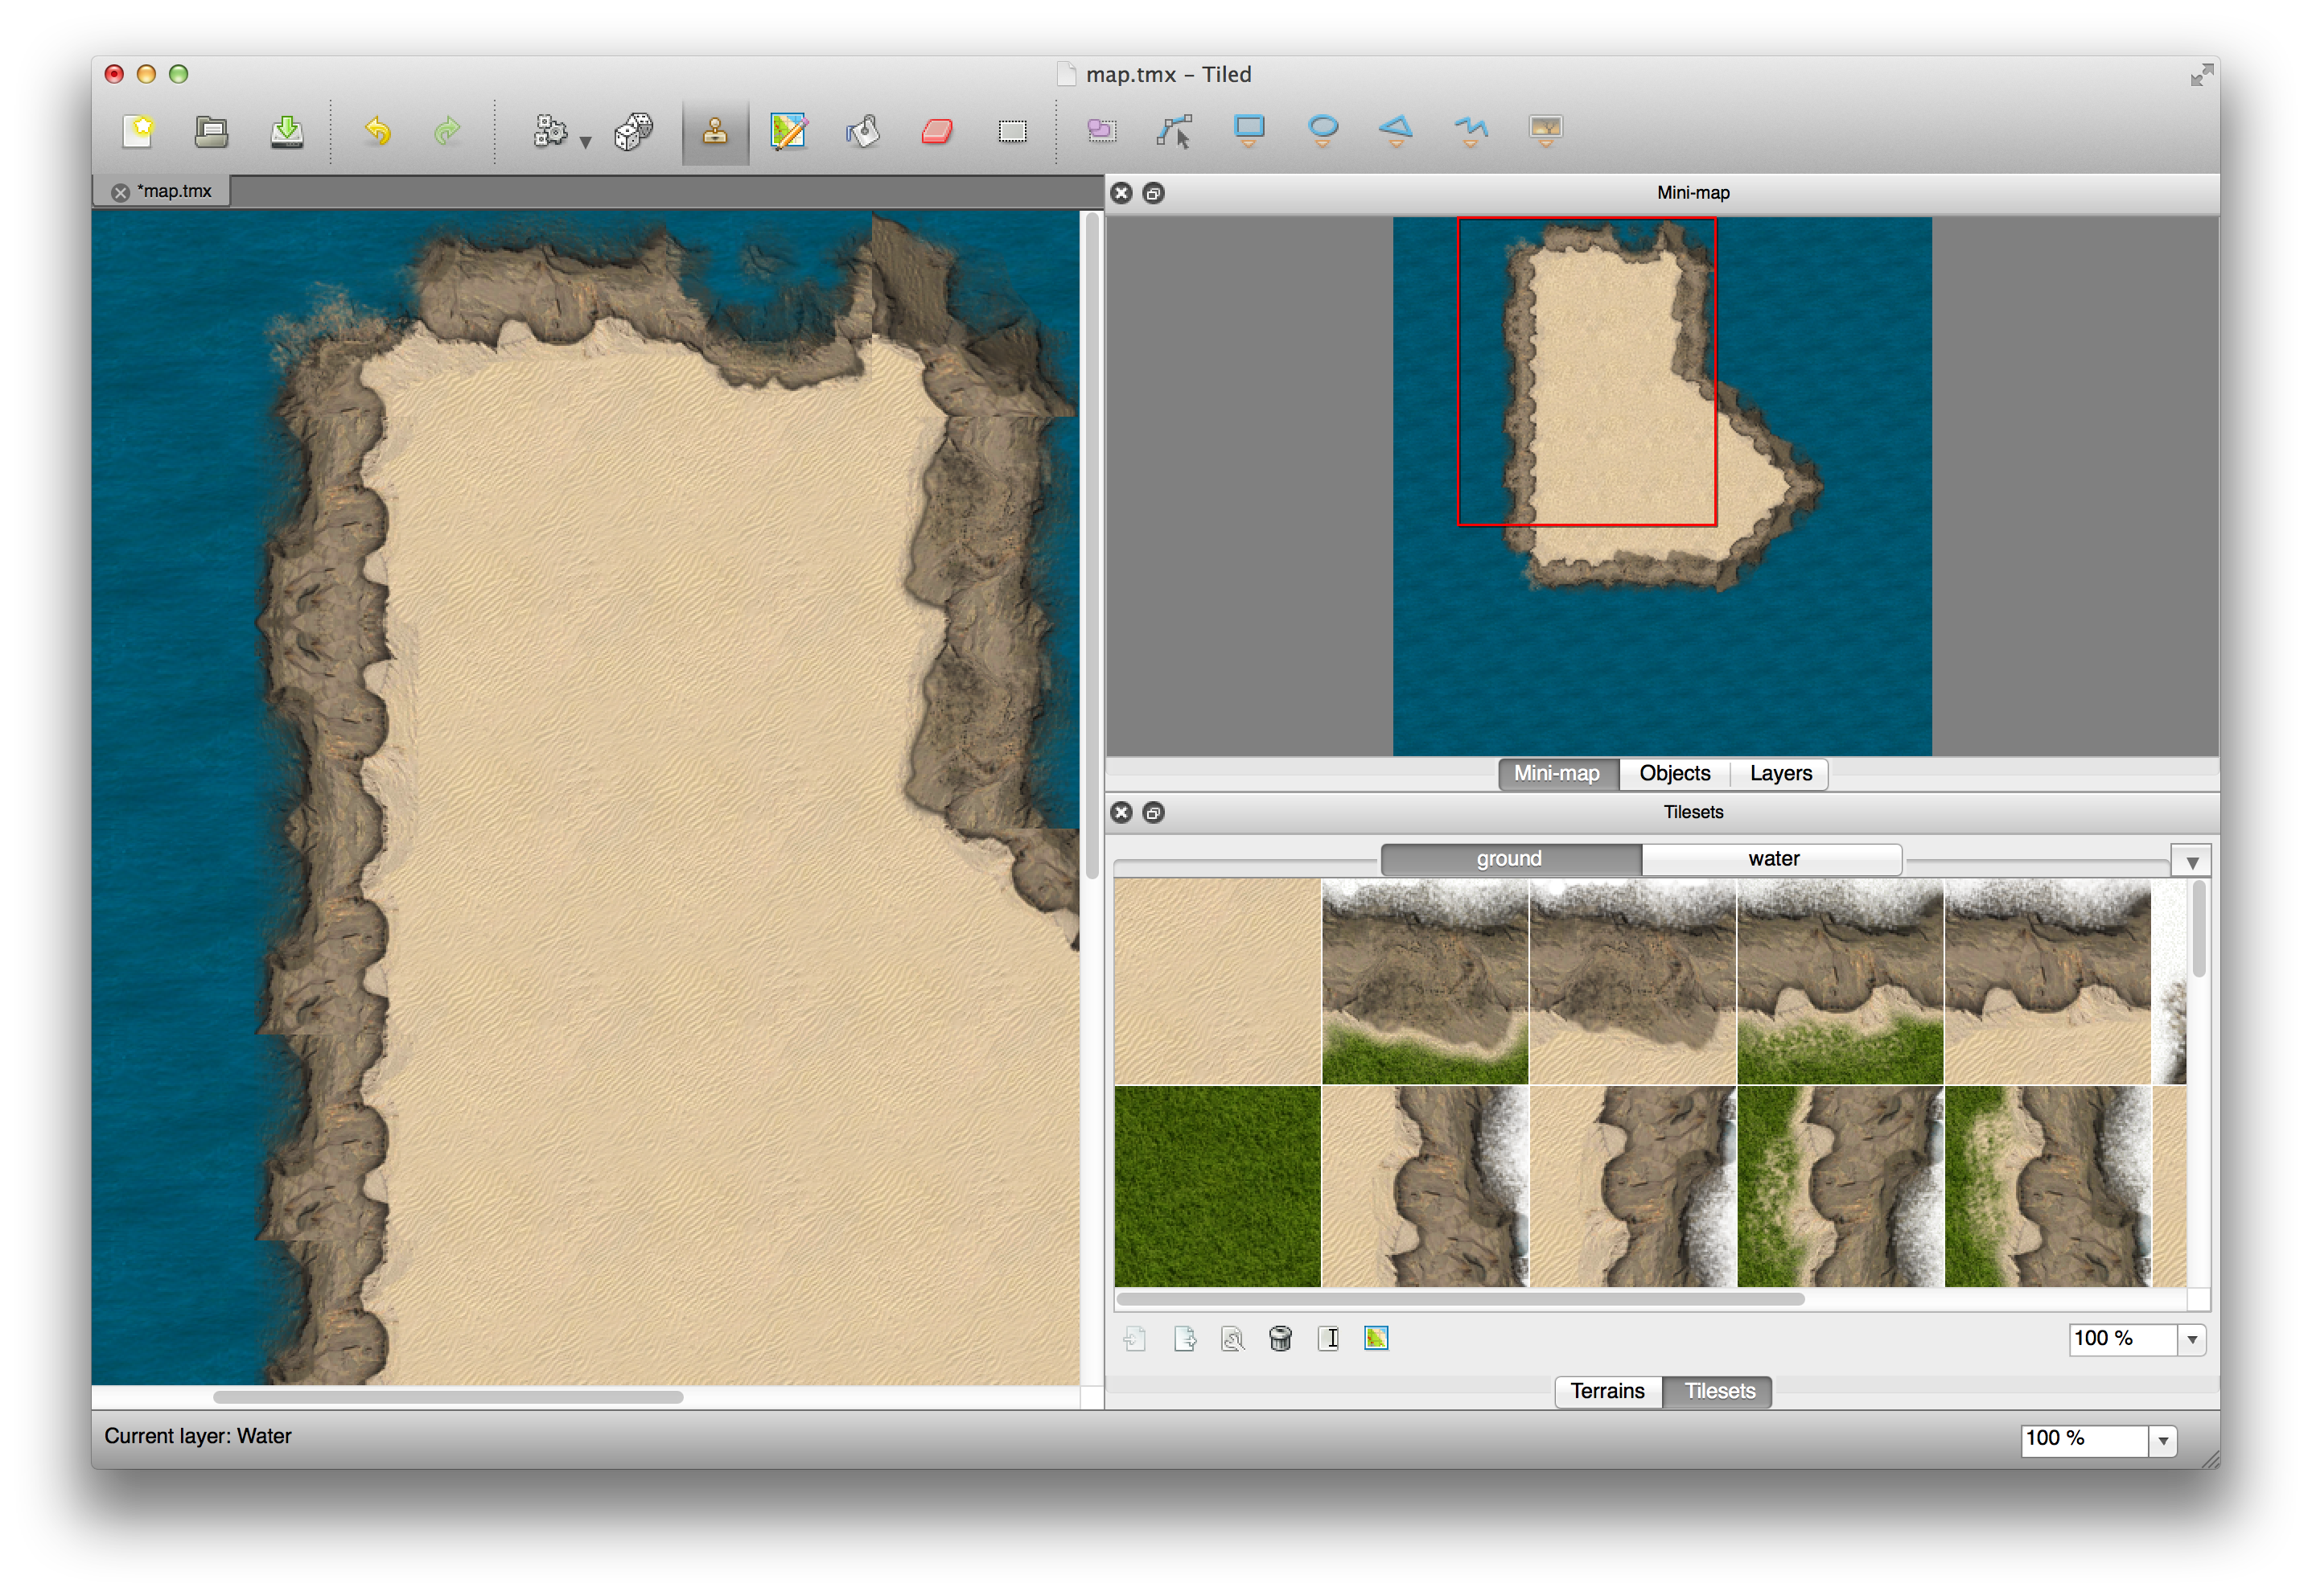
Tiled
Tiled uses it’s own custom, XML based tmx format for saving maps. It also allows exporting maps
to JSON, which is way more convenient, since parsing XML in Ruby is usually done with
Nokogiri, which is heavier and it’s native extensions usually cause more
trouble than ones JSON parser uses. So, let’s see how that JSON looks like:
02-warmup/tiled_map.json
 1 { "height":10,
 2  "layers":[
 3         {
 4          "data":[65, 65, 65, 65, 65, 65, 65, 65, 65, 65, 65, 65, 65, 0, 0, 65, 6\
 5 5, 65, 65, 65, 65, 65, 65, 0, 0, 65, 65, 65, 65, 65, 65, 65, 65, 0, 0, 0, 65, 65\
 6 , 65, 65, 65, 65, 65, 0, 0, 0, 0, 65, 65, 65, 65, 65, 65, 0, 0, 0, 0, 65, 65, 65\
 7 , 65, 65, 65, 65, 65, 65, 65, 65, 65, 65, 65, 65, 65, 65, 65, 65, 65, 65, 65, 65\
 8 , 65, 65, 65, 65, 65, 65, 65, 65, 65, 65, 65, 65, 65, 65, 65, 65, 65, 65, 65, 65\
 9 ],
10          "height":10,
11          "name":"Water",
12          "opacity":1,
13          "type":"tilelayer",
14          "visible":true,
15          "width":10,
16          "x":0,
17          "y":0
18         },
19         {
20          "data":[0, 0, 7, 5, 57, 43, 0, 0, 0, 0, 0, 0, 28, 1, 1, 42, 0, 0, 0, 0,\
21  0, 0, 44, 1, 1, 42, 0, 0, 0, 0, 0, 0, 28, 1, 1, 27, 43, 0, 0, 0, 0, 0, 28, 1, 1\
22 , 1, 27, 43, 0, 0, 0, 0, 28, 1, 1, 1, 59, 16, 0, 0, 0, 0, 48, 62, 61, 61, 16, 0,\
23  0, 0, 0, 0, 0, 0, 0, 0, 0, 0, 0, 0, 0, 0, 0, 0, 0, 0, 0, 0, 0, 0, 0, 0, 0, 0, 0\
24 , 0, 0, 0, 0, 0],
25          "height":10,
26          "name":"Ground",
27          "opacity":1,
28          "type":"tilelayer",
29          "visible":true,
30          "width":10,
31          "x":0,
32          "y":0
33         }],
34  "orientation":"orthogonal",
35  "properties":
36     {
37
38     },
39  "tileheight":128,
40  "tilesets":[
41         {
42          "firstgid":1,
43          "image":"media\/ground.png",
44          "imageheight":1024,
45          "imagewidth":1024,
46          "margin":0,
47          "name":"ground",
48          "properties":
49             {
50
51             },
52          "spacing":0,
53          "tileheight":128,
54          "tilewidth":128
55         },
56         {
57          "firstgid":65,
58          "image":"media\/water.png",
59          "imageheight":128,
60          "imagewidth":128,
61          "margin":0,
62          "name":"water",
63          "properties":
64             {
65
66             },
67          "spacing":0,
68          "tileheight":128,
69          "tilewidth":128
70         }],
71  "tilewidth":128,
72  "version":1,
73  "width":10
74 }
There are following things listed here:
- Two different tilesets, “ground” and “water”
- Map width and height in tile count (10x10)
- Layers with data array contains tile numbers
Couple of extra things that Tiled maps can have:
- Object layers containing lists of objects with their coordinates
- Properties hash on tiles and objects
This doesn’t look too difficult to parse, so we’re going to implement a loader for Tiled maps. And make it open source, of course.
Loading Tiled Maps With Gosu
Probably the easiest way to load Tiled map is to take each layer and render it on screen, tile by tile, like a cake. We will not care about caching at this point, and the only optimization would be not drawing things that are out of screen boundaries.
After couple of days of test driven development, I’ve ended up writing gosu_tiled gem, that allows you to load Tiled maps with just a few lines of code.
I will not go through describing the implementation, but if you want to examine the thought
process, take a look at gosu_tiled gem’s
git commit history.
To use the gem, do gem install gosu_tiled and examine the code that shows a map of the island
that you can scroll around with arrow keys:
02-warmup/island.rb
 1 require 'gosu'
 2 require 'gosu_tiled'
 3
 4 class GameWindow < Gosu::Window
 5   MAP_FILE = File.join(File.dirname(
 6     __FILE__), 'island.json')
 7   SPEED = 5
 8
 9   def initialize
10     super(640, 480, false)
11     @map = Gosu::Tiled.load_json(self, MAP_FILE)
12     @x = @y = 0
13     @first_render = true
14   end
15
16   def button_down(id)
17     close if id == Gosu::KbEscape
18   end
19
20   def update
21     @x -= SPEED if button_down?(Gosu::KbLeft)
22     @x += SPEED if button_down?(Gosu::KbRight)
23     @y -= SPEED if button_down?(Gosu::KbUp)
24     @y += SPEED if button_down?(Gosu::KbDown)
25     self.caption = "#{Gosu.fps} FPS. Use arrow keys to pan"
26   end
27
28   def draw
29     @first_render = false
30     @map.draw(@x, @y)
31   end
32
33   def needs_redraw?
34     [Gosu::KbLeft,
35      Gosu::KbRight,
36      Gosu::KbUp,
37      Gosu::KbDown].each do |b|
38       return true if button_down?(b)
39     end
40     @first_render
41   end
42 end
43
44 GameWindow.new.show
Run it, use arrow keys to scroll the map.
$ ruby 02-warmup/island.rb
The result is quite satisfying, and it scrolls smoothly without any optimizations:
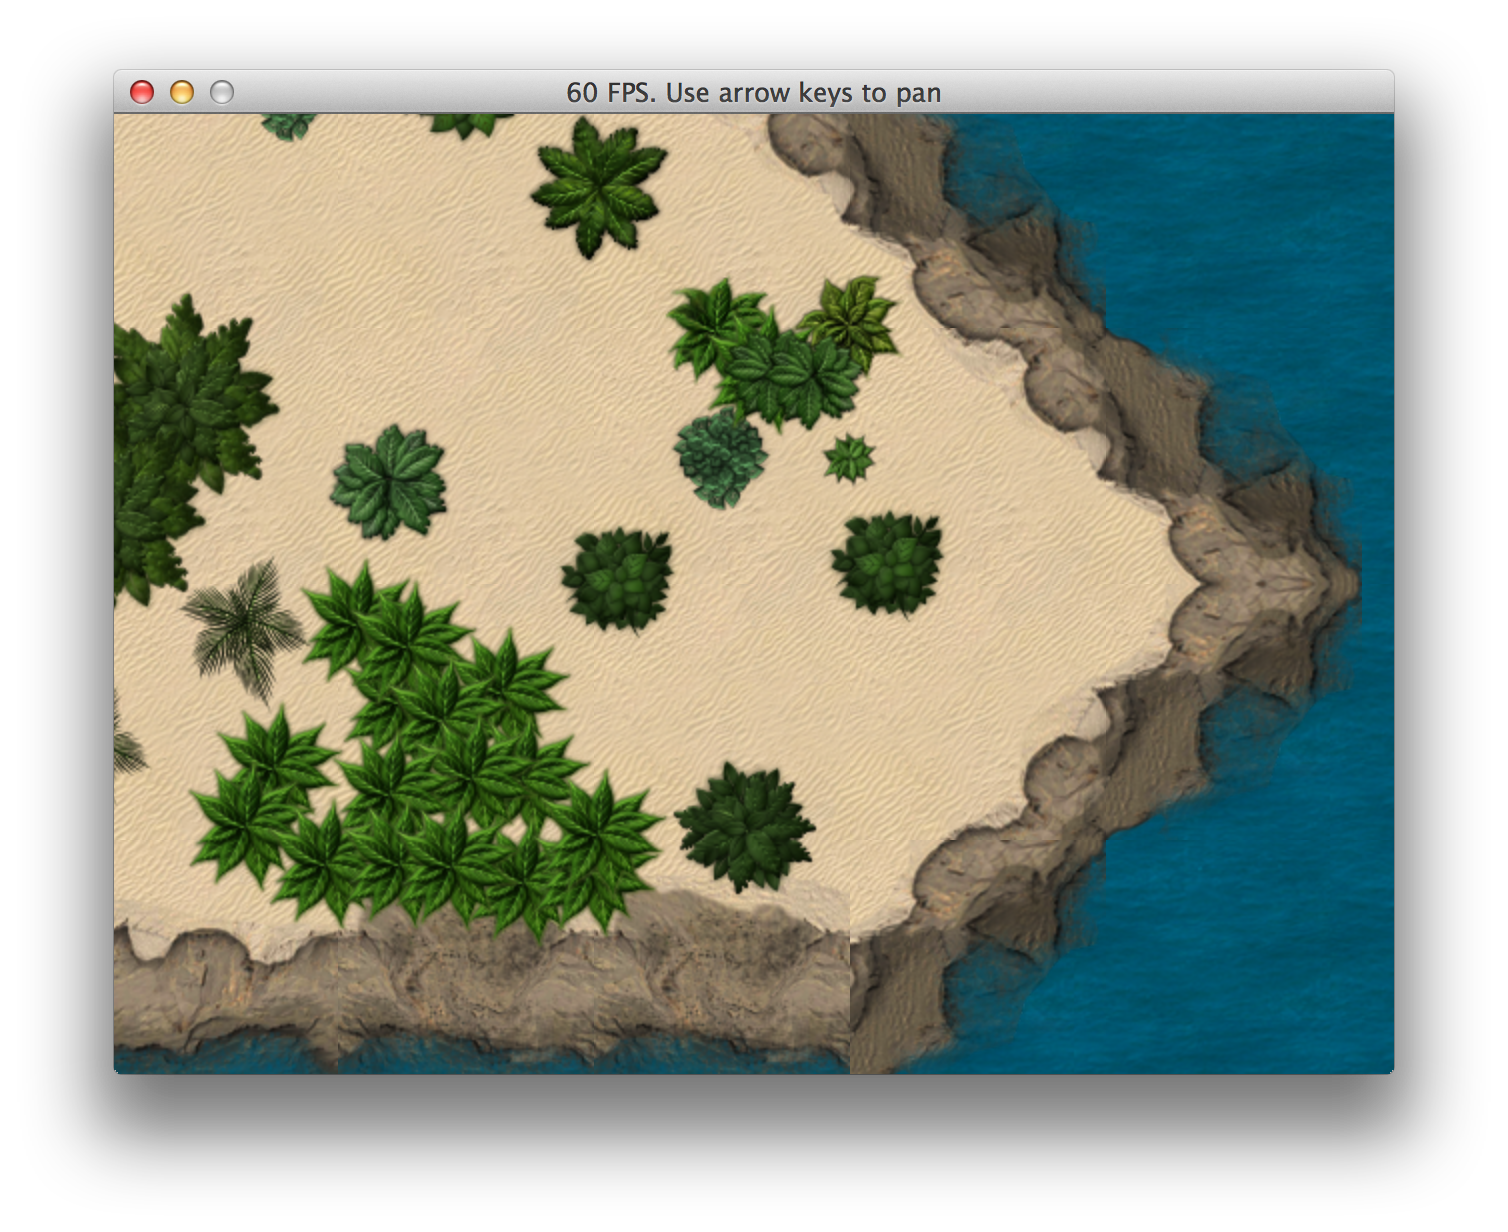
Exploring Tiled map in Gosu
Generating Random Map With Perlin Noise
In some cases random generated maps make all the difference. Worms and Diablo would probably be just average games if it wasn’t for those always unique, procedurally generated maps.
We will try to make a very primitive map generator ourselves. To begin with, we will be using only 3 different tiles - water, sand and grass. For implementing fully tiled edges, the generator must be aware of available tilesets and know how to combine them in valid ways. We may come back to it, but for now let’s keep things simple.
Now, generating naturally looking randomness is something worth having a book of it’s own, so instead of trying to poorly reinvent what other people have already done, we will use a well known algorithm perfectly suited for this task - Perlin noise.
If you have ever used Photoshop’s Cloud filter, you already know how Perlin noise looks like:
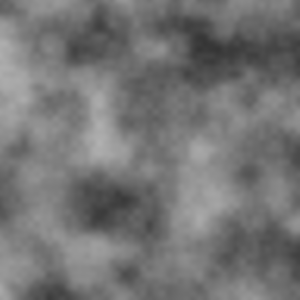
Perlin noise
Now, we could implement the algorithm ourselves, but there is perlin_noise gem already available, it looks pretty solid, so we will use it.
The following program generates 100x100 map with 30% chance of water, 15% chance of sand and 55%
chance of grass:
02-warmup/perlin_noise_map.rb
  1 require 'gosu'
  2 require 'gosu_texture_packer'
  3 require 'perlin_noise'
  4
  5 def media_path(file)
  6   File.join(File.dirname(File.dirname(
  7     __FILE__)), 'media', file)
  8 end
  9
 10 class GameWindow < Gosu::Window
 11   MAP_WIDTH = 100
 12   MAP_HEIGHT = 100
 13   WIDTH = 800
 14   HEIGHT = 600
 15   TILE_SIZE = 128
 16
 17   def initialize
 18     super(WIDTH, HEIGHT, false)
 19     load_tiles
 20     @map = generate_map
 21     @zoom = 0.2
 22   end
 23
 24   def button_down(id)
 25     close if id == Gosu::KbEscape
 26     @map = generate_map if id == Gosu::KbSpace
 27   end
 28
 29   def update
 30     adjust_zoom(0.005) if button_down?(Gosu::KbDown)
 31     adjust_zoom(-0.005) if button_down?(Gosu::KbUp)
 32     set_caption
 33   end
 34
 35   def draw
 36     tiles_x.times do |x|
 37       tiles_y.times do |y|
 38         @map[x][y].draw(
 39           x * TILE_SIZE * @zoom,
 40           y * TILE_SIZE * @zoom,
 41           0,
 42           @zoom,
 43           @zoom)
 44       end
 45     end
 46   end
 47
 48   private
 49
 50   def set_caption
 51     self.caption = 'Perlin Noise. ' <<
 52       "Zoom: #{'%.2f' % @zoom}. " <<
 53       'Use Up/Down to zoom. Space to regenerate.'
 54   end
 55
 56   def adjust_zoom(delta)
 57     new_zoom = @zoom + delta
 58     if new_zoom > 0.07 && new_zoom < 2
 59       @zoom = new_zoom
 60     end
 61   end
 62
 63   def load_tiles
 64     tiles = Gosu::Image.load_tiles(
 65       self, media_path('ground.png'), 128, 128, true)
 66     @sand = tiles[0]
 67     @grass = tiles[8]
 68     @water = Gosu::Image.new(
 69       self, media_path('water.png'), true)
 70   end
 71
 72   def tiles_x
 73     count = (WIDTH / (TILE_SIZE * @zoom)).ceil + 1
 74     [count, MAP_WIDTH].min
 75   end
 76
 77   def tiles_y
 78     count = (HEIGHT / (TILE_SIZE * @zoom)).ceil + 1
 79     [count, MAP_HEIGHT].min
 80   end
 81
 82   def generate_map
 83     noises = Perlin::Noise.new(2)
 84     contrast = Perlin::Curve.contrast(
 85       Perlin::Curve::CUBIC, 2)
 86     map = {}
 87     MAP_WIDTH.times do |x|
 88       map[x] = {}
 89       MAP_HEIGHT.times do |y|
 90         n = noises[x * 0.1, y * 0.1]
 91         n = contrast.call(n)
 92         map[x][y] = choose_tile(n)
 93       end
 94     end
 95     map
 96   end
 97
 98   def choose_tile(val)
 99     case val
100     when 0.0..0.3 # 30% chance
101       @water
102     when 0.3..0.45 # 15% chance, water edges
103       @sand
104     else # 55% chance
105       @grass
106     end
107   end
108
109 end
110
111 window = GameWindow.new
112 window.show
Run the program, zoom with up / down arrows and regenerate everything with spacebar.
$ ruby 02-warmup/perlin_noise_map.rb

Map generated with Perlin noise
This is a little longer than our previous examples, so we will analyze some parts to make it clear.
81 def generate_map
82   noises = Perlin::Noise.new(2)
83   contrast = Perlin::Curve.contrast(
84     Perlin::Curve::CUBIC, 2)
85   map = {}
86   MAP_WIDTH.times do |x|
87     map[x] = {}
88     MAP_HEIGHT.times do |y|
89       n = noises[x * 0.1, y * 0.1]
90       n = contrast.call(n)
91       map[x][y] = choose_tile(n)
92     end
93   end
94   map
95 end
generate_map is the heart of this program. It creates two dimensional Perlin::Noise generator,
then chooses a random tile for each location of the map, according to noise value. To make the map
a little sharper, cubic contrast is applied to noise value before choosing the tile. Try commenting
out contrast application - it will look like a boring golf course, since noise values will keep
buzzing around the middle.
 97 def choose_tile(val)
 98   case val
 99   when 0.0..0.3 # 30% chance
100     @water
101   when 0.3..0.45 # 15% chance, water edges
102     @sand
103   else # 55% chance
104     @grass
105   end
106 end
Here we could go crazy if we had more different tiles to use. We could add deep waters at
0.0..0.1, mountains at 0.9..0.95 and snow caps at 0.95..1.0. And all this would have
beautiful transitions.
Player Movement With Keyboard And Mouse
We have learned to draw maps, but we need a protagonist to explore them. It will be a tank that you can move around the island with WASD keys and use your mouse to target it’s gun at things. The tank will be drawn on top of our island map, and it will be above ground, but below tree layer, so it can sneak behind palm trees. That’s as close to real deal as it gets!
02-warmup/player_movement.rb
  1 require 'gosu'
  2 require 'gosu_tiled'
  3 require 'gosu_texture_packer'
  4
  5 class Tank
  6   attr_accessor :x, :y, :body_angle, :gun_angle
  7
  8   def initialize(window, body, shadow, gun)
  9     @x = window.width / 2
 10     @y = window.height / 2
 11     @window = window
 12     @body = body
 13     @shadow = shadow
 14     @gun = gun
 15     @body_angle = 0.0
 16     @gun_angle = 0.0
 17   end
 18
 19   def update
 20     atan = Math.atan2(320 - @window.mouse_x,
 21                       240 - @window.mouse_y)
 22     @gun_angle = -atan * 180 / Math::PI
 23     @body_angle = change_angle(@body_angle,
 24       Gosu::KbW, Gosu::KbS, Gosu::KbA, Gosu::KbD)
 25   end
 26
 27   def draw
 28     @shadow.draw_rot(@x - 1, @y - 1, 0, @body_angle)
 29     @body.draw_rot(@x, @y, 1, @body_angle)
 30     @gun.draw_rot(@x, @y, 2, @gun_angle)
 31   end
 32
 33   private
 34
 35   def change_angle(previous_angle, up, down, right, left)
 36     if @window.button_down?(up)
 37       angle = 0.0
 38       angle += 45.0 if @window.button_down?(left)
 39       angle -= 45.0 if @window.button_down?(right)
 40     elsif @window.button_down?(down)
 41       angle = 180.0
 42       angle -= 45.0 if @window.button_down?(left)
 43       angle += 45.0 if @window.button_down?(right)
 44     elsif @window.button_down?(left)
 45       angle = 90.0
 46       angle += 45.0 if @window.button_down?(up)
 47       angle -= 45.0 if @window.button_down?(down)
 48     elsif @window.button_down?(right)
 49       angle = 270.0
 50       angle -= 45.0 if @window.button_down?(up)
 51       angle += 45.0 if @window.button_down?(down)
 52     end
 53     angle || previous_angle
 54   end
 55 end
 56
 57 class GameWindow < Gosu::Window
 58   MAP_FILE = File.join(File.dirname(
 59     __FILE__), 'island.json')
 60   UNIT_FILE = File.join(File.dirname(File.dirname(
 61     __FILE__)), 'media', 'ground_units.json')
 62   SPEED = 5
 63
 64   def initialize
 65     super(640, 480, false)
 66     @map = Gosu::Tiled.load_json(self, MAP_FILE)
 67     @units = Gosu::TexturePacker.load_json(
 68       self, UNIT_FILE, :precise)
 69     @tank = Tank.new(self,
 70       @units.frame('tank1_body.png'),
 71       @units.frame('tank1_body_shadow.png'),
 72       @units.frame('tank1_dualgun.png'))
 73     @x = @y = 0
 74     @first_render = true
 75     @buttons_down = 0
 76   end
 77
 78   def needs_cursor?
 79     true
 80   end
 81
 82   def button_down(id)
 83     close if id == Gosu::KbEscape
 84     @buttons_down += 1
 85   end
 86
 87   def button_up(id)
 88     @buttons_down -= 1
 89   end
 90
 91   def update
 92     @x -= SPEED if button_down?(Gosu::KbA)
 93     @x += SPEED if button_down?(Gosu::KbD)
 94     @y -= SPEED if button_down?(Gosu::KbW)
 95     @y += SPEED if button_down?(Gosu::KbS)
 96     @tank.update
 97     self.caption = "#{Gosu.fps} FPS. " <<
 98       'Use WASD and mouse to control tank'
 99   end
100
101   def draw
102     @first_render = false
103     @map.draw(@x, @y)
104     @tank.draw()
105   end
106 end
107
108 GameWindow.new.show
Tank sprite is rendered in the middle of screen. It consists of three layers, body shadow, body and gun. Body and it’s shadow are always rendered in same angle, one on top of another. The angle is determined by keys that are pressed. It supports 8 directions.
Gun is a little bit different. It follows mouse cursor. To determine the angle we had to use some
math. The formula to get angle in degrees is arctan(delta_x / delta_y) * 180 / PI. You can see it
explained in more detail on stackoverflow.
Run it and stroll around the island. You can still move on water and into the darkness, away from the map itself, but we will handle it later.
$ ruby 02-warmup/player_movement.rb
See that tank hiding between the bushes, ready to go in 8 directions and blow shit up with that precisely aimed double cannon?
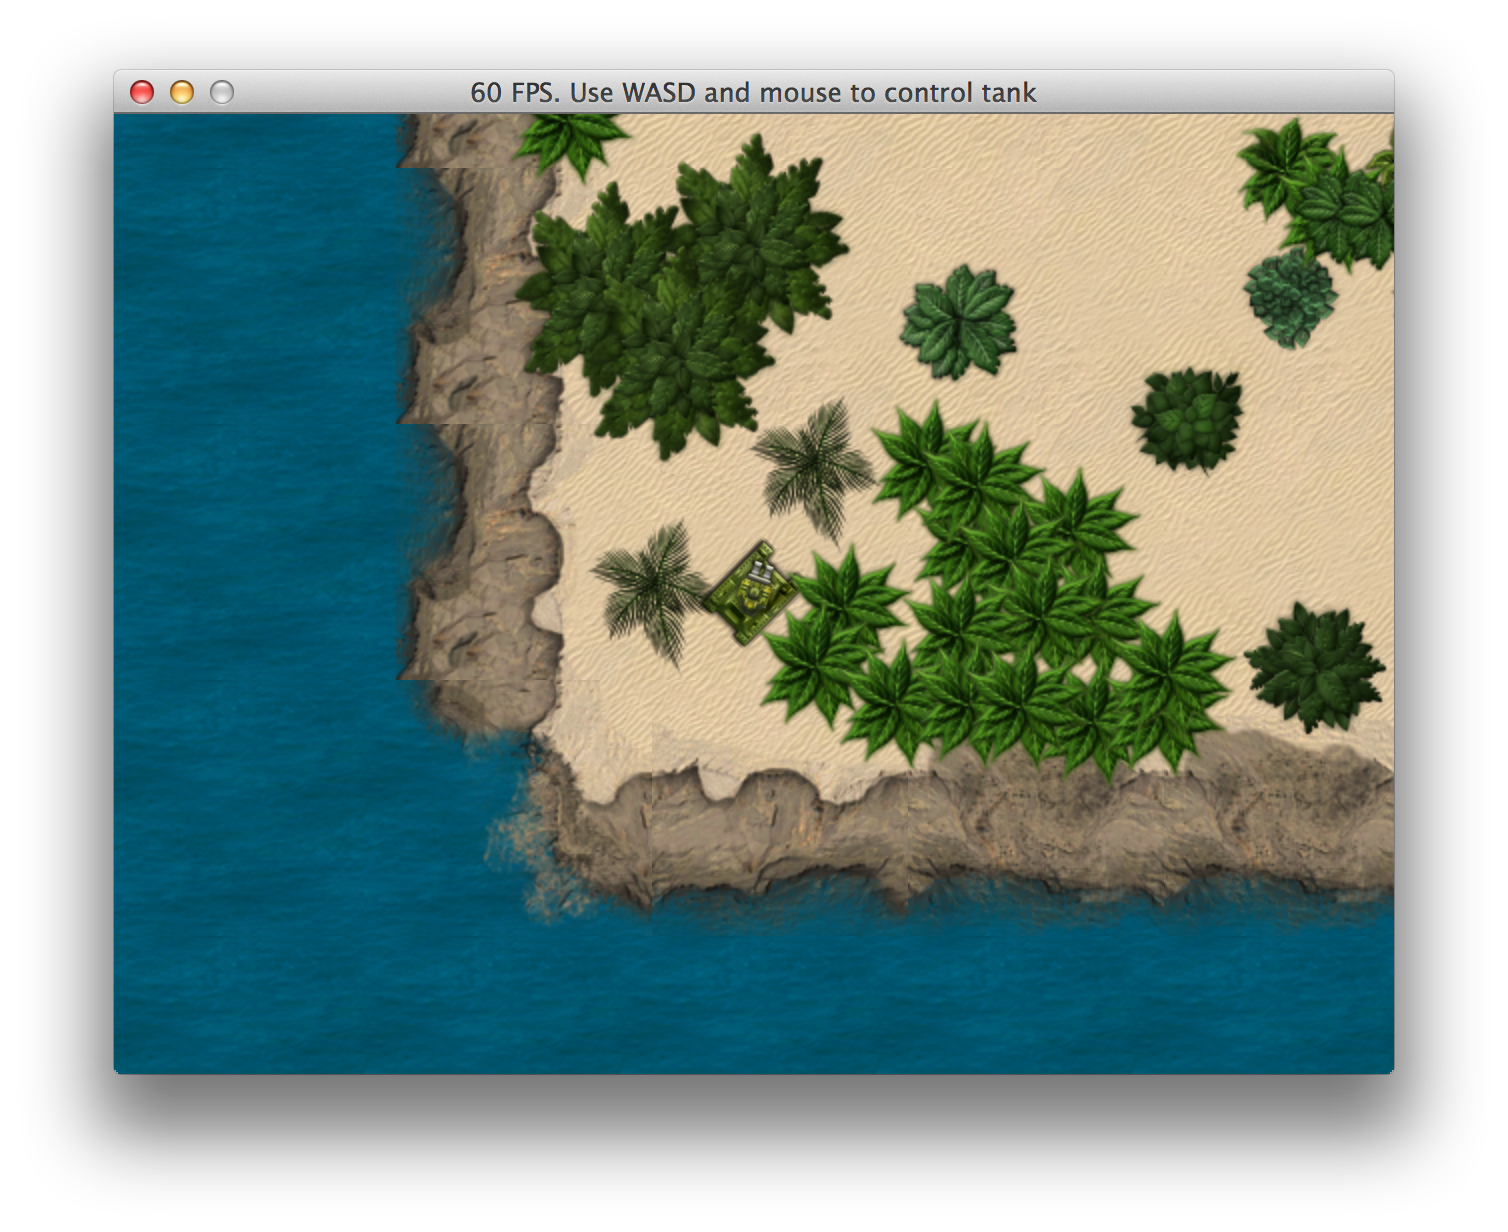
Tank moving around and aiming guns
Game Coordinate System
By now we may start realizing, that there is one key component missing in our designs. We have a virtual map, which is bigger than our screen space, and we should perform all calculations using that map, and only then cut out the required piece and render it in our game window.
There are three different coordinate systems that have to map with each other:
- Game coordinates
- Viewport coordinates
- Screen coordinates
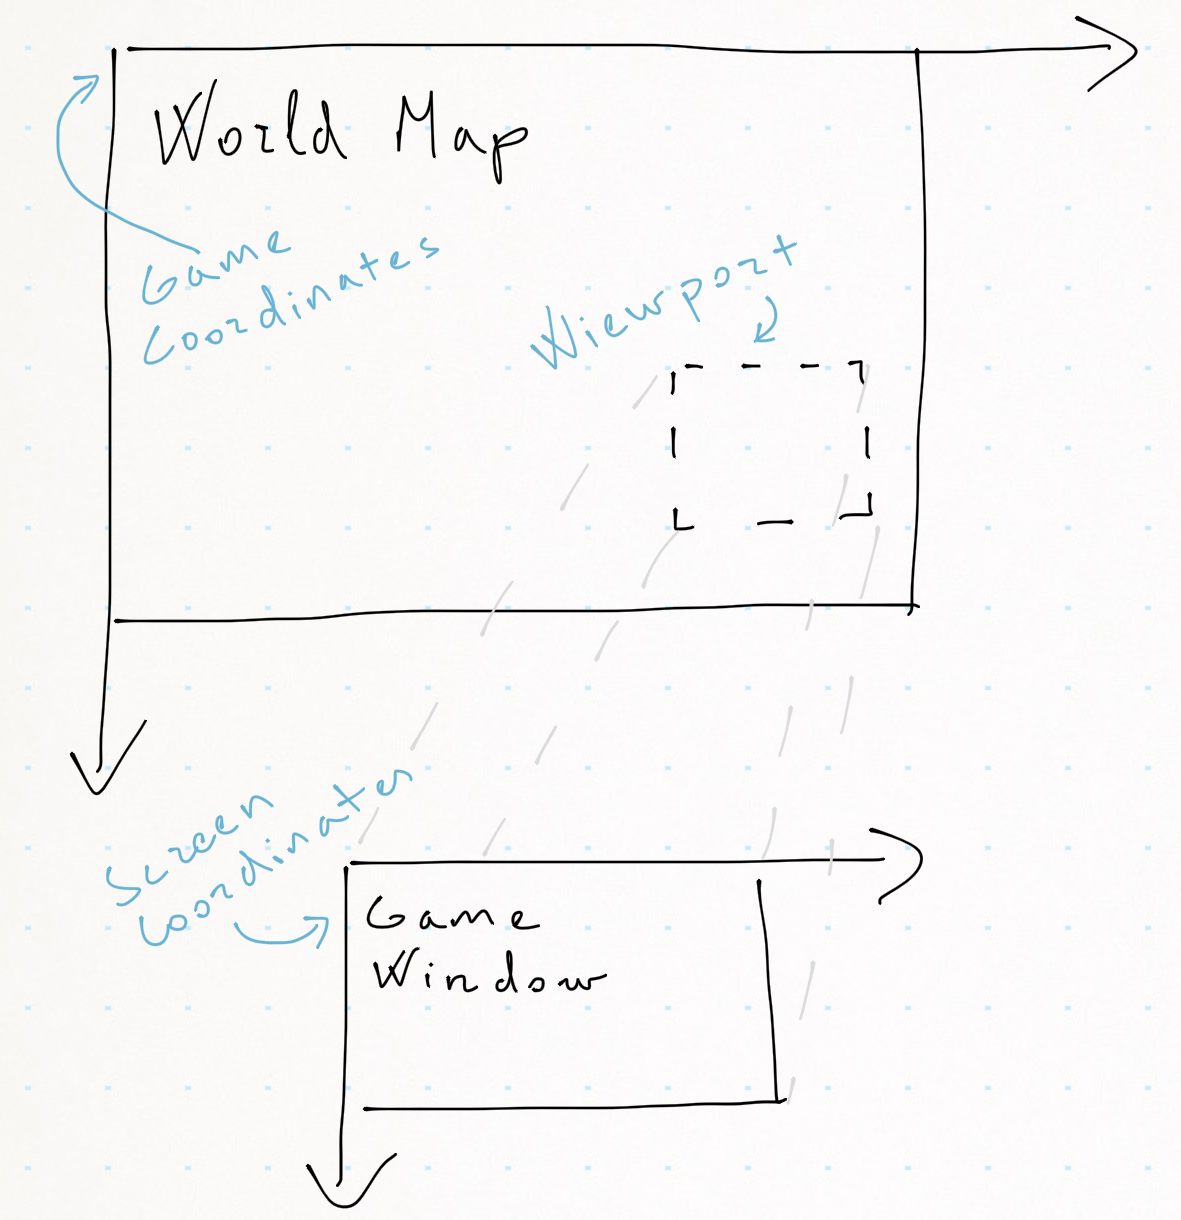
Coordinate systems
Game Coordinates
This is where all logic will happen. Player location, enemy locations, powerup locations - all this will have game coordinates, and it should have nothing to do with your screen position.
Viewport Coordinates
Viewport is the position of virtual camera, that is “filming” world in action. Don’t confuse it with screen coordinates, because viewport will not necessarily be mapped pixel to pixel to your game window. Imagine this: you have a huge world map, your player is standing in the middle, and game window displays the player while slowly zooming in. In this scenario, viewport is constantly shrinking, while game map stays the same, and game window also stays the same.
Screen Coordinates
This is your game display, pixel by pixel. You will draw static information, like your HUD directly on it.
How To Put It All Together
In our games we will want to separate game coordinates from viewport and screen as much as possible. Basically, we will program ourselves a “camera man” who will be busy following the action, zooming in and out, perhaps changing the view angle now and then.
Let’s implement a prototype that will allow us to navigate and zoom around a big map. We will only draw objects that are visible in viewport. Some math will be unavoidable, but in most cases it’s pretty basic - that’s the beauty of 2D games:
02-warmup/coordinate_system.rb
  1 require 'gosu'
  2
  3 class WorldMap
  4   attr_accessor :on_screen, :off_screen
  5
  6   def initialize(width, height)
  7     @images = {}
  8     (0..width).step(50) do |x|
  9       @images[x] = {}
 10       (0..height).step(50) do |y|
 11         img = Gosu::Image.from_text(
 12           $window, "#{x}:#{y}",
 13           Gosu.default_font_name, 15)
 14         @images[x][y] = img
 15       end
 16     end
 17   end
 18
 19   def draw(camera)
 20     @on_screen = @off_screen = 0
 21     @images.each do |x, row|
 22       row.each do |y, val|
 23         if camera.can_view?(x, y, val)
 24           val.draw(x, y, 0)
 25           @on_screen += 1
 26         else
 27           @off_screen += 1
 28         end
 29       end
 30     end
 31   end
 32 end
 33
 34 class Camera
 35   attr_accessor :x, :y, :zoom
 36
 37   def initialize
 38     @x = @y = 0
 39     @zoom = 1
 40   end
 41
 42   def can_view?(x, y, obj)
 43     x0, x1, y0, y1 = viewport
 44     (x0 - obj.width..x1).include?(x) &&
 45       (y0 - obj.height..y1).include?(y)
 46   end
 47
 48   def viewport
 49     x0 = @x - ($window.width / 2)  / @zoom
 50     x1 = @x + ($window.width / 2)  / @zoom
 51     y0 = @y - ($window.height / 2) / @zoom
 52     y1 = @y + ($window.height / 2) / @zoom
 53     [x0, x1, y0, y1]
 54   end
 55
 56   def to_s
 57     "FPS: #{Gosu.fps}. " <<
 58       "#{@x}:#{@y} @ #{'%.2f' % @zoom}. " <<
 59       'WASD to move, arrows to zoom.'
 60   end
 61
 62   def draw_crosshair
 63     $window.draw_line(
 64       @x - 10, @y, Gosu::Color::YELLOW,
 65       @x + 10, @y, Gosu::Color::YELLOW, 100)
 66     $window.draw_line(
 67       @x, @y - 10, Gosu::Color::YELLOW,
 68       @x, @y + 10, Gosu::Color::YELLOW, 100)
 69   end
 70 end
 71
 72
 73 class GameWindow < Gosu::Window
 74   SPEED = 10
 75
 76   def initialize
 77     super(800, 600, false)
 78     $window = self
 79     @map = WorldMap.new(2048, 1024)
 80     @camera = Camera.new
 81   end
 82
 83   def button_down(id)
 84     close if id == Gosu::KbEscape
 85     if id == Gosu::KbSpace
 86       @camera.zoom = 1.0
 87       @camera.x = 0
 88       @camera.y = 0
 89     end
 90   end
 91
 92   def update
 93     @camera.x -= SPEED if button_down?(Gosu::KbA)
 94     @camera.x += SPEED if button_down?(Gosu::KbD)
 95     @camera.y -= SPEED if button_down?(Gosu::KbW)
 96     @camera.y += SPEED if button_down?(Gosu::KbS)
 97
 98     zoom_delta = @camera.zoom > 0 ? 0.01 : 1.0
 99
100     if button_down?(Gosu::KbUp)
101       @camera.zoom -= zoom_delta
102     end
103     if button_down?(Gosu::KbDown)
104       @camera.zoom += zoom_delta
105     end
106     self.caption = @camera.to_s
107   end
108
109   def draw
110     off_x = -@camera.x + width / 2
111     off_y = -@camera.y + height / 2
112     cam_x = @camera.x
113     cam_y = @camera.y
114     translate(off_x, off_y) do
115       @camera.draw_crosshair
116       zoom = @camera.zoom
117       scale(zoom, zoom, cam_x, cam_y) do
118         @map.draw(@camera)
119       end
120     end
121     info = 'Objects on/off screen: ' <<
122       "#{@map.on_screen}/#{@map.off_screen}"
123     info_img = Gosu::Image.from_text(
124       self, info, Gosu.default_font_name, 30)
125     info_img.draw(10, 10, 1)
126   end
127 end
128
129 GameWindow.new.show
Run it, use WASD to navigate, up / down arrows to zoom and spacebar to reset the camera.
$ ruby 02-warmup/coordinate_system.rb
It doesn’t look impressive, but understanding the concept of different coordinate systems and being able to stitch them together is paramount to the success of our final product.
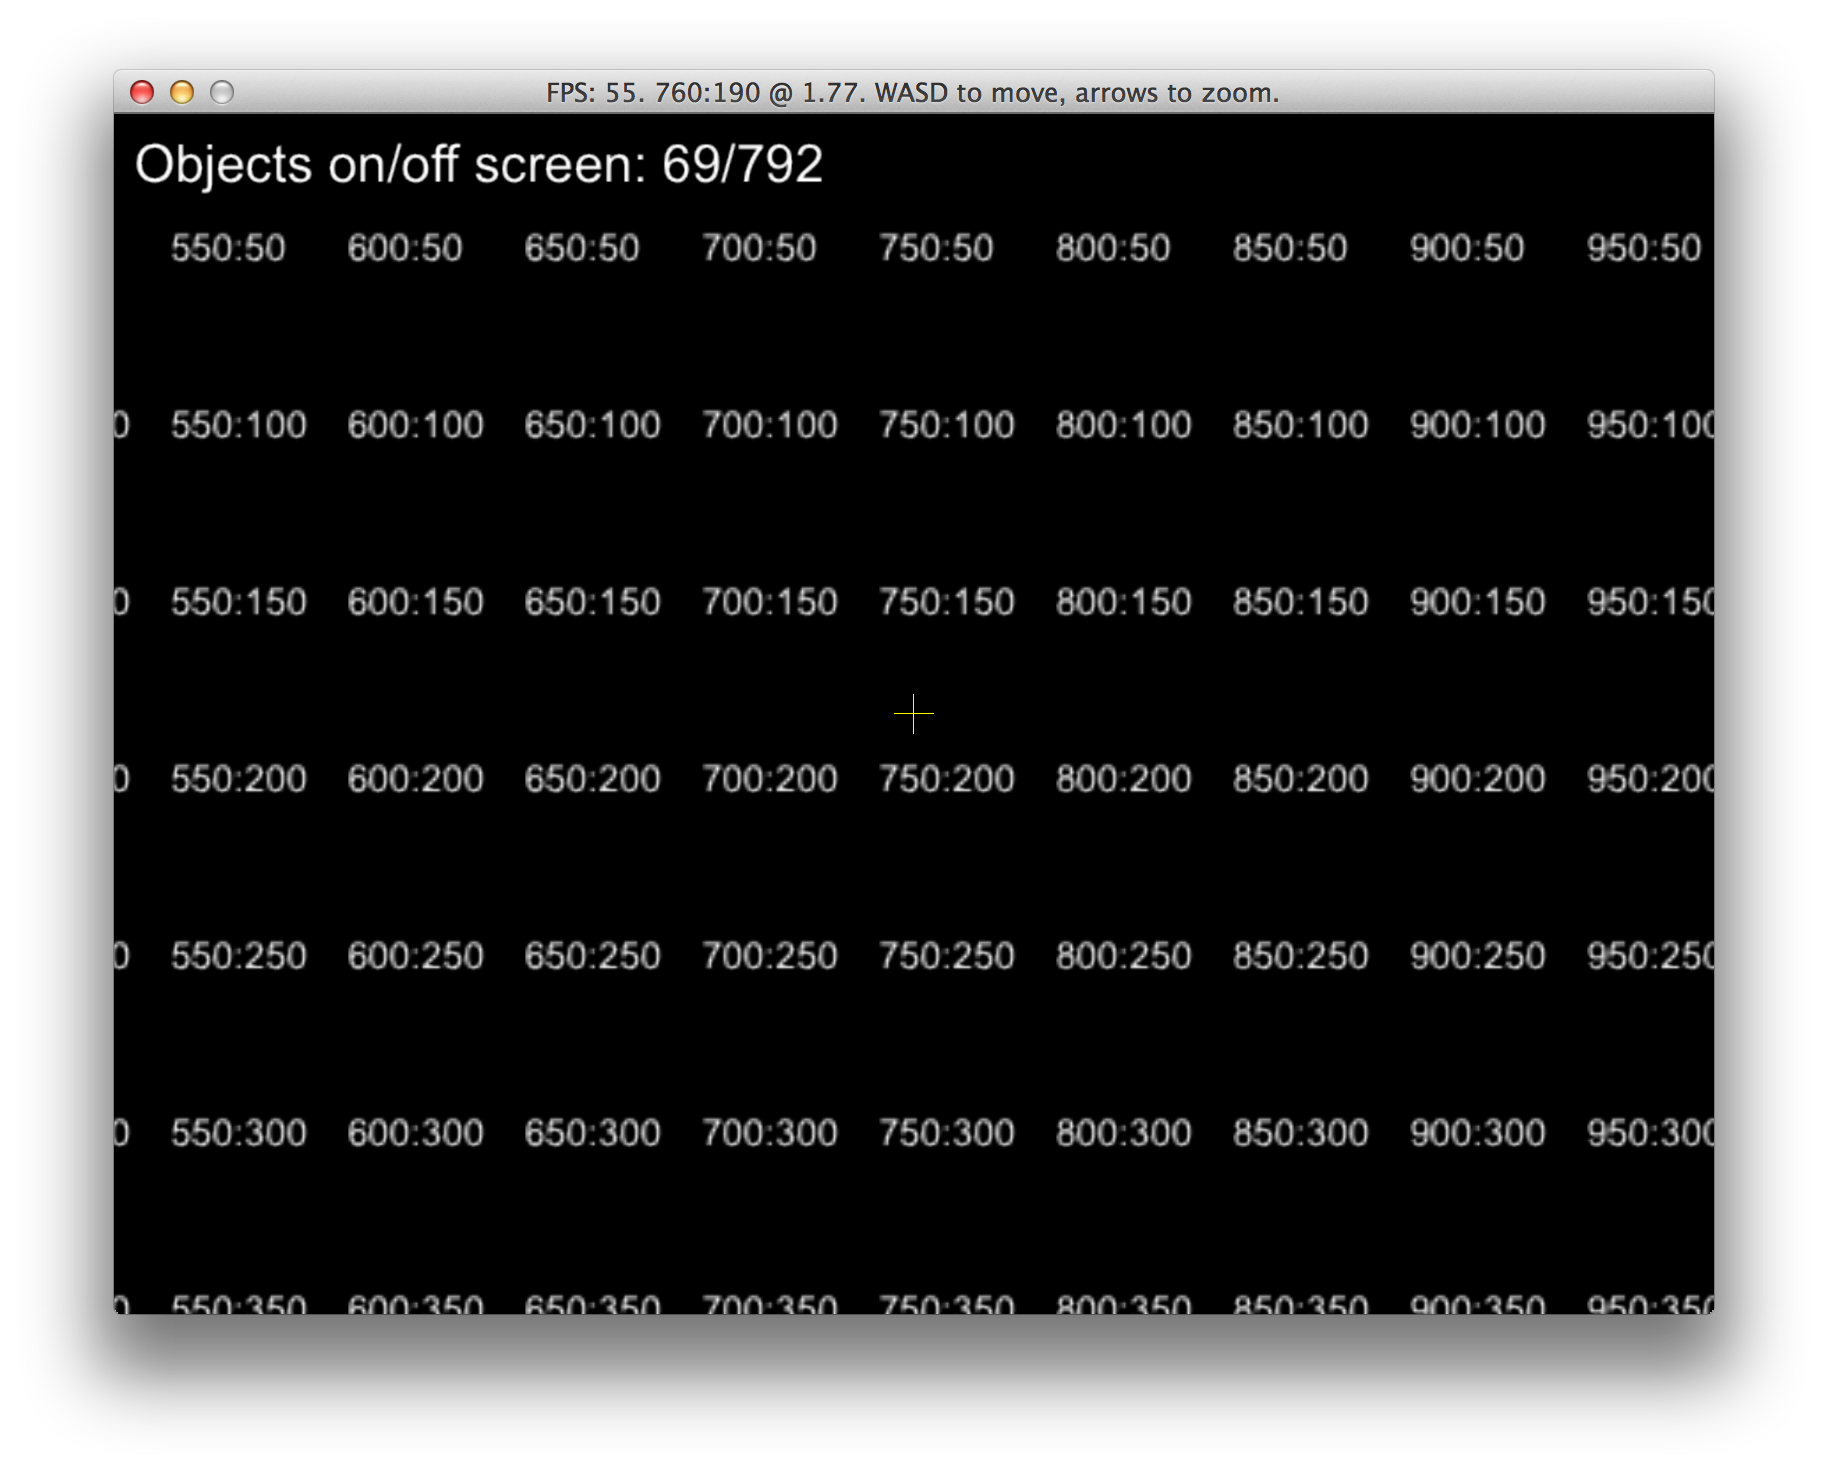
Prototype of separate coordinate systems
Luckily for us, Gosu helps us by providing
Gosu::Window#translate
that handles camera offset,
Gosu::Window#scale that
aids zooming, and
Gosu::Window#rotate that
was not used yet, but will be great for shaking the view to emphasize explosions.