6 Preparing, Firing and Assessing a Grid Set
Glaze Preparation - Volumetric Blending
300 gram Batch Recipes
The first step is to determine the batch recipes of the 4 “corner glazes”. These are the glazes we blend to produce the full set of 35. We usually use 300-gram batches.
The recipes following are batch recipes for the corner glazes for stoneware, midfire and earthenware firing ranges. They are similarly high in lime (CaO) but manage to lower the firing range mainly by addition of B2O3, and substitution of Na2O for K2O. (This can be seen if we convert the recipes to unity formula or Oxide Weight %, but is not shown here.)
All three sets can be used as the basis for further experimentation by replacing some or all of the CaO with other flux oxides. This was discussed in the chapter: “Choosing the Starting Point”.
Glaze C for each of the three sets is shown. Whether we use percentage recipes from the tables multiplied by 3, or the batch recipes from the “Calculations Page”, we should end up with batch recipes for the corner glazes as shown in the 3 tables.
Stoneware Set - The Standard 0.7 Limestone Set: Glaze C: 70% Potash Feldspar, 30% Whiting
| Potash Feldspar | Whiting | Kaolin | Silica | Totals | |
| Glaze A: | 126.0 | 54.0 | 120.0 | 0.0 | 300.0 |
| Glaze B: | 73.5 | 31.5 | 75.0 | 120.0 | 300.0 |
| Glaze C: | 210.0 | 90.0 | 0.0 | 0.0 | 300.0 |
| Glaze D: | 105.0 | 45.0 | 0.0 | 150.0 | 300.0 |
**Midfire Set: ** Glaze C: 50% Nephe line Syenite, 20% Whiting, 30% Frit 3134
| Nepheline Syenite | Whiting | Ferro Frit 3134 | Kaolin | Silica | Totals | |
| Glaze A: | 90.0 | 36.0 | 54.0 | 120.0 | 0.0. | 300.0 |
| Glaze B: | 52.5 | 21.0 | 31.5 | 75.0 | 120.0 | 300.0 |
| Glaze C: | 150.0 | 60.0 | 90.0 | 0.0 | 0.0 | 300.0 |
| Glaze D: | 75.0 | 30.0 | 45.0 | 0.0 | 150.0 | 300.0 |
Earthenware Set:. Glaze C: 100% Ferro Fr. it 3134
| Ferro Frit 3134 | Kaolin | Silica | Totals | |
| Glaze A: | 180.0 | 120.0 | 0.0 | 300.0 |
| Glaze B: | 105.0 | 75.0 | 120.0 | 300.0 |
| Glaze C: | 300.0 | 0.0 | 0.0 | 300.0 |
| Glaze D: | 150.0 | 0.0 | 150.0 | 300.0 |
We can make these up simply as base glazes, or we might decide to put in a small amount of colourant that is going to have minimal effect other than colour. For example, we could add (% cobalt oxide (= 1 gram in a 300 gram batch).
Preparing the Four Glazes
 1. Weigh.
Weigh out the four glazes. In the process of preparing the four corner glazes, try not to lose too much of the 300 grams of dry material. The theory of volumetric blending assumes that we have known weights (in this case, identical weights) in identical volumes. If we lose a lot of one of the corner glazes during preparation, this could affect the result.
1. Weigh.
Weigh out the four glazes. In the process of preparing the four corner glazes, try not to lose too much of the 300 grams of dry material. The theory of volumetric blending assumes that we have known weights (in this case, identical weights) in identical volumes. If we lose a lot of one of the corner glazes during preparation, this could affect the result.
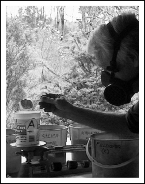
 2. Wet and Sieve.
Add water and sieve. Start with Glaze A and don’t use too much water. Glaze A will usually be the “thickest” of the four glazes (because it contains the most kaolin) and it should be prepared a little thicker than we would normally use for glazing bisque. This means that by the time we make up C and D to the same volume they won’t be too “thin” in consistency.
2. Wet and Sieve.
Add water and sieve. Start with Glaze A and don’t use too much water. Glaze A will usually be the “thickest” of the four glazes (because it contains the most kaolin) and it should be prepared a little thicker than we would normally use for glazing bisque. This means that by the time we make up C and D to the same volume they won’t be too “thin” in consistency.
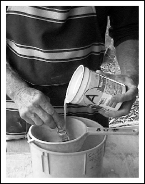
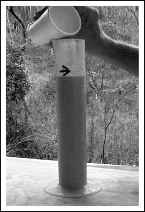 3. Adjust Volume.
Measure the volume of the four glazes with a measuring cylinder and add water to adjust them to exactly the same Equalizing Volume (total wet volume), at least 460ml*. For 300 grams of glaze, the equalizing volume will often be around half a litre (500 ml). [Note that this does NOT mean add half a litre of water to each dry glaze!] Once this is finished the glazes are gently stirred until they are uniform. We now have four corner glazes containing equal dry weight made up to equal wet volume. This simplifies the maths.
3. Adjust Volume.
Measure the volume of the four glazes with a measuring cylinder and add water to adjust them to exactly the same Equalizing Volume (total wet volume), at least 460ml*. For 300 grams of glaze, the equalizing volume will often be around half a litre (500 ml). [Note that this does NOT mean add half a litre of water to each dry glaze!] Once this is finished the glazes are gently stirred until they are uniform. We now have four corner glazes containing equal dry weight made up to equal wet volume. This simplifies the maths.
Blending to Produce the 35 Glazes
We can now blend by volume and the maths is the same as if we were blending by weight. We prepare the remaining 31 glazes (we already have 4) by volumetric blending using the Blending Chart (see next page). It’s important to be accurate and careful in our technique so that the actual recipes of the samples correspond to the theoretical recipes (explained in the chapter: “Working Out the 35 Glaze Recipes”).
Layout. Order is important if we are not to become confused or make a mistake. In the blending and the glazing of the grid tiles, we orient the various “grids”* the same way, i.e. with the “A corner” in the “top left corner”. This avoids a major cause of mistakes.
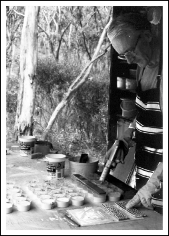
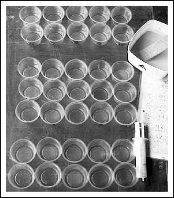
On our workbench, we set out 35 cups exactly as set out on the Blending Chart, in the 5 x 7 format. Write the numbers 1 to 35 on the cups with waterproof marker pen, and also some identification for the glaze set.
The Blending Chart
The Blending Chart on the next page shows how many ml. of each glaze goes into each cup. Note the explanatory key at the bottom of the diagram.
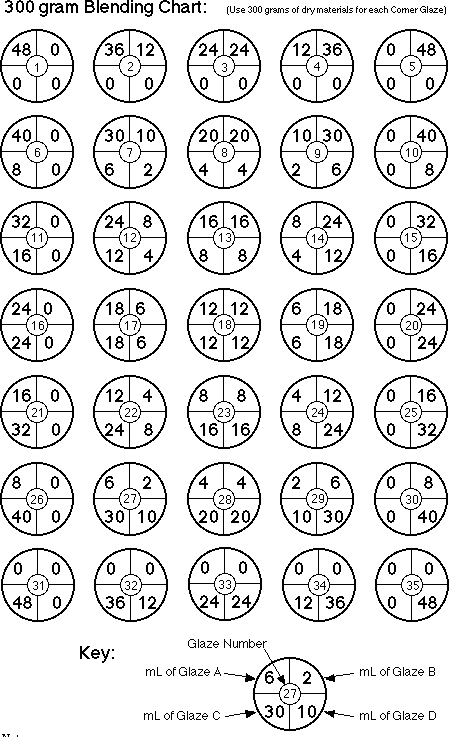
 Measuring with a Syringe.
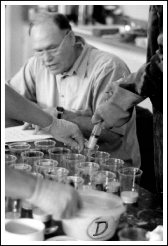
Starting with Corner Glaze A, stir it carefully so it is quite uniform (this is very important), and using a 50 ml plastic veterinary syringe, measure out into each cup the amount of glaze A indicated by the Blending Chart. Repeat for the other 3 corner glazes. (Avoid getting a suspension of fine bubbles in the glaze when stirring as this will affect the accuracy of the volumetric blending.)
Measuring with a Syringe.
Starting with Corner Glaze A, stir it carefully so it is quite uniform (this is very important), and using a 50 ml plastic veterinary syringe, measure out into each cup the amount of glaze A indicated by the Blending Chart. Repeat for the other 3 corner glazes. (Avoid getting a suspension of fine bubbles in the glaze when stirring as this will affect the accuracy of the volumetric blending.)
If any of the corner glazes are at all watery, do what is required to keep them uniformly suspended, e.g. gentle stirring. Also don’t allow the glaze to settle in the syringe. Glazes C and D will often be a bit watery and settle quickly because they contain no kaolin. The corner glazes must be evenly mixed and uniformly suspended during the syringing process.
 Teamwork.
If working in a team of 3 or 4 people, we can break up the jobs thus:
Teamwork.
If working in a team of 3 or 4 people, we can break up the jobs thus:
Number 1 works the syringe.
Number 2 keeps track on the blending chart and points to the appropriate cup.
Number 3 keeps the corner glaze suspended if necessary by gentle stirring.
With 4 people we can sometimes work efficiently as two teams, each measuring out two of the corner glazes.

Precautions in the Preparation Stage
The main source of error in this method is someone getting confused. If we are working in a group, we put the control freak in command of this stage! :) It’s particularly important that we take great care from the time we start to weigh out the corner glazes until the time the blending is finished. Any error in this period could affect most or all of the set. There are a number of ways we can ensure that we have done the experiment correctly…
1. Double checking. Make absolutely certain that weights, materials and blending are correct. When applying the 35 glazes to the grid tile (described below) make sure they are applied in the correct order. It is easy to make a mistake. If working in a team have someone double check every action.
 2. Visual Order.
In the 5 x 7 layout of the cups, break up the 7 with one or two gaps across the set. This helps us to keep track of where we are.
2. Visual Order.
In the 5 x 7 layout of the cups, break up the 7 with one or two gaps across the set. This helps us to keep track of where we are.
3. Colour code the blending chart On the blending chart, use 4 colours (e.g. highlighter pen) to colour code the 4 corner glaze ml amounts.
4. Keep the corner glaze suspended Put the corner glaze being syringed into a reasonable large (e.g. 2 litre) container. This makes it easy to stir, easy to syringe, and easy to check there is no glaze settling out. We do this by tipping (without the glaze pouring out!) and checking the base of the container.
 5. Check liquid level in the cups.
After blending squat down so the eye is level with the liquid level in the cups, and make sure they all have the same volume. We need identical cups that are transparent or translucent for this. Read to the top liquid level, not to the solids which may have settled. If any cup shows a liquid level higher or lower than the rest, discard the contents, and use the excess corner glazes to blend it again.
5. Check liquid level in the cups.
After blending squat down so the eye is level with the liquid level in the cups, and make sure they all have the same volume. We need identical cups that are transparent or translucent for this. Read to the top liquid level, not to the solids which may have settled. If any cup shows a liquid level higher or lower than the rest, discard the contents, and use the excess corner glazes to blend it again.
Applying the Glazes to the Grid Tiles
Adjusting Water Content
Once the blending is finished, let the 35 glazes stand if possible for an hour or so. Now that the blending is completed it is allowable to add (or remove) water to the 35 glazes to get a good consistency for applying them thickly to the grid tiles. This may mean decanting water off the bottom few rows (low kaolin) and/or adding water to the top few rows (high kaolin). The kaolin functions as a suspender and thickens the glaze. It varies from zero to 40% across the set, and so the glaze water content usually needs to be adjusted in some of the glazes after blending and before applying to the grid tiles.
ID
Print the necessary identification (identification of the set at least, possibly student’s name as well) on the border of each tile using iron oxide or underglaze pencil. ( If the tiles are to be fired in stacks, then don’t write underneath the tile in oxide lest it might fall onto a glaze underneath.)
Layout
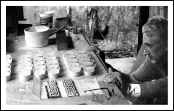
Set out the grid tiles ready for glazing. Some of the tiles should be white clay, some iron-y clay. Orient the tiles to correspond with the layout of the glazes on the bench. The “A” marked in the top left corner of each tile corresponds to Corner A (Glaze No.1).
Glaze Application
Stir each glaze before applying it to make sure the blend is mixed together properly.
Apply the glazes one at a time using a well-lubricated syringe, or a small spoon. A syringe is quick as we can apply the glaze to a number of tiles one after another, but it MUST be well lubricated or glaze will squirt into other compartments on the grid. (A smooth action is usually facilitated by putting Vaseline on the plunger.) Try to get thick and thin application with each glaze; thick should be about 2 mm thick. This is important. Use a needle to check it. First apply the thin layer all over the compartment. Once the water is sucked into the bisque and the glaze “set”, apply the second thicker coat covering about half the area.
Tips:
- If the glaze consistency is too thick, it goes on rough and lumpy. This can be a problem for non-runny glazes because the glaze does not smooth out in the firing. If the consistency is too thin or runny, it can be hard to get adequate thickness. Experiment with glaze consistency. It should be possible to apply the glazes with a veterinary syringe without much trouble (assuming we are using 200# (200 mesh per inch) or finer materials).
As we syringe the glaze onto the grid tile, it should stay wet for long enough to form into a reasonably smooth layer by liquid surface tension. If it “sets” too quickly add more water.
- Different Syringes. Some designs work better than others. Some are more easily lubricated than others.
- Often the syringe will squirt out of control during glaze application. Hold the syringe at an angle such that it does not squirt onto previously glazed compartments. One person in the team should have the job of cleaning up mistakes like this.
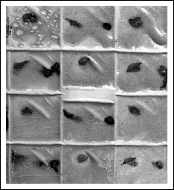
Applying Colouring Oxides (Optional)
We may prefer to fire the glazes as mixed. If however we decide to apply brushstrokes of one or more colouring oxides to the set, this should be done with great care. The main concern is not to swamp the information contained in the systematic variation of fluxes, kaolin and silica. Leave most of each glaze sample untouched, and apply the colourant to only one or two of the grid tiles for the set. Leave the rest plain.
- Apply only a very small dot of colourant with the tip of a fine brush.
- There is usually very little change between adjacent glazes, so there is no need to apply it to more than every second glaze (in both directions).
After the firing, study the oxide dots with a lens. Any colour variation around the edges of the dot gives a hint to what we will achieve if we blend that oxide into the base glaze. It doesn’t tell us how much of the oxide to add, but it does usually indicate if it is worth experimenting more for example with a line blend addition of the oxide to the glaze.
Firing the Grid Tiles
Firing Type
As mentioned elsewhere, there is no correct firing type for any particular set. There is a firing that will produce maximum interesting glazes, one that will produce maximum information for the student trying to understand the way glazes work, and a firing that will reveal those glazes well beyond the usually accepted boundaries… and these are probably all different firings. That’s why we make several replications of the same set. In a grossly over- or under-fired grid tile, there may be just one glaze that makes the whole exercise worthwhile. It’s impossible to know where the real successes will occur, but the “wide net” approach of the systematic method with the grid tiles ensures that if there is anything there, we can find it.
Fast Firing/Slow Firing
There are some glazes that are favoured by quick firing or cooling, but in an experiment like this it narrows the range of possible results, and some qualities simply cannot be achieved. Glazes go through a physical process of fusing, melting, bubbling and smoothing out and at stoneware temperatures attacking the clay body. These things take time. Also crystal growth within the glaze or the clay/glaze interface takes time. Sometimes you have to slow or stop the cooling process at certain temperatures to get certain crystalline effects.
Slow Maturing - Try soaking at the end of the firing. In a cone 10 firing for example, ease back towards the finish so that it takes about an hour from cone 9 to cone 10.
Slow Cooling - Small kilns may have to be fired down to slow the cooling process. This can be done manually, or with a programmable kiln it is possible to set it to do the soaks and slow cooling as part of the firing cycle. Cool at perhaps 100 - 200 deg. C an hour. Alternatively a 30 to 60 minute soak at around 200 - 300deg C below the top temperature can have interesting and beneficial effects.
A similar effect to slow cooling can be achieved with some glazes by re-firing in a bisque. The red colour in shino glaze often benefits from this.
Draw Trials
Draw trials are samples that are taken from the kiln during firing. They give a “snapshot” of kiln/clay/glaze conditions at the time of drawing. They can be used for judging when to finish a firing and for studying the firing and glaze/clay maturing process.
They are particularly useful used in pairs with one left in the kiln to study the role of soaking, fast cooling etc. One can even take out small grid tiles. Any difference found between the pairs of glazes indicates something that can be manipulated by adjusting the rate of cooling.


Virtually Identical Firing Conditions
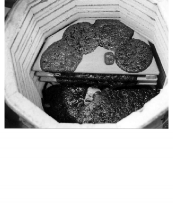
One of the advantages of using the grid tiles is that we can fire many glazes under virtually identical conditions. This removes the firing as a variable and helps analysis of the results, as we know differences are caused by the chosen variables, and not by extraneous firing variables. In this chapter we are preparing just one set of glazes, but if we embark on a serious course of study, we might soon have a number of sets to fire. We can stack different sets on top of each other, leaving plenty of room for air circulation. Separate the tiles with dobs of kiln wadding about 10mm thick. At stoneware temperatures we may need up to 12 dobs so the tile doesn’t warp too much - 10 around the edge, and 2 in the central area on the raised pads. The number depends on how vitreous the clay becomes in the firing.


Some Aids to Uniform Firing Conditions:
1. Put a spare grid tile on the top as a lid.
2. Avoid resting the bottom tile directly on the kiln shelf, or it will cool slower than the rest.
3. Avoid areas within the kiln where there are steep gradients of temperature etc.* In a small uneven kiln we can help uniformity of firing conditions by using baffles or a saggar.
4. Ensure enough space between tiles for adequate circulation.
A> * We might use these areas sometimes to explore the extremes, but we should be aware if there is likely to be a temperature or other gradient across the grid tile.
At least one set of cones is placed with the stack.
Normally we would fire at least 2 of the tiles, in white and dark clay, more if we have hot and cold spots in the kiln. Store the others to fire under a range of different firing conditions whenever possible.
Bring out the Differences
There are a few precautions worth mentioning that will help us get the most out of each set. A number of things can mask the subtle variations between one glaze and the next in a set, and make them all look very similar.
Glaze Thickness
If the glazes are put on only thinly, this will mask differences. Certainly we do want to see what each glaze looks like thinly applied, but it is most important that we also apply each glaze thickly in part.
Glaze Type. Some glazes are overwhelmed by some ingredient. For example, we can make an interesting set based around a high percentage of manganese oxide to produce bronze and gold metallic glazes. Even if the manganese is treated as a flux (it is a flux as well as a colourant), which means that by this method, it varies substantially across the set, the metallic nature is overbearing, and very little variation occurs across the set.
Clay body
Sometimes a clay body is so powerful in character that it overpowers the glaze. For example bodies with high content of iron oxide, especially if fired in reduction where the iron acts as a flux, can turn most of the 35 glazes in a set into similar iron glazes. On the other hand, the iron-y body can sometimes bring out some interesting quality that is absent on the white clay.
A highly textured clay will sometimes overpower subtle glaze features.
Firing
{float=left}
 Too fast firing, too little soak at top temperature, and too fast cooling can all prevent features from emerging. The glaze maturing process takes time; colour-break from the development of the clay/glaze interface zone, the formation of crystals in the cooling and many matt effects… all take time and all contribute to the production of a greater range of interesting features.
Grossly over- or under-firing will usually limit the range of glazes obtained from a set, but will sometimes reveal useful glazes at the extremes of flux, alumina or silica content that might not be discovered otherwise.
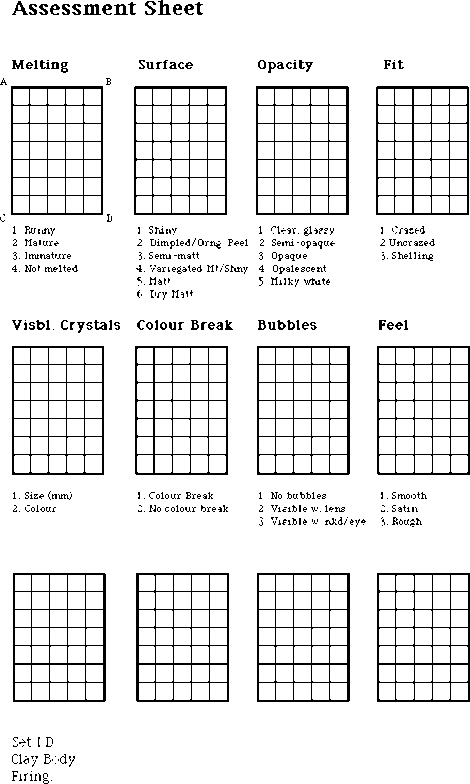
Assessing the Results
 Once the tiles are drawn from the kiln the job of assessment can begin. With this method there are two levels on which this can occur.. firstly the matter of looking for useful, interesting or beautiful glazes. This is the same in any glaze research. However as a result of the systematic variation of important variables, this method also has the potential to reveal much more. I’m referring to the way cause and effect principles can be revealed when our research has been systematically organized.
It’s important to preserve all details of glaze, clay and firing. This is a matter of thorough and conscientious recording.
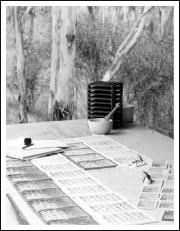
For the beginner it’s really useful to plot out results on an Assessment Sheet. Some things are obvious when we look at the grid tile. However some characteristics such as crazing in a dark glaze can only be seen with a lens, and to understand the way crazing changes with varying alumina or silica we have to examine each glaze individually and record whether or not it is crazed on the assessment sheet. We use a different grid for each characteristic, and write a number inside each square corresponding to the property for that glaze on that tile. Use a copy of the assessment sheet on the next page to aid in developing your ability to assess the results.
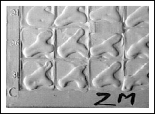
Assessing Glaze Fluidity from the Grid Tiles
One problem with the horizontally-fired grid tiles is seeing how the glazes perform on a vertical surface. The four images here illustrate how we can estimate runniness from the grid tile data.
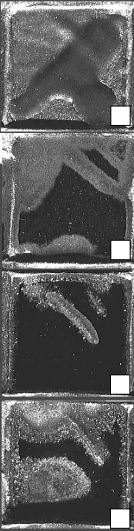
These compartments are 1 inch (25 mm) square. The glaze was applied all over thinly, then a second thick layer was applied in the pattern clearly evident in 1, and still visible as the dark area in 2.
- A very stiff glaze does not thin out over the ridges. (Note the two diagonal ridges in the top right-hand quarter of each compartment.) The glaze does not flow sideways. Thick-thin application is obvious.
- Medium-stiff glazes thin out over the ridges and smooth out, but one can still make out thick and thin application, especially with a non-opaque glaze.
- Runny glazes smooth out to obliterate the difference between single and double application.
- Extremely runny glazes usually reveal themselves by surface tension effects, the glaze leaving bare patches and being drawn up into the edge-angles of the grid compartment.
These examples give a rough guide to glaze runniness. It is not a good idea to assume that our new-found glaze will not run until flow tests have been tried on a small pot or vertically fired tile! See the box: “Dealing with Runny Glazes” on the next page.
Dealing with Runny Glazes
The Next Step
The main purpose of the grid tile is discovery. The normal process of testing individual glazes on larger samples, small pots etc. is still required unless we are willing to risk ruining valuable work and kiln furniture. This process is widely understood and not covered in this text.
Unusable or Dangerous Glazes
Exploring the limits as we do with this approach will always turn up unusable and sometimes even dangerous glazes. Glazes might be under or over fired, poisonous or water-soluble. Sometimes poor glaze fit might cause a pot to shatter in use, or to “shiver” causing the glaze to be shed in dangerous fine shards. There is more in the Appendix on utilitarian risk.