2 Outline of the Grid Method

The 3 main variables in the base glaze are fluxes, alumina and silica. The power of this method comes from the systematic variation of these variables using a standardized and simplified experimental approach.
The Standard Grid
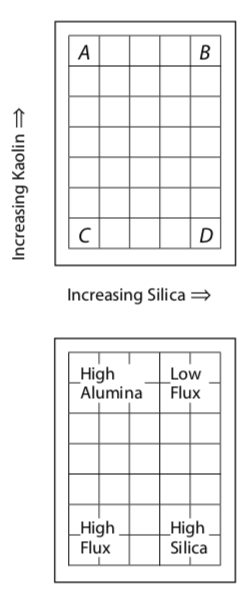
Varying Alumina and Silica: The central experimental format is the “grid” of 35 glazes on one large tile in a 5 X 7 layout displaying 2 of the 3 main variables:
1: alumina increasing from bottom to top (as a result of increasing kaolin) and 2: silica increasing left to right.
Varying Fluxes: In any one set, the proportion of flux materials, one to another, remains constant. To alter this third variable, we have to do a different set of 35 glazes.
In the second diagram we can see four zones that result automatically from the way we have increased the alumina and silica. The zone in the middle of the set can usually be regarded as “well balanced” glazes, or in other words, not “high” or “low” in anything. Don’t forget that all the glazes contain fluxes as well.
Starting Point
An examination of these two diagrams will show that corner C has minimum alumina and silica. To understand the grid method this is where we start; the glaze in this corner is a mix of just “flux materials”. We refer to Glaze C as the “Starting Point” for the set. For example it might consist of 70% feldspar plus 30% whiting*.
Varying Alumina and Silica
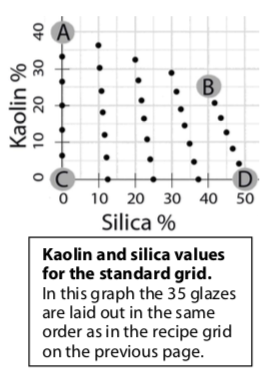
Starting in Corner C made from just flux materials we add in silica (or quartz or flint - these are all more or less pure \(SiO_{2}\)) to move from left to right across the grid. We add kaolin (our source of variable \(Al_{2}O_{3}\)) to go from bottom to top. The 35 glazes are always related to each other in exactly the same way. Essentially, the kaolin and added silica percentages across the grid are the same in every set. These percentages are laid out in the Standard Recipe Grid (see the next page).
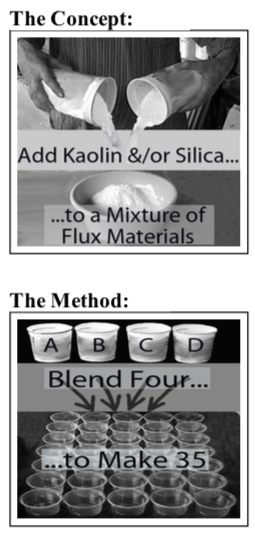
To understand the relationship between the 35 glazes, imagine this: Initially we decide on the composition of glaze 31, the starting point glaze, which is composed of 100% flux materials. We could obtain the rest of the 35 glazes in the set by adding kaolin and/or silica to Glaze 31. Therefore the flux materials don’t change as kaolin and silica increase. But this is not how we actually prepare the glazes…..
To prepare a set, we make up the 4 glazes at the corners of the set, numbers 1, 5, 31 and 35, and blend them to produce the rest. [This is just to prepare the set of 35 glazes. Glazes that we might choose from the set to use in larger quantities are prepared in the normal manner. See Chapter 4 for the recipes.]
One set represents the “story” of the set of flux materials originally chosen for glaze 31, examining how it changes as we increase alumina and/or silica.
The Standard Recipe Grid (base glazes)
Glaze Recipes and Glaze Numbering: This diagram shows the recipes for each glaze in the grid (to the nearest 1%). It also shows the standard layout of the glaze numbers from 1 to 35. This layout does not change. [*Note below: “ Fl.Mtl.” = “Total Flux Materials”]
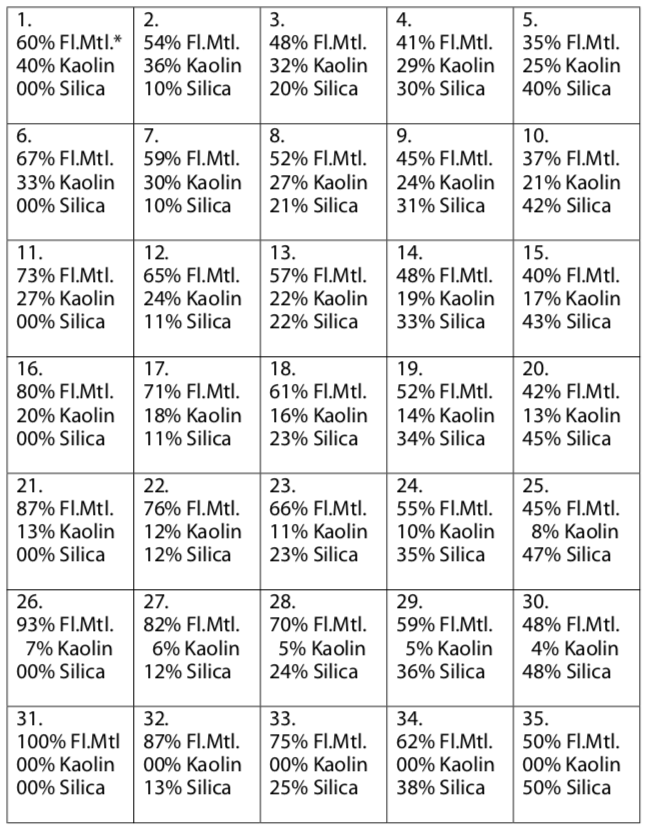
Note the following in the Standard Recipe Grid: 1. Glaze 31 is 100% flux materials. This is Corner C. 2. The bottom row contains no kaolin. 3. The left-hand vertical row contains no added silica. 4. The maximum amount of kaolin is 40% in Glaze No.1 (Corner A). 5. The maximum amount of added silica is 50% in Glaze No.35 (Corner D).
Working out the Flux Material Breakup
One of the important features of this method is that the percentages in this recipe grid do not change, irrespective of the flux materials used. If the set uses only one flux material, then these are the final recipes… for ANY set. Usually however there is more than one and we have to find the breakdown of flux material. There are several easy ways of doing this, and these will be given in a later section.
One Glaze Recipe Explains the Whole Set
Another result of using this approach is that all the glaze recipes can be worked out once we know the recipe for the Corner C glaze. This is a natural consequence of standardizing the method. This means the only recipe we need to record is Glaze C. From this anyone understanding the method can work out the rest of the 35 recipes if and when required. It also means that we can think of a whole set of glazes just by stating one recipe, Glaze C. We can compare whole sets of glazes one with another just by comparing the C-corner glazes; the difference between sets can be fully understood by examining the difference between the two C-glazes. This is because a particular glaze number always has the same amounts of kaolin and silica in the recipe.
Colourants and Opacifiers in the Standard Grid
It is important when designing an experiment to separate out the variables. In a two-dimensional grid format experiment we can cope with a maximum of 2 variables - for example, silica increasing from left to right and alumina from bottom to top. If we decide to add colourant or opacifier to the standard grid as outlined here, we simply add the same percentage to each of the 35 glazes. This means that the addition of colourant or opacifier is not a variable in this experiment of 35 glazes.
The general rule that will apply for this method is that colourants and opacifiers will be added as a percentage on top of the 100% of the base glaze. See the following example.
Glaze Recipe:
100% Base Glaze
+10% Red iron oxide
Revealing Glaze Principles
As well as discovering interesting glazes, the standard grid method also reveals glaze principles because wherever possible we are separating out the variables. This reveals cause and effect. For example, a glance at a fired standard grid tile reveals immediately the effect of altering alumina or silica on a given set of fluxes. Also, we can see the effect of altering fluxes by comparing the grid tiles for 2 different sets, if they have been fired on the same clay under identical firing conditions.