5 A Guided Tour
Isolating Variables
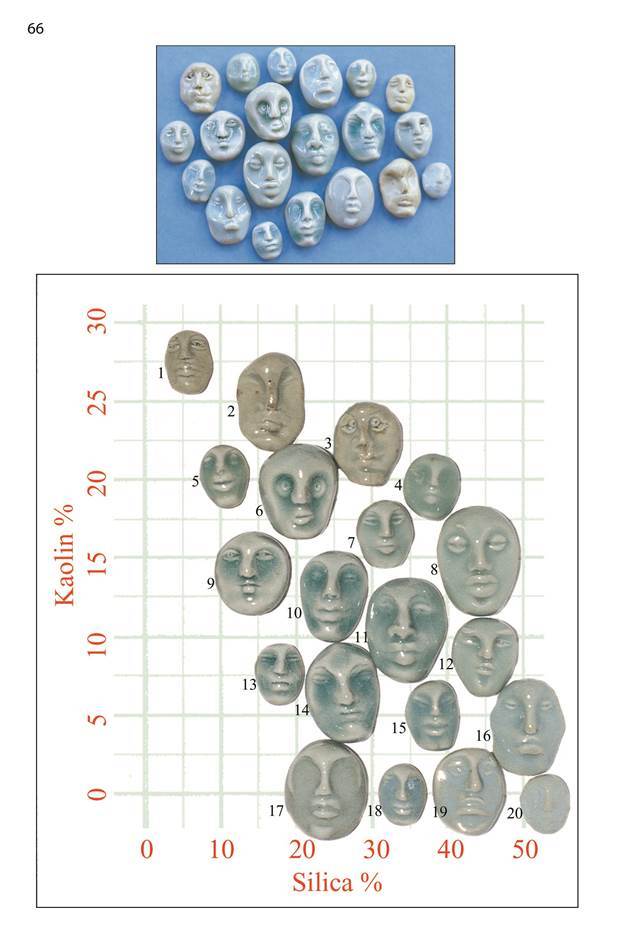
The page opposite shows two photographs of the same set of glaze samples. If we are provided with all the recipes and details of the clay body, firing etc. then a competent potter could reproduce the glazes. But looking at the first photograph where the heads have been jumbled at random, we really can’t make much sense of why the glazes are different. Looking closely at the recipes we will find the glazes are very similar; they all have the same amount of black iron oxide (1%) and if we bothered to do the calculations we’d find they all have feldspar and whiting in the ratio of 7 to 3. The only thing varying is the amount of kaolin and silica in the recipe. This is interesting, but is not much help until we rearrange the heads as in the second photograph, placing them in their correct positions on the kaolin/slica graph.
Suddenly we can see trends and zones of similarity, and we can come to conclusions regarding cause and effect. In this case we can reach some conclusions about the role of kaolin and silica in celadon glazes.
We can see that high kaolin celadons can develop a brown or greyish tinge, high silica can cause opalescence and eventually opacity. We can see how to manipulate crazing and bubble size and density. Although it’s not obvious on the photograph, we can easily determine trends in melting point and glaze stiffness or runniness. The interesting question to ask is “Where did all this extra knowledge come from?” All the glaze recipes and other information necessary to reproduce the glazes was provided, but only now we can start to reach conclusions about glaze principles.
It comes from the order we put into the experiment. In particular it comes from isolating variables, in this case kaolin and silica, and displaying them appropriately. Looking across the graph from left to right the only variable is added silica. Going from bottom to top the variable is kaolin.
Standard Limestone Set (The 0.7 Limestone Set)
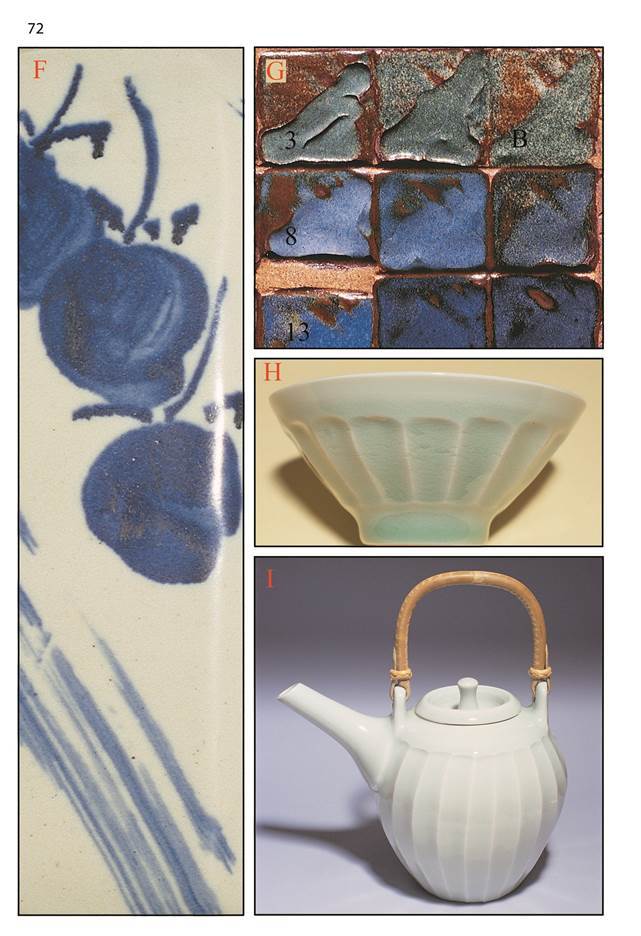
All the glazes of the opposite page have the same set of stoneware flux materials, namely feldspar and whiting in the ratio of 7 to 3. The enormous range of qualities is the result of varing additions of kaolin and silica and also two colourants and one opacifier. This set of glazes was first mentioned in the book Introduction and is used throughout as a standard or reference set. For anyone wishing to come to grips with glaze principles it is an excellent place to start. The stoneware set is the “standard” set, but similar sets are offered on page 99 for midfire and earthenware temperatures.
The Starting Point Glaze (No. 31) for the 0.7 Limestone Set is:
70% Potash feldspar
30% Whiting
This is the recipe for Corner C for this set. The rest of the set of 35 recipes can be obtained by adding kaolin and/or silica to this glaze.
Glaze No. 18 - This glaze right in the middle of the set is almost identical in composition to the standard limestone glaze used by Mr.Onishi as his reference glaze. (See page 15) At cone 10 this is a stable, stiff (non- runny), reasonable transparent and shiny glaze free of crystals. On most stoneware bodies it is uncrazed. By today’s standards it is a fairly uninteresting glaze unless we add colourants or opacifiers. It is however a stable and reliable glaze.

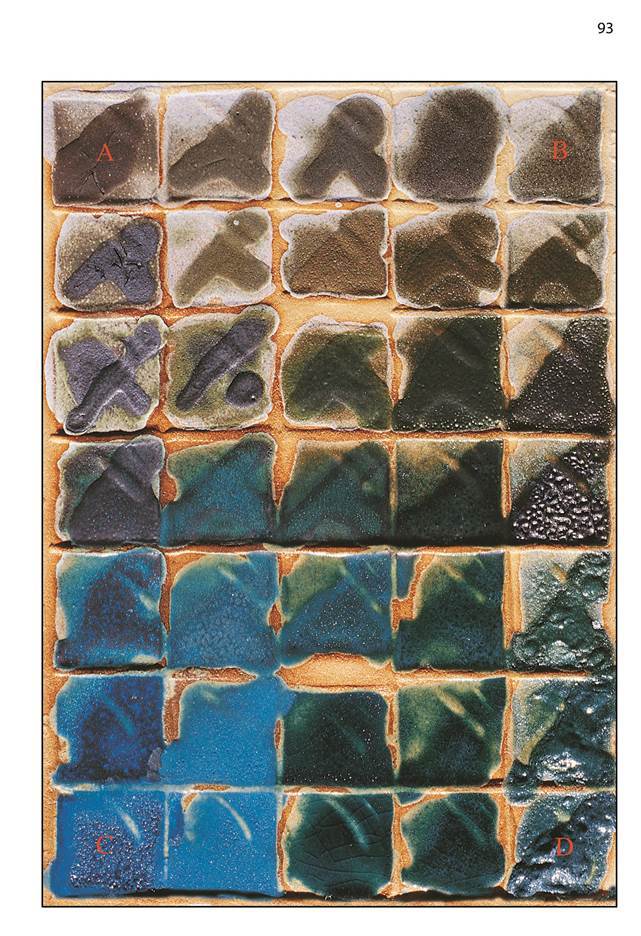
Corner A - High Alumina
The high alumina corner at stoneware or midfire is typified by dry or matt glazes that are semi-opaque or opaque. They are stiff and the high kaolin content often causes the glazes to crawl unless some or all of it is calcined. Over a dark body, these glazes usually exhibit colour- break (colour changing sharply) where glaze thickness varies. They are often uncrazed.
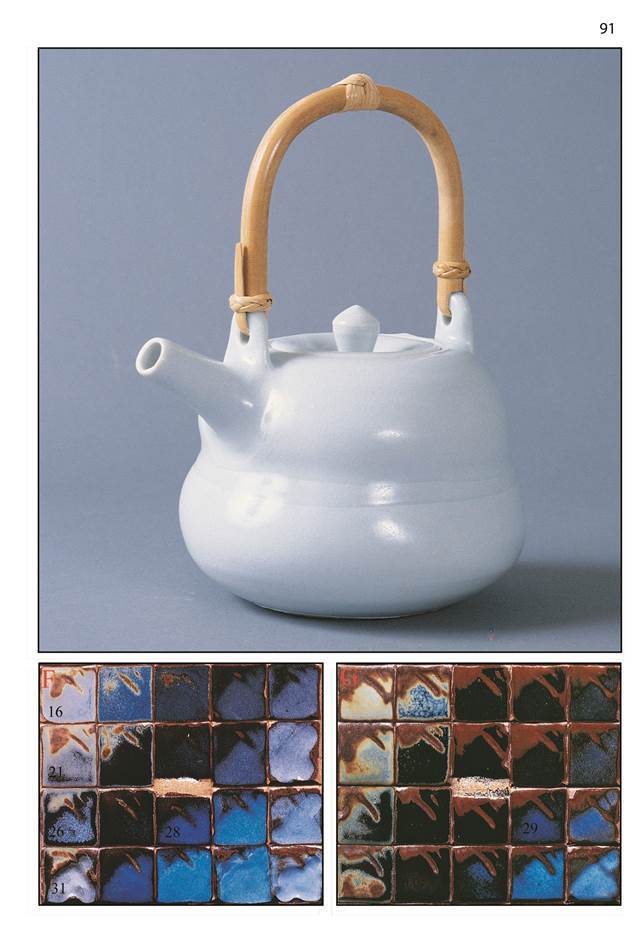
If most of the glazes in a grid tile are mature (properly melted), then moving from the middle of the grid towards A we move from shiny to matt glazes, passing through a zone of semi-matt that will often have subtle and rich surface qualities. The teapot on page 91 illustrates such a glaze.
At earthenware temperatures matured alumina matts usually don’t develop. Dry matts are possible however.
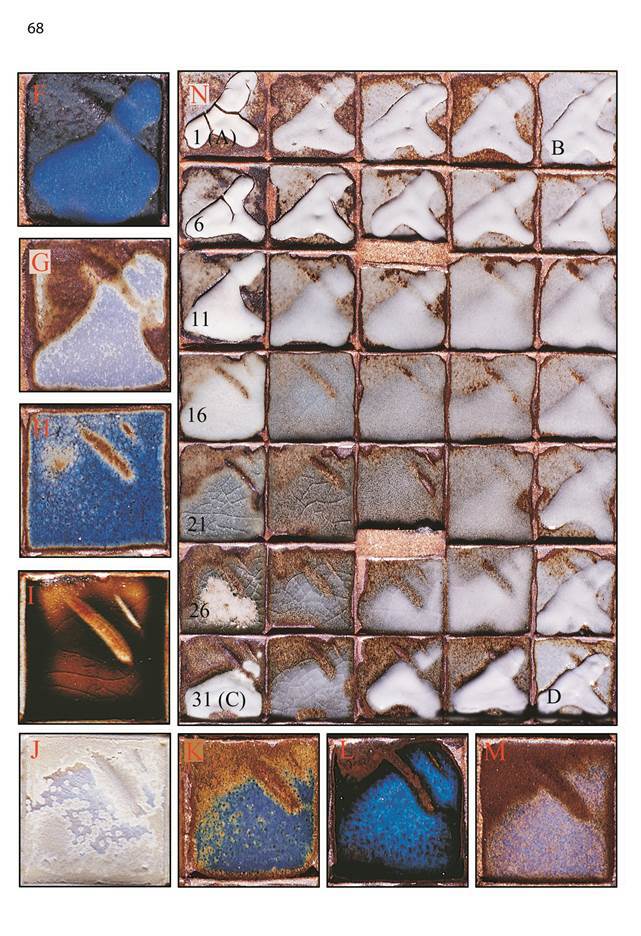
When a grid tile is fired high enough, there is often a zone of shiny transparent glazes extending from C diagonally to B. This table outlines some of the differences between B-corner and C-corner glazes:
| B Low Flux | C High Flux | |
| Melting Point | High | Low |
| Firing Range | Wide | Narrow |
| Runniness | Stiff | Runny |
| Pigments | Stable | Unstable |
| Crystals grow | No | Yes |
| Crazing | Less | More |
| Durability | Strong | Weak |
| Reaction with body | Normal | V. reactive |
Corner B - Low Flux
The low flux (high alumina / high silica) corner is typified by stiff, stable, semi-opaque slightly immature glazes that are uncrazed. They mature if fired high enough, and become transparent (assuming no opacifying additions) and shiny. The stiffness and stability make them good for use with colouring oxide application where it is desirable that the colourant not move or flow.
The diagonal zone between corner B and glaze no.18 (the middle of the set) is good for choosing a stable uncrazed liner glaze that is reasonably resistant to chipping and scratching (depending on glaze fit). This area is in fact the source of many strong, stable and dependable commercial glazes. The downside is that the glazes can be somewhat lacklustre, or not so interesting. As in so many things, there is a tradeoff between dependable and exciting!
Corner C - High Flux
The high flux glazes are in many respects the opposite of corner B. (See the comparative table on page 73.) They are very runny once they have melted, are crazed, soft (easily chipped or scratched) and applied colouring oxides flow and diffuse away. In extreme cases they are water- soluble. They often develop “stringing” or “webbing”. They are highly sensitive, mobile glazes that often develop crystals, unusual colour responses from colourants and often provide very interesting effects.
Soda Glazing and salt glazing will convert many glazes into a “Corner C” type exhibiting high- flux characteristics. (See J). Also, C-corner glazes will often flash or thinly glaze the surrounding bare clay with volatile fluxes like soda, lithium, barium etc. evaporating from the applied glaze during the firing.
One might imagine that glaze 31 would always melt first. After all it does contain maximum flux material, and the fluxes are there to facilitate melting. Paradoxically many of the flux materials have very high melting points and are themselves “fluxed” by alumina and silica. Glaze 31 (C) will be first to melt only if it contains enough low melting flux material, such as a frit. However it will melt well before the other corners.
Corner D - High Silica
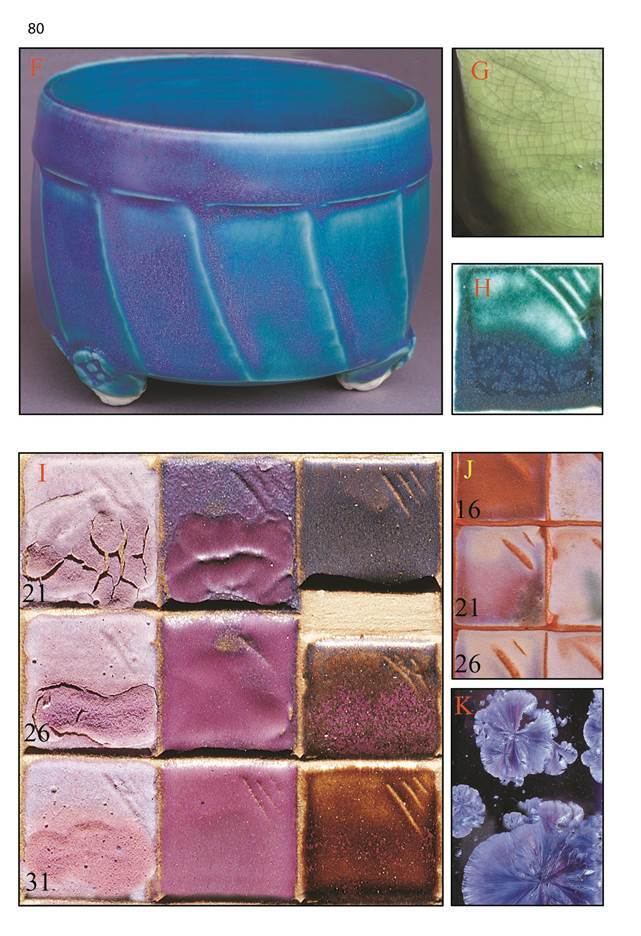
There is normally a transition from underfired glaze right at D through to shiny transparent glazes towards the middle of the grid. This is evident in K opposite. (Note: 23 is a very dark transparent glass.) Next to D is a zone of opaque glazes, white in the absence of colourants. They may have a shiny sugary surface. Between the opaque zone and the transparent is sometimes a zone of opalescent blue glazes, e.g. 28 in K. In high fired reduced glazes these are helped by titanium (on page 87 compare tiles H and I) and iron oxide. The iron can be from the body, or a slip or glaze underneath. In lower fired oxidised glazes zinc and boric oxide help to produce a milky opalescence; on page 87 see tile F, glaze 21. (At lower temperatures the effect is not necessarily near D; the pattern of zones is not as consistent. However these glazes are still apparently a transition between the higher-silica opaque and the transparent glazes.) Here the addition of titanium (page 87 tile G) added to the zinc and boric oxides opacifies most of the glazes pushing the opalescent zone right across to the upper left.
High frit/high silica glazes often bubble and fail to smooth over. The bubbles can be smoothed with a grinding stone and/or abrasive paper. This sort of glaze is usually not very stable. Don’t use them inside functional pots. See G.
The lizard skin texture in I is usually associated with A-corner glazes high in raw clay, however diatomite shrinks like a clay, so it can be used to achieve this effect in the D-corner. Here the silica in a chun-glaze recipe has been replaced by diatomite. There is some difficulty getting it to stick on a vertical surface.
Increasing silica in the glaze usually (not always) decreases crazing.
Magnesia Glazes
The white glaze on Craig Martell’s cup (F) displays several of the typical characteristics of magnesia glazes: 1. A beautiful satin matt surface. 2. A lilac colour with cobalt pigment (small squares to the left) 3. yellow “teadust” crystals with iron oxide (on the bottom where it mingles with the black tenmoku glaze). These three things are caused by the production of pyroxene crystals, which are favoured by medium-to-low alumina and medium-to-high silica, so high silica matts are possible. High alumina magnesia matts work too, but tend to easily go shiny and craze if overfired.
Light magnesium carbonate causes crawling if used in excess (see G). This crawling does heal over more or less with higher firing (unlike the crawling caused by for example colloidal zinc oxide).
I: The dramatic development of pyroxene crystals on this sample is probably caused by a combinatinon of slow cooling and the choice of clay. Some rough clays seem to promote large pyroxene crystals in magnesia glazes.
Substituting magnesia (from talc, magnesium carbonate or dolomite) for some other fluxes can reduce crazing.
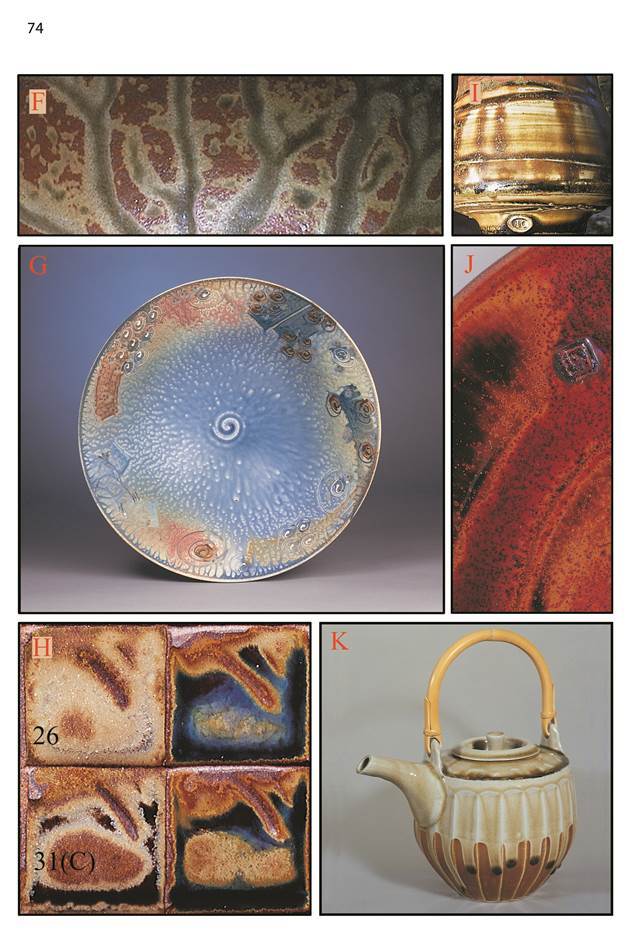
Strontium Glazes
A relatively recent addition to popular use, strontium is sometimes dismissed as similar to lime or barium. Most fluxes can be substituted at times with little change to the glaze, but to get the big picture, the grid method is hard to beat. The segment shown in L shows some interesting features, including some reliable macro-crystals in 24 and 29, turquoise in many of the glazes (an alkaline colour from the copper) and an interesting overload in the low silica zone (A to C) from the copper. There is no matting on the high silica side, only a sharp transition from shiny to underfired. Some of these characteristics are similar to barium, but a grid tile substituting barium for strontium is quite different.
Barium Glazes
Barium carbonate produces excellent matt glazes in the low silica zone of the grid (corner A to corner C). The mattness persists even when the glazes are overfired and runny (c.f. magnesia).
Barium promotes alkaline colours such as turquoise or other blues from copper (see F and H), and pale apple greens with a small amount of chrome oxide (G).
In combination with zinc, pinks and blues are possible with nickel oxide (see I).
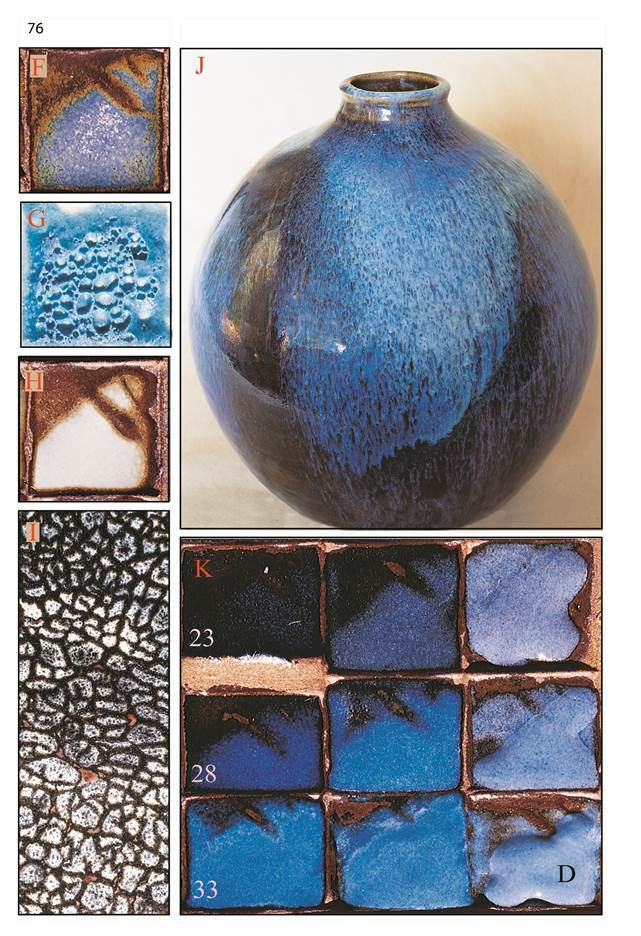
Zinc Glazes
Zinc oxide (ZnO) is lost from reduced glazes. (See Hamer.) It should be possible to use zinc as a flux in reduction if it is already incorporated into a glass such as a frit.
As well as being a flux, ZnO is an opacifier, or if the opacifying particles are small enough it gives rise to milkiness and opalescence (see J).
Zinc oxide in low alumina glazes will produce large fan- shaped crystals if the glaze is adequately matured and slowly cooled (K).
Zinc oxide tends to reduce crazing. It also tends to change many matt glazes to shiny.
Feldspathic Glazes
If the flux materials are high in feldspathic ingredients then the glaze is necessarily high in alumina and silica (see the diagram on page 149). They are therefore fairly stiff at normal stoneware temperatures. A standard grid using 100% feldspar or nepheline syenite as our starting point will have stiff glazes in corner C and they get stiffer and drier as we move away from there. We will probably find little change from cell to cell on the grid. (We could adequately sample the grid omitting every second row, leaving 12 glazes.)
On normal stoneware clays the glazes are usually crazed because of the high soda and/or potash, and in spite of the high alumina and silica.
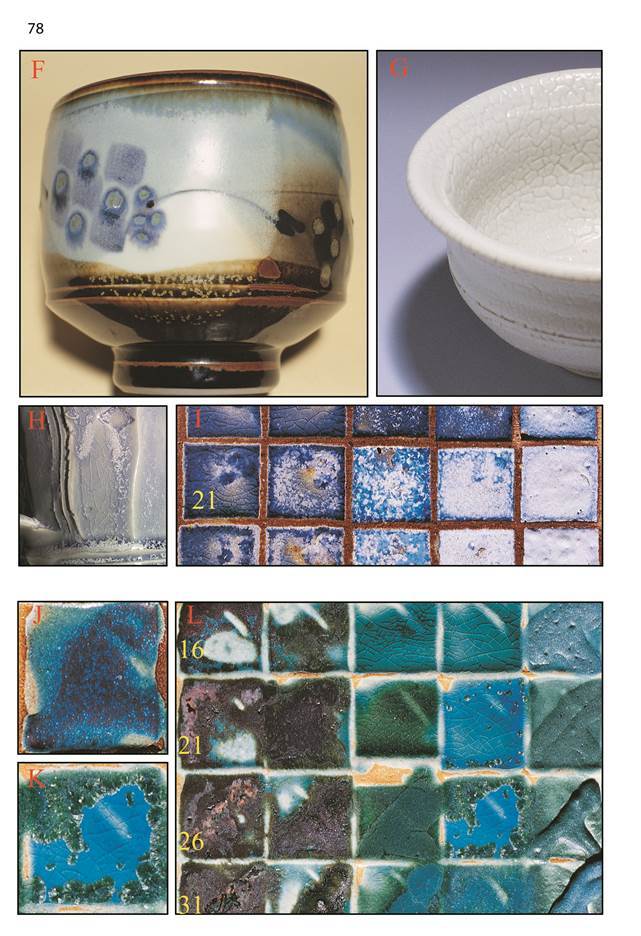
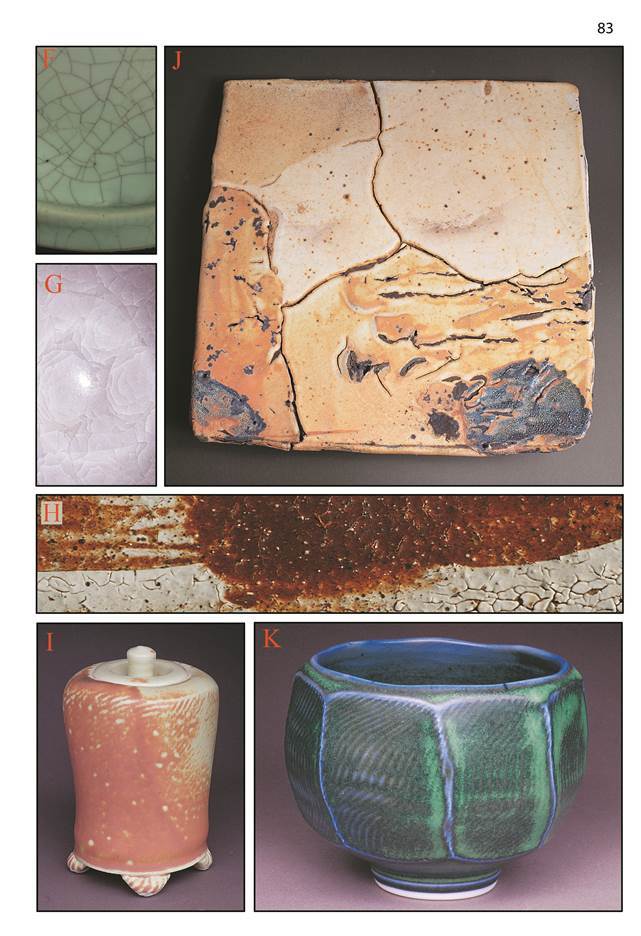
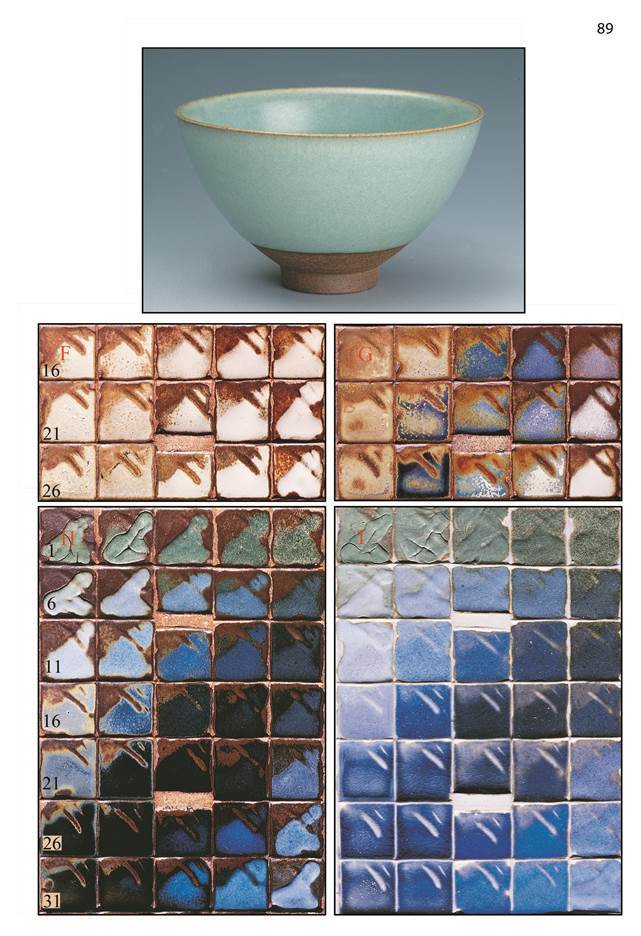
Guan (Kuan) are traditional Chinese glazes high in feldspathic material. F and G belong in this family. See also the discussion and photo by Steve Harrison on Page 88, 89.
There are a large range of shino-type glazes possible, depending on materials, body (or under-slips) and firing. H is based on nepheline syenite, J on soda feldspar. A relatively new extension of the theme has emerged replacing some of these materials with lithium materials and soda ash to produce so- called “carbon trap” shinos. [See “Revival Fires: Another Face for Shino” by Jim Robinson - Studio Potter, Volume 21, #1, December 1992, for a comprehensive discussion.]
There are some unusual colour responses, see I and K on the opposite page. The cobalt green in K however is not confined to high feldspar glazes. See for example the top row in photo F on page 70; this is based on the standard limestone set. The green colour requires cobalt and titania (titanium dioxide) in a high alumina glaze; a feldspathic base helps, as does barium carbonate.
Traditional oilspot tenmoku glazes have a high- feldspathic base.
Alkaline Glazes
These glazes are rich in the alkaline fluxes: soda, potash, lithium oxide and barium oxide. They are usually also low in alumina (cf. feldspathic glazes, previous page); increasing alumina decreases the “alkaline” characteristics (e.g. colour). See also in Hamer’s Dictionary*.
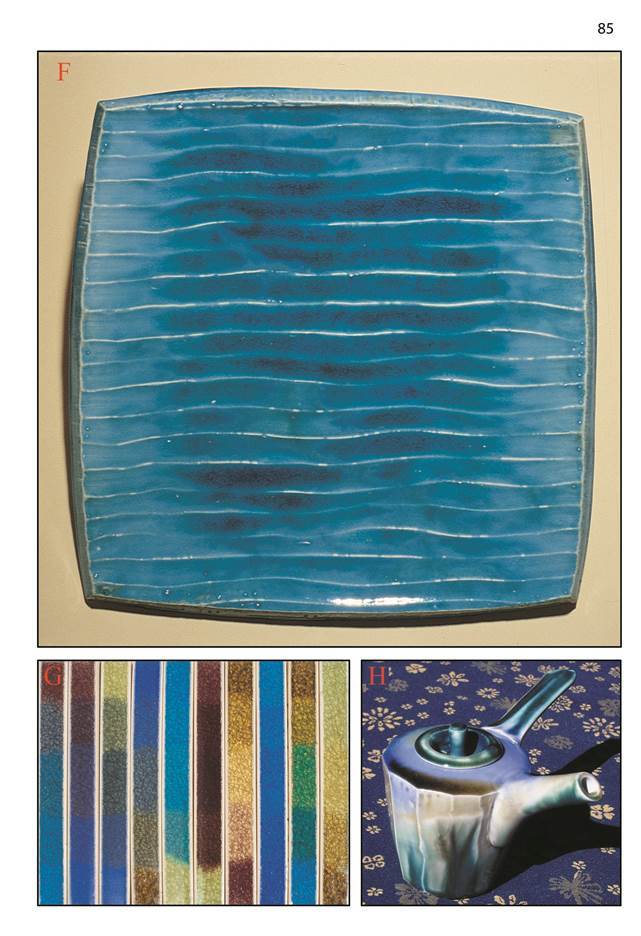
Alkaline Frit Glazes - alkaline colours often occur if a colouring oxide is added to a low melting point frit. This alone is usually too runny and soft to be much use, but we can add kaolin and silica to stiffen the glaze up. Excess kaolin addition will change the colour towards a more “normal” colour response. The addition of silica will usually maintain the alkaline colour and eventually produce coarsely bubbled glazes around Corner D that can be ground back to produce a crater glaze (see G on page 76, 77). High frit alkaline glazes are usually used at low temperature (earthenware or midfire) and in oxidation. One can develop a palette of different colours that run together nicely once the glazes start to move (see the teapot in H)
One of the “gradients” that we can explore is transparent to opaque colour. If we use a lot of high sodatrit such as Ferro frit 3110(=4110) we get transparent heavily crazed glazes such as in the narrow tiles in G. On the other hand a high B2O2 frit such as Ferro 3134 (= 4108, or 4508) will produce milky opacity with colourants, especially where thin, simmilar to the platter in F. Note the transparent darker colour where thick. It is possible to blend frits to fine-tune these two properties.Obtain analyses of the frits available from your supplier and compare the relative amounts of the 12 base glaze oxides (see page 12). This will guide you in your choice
High Barium Glazes - For higher firing, alkaline glazes with matt surfaces can be achieved by the use of barium carbonate. In this case low alumina is not necessary.
Alkaline Colour - typical alkaline colour responses are illustrated on the opposite page: copper pigment (Cu) giving blue (turquoise), iron (Fe) giving yellow, manganese (Mn) purple, Chrome (Cr) in small amounts can give a soft apple green. Cobalt (Co) gives a brilliant blue here, but can give pinks in some alkaline glazes.
Volumetric Addition
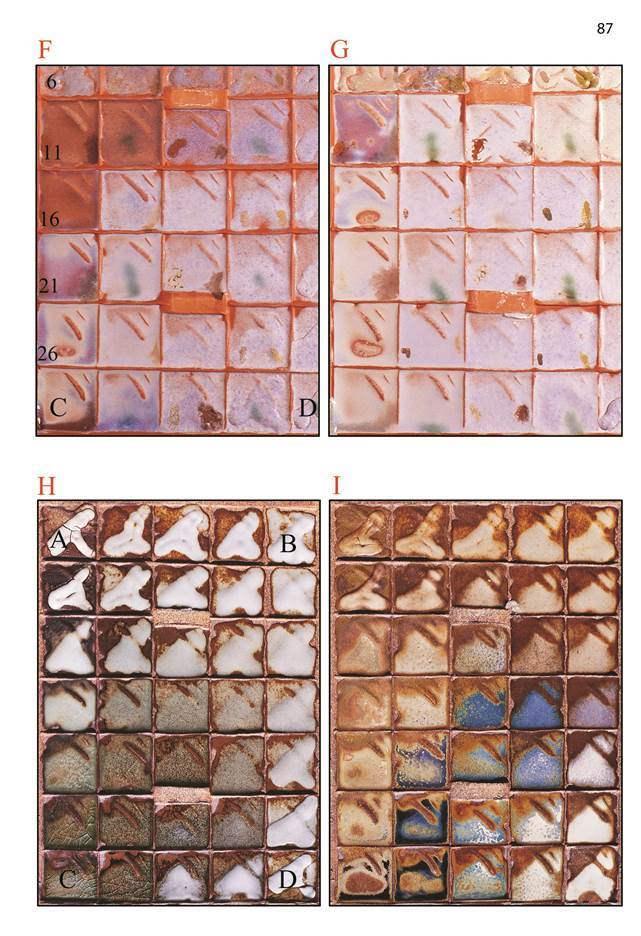
If we take all the glazes in tile F (opposite) and add 5% titanium dioxide (TiO2) to each, we get tile G. Rather than make up a whole new set, we can use volumetric addition to produce the second set from the first with very little extra effort. This method is detailed in Chapter 7.
For a given pair (opposite page), the only difference is the addition; the base glazes are identical, the clay body is identical and the two tiles were fired in a stack near each other, so the firing is also identical. This means we can compare say, glaze 21 with glaze 21 in the other set, and know that any observable difference is caused by the TiO2 alone. This elimination of extraneous variables often throws up surprising results. For example if we compare glaze C in tiles H and I, even in the photograph we can detect a dramatic difference in fluidity. The TiO2 is strongly fluxing the glaze! This is unexpected, and suggests the existence of a nearby eutectic* with TiO2.
Clay Body and Firing
The firing and the clay body often have more impact on glaze quality than the glaze recipe itself. The grid method helps the study of these vital variables by facilitating easy production of “clones”, applying the same set of glazes to several grid tiles using more than one clay body. (Read also the box on page 105.) Close study of pairs of grid tiles fired under different conditions, or on different clays, will provide insights to important glaze principles.
Varying the Firing:
F and G (opposite) show the same glazes on the same clay body. Firing variables were as close as possible, with the exception of maturing temperature. F was fired tocone10,Gtocone12. Atcone10manyofthe glazes look very similar - opaque and semi-matt. The 10% of titanium dioxide is acting here as an opacifier and matting agent in most of the glazes. When the firing is elevated to cone 12 suddenly the extra heat has caused the titanium dioxide to act as an agent of diversity rather than uniformity. Now we see a diagonal band across the set starts to clear up (along the eutectic trough) giving a beautifully varied series of glazes showing changes in opacity, opalescence, shininess and textural breakup. Holding the two grid tiles side by side we see at a glance how the firing has brought these glazes to life.
Varying the Clay Body:
Grid tiles H and I are identical sets of glazes fired side by side on different clay bodies. Comparing the pairs of individual glazes we would be excused for thinking they are completely different, where in fact they are exactly the same glaze.
Interfaces
Another subtle lesson here is the importance of thresholds or interfaces or the marginal region between two different states. In tile G we’ve reached a state where some are starting to move from opaque to opalescent or transparent, and small changes in alumina and silica are causing big changes as we move from glaze to glaze, or even within the same glaze as we vary thickness. Similarly in H and I we can see how the use of a dark body can cause interesting colour changes with glaze thickness. The iron in the body is bleeding through and even where it is thick the glaze is often a completely different colour; where the glaze is thin it is changed utterly, breaking to a different colour.
This illustrates the trade-off between the responsive and the foolproof. Commercial glazes rarely have this sort of life in them, because commerce needs reliability. To express ourselves we need a responsive medium - one that responds to our smallest inputs! It is the very antithesis of foolproof. The use of “foolproof” materials and processes leads to a boring uniformity and can disempower the artist.
Using the Grid
There is more to studying glazes than the grid method! However the systematic variation of fluxes alumina and silica gives deep insights into the nature of glazes, and often it takes us to what we seek in one step.
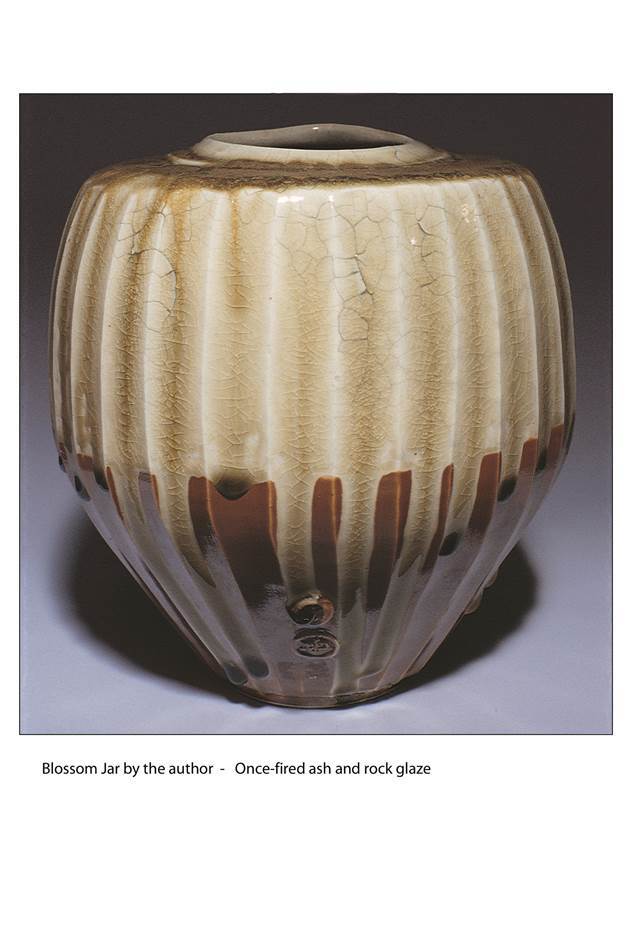
The glaze on the teapot opposite came out of the very first alumina/silica grid experiment I performed. I had been seeking such subtle surfaces for some time believing some secret ingredient was involved. However all it required was just the right balance of kaolin and silica with feldspar and whiting. We’ve moved on a bit since then, but the principle is as effective as it ever was: when we go fishing for beautiful new glazes we really are searching blind, and a blind angler should use a net rather than a spear!
The use of the “net” or the grid enables… - the location of sensitive marginal phenomena such as opalescence, special surface, colour break, crystal formation etc. - the manifestation of the chosen variable - the variable and its range of effects is laid out in front of us to see. - the following of phenomena as they move across the grid with change of temperature, firing rate, material purity, etc. See for example how the blue opalescence in F (opposite page) moves to the right with the more intense firing in G - the quality in 28 moves at least to 29, and probably down a bit as well. - the adjustment of recipe to maintain glaze properties as materials change. This applies especially where the main change is variation in alumina and /or silica - a common problem with kaolins and feldspars. - the comparison of glazes a set at a time rather than one by one; if we use “standard” grid sets we can comprehend and compare the data in sets of glazes just by comparing the C-recipes. This is because when using standard grids the kaolin and silica percentages in the 35 glazes remain consistent from set to set. Therefore the one glaze (C) describes the whole set. Surfaces similar to the one on the teapot occur in many types of glazes at midfire and stoneware temperatures. With the help of the grid they are easily found. (They are more difficult at earthenware.) This glaze was found between the middle of the set and Corner A. Assuming the set is fired high enough, we will usually pass from a clear shiny glaze at number 18 through to full matt glazes around A. We can usually locate one or more candidates for these beautiful surfaces in the transition zone between shiny and matt. We can fine-tune the surface by adjusting firing temperature and cooling rate or by interpolating between the glazes on the fired grid tile.
Family Set
We can take any glaze and make a standard grid around it, thereby producing a set of 35 glazes with the same set of fluxes and colourants/opacifiers, but varying alumina and silica. The set here is an example based originally on a midfire glaze attributed to Pete Pinnell.
The photograph shows a family of glazes closely related to the original, illustrating the sort of variation we can expect moving around the grid. We also have many interesting glazes that are quite different from the original; the extent of the standard grid usually takes us well beyond any single glaze type.
The evolution of this set is detailed in Chapter 3; see page 50 “Family Set - Designing a Set Based on a Particular Glaze Recipe”.
Photographs
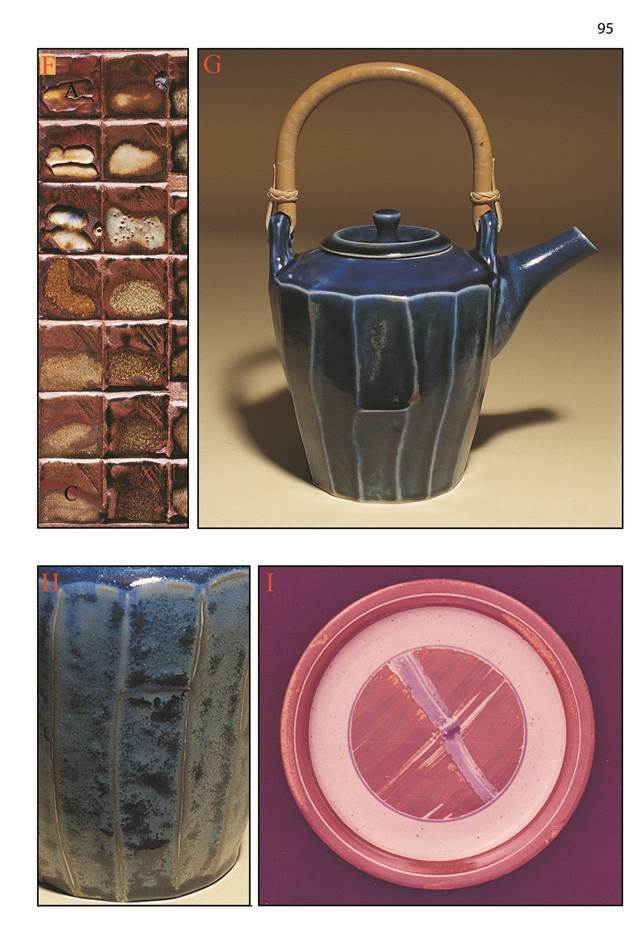
F: Corner C* is as follows: 27 Nepheline syenite 27 Whiting 11 Talc 35 Bone ash Fired to Cone 12, reduction. Red stoneware clay.
G and H: Teapots by the author. | 13.5 | Nepheline syenite | | 13.5 | Whiting | | 5.5 | Talc | | 23.1 | Ferro frit 3134 | | 17.5 | Bone ash | | 18.6 | Kaolin | | 8.3 | Silica | | +2% | Cobalt carbonate | | +6% | Titanium dioxide |
With G and H the glaze is applied over a wash of iron oxide slip. (The clay is white stoneware, which does not obtain much response from the glaze) and they were fired in reduction to cone 10
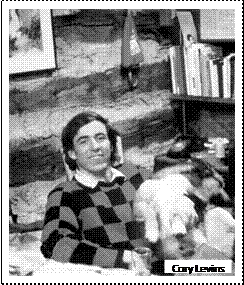
I: Plate by Hank Murrow. Glazed with the original “Cory’s Weird”, developed in 1971 by Cory Levins:
| 32 | Nepheline Syenite |
| 3 | Whiting |
| 32 | Bone Ash |
| 13 | Talc |
| 18 | Kaolin |
| 2 | Silica |
Iron/rutile and iron/cobalt slips brushed over. Cone 10 Reduction
“I used McNamee Kaolin which is high in Ti; but any kaolin is worth a try….
Brush with iron/rutile for iron-red to orange, iron for rich brown, 2iron/cobalt for blue-black, ferric phosphate for ironred,thincobaltforsoftblue.” H.M.
Exploring the Limits
Built into the grid method is the ability to explore to the limits and beyond. When moving into new territory like this, we are nearly always working blind, and never know what will occur or where. The use of the grid with its broad net approach allows us to quickly pinpoint where the interesting glazes are located. The high bone ash glazes explored here arose from a meeting with Hank Murrow at a workshop I conducted in Salem, Oregon, where he showed me a beautiful glaze on a plate he had done decades ago. He called the glaze Cory’s Weird, and it contained over 30% of bone ash - an amount I found hard to imagine using. Upon returning to Australia I prepared a standard grid set based (very loosely) on the glaze. Part of the set is shown opposite in F. It was interesting enough to warrant further investigation, and after addition of cobalt carbonate and titanium dioxide some very interesting things appeared. The glazes are all fairly stiff at stoneware temperature (not unexpected) with several interesting things happening between A and C corners. Many of the glazes show strong colour break, especially over a dark body or slips with colouring oxides, and some exhibit crystal formation and interesting surfaces. To lower the melting point some frit was added to glaze 12. The result was the glaze in G and H. An unusual coarsely mottled texture sometimes appears (see H) giving interesting variation to colour and mattness. Sometimes crystalline spots form, probably caused by the titanium addition.
From Hank Murrow:
“A few words of background to explain the provenance of this high phosphorus notion. While teaching at Anderson Ranch in Snowmass, CO, I was fortunate to share both studio and dinner table with Cory Levins (aged 17, huge appetite, did the dishes). He later went on to study at Alfred University, where he entertained himself during Art History slide lectures by using a penlight to make up new glazes to test. One of his habits was to take any pronouncement of Dan Rhodes (ie; “Can’t have more than 5% bone ash in a glaze”) and multiply it by a factor of ten to test the pronouncement. Naturally, Cory’s Weird (I named it at the Snowmass post office when I first read the recipe in a letter from Cory) came out of this sort of investigation. He graduated from Alfred, married, and bought a dairy farm/maple sugar bush, intending to build a pottery; but died a year later when his tractor turned over; the end to a wonderful and very promising life. I would love to see his work carried on; and I feel Cory’s Weird is a fitting way to begin. I know he’d be tickled; and I wish all could have known him. My source of bone ash is produced by the Eastman Kodak Company from bones. I have gradually become convinced that Phosphorus is a network former (glassformer) from the experimentation which Cory’s Weird began. However, it was your grid tile method which opened a way to really demonstrate my contention.” H.M.