What is a class?
NOTE
This is the first theory lesson in this workbook so please see the introductory video on theory lessons if you haven’t seen it already.
Lesson content
- Class, definition and elements
- Layout of keys on the keyboard
- Reserved words in Java
- Comments in Java
- Convention for naming classes
- Code formatting: “breaking” code into multiple lines
- What are syntax errors and how are they marked in code
- Most common errors
Class, definition and elements
A class is a general representation of a set of objects (things or phenomena) that have the same structure and behavior. A class is a simplified model of these real objects and phenomena and encompasses their:
- characteristics (attributes)
- behaviors (methods)
- relationships with other classes (relations)
Attributes, methods, and relations are called elements (members) of the class. Attributes are sometimes also called fields or properties.
Example 1
An example of a class is Car (Figure 3). The class is graphically represented by a rectangle consisting of three parts. The top part only contains the class name - Car.
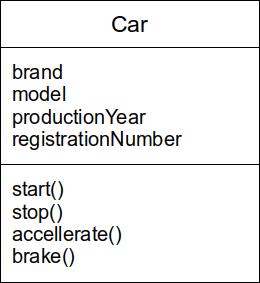
The Car class has the following characteristics: brand, model, production year, and registration number. These characteristics are located in the middle part of the rectangle in the image.
Some behaviors of a car include: start, stop, accelerate, brake. These behaviors are found in the bottom part of the rectangle in the image.
In the image, these characteristics are represented by attributes, while behaviors are represented using methods. It’s important to note that this is a simplified version of a real car because a car can have many other characteristics (serial number, color…) and behaviors (turn, open door…).
It is also important to mention that the UML class diagram (Unified Modelling Language) is used here to graphically represent the Car class. This graphical notation will be used throughout the text, and more about UML can be read here.
Example 2
Another example of a class could be Person (Figure 4).
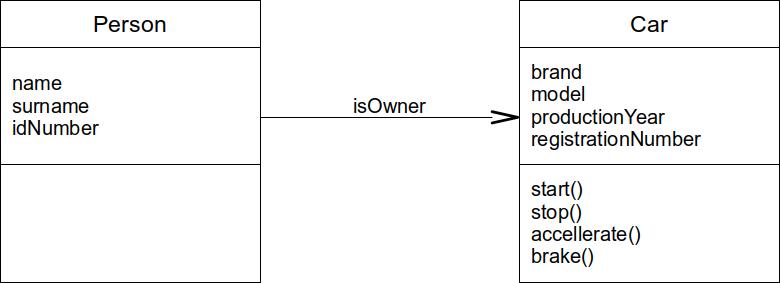
Let’s say a person has a first name, last name, and identification number, but in this example, it doesn’t have any defined behaviors.
If we consider the Car class from the previous example and the Person class, there is a certain relationship between them. A person can be the owner of a car. This relationship is represented by a relation between the classes.
Details about attributes, methods, and relations will be explained in the following lessons. For now, it’s important to see how to define a class in Java. The general format of class definition in Java is as follows:
1 class ClassName {
2
3     // definition of attributes...
4
5     // definition of methods...
6 }
The definition begins with the reserved word “class”, followed by the class name. This first line is the class header. The next element is an open curly brace ({). After the curly brace begins the body of the class, which contains the definitions of attributes and methods. The class definition ends with a closing curly brace (}).
Whenever multiple related statements need to be written together, a block of statements is written. A block of statements in Java begins with an open curly brace ({), followed by the desired statements, and ends with a closing curly brace (}). In other words, the body of the class, as it contains multiple related statements (definitions of attributes and methods), is written as a block of statements. When writing a block of statements, both braces must be written, meaning the block must both begin and end.
Layout of keys on the keyboard
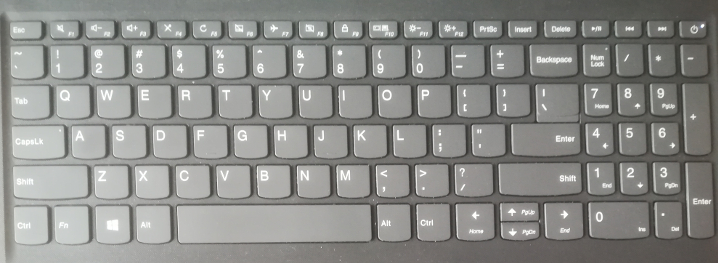
Now, if you are not that familiar with the standard keyboard layout, you are probably wondering where some special characters are placed, like the curly brackets we just mentioned - { and }. There are a lot of keyboard types out there, and a lot of keyboard layouts. Different languages can have different alphabets, hence the letters printed on the keyboard reflect this. In this workbook, we will focus on a regular keyboard with a US-English (EN-US) layout. The keyboard should look like this (Figure 5). Even if your keyboard has some different characters printed on some of its keys, it can be configured to use the EN-US layout in the language and keyboard settings in your operating system.

The special character keys are marked with ellipses in the figure (Figure 5). From top to bottom, the first line of keys are mostly numbers, where each pressed key produces a digit (1-9 and 0 towards the end), while the same key, when pressed together with the Shift key (there are two - bottom left and bottom right), produces a special character. For each key, both characters are printed on the key:
1 Without Shift    1   2   3   4   5   6   7   8   9   0   -   =
2 ---------------------------------------------------------------
3 With   Shift     !   @   ##   $   %   ^   &   *   (   )   _   +
In the second keyboard row (after the P key) are positioned the bracket keys, square and curly brackets:
1 Without Shift    [  ]
2 ---------------------
3 With   Shift     {  }
In the third keyboard row (after the L key) are positioned the column/semicolumn, apostrophy/quotation marks and backslash/vertical line keys:
1 Without Shift    ;  '   \
2 -------------------------
3 With   Shift     :  "   |
Finally, in the fourth row (after the M key) are the less-than/comma, greater-than/dot, and question mark/slash keys:
1 Without Shift    ,  .   /
2 -------------------------
3 With   Shift     <  >   ?
A laptop keyboard has a similar layout, so you should also be able to find the special characters (Figure 6). Here, the | key is placed in the second keyboard row instead of the third, and all other keys have the same placement.
Reserved words in Java
And what exactly are reserved words? Reserved words are words chosen (reserved) to be part of the programming language, i.e., to be used for writing its statements. Java has around 40 reserved words, some of which are:
1 class, int, double, boolean,
2 char, void, for, if, while...
Reserved words cannot be used as names for classes, attributes, variables, etc.
Java is a programming language in which case matters (i.e., it is “case-sensitive”). This means that class names, attribute names, method names can differ depending on whether they are written in uppercase or lowercase letters. For example, “CurrencyConverter”, “currencyconverter”, and “CURRENCYCONVERTER” are treated as completely different names.
Reserved words in Java are written exclusively in lowercase, so it’s class and not Class nor CLASS.
Comments in Java
Currently, within the class body given as an example, there are only two comments. In general, comments are used to write a message to the person who will read or modify the source code. This can be an explanation or note that helps with better understanding of the written code. During compilation, the Java compiler ignores comments and does not interpret them as program code, so the content of the comments can be any text.
Comments in Java can be written in two ways. One variant is single-line comments. The beginning of such a comment is marked by two slashes, and the entire text must fit on one line. An example of a single-line comment is:
1 // definition of attributes...
The other type of comment is a multi-line comment. These are used when a more detailed or longer explanation is needed. Of course, multiple single-line comments can be written, but it’s much simpler to frame the entire text as one multi-line comment. A multi-line comment starts with a slash and an asterisk (“/*”) and ends with an asterisk and a slash (“*/”):
1 /* This is
2    a multi-line
3    comment */
It’s important to note that not all slashes are the same. When writing comments, only the regular slash (“/”) is used, not the backslash (“\”), which has a different meaning in Java.
Example 3
Create (define) the Car Class. This class should not have any attributes or methods. Write this fact as a single-line comment.
1 class Car {
2     // This class has no attributes or methods.
3 }
Example 4
Create the Person Class. This class should not have any attributes or methods. Write this fact as a multi-line comment.
1 class Person {
2     /* This class has no
3        attributes or methods. */
4 }
Convention for naming classes
It’s important to note that in Java (and in many other object-oriented programming languages), there is an unwritten rule (Java class naming convention) that class names should start with an uppercase letter and continue with lowercase letters (“Car”, not “car” nor “CAR”). If the class name consists of multiple words, then all words are written together, with the first letter of each word capitalized (“CurrencyConverter”, “BusinessCenter”). The name must not contain any spaces (this applies to the names of all other elements - attributes, methods…).
Code formatting: “breaking” code into multiple lines
There are also rules regarding breaking statements into multiple lines (text) and blank spaces (’ ’). The basic rule in this regard is that each statement should start on a new line. Additionally, almost every statement, declaration, etc., can be written on one or more lines (text) with an arbitrary number of blank spaces, provided that breaking (moving the remainder of the statement to the next line) or adding new blank spaces can occur in places where there would normally be a blank space. The exception is breaking within a String value or a single-line comment, which cannot be done this way.
The goal of breaking statements into multiple lines is to make the code as readable as possible (for the programmer). During compilation, all unnecessary blank spaces are removed, and the code is joined into one line, followed by syntax checking, so in that sense, how the code is broken up doesn’t matter.
Example 5
Create the Chameleon Class. Write a multi-line comment in the method body stating that it is an animal. Break the code of the class in different ways and add blank spaces where allowed (several solutions are given below, with the first solution being the most readable). Open the class code and try modifying it by breaking the lines in different ways.
1 class Chameleon {
2     /* This is an animal.*/
3 }
or
1 class      Chameleon      {
2              /* This is an animal.*/
3         }
or
1 class Chameleon {/*This is an animal.*/}
or
1 class Chameleon { /* This is an animal.*/ }
or
1 class
2 Chameleon
3 {
4 /*
5 This is an animal.
6 */
7 }
Usually, the source code of each class is saved in a separate file. For example, the source code of the “Car” class might be saved in a file named “Car.java”, and the “Person” class in “Person.java”. When compiled, the Java executable code will be saved in “Car.class” and “Person.class”.
However, it is possible to save the source code of multiple classes in one file. In other words, the source code for both the “Car” and “Person” classes could be saved in one file, such as “Car.java”. But when compiled, two files will still be generated: “Car.class” and “Person.class”.
What are syntax errors and how are they marked in code
Just as every natural (human) language has its own rules — grammar,
every programming language also has its own rules — syntax. If
during coding the rules of the programming language are not followed,
syntax errors occur, and such code cannot be compiled until these errors are corrected.
It is completely normal and expected that someone who is just learning a programming language makes many syntax errors until they master the basics of the language. Because of this, many programming environments have additional features to help identify syntax errors, fix them, and make it easier to write code in general.
In the IntelliJ environment, syntax errors are usually highlighted in red. More precisely, the environment marks them in red within the code editor, so it’s enough to look and see “if something is red“to spot the error. The file name in which the error is located (e.g., “Motorcycle.java”) will also be marked in red, as well as the commands within that file that are not written correctly.
Of course, if there are multiple errors, IntelliJ will highlight each one, and in the top-right corner of the code editor, the total number of errors in that class or file will be shown.
It is important to know that with a syntax error, there is always a message from the compiler explaining what the error is. For example, “insert ; to complete statement” (insert a semicolon at the end of the statement), “unclosed comment” (the multiline comment is not closed), etc.
Example 6
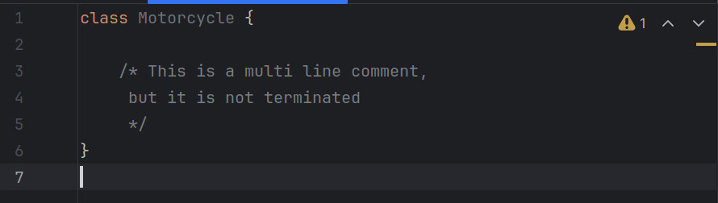
Consider the class Motorcycle, which contains several syntax errors (Figure 7). You can see on the left side that the file name “Motorcycle.java” is underlined in red.
The first syntax error is that the reserved word “class” is written in uppercase letters (“CLASS”). It can be seen (on the first line of code) that this word is highlighted in red, and a red line appears along the right edge, indicating that the first line of code is syntactically incorrect (Figure 7).
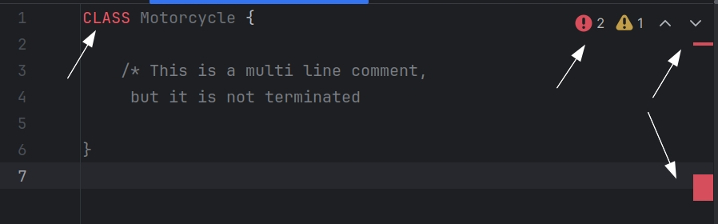
The second syntax error is that the multiline comment is not closed (with */). It can be seen that along the right edge of the editor, there is a red rectangle that highlights these lines of code (from the start of the comment to the end of the file) as syntactically incorrect (Figure 7).
Finally, the total number of syntax errors in that class (or file) is shown by the number two in the top-right corner of the editor (Figure 7).
Also, if the mouse cursor is placed on the syntax error, i.e., the word “CLASS”, an error description will appear: “Cannot resolve symbol ‘CLASS’”, meaning that the compiler does not recognize the word CLASS as a reserved word or as the name of a class, attribute, etc. The same text will appear if the mouse cursor is placed on the right edge of the editor, over the red line that marks the first line of code. If the mouse cursor is placed over the red rectangle that marks the syntax error due to the unclosed comment, the message “Unclosed comment” will appear.
If the syntax errors are corrected, the colors and indicators in the code editor change immediately (Figure 8).
From all of this, it can be concluded that IntelliJ’s code editor has several features related to syntax checking:
- Syntax checking is real-time, while the programmer types the code.
- All syntax errors are highlighted in red.
- With each syntax error, a message from the compiler is displayed explaining what the error is.
- There is also syntax coloring where reserved words are shown in yellow, local variables in gray, etc.
All these features are aimed at helping the programmer write and check code for syntax correctness more easily. Additionally, there is something called automatic code completion (also known as “code completion”), which helps write code faster.
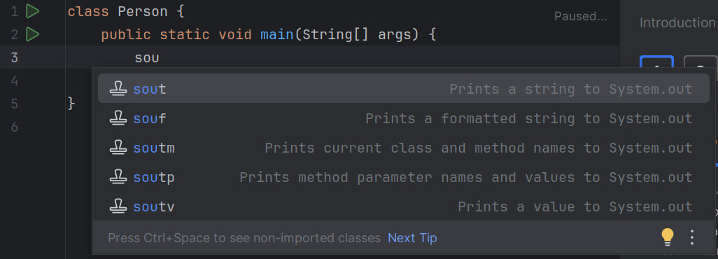
When the programmer starts typing a reserved word, class name, or variable name (usually the first two or three letters), the editor suggests the completion of that word, name, etc., and it’s enough to press the “Return/Enter” key (for a new line) for that word to be inserted into the code (Figure 9). If there are multiple suggestions, the user can choose between them using the up and down arrows before pressing Enter.

Moreover, there are shortcuts that can be activated for:
- Performing an action (e.g., Shift+F10 to run the program or Ctrl+F to search for a word within a file).
- Adding a large chunk of code into the editor (e.g., typing “sout” and pressing “Enter” to insert the command
“System.out.println();” — Figure 10, or typing “main” and “Enter” to insert the main method — Figure 11).

Most common errors
Some of the most common syntax errors related to class declarations and writing comments are:
- Incorrectly writing the reserved word class in uppercase, e.g., CLASS, Class, ClAss, etc.
- Forgetting to write an open ({) or closed brace (}) when forming the body of a class or any other block of statements.
- Writing a single-line comment with one slash (/) instead of two (//).
- Forgetting to close a multi-line comment with the asterisk and slash (*/).
- Forgetting to start a multi-line comment with the asterisk and slash (/*).
- Adding a blank space in the class name, e.g., writing My Car instead of MyCar.
- Writing comments with backslashes () instead of regular slashes (/).
Time for tasks
Now that you have read the theory lesson, it is time for tasks. If you haven’t already, install IntelliJ with the Jetbrains Academy plugin, and load the Interactive Java workbook part 1. It is contained in the “Interactive Java workbook 1.zip” file accompanying this book.
Installation and introductory video tutorials can be found in this playlist for convenience.
Happy coding!!!