Objects, program execution and printing on the screen
Lesson Content
- Objects - definition, and purpose
- Executing (running) a Java program (main method)
- Printing on the screen (print and println methods)
- Most common errors
Objects - definition, and purpose
An object represents a specific instance or occurrence of a class. Therefore, a class can be defined as “a set of objects that have the same properties and behaviors”. The relationship between a class and an object is shown in the following example.
Example 1
The car represents a class because it is a general blueprint of some characteristics and behaviors that every car has (Figure 12, top).
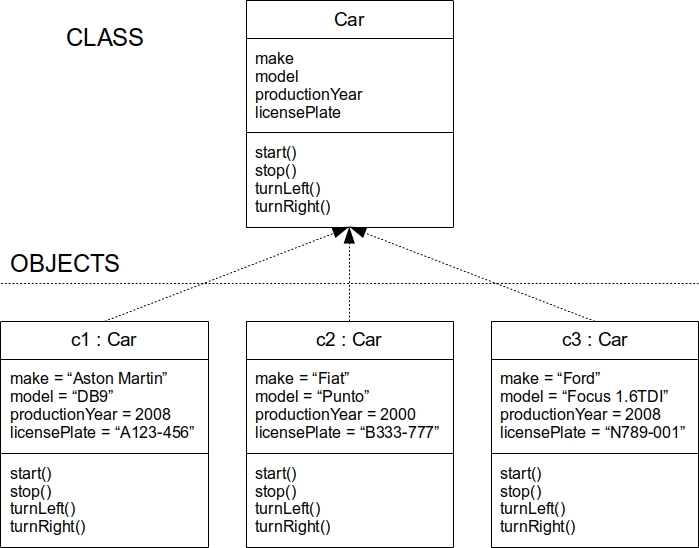
However, “Aston Martin DB9” with a production year of 2008 and registration “A123-456” represents a specific instance of a car, i.e., an object of the car class. The relationship between the class and the object is shown in the following image (Figure 12, bottom).
In Java, objects are declared similarly to class attributes. First, the class name is mentioned, and then the name of the specific object. In this way, a variable is created that will reference a specific object. As mentioned earlier, if no initial value is assigned, every object gets the default value of null.
1 ClassName objectName;
However, an object needs to be initialized before it can be used (make calls to its methods, change the values of its attributes, etc.). If you try to access an object without initialization, Java will report an error. Initialization is done using the “new” command as follows:
1 objectName = new ClassName();
Initialization can also be done immediately during object declaration (for shorter code), similar to how initial values can be assigned to attributes:
1 ClassName objectName = new ClassName();
What actually happens when an object is initialized (Figure 13)? When an object (variable) is declared, only a pointer is created that will reference the object, and it gets the default value null (upper half of Figure 13).In Java, variables that represent objects only contain the memory address of the object (where the object is located), not the object itself. This null value actually means that the pointer does not point to any memory address , i.e., the object does not yet exist.
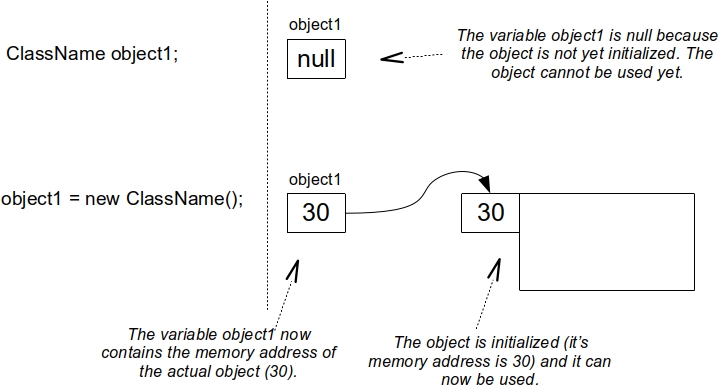
When initialization is performed, only then a part of the computer’s memory (RAM memory) is allocated for the object and linked to the pointer. From that point on, the pointer contains the object’s memory address (lower half of Figure 13). Only then can the object be used.
It would also be interesting to explain how objects are deleted in Java (Figure 14). It is quite normal in the execution of a regular program that hundreds or thousands of objects are created (initialized) in a short period. Each of these objects occupies a part of the computer’s memory, and it often happens that many of them are no longer needed and should be deleted, i.e., removed from memory. If this is not done, memory overload can occur.
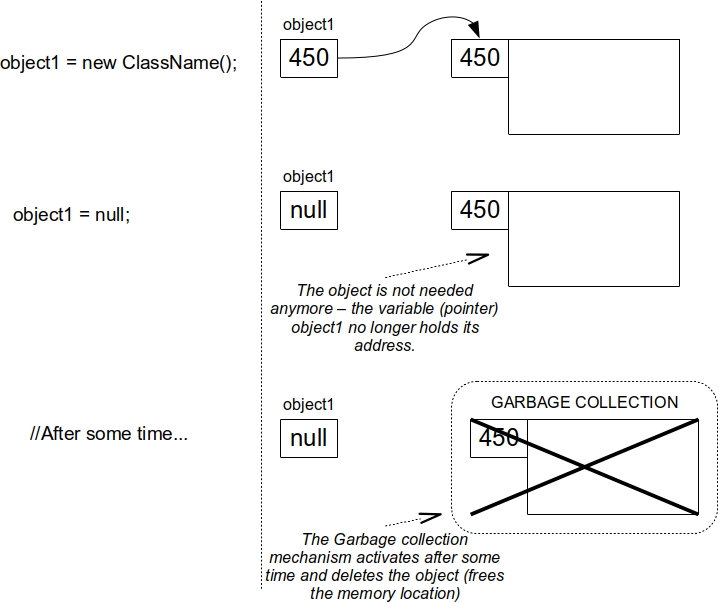
Java has a mechanism called “Garbage collection” (Figure 14) that automatically deletes unnecessary objects. An object is unnecessary if no variable or pointer points to it. In other words, it is enough to assign null to the variable (pointer) or initialize a new object through the same variable, and the old object will be automatically deleted after some time.
Executing (running) a Java program (main method)
For a Java program to run, it must have the so-called “main” method. Methods are covered in detail in the next lesson, so only the specifics related to the main method are given here.
Similar to a class, the main method has its header (declaration), followed by a block of statements that forms the body of the main method (it starts with ‘{’ and ends with ‘}’).
The main method is written within the body of the class, and its header is always written in the same way (public static void main(String[] args)). The desired statements are written within the body of the main method (which represents a new block of statements), so it looks like this:
1 public static void main(String[] args) {
2     //statements...
3 }
Each Java class can have a main method (at most one), so the program can be run from any class. Code formatting rules also apply here, so additional indentation is performed on the statements within the block of the main method. In this way, it is immediately clear which statement belongs to which part of the program, i.e., which block of statements.
Example 2
Create a class Motorcycle that has:
- Attribute makeModel.
- Attribute engineCapacity (integer).
Add a main method to the Motorcycle class and, within it, create two objects of the Motorcycle class.
 1 class Motorcycle {
 2     String makeModel;
 3     int engineCapacity;
 4
 5     public static void main(String[] args) {
 6         Motorcycle m1;
 7         Motorcycle m2;
 8
 9         m1 = new Motorcycle();
10         m2 = new Motorcycle();
11     }
12 }
Although the previous example demonstrated the rule that each class can have a main method, it is recommended that the main method be separated into its own class, which will only serve to run the program. This way, the code for running the program is separated from the code for attributes and regular methods. This can be seen in the next example.
Example 3
Create a class Motorcycle2 that has:
- Attribute makeModel.
- Attribute engineCapacity (integer).
Create a class Test that contains the main method and, within it, creates two objects of the Motorcycle class, but with the objects initialized immediately during the declaration.
1     class Motorcycle2 {
2             String makeModel;
3             int engineCapacity;
4     }
5
 1     class Test {
 2
 3         public static void main(String[] args) {
 4             Motorcycle2 m1 = new Motorcycle2();
 5             Motorcycle2 m2 = new Motorcycle2();
 6
 7             //Or the variables can first be declared and
 8             //then initialized in the following lines.
 9
10             //Motorcycle2 m1;
11             //Motorcycle2 m2;
12             //m1 = new Motorcycle2();
13             //m2 = new Motorcycle2();
14         }
15     }
An object is an occurrence of a class that has specific attribute values. To change or read the values of an attribute, it must be accessed in a specific way. Access to object attributes is done through the object name and the attribute name, separated by a dot:
1 objectName.attributeName
Example 4
Use the class Motorcycle2 from the previous example and create the class Test2 that, wihin its main method creates two objects of the Motorcycle2 class.
- The first motorcycle should be “Suzuki GS” with 500 cc engine capacity (assign these values to the first object’s attributes).
- The second motorcycle should be “Yamaha R6” with 600 cc engine capacity (assign these values to the second object’s attributes).
 1     class Test2 {
 2
 3         public static void main(String[] args) {
 4             Motorcycle2 m1;
 5             Motorcycle2 m2;
 6
 7             m1 = new Motorcycle2();
 8             m2 = new Motorcycle2();
 9
10             m1.makeModel = "Suzuki GS";
11             m1.engineCapacity = 500;
12
13             m2.makeModel = "Yamaha R6";
14             m2.engineCapacity = 600;
15         }
16     }
In Java, commands are executed in the order in which they are written (“top to bottom”). For example, if commands for accessing attributes are written first within the main method, and object initialization follows, Java will report an error.
Printing on the screen (print and println methods)
The previous two examples contain the main method and can be executed. However, the result of their execution will not be visible—objects will be initialized, values will be assigned to attributes, but nothing will be printed on the screen.
The command for printing on the screen (in Java, the screen is called “standard output”) is as follows:
1 System.out.println( ...some text or String and/or value... );
The result of executing this command is printing (on the screen) the content inside the parentheses and moving to a new line. This content can be some text (String value written in quotation marks), the value of some attribute (or variable), or a combination of both.
If there are multiple values (e.g., a String and another number), the concatenation operator (+) is used to combine parts of the message into one whole.
Here, System is a predefined Java class representing the computer on which the program is executed and is written with an uppercase letter. Also, out is an attribute of the System class that represents the standard output (screen), and it is invoked as System.out.
The println command is actually a method of the out attribute that prints something to the screen. In the next example, it is shown exactly what this command does and how to use it.
Every time a program is executed, a special “Run” frame appears on the bottom of the IntelliJ window which shows the status of the program, and if it ended correctly (“Process finished with exit code 0”). If the program prints something on the screen, the output text is also displayed there (in the “Run” frame). This frame can be shown or hidden by clicking on the grey triangle (“Play”) button in the lower left part of the screen.
Example 5
Here are several examples of using the “println” command to print on the screen and the results that will be displayed. All examples are written in the main method of the class PrintExamples1.
 1 class PrintExamples1 {
 2
 3     public static void main(String[] args) {
 4         System.out.println ("Nice day today");
 5         // Prints on the screen:
 6         // Nice day today
 7
 8         int number;
 9         number = 12;
10         System.out.println (number);
11         // Prints on the screen:
12         // 12
13
14         System.out.println ("This sentence prints in the first row");
15         System.out.println ("This sentence prints in the second row");
16         // Prints on the screen:
17         // This sentence prints in the first row
18         // This sentence prints in the second row
19
20         int temperature;
21         temperature = 21;
22         System.out.println ("Temperature is: " + temperature);
23         // The role of the plus (+) sign is to allow the
24         // concatenation (joining) of the message "Temperature
25         // is: " with the temperature value (21).
26         // Prints on the screen:
27         // Temperature is: 21
28     }
29
30 }
Run the program with the Ctrl+F2; command or by clicking the run program icon (green triangular “Play” button)
Since this program is printing something on the screen, the “Run” frame will appear on the bottom and display the text as well as program finishing status.
Example 6
Use the Motorcycle2 class from previous examples and the Test2 class that contains the main method.
Modify the main method of the Test2 class so that it prints the values of both objects’ attributes on the screen.
 1 class Test2 {
 2
 3     public static void main(String[] args) {
 4         Motorcycle2 m1;
 5         Motorcycle2 m2;
 6
 7         m1 = new Motorcycle2();
 8         m2 = new Motorcycle2();
 9
10         m1.makeModel = "Suzuki GS";
11         m1.engineCapacity = 500;
12
13         m2.makeModel = "Yamaha R6";
14         m2.engineCapacity = 600;
15
16         System.out.println(m1.makeModel);
17         System.out.println(m1.engineCapacity);
18
19         System.out.println(m2.makeModel);
20         System.out.println(m2.engineCapacity);
21         //It will print:
22         //Suzuki GS
23         //500
24         //Yamaha R6
25         //600
26     }
27 }
One of the variants of the command for printing
on the screen is the “print” command.
The only difference compared to the “println”
(print-line) command is that after printing the
text, the cursor does not move to the next line,
and it continues printing in the same line.
1 System.out.print( ...some text and/or value... );
Example 7
Here are a few examples of using the “print” command for printing on the screen and the results that will be displayed. All examples are entered in the main method of the PrintExamples2 class.
 1 class PrintExamples2 {
 2
 3     public static void main(String[] args) {
 4         System.out.print("Word1");
 5         System.out.print("Word2");
 6         //Notice that it prints both words in the same
 7         // line, and we have not added any "space"
 8         // between them so the words are "stuck" together
 9         // Prints on the screen:
10         // Word1Word2
11
12         // Prints a sign for the new line i.e.
13         // moves the cursor to a new line
14         System.out.println();
15
16         int temperature;
17         temperature = 21;
18         System.out.print("The temperature is: "+temperature+" degrees");
19         System.out.print (" in London");
20         // Prints on the screen:
21         // The temperature is 21 degrees in London
22     }
23
24 }
It is important to note something about concatenating message parts. Usually, there should be at least one space between these parts so that the text is not “stuck” together. This space can be added directly in the String value before or after the concatenation operator, or as a completely separate space if no part of the message is a text value (i.e. only numeric or boolean values).
When concatenating, if none of the message parts is a String value, the concatenation operator will be interpreted as an addition operator (the same operator is written as +) and it will print the result of the addition on the screen.
Example 8
Here are several examples of using the “println” commands for printing on the screen and the results that will be displayed, with attention paid to how the message is concatenated. The code can be found in the main method of the PrintExamples3 class.
 1 class PrintExamples3 {
 2
 3     public static void main(String[] args) {
 4
 5         System.out.println ("beautiful"+"day"+"today");
 6         // Prints on the screen (no space sign entered
 7         // to separate words when concatenating the
 8         // message parts, so words are "stuck"):
 9         // beautifuldaytoday
10
11         System.out.println ("beautiful" + "day" + "today");
12         // Prints THE SAME on the screen (no space sign entered
13         // WITHIN the String values to separate words when
14         // concatenating the message parts, spaces only outside
15         // String values, around the + operator):
16         // beautifuldaytoday
17
18         System.out.println ("beautiful " + "day" + " today");
19         // Prints on the screen (entered space sign at the end
20         // of the string value "beautiful " and at the beginning
21         // of the String value " today"):
22         // beautiful day today
23
24         System.out.println ("beautiful" + " day " + "today");
25         // Prints on the screen (entered space sign at the beginning
26         // and the end of the String value " day "):
27         // beautiful day today
28
29         int temperature;
30         temperature = 21;
31         System.out.println ("The temperature is"+temperature);
32         // print on the screen (message parts are "stuck"
33         // because no space sign is entered at the end
34         // of String value "The temperature is"):
35         // The temperature is21
36
37         System.out.println ("The temperature is" + temperature);
38         // Prints on the screen (still "stuck" as space sign
39         // is not entered in the string but around the + operator):
40         // The temperature is21
41
42         System.out.println ("The temperature is " + temperature);
43         // Prints on the screen:
44         // The temperature is 21
45
46         System.out.println (21 + 32);
47         // Prints on the screen (no part of the message is
48         // String value, so the operator + is interpreted
49         // as addition and the numbers are added 21 + 32 = 53):
50         // 53
51
52         System.out.println (21 + " " + 32);
53         // Prints on the screen:
54         // 21 32
55
56         // Will print because the number code
57         // for character 'A' is 65, and no part od the
58         // message is a String value. The number 65 will
59         // be added to 32 which gives 97
60         System.out.println ('A' + 32);
61         // Prints on the screen:
62         // 97
63     }
64 }
One of the common questions that beginner programmers have is: “Why is my program not running even though it has a main method?” If there are no syntax errors, the problem is often that the program is running, but it is not printing anything to the screen. If there are no calls to the print or println methods anywhere in the program, the program will not print anything, even though it will execute normally.
Example 9
Here is an example of a program that runs normally but does not print anything to the screen. The Meal class has two attributes, and in the main method of the Test3 class an object of the Meal class is created and values are entered into its attributes.
1     class Meal {
2         String name;
3         boolean isVegan;
4     }
 1     class Test3 {
 2
 3         public static void main(String[] args) {
 4             Meal m1 = new Meal();
 5
 6             m1.name = "baked beans";
 7             m1.isVegan = true;
 8         }
 9
10     }
However, neither the print nor the println method is called. Therefore, nothing will be printed when the program is run. This creates the illusion that the program is not working.
Most common errors
Some common syntax errors related to the declaration and initialization of objects, accessing attributes, printing to the screen, and the main method are:
- Incorrectly writing the class name when creating an object with a lowercase first letter:
1 motorcycle m; // Incorrect
Instead of (correct):
1 Motorcycle m; // Correct
- Forgetting to initialize the object before using it:
1     Motorcycle m;
2     m.make = "Honda";
Instead of (correct):
1     Motorcycle m = new Motorcycle();
2     m.make = "Honda";
Incorrectly writing the class name System when calling System.out.println or System.out.print with a lowercase first letter, i.e., “system.out.println” or “system.out.print”.
Forgetting to write parentheses when calling the println command, e.g.:
1 System.out.println "some text"; // Incorrect
Instead of (correct):
1 System.out.println("some text"); // Correct
- Writing String (textual) values within the println command with apostrophes instead of quotes, e.g.:
1 System.out.println('Some text'); // Incorrect
Instead of (correct):
1 System.out.println("Some text"); // Correct
- Forgetting to write the + operator for concatenating message parts, e.g.:
1 System.out.println("Some text: " temperature); // Incorrect
Instead of (correct):
1 System.out.println("Some text: " + temperature); // Correct
- Forgetting to write double quotes at the beginning and end of each String value when concatenating multiple message parts, e.g.:
1 System.out.println("Some text: + temperature); // Incorrect
Instead of (correct):
1 System.out.println("Some text: " + temperature); // Correct
- Incorrectly writing the declaration of the main method (reversed order of reserved words or incorrectly writing those words), e.g.:
1 void static public main (String[] args); // Incorrect order
Instead of (correct):
1 public static void main(String[] args); // Correct order
- Forgetting to begin and/or close a new block of statements with curly braces {} after declaring the main method, or incorrectly starting and ending the body of the main method.
Other common errors that are not syntax errors, but affect the program’s behavior:
Misjudging that the program is not working, when in fact it is executing but just not printing anything on the screen.
Printing a message to the screen where no part of the message is a String value. In that case, the concatenation operator will be interpreted as an addition operator (even if one part of the message is a char). For example:
1     // Will print 53
2     System.out.println(21 + 32);
3
4     // Will print 97 because the code for the letter A is 65, so
5     // adding 32 results in 97
6     System.out.println('A' + 32);
Time for tasks
Now that you have read the theory lesson, it is time for tasks. If you haven’t already, install IntelliJ with the Jetbrains Academy plugin, and load the Interactive Java workbook part 1. It is contained in the “Interactive Java workbook 1.zip” file accompanying this book.
Installation and introductory video tutorials can be found in this playlist for convenience.
Happy coding!!!