Background Information for Writing Swift Command Line Utilities
This short chapter contains example code and utilities for writing command line programs, using external shell processes, and using the FileIO library. At the end of this chapter we see two ways to use this example package in other projects.
Using Shell Processes
The library for using shell processes is one of my GitHub projects.
You can clone this repository if you want to have the source code at hand:
1 git clone https://github.com/mark-watson/SwiftAI-book
2 cd SwiftAI-book
3 cd source-code/ShellProcess_swift
4 swift test
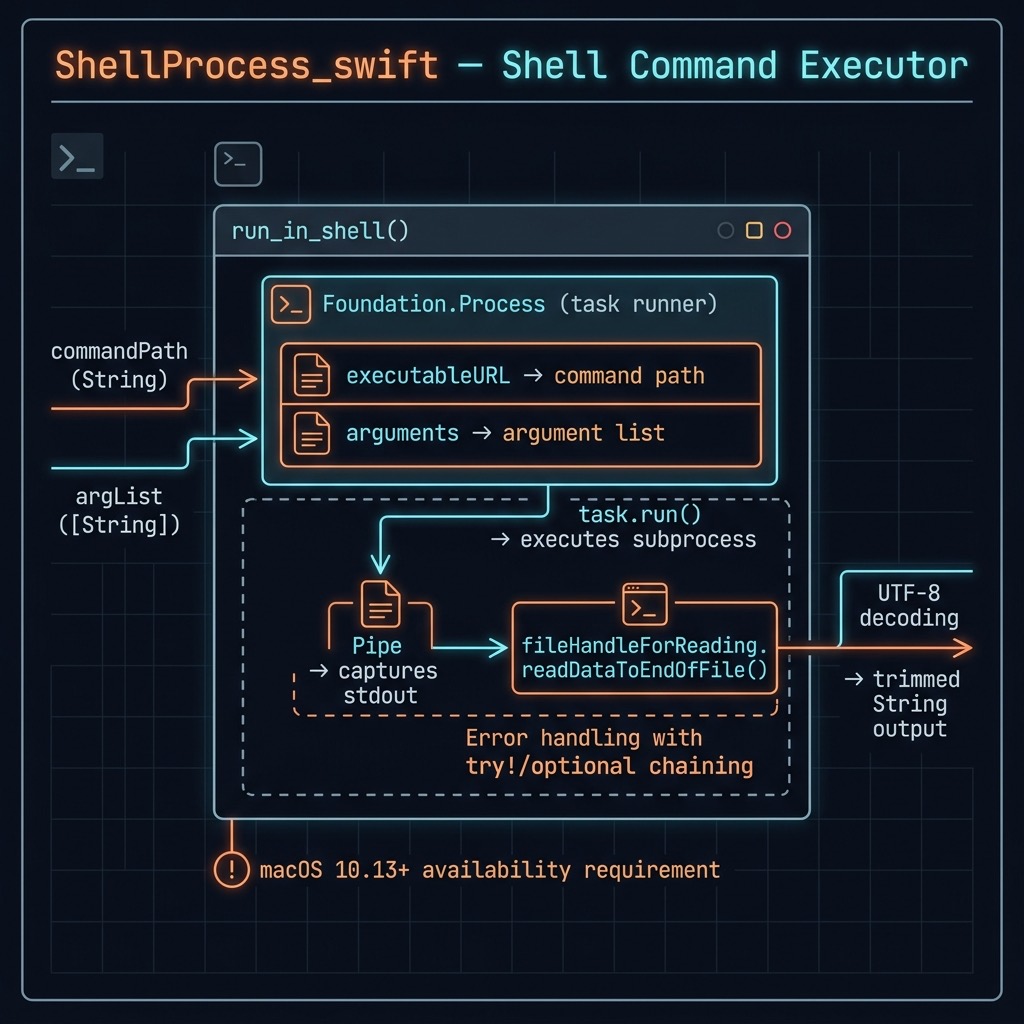
The following listing shows the library implementation. In line 5 we use the constructor Process from the Apple Foundation library to get a new process object that we set fields executableURL and argList. In lines 8 and 9 we create a new Unix style pipe to capture the output from the shell process we are starting and attach it to the process. After we run the task, we capture the output and return it as the value of function run_in_shell.
 1 import Foundation
 2
 3 @available(OSX 10.13, *)
 4 public func run_in_shell(commandPath: String, argList: [String] = []) -> String {
 5     let task = Process()
 6     task.executableURL = URL(fileURLWithPath: commandPath)
 7     task.arguments = argList
 8     let pipe = Pipe()
 9     task.standardOutput = pipe
10     do {
11         try! task.run()
12         let data = pipe.fileHandleForReading.readDataToEndOfFile()
13         let output: String? = String(data: data, encoding: String.Encoding.utf8)
14         if let output = output {
15           if !output.isEmpty {
16             return output.trimmingCharacters(in: .whitespacesAndNewlines)
17           }
18         }
19     }
20     return ""
21 }
The function named run_in_shell takes two parameters: commandPath (a string representing the path to the executable command to be run) and argList (an array of strings representing the arguments to be passed to the command). The function returns a string that represents the output of the command.
Function run_in_shell first creates an instance of the Process class, which is used to run the command. It sets the executableURL property of the task instance to the commandPath value and sets the arguments property to the argList value. This function then creates a Pipe instance, which is used to capture the output of the command. It sets the standardOutput property of the task instance to the Pipe instance.
The function then runs the command using the run() method of the task instance. If the command runs successfully, the function reads the output of the command from the Pipe instance using the readDataToEndOfFile() method of the fileHandleForReading property. It then converts the output data to a string using the String(data:encoding:) initializer.
If the output string is not empty, this function trims leading and trailing whitespace and returns the resulting string. Otherwise, the function returns an empty string.
Overall, this function provides a simple way to run a shell command and capture its output in a Swift program.
As in most examples in this book we use the Swift testing framework to run the example code at the command line using swift test. Running swift test does an implicit swift build.
 1 import XCTest
 2 @testable import ShellProcess_swift
 3
 4 final class ShellProcessTests: XCTestCase {
 5     func testExample() {
 6         // This is an example of a functional test case.
 7         // Use XCTAssert and related functions to verify your tests produce the
 8         // correct results.
 9         print("** s1:")
10         let s1 = run_in_shell(commandPath: "/bin/ps", argList: ["a"])
11         print(s1)
12         let s2 = run_in_shell(commandPath: "/bin/ls", argList: ["."])
13         print("** s2:")
14         print(s2)
15         let s3 = run_in_shell(commandPath: "/bin/sleep", argList: ["2"])
16         print("** s3:")
17         print(s3)
18
19     }
20
21     static var allTests = [
22         ("testExample", testExample),
23     ]
24 }
This Swift unit test function is part of a test suite for the ShellProcess_swift package. The function is named testExample and is decorated with the @testable import statement to indicate that it tests an internal implementation detail of the ShellProcess_swift package.
The function uses the run_in_shell function to run three shell commands: ps a, ls ., and sleep 2. It prints the output of each command to the console.
This test function is an example of a functional test case. It doesn’t actually verify that the functions being tested produce the correct results. Instead, it’s a simple way to visually inspect the output of the commands and ensure that they are working as expected.
The allTests variable is an array of tuples that map the test function names to the corresponding function references. This variable is used by the XCTest framework to discover and run the test functions.
The test output (with some text removed for brevity) is:
 1 $ swift test
 2 Test Suite 'All tests' started at 2021-08-06 16:36:21.447
 3 ** s1:
 4 PID   TT  STAT      TIME COMMAND
 5  3898 s000  Ss     0:00.01 login -pf markw8
 6  3899 s000  S+     0:00.18 -zsh
 7  3999 s001  Ss     0:00.02 login -pfl markw8 /bin/bash -c exec -la zsh /bin/zsh
 8  4000 s001  S+     0:00.38 -zsh
 9  5760 s002  Ss     0:00.02 login -pfl markw8 /bin/bash -c exec -la zsh /bin/zsh
10  5761 s002  S      0:00.14 -zsh
11  8654 s002  S+     0:00.06 /Applications/Xcode.app/Contents/Developer/Toolchains/Xco\
12 deDefault.xctoolchain/usr/bin/swift-test
13  8665 s002  S      0:00.03 /Applications/Xcode.app/Contents/Developer/usr/bin/xctest\
14  /Users/markw_1/GIT_swift_book/ShellProcess_swift/.build/arm64-apple-macosx/debug/Sh\
15 ellProcess_swiftPackageTests.xctest
16  8666 s002  R      0:00.00 /bin/ps a
17 ** s2:
18 Package.swift
19 README.md
20 Sources
21 Tests
22 ** s3:
23
24 Test Suite 'All tests' passed at 2021-08-06 16:36:23.468.
25 	 Executed 1 test, with 0 failures (0 unexpected) in 2.019 (2.021) seconds
FileIO Examples
This file I/O example uses the ShellProcess_swift library we saw in the last section so if you were to create your own Swift project with the following code listing, you would have to add this dependency in the Package.swift file.
When writing command line Swift programs you will often need to do simple file IO so let’s look at some examples here:
 1 import Foundation
 2 import ShellProcess_swift // my library
 3
 4 @available(OSX 10.13, *)
 5 func test_files_demo() -> Void {
 6     // In order to append to an existing file, you need to get a file handle
 7     // and seek to the end of a file. The following will not work:
 8     let s = "the dog chased the cat\n"
 9     try! s.write(toFile: "out.txt", atomically: true,
10                  encoding: String.Encoding.ascii)
11     let s2 = "a second string\n"
12     try! s2.write(toFile: "out.txt", atomically: true,
13                   encoding: String.Encoding.ascii)
14     let aString = try! String(contentsOfFile: "out.txt")
15     print(aString)
16
17     // For simple use cases, simply appending strings, then writing
18     // the result atomically works fine:
19     var s3 = "the dog chased the cat\n"
20     s3 += "a second string\n"
21     try! s3.write(toFile: "out2.txt", atomically: true,
22                   encoding: String.Encoding.ascii)
23     let aString2 = try! String(contentsOfFile: "out2.txt")
24     print(aString2)
25
26     // list files in current directory:
27     let ls = run_in_shell(commandPath: "/bin/ls", argList: ["."])
28     print(ls)
29
30     // remove two temnporary files:
31     let shellOutput = run_in_shell(commandPath: "/bin/rm",
32                                    argList: ["out.txt", "out2.txt"])
33     print(shellOutput)
34 }
35
36 if #available(OSX 10.13, *) {
37     test_files_demo()
38 }
The OS version checks in this Swift code use the #available conditional compilation block.
The #available block is used to conditionally compile code based on the availability of APIs or features in the operating system version. In this case, the code inside the #available(OSX 10.13, *) block will only be executed if the running operating system is macOS 10.13 or later.
If the running operating system version is earlier than 10.13, the code inside the #available block will be skipped and the program will exit without running the test_files_demo() function.
These operating system version checks are done to ensure that the program is only executed on operating systems that support the APIs and features used by the code. This helps to prevent runtime errors and crashes on older operating system versions that may not support the required features.
This function demonstrates how to write to and read from files using the write(toFile:atomically:encoding:) and String(contentsOfFile:) methods, how to list files in the current directory using the ls shell command, and how to remove files using the rm shell command.
I created a temporary Swift project with the previous code listing and a Package.swift file. I built and ran this example using the swift command line tool.
Unlike the example in the last section where we built a reusable library with a test program, here we have a standalone program contained in a single file so we will use swift run to build and run this example:
 1 $ swift run
 2 [5/5] Build complete!
 3 a second string
 4
 5 the dog chased the cat
 6 a second string
 7
 8 Package.resolved
 9 Package.swift
10 README.md
11 Sources
12 out.txt
13 out2.txt
If you are instead working inside the SwiftAI-book mono-repo clone and the local relative path is configured, SwiftPM resolves ShellProcess_swift from the neighbouring folder rather than fetching it from GitHub, and the build output simply shows [N/N] Build complete! with no fetch step.
Mono-Repo Umbrella Package
The SwiftAI-book repository ships a root-level Package.swift that acts as an umbrella package for the entire mono-repo. This gives remote users a single GitHub URL they can add as a Swift Package dependency and then selectively import any example:
 1 // In your own project's Package.swift:
 2 dependencies: [
 3     .package(url: "https://github.com/mark-watson/SwiftAI-book.git",
 4              branch: "main")
 5 ],
 6 targets: [
 7     .target(
 8         name: "MyApp",
 9         dependencies: [
10             .product(name: "ShellProcess_swift",    package: "SwiftAI-book"),
11             .product(name: "SparqlQuery_swift",     package: "SwiftAI-book"),
12             // …add other products as needed
13         ]
14     )
15 ]
The umbrella manifest (at the root of the repo) explicitly re-declares the full internal dependency graph. For example, KnowledgeGraphNavigator_swift depends on SparqlQuery_swift — that relationship is listed in the umbrella’s targets array so SwiftPM resolves it correctly even though it does not read the individual sub-package manifests:
 1 // source-code/KnowledgeGraphNavigator_swift/Package.swift
 2 // (local sub-package manifest — for working inside the clone)
 3 dependencies: [
 4     .package(name: "SparqlQuery_swift", path: "../SparqlQuery_swift"),
 5     .package(url: "git@github.com:mark-watson/Nlp_swift.git", branch: "main"),
 6     // …external deps
 7 ],
 8
 9 // /Package.swift (umbrella — for remote consumers)
10 targets: [
11     .target(
12         name: "SparqlQuery_swift",
13         path: "source-code/SparqlQuery_swift/Sources/SparqlQuery_swift"
14     ),
15     .target(
16         name: "KnowledgeGraphNavigator_swift",
17         dependencies: ["SparqlQuery_swift", …],   // internal dep re-declared here
18         path: "source-code/KnowledgeGraphNavigator_swift/Sources/…"
19     ),
20 ]
Local readers who clone the book can open any individual sub-directory in Xcode (or run swift build / swift test from within it) and the relative-path dependency will resolve instantly from the neighbouring folder on disk.
Swift REPL
There is an example of using the Swift REPL at the end of the next chapter on web scraping. For reference, you can start a REPL with:
1 $ swift run --repl
2 Type :help for assistance.
3 1> import WebScraping_swift
4 2> webPageText(uri: "https://markwatson.com")
5 $R0: String = "Mark Watson: AI Practitioner and Polyglot Programmer"...
6 3> public func foo(s: String) -> String { return s }
7 4> foo(s: "cat")
8 $R1: String = "cat"
9 5>
You can import packages and interactively enter Swift expressions, including defining functions.
In the next chapter we will look at a longer example that scrapes web sites.
In the next chapter we will look at one more simple example, building a web scraping library, before getting to the machine learning and NLP part of the book.