5. March 2013
- Seeing an NGit Diff by using reflection to access the internal Sharpen.ByteArrayOutputStream Class
- GitHub.com needs to improve their the ‘Normal’ status definition and error reporting dashboard
- Another GitHub ‘Normal’ status that doesn’t allow me to Push
- Prob with (older version of) NGit where it was failing to create Git repositories in Azure/TeamCity
- Creating a version TeamMentor which uses the new GitUserData.config file
- Changing the ‘View TM article by anonymous users’ status via GitHub
- Creating a new TeamMentor test site using TeamCity, GitHub and Azure
- Using Git Branches to fix Issues added to TeamMentor’s GitHub repository
- Extracting content files from a Azure deployed version of TeamMentor (pre 3.3 git support), starting with a failed SFTP attemp and ending with a CSharp REPL script
- Using NGit to create native Git support in Azure deployed app (with automatic pushes and pulls)
Seeing an NGit Diff by using reflection to access the internal Sharpen.ByteArrayOutputStream Class
I was trying to get the NGif diff output stream, but hit on an issue that the Sharpen.ByteArrayOutputStream class is internal
Here is an example from NGit UnitTests on how to use the NGI Diff Command:
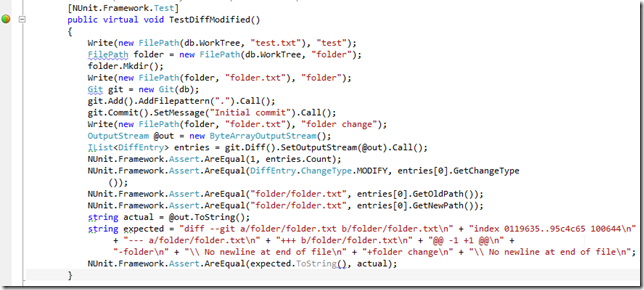
The key part is:

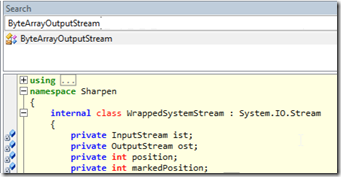
Note how the Sharpen.ByteArrayOutputStream was created and used on** Diff.SetOutputStream, but (as we will see below), we will have a problem because this class is internal:
On an O2 Platform C# REPL script, lets create a quick repo and a valid Diff result:
Our objective is to get the Diff formatted output shown in the NGit Unit test.
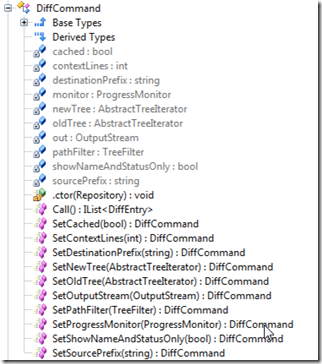
A quick look at the Diff class, shows no public fields, properties or methods that expose it:
And by default the out field is null:
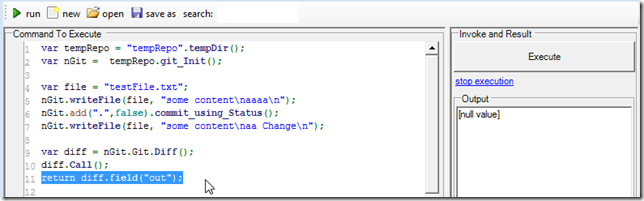
Basically what we need to do is this:
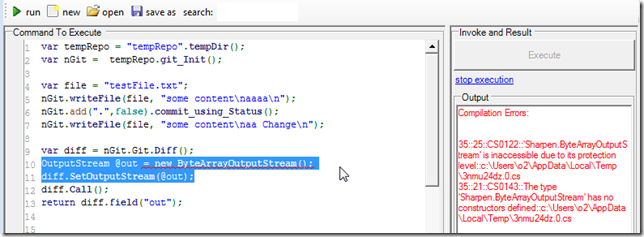
But as you can see, we can’t create an instance of the Sharpen.ByteArrayOutputStream
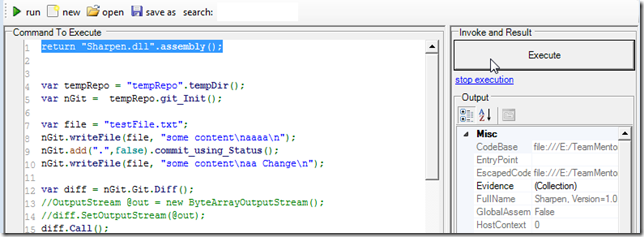
Well, we can’t create it directly, but we can easily create it using reflection :)
To do that, lets start by getting an reference to the Sharpen.dll assembly
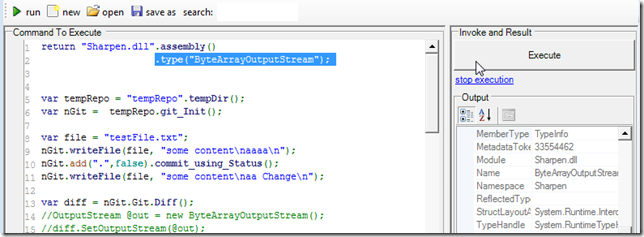
then add a reference to the ByteArrayOutputStream type
invoke its constructor to create a live instance of it:
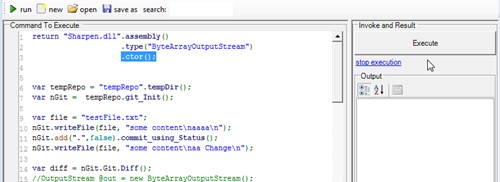
since the Sharpen.OutputStream class is public, we can cast our ByteArrayOutputStream object into it:
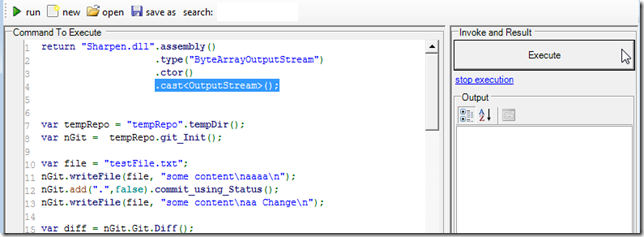
we then assign it to the NGit command, which will give us the diff log we wanted
Note that the out field is now not null:
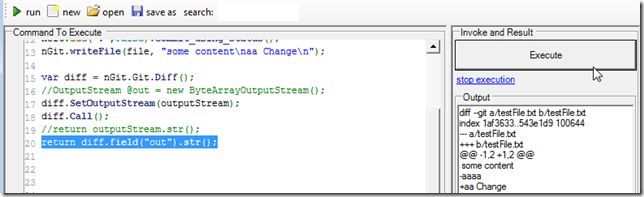
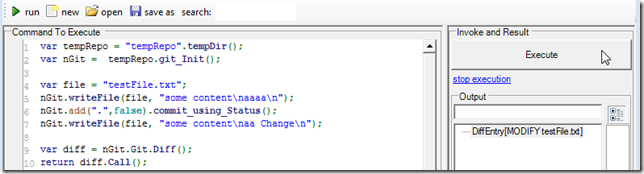
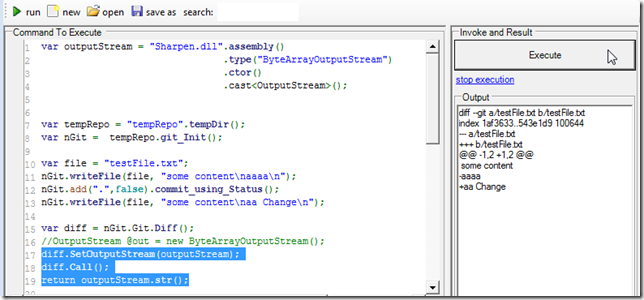
Here is the Source code of the C# code snippet created:
 1 var outputStream = "Sharpen.dll".assembly()
 2                                 .type("ByteArrayOutputStream")
 3                                 .ctor()
 4                                 .cast<OutputStream>();
 5
 6
 7 var tempRepo = "tempRepo".tempDir();
 8 var nGit = tempRepo.git_Init();
 9
10 var file = "testFile.txt";
11 nGit.writeFile (file, "some content\naaaa\n");
12 nGit.add (".",false).commit_using_Status();
13 nGit.writeFile (file, "some content\naa Change\n");
14
15 var diff = nGit.Git.Diff();
16
17 diff.SetOutputStream(outputStream).Call();
18 return outputStream.str();
19
20 //using Sharpen
21 //O2Ref:FluentSharp.NGit.DLL
22 //O2Ref:NGit.dll
23 //O2Ref:Sharpen.dll
GitHub.com needs to improve their the ‘Normal’ status definition and error reporting dashboard
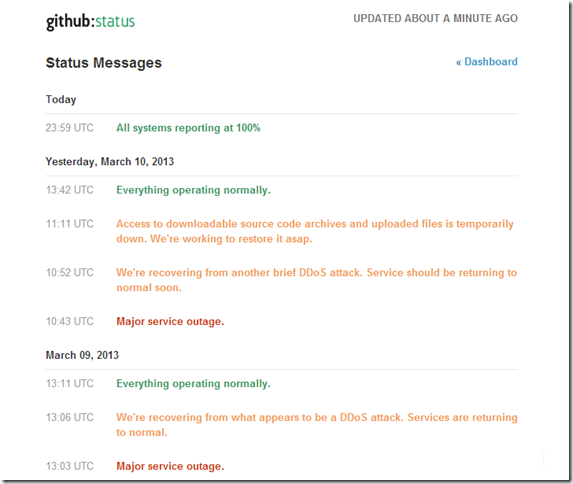
At the moment (i.e. when I wrote this post), all should be ‘Normal’ with GitHub, since according to their status, their world looks like this:
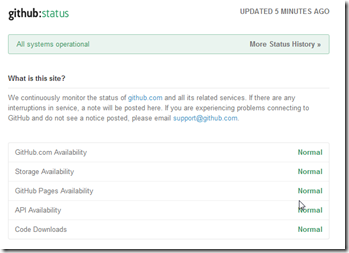
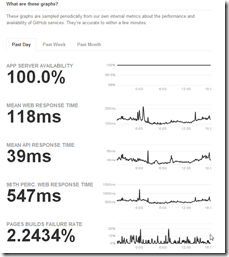
But to me here, a simple/small git push took about 5 minutes of retries:
which doesn’t look ‘Normal’ to me!
I think GitHub.com needs to improve their the ‘Normal’ status definition and error reporting dashboard
Note that yesterday was the same thing.
Something weird is going on in GitHub’s land
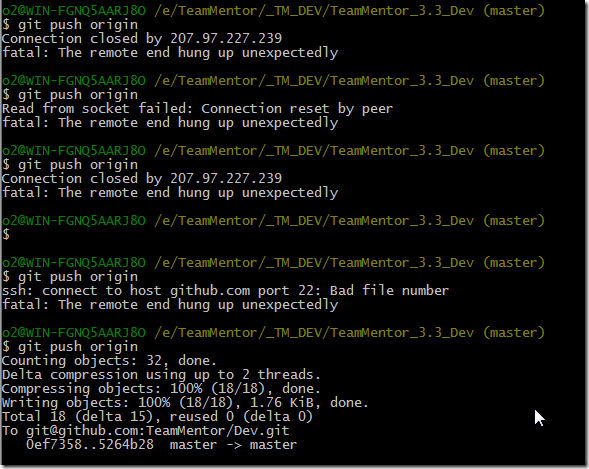
Another GitHub ‘Normal’ status that doesn’t allow me to Push
It took me 5 attempts over about 10m (from 7:40pm on 11th Mar 2013) to get a commit pushed into GitHub’s servers:
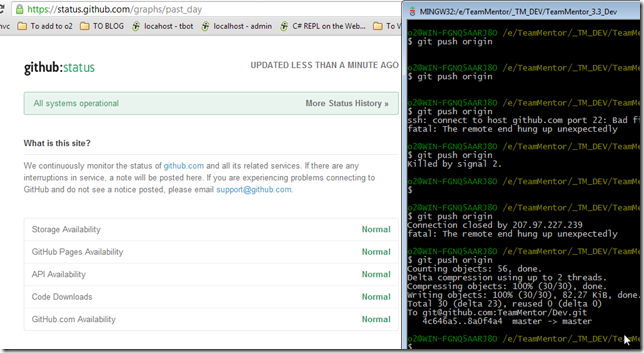
It looks like GitHub is having DDos probs, which is another reason why they need to improve they visibility into what is going on:
Prob with (older version of) NGit where it was failing to create Git repositories in Azure/TeamCity
Using an NGit version from a couple months ago.
 1 var userHome = Path.Combine(Path.Combine(HostingEnvironment.ApplicationPhysicalPath, "App_Dat\
 2 a"), "git");
 3 //using System.IO;
 4 //using System.Web.Hosting;
 5
 6 var runTime = "Sharpen.dll".assembly().type("Runtime");
 7
 8 var properties = (Hashtable)runTime.invokeStatic("GetProperties");
 9
10 var result = "There are {0} properties <br>".format(properties.size());
11 properties["user.home"] = userHome;
12 //return properties["user.home"];
13 foreach(DictionaryEntry item in properties)
14   result+= "{0} = {1}<br/>".format(item.Key, item.Value);
15
16 return result;
17
18 var tempRepo = "tempRepo".tempDir(false);
19 try
20 {
21   var initCommand = NGit.Api.Git.Init();
22   initCommand.SetDirectory(tempRepo);
23   initCommand.Call();
24 }
25 catch(Exception ex)
26 {
27   return ex.Message + ex.StackTrace;
28 }
29
30 //O2Ref:NGit.dll
31 //O2Ref:Sharpen.dll
32 //return new API_NGit().init(tempRepo).str();
33 return tempRepo.isGitRepository();
34
35
36 //using O2.FluentSharp;
37
38 /*var runTime = "Sharpen.dll".assembly().type("Runtime");
39 var properties = (Hashtable)runTime.invokeStatic("GetProperties");
40 var result = "There are {0} properties <br>".format(properties.size());
41
42 foreach(DictionaryEntry item in properties)
43   result+= "{0} = {1}<br/>".format(item.Key, item.Value);
44 return result;
45 return "FluentSharp.NGit.dll".assembly();*/
46
47 //using System.Collections;
48 //O2Ref:TeamMentor.CoreLib.dll
49 //O2Ref:FluentSharp.NGit.dll
I would get this exception:
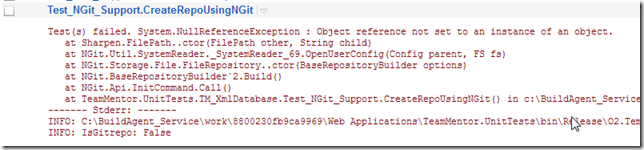
The error is the one documented here: https://github.com/mono/ngit/issues/14
After forking the repo and building it locally in VS 2010, I run the UnitTests (note: only one of 2284 tests failed after a couple retries (there were about 20 that failed on fist execution, but passed to individual retest)):

I then added the compiled assemblies to TeamMentor, and now this script:
 1 var properties = Sharpen.Runtime.GetProperties();
 2 var result = "There are {0} properties <br>".format(properties.size());
 3 //properties["user.home"] = userHome;
 4 //return properties["user.home"];
 5 foreach(DictionaryEntry item in properties)
 6     result+= "{0} = {1}<br/>".format(item.Key, item.Value);
 7
 8
 9 var tempRepo = "tempRepo".tempDir(false);
10 try
11 {
12   var initCommand = NGit.Api.Git.Init();
13   initCommand.SetDirectory(tempRepo);
14   initCommand.Call();
15 }
16 catch(Exception ex)
17 {
18   return ex.Message + ex.StackTrace;
19 }
20 return tempRepo;
21
22 return result;
23
24
25 //using System.Collections;
26 //O2Ref:Sharpen.dll
27 //O2Ref:NGit.dll
Executed on the O2 Platform Browser-based C# REPL:
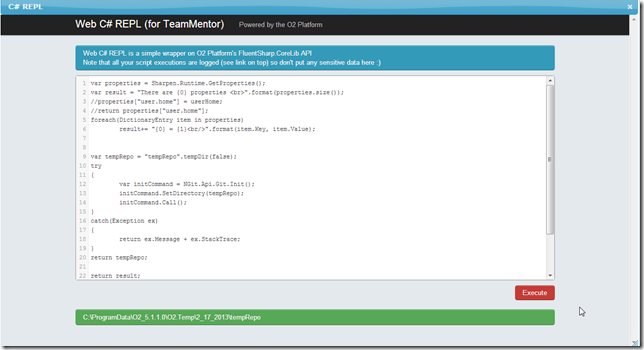
Creates the local repository on a local folder.
NOTE: For reference here is how to write that reflection script using the O2 API;s
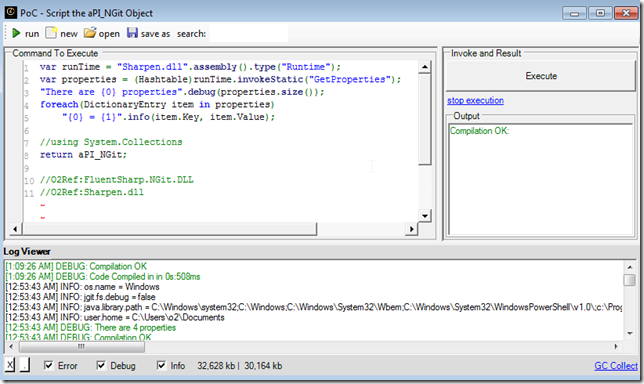
 1 var runTime = "Sharpen.dll".assembly().type("Runtime");
 2 var properties = (Hashtable)runTime.invokeStatic("GetProperties");
 3 "There are {0} properties".debug(properties.size());
 4 foreach(DictionaryEntry item in properties)
 5     "{0} = {1}".info(item.Key, item.Value);
 6
 7 //using System.Collections
 8 return aPI_NGit;
 9
10 //O2Ref:FluentSharp.NGit.DLL
11 //O2Ref:Sharpen.dll
Creating a version TeamMentor which uses the new GitUserData.config file
Introduced in the 3.3 version of TM is a new feature to load the UserData repository from an external location (GitHub or local folder).
This post shows how to set it up.
First step is to get the latest version of TeamMentor from GitHub, where we can clone it locally or download the zip file
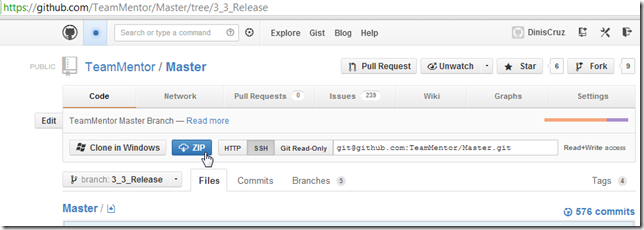
Using the Zip file has an example, unzip the 10Mb file into a local folder, and click on start_TeamMentor.bat
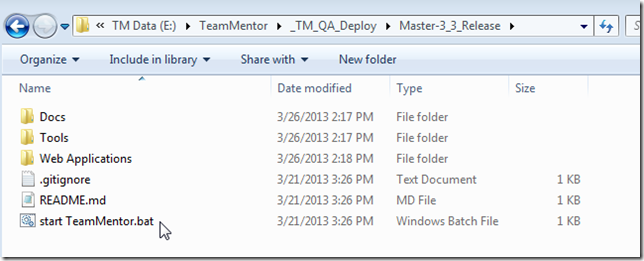
This will open an empty TM site, and a new Library_Data folder should had been created:

With this default structure:
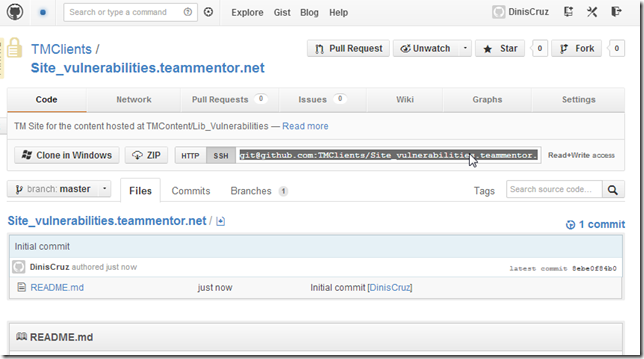
Now in GitHub (or on a local folder), create a new Git Repository (which should be marked as private, since security sensitive data will be stored here)
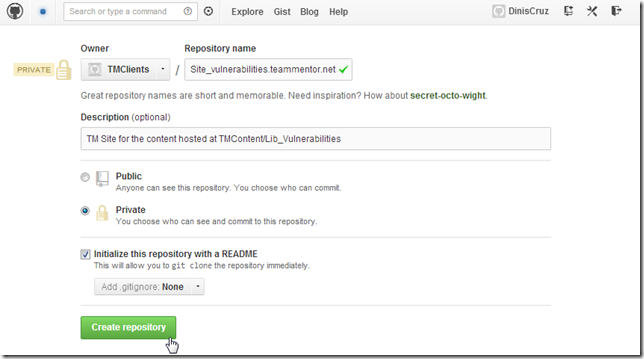
Once the repository is created, copy its git url (in this case git@github.com:TMClients/Site_vulnerabilities.teammentor.net.git )
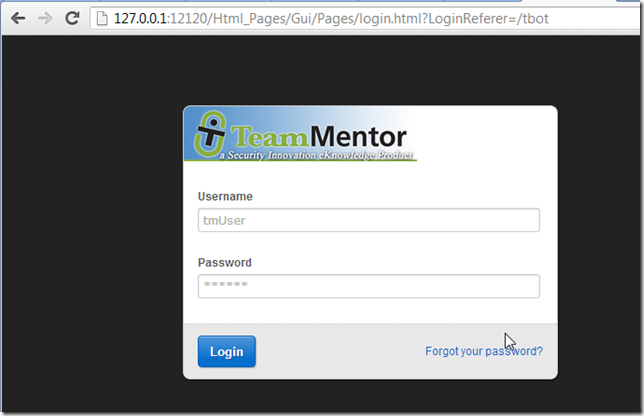
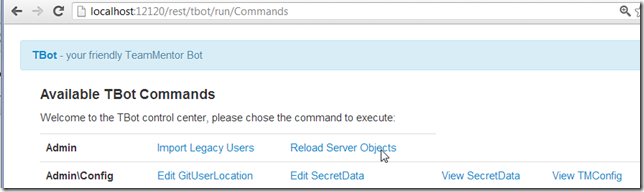
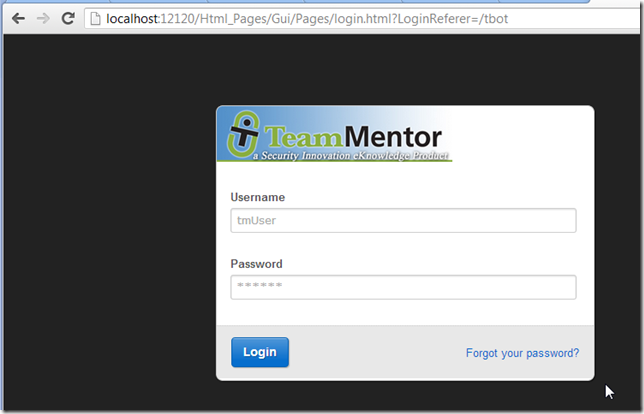
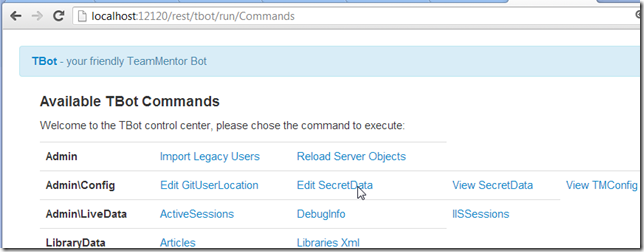
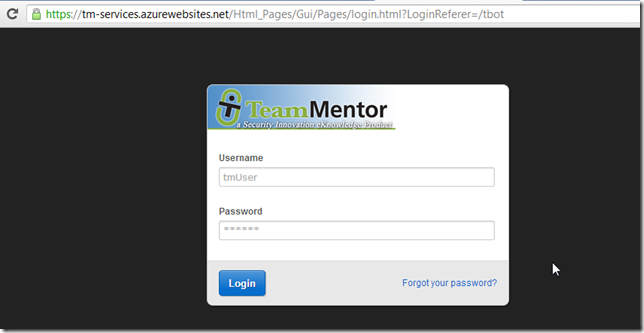
Back in the local copy of TeamMentor, open the TBot page:

which will require an admin account:
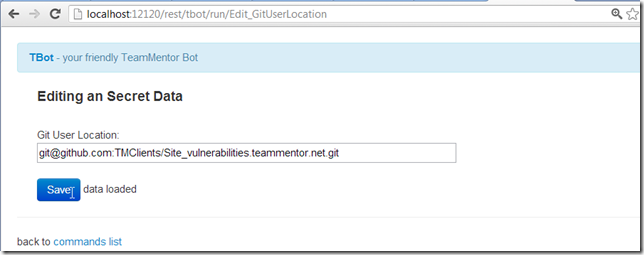
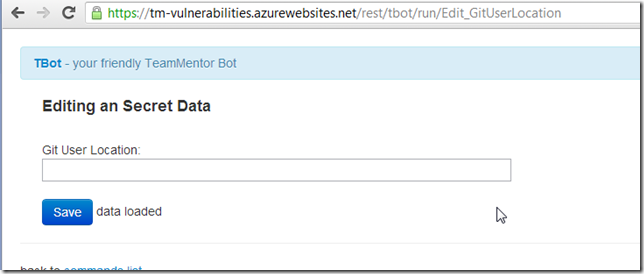
After login, open the Edit GitUserLocation
And enter the Git url copied from GitHub:
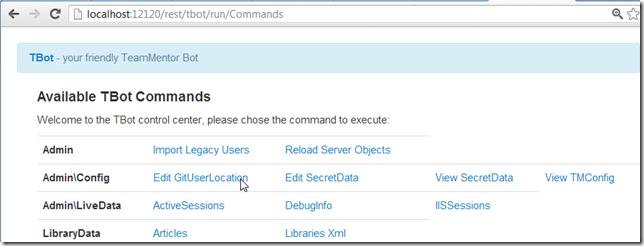
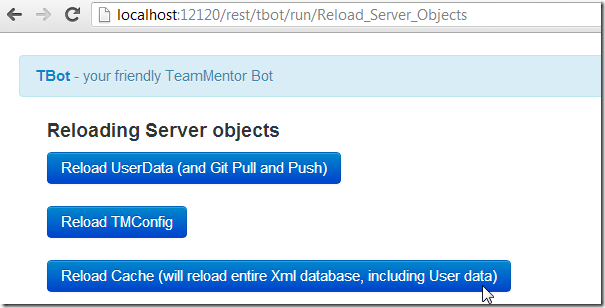
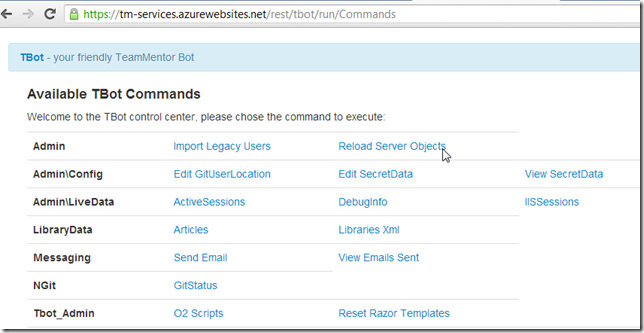
After the data is saved, go back to the commands list:

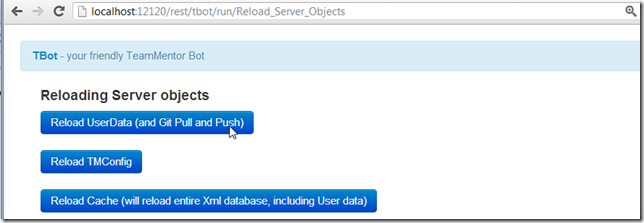
Go to the Reload Server Objects
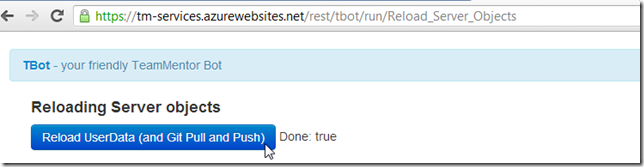
And click on ‘Reload UserData’:
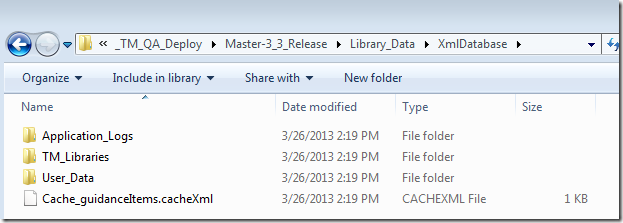
After that step is completed, if you look at the Library Data folder, you should see a new UserData folder in there (that uses the git repository name as part of its path)
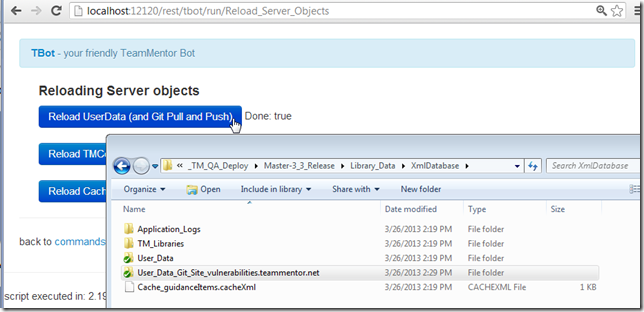
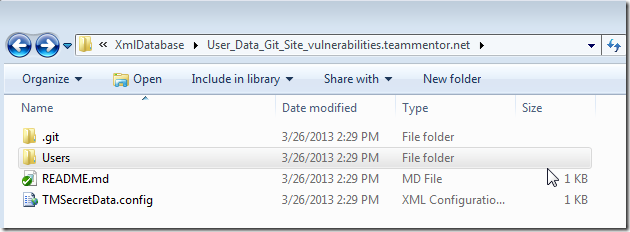
Inside it, you will see the README.md that was received from GitHub, and a new TMSecretData.config and Users folder
Back in TBot’s page, if you click on any link you should be redirected to the login page, and you will need to login again using the default admin credentials (this happens because the current browser cookie is pointing
to the admin user that is in XmlDatabaseUser_Data and not in the newly created XmlDatabaseUser_Data_Git_Site_vulnerabilities.teammentor.net:
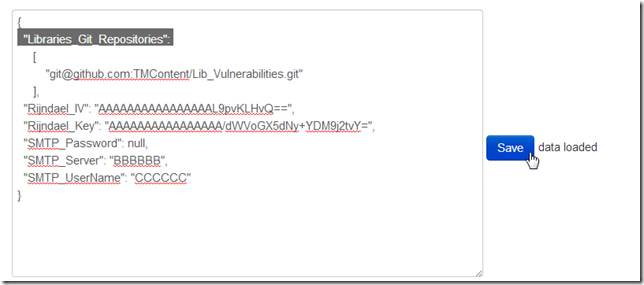
After logging in, open the Edit SecretData command:
Which should look like this (with correct values for the Rijndael and SMTP fields):
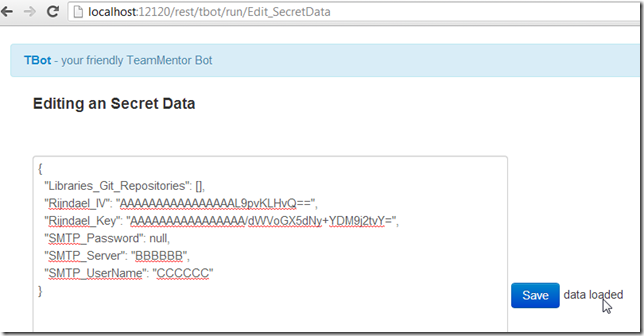
The value that we want to change is the Libraries_Git_Repositories, which should point to the Git repo we want to add to this TM instance. In this case:
Add the git url as an item in the Libraries_Git_Repositories Javascript array:
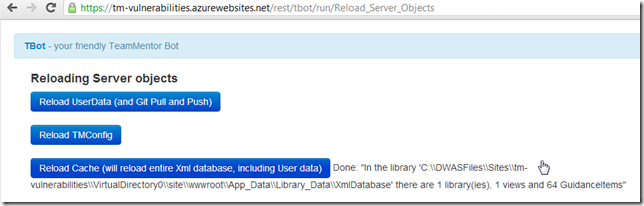
After the data is saved, open the Reload Server Objects again:

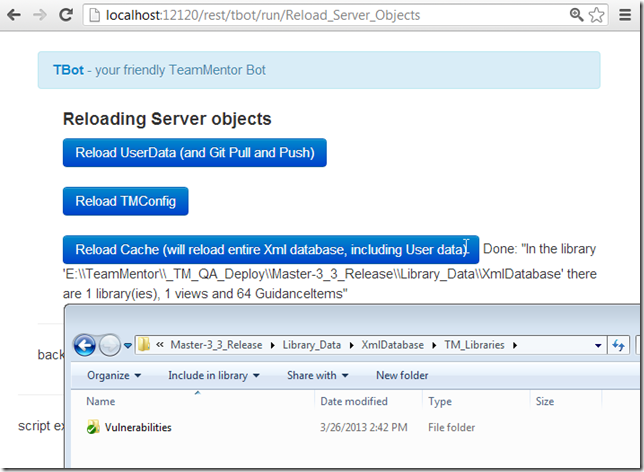
And this time around click on the Reload Cache button:
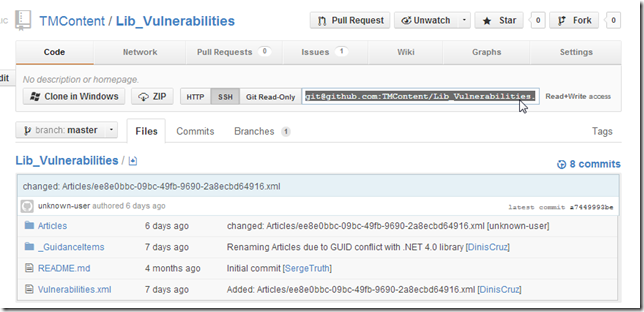
Once that is completed, if your open the XmlDatabase/TM_Libraries folder, you should see a new Vulnerabilities subfolder
Which is in fact a git clone:
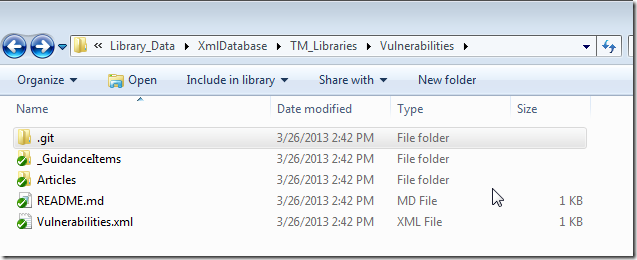
of the git repository configured on the Libraries_Git_Repositories value
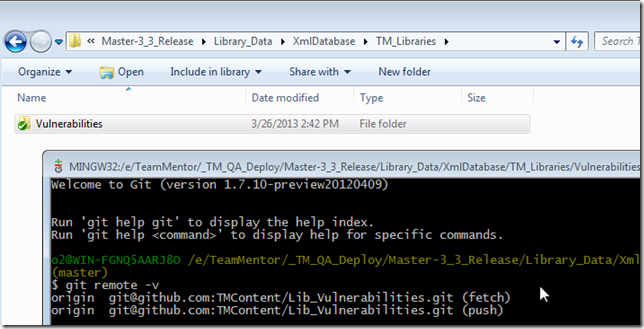
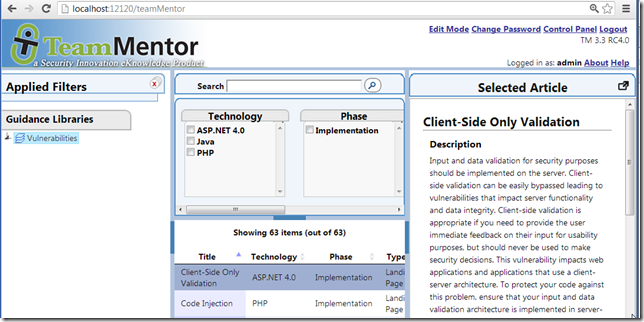
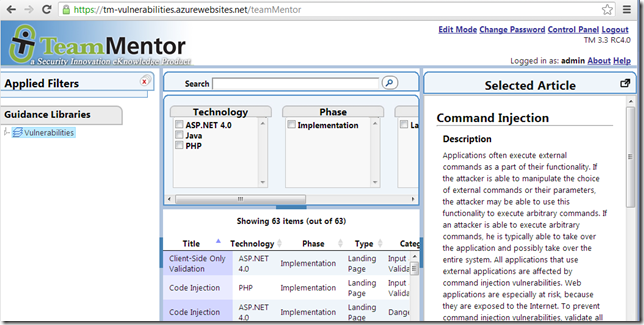
Quickly opening the main TM page, will now show the Vulnerabilities Library:
Final step is to do manually commit the changes made to the User_Data_Git_Site_vulnerabilities.teammentor.net local repository (note: auto commit and push is disabled on the UserData when running TM from localhost)
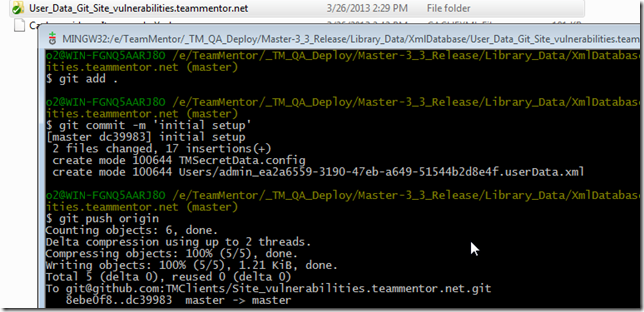
Which will put those updates in GitHub

Now that we have this GitHub repository configured, we can configure the Git UserLocation of live QA server:
And after reloading the cache:
The https://tm-vulnerabilities.azurewebsites.net will now have the Lib_Vulnerabilities library
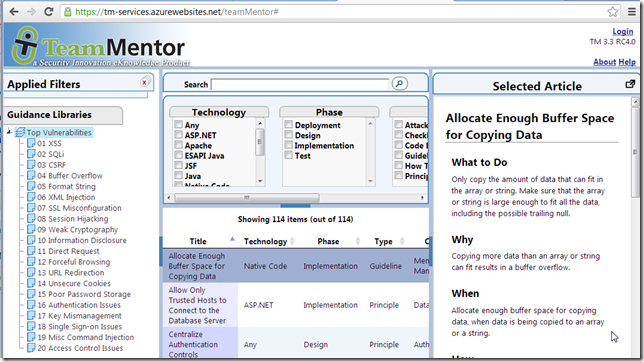
Changing the ‘View TM article by anonymous users’ status via GitHub
From the 3.3. release of TeamMentor (TM) it is now possible to change configuration settings of live servers directly from GitHub.
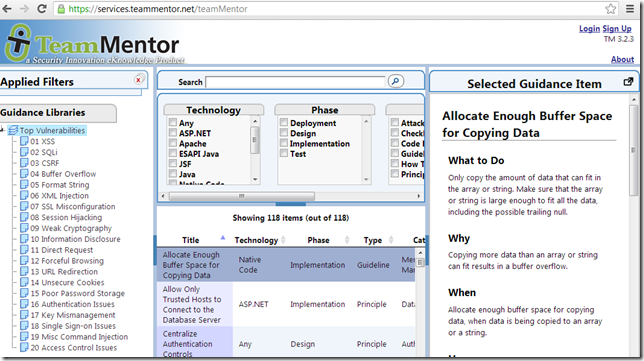
For example I just published a QA version of the https://services.teammentor.net site on Azure’s https://tm-services.azurewebsites.net
Here is what https://services.teammentor.net (on version 3.2.3) looks like:
Here is what https://tm-services.azurewebsites.net (on version 3.3 RC4) looks like:
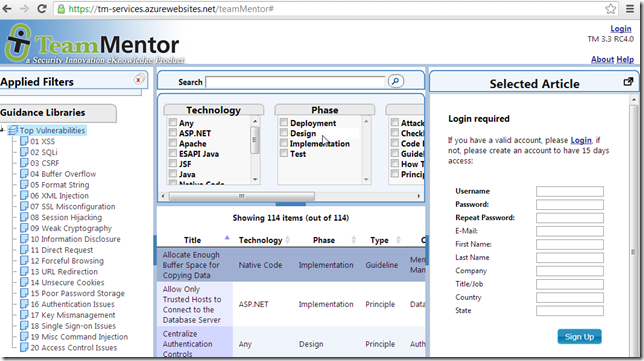
Can you spot the difference?
Here is the file (on GitHub) that controls if Anonymous users should be able to see TM’s articles:
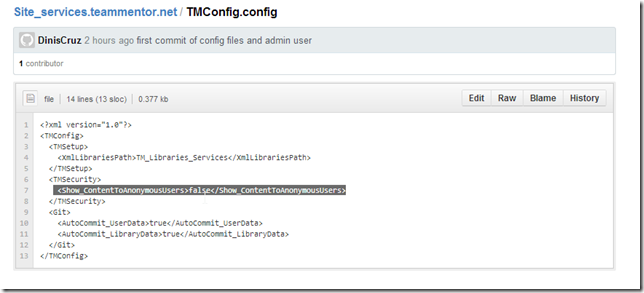
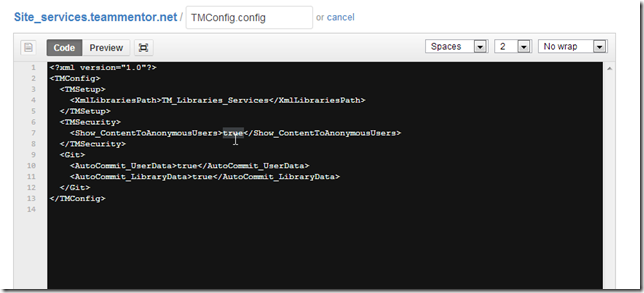
So the solution is to edit this file (in GitHub):
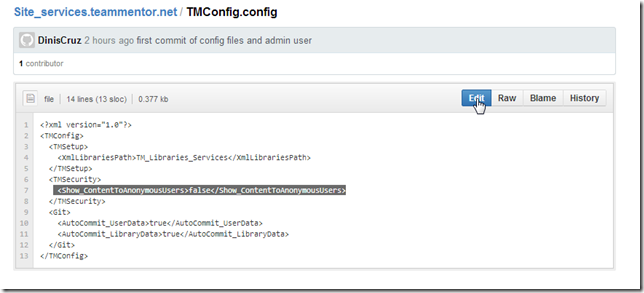
change that value to true:
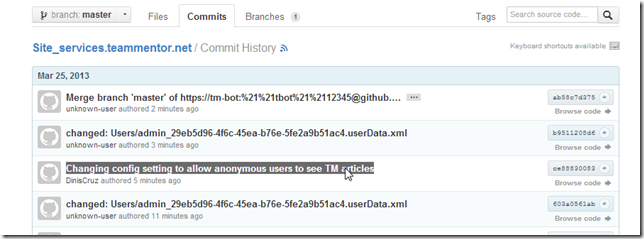
Commit that change in GitHub’s UI:

With this commit being now part of this repository:
Next we go into the new Tbot interface (https://tm-services.azurewebsites.net/tbot ), which requires admin privs:
After login , open the ‘Reload Server Objects’ page
And click on the Reload UserData (and Git Pull and Push) button

which when executed:
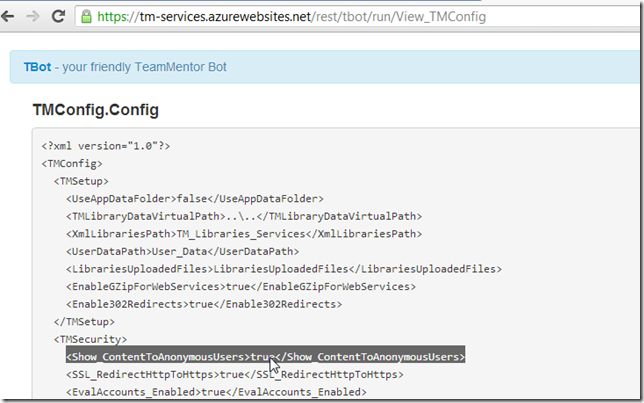
will have updated the local TMConfig.config file:
And if we logout, we will see the expected behavior:
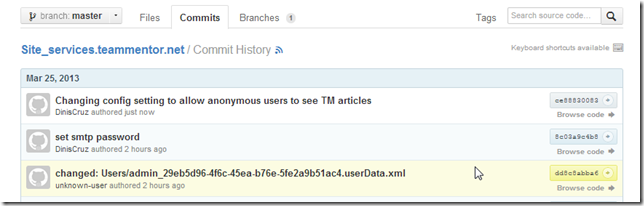
Finally, if we look at GitHub’s commit history, we will see the commit we did in GitHub nicely merged with the commits that happened at the live server
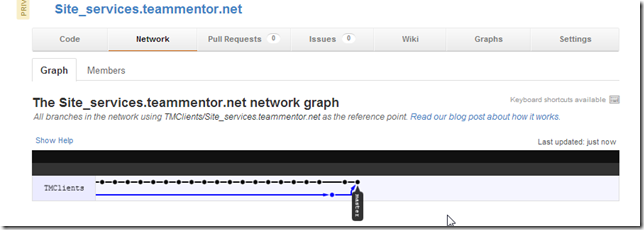
Here is the GitHub’s Network Graph of this repository, which shows both types of commits (the ones performed at at the live server vs the one at GitHub)
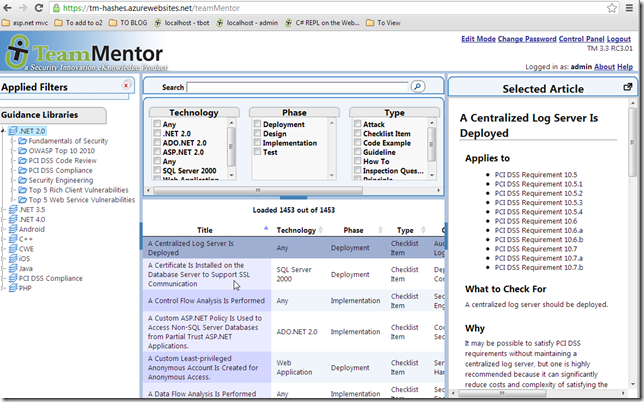
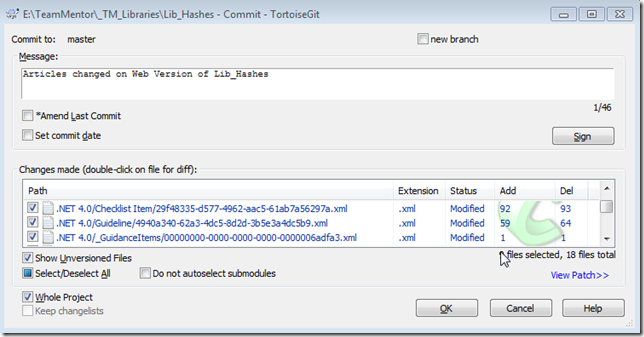
Creating a new TeamMentor test site using TeamCity, GitHub and Azure
Serge just asked me to create a new TeamMentor (TM) website for him using a particular TM library, so here are the steps I took (note: some of this will be automated in the next TM release)
In Azure ….
It all started by going into Azure and creating a new website:
In this case called tm-hashes
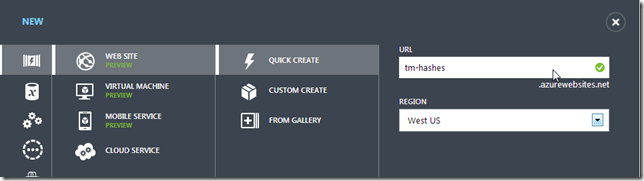
in a couple secs it was available

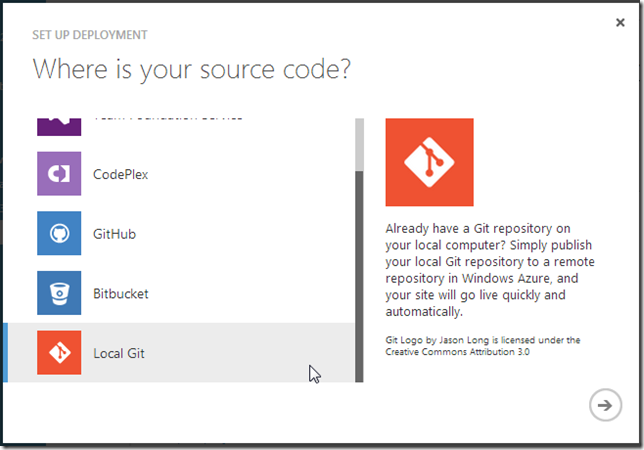
next I set-up git publishing:

using ‘Local Git’ since that works well with TeamCity and doesn’t require that Azure is given pull privileges into the target repo:
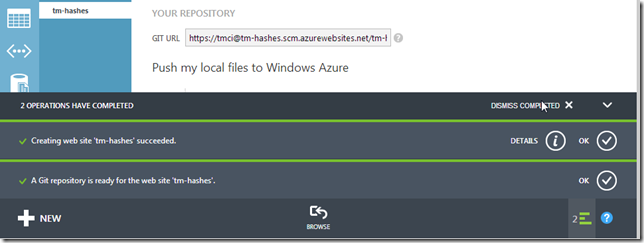
Azure worked for a bit, and after a couple secs I had:
In TeamCity …
Next, in the TeamCity server, to make it easier on next deployments, I added this site to one of the builds that already pushes other sites into Azure:
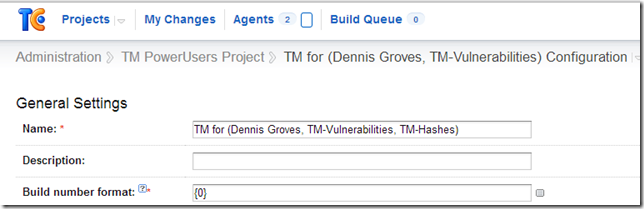
Specifically I added another build-step similar to the ones already there for tm-vulnerabilities and tm-DennisGroves
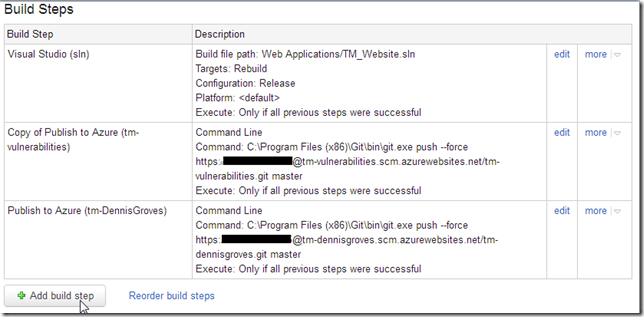
The easiest way to do it, was to create a copy of one of the existing steps:
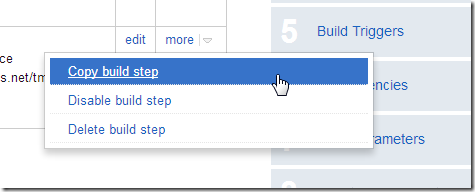
After editing the ‘copied build step’, called Publish to Azure (tm-Hashes), I quickly reordered the build steps
from:
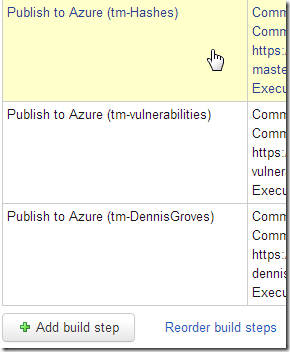
to:

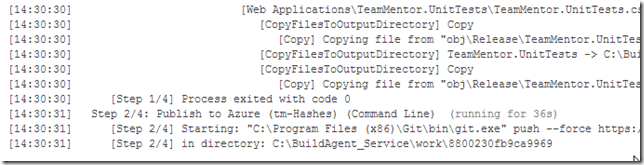
Next, I clicked on Run:

in order to trigger a TeamCity build:

That build will:
- do a git pull from the latest version of the TM code (currently at 3.3 RC3.01),
- build the VisualStudio main project,
- and push to Azure
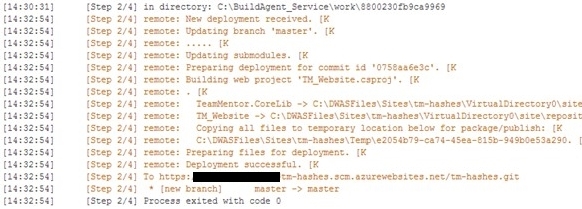
Here are the build logs during the ‘push to Azure’ step:
At this moment the Azure admin page for the tm-hashes site, will show a Deploying message

which becomes Active Deployment once it is completed:
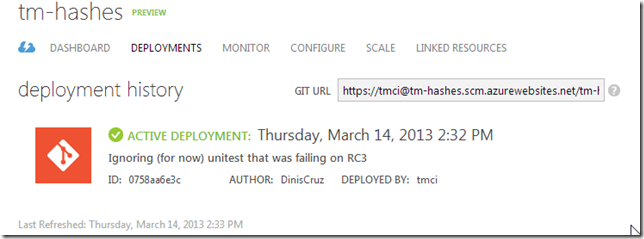
One of the nice hacks the Azure team did with their git implementation is to provide good messages/info in the git data sent back on pushes (the lines in dark-orange below where created by Azure):
Once the push in complete, we can browse the Azure site:

And see an empty TeamMentor installation:

In TM Control panel using GitHub zip file …
The final step is to add the library that Serge wants (note: for this example I’m going to install the library via drag and drop of zip files.)
To get the library files, I went to its private Github repository, and clicked on the zip button
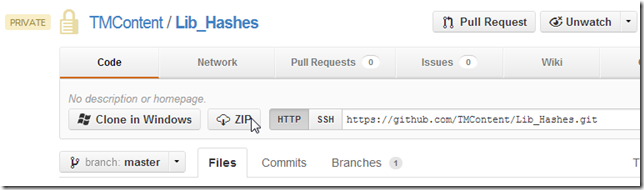
which downloaded the zip file into my current vm:

back in TeamMentor,
I logged in:
as admin
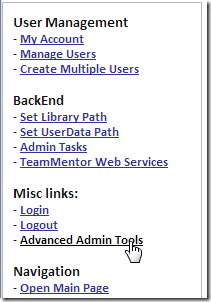
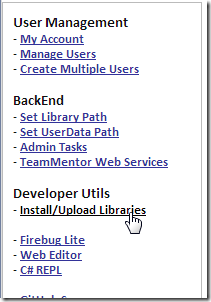
went to the control panel:

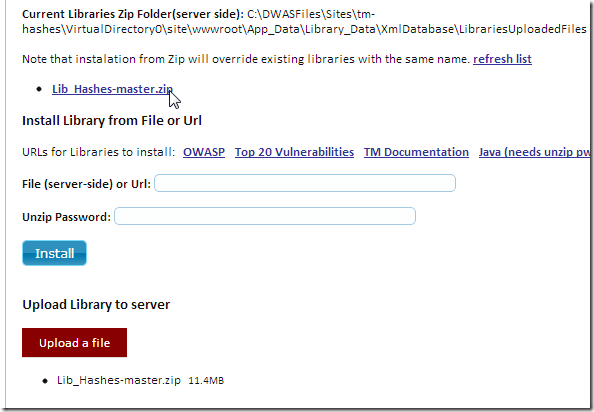
clicked on Advanced Admin Tools and Install/Upload Libraries
drag-n-dropped the local zip file into the Upload a file red box
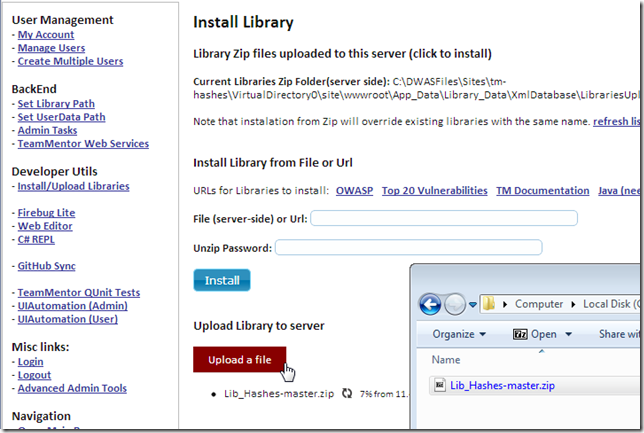
Depending on the network speed, this can take a couple seconds or minutes:
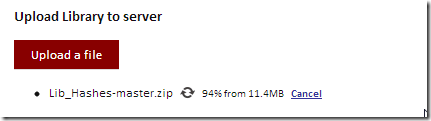
Once the upload was completed,
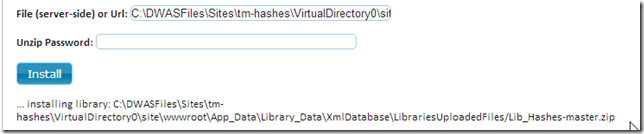
I clicked on the ‘Lib_Hashes-master.zip’ link that appeared at the top:
waited a little bit:
and once I saw the success message:
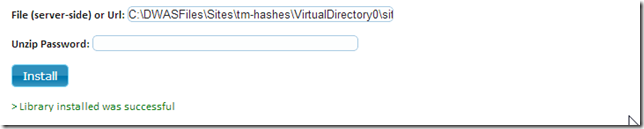
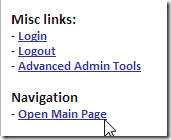
I clicked on Open Main Page
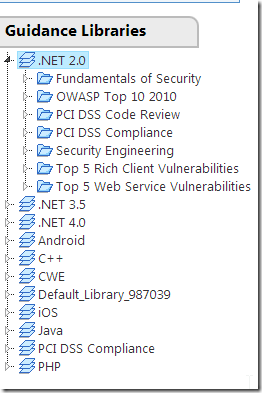
and the main TeamMentor GUI showed the imported libraries:
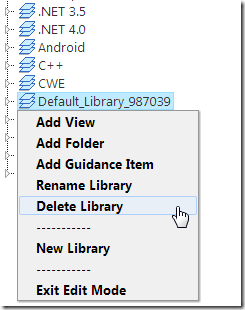
The final step was to remove the original temp library (created by TeamMentor on first install)
And finally, I sent Serge an email with the link to his brand new install of TeamMentor :)
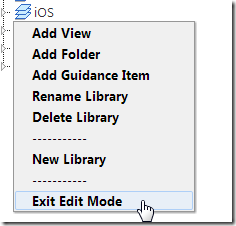
Using Git Branches to fix Issues added to TeamMentor’s GitHub repository
This is the currently workflow that I’m following when coding/fixing TeamMentor Issues added to the TeamMentor/Master/Issues list.
- Find issue to address
- Create and checkout new branch (with the issue ID on its title)
- Apply the fixes (on the new branch)
- Commit the changes (on the new branch)
- Checkout master branch
- Merge changes (from new branch) into master , using the –no–ff (no fast-forward) option (this is very important, see here and here for a good explanation why)
- Push to GitHub
Lets look at this in action.
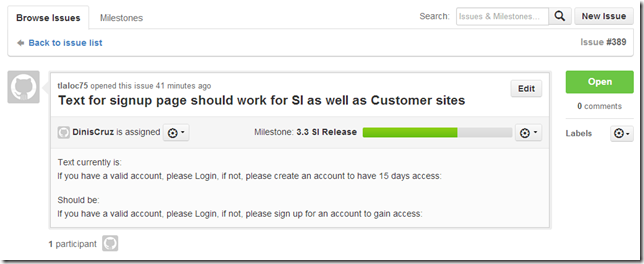
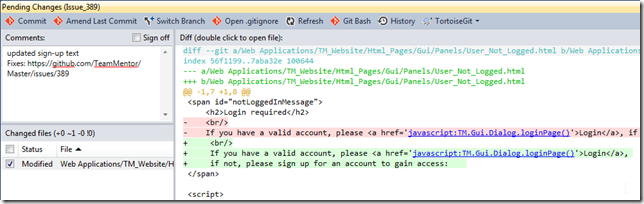
Here is a simple issue to fix: https://github.com/TeamMentor/Master/issues/389
In GitHub, the issue is #389, so on a local clone of the Master repository, we create a branch called Issue_389 (using the –b switch to create it)

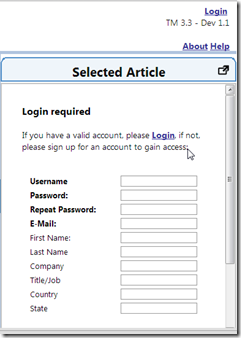
In VisualStudio, apply the fix to the code:

Quickly look in a browser to confirm the change (this should also be reconfirmed via a UI UnitTest):
Commit the change to the Issue_389 branch:
Which means that at this moment, there is nothing else to commit on the Issue_389 branch:

which is now one commit ahead of master
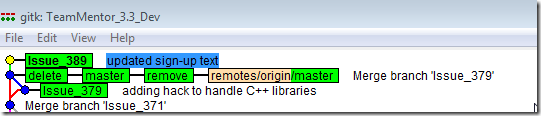
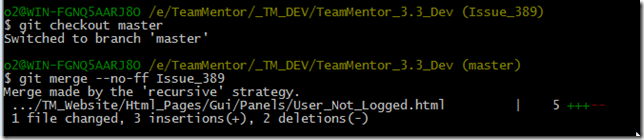
Next step is to checkout _**(into) master and do the **_git merge using the _–no–ff _
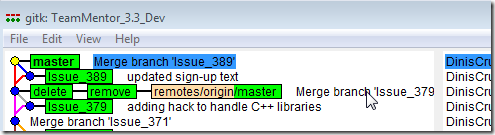
Gitk shows the effect of the –no–ff (ie. the use of the branch was preserved)
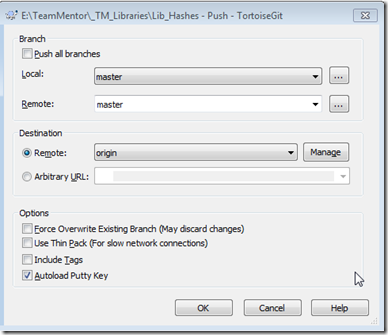
Final step is to push the commits to GitHub:
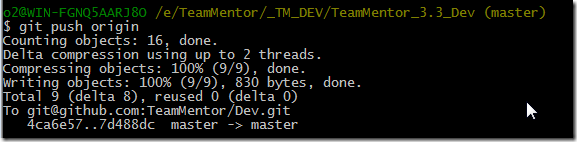
Here is the commit at GitHub:
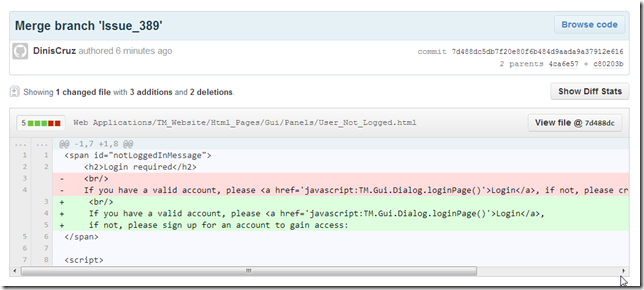
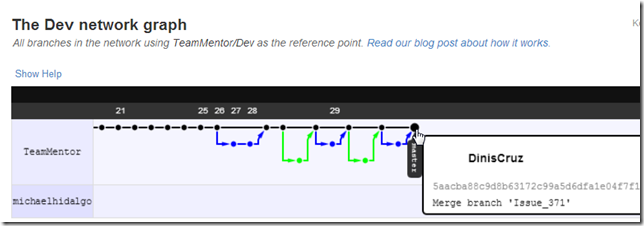
Here is the GitHub’s Network view:
Extracting content files from a Azure deployed version of TeamMentor (pre 3.3 git support)
I was asked by Serge to retrieve some changes he made to a test version of TM hosted in Azure.
This site was hosted at https://tm-hashes.azurewebsites.net and since this was a version before the built-in Git Support (where git TM Libraries are natively supported by TM), the only way to get the files was to copy them from the live server.
So my first attempt was to use SFTP (which Azure supports) to connect directly to the web root.
To get the STFP address, I went into Azure’s control panel for the tm-hashes site:
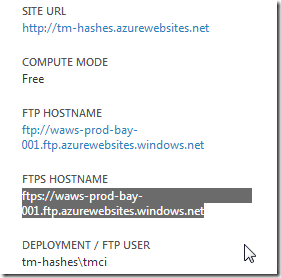
Copied the SFTP address and opened it in local windows explorer (which will require login into the tm-hashes\tmci account):

Navigated to the site’s webroot (which are the deployed files)
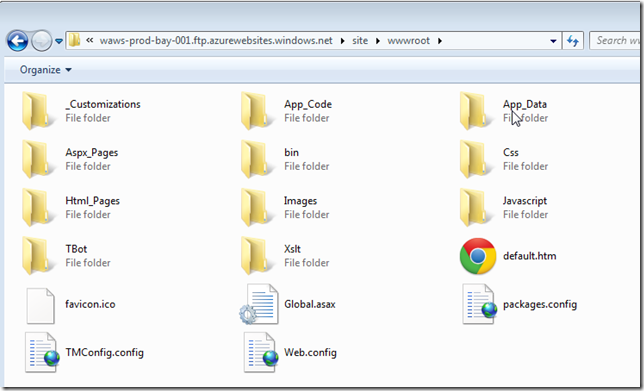
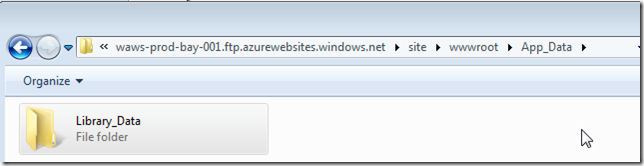
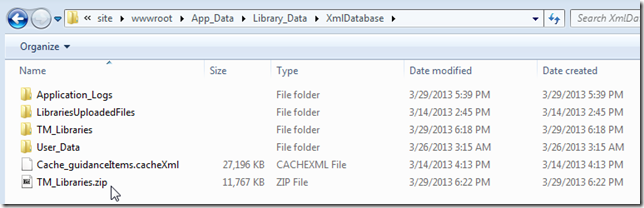
Then into TM’s Library_Data folder, which is located inside the App_Data folder (because this is the main location where this site’s IIS account has ‘write privileges’)
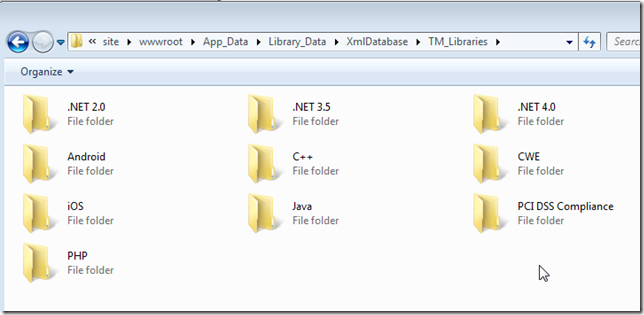
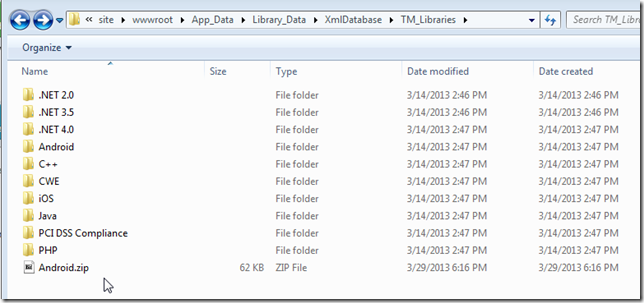
In there we can find the XmlDatabaseTM_Libraries folder which contains all libraries currently loaded in this server
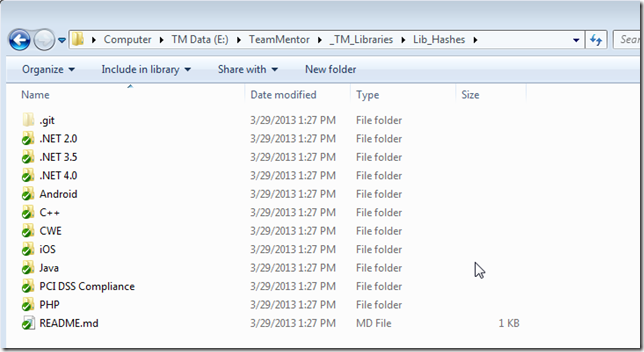
Back in my local VM, I have clone of the target git repository (https://github.com/TMContent/Lib_Hashes):
into which I’m going to copy the folders from the SFTP live site:
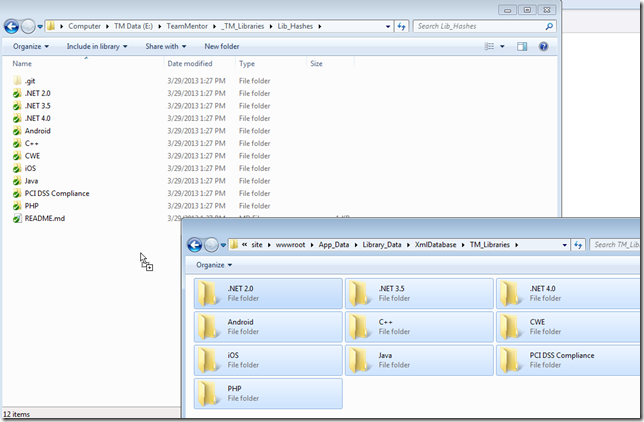
After some time of starting the drop ….
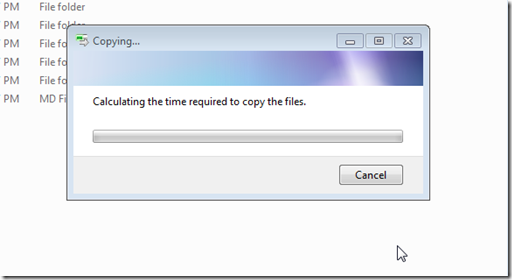
…. I confirm the overwrite
…. and it looks like it will take 1 hour
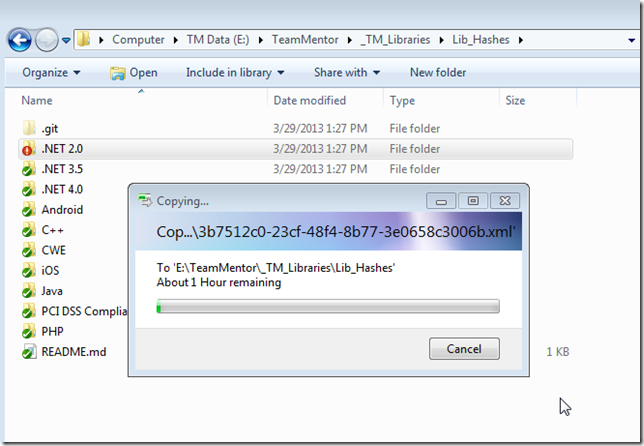
or maybe 6 hours :
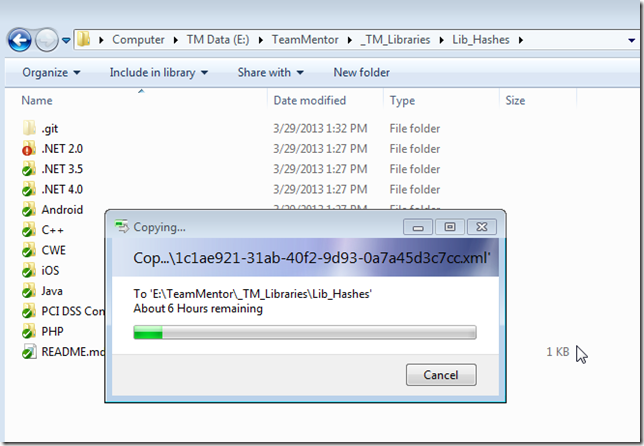
After 38m of copying it is now down to 3h
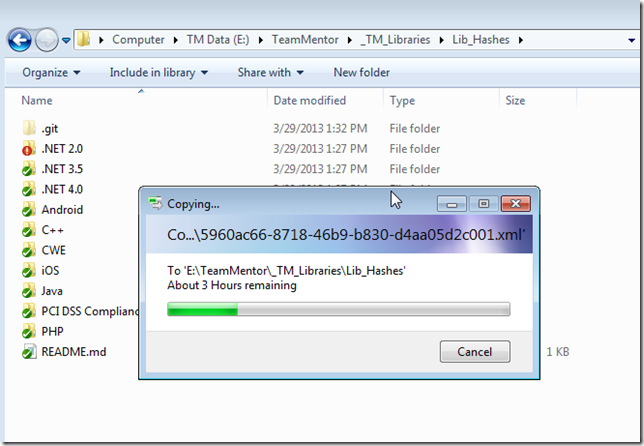
hummm….. damm (after 1h and a bit of copying)

That kinda sucks
I think I need to try a different approach :)
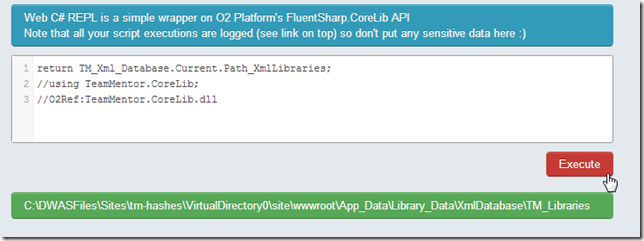
Time to open up the C# REPL included in TM:

Get the path to the Xml Libraries folder:
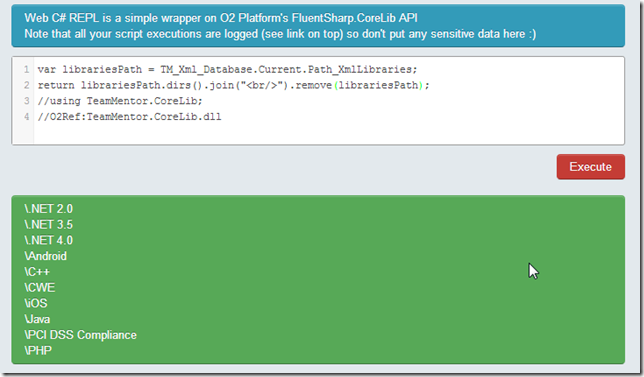
Confirm that the folders we want are in there:
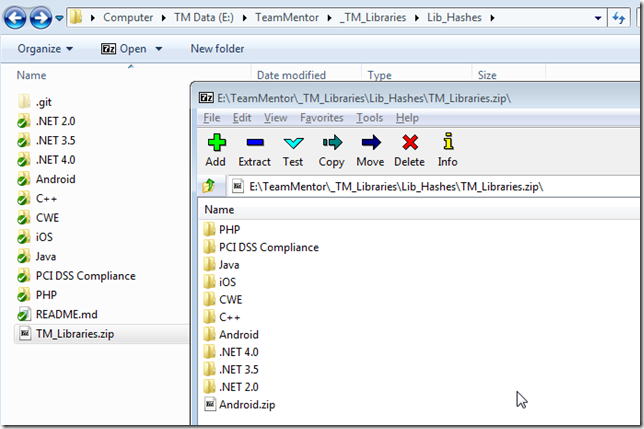
Lets first try to zip the forth library:
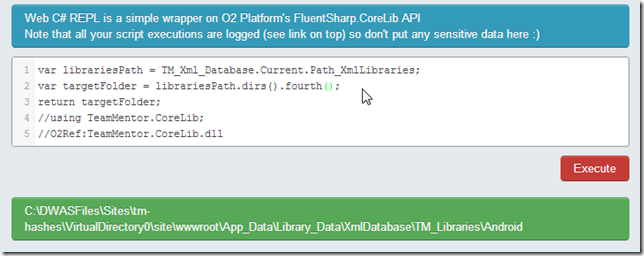
Which is the Android one:
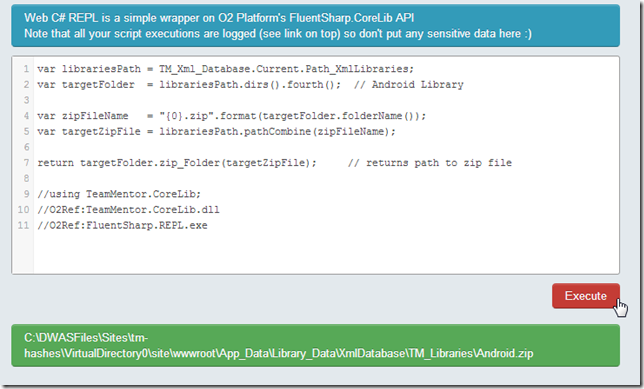
After the script shown above executes, a quick look at the ftp site shows the expected Android.zip in there:
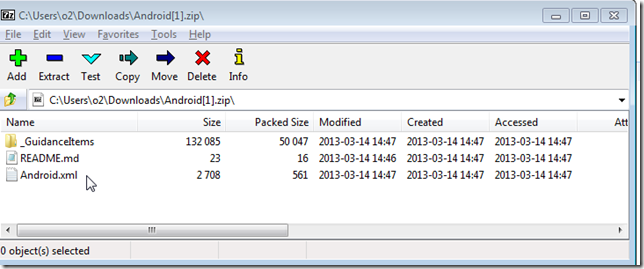
Which contains the files we want to get:
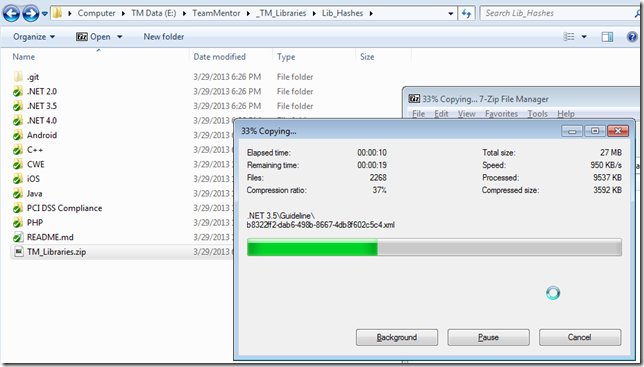
Next lets do the zip of the entire Libraries folder:
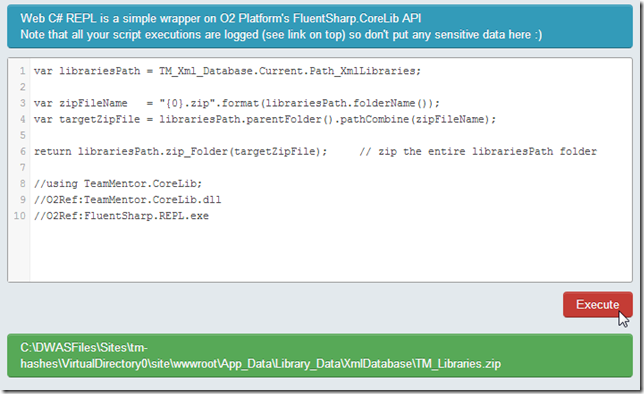
It takes about 1m to create the 11Mb file
Which can now be copied locally
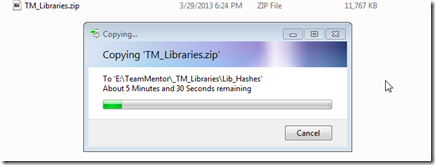
…note how this is much faster than the multiple hours wait we experienced above:
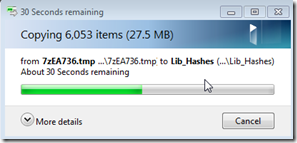
Once the zip file is downloaded:
I unzipped the files into the Lib_Hashes folder:
Choosing to overwrite the existing files:
After the copy, Git will pick up the changed files:
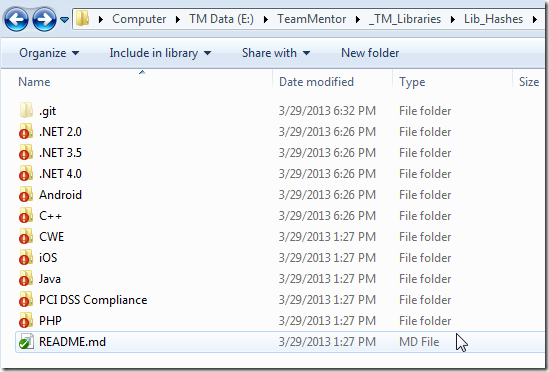
Which we can commit:
And push to GitHub:
Using NGit to create native Git support in Azure deployed app (with automatic pushes and pulls)
This entry will show a pretty powerful new feature in TeamMentor (TM) which I’m very proud and excited about!
This feature is so important, that it literary caused a delay on the release of TM 3.3 for about 1 month (my instinct was pushing me on this direction since I ‘knew’ that this could be done, and that it would be a killer feature). Btw, there is a lot more NGit/Git support than what is shown here, but I’m sure you will see the power in the workflow described below.
Basically, TM’s backend engine will now automatically perform:
- a git pull when the TM server starts (or it cache is rebuilt)
- a git commit followed by a git push on every library edit (on both content and structure changes).
And since TM uses the .NET Library NGit, what we have here is a pretty powerful self-contained .Net-based ‘git for content versioning’ solution.
Practically speaking, this is a Git workflow that runs on Azure-hosted-site without requiring Git to be installed on the live servers!
This solves the problem created by the lack of git.exe (and supporting files) on an Azure’s deployed web application (Azure’s git support is limited to pushing code to Azure’s servers, which will trigger MSBuild-like website publishing workflow)
Here is a example of this managed Git workflow in action.
The https://tm-tm4tm.azurewebsites.net site:
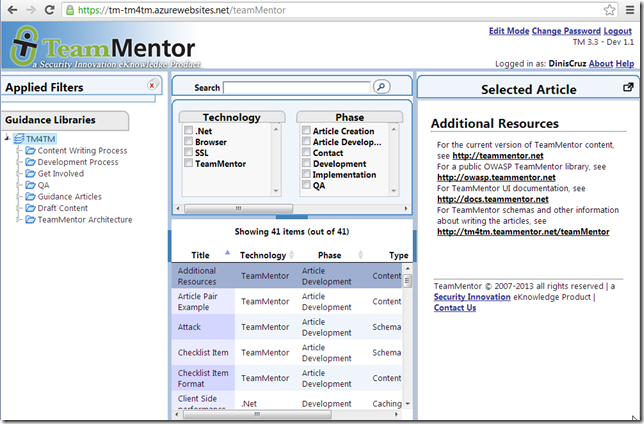
is currently configured to use the UserData from this repository
which contains a reference to the https://github.com/TMContent/Lib_TM4TM repository:
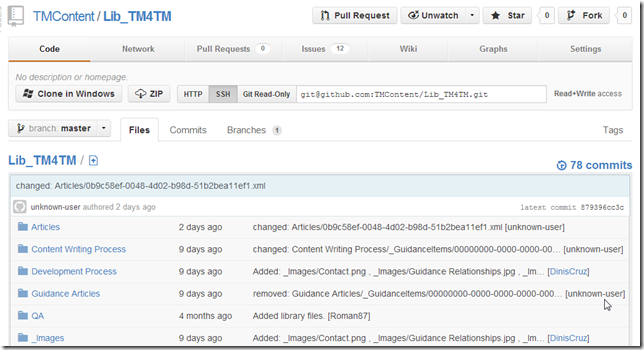
In practice, what this means is that the TM articles we see in https://tm-tm4tm.azurewebsites.net are the ones hosted and managed by the https://github.com/TMContent/Lib_TM4TM repository.
But since the mapping is done via NGit and the account used (in Azure) to connect to GitHub’s Lib_TM4TM has push privileges, it is now possible to make a change in https://tm-tm4tm.azurewebsites.net that is auto committed locally and then into https://github.com/TMContent/Lib_TM4TM
Auto Committing and pushing changes
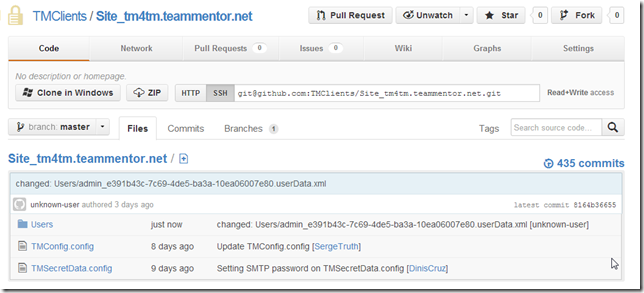
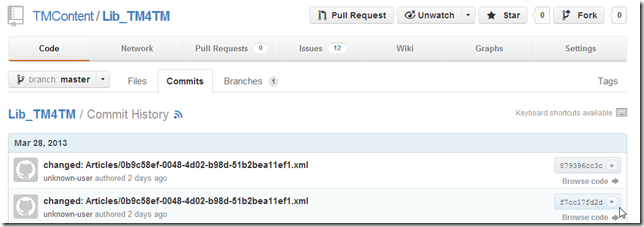
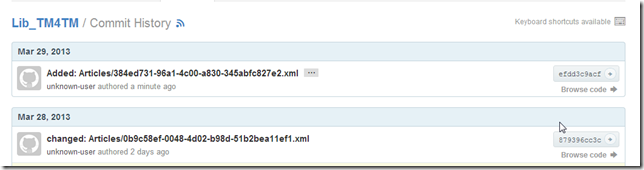
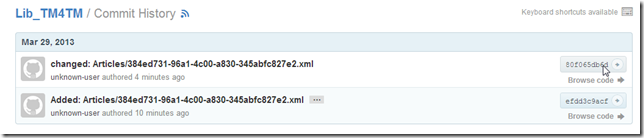
For example, here are the last commits at https://github.com/TMContent/Lib_TM4TM
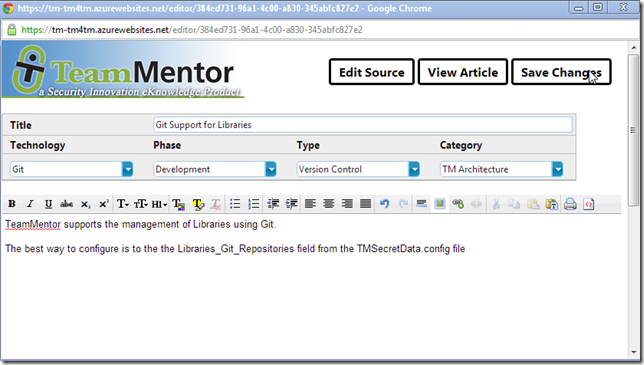
In the https://tm-tm4tm.azurewebsites.net server, lets’ add an new Guidance Item (i.e. an Article)
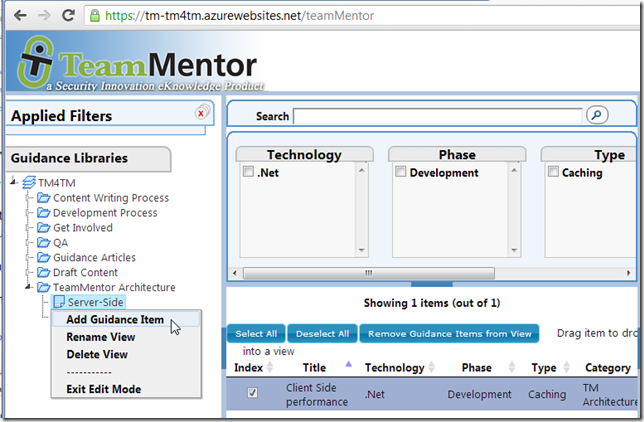
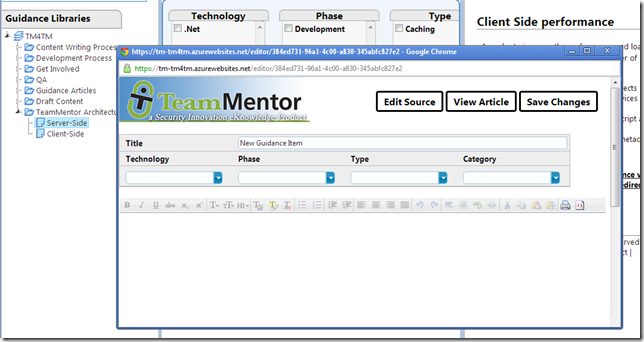
Since (in TM 3.3) the articles are created immediately, by the time the editor is shown, the article shown in the popup-window will already exist on disks (i.e. there is already an 384ed731-96a1-4c00-a830-345abfc827e2.xml file on the server)
And with the new ‘auto Git commit’ feature, the git commit of the new article will be available (after a couple secs) at GitHub:
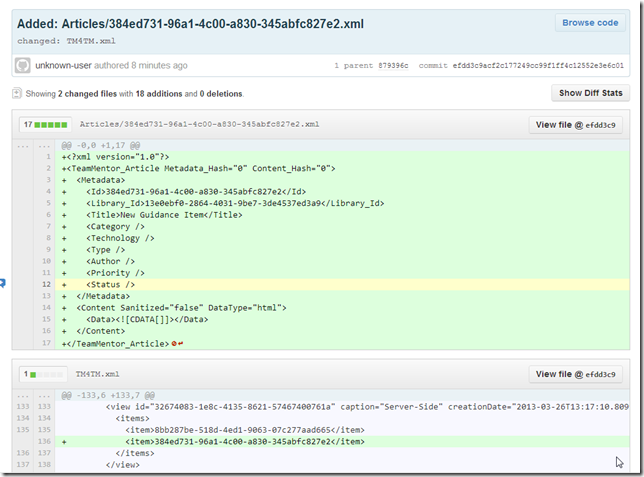
This ‘commit on new article’ is made of two file changes:
- The new article (the 384ed731-96a1-4c00-a830-345abfc827e2.xml file)
- The mapping of the new Article’s GUID to the chosen ‘view’ element (which is part of the Tm4TM.xml library xml file)
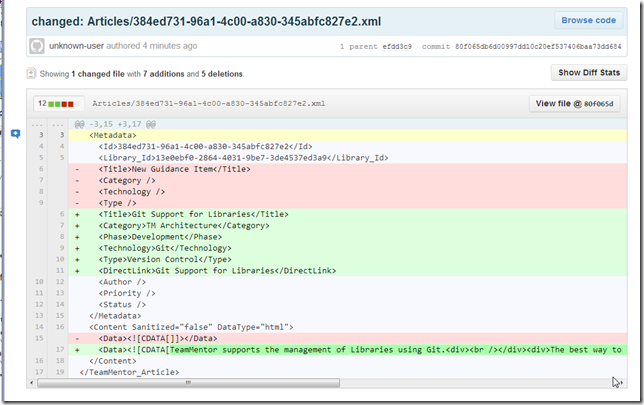
Next let’s make some changes to the new article:
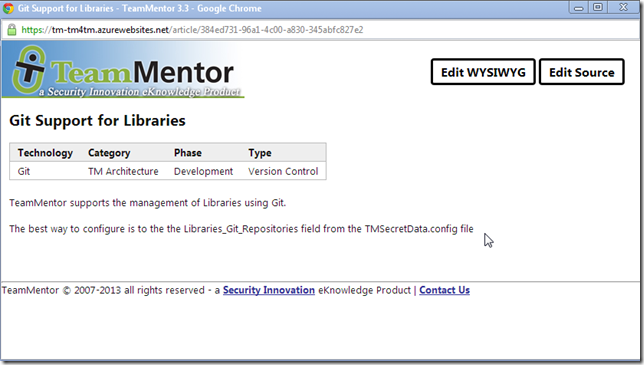
After saving, the article is now available at
https://tm-tm4tm.azurewebsites.net/article/384ed731-96a1-4c00-a830-345abfc827e2 or
https://tm-tm4tm.azurewebsites.net/article/Git_Support_for_Libraries
As before, there is a new Commit at GitHub (https://github.com/TMContent/Lib_TM4TM/commits/):
Which contains the ‘metadata changes’ and the new article’s html content (created by the WYSIWYG TM online editor):
And since this is all Git based, many more complex and multi-user/hosting scenarios are easily supported (for example I can have a local copy of the TM4TM server/repo which I can edit offline and push to GitHub (directly or via Pull Requests)).
The git merge strategy is the same used by GitHub:
- If there are no conflicting changes, everything happens automatically or via GUIs pages
- If there are merge conflicts, the Git Bash and Windows Diff tools should be used to address them