Table of Contents
- The Dance of Shiva
- Quick Tips
- Making Learning, Communication and Recall Easier
- Position Combinations
- Starting Positions
- The Moves and the Zero Move
- One Arm Basic Movement Maps
- Combined Movements
- Dance of Shiva Posture Suggestions
- Say What You Are About To Do
The Dance of Shiva
This guide is designed to help you learn and understand the Dance of Shiva. While the movements and positions are the same as those developed and taught by Andrey Lappa, the methodology in this manual is slightly different.
Ideally this manual helps make dance of shiva easier to learn.
Quick Tips
Dance of Shiva is a mind/body exercise that can be practiced in 5 minutes a day. It can be used to practice decision making, clear thinking and getting into the flow.
Start by learning the basic positions first (unless you already know them.) They provide the framework for the movements.
When learning the moves, practice a page of moves (4 positions) or a set of moves (4 pages) at a time. Practice until you can easily remember the moves without needing to refer to this book. Once you’ve memorized a page or set of moves then move on to learning the next set.
Perfection is not required prior to moving on to the next set. What I would suggest is required is that you can do a set of movements without having to think about them in order to do them.
Flow While Learning
One goal of the dance of shiva (one possible goal) is to enter the flow while doing the movements.
Flow is an absence of thought. You know what you have to do without having to think. (There is awareness, but the awareness is focused on doing as opposed to thinking.)
You can practice flowing by working within the limits of your short term memory.
Learning a set of movements, if you find that you have to think in order to figure out what move is next then you are trying to learn too much at once.
Focus instead on learning or practicing a smaller set of movements so that you can get into the flow even as you are learning the movements.
One of the reasons I like to use dance of shiva to practice flowing is that it is easy to brake movements (or positions) into smaller elements that are still meaningful. It is also easy to combine movements.
Use Discernment Prior to Practice
Prior to practicing (or learning) a dance of shiva movement use “discernment” (or thought) to decide which moves to practice.
If you find that you can’t flow (because you have to keep thinking) then use discernment to break the moves down into a smaller practice set.
After learning a small set of movements then practice it in the context of a larger set of movements that you already know. (Here you can use discernment to group a set of practice movements together.
Rest when you’ve had enough.
If you’ve already learned movements then
I would suggest that if you are limited time wise, then focus on doing a few moves and on doing those moves well.
You will feel better doing this (and flowing) versus going through the motions of too many movements, none of which you have learned to the point of being able to do them without having to think about how to do them.
Lead With Your Mind
As you get used to doing the movements, practice seeing or visualizing the position you are moving into before you do the move.
A benefit of the dance of shiva is that the positions and movements are simple enough that this is relatively easy to do.
One other action that you can do is to say the position you are moving to before you actually do the move.
You can think of this as “Leading with your Mind.�
Immediate Feedback for Faster Learning
With dance of shiva you can act as your own teacher. The movements and positions are all clearly defined. Once you’ve learned the basics, you can sense whether you are doing them right or wrong.
You can then correct yourself straight away.
Because there is no lag time between doing the “test” and finding out the results, you can learn relatively quickly. You aren’t waiting for a teacher to “grade your tests.”
With that in mind don’t beat yourself over the head when you make a mistake. Instead, focus on continuing to flow. If you continually make the same mistake then isolate and practice the problem area until you can do it comfortably. Then (gradually if required) re-integrate it.
Making Learning, Communication and Recall Easier
Uniquely naming directories and files allows computer programs to find pieces of information and put them together meaningfully.
Ever notice how you can’t give two files in the same computer directory the same name? The same can be said when communicating information between people.
If the names that we use for pieces of information are unique, it makes it that much easier to communicate those pieces of information meaningfully and without error.
The naming conventions I used for positions and movements are designed to uniquely point to those movements and positions so there is minimal confusion.
Because movements and positions at the basic and complex level are unique, it makes it easier to isolate or recombine both positions and movements meaningfully.
This gives both the brain and your conscious mind a simple hook with which to file what is being learned and to easily recall it.
Basic Positions
Dance of shiva has 64 arm positions which are a combination of 8 basic positions. The 8 basic positions can be divided into two groups, horizontal and vertical.
- In the horizontal positions the palms face upwards and are named 1, 2, 3 and 4.
- In the vertical positions the hands face vertically outwards and are named a, b, c and d.
Horizontal Basics
In the horizontal positions the fingers either point outwards or inwards. In addition the hands are at head height or higher or at about the level of the waist as follows:
- 1 and 3: The fingers point outwards.
- 2 and 4: The fingers point inwards.
- 1 and 4: The hands are head height or higher.
- 2 and 3: The hands are belly button height (ish).
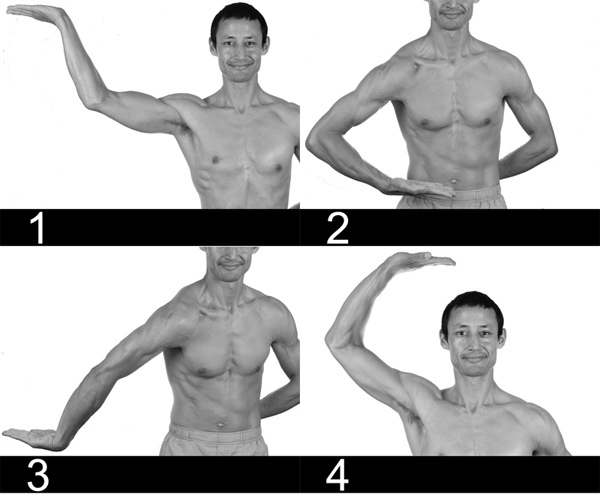
These pictures show the horizontal positions (1, 2, 3 and 4) using one arm.
- For position 1 the hand is held with palm facing upwards with the fingers pointing outward to the side.
The elbow is positioned slightly higher than the shoulder. - For position 2, the hand is held palm up with the fingers pointing inwards just above the belly button. (This height may vary.)
The elbow points out to the side. - For position 3, the hand is held palm up with elbow and fingers both pointing outwards.
This position is challenging. Roll the top of the shoulder forwards. - For position 4, the hand above head height with the the fingers and elbow pointing outwards.
Vertical Basics
In the vertical positions the arms are between shoulder height and the height of the bottom of the sternum. The fingers either point forwards or rearwards. The elbows point outwards or inwards.
- a and c: Fingers point forwards.
- b and d: Fingers point backwards.
- a and b: Elbows point outwards.
- c and d: Elbows point inwards.
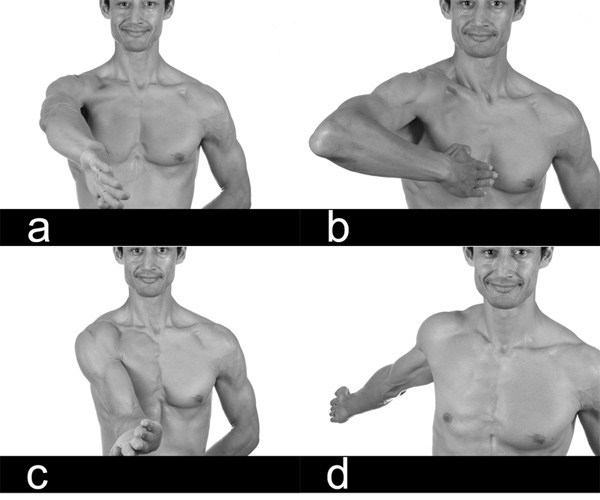
These pictures show the vertical positions (a, b, c and d) using the one hand.
In position a, the hand stab forwards. Fingers point forwards and the elbow pointing outwards.
In position b, the elbow is bent and points forwards. The forearm, hand and fingers point backwards towards the chest.
Wrists are (ideally) straight.
In position c, the hand stabs forwards. Fingers point forwards but unlike position a, the elbow points inwards as much as possible.
In position d, the arm reaches backwards. The fingers point back and the elbows point inwards.
What About the Fingers?
With regards to the fingers.
- One option is to keep the fingers straight and together.
- Another option is to make them long and separate them slightly.
In either case, if you make a decision on how you want your fingers to be, you can then feel them and make corrections when your fingers fall out of line.
When picking how to “use” your hands it might help to have an imaginary intention.
- For the horizontal positions imagine balancing a tray on your finger tips. In this case the fingers will be spread and slightly curved.
- For the vertical positions you can imagine your fingers are like knives that you can cut and stab with.
One final option is simply to feel your palms and finger. And make them feel “alive” and comfortable.
To get this feeling open your palm and spread your fingers. And lengthen your fingers just a little.
Maximum Space and Minimum Effort
In a yoga pose one goal could be to create maximum space with minimum effort. The goal is tension that allows you to feel your body and control it.
This same idea can be applied to the hands. Find a balance between maximum space and minimum effort.
Position Combinations
A two digit code is used to represent the positions of both arms as follows:
- the first digit, that on the left, represents the position of the left arm
- the second digit represents the positions of the right arm.
This is how positions using both arms are uniquely identified.
- 1-1 means both arms are in position 1.
- d-a means that the left arm is in position d and the right arm in position a.
- 4-b means that the left arm is in position 4 and the right arm is in position b.
Position Types (Four Quadrants)
Because there are two types of position for each arm, positions using both arms can be divided into four groups or quadrants.
- Both hands can be horizontal, (i.e. 1-1)
- both hands can be vertical (i.e. a-b),
- the left hand can be horizontal and the right hand vertical (i.e. 1-c)
- or vice versa (i.e. d-3.)
Here are examples positions from each quadrant.


For brevity I refer to these as Q1, Q2, Q3 and Q4 where Q stands for Quadrant.
When practicing (and learning) I tend to group Quadrant 1 and 2 positions together since both arms are in the same plane. Likewise I tend to group Quadrants 3 and 4 since both arms are in different planes.
Mirror the Pictures
When looking at pictures of the positions in this guide, imagine you are using a mirror. Even though my right hand is doing the positions, if you mirrored me, you’d use your left hand.

In this picture my arms show position 3-a.
Because it is mirrored my right arm is in position 3 and my left arm is in position a. If you mirrored the picture and put your left arm in position 3 and your right arm in position a, then your arms would be in position 3-a.
Combined Position Relationships
In Dance of Shiva we can use movement terminology to describe the relationship between the hands. This is a tool we can use to make learning movements easier. We can notice changes (or a lack of change) in the relationship between the hands as they shift positions.
Say you are learning the F-B move. You want to practice this sequence:
- 1-1, 2-4, 3-3, 4-2, 1-1.
You note that the first and third positions relate the arms via a zero move. The second and third positions relate the arms via a transquarter move. If you already understand the transquarter move you can use this understanding to make learning the f-b move easier.
- Starting at position 1-1: move the left hand forward from positions 1 to position 2. You know the right relates via a transquarter. The transquarter of 2 is 4 so you move the right hand to 4. The arms are now in position 2-4.
- From 2-4: move the left hand Forwards from 2 to 3. You know that a zero from 3 is 3, so then you move the right hand to 3. The arms are in position 3-3.
- From 3-3: move the left hand Forwards from 3 to 4. You know the transquarter of 4 is 2 so then you move the right hand to 2. The arms are in position 4-2.
- From 4-2: move the left hand Forwards from 4 to 1. You know the zero of 1 is 1 and so you move the right hand to 1 and you are back at the beginning again.
Then you repeat a few more times to the point (ideally) where you can move both hands at the same time. Eventually you reach the point where you no longer have to think about how the hands relate in order to move them. You can do them without thinking. That is when you can focus on flowing.
However, should you need to you can always call up on this “reference” system again whenever you need it.
I’ve grouped positions that share a relationship below. The first four sets consist of Q1 and Q2 positions. The last four sets consist of Q3 and Q4 positions.
Zero Related Hand Positions
Here are the 8 positions where the right arm relates to the left via a zero move. In these positions (below) the right hand is in the same position as the left hand.
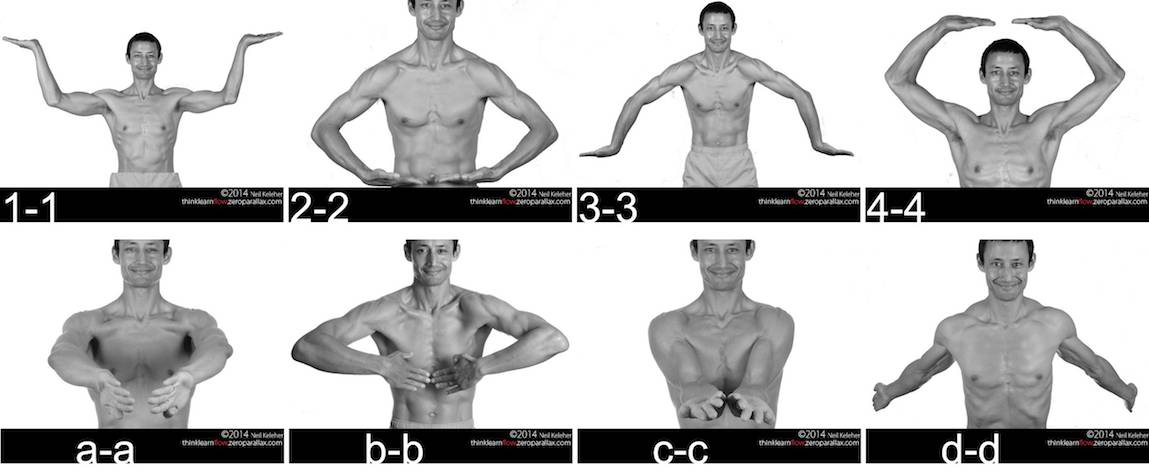
Positions where right arm relates to left arm via the Zero move.
Forward Related Hand Positions
These are the positions (below) in which the right arms relates via a forward move. Or you could just think of the right hand as being one position ahead of the left hand.
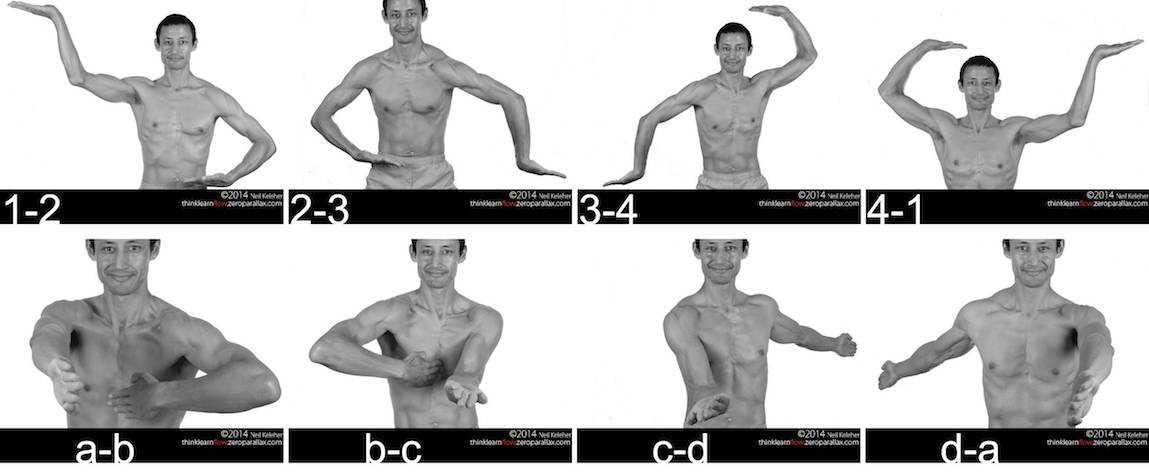
Positions where right arm relates to left arm via the Forward move.
Transquarter Related Hand Positions
These are the 8 positions (below) in which the right arm relates to the left via a transquarter move. This means the right hand is two positions ahead of the left hand.
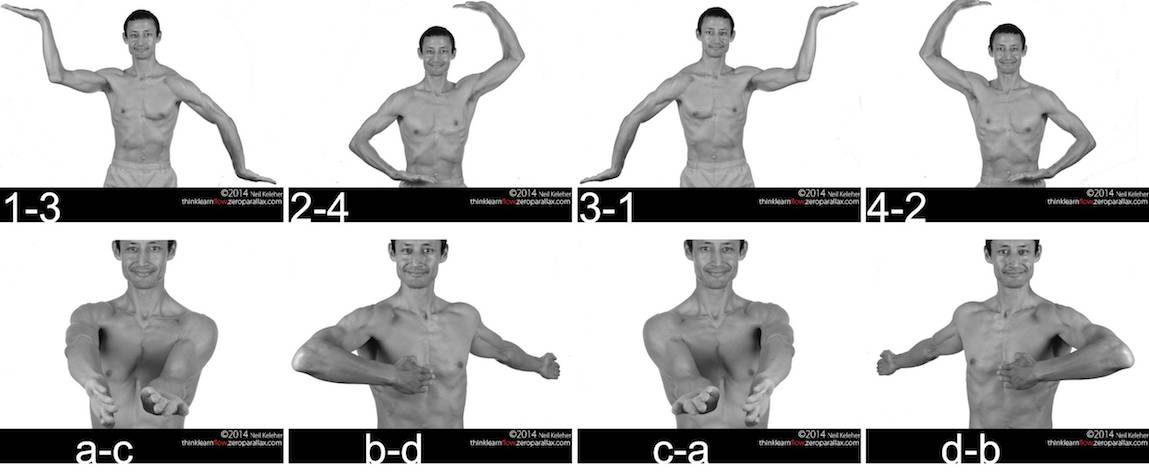
Positions where right arm relates to left arm via the Transquarter move.
Backward Related Hand Positions
These are the 8 positions (below) in which the right arm relates to the left via a backward move. The right hand is three positions ahead (or one position behind) the left hand.
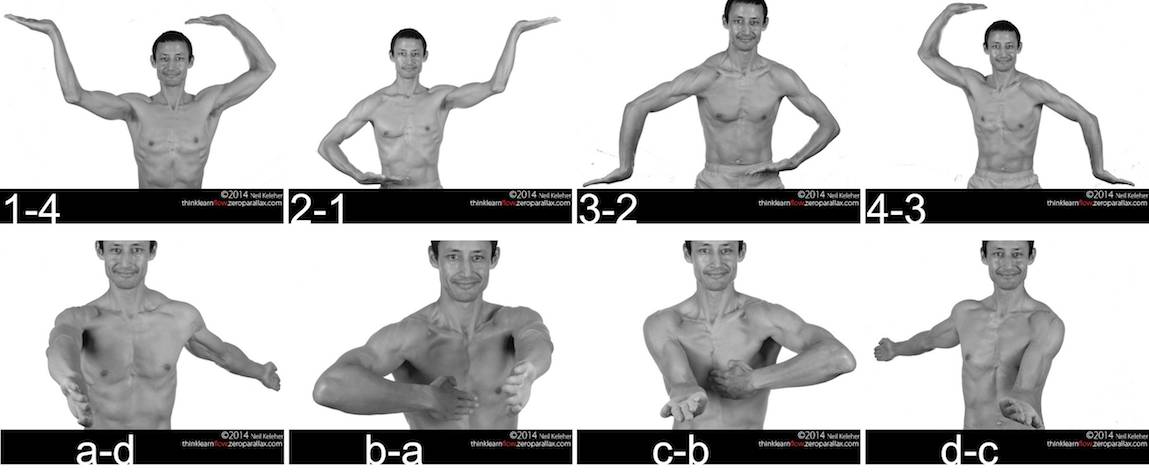
Positions where right arm relates to left arm via the Backward move.
Note that in all of the cases above both hands are in the same plane. These are all Q1 and Q2 positions.
Change Related Arm Positions
These are the 8 positions (below) where the right arm relates to the left via a Change move.
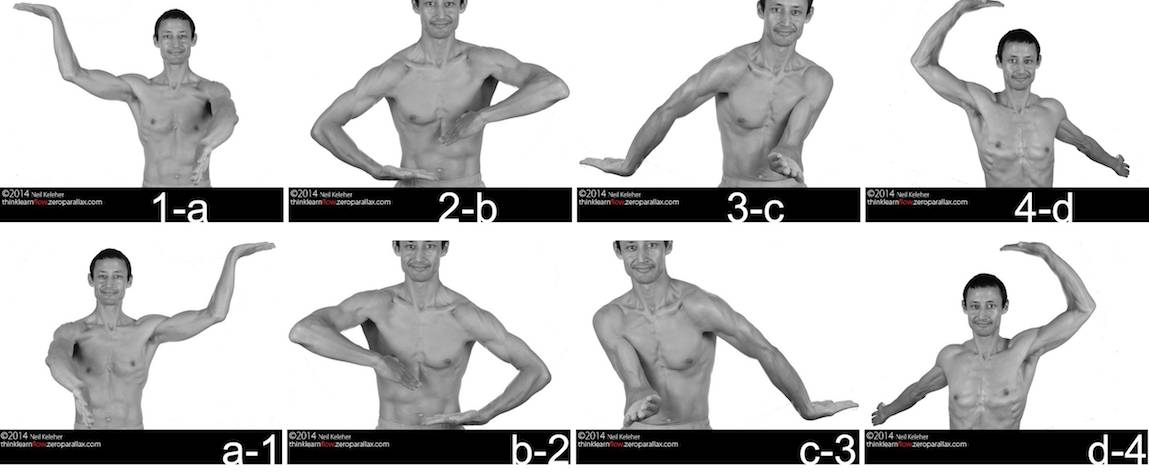
Positions where right arm relates to left arm via the Change move.
ChangeForward Related Arm Positions
In these positions (below) the right arm relates to the left via a changeforward move.
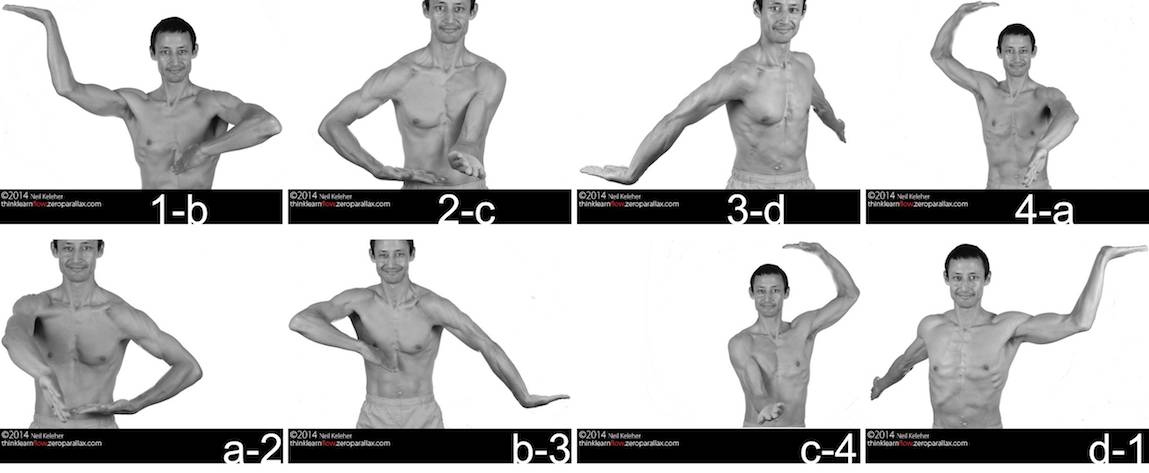
Positions where right arm relates to left arm via the ChangeForward move.
ChangeTransquarter Related Arm Positions
These are the 8 positions (below) in which the right arm relates to the left via a changetransquarter move.
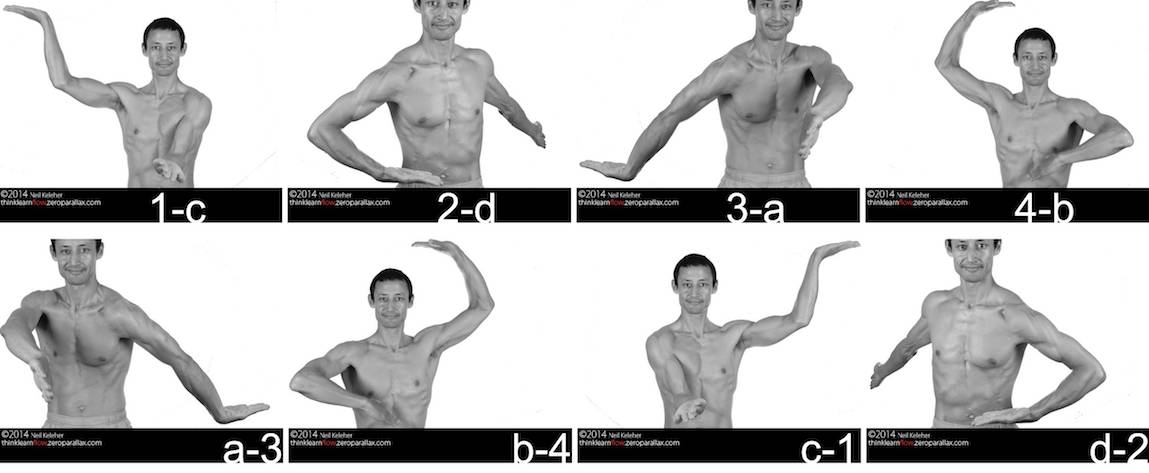
Positions where right arm relates to left arm via the ChangeTransquarter move.
ChangeBackward Related Arm Positions
Below the right arm relates to the left via a changebackwards move.
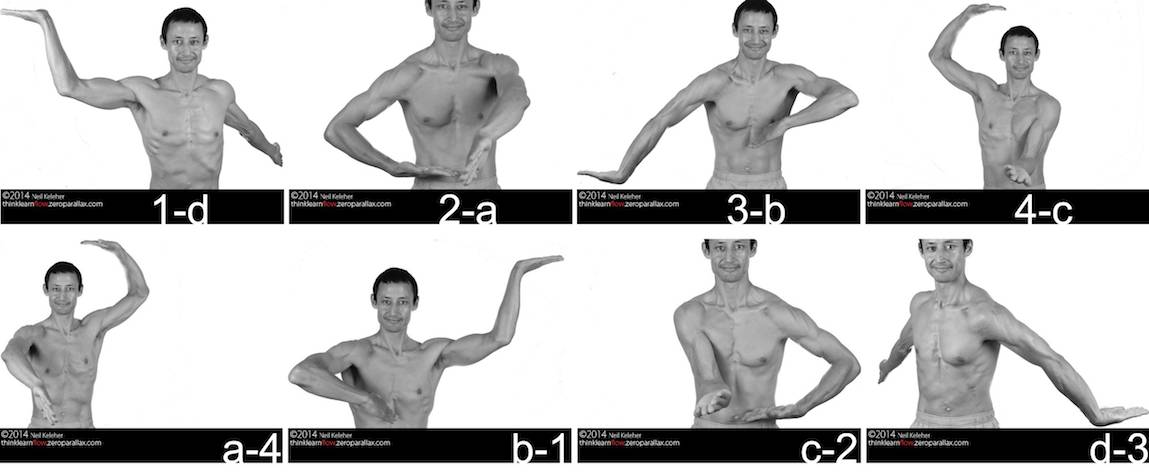
Positions where right arm relates to left arm via the ChangeBackward move.
Memory Aids
When doing movements with both hands we can notice how the relationship between hands changes or doesn’t change depending on the movement being done.
Starting Positions
To make learning the dance of shiva easier I try to use a consistent set of starting positions. That way, instead of having to think about what starting position to use, you can get on with practicing because the starting position is a given.
As your understanding improves you can experiment with different starting positions perhaps with the goal of improving flowability.
Most of the recommended starting positions for learning the dance of shiva have been selected with the goal that their is little or no duplicated movements within a practice set.
And I’ve also selected starting positions so that for each set of moves, the starting positions are (mostly) the same.
As an example, in the part 2 moves, the starting moves for quadrant 1 are generally
- 1-1, 1-2, 1-3, 1-4.
For each new starting position the right hand advances 1 move.
For quadrant 2 the starts are similar:
- a-a, a-b, a-c and a-d.
Likewise for Q3 and Q4 starts:
- 1-a, 1-b, 1-c, 1-d, and
- a-1, a-2, a-3, a-4.
In each case the left arm remains fixed and the right arm advances. I’ll discuss other starting position sets when they arise.
The Moves and the Zero Move
In dance of shiva the definition of a single movement is that it connects one position to another position. The normal assumption is that those two positions have to be different. But, if you consider that an option is also not moving, then there are 8 types of movements. The eighth move, a zero move, connects a position to itself.
The eight moves are: zero, forwards, backwards, transquarter, change, change forwards, change backwards, change transquarter.
Usually I write these in short form as follows:
- Z zero
- F forwards
- B backwards
- T transquarter
- C change
- CF change forwards
- CB change backwards
- CT change transquarter
The zero movement is important in dance of shiva because if we want to be able to join every position that uses both arms to every other position we need a zero move for one arm.
As an example, say we want to connect positions 1-2 and 2-2. The left arm does a forward move. Meanwhile the right arm has to do a zero move. To join 3-2 to 3-4 the left arm does a zero move and the right arm a transquarter move.
In real life, doing nothing is always an option. You could think of it as the option that contains all other options. It’s freedom. But if we always only do nothing, then it’s potential that isn’t realized.
Imagine if the big bang had never happened. You could think of the state before the big bang as a great big zero, potential not yet realized. If it had never happened, then that potential would never have been realized, and neither would we have.
64 Possible Movements
With 8 basic movements there are a total of 64 possible movements using both arms. From each position there are 64 movement possibilities. From position 1-1 there are 64 possible movements. From position 1-2 there are another 64 possible movements etc.
Because the movements are unique to those positions we only need 64 movement names in total.
- There are 49 movements where both arms move.
- There are 14 movements where only one arm moves.
- There is one movement where neither arm moves.
The movements where only one arm moves are a great way to get familiar with both the positions and the movements of the dance of shiva.
One Arm Basic Movement Maps
The following movement maps show each of the arm movements for one arm.
Say the name of the movement and the position the arm is moving into then do the move.
Repeat each set four times, switching arms each time.
Forward and Backward Moves, Horizontal Positions.
The Forward and Backward moves are simple ways to learn the positions while also practicing two basic movements. In the two sets below the focus is on the horizontal positions.
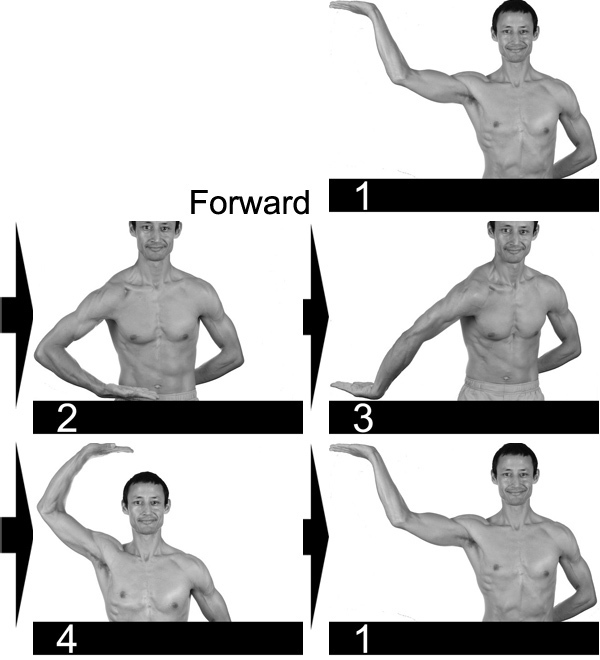
Forward move with hand horizontal.
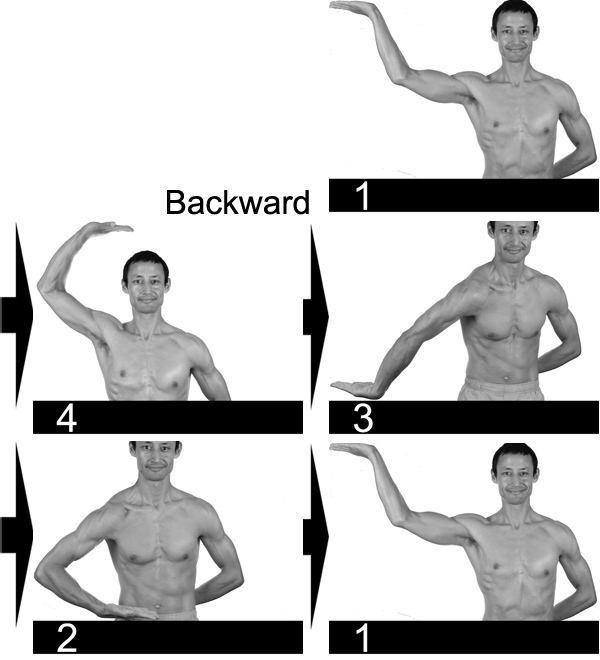
Backward move with hand horizontal.
To get extra comfortable with these positions you can practice incrementing the start position for each repetition. So first start from position 1, then start from position 2 (and finish at position 2) then from position 3 and so on.
Forward and Backward Moves, Vertical Positions
Here the focus is on using the F and B moves to get familiar with the Vertical positions.
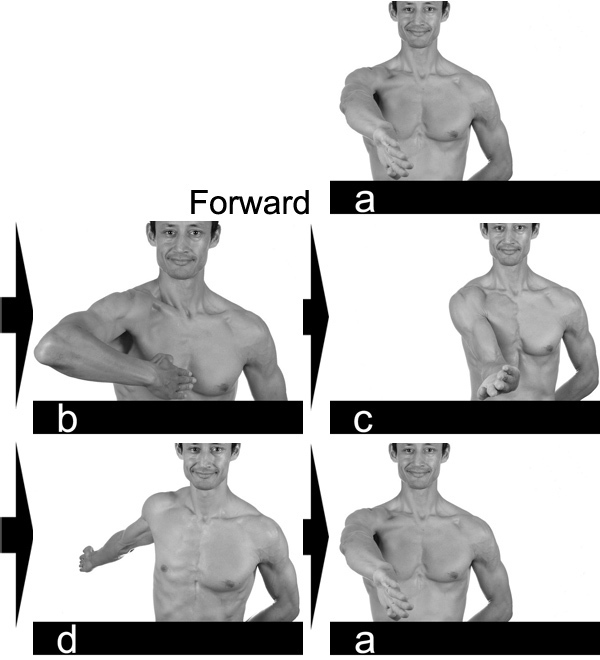
Forward move with hand vertical.
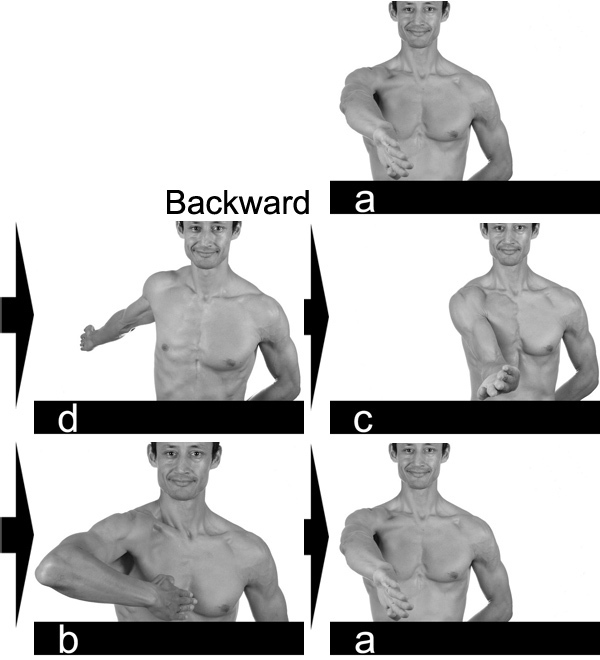
Backward move with hand vertical.
Here again, you can repeat increment your start position by one position after each repetition.
ChangeForward and ChangeBackward Moves, Odd Numbered Positions
The ChangeForward and ChangeBackward movement changes plane each move. In this set the focus is on the CF and CB that move through the odd numbered horizontal positions.
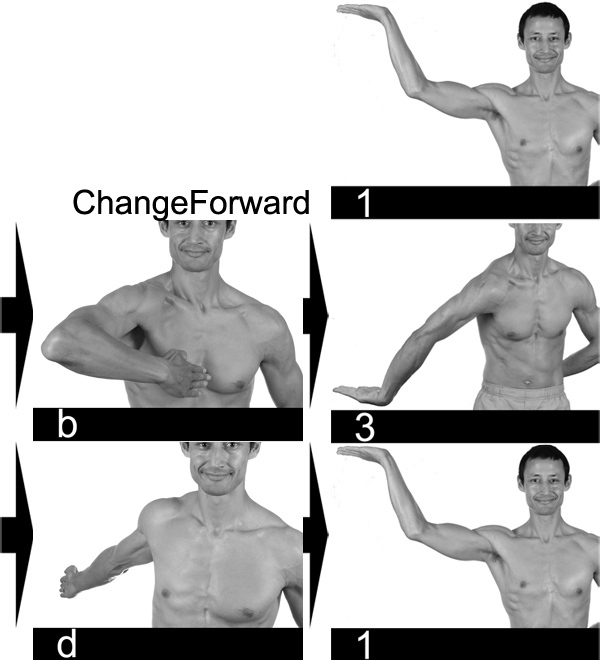
The CF through odd numbered horizontal positions.
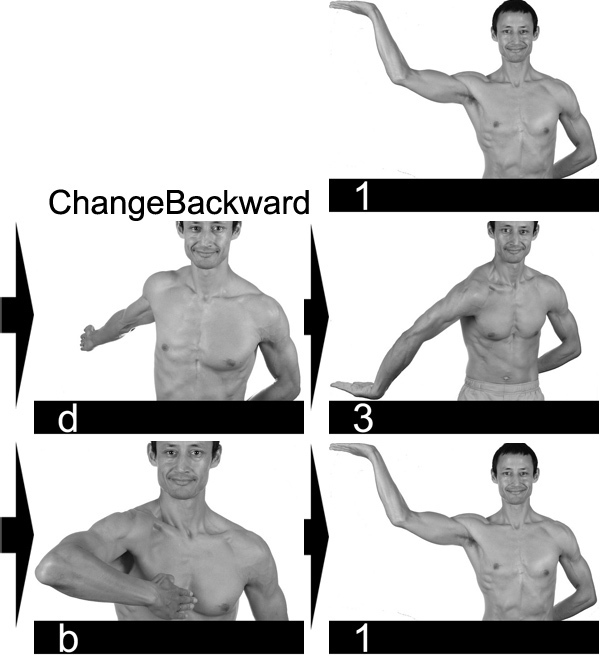
The CB through odd numbered horizontal positions.
ChangeForward and ChangeBackward Moves, Even Numbered Positions
In this set the focus is on the CF and CB that move through the odd numbered horizontal positions.
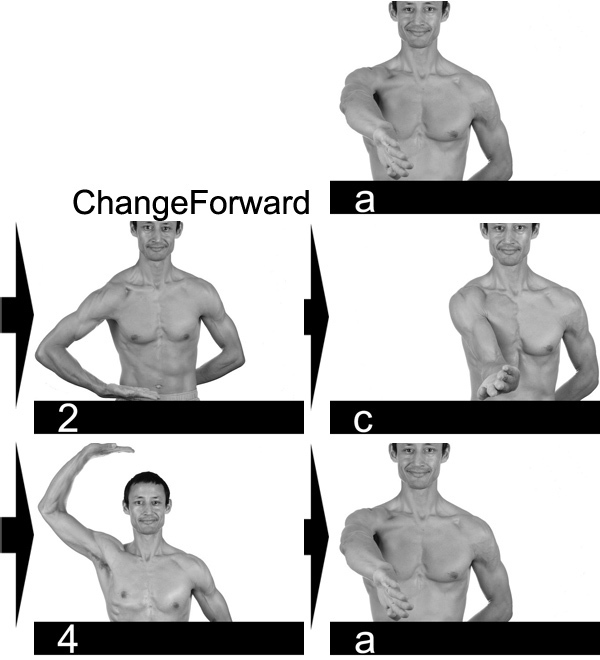
CF move through even numbered horizontal positions.
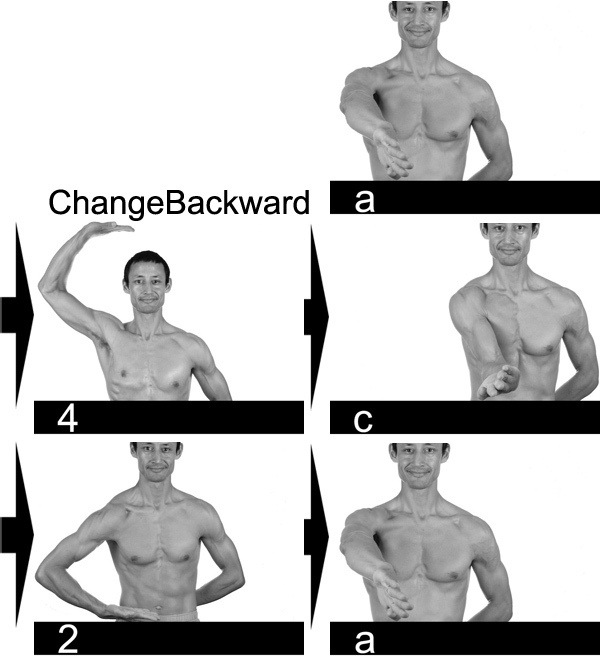
CB move through even numbered horizontal positions.
Transquarter
For the Transquarter and all remaining Acyclic moves, we use four starting positions, not two. Alternate arms after each start and for extra practice use all 8 positions to start from.
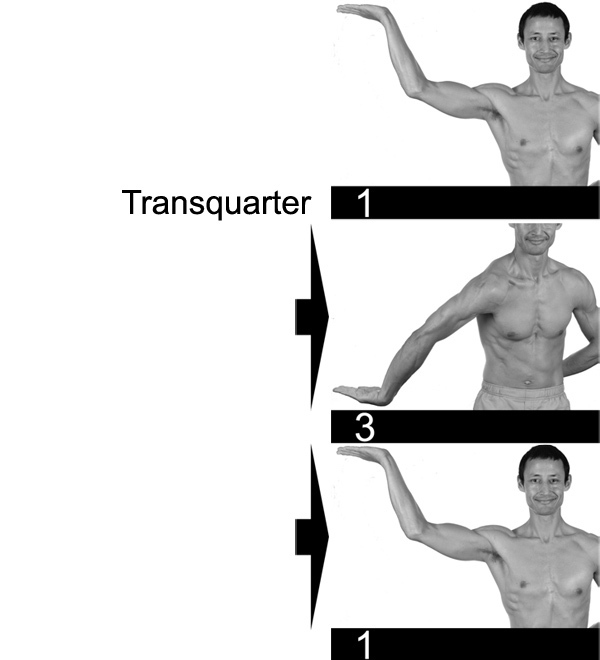
Transquarter between 1 and 3.
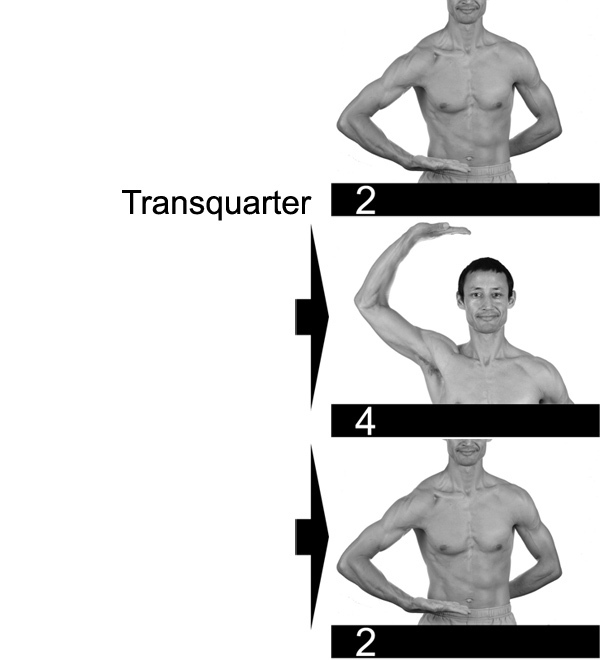
Transquarter between 2 and 4.
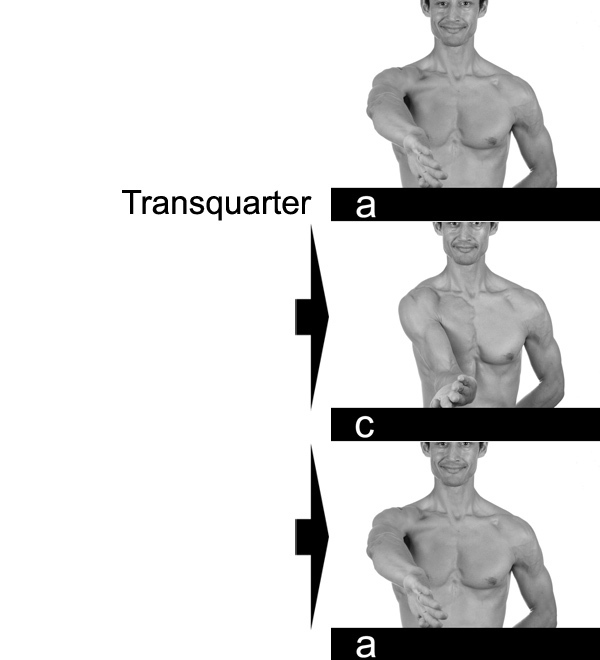
Transquarter between a and c.
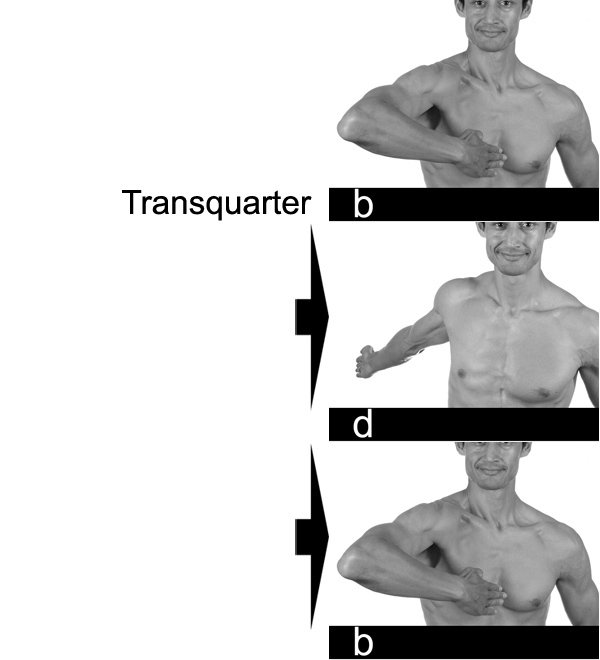
Transquarter between b and d.
Change
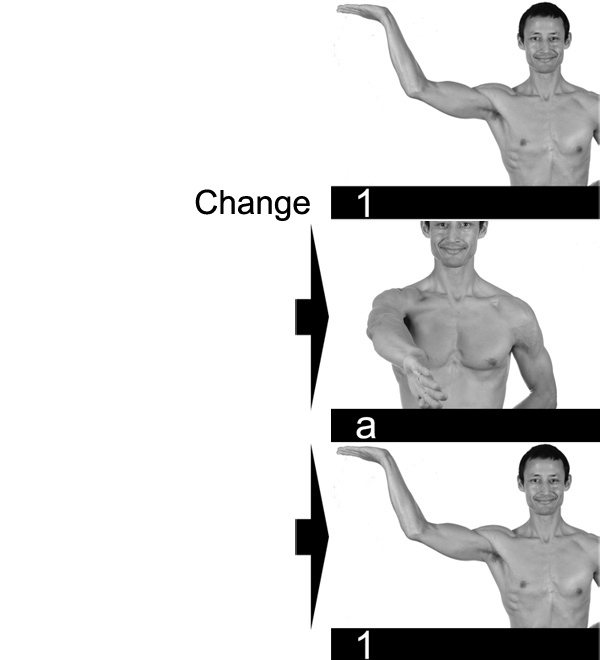
Change between 1 and a.
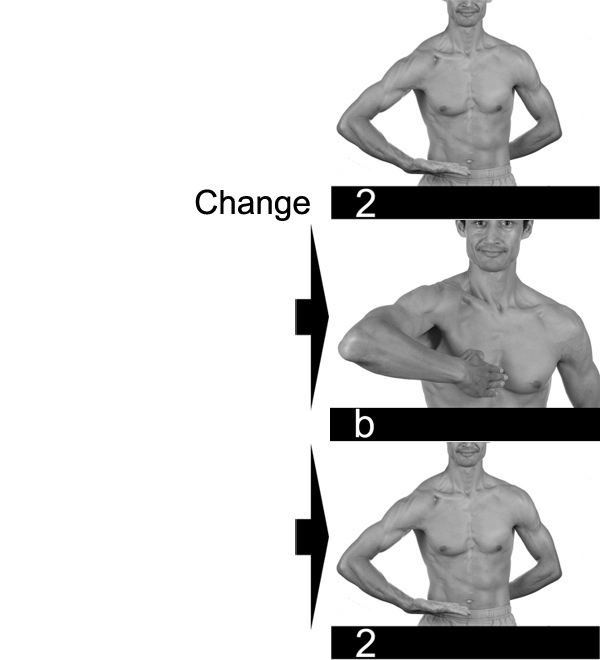
Change between 2 and b.
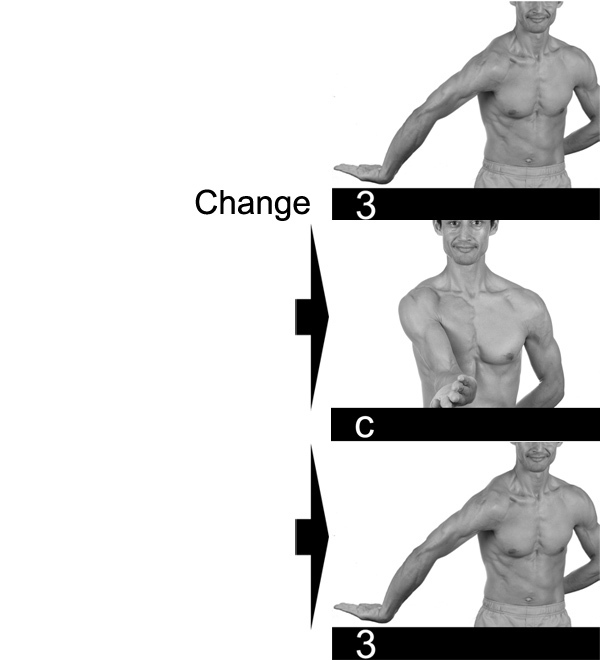
Change between 3 and c.
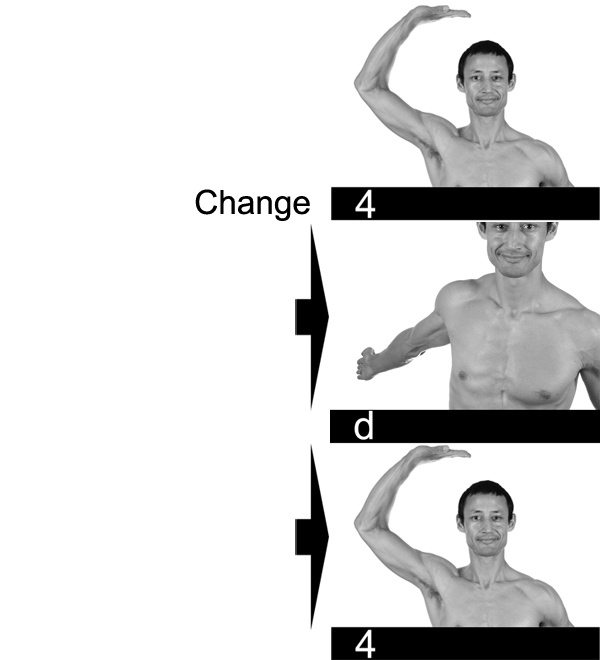
Change between 4 and d.
ChangeTransquarter
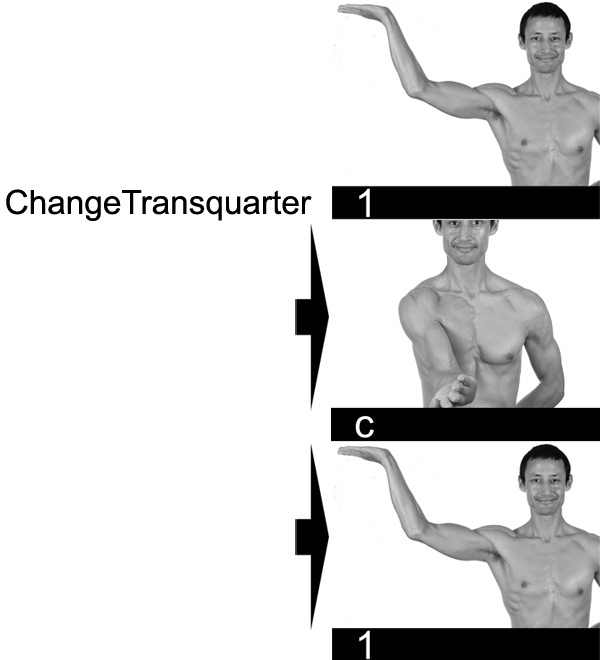
ChangeTransquarter between 1 and c.
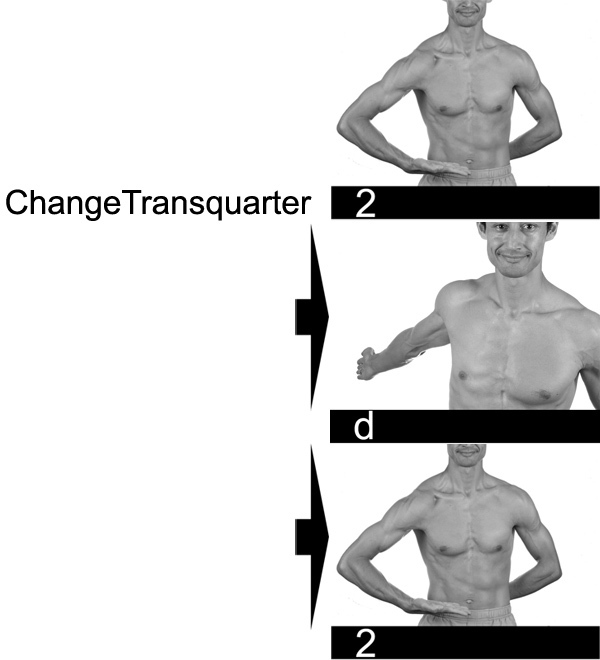
ChangeTransquarter between 1 and c.
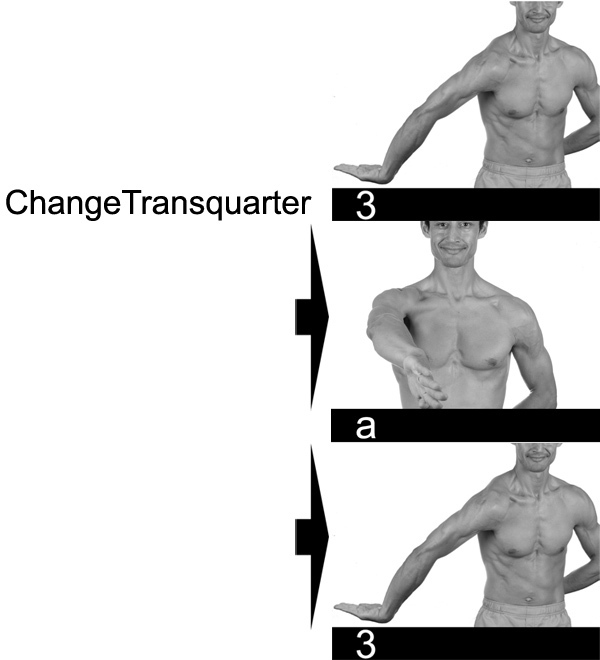
ChangeTransquarter between 1 and c.
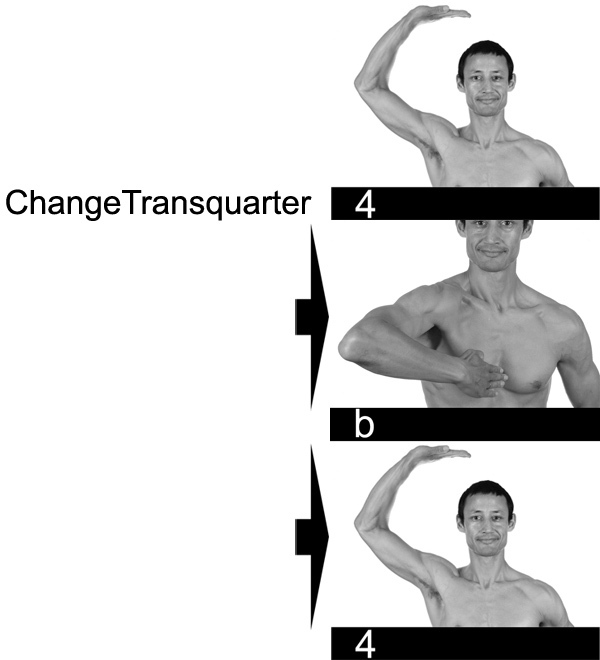
ChangeTransquarter between 1 and c.
Combined Movements
Movements for both arms use a two digit code. The letter(s) on the left corresponds to the movement of the left arm, the letter(s) on the right that of the right arm:
- F-B means the left arm moves forwards, the right arm back.
- CT-C means the left arm does a change transquarter, and the right arm a change.
- CF-CB means the left arm does a change forward, and the right arm a change backward move.
To make learning combined movements easier we can group them according to movement types. This is to make learning easier and more efficient. First a look at the classifications.
Same Plane or Change Plane
One way to categorize single arm movements is as Same Plane or Change Plane movements.
- Same plane movements are movements which join positions in the same plane. They join letters to letters and numbers to numbers.
- Change plane movements are movements which join positions in different planes. They join letters to numbers and vice versa.
The same plane movements are called: zero, forward, transquarter, backward.
The four change plane moves are: Change, Change Transquarter, Change Forward and Change Backwards.
Cyclic or Acyclic
Another way to classify movements is whether they are Cyclic or Acyclic.
- The cyclic moves are forwards, backwards, change forwards, change backwards (F, B, CF, CB)
- The Acyclic moves are transquarter, change, change transquarter. (T, C, CT)
Cyclic moves connect four positions when repeated. Acyclic moves jump between the same two positions when repeated.
Why Classify Movements?
Why classify movements (and positions for that matter)?
Because it makes it easier to break up the movements and learn them in a meaningful fashion.
In the end, assuming you’ve learned all of the movements, the classifications won’t matter. But while learning they can be helpful because you focus on learning all the movements within a particular classification one by one. This may help reduce learning effort because you are focused on similar moves.
It also gives a sense of accomplishment once you’ve learned all of the moves with one particular classification.
Movement Combination Classifications
To make movements easier to learn I’ve grouped them as follows:
- zero (cyclics then a-cyclics)
- cyclics 1 (both same plane or both change plane)
- cyclics 2 (mixed)
- cyclic/a-cyclic combos 1 (both same plane or both change plane)
- cyclic/a-cyclic combos 2 (mixed)
- a-cyclics 1 (both same plane or both change plane)
- a-cyclics 2 (mixed)
We’ve already done the zero movements. These are movement combinations where one arm stays still.
The Cyclic groups are where both arms do Cyclic movements. In the first group both arms do same plane or change plane movements. In the second group one arm does a same plane movement and the other a change plane movement.
The Cyclic/Acyclic groups are where one arm does a cyclic move and the other an Acyclic move. In the first of these two groups both arms do either same or change plane moves. In the second of these two groups one arm is doing a change move the other a same plane move.
The final groups are where both arms to Acyclic moves.
Dance of Shiva Posture Suggestions
I’ve actually done dance of shiva sitting. My intent was to make it easier to focus on the arms. However the feeling afterwards wasn’t so good. So I’d recommend doing it while standing when possible.
The standing position that I would recommend is with feet about hip or shoulder width apart, feet parallel and knees slightly bent. Point your knees in the same direction as your toes.
If you want to work on strengthening your legs while doing dance of shiva, then stand with feet wide, and turned out with knees bent. This is like the kung fu horse stance except the feet are turned out.
So that your spine feels long, move your ribs away from your pelvis so that your waist feels long. Then move your ears away from your shoulders so that your neck feels long. Or if you can feel the vertebrae of your spine, then focus on the vertebrae themselves and making your spinal column feel long.
Make Your Neck Feel Long
Since dance of shiva is a shoulder exercise (as well as an exercise for the arms and wrists) you may find it helpful, especially in the beginning to focus on keeping your neck long. To make the neck long pull the back of your head back and up and pull your chin in and down, towards your chest. Rather than trying to hold this position you can lengthen your neck with your inhale and relax it while exhaling.
If you inhale through your nose, you can pull your head back and up and at the same time pull the base of your nose back (as if your inhale pulls your head back and up.) The release this as you exhale. To combine the neck movements with the dance of shiva arm movements you can try the following:
- Inhale and lengthen your neck and do the movement at the same time.
- Then exhale and relax your neck while keeping the arms still.
Standing Positions, One Leg
One you are comfortable with the movements, you can then practice the movements while standing on one leg at a time.
If you have difficulty standing on one leg, you can work at gradually shifting more and more weight onto the standing leg. This “gradual shifting” can happen over the course of several practices, or over the course of weeks and months.
Stabilizing the Standing Leg
When standing on one leg, with the other foot resting on the floor, stability is important.
Prior to shifting to one foot, standing with weight even on both feet. With feet parallel and shoulder width apart, and knees slightly bent, rotate your shins inwards or outwards so that the base of your little toe and the base of your big toe press down with equal pressure. Rather than pressing the front of your foot into the floor with muscular effort, lean forwards slightly so that the fronts of your feet press into the floor. Once you are used to “activating your feet” you can then stand with feet turned out slightly.
With feet active and knees slightly bent, shift your weight onto one foot. To make it easier to keep your foot active, slowly shift your weight onto one foot.
How do you know when your weight is completely on one foot? The other leg will relax. You may also notice your the outer and inner edge of your standing foot having equal pressure. In addition, if all of your weight is on your left foot you should be able to lift your right foot without any movement of your upper body.
If standing on one foot and balancing is too challenging, work towards it gradually. Instead of having all of your weight on your standing foot, have most of your weight on it, or as much as is comfortable.
Gradually work towards having all of your weight on your standing foot and keeping it there for the duration of your set. Then return to center (weight even on both feet) to rest before doing the other side. Or rest by doing the other side.
To make standing on one leg easier, keep your spine, and particularly your waist, long. Lift (and open) your ribs at front and back to lengthen your waist. You can then “squeeze” your side glutes and inner thighs to make your standing leg more stable. You may also find it helpful to tighten the back of the standing leg thigh as well as the buttocks.
Reference Leg
When standing on one leg, you do each set twice, once on one leg and then on the other. For each set, the standing leg is the reference leg. Doing the F-B move, first stand on the left leg. The left arm does the F move while the right arm does the B move. For symmetry, when standing on the right leg, the right arm does the F move. The movements are “mirrored,” however the set as a whole is called the F-B set.
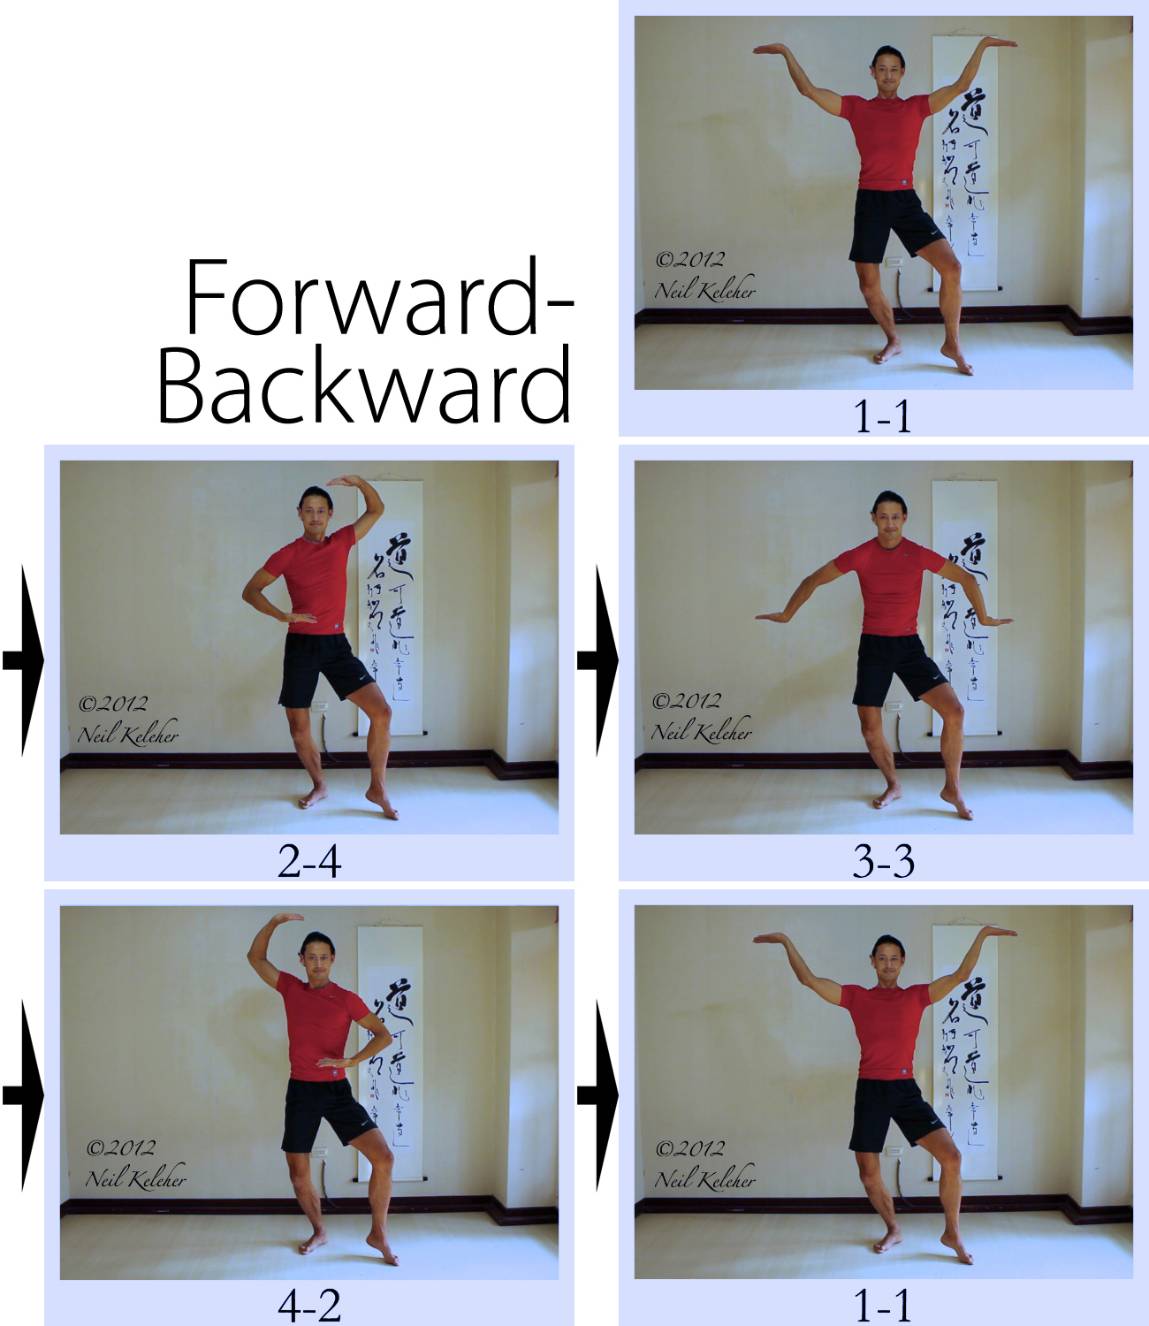
Here’s the F-B movement done while on the left leg.
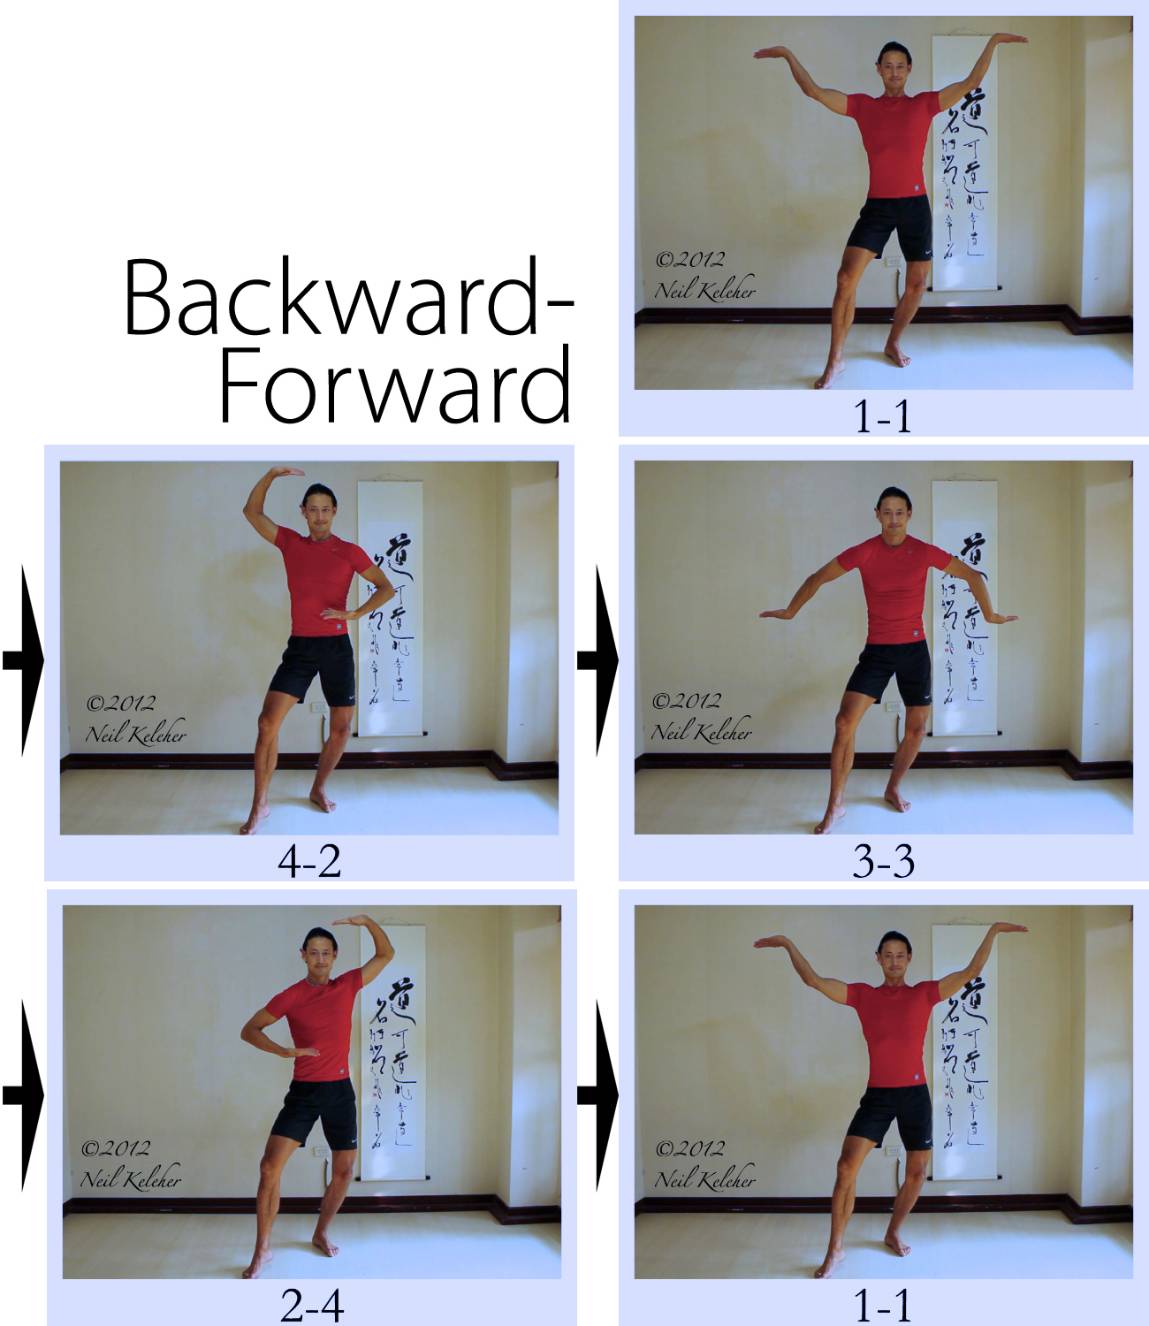
Here’s the mirrored F-B movement, while standing on the right leg.
Warm ups for the Arms
Because the arm positions can be challenging for the shoulders here are some warm up positions you can use. You can try these before you practice. Try to move in and out of each warm up position slowly and smoothly. Hold each for about 5 seconds and then rest. Repeat if desired.
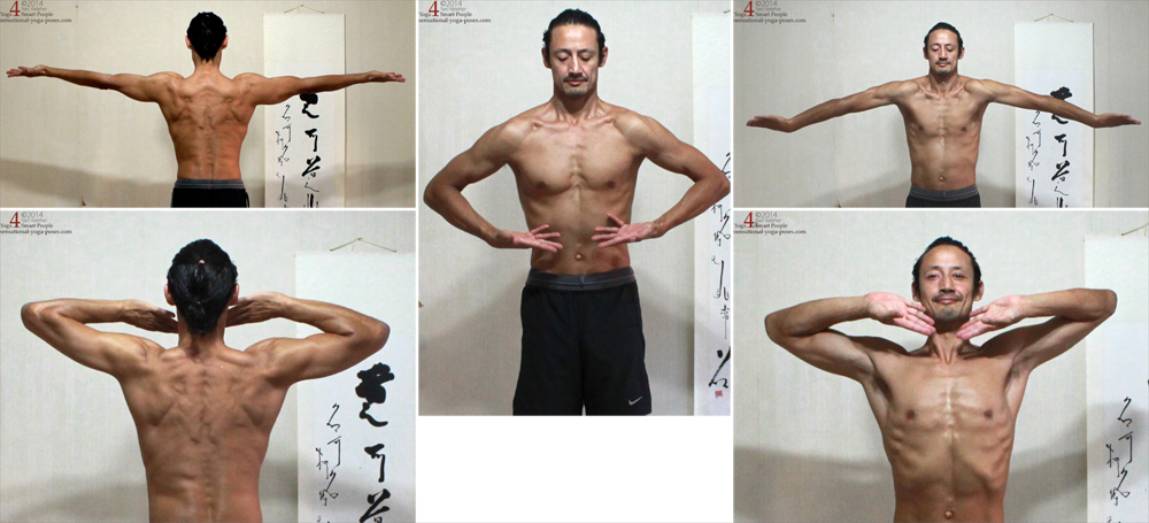
Warmups for positions 1 through 4.
- For position 1-1, warm up with the arms out to the sides, palms up. Roll the arms backwards/externally so that the pinky side of the hand moves up and back.
- For position 2-2, warm up with the hands in front of the waist, palms up, and roll the forearms forwards so that the pinky side of the hand moves up and the thumb side down
- For position 3-3 warm up with the arms out to the sides, elbows and palms up. Roll the arms forwards/internally so that the pinky side of the hand moves downwards and backwards.
- For position 4-4 stand with the hands at the sides of the neck, palms up, elbows out to the sides. (Last two pictures above.) Try to roll the forearms so that the pinky side of the hand moves downwards.
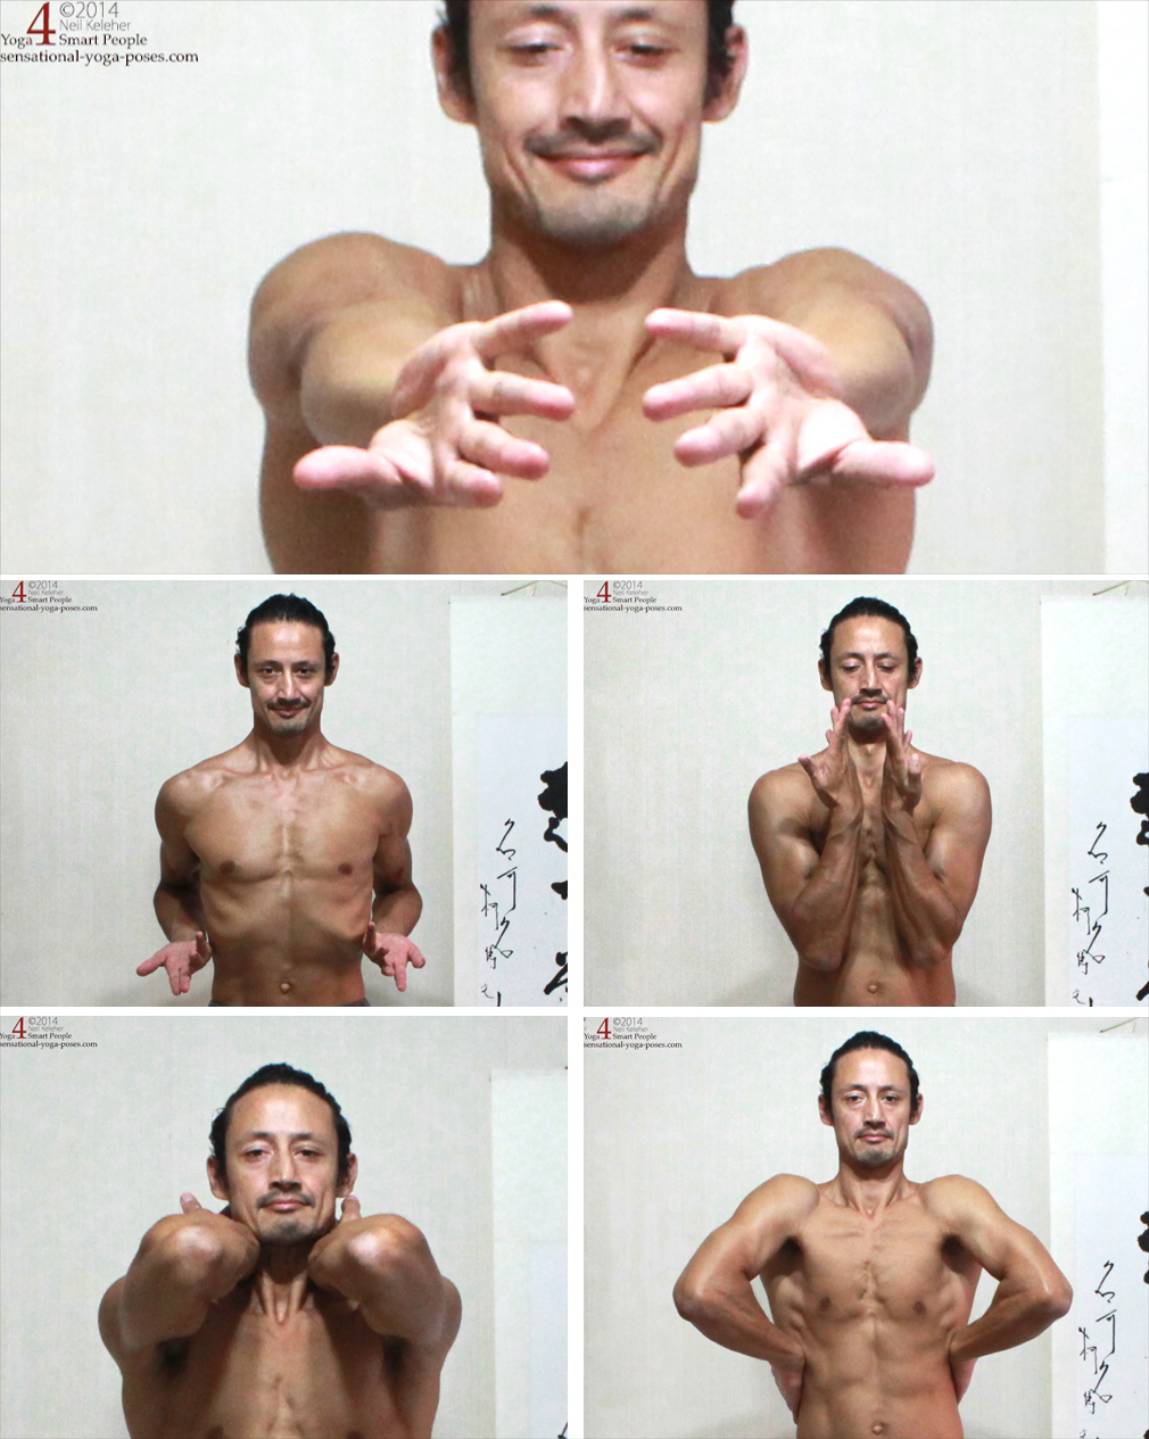
Warm ups for positions a through b.
- For position a-a, warm up by reaching the arms straight ahead, elbows and palms both facing outwards. Roll the arms inwards so that pinky side of each hand moves inwards.
- For position b-b, the first warm up position is with arms by the sides, elbows bent and pointing backwards. Starting with palms up, roll forearms outwards so that pinky side of hand moves upwards towards armpits. (Top left two pictures.)
- For b-b, the second warm up position is with forearms vertical in front of body. With palms facing towards you, roll forearms so that pinky side of each hand rolls towards you and palms face outwards.
- For the 3rd position b-b warm up, elbows forward with back of hands at sides of neck and palms downwards. Roll forearms so that pinky side of hand moves outwards, away from the neck.
- For the fourth warm up for position b-b, place backs of hands at sides of waist with elbows outwards. Move elbows forwards and inwards, towards each other.
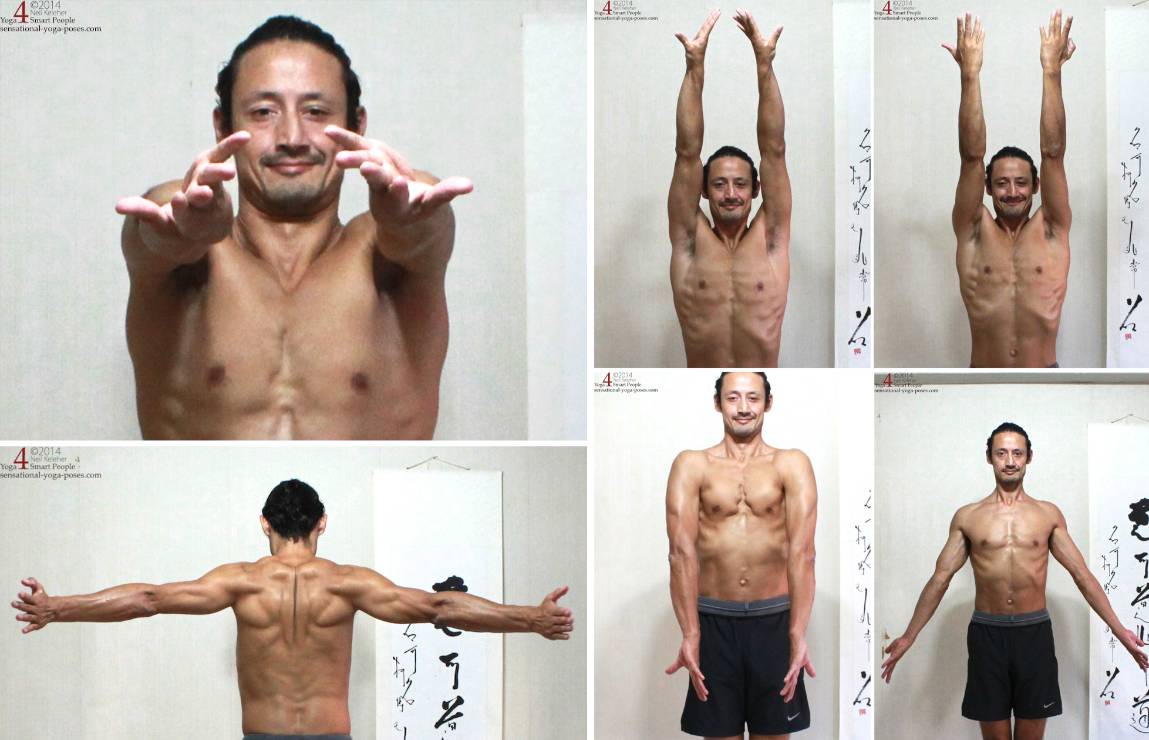
Warm ups for positions c through d.
- For position c-c, warm up by reaching arms forwards, palms up and elbows down. Roll the forearms so that pinky side of hands moves upwards.
- For d-d, arms by your sides, roll fronts of arms outwards.
- Next for d-d, arms by your sides, roll fronts of arms inwards.
- Next warm up for d-d, arms over head, palms outwards, roll arms so that pinky side of each hand move towards each other.
- Next for d-d, arms over head, palms face backwards and elbows forwards, roll arms so that pinky side of each hand moves backwards.
- Finally for d-d, arms out to sides, elbows face back, palms forwards, move arms backwards.
Say What You Are About To Do
When learning you may find it easier to say just the movement you are doing before you do it. i.e. “forward forward.” As you get more comfortable you can say that position you are moving to before you do the move. If you are at 1-1 and are moving to 2-2 say “two two” then do the move. Note that you may find it helpful to practice saying the positions in isolation, without actually doing the moves. Once you can say the positions smoothly, then add the actual movements.
