Groovy Server Pages (GSP)
Change Scaffolding Templates in Grails
The scaffolding feature in Grails is impressive, especially when we want to show off Grails to other developers. Seems like magic is happening with only a minimal of code. But what if we don’t like the default pages Grails generates for us. Of course there is a way to have another layout for the dynamically generated pages.
First we start with a simple, one domain object application:
We open grails-app/domain/Message.groovy and add the following simple attribute with a small constraint:
Next we add the magic code to the grails-app/controllers/MessageController.groovy:
We are ready to run the application and we are able to view, add, update or delete messages:

We see the default layout we get from Grails. To see which GSP files Grails uses to generate these pages we only have to invoke one command:
After the script is finished we have a new directory src/templates. In this directory we find the scaffolding directory with a couple of GSP files. To change the layout of the pages we only have to make our changes here. Every controller which uses scaffolding will get these changes. Let’s create a new CSS file and use it in the create.gsp, edit.gsp, list.gsp and show.gsp files.
We create a new file scaffold.css in the web-app/css directory:
We open the files create.gsp, edit.gsp, list.gsp and show.gsp and add the following line in the HTML head section:
Now when we run the application again we see that the dynamically generated pages are using the new CSS file:
Besides a simple change like this, we can of course do anything we want with the GSP files that are used for scaffolding. In the above screenshot we can see for example we have removed the default Grails logo and replaced it with our own text.
Code written with Grails 1.1.
Original blog post written on July 28, 2009.
Use the GSP Template Engine in a Controller
The GSP TemplateEngine used to render the GSP pages in Grails is also available as standalone service in for example our controllers, taglibs or services. In the Spring application context the template engine is loaded with the name groovyPagesTemplateEngine. This means we only have to define a new variable in our controller with this name and the Spring autowire by name functionality will automatically insert the template engine in our class. See the following code sample where we use the template engine, notice we even can use taglibs in our template code.
We get the following HTML output:
Code written with Grails 1.2.2.
Original blog post written on May 06, 2010.
The Template Namespace
To have clean and re-usable Groovy Server Pages (GSP) we can use templates on our pages. A template contains HTML and code that we can maintain separately. In this post we learn about the template namespace to include a template on our page.
Suppose we have a page in our application that display a list of products. Each product has several properties we show. The template for a product is:
We can use the template with the g:render tag and template attribute on our page:
But we can also use the template namespace feature in Grails. We define a tag with the namespace tmpl and the tagname is our template name. We pass the model for the template through the attributes. Each attribute name/value pair is passed as model to the template.
Code written with Grails 1.3.7.
Original blog post written on February 19, 2011.
Templates Can Have a Body
To create a more modular Groovy Server Page we can use Grails’ template support. We use <g:render template="..." ... /> or <tmpl:templateName ... /> tags to render the template content. These tags can have a body. The body of the tag is then available in the template code. We use the expression ${body()} in our template to output the body content.
Suppose we have the following template code:
We can use the template with different body contents:
If the content of the body has HTML tags and we have set in grails-app/conf/Config.groovy the property grails.views.default.codec to html we get escaped HTML. Instead of using ${body()} we must then use <%= body() %>.
Code written with Grails 1.3.7.
Original blog post written on February 19, 2011.
The Link Namespace
Grails supports named URL mappings. We can define a name for a URL mapping and use that name when we generate links in our application. In this post we see how we can use the link namespace to use a named mapping.
We start with a simple named URL mapping for viewing product details on our site:
We can use the <g:link mapping="..." .../> tag in our code to use this named URL mapping:
outputs for product with identifier ‘901’:
But we can also use the special link namespace in our code. We start a new tag with link as namespace. The name of the tag is the name of the URL mapping we have created. The attributes we specify are all converted to parameters for the link. If we add the attrs attribute we can specify attribute key/value pairs that need to be applied to the generated link as is.
Code written with Grails 1.3.7.
Original blog post written on February 20, 2011.
Format Boolean Values with the formatBoolean Tag
If we want to display something else than true or false for a boolean value on our Groovy Server Page (GSP) we can use the formatBoolean tag. We can specify a value for true with the true attribute and for false with the false attribute. If we don’t specify a true or false attribute Grails will look for the key boolean.true and boolean.false in the i18n resource bundle. If those are not found than the keys default.boolean.true and default.boolean.false are used. And the last fallback are the values True for true and False for false boolean values.
Code written with Grails 1.3.7.
Original blog post written on February 21, 2011.
Encode Content with the encodeAs Tag
Encoding and decoding values is easy in Grails. We can invoke the dynamic methods encodeAs...() and decodeAs...() for several codecs. If we have a large block of content on our Groovy Server Page (GSP) we want to encode we can use the <g:encodeAs codec="..."/> tag. The body of the tag is encoded with the codec we specify with the codec attribute.
If we look at the generated HTML source we see:
Code written with Grails 1.3.7.
Original blog post written on February 22, 2011.
Set Application Wide Default Layout
Grails uses Sitemesh as the layout and decoration framework. Layouts are defined in the grails-app/views/layouts directory. There are several conventions Grails uses to determine which layout file must be applied. We can set a default layout for our application by setting the property grails.sitemesh.default.layout in grails-app/conf/Config.groovy. The value of the property maps to the filename of the layout. For example if we set the value to main then Grails will use grails-app/views/layouts/main.gsp.
Another way is to create a layout with the name application.gsp and save it in grails-app/views/layouts. Grails will use this layout if the layout cannot be determined in another way.
Code written with Grails 1.3.7.
Original blog post written on February 24, 2011.
Applying Layouts in Layouts
Grails uses Sitemesh to support view layouts. A layout contains common HTML content that is reused on several pages. For example we can create a web application with a common header and footer. The body of the HTML pages is different for the pages in the web application. But the body can also have a common layout for certain pages. For example some pages have a body with two columns, others have a single column. To reuse these layouts we can use the <g:applyLayout .../> tag. This means we can apply layouts in layouts, which provides a very flexible solution with optimal reuse of HTML content.
Update: another way to apply layouts in layouts based on the comments by Peter Ledbrook.
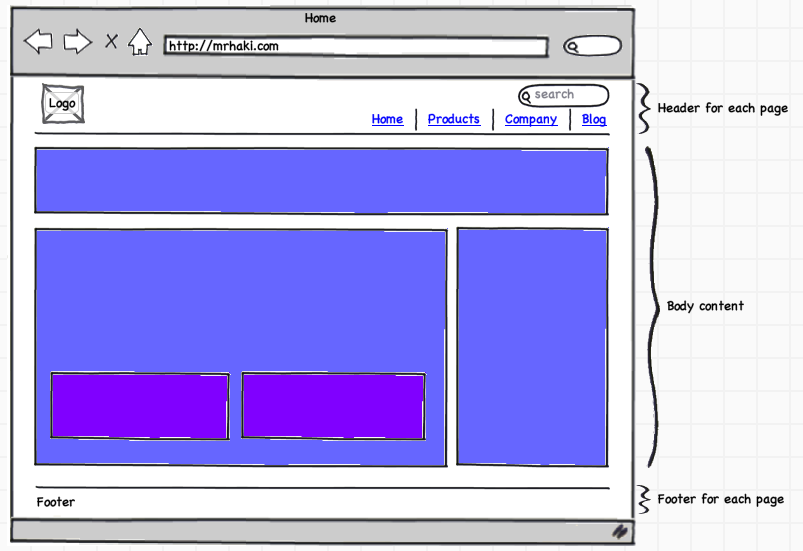
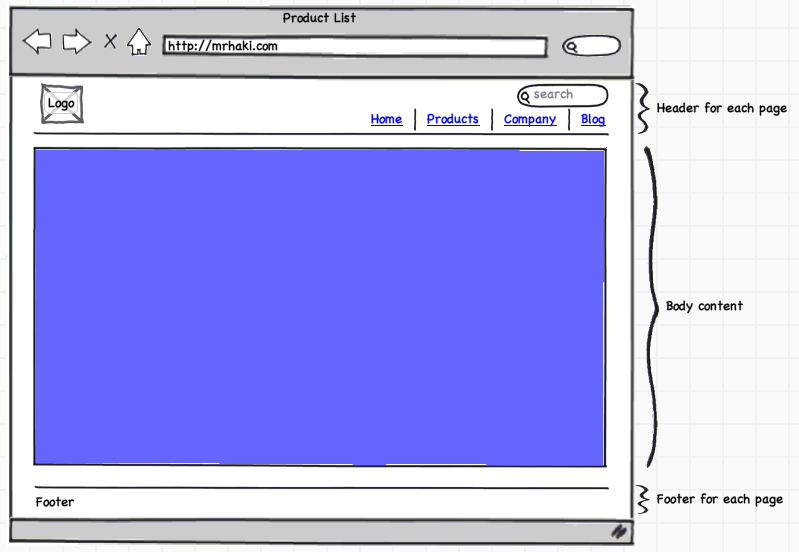
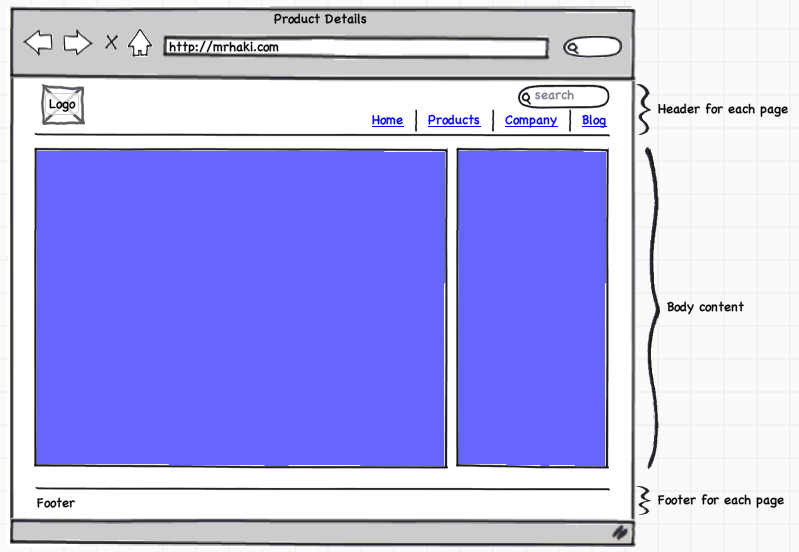
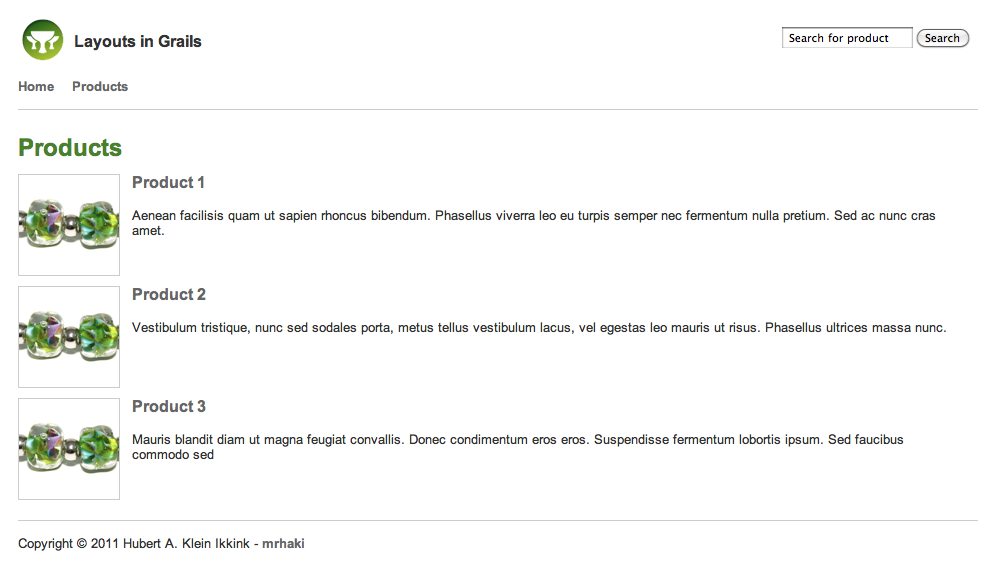
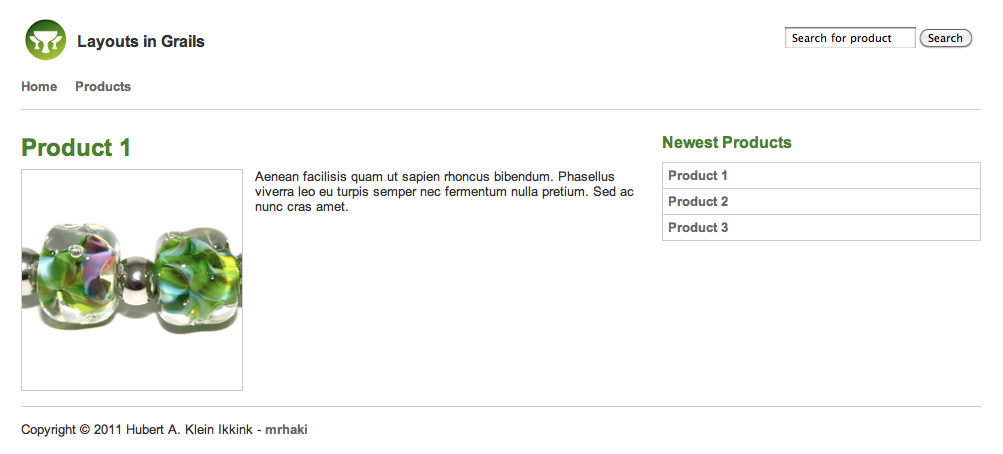
Let’s see how this works with a small sample application. All pages have a header with a logo, search form and main menu. Each page also has a footer with some copyright information. The homepage has a body with five blocks of information, we have product list page with a one column body and finally a product details view with a two column body.
The following diagrams shows the structure of the pages:
First we create the main layout with the header and footer HTML content. The body content is variable for the pages, so we use <g:layoutBody/> in our main layout.
For our homepage we define a layout with five blocks. We use Sitemesh content blocks in our layout. This way we can define content blocks in the pages and reference these components in the layouts. To reference a content block we use the <g:pageProperty .../> tag. The name attribute contains the name of the content block we want to reference. Notice we reference our main layout page with <meta name="layout" content="page"/>.
And in the homepage Groovy server page we can use the <g:applyLayout .../> tag and define the content for our Sitemesh content blocks.
We also define a layout with one block:
And a layout with two columns:
Then we use these layouts in the product list and details views:
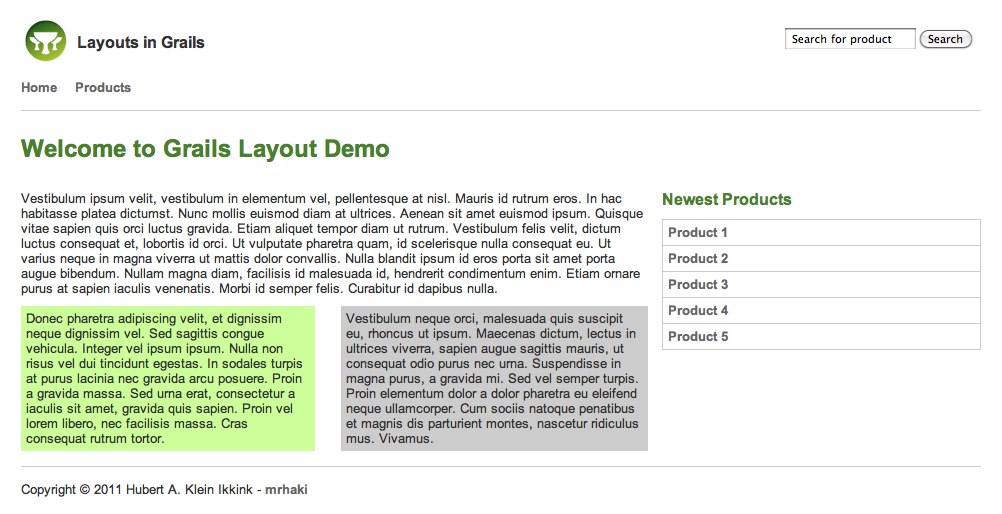
Because this is only a small sample application this might seem like overhead, but for a bigger application it is really useful to have reusable layouts. The following screenshots show the layouts in action for a Grails application.
Sources of the sample Grails application can be found at GitHub.
Code written with Grails 1.3.7.
Original blog post written on March 31, 2011.
Applying Layouts in Layouts Revisited
In the blog post Applying Layouts in Layouts we learned how to reuse layouts in a Grails application. Peter Ledbrook added a comment suggesting to use the <g:applyLayout/> in the Groovy Server Pages in the layouts directory instead of in the views. So this way we can use the default method of applying layouts in our views (using for example the <meta/> tag) and keep all <g:applyLayout/> tags in the layout pages. In this post we see how we can support this for our applications and still reuse the layouts like before.
Please read the previous blog post to see the layout structure of our sample Grails application. The main layout page is still grails-app/views/layouts/page.gsp and doesn’t need to be changed:
The layout for the homepage is defined by fiveblocks.gsp in the layouts directory. We change this file and use <g:applyLayout/> to apply the main page layout instead of using <meta name="layout" content="page"/>:
And now we use <meta name="layout" content="fiveblocks"/> in the homepage Groovy server page and define the content for our Sitemesh content blocks.
We notice the changes aren’t big compared to the previous solution, but using <meta name=”layout” content=”…”/> in the views is more compliant to what we already learned when using layouts in views.
Also keep in mind Peter Ledbrook’s warning about having layouts nested more than one deep:
Finally, if you do have layouts nested more than one deep (not necessarily a good idea, but that’s what grails.org is currently doing) then it’s worth noting that every layout must have the <g:layout*/> and <g:pageProperty/> tags, otherwise the contents don’t propagate properly.
Sources of the sample Grails application can be found at GitHub.
Code written with Grials 1.3.7.
Original blog post written on April 13, 2011.
Access Action and Controller Name in GSP
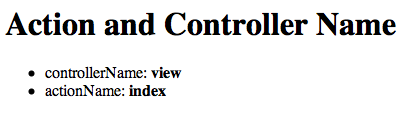
In our GSP views we can see the name of the action and controller that resulted in the view. We can use this for example to show or hide certain information based on the values for the action and controller name. Grails injects the variables actionName and controllerName automatically and sets the values based on the action and controller.
When we open the GSP we get the following output:
Code written with Grails 1.3.7.
Original blog post written on November 25, 2011.
Get GrailsApplication and ApplicationContext in GSP
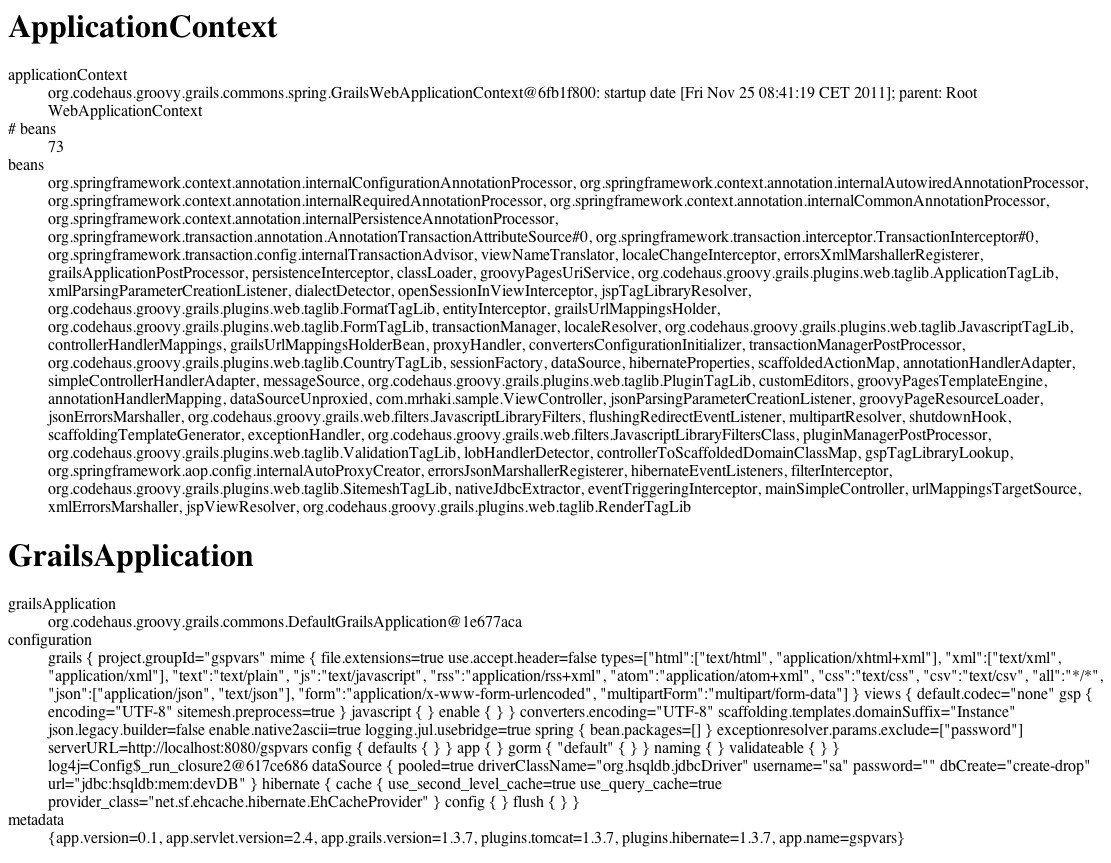
Several variables are injected to Groovy Server Pages (GSP) in a Grails application. Two of them are the ApplicationContext and GrailsApplication objects. They are bound to the variables applicationContext and grailsApplication.
When we have access to the ApplicationContext we could for example load resources or get references to beans in the context. Via the grailsApplication variable we have access to for example the configuration values and metadata of the application.
When we open this GSP in our browser we get the following output:
Code written with Grails 1.3.7.
Original blog post written on November 28, 2011.
Use Services in GSP with g:set Tag
In Grails we can use the set tag to define a variable with a value on a GSP. But we can also use the same tag to access a Grails service on a GSP. We must use the bean attribute with the name of the Grails service. We can even pass the name of any Spring managed bean in the application context of our application.
In the following sample GSP we access a Grails service with the name BlogService. We invoke the method allTitles() and use the result.
Code written with Grails 2.2.4.
Original blog post written on August 28, 2013.
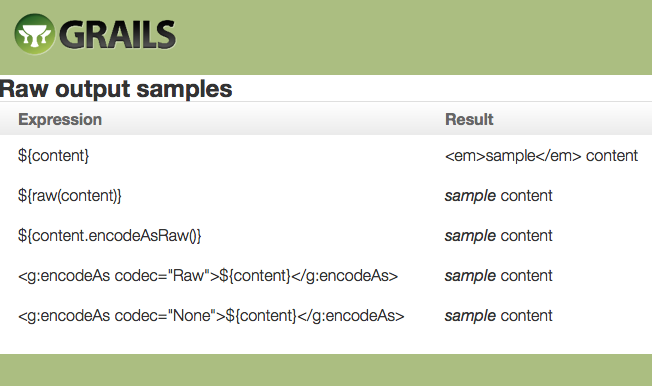
Generating Raw Output with Raw Codec
Since Grails 2.3 all ${} expression output is automatically escaped on GSPs. This is very useful, because user input is now escaped and any HTML or JavaScript in the input value is escaped and not interpreted by the browser as HTML or JavaScript. This is done so our Grails application is protected from Cross Site Scripting (XSS) attacks.
But sometimes we do want to output unescaped HTML content in the web browser. For example we generate the value ourselves and we know the value is safe and cannot be misused for XSS attacks. In Grails 2.3 we can use a new raw() method in our GSPs, tag libraries or controllers. The method will leave the content unchanged and return the unescaped value to be displayed. Alternatively we can use encodeAsRaw() on the content we want to leave unescaped. Finally the encodeAs tag accepts Raw or None as values for the attribute codec and will return the unescaped value.
In the following sample GSP we display the value of the content model property passed to the page. The value is set by a controller and is <em>sample</em> content.
In our web browser we see the following output:
Code written with Grails 2.3.
Original blog post written on November 18, 2013.
Using Closures for Select Value Rendering
To generate an HTML select we can use the Grails tag <g:select .../>. We use the optionValue attribute to specify a specific property we want to be used as the value. But we can also define a closure for the optionValue attribute to further customize the value that is shown to the user.
Suppose we have a simple domain class Book with a couple of properties. We want to combine multiple properties as the text for the HTML select options. In the following GSP we define first a <g:select .../> tag where we simply use the title property. In the next <g:select .../> tag we use a closure to combine multiple properties.
We can also pass the closure as model property to the GSP from a controller. In a controller we define the transformation in a closure and pass it along to the GSP page. On the GSP we can use this closure as a value for the optionValue attribute of the <g:select .../> tag. The following GSP shows all three scenarios.
Here is a sample controller which passes the transformation to the GSP:
When we run the application and open the page in a web browser we get the following HTML source:
The optionKey attribute also allows closures as arguments.
Code written with Grails 2.3.2.
Original blog post written on December 09, 2013.