
Table of Contents
- Lazy Programmer’s Guide to Angular 1.x
- Getting you up and running
- Angular, Reader, Reader, Angular!
- Controllers, templates and more!
- Module lifecycle and configuration
- Refactoring to a large scale application
- Appendix and further reading
Lazy Programmer’s Guide to Angular 1.x
Preface
Angular JS is an open source modern front end web framework mostly maintained by Google. It Mostly takes the burden of developing a large scale web application away by introducing a set of capabilities such as:
- Modules for breaking a large web app (aka. Single Page Application) into smaller modules
- Controllers for handling UI interactions
- Directives for creating an isolated component on the web encapsulating a specific view and behavior
- Services for isolating Application logic and data logic
- Template 2-way Data Binding for managing your HTML more easily
and many other capabilities.
Usually when i introduce this framework to a friend, after he/she starts learning it one of the first questions that i’m asked is this:
So… can I use JQuery alongside it?
Some newcomers to Angular misunderstand its concept by thinking that this framework somehow is going to force using it alone (or even worse, some people might think that it’s not javascript! They think it’s some magical language that google created!), which is obviously wrong and technically there is nothing keeping you away form using Angular alongside JQuery (although, I might personally hate you for doing that! It’s nothing more that plain Javascript!) or any other framework, or just vanilla javascript . So keep in mind that AngularJS is nothing more than a frontend framework, but it really is more Sophisticated than most of them.
Seriously? Angular 1?
Assume that you believe Angular is something really worth learning. But these days everyone is now talking about a new version of Angular, Angular2! A doubt pops into mind here about whether to start with Angular1 or Angular2. Let’s make this issue clear, Once and for all.
At the time of writing of this book, Angular2 has just had its first Release Candidate (aka rc) version, so it’s still not ready for production, but many people are learning it. Many frameworks that depend on Angular1 or use it (like my personal favorite, the lovely Ionic) are working on shifting their core code to Angular2, and if your are a community person (meaning that you like catching up with other developers often, read many blogs etc.), you will see that Angular 2 is Very HOT right now. By HOT i mean everyone is talking about it, everyone is exited to go and hack around with it. It’s basically everywhere! And Angular2 really does bring a lot of improvements such as a new Design, less size, more speed, etc.
But that is not the end of the story! With all that said, something that should not be forgotten is that Angular2 was announced not because Angular1 was no longer able to deliver a specific capability or was lacking horribly in some aspect, No! There is a new version because they were both developed to serve different purposes. Angular1 is a Framework for building large scale fast web applications, that can be extended to mobile and desktop. Angular2 is a Platform for building fast, optimized Desktop, web and mobile applications with emphasis on Mobile and making one source code reusable for both mobile and desktop. This does not mean at all that Angular1 in an obsolete technology. if you still face the challenge of creating a web application and you want it to be fast, yet have a lot of complicated features and you want it to be easy to develop and test, Angular1 is there for you. and in terms of support, at time of this writing the last announcement about future of Angular declared that both versions will be maintained as different projects. Even if one day Google decides to stop its official maintenance of Angular1, the community of libraries and developers using it are big enough to keep it in good shape.
As time goes by, you will understand more about differences of Angular versions and why in some ways, Learning both of them are necessarily, with respect to their purpose. There are many more aspects to be compared when it comes to differences between Angular1 and Angular2, but since it is not the main topic of this book, we are not going to cover them. For the rest of this book by mentioning Angular, we mean Angular version 1 (aka Angular 1.x, Angular 1.5.x)
Who is this book for?
This book assumes that you have sufficient knowledge of javascript, web pages (HTML, CSS) and basic knowledge of networking and HTTP requests. The main goal of this book is to serve as a handbook to help someone who is just about to learn Angular. It’s important to mention that this books aim to get you up and running with Angular as soon as possible. Angular is a pretty popular framework and many long books and documentations has been written about it so far, therefor this book is not going to be one of those. It will be short, direct to the point with no extra boring detail that you might never use.
Notes on Codes, The Text and this book
Some final notes about this book, and how to read it:
- I (honestly) don’t believe in learning if it’s not fun. If it does not feel friendly. Therefor this writing might feel - just a little - informal compare to other books
- aside from being friendly, I REALLY don’t believe in learning programming with just reading a book. Try to play around for a while after each section with what you have learned. If you reach end of a chapter without going back to your code editor and browser, i really suggest not going any further.
- There’s more! I do believe that writing a code snippet, as frustrating as it might be, even if you understand it completely, will have some good effects. Try not to copy the code and instead write it yourself.
- each code snippet will be mentioned with a specific commit from the github repository that contains the code for this book. You can browse the code online or download that snapshot.
- Forgot to mention: I also believe that writing a piece of code that you do not fully understand, both from syntax and architecture point of view, is nothing but trouble. New generation web frameworks that introduce an Architecture with them are now trending everywhere and if you want to stay on the edge of technology, you must learn them. But many people (specifically those who i refer to as Traditional web developer) are facing problems with this transition from old libraries to new ones, just because more architectural stuff are involved. Few years ago, while java developers were struggling with Design Patterns, Classes and Software Architectures, web developers were happily getting all of the things worked out using just
$("...")! Like it or not, those days are over now. So, if you are a very good Traditional Web developer, meaning that you master both HTML and CSS and know a wide variety of JQuery plugins, there is a good chance that some architectural concepts will be new to you, and DO NOT ignore them at all.Think about them and try to convince yourself why there are right. Challenge yourself!
Chapters overview
The following contents will be covered in the following chapters:
- Chapter2 : Getting you up and running - You’ll get familiar with a minimal set of tools required to start developing and learning Angular.
- Chapter3: Angular, Reader, Reader, Angular! - You’ll learn almost every concept about Angular! We’re going to cover most of the building blocks of an Angular application, but in a more conceptual manner. More technical details about each of these blocks are going to be explained in the next chapters.
- Chapter4: Controllers, templates and more - You’ll dive deep into controllers, scopes and template binding, the minimal tools required to build an Angular application.
- Chapter5: Module life cycle and configuration - Aside from learning how to add configuration and preprocessing, you’ll learn how to route your user through a web application.
- Chapter6: Refactoring to large scale application - You’ll Learn how to refactor your application to scale, using some common patterns and best practices.
- Chapter7: Appendix - Any extra/left behind information will be covered in this chapter.
Getting you up and running
In this -mini- chapter we’ll briefly mention the tools required to get started with Angular.
What you’ll need for learning
I highly suggest keeping things out of the way when you just want to learn something new. Good or bad, there are a lot of different tools that you can use nowadays as a helper for your development, build and distribution in front end projects. I’ll suggest the minimal set of following tools:
- Node js runtime for having a HTTP server.
- A simple Editor. Atom or Sublime Text.
And that’s it! No gulp, grunt, bower, npm build etc.
Don’t get me wrong, these tools are awesome, but in Production environment, not when you want to learn. Besides, each of these tools have lots of tricks to learn and will just over complicate things.
After installing Node runtime on your machine, run the following command:
1 npm install -g live-server
This will install a global node module that runs a http server. Then create a directory for this book and create a html file in it, named index.html:
1 $ mkdir learningangular
2 $ cd learningangular
and just grab a copy of the latest version of angular 1.x and put it inside the <heade> of your HTML file:
1 <head>
2   <title>Learning AngularJS is a lazy manner</title>
3   <script type="text/javascript" src="https://cdnjs.cloudflare.com/ajax/libs/angular.js/1.\
4 5.8/angular.min.js"></script>
5   ...
6 </head>
Just remember to grab the latest 1.x version!
To try the node server that we have just installed, write something inside your <body> tag and just run live-server inside your Terminal, inside the directory that the index.html file exists. You will probably see it pops up inside your browser. live-server actually has live-reloading as well which will be very useful later in this book. Now you are good to go. In the next chapter, we’ll actually start learning Angular, brace yourself!
Inspection and dev tools inside browser
As you might know, debugging an application inside the browser is possible using console. In the upcoming chapters, we use console.log() / console.warn() methods very often to debug our values and you are also encouraged to do so. Each browser provides for specific debugging tools, since they can be different, we do not cover them directly here. Just to mention a suggestion, I highly recommend Google Chrome + AngularJS Batarang plugin.
Angular, Reader, Reader, Angular!
Enough with small talk! Let’s code:
In this chapter we will begin with importing Angular library and discuss the structure of an Application built with Angular, Its main components and the duty of each of its components.
Building blocks of an Angular app
Angular provides a modular structure for creating applications. Which means we can (and should) use them to encapsulate different pieces of our application together, meanwhile keeping each module simple and clean.
An Angular module itself is actually.. well nothing but one line of code declaring its name and dependencies. But, what gives power to a module are the components that can attach to a it. Each module is usually consisted of the following major components:
- A list of dependencies (which is just a list of other modules)
- One or more Controllers. Where each is responsible for managing the UI Logic a specific section (AKA. scope) of the page.
- One or more Services . Where each is responsible for managing Data / Business Logic of an specific entity.
- One or more Directives. Where each is responsible for creating a reusable DOM element to be used inside that module.
(Above definitions are somehow simplistic, because at this point we want things to be simple. a more sophisticated definition of each of them will be provided in a dedicated chapter)
and - perhaps - the following minor components :
- Filters
- Providers and Services
- Constants
- Etc.
In the upcoming sections we will scratch the surface of each of these components briefly so that you get clear understanding of what they really are, and then focus technically on each of them more in a separate chapter.
Module
Let’s Begin coding with defining a module, and attaching a controller to it and see what can we achieve in terms of managing the UI Logic.
Create a main.js file in your working directory and link it to your HTML after including Angular.
1 <head>
2   <title>Learning AngularJS is a lazy manner</title>
3   <script type="text/javascript" src="https://cdnjs.cloudflare.com/ajax/libs/angular.js/1.\
4 5.8/angular.min.js"></script>
5   <script type="text/javascript" src="./main.js"></script>
6 </head>
Define a module inside your js file with the following syntax:
1 var myApp = angular.module('myApp', []) ;
Where the first argument, myApp is the actual name of the module. The variable name is just for further referencing this module (for more information see the section Referencing a module under Further reading) .
The second argument is an empty array indication module dependencies. Which is fine to be empty because now we do not have any dependent angular modules.
Now, when this module want’s to take control of the HTML in the future, it must have an idea of which portion of our HTML. This could be done using the ng-app directive. we’ll discuss directives later on, for now just think about it as an indicator that links a module (Javascript logic ), to a portion of HTML. We’ll assign this module to our entire <body> tag for now.
1 <body ng-app="myApp">
2   <h3>
3     Hello Angular!
4   </h3>
5 </body>
And your first module is now set up!
Controllers, Scopes and Data binding
Good. Refresh and double check the console is your browser for no errors. Unfortunately a module alone can’t give us much to see. Let’s add a controller to this module, assign it to control some input tag and a button!
Add the following to your main.js javascript file.
1 myApp.controller('mainCtrl', function ($scope) {})
Similar, to defining a module, we create a controller with the first argument being the name and the second argument a function that the main logic of our Controller will go into. Two good points can be mentioned here:
First, unlike a module, we are not calling a construction from the library (angular.module(..)) to create something, we are calling a constructor from the module that we created (myApp.controller(..)) earlier! this is why it’s common to say that Some Controller attaches to Some Module.
Secondly, a module had some dependencies, a controller has that too! the list of arguments passed to the function declaring the controller is actually Injecting the dependencies into the controller. for example, here the $scope variable is dependency being injected into the controller. These dependencies are either angular internal services (services are like re-usable pieces of code, or functions that can be injected and used anywhere else. we’ll learn about them in a second!), which all start with a $, or the services that we write them ourself. We’ll examine this dependency injection later in this book.
So, going back to the controller. Just like linking the module to the HTML with an ng-app, we must to the same with controllers with ng-controller directive. Just for simplicity, add an internal <div> to your <body> tag and assign ng-controller='mainCtrl' to it. Check again for errors.
1 <body ng-app="myApp">
2   <div ng-controller='mainCtrl'>
3     <h3>
4       Hello Angular!
5     </h3>
6   </div>
7 </body>
The $scope variable that we inject into to controller is a special Angular variable which is bounded to the view. This enables a lot a functionality and we’re going to see some of them now.
Data Binding
Any property added to the $scope variable will be visible for rendering inside HTML with angular’s Template Syntax. And the binding is two way. this is the most important thing to know about each controller.
Let’s test this. remove the text inside <h2> and replace it with {{ Title }}. Placing anything between {{ }} will mean that Angular will expect to find it in properties of the $scope and replace them with the appropriate value. To complete this, add the Title as a property of $scope.
1 myApp.controller('mainCtrl', function($scope){
2   $scope.Title = 'Hello Angular from data binding';
3 });
You should see the new text displayed inside the <h2>. Open up your browser inspection tools and see how the content of the <h2> is being replaced.
OK, Cool! What else?
Using functions
Any function assigned to $scope can be used as event listeners for different events (aside from being visible inside {{}})
On normal vanilla Javascript we listen to events like onclick, oninit etc. Angular provides wrappers around these events as directives and if we want to use $scope defined function as listeners, we must use angular’s directives instead of normal event listeners. One of these directives is ng-click. That’s what we’re going to use.Add some functions to your $scope:
1   $scope.sayHey = function() {
2     alert("Hey!");
3   }
4   $scope.title = function() {
5     return "Hello form a function";
6   }
and inside html:
1 <div ng-controller='mainCtrl'>
2     <h3>
3       {{ Title }}
4     </h3>
5     <button ng-click="sayHey()"> Alert Btn </button>
6     <h2> Function returned value : {{ title() }}</h2>
7 </div>
note how the names of title and Title must match, and how title comes with a () because it’s actually a function.
Also, notice how the names of variables and functions inside directives that are provided by angular do not need to be wrapped inside {{ }}.
think of it this way: when it comes to writing some property of any $scope inside HTML, whenever we are inside the territory of Angular, we don’t need to have {{ }}. for example, just as we had something like ng-click instead of onclick, we have ng-change instead of onchange and inside an ng-chnage you just put :
1 <!--  Angular territory -->
2 <select ng-change="someModelNamefromScope">...</select>
3
4 <!-- global territory - although this is not a good practice, we mentioned it just to prov\
5 e a point here -->
6 <select href="{{someModelNamefromScope}}">...</select>
But if for any reason you needed to write a $scope property inside plain HTML attributes, or inside plain HTML, you need to wrap it inside {{ }} like this : <a href="{{someModelNameFromScope}}"></a> (the is indeed a difference between href and ng-href, which we’ll get to it later).
Just to double check this, add an <input type="text"> and try ti assign its value property to $scope.Title how would you do this? Keep in mind that value is a generic HTML attribute, not an Angular directive, so something like this would do:
1 <input type="text" value="{{Title}}" />
Last thing to know is all of this is happening, you have the power over your UI from a controller because you are doing all of it inside the ng-controller try and move the {{Title}} outside and see that nothing happens!
What we actually did right now, assigning a $scope variable to value="..." is something that we actually should never do! Angular has a very powerful directive for HTML tags that have a value, it’s called ng-model and we’re going to write about it in our next Bold Title:
The holy ng-model
Any attribute of the $scope can be bounded - two way - to a HTML value using the ng-model directive
What do we mean by two way? it means that if you change the value from your code, the HTML will update automatically and if a value gets changed by the user from the HTML, the value in $scope will be changed automatically. We mentioned the property earlier but we did not really test it. First let’s do some tests.
We mentioned that Angular services can be injected inside a controller as an argument. One of these services is $interval which is actually just a wrapper around window.setInterval() function and has the same functionality. Inject this service into the controller and change the value of $scope.Title and see what happens:
1 myApp.controller('mainCtrl', function($scope, $interval){ // note how we injected $interva\
2 l through an argument
3   $scope.Title = 'Hello Angualr from data binding';
4   $interval(function() {
5     $scope.Title = 'Hello Angualr from data binding at ' + new Date()
6     }, 1000);
7    ...
8 });
You should see that the value of title is getting changed inside the UI every second with the new time. this is just one possible way, let’s try it the other way around!
Now let’s make things more interesting with ng-model. Assign this directive to an attribute in your $scope, meanwhile display it inside an input tag.
1 <div ng-controller='mainCtrl'>
2     ...
3     <input ng-model="inputModel" type="text" />
4     {{ inputModel }}
5   </div>
You’ll see that as you change the value of ng-model='inputModel' inside <input/> (which can be accessed via $scope.inputModel from the controller), the value inside {{inputModel}} updates on the fly!
You might have felt something suspicious inside the last snippet. inputModel was never defined, yet we are using it inside ng-model="inputModel" and the value is being assign and we can actually see it inside {{ inputModel }}. This is actually something that has more to do with javascript than Angular. In javascript, if you have an object name foo that has no properties, and then try to access a property from it (foo.bar / foo['bar'] for example) No errors will be raised. it will just be undefined and until some value is assigned, or it will simply keep being undefined!
1 var foo = {};
2 console.log(foo.prop) // will return undefined
3
4 foo.bar = 'buz' ;
5 console.log(foo.prop) // will return buz
Here, just like the Example we just had, $scope.inputModel was never declared, so accessing it via {{ inputModel }} will be evaluated to undefined and nothing will be displayed in the HTML. Eventually, you will change the value inside the <input> and only just then, $scope.inputModel will be defined. You can easily go inside your controller and assign an initial value to it:
1 myApp.controller('mainCtrl', function($scope, $interval){
2   $scope.inputModel = "initialValue"
3 });
So far we saw how a controller can be used to control the HTML and bind data to it, we also saw how some of the build in directives of angular work, line ng-model and ng-click. In the next section we will focus on Directives!
The code until the end of this section can be found in this link.
Directives, adding supernatural power to HTML
So far we have seen some of Angular’s directives in action, ng-model and ng-click. you might have noticed that all of them start with ng-*. this means that they are directives that angular provides out of the box. but of course, we can create them our selfs too.
Actually these directives names which are now dash-delimited, can be referenced as camelCase . like ngModel="" etc. you can read more about them here.
We will first examine some other important built in directives, and then write a simple one using the directive() constructor.
Iterating over objects
List and Objects can be easily iterated with ng-repeat.
let’s directly jump into how this works. Create an array inside your controller, attached to $scope (obviously) .
1 $scope.actors = ["Marshall", "Ted", "Barney", "Robin"] ;
Now create a HTML <ul> element and display this list, item by item inside it using ng-repeat with the following syntax:
1 <ul>
2   <li ng-repeat="actor in actors">
3     {{ actor }}
4   </li>
5 </ul>
You should see the actor names being rendered properly inside the ul element. In this code snippet, the actors variable is the same of the property you defined in mainCtrl. the actor variable is trivial with respect to mainCtrl. Meaning that it could be anything and it is used to reference the current index of the actors array. You could replace it with ng-repeat="foo in actors" and inside the template just type : {{ foo }}.
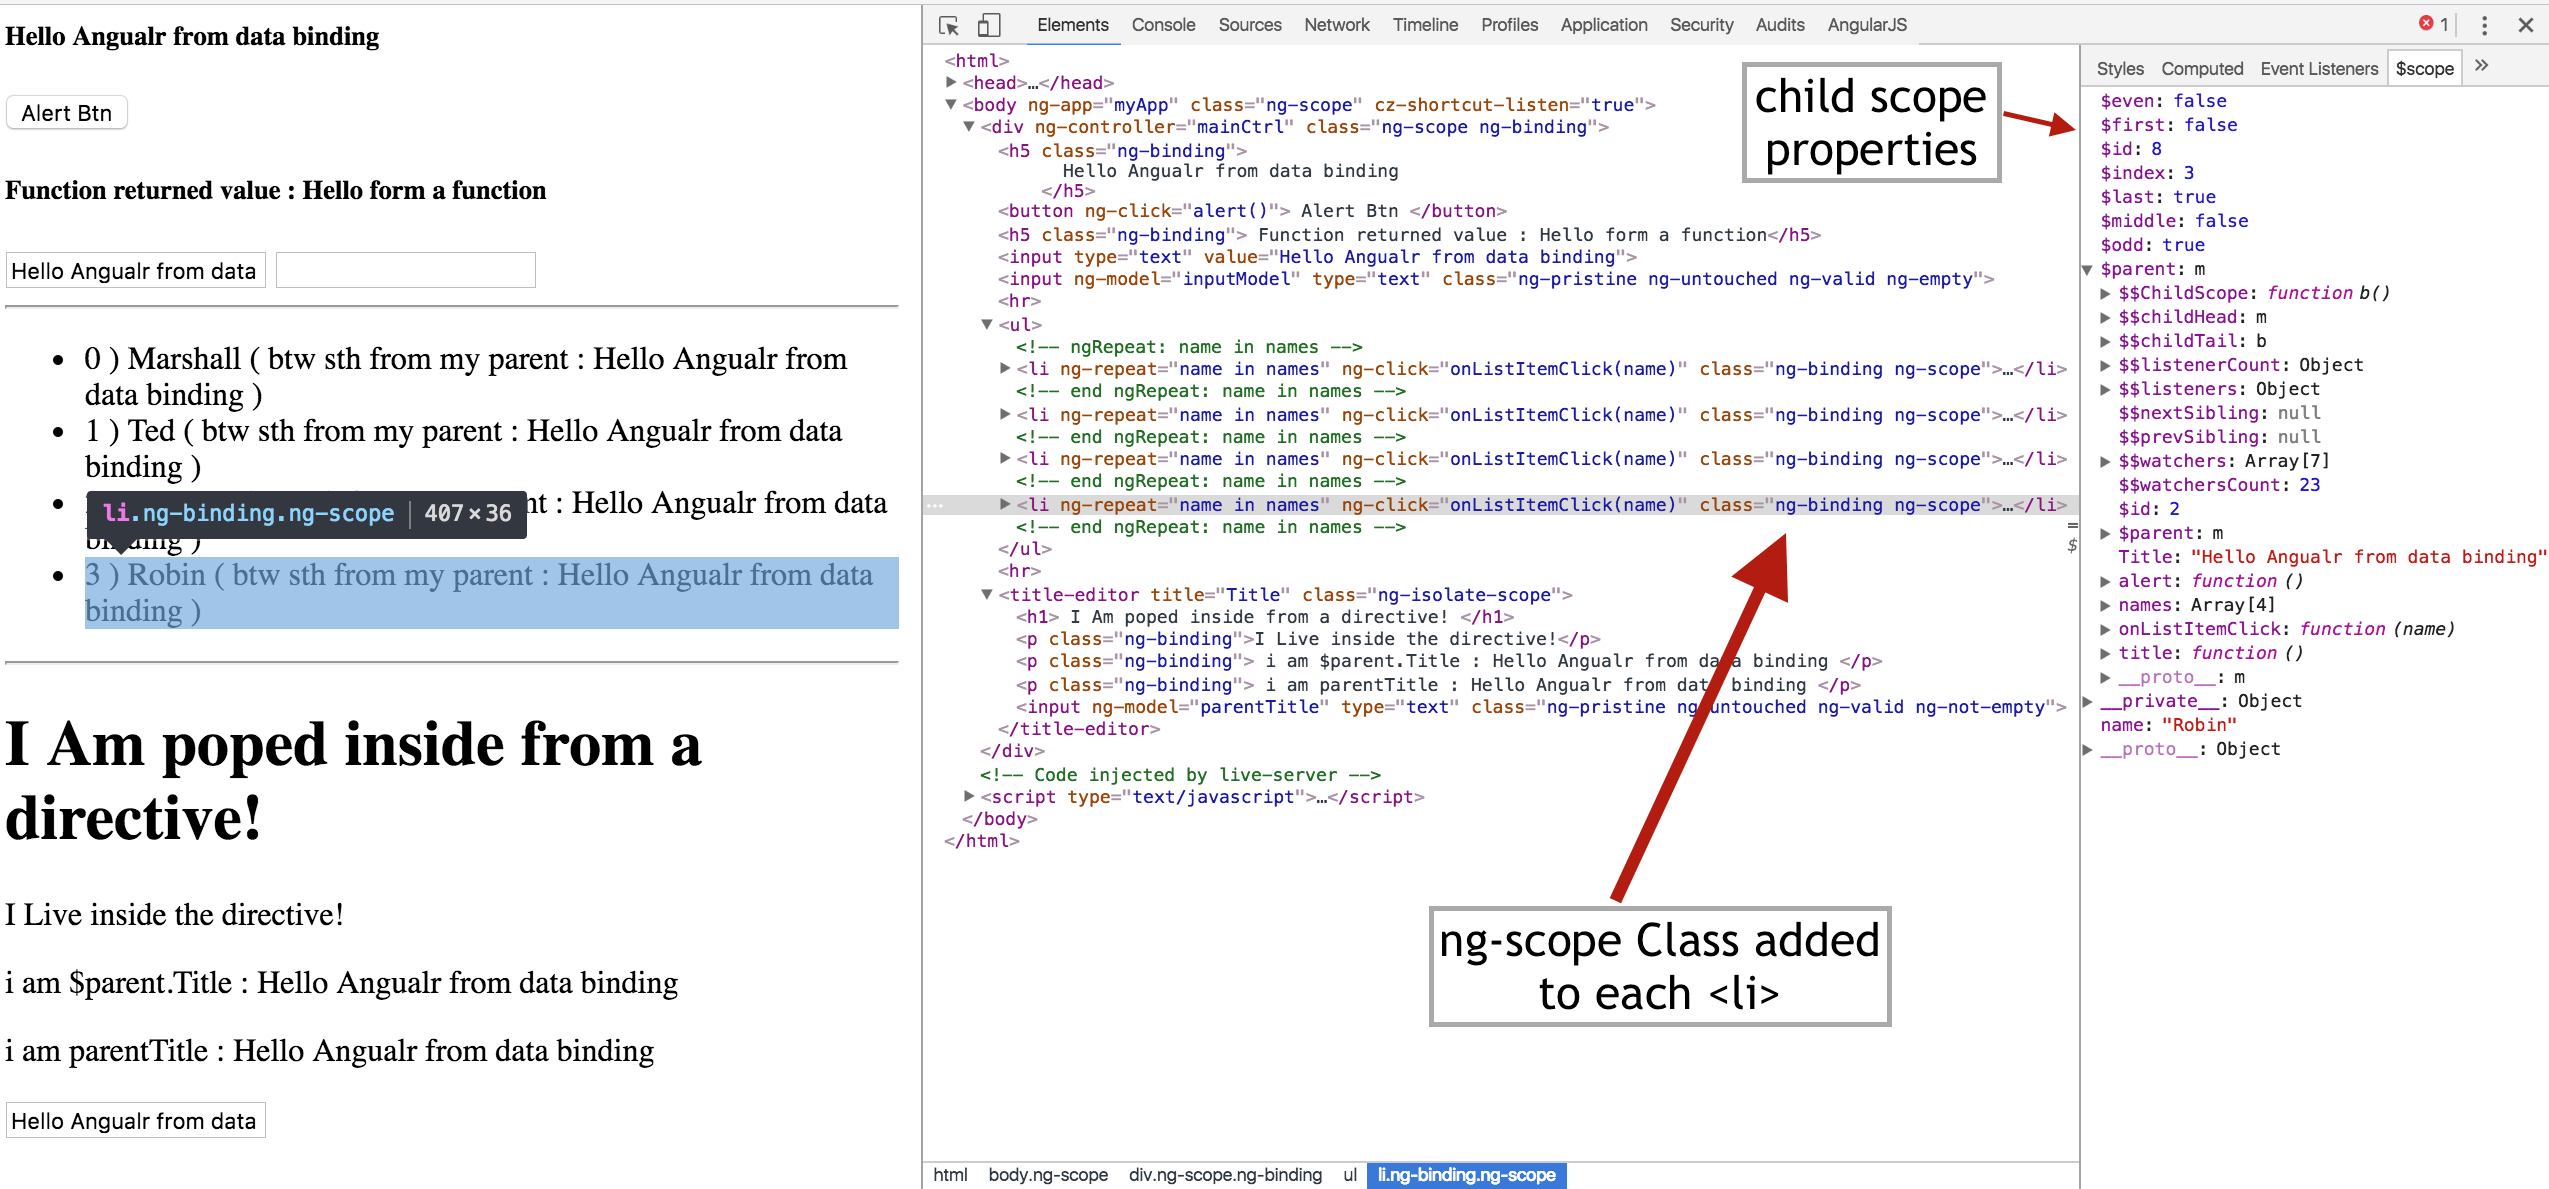
What happens here is very important in concept of understanding the hierarchy of controllers/scopes. We mentioned that a/an page/app can be consisted of many controllers, this means that one controller could be placed inside another. This is actually exactly what is happening here. Each directive might have it’s own $scope nested inside the parent $scope. ng-repeat is a directive that creates a separate $scope for each of its elements and each of these $scope variables have a property named the same as we declared inside ng-repeat, actor in this case. You can easily check this by testing weather any {{actor}} property is visible outside the ng-repeat or not.
Angular automatically adds a class named ng-scope / ng-isolate-scope to all HTML tags that act as the holder of a scope. you can see them inside your HTML. Read more about scopes here.
So always keep in mind that directives can created their own -child- $scopes. Another property that this child $scope has is a property called $index. try and change the content of <li> to {{ $index }} ) {{ actor }} and see what happens.
If the rendered version of the above code was something like:
 1 <ul>
 2   <li ng-repeat="actor in actors">
 3 	<!-- This <li> has a $scope like :
 4 		 $scope : {
 5 			 actor : "Marshall" ,
 6 			 $index :0 , ...
 7 		 } -->
 8     {{ actor }}
 9   </li>
10   <li ng-repeat="actor in actors">
11   <!-- This <li> has a $scope like :
12 		 $scope : {
13 			 actor : "Marshall" ,
14 			 $index :0 , ...
15 		 } -->
16     {{ actor }}
17   </li>
18   <li ng-repeat="actor in actors">
19     {{ actor }}
20   </li>
21   <li ng-repeat="actor in actors">
22     {{ actor }}
23   </li>
24 </ul>
Another cool thing about nested $scopes is that each child $scope, has access to its parent $scope properties (well, not always, but it has by default. you learn more about this soon). this means that inside the ng-repeat, we can still use the $scope associated with mainCtrl and its a attributes.
Try this with:
1 <ul>
2   <li ng-repeat="actor in actors">
3     {{ $index }} ) {{ actor }} ( btw sth from my parent : {{ Title }} )
4   </li>
5 </ul>
Although you have access to all of the values that you bind into your html from your $scope, inside that $scope (naturally!), but you can also pass some of them back as arguments of listener functions back to $scope. As an example, let’s pass the actor property from ng-repeat back to a function inside the mianCtrl. Create a function onListItemClick inside the controller:
1   $scope.onListItemClick = function ( actor ) {
2   alert('Hello ' + actor)
3  }
and pass the actor to it :
1 <li ng-repeat="actor in actors" ng-click="onListItemClick(actor)">
2     {{ $index }} ) {{ actor }} ( btw sth from my parent : {{ Title }} )
3 </li>
Creating custom directives
Now let’s go into creating a custom directive. Like controllers, directives must also be attached to a module.
Add this to mian.js:
 1 myApp.directive('titleEditor', function() {
 2   return {
 3     restrict: 'AE', // how this directive can be
 4 				    //used. <attribute> and <element> in this case
 5
 6     // scope: true, // isolated scope
 7
 8     template: '<h1> I Am poped inside from a directive! </h1>' +
 9       ' <p>{{ directiveData }}</p> <p>{{ Title }}</p>',
10
11     // controller: function($scope) {
12     //     $scope.directiveData = "I Live inside the directive!";
13     //   }, // custom controller for this directive
14
15     link: function(scope, iElem, iAttr, ctrl) {
16       console.log(scope, iElem, iAttr, ctrl);
17     }
18   }
19 })
Just like a controller, a directive has a name as the first argument. note that since we mentioned that a directive name like ngModel is equivalent to ng-model, a Directive name MUST start with lowercase letter. Let’s begin by inspecting the code. the second argument, the function, must return an object that declares the directive. this object must have specific keys that each have e meaning:
-
restrict: defines how this directive can be used.
Astand for a attribute ( like<div title-editor> ..) andEstands for element (like<title-editor></title-editor> -
scope: declares weather the directive creates a new scope of it owns or not. Remember what we said about how
ng-repeatis creating multiple scopes, each havingactorand$indexproperties? this is exactly that! We can define here weather our directive has a scope or not, does it inherit from it parent or not etc. -
template: defines the html template that should be rendered inside the directive. you can also use
templateUrlto link an HTML file to be rendered inside. Note that in Angular whenever we have atemplateoption, we can replace it withtemplateUrl. This is generally a cleaner approach, but for learning purposes we stick with inlinetemplate. -
controller: just like normal declaration of a controller, a directive can also define its own controller. notice that we can inject
$scopevariable (and services like$timeoutetc.) in the same way inside this directive’s controller too. - link: a function that will be invoked as the template is getting rendered, which has access to the directives scope, controller, DOM element and DOM attributes. So it’s actually quite good for manipulation the DOM or binding events!
Unfortunately, there is more to these attributes, and more detail that can be learned. Fortunately the portion above is what you probably need (might even more that what you need) and we are only going to cover these for now.
With all things said, let’s start examining the directive. Look the titleEditor directive carefully again, how we are logging some details inside the link and specially the template that we declared for it. Then place a <title-editor></title-editor> anywhere inside the ng-controller='mainCtrl' and see both the HTML and your console.
1 <body ng-app="myApp">
2   <div ng-controller="mainCtrl">
3     <title-editor></title-editor>
4   </div>
5 </body>
You should notice that:
Since we did not declared an isolated scope for this directive, and since it is inside mainCtrl it has access to all it’s properties. aside from {{Title}} which is being displayed in the screen, you can see in the console that when we logged the scope parameter of the link function, it actually has all of the:
1 Title "Hello Angular from data binding at Mon Aug 01 2016"
2 sayHey()
3 actors Array[4]
4 onListItemClick = function(actor)
Again, this is because scopes - by default - inherit from each other. We’ll learn about this feature alter in this chapter.
You should check yourself that if we place <title-editor> outside of the mainCtrl we do not get properties like {{ Title }} anymore.
So, let’s start by making the directive isolated. Directives are meant to be Reusable component, so it is a very bad idea to let each of them have Full Access to its parent scope.
Change scope: true inside the directive declaration and check the results again.
You see no changes. why is the new scope still having access to the parent scope? Well, because so far we have defined a scope for the directive, but no specific isolation was defined! this is because scopes naturally inherit from their parents, unless said not to do so! So we basically created a copy of the scope associated with mainCtrl inside the scope associated with <title-editor>. there is one small thing that you can use to convince yourself that this a new scope, even though it has the same Title and .. it is not the same. on the log of the scope inside link function pay attention to an attribute named $id. you should see that there are not the same with scope: true/ false and actually when it is false it is equal to the $id inside mainCtrl! (check the $id of mianCtrl with printing $scope.$id inside it)
Now let’s change to scope: {} and see what happens. You should see no more sign of the {{Title}} inside of titleEditor and the $id must be different from mainCtrl. Now we have an isolated Scope!
But this is … well, not good! It might be a very common situation that we need to access something from the parent scope or pass a data back to it. There are ways for that to! Actually, there are two ways, a good one and a bad one.
The bad way is to use the $parent property in a scope. As you - should - remember, scopes are nested inside each other. and each scope has a reference to its parent scope under $parent name. Check inside the console to see that a $parent property which contains Title, sayHey(), title(), actors[] and.. exists inside the directive’s scope. we can use them inside javascript and HTML by using the $parent prefix . Change {{Title}} to {{ $parent.Title }} and see that the title from mainCtrl is visible again.
Speaking of the devil.. I mean controllers and scopes, let’s uncomment the controller section as well inside the directive declaration object and check $parent inside of that. Aside from that a property named directiveData should be as well visible now.
 1 return {
 2   ...
 3   template: '<h1> I Am popped inside from a directive! </h1>' +
 4     ' <p>{{ directiveData }}</p> ' +
 5     '<p>{{ $parent.Title }}</p>', // Should be the same as
 6 	                              // defined inside mainCtrl
 7     ...
 8   controller: function($scope) {
 9      $scope.directiveData = "I Live inside the directive!";
10      console.log($scope.$parent.Title); // Should be the same as
11                                         // defined inside mainCtrl
12   },
13   ...
14 }
What we did before, using $parent is actually a backdoor for accessing parent scope. It can be used anywhere but to be honest, almost always it’s a bad idea to use it, specially for changing something. One of the only safe use cases of $parent is inside nested loops. As me mentioned, each ng-repeat will create a scope for each of its items, and these scopes will inherit their parent’s properties. But the thing is that each of these scopes have the same properties, so they’ll override their parent’s properties and hence, each child loop will not have access to its parent index or other properties. In this situation, it’s safe and common to use expressions such as:
1 {{ $parent.$index }}
To access the parent loop index.
The Good Way for getting the data from a parent scope to a directive scope is to specify them inside scope: {}. The simplest of examples: Define scope inside the directive as following: scope: {parentTitle: @title}
What this means is that a property named parentTitle will be added to the Isolated Scope (since we are using {} as the scope value, not ture/false) and its expecting to receive its value from the parent scope via an attribute named: title. Ignore the @ for now. we’ll get to that in a second. Let’s implement this inside our HTML and javascript file.
 1 // inside main.js directive function
 2 scope: {
 3   'parentTitle': '@title'
 4 },
 5 template: '<h1> I Am popped inside from a directive! </h1>' +
 6   ' <p>{{ directiveData }}</p>' +
 7   '<p> i am $parent.Title : {{ $parent.Title }} </p>' + // the bad way
 8   '<p> i am parentTitle : {{ parentTitle }} </p>' , // the GOOOOOOD way
 9 controller: function($scope) {
10   $scope.directiveData = "I Live inside the directive!";
11   console.log($scope.$parent.Title); // the bad way
12   console.log($scope.parentTitle); // the GOOOOD way!
13 }, // custom controller for this directive
14
15 // link and ...
And inside your html file:
1 <title-editor title="{{Title}}"></title-editor>
Note that here, {{ Title }} belongs to mainCtrl.
So what was the deal with that mysterious @? There are basically 3 main ways to bind data to a directive scope via attributes. any of these ways have a special character that you must put before the name for angular to recognize it :
-
@- binds a local scope property to the value defined inside the DOM attribute. Recall our example from the last section :1scope:{2'parentTitle':'@title'3},1<title-editortitle="{{Title}}"></title-editor>this means that the value that we provided to the
title=""attribute,{{Title}}, will be resolved and then bounded toparentTitleof the directive’s scope. Since DOM attributes are strings by nature, the values bounded to the scope are also strings by nature. Try something like<title-editor title="Some String and a template : {{Title}}"></title-editor>and explain to yourself how this works. -
=- binds a Two way data to a local property. this might look similar to the last one, but there is crucial difference between=and@.@interprets an expression as string and then just passes it down to directive’s scope. But=knows that there is going to be a binding between Properties (AKA. a Models) of the two scopes, so it actually does not expect to see something like{{ Title }}, instead the Name of that property. Long story short, if you want to achieve the same thing with two way data binding, you should to something like:<title-editor title="Title"></title-editor>andscope: {'parentTitle': '=title'}. -
<- works exactly the same as=but it has a one way flow of data, meaning that changes in parent scope will reflect on child scope, but changes on child scope will not reflect on the parent scope.
There is one last way, which we do not fully cover here, & is only for when we want to pass an executable expression to a child scope and is (in my experience) rarely used. for more info on scope binding types, see this link.
Let’s move on to the last part. The link function, with the arguments that you are already familiar with, gets called only when the directive is being mapped inside the HTML, once in its lifetime in other words. The main advantage of link function is that it has full access to the DOM Node associated with this directive (after all, directives will eventually render as some HTML/non-HTML tags inside the page!), therefor it is pretty good to bind some events!
As an example you could easily do something like:
1 link: function(scope, iElem, iAttr, ctrl) {
2       iElem.on('click', function(){
3         alert("clicked!");
4       })
5  }
To listen to some events, manipulate directive scope, manipulate the parent scope (which we just learned how using the =) etc.
To wrap up our understanding of directives, we are going to complete a simple directive that gets a property from a parent controller using = in scope definition, and provide user with an input tag tag to change that property, and we can then clearly see how these changes propagate everywhere.Actually, doing this is quite easy. just add this to directive template: '<input ng-model="parentTitle" type="text" />' + . And from now on, you will probably see the changes to both $scope.title and $scope.parentTitle will be reflected everywhere.
The code for this section so far could be viewed here.
Services, handling the data logic properly
We mentioned Services as objects that can be injected into a function, a controller , a directive etc. Sometimes these Services are referenced to as Providers, or Factories. The argument about the correct name is not our main purpose here, instead let’s stick the core definition of a Service for now: An injectable object.
Why we might need a Service?
There are many use cases for these objects. So far you have gotten familiar with something like $interval which is a wrapper around window.setInterval. When it comes to creating custom services the following scenario is the most common:
So far we have only had one controller, one module, life is good, huh? We all know that this is just temporary. if you attempt to build a complete angular application with only just one controller, I assure you, it is going to be biggest mistake of your life! soon or late you have to expand your application to multiple modules and multiple controllers and one of your first needs is: Sharing data between controllers. this is one of the main cases where we need to have a service which controls and shares the data between two controllers.
Before getting to these points exactly and defining different types of providers and services (yes, yes, there are many types of services!) let’s create a simple one for now. Add the following to your mian.js:
 1 myApp.factory("actorService", function() {
 2   // Internal | Private functions and variables
 3   var actors = ["Marshall", "Ted", "Barney", "Robin"];
 4   var getActors = function() { return actors }
 5   var getActor = function(idx) { return actors[idx] }
 6
 7   // this will be public
 8   return {
 9     getActors: getActors,
10     getActor: getActor
11   }
12 })
Let’s go through the code step by step:
First, Like literally everything else in Angular, the first argument of the factory method is it’s name.
Second, Factory is one of many types of providers that we can use. think of it as a function/constructor that can have many methods and properties, but only those that come in the return statement are public and can be used by objects injecting this factory.
The rest of the code is just for having something to show. You get the point of it! Let’s go to the part that we inject this! as you might’ve mentioned we planned on using this service to provide the mainCtrl with the list of actors that it already had. This way if another controller wants this list of actors, we do not need to rewrite anything there! We just inject this factory again and ask it for the list of actors.
Go to the mainCtrl section and modify the code:
1 myApp.controller('mainCtrl', function($scope, $interval, actorService) {
2   $scope.Title = 'Hello Angular from data binding';
3   $scope.actors = actorService.getActors()
4   ...
5 })
Notice how we injected the actorService (which is equivalent to the name that we declared for it) just like any other provider or service that angular has.
Different types
Let’s continue with explaining different types of providers
Constants
As the name suggest, they are only key-value like constant values.
1 myApp.constant("key", "value");
2 myApp.constant("aName", {value1: 'key1', value2: 'key2'});
3 myApp.controller("mainCtrl", function($scope, key, aName){})
Values
A Value is same as a constant, but unlike a constant its value can be changed and it can be interpreted by a decorator (which we will learn about in the final chapter).
1 myApp.value("key", "value");
2 myApp.controller("mainCtrl", function($scope, key){})
Note that the "value" can be anything, a string, a number, even a function.
1 myApp.value("someFn", function() {console.log('here!') });
2 myApp.controller("mainCtrl", function($scope, someFn){})
Service
Think of services as value that is always an object and can have dependency injection. in the previous example, consider what would happen if myApp.value("key", "value") wanted to use some other value provider, like someOtherService! A dead lock! Because of this property service are the best fit for when we just want to share some data/functionality between different components.
You can entirely replace the factory above with the following service:
1 myApp.service('actorService', function($timeout) {
2   this.actors = ["Marshall", "Ted", "Barney", "Robin"];
3
4   this.getActors = function() { return this.actors}
5   this.getActor = function(idx) { return this.actors[idx] }
6 })
Notice how we injected the $timeout in actorService. anything that you attach to this inside a service() will be public for the world to see. So in some sense, service is like an object (as we mentioned above: Think of services as values that are always object) and using the function declaration is only to allow them have dependencies.
Factories
think of factories as a Service that injects a function instead of an object. this somehow makes sense with what we already saw from factories. they could have some private APIs, some public ones, the code inside them get executed like a constructor and so on. And you probably already know about how in javascript a function as somehow like a class (if you don’t, please search it on google ASAP. you might hate the entire concept and let go of it the first time. please search again!), so I’m not going to talk about them again.
Just to refresh your mind on the factory that we already had and to compare it again with the service:
 1 myApp.factory("actorService", function() {
 2   // Internal | Private functions and variables
 3   var actors = ["Marshall", "Ted", "Barney", "Robin"];
 4   var getActors = function() { return actors }
 5   var getActor = function(idx) { return actors[idx] }
 6
 7   // this will be public
 8   return {
 9     getActors: getActors,
10     getActor: getActor
11   }
12 })
There are two other types of providers to learn, Provider and Decorator, which we will cover them in a separate chapter. To give you brief view of what they are
- As mentioned above, a
.decorator()is a wrapper for.value(). it can be applied to modify a.value()at the beginning of the runtime. - A
.provider()is like a parent to all other types of services that we learned in this chapter. As the name suggest, a provider can be used to create a new instance of a class. It can provide it.
Let’s go back to the naming argument in the beginning of this section and conclude it:
Angular’s Injectable Object/functions are sometimes called providers because: the provider() function can be used to create them and inject them.
Mostly, these Injectable Object/functions are named as Factory, or Service because factory() and service() are the most common.
For the rest of this book, we refer to all of .service(), .factory(), .constant() etc. as a type of Service. By Provider we only specifically mean .provider().
Into the next chapters
Don’t take this the wrong way, you have not learned everything yet, but believe me, what you have learned until here is probably the only conceptual thing that you need to know about Angular 90% of the times. From here on, in the next chapters, we will focus more on technical details, tricks and solutions to well known problems.
Further reading and challenges
More ideas to hack around with
- Try writing a custom
ng-clickthat has the exact same API as Angular’sng-clickbut it outputs a log of each click event to the console every time a click event occurs. Imagine you need it for debugging or testing purposes. Call it something likeclick-log='...'. Keep in mind that you probably need to use the¬ation for passing a function to the isolated scope of your directive. So get your hands dirty with jumping into Angular guides on directive!
Referencing a module
In our code, we named the variable containing the module var myApp = angular.module(.. and used it for further reference. there is actually another common way to do this.
the syntax angular.module(aName) is actually a lookup for any module created before with the name aName and the syntax angular.module(aName, []) is actually the constructor. So you could created the controllers and directives with :
1 angular.module('myApp' , []);
2
3 angular.module('myApp').controller( ... ) ;
4 angular.module('myApp').directive( ... ) ;
Debug Angular in your browser and learn about $scopes
There are many extensions for Angular in Chrome/Firefox. many of them provide $scope inspector which let you examine the value of your $scope variables and their hierarchy at runtime. Aside from being useful for development, they are VERY VERY good for learning. search around in extensions of your web browser and install some of them and try to examine some of your code with it. AngularJS Batarang for chrome is one of the bests.
Controllers, templates and more!
In the previous chapter, although we learned some very good fundamental details of Angular (specially on controllers and $scope), but the code that we worked on was mostly like a Hello World for Angular.
In this chapter we will learn more technical details of Angular. by technical I mean that they are going to be details that you will surely need to know them and use them in your next Angular project!
The code for this chapter can be found under a separate folder under the github repository associated with this project.
As a heads up for this chapter, it is good to mention that we are going to learn a LOT in this chapter. and as the name suggests, they are all going to be implemented inside and using a controller. in the next chapters we are going to dedicate our time to revisit all that we learn here to see which of them are suited to be implemented via a Service or a Directive so they become Reusable components.
We are going to start with a single page application with an index.html and main.js file linked like the previous chapter. I also included twitter bootstrap to make the pages that we create a little bit brighter! if you are not familiar with it, it’s just library that you can use a set of css classes it provides to have a better looking HTML.
More advance iteration with ng-repeat and pipe filters
In the previous chapter we barely introduced ng-repeat, while it’s one of the most commonly used Angular directives. Let’s inspect it more and see how it behaves with objects instead of arrays, and how to mix it up with some filters.
ng-repeat with objects
You now know how to iterate a simple array. Two more things to learn:
- Iterating over objects
- Iterating over arrays of objects
We’ll change our list of actor to the following:
1 $scope.actors = {
2     "Ted": { lastName: "Mosbey", age: 27 },
3     "Barney": { lastName: "Stinson", age: 30 }
4   }
If you iterate over this object with the same way as we did before, you’ll find something like this:
1 	<li class="list-group-item">
2 		{ lastName: "Mosbey", age: 27 }
3 	</li>
4 	<li class="list-group-item">
5 		{ lastName: "Stinson", age: 30 }
6 	</li>
7 	...
We have no access to the key of the object and the values are displayed as plain object.
Two point will solve this:
First, you can use ng-repeat="for (key, value) in someObject" to have access to both the keys and the values.
Second, you should know that Angular’s template syntax actually supports a large subset of javascript operation, like : {{ a + b }}, {{ someFunction(someProp) }} ,{{ someString + ' , I am concatenated! }}', so you can use the dot operation to access the properties the object associated with a key. Change the html template:
1 <li class="list-group-item" ng-repeat="(name, detail) in actors">
2 	{{ name }} [{{detail.lastName}}] is {{ detail.age }} years old!
3 </li>
Having this in mind you can even figure out how you can have nested loops. change to actors property to:
 1 $scope.actors = {
 2     "Ted": {
 3       lastName: "Mosbey",
 4       age: 27,
 5       bars: ["Blind Tiger", "Torst", "Good Beer"]
 6     },
 7     "Barney": {
 8       lastName: "Stinson",
 9       age: 30,
10       bars: ["The Poney Bar"]
11     }
12   }
And your HTML to:
1 <li class="list-group-item" ng-repeat="(name, detail) in actors">
2           {{ name }} [{{detail.lastName}}] is {{ detail.age }} years old!
3           I like catching a beer in
4           <span ng-repeat="bar in detail.bars"> {{ bar }} , </span>
5 </li>
There is a problem here! We really don’t want the last “,” there. Let’s use some template magic to get rid of it:
1 <span ng-repeat="bar in detail.bars">
2       {{ bar }} {{ ($index === ( $parent.detail.bars.length-1 ) ) ? '' : ',' }}
3 </span>
As you see, we used an if statement to check the index of the bar being printed, with the length of all of the bars, and when we reach the last one, we omit the ,.
You should know clearly why $parent.detail.bar is what we compared it’s length with $index (nested loops! each creating their own scopes!) , if you don’t, jump right back to the section about ng-repeat in chapter 3!
Filters
Filters provide a way to modify any model binding (using {{}} in other words) in your html. By the Term model binding we mean any place that you place one your $scope properties inside HTML. It could be:
- Template binding
{{ someModel }} - Loops
<div ng-repeat="item in someModel">
Or any other place. The filters work similar to Unix pipe style. think of your model as the input and with each |operator it will be piped into a filter and the results come out. with this way, multiple pipes can be combined and the output of one of them could be added to the other one.
Like many other situations, Angular provides us with a set of built in filters, but with can extend them to any usage and build our own filter. you can read the full list of filters here.
Let’s begin testing with some of the built in filters. One of these filters are called uppercase and you probably guess from the name what it is going to do! Apply it to the list of beers from the previous section with:
1 <span ng-repeat="bar in detail.bars">
2   {{ bar | uppercase }} {{ ($index === ($parent.detail.bars.length-1)) ? '' : 'or' }}
3 </span>
Notice the | pipe after {{ bar }}. Aside from simple filters like uppercase that works on a single object, there are some more interesting filters that work on collection, arrays, and can be applied to loops.
One of the best filters for collections is called… well, it’s called filter! It works only on arrays and takes an argument as input and returns only those elements in the array that contain the value given.
Modify the following for an actor’s list of favorite beer.
1 <li class="list-group-item" ng-repeat="(name, detail) in actors">
2      {{ name }} [{{detail.lastName}}] is {{ detail.age }} years old! I like catching a bee\
3 r in
4      <input type="text" ng-model="beerFilter" />
5      <span ng-repeat="bar in detail.bars | filter : beerFilter">
6              {{ bar | uppercase }} {{ ($index === ($parent.detail.bars.length-1)) ? '' : '\
7 or' }}
8      </span>
9 </li>
Change the value inside the input tag you see that the array of beers will actually get filtered according to that value. As mentioned before, the fact that we never declared $scope.beerFilter is not a problem. It will be equal to undefined at the beginning and will have a value as we modify the input tag.
Keep in mind that you do not HAVE to use a model as input to the filter. You could’ve just used something like:
1 <span ng-repeat="bar in detail.bars | filter : 'someVal'">
The orderBy filter works over an array of objects by taking one key name as the filter and sorting the array according to that key. For example: <div ng-repeat="item in array | orderBy 'keyName'"> ... </div> will sort an array with the format
1 $scope.array = [
2 	{name: "item1", key:3},
3 	{name: "item2", key:2},
4 	{name: "item3", key:1}
5 [
according to key property.
Let’s finish this section with creating a custom filter. Custom filters can be created using the .filter() method on a module. It must return o function that takes the input value as argument and returns the new formatted values as output.
The following filter simply takes an string input and returns the same value in reverse.
1 myApp.filter('strRev', function () {
2   return function (inp) {
3     return inp.split('').reverse().join('')
4   }
5 })
You can now test it with :
1 <span ng-repeat="bar in detail.bars | filter : beerFilter">
2       {{ bar | strRev }} {{ ($index === ($parent.detail.bars.length-1)) ? '' : 'or' }}
3 </span>
Further reading, challenges and the code
As you might have noticed, we have two types of filters, those who operate on single values (pipe) and those who filter a collection. Creating a custom filter that operates on a collection has the same API and routine as above, but it takes additional input arguments beside inp. As a good exercise, you can go ahead and read some examples of this type of filter and work on creating the following the filters :
- One that filters an object over it key names.
- One that takes an array and returns all of its elements in
uppercaseformat.
The code until the end of this section can be viewed here.
Style manipulation with Angular
Angular provides convenient ways to manipulate the DOM attributes or Style. Some of these ways will be described in this section. the key difference between Angular’s way and vanilla Javascript’s way is that using Angular, as you might expect, we can control element’s style and behavior using $scope properties, which gives us a better and easier way of control.
Using ng-show, ng-hide and ng-if
Two of the most basic of these UI controls are two directives named: ng-show and ng-hide. As the names suggest, they both hide or show an element based on the expression given to it. Look at the following example:
1 <div class="row">
2      <div class="col col-sm-6 col-sm-offset-3">
3         <button class="btn btn-success btn-block" ng-show="true">
4             Click me for some process
5         </button>
6      </div>
7 </div>
As you see, the button is there. now change the ng-show value to false. As you might expect, the button goes away. Now browse the DOM elements with your browser. When you find the <button> node, you’ll see that it has been rendered as:
1 <button class="btn btn-success btn-block ng-hide" ng-show="true">
2       Click me for some process
3 </button>
The ng-hide class automatically adds the display: none property to the node element. There are some important notes to keep in mind about display: none here:
- This property will hide all of the child elements
- ng-hide will not cause the DOM elements to be not rendered, it just hides them.
The ng-hide works exactly in the same manner, but as the name suggests, the Boolean value is the other way around and when it is equal to true, the element will not be displayed.
The ng-if directive works almost the same as ng-show, but there is one key difference, if the expression provided to ng-if is equal to false, the element will actually be removed from the DOM, and if later evaluates to true again, it will be recreated once again.
We mentioned :
the key difference between Angular’s way and vanilla Javascript’s way is that using Angular, as you might expect, we can control element’s style and behavior using
$scopeproperties, which gives us a better and easier way of control.
But so far, even though we learned how ng-show, ng-hide and ng-if work, we only used static true / false values for testing. let’s try this in a more realistic way and use $scope properties to control the button:
Suppose that the button will perform an http request as you click it and you wish for it to display a loading icon during this period and then fade away.
We add to state variables to our scope, indicating wether the button or the icon should be displayed or not, and a function to change them.
1 $scope.btnDisplay = true;
2 $scope.iconDisplay = false;
3
4 $scope.doProcess = function () {
5   $scope.iconDisplay = true;
6   $timeout(function () { $scope.btnDisplay = false }, 3000);
7 }
And then just assign these values to the HTML markup that we had:
1 <button ng-click="doProcess()" ng-if="btnDisplay" class="btn btn-success btn-block">
2             <span
3 	        ng-show="iconDisplay"
4 	        class="glyphicon glyphicon-cloud-download">
5 	        </span>
6 	        {{ iconDisplay ? 'Waiting for process' : 'Click me for some process'}}
7 </button>
This is a simple example, of course you can do more! Now you have an understanding of How and Why controlling our UI with $scope values is very reflexive.
Using ng-class
The ng-class directive is one of my own favorite directives! in allows you to dynamically assign a class to an element, according to a boolean expression defined from your controller.
Assume that you want to assign a different color to your button while it is processing, and show a red color when if it has failed for some reasons. We’ll use two classes from twitter bootstrap named btn-warnign and bnt-danger.
ngClass can be applied in many ways, one of them is using an object with the following format:
1 <div ng-class="{aClassToBeAdded: conditionForThisClass, secondClass: secondCondition}"></d\
2 iv>
An important note on this object is that by default it does not require you to wrap the condition and class name in quotations, but if the class name has dashes, it Must be.
1 <div ng-class="{'a-dash-class-name': conditionForThisClass, secondClass: secondCondition}"\
2 ></div>
The condition can be a model associated with $scope,
1 $scope.conditionForThisClass = true
an expression, or negation of an expression (don’t miss the ! before second expression) :
1 <div ng-class="{'a-dash-class-name': someModel.name == 'aName' , secondClass: !secondCondi\
2 tion}"></div>
or a function:
1 <div ng-class="{'a-dash-class-name': someFunction()}"></div>
Ok, with all of this in mind let’s add what we described, changing the color of the button while it is processing. Like many other changes in our code, this will also be just a one line small modification:
 1 <button
 2   ng-class="{'btn-warning' : iconDisplay, 'btn-info': !iconDisplay}"
 3   ng-click="doProcess()"
 4   ng-if="btnDisplay"
 5   class="btn btn-block">
 6 	<span
 7     ng-show="iconDisplay"
 8     class="glyphicon glyphicon-cloud-download">
 9   </span>
10 	{{ iconDisplay ? 'waiting for process' : 'Click me for some process'}}
11 </button>
and Thats it! we just remove the btn-success default class, and added two other conditional classes using ng-class.
Aside from Object there are more ways to use ng-class. another one that might be useful is:
Using an model that evaluates to an Array. as an example:
1 $scope.someClasses = ["btn-danger", "btn-xs"] ;
and
1 <button class="btn" ng-class"someClasses"> </div>
Of course, in this example, as you change the someClasses, to button classes change with it.
Further reading and challenges and the code:
- You can read more about ngClass here.
- Continue the last section and add an input tag which binds its value to an
ngClass. change the value in the input and see the changes in theclass=''attribute of the target element. - Read about ng-style. It’s very similar to ng-class, but it applies an object of css styles like:
1$scope.someStyle={'width':100px,'display':'block'};to an element. Create some HTML elements with dynamic width and style, changing from the UI using
<input>tags. - The code until the end of this section can be viewed here.
Ups and downs of < form > management with Angular
Angular provide some helper classes that help you work more easily with a <form> tag.
To examine these classes first hand we use the template below (in order to get this to work, all elements must have a name= and all inputs must have ngModel) :
 1 <form name="submitform" novalidate>
 2     <div class="form-group">
 3        <label> Email</label>
 4        <input ng-model="formData.email" class="form-control" name="email" type="email" req\
 5 uired>
 6     </div>
 7
 8     <div class="form-group">
 9        <label> Name </label>
10        <input ng-model="formData.name" class="form-control" name="name" type="text" requir\
11 ed />
12     </div>
13
14     <div class="form-group">
15        <label> Password </label>
16        <input ng-model="formData.password" class="form-control"
17 	       name="password" type="password" required
18 	       />
19     </div>
20     <div class="form-group">
21 	  <button class="btn btn-success" ng-click="submit()"> Submit </button>
22     </div>
23  </form>
Notice how we put novalidate attribute on the form tag and required on each of the inputs.
By going to your browser’s inspection tools, you can see that before taking any type of action, the form is rendered like:
1 <form name="submitform" class="classng-pristine ng-invalid ..."> ... </form>
Notice how Angular added the classes. This means that Angular will detect automatically that a form exists and starts watching it for changes.
You should convince yourself that these classes are logical with respect to the attributes that we placed on our form. for example since all inputs had required, if you leave one of them empty, we see : ng-invalid-required. if you type a name inside email, since it had a type='email’, you will see: ng-invalid-email.
You can also find similar class names on each <input> inside the form. such as ng-dirty, ng-touched, indicating the field’s state.
These information can also be used inside the controller, the rule, according to which Angular watches forms is:
A property equal to the form’s name='' attribute will be added to the scope, in which the form exists. This new property holds information about whether the form is valid, has it been submitted, have the fields been touched so far or not and so on. To experiment this, try passing a variable named submitForm back to controller and log it:
1 <button class="btn btn-success" ng-click="submit(submitForm)"> Submit </button>
1 $scope.submit = function(form) {
2 	console.log(form);
3   // or just log it directly
4   console.log($scope.submitFrom)
5 }
You can see how similar information is also stored inside this property ($scope.submitForm, in this case). There are many more details about form validation (such as the exact meaning of each class) and you can read more about them here. Instead of going through every single detail which you probably won’t need in a decade, we spend time explaining a common usage pattern for Angular form management.
If you inspect the form object that we logged closely, you’ll see that errors associated with classes that were added to <form> are stored in:
1 $scope.submit = function(form) {
2 	// form.$error
3 }
and errors associated with each input, for example email is stored inside
1 $scope.submit = function(form) {
2 	// form.email.$error
3 }
and so on. Let’s use these to add a validation for our email field. we’ll create all of the error texts required, but hide all of them and only show one, depending on the state of the form. for example when the value of submitForm.email.$error.required is true, we should show a text telling that is can not be empty.
Change the email section as following:
 1 <div class="form-group">
 2    <label> Email</label>
 3
 4    <!-- Notice the ng-show condition -->
 5    <span class="label label-danger" ng-show="submitform.email.$error.required">
 6      Required!
 7    </span>
 8    <!-- Notice the ng-show condition -->
 9    <span class="label label-danger" ng-show="submitform.$error.email">
10      Invalid email!
11    </span>
12
13    <input ng-model="formData.email" class="form-control" name="email" type="email" require\
14 d>
15 </div>
Of course there more to it than this, HTML provides more form validation attributes, min/max length , min/max value and so on. All of them could be used and Angular will provide the corresponding error values and classes. Aside from using these attributes, we can use them with a ng- prefix and Angular’s magical data binding will be available:
1 <input type='number' min=10>
2 // if we use ng-
3 // magic can happen!
4 <input type='number' ng-min='dynamicMinValue'>
1 $scope.dynamicMinValue = 10 ;
2 // change it to 12 or so later!
As an example, Change the password section to the following to see this:
1 <div class="form-group">
2   <label> Password </label>
3   <span class="label label-danger"
4         ng-show="submitform.password.$error.minlength">
5         That's too short!
6    </span>
7   <input ng-minlength="minpwd" ng-model="formData.password" class="form-control" name="pas\
8 sword" type="password" required />
9 </div>
Notice how we set ng-minlength="minpwd", so:
1 $scope.minpwd = 3 ;
must be declared. of course you could also write something like: ng-minlength="3", we just wanted to show the data binding stuff and .. well you get the point!
You should now have a fully functioning demo with proper inline errors for email and password.
Two final notes,
- User don’t usually like facing a pile of error messages when they haven’t even started with filling a form! A good way to prevent this is to add the
submitform.filedname.$touchedcondition to display the error messages. This will display the message only when the user types something and leaves the filed (the focus leaves the filed (notice the passed tense of the name, $touched).
Something like this works for our email field:
 1   <span
 2     class="label label-danger"
 3     ng-show="submitform.email.$error.required && submitform.email.$touched">
 4     Required!
 5   </span>
 6   <span
 7     class="label label-danger"
 8     ng-show="submitform.$error.email && submitform.email.$touched">
 9     Invalid email!
10   </span>
- Many times, these simple validation might not suffice, as with HTML that had
pattern, a simple way is to provideng-patternwith a regular expression for a more sophisticated validation.
After validating a form, thing always end up with making an AJAX call which can be done using $http, which is what we are going to learn in the next section.
Further reading and challenges and the code:
There are a few simple types of <input> tags that we didn’t cover here
- checkbox
- radio
- date/time
- number
Truth be told, all of them are fairly simple to use with Angular and ngModel directive and with very similar attributes to the standard HTML. We spared some time here by not explaining each of them separately, but this doesn’t mean you don’t have to hack with them! Go on and add some of them to your view, bind them and check their values to see how they behave.
The code until the end of this section can be viewed here.
Using $http and $watch
There are many services that you can inject to your controller and use them. The most obvious one here is $scope. Aside from that, a number of other services that you probably will inevitably use them. we mention all of them here and discuss to of them in detail.
- $http: service for making Ajax calls. Pretty useful!
- $watch: a method used for subscribing to state change event on scope properties, services etc.
- $rootScope: a parent for all scopes, which we’ll discuss at the end of this chapter.
- $state and other route services: a set of services usually providing information about the current route of the application, route parameters etc. We will discuss this in a separate chapter.
- user defined services: You’ll learn soon that building isolated group of functionalities inside a
.factoryor.serviceis one of the most common patterns in angular.
So, let’s dive into the first two services that we wanted to discuss.
Using $http
As the name suggests, this service helps us make http requests to remote or local servers. The overall syntax of this service could be summarized as:
1 $http({
2 	method: "GET",
3 	url: "/some/path",
4 	data: {someDataKey : 12},
5 	headers: {'additional-header': 'hello $http'},
6 	params : {'a': 13}
7 }).then( successCallback, errorCallback);
Before we get into more detail, let’s discuss the code above. If you have a simple knowledge of http request, none of the keys defined above and passed to $http should be ambiguous for you. Just for double checking, it’s safe to say that the request above will be translated to:
a GET Request to the same domain - since the path we provided started with /
with a query string of : /some/path?a=13
and an additional header added to the default HTTP headers.
and a JSON payload equal to {someDataKey : 12}
Good, moving forward. The next thing that catches out eyes is the then() function, which indicated that $http.get() returns a Promise. Promises are a very important concept in both angular and general javascript (and will be natively supported in ES2016). if you are familiar with promises, you can skip this section, if not hold on tight because what we are about to learn is very important.
detour on Promises and Callbacks
Javascript is a single threaded language, therefor it has it’s own unique way of handling asynchronous operation. When we have only one thread, it means that the main program’s flow can never - should never - wait for an operation that takes time. it should move pass it and come back to it later, in an Event based manner. There are two famous ways two implement this. Promises and Callback functions.
The Callback way usually works like this: we pass a function, to the function that might take a long time and say to it :
Hey, long time function! please invoke this function that i’m giving it to you now when you are finished and btw pass the result of your operation to it as argument, if you want.
 1 var someSlowDataFetching = function(args, callback) {
 2 	operation.start()
 3 	// my process will take time
 4 	// some more time
 5 	// even more
 6 	// seriously, it's gonna take a while
 7
 8
 9 	// and when I am finally finished:
10 	if ( operation.isOK ) {
11 		callback(null, operation.data) ;
12 	} else {
13 		callback(someErr, null) ;
14 	}
15 }
16
17 someSlowDataFetching(args, function(err, data) {})
18 // note that the previous line will NOT BLOCK the program
You should read and examine this example carefully and completely understand how javascript handler parallelism with callback function.
To save time we will not discuss here how promises are implemented, instead we are just going to focus on how to use them. We’ll begin by defining them.
A promise is … well, its a Promise that assures you of receiving Some response about the task which is going to take some time. A promise can either resolve or reject
- resolve means that the async task was completed, regardless of the result, the result could even be e failure, but the task was completed with no errors.
- reject means that execution of the task was not competed because of some errors.
Async tasks using Promises don’t take in a function to invoke it later, instead, they return a promise, which has a .then() method, which will be invoked later when the task is completed.
 1 function someSlowPromiseFn(args) {
 2 	operation.start();
 3   var promise ;
 4 	// my process will take time
 5 	// some more time
 6 	// even more
 7 	// seriously, it's gonna take a while
 8
 9 	setTimeout(function(){
10     // and when I am finally finished:
11   	if ( operation.isOK ) {
12   		promise.resolve(operation.data);
13   	} else {
14   		promise.reject(operation.data);
15   	}
16   }, 5000);
17   return promise;
18 }
19
20
21 someSlowPromiseFn(args)
22 	.then(
23 		function onResolve() {...},
24 		function onReject()  {...}
25 		);
The name of the functions passed to then() were meant to be a hint, to imply that:
First argument of then() will be called when the promise resolves.
Second argument of then() will be called when the promise rejects.
Angular implements Promises with a (hell of a) library called q, which you can read about it here. This link also helps you understand promises better.
As we reach the end of our de-tour on promises, the main purpose of this detour has satisfied and now you exactly know what this means:
1 $http({....}).then(
2 	function() {},
3 	function() {}
4 	) ;
Continuing with $http
To refresh your mind on what we had:
1 $http({
2 	method: "GET",
3 	url: "/some/path",
4 	data: {someDataKey : 12},
5 	headers: {'additional-header': 'hello $http'},
6 	params : {'a': 13}
7 }).then( successCallback, errorCallback);
Now let’s try and make this more realistic by calling a real JSON API. we’ll use github’s public API for this reason. If you refer to the documentation you’ll see that you can fetch the list of repositories by making a GET request to:
1 https://api.github.com/users/{username}/repos
You can test this with:
1 curl -i https://api.github.com/users/kianenigma/repos
in your command line. let’s make this call in angular and inspect the result.
 1 myApp.controller("mainCtrl", function($scope, ... , $http ) {
 2 	// remember to inject $http service
 3
 4 	 $http({
 5       method: 'GET',
 6       url: 'https://api.github.com/users/kianenigma/repos',
 7     })
 8     .then(function (response) {
 9       console.log(response);
10     }, function (err) {
11       console.log("ERROR ", err);
12     })
13 })
Now change the username to an invalid one https://api.github.com/users/invalidUserrrrrblahbalh/repos and see how the error callback is being invoked.
As you might’ve mentioned, both the success and error callbacks have the same schema and the following keys are the ones you will probably need:
-
response.data: data associated with the response -
response.statusCode: status code of the response. Note that when the success callback is being invoked, we are sure that status code has a value in 200/300 range2**/3**and the 400/500 status code ranges are associated with errors,404 not foundand500 internal server errorfor example. -
response.config.headers: http headers of the response. it is common to use them specially when using json web tokens - aka. JWT - as authentication method.
As final notes on $http:
- you’ll learn in a separate chapter about a concept named
http interceptor. It is VERY common to feel the need to add a specific data or header to ALL of your http requests, such as web token authentication header. http interceptors help you do this. - There is actually another way of watching for an http response, name
successanderror. The syntax is like the following:
1 $http({
2 	method : "GET",
3 	...
4 })
5 	.success(function(data, status, config) {}) // called when request returns fine
6 	.error(function(data, status, config) {}) // called on error
7 	.finally(function() {}) ;  // called either way!
Although this was my personal favorite syntax (and dark deep secret!), there are many reasons not to use it. You can read about them here.
- the following syntactic sugars are provided for specific http verbs:
1 $http.get('/someUrl', config).then(successCallback, errorCallback);
2 $http.post('/someUrl', data, config).then(successCallback, errorCallback);
3
4 and more for /DELETE /PUT and so on.
You can read the full list here.
We’ll extend this example of Github in the next section to make something more interesting out of it.
Using $watch
The $watch service helps us add eventListeners to model changes, as the name suggests. The overall syntax is like this:
1 $scope.$watch("stingEqualToPropertyNameInScope", function(newValue, oldValue) {
2
3 })
here, by stingEqualToPropertyNameInScope we mean the name of a property assigned to scope.
As an example, add a username property to $scope and bind it to the an input tag :
1 <input ng-model="username" />
and
1 $scope.username = "initialUserName";
2
3 $scope.$watch("username", function(o, n) {
4 	console.log(o,n);
5 })
now change the username value (via javascript or by binding it to HTML) and see the logs for change.
There are two very common situations when it comes to $watch that you have to pay attention to:
- By default,
$scope.watch()performs a shallow equality test. by shallow we mean that changes like[1,2] => [1],1 => 2,"hello" => "mellow"are detected, but deep changes to properties like{ foo : { bar : 1 } } => { foo : {bar : 2}}are NOT. in order to fix this you can set the third argument of the$watchtotrue, so that it perform deep search:
1   $scope.$watch("username", function(o, n) {
2   	console.log(o,n);
3   }, true);
- It is extremely! common (actually common is not a good word here, it’s a famous, must use - one beast of a - pattern!) to use a
servicefor fetching json data from a remote API and store it there. We usually assign a portion of data stored inside a service to$scopeand display just that portion to the user. So it would be pretty good if we could just listen to changes in data returned by a service too. Turns out that you can’t do that .. directly. but you easily can do it if you wrap it inside a function. Follow the code below with the comments inside to get a clear idea:
 1   // remember factories and their syntax ?
 2   myApp.factory("dataService", function() {
 3   	var getSomeData = function () { return someData }
 4
 5   	return {
 6   		getSomeData: getSomeData
 7   	}
 8   })
 9
10   myApp.controller("mainCtrl", function($scope, dataService) { // remember injection?
11   	$scope.data = dataService.getSomeData() ;
12
13   	// now the dataService might be connected and synced with a remote API
14   	// so it can change it's value internally ...
15   	// TaaDaa! :
16   	$scope.$watch(function() {return dataService.getSomeData() },
17   		function(n,o) {} , true
18   	)
19
20   })
We can extend our last example to make something cool.
Add the following markup to your html:
 1 <div class="row">
 2   <div class="col col-sm-6 col-sm-offset-3 form-group">
 3     <input
 4     	class="form-control"
 5     	type="text"
 6     	placeholder="enter username" style="margin : 20px"
 7     />
 8     <label class="label label-success"> Result is here</label>
 9     <label class="label label-warning"> Searching </label>
10     <label class="label label-danger"> No result found!</label>
11   </div>
12 </div>
13 <div class="row">
14   <ul class="list-group">
15      <li class="list-group-item">
16      </li>
17   </ul>
18 </div>
You can easily guess what we want to do. search a username and display a list of repositories!
Let’s first explain how.
- First, add a
$scope.usernameproperty and bind it to input tag. - $watch form changes and make the $http call that we performed in the previous chapter to get the list of repositories.
- Show the loading span while the request is being performed.
- Show the success message if request comes back .. well, obviously, successfully.
- Show the error message if the request fails for any reason.
- render the list of repositories.
The trivial approach to this would be to simply just do :
1 // assuming that $scope.username is the name
2 $scope.$watch("username", function(n, o) {
3 	// make the http call
4 })
This is … not good. because we did not wanted to make 10 http calls during the time when i type my own github username : kianenigma
If you go to Angular’s documentation over forms, you’ll see that we can use a debounce property. When for example we set it to 250, it means that the model in $scope will only update, when the input in UI stays fix for 250ms, hence the $watch will be invoked only then. Change the input tag to:
1 <input
2 		ng-model="username"
3     	ng-model-options="{ debounce: 500 }"
4     	class="form-control"
5     	type="text"
6     	placeholder="enter username" style="margin : 20px"
7 />
write a $watch statement for $scope.username, log the values and change the debounce value. See how the behavior differs!
Now, the main deal!
add the following javascript code to your controller:
 1 $scope.repos = [];
 2 $scope.reqStatus = 0;
 3 // 0 = success
 4 // 1 = req sent
 5 // 2 = error
 6 $scope.$watch("username", function (n, o) {
 7   if (n) {
 8     $scope.reqStatus = 1;
 9     $http({
10         method: 'GET',
11         url: 'https://api.github.com/users/' + n + '/repos',
12       })
13       .then(function (response) {
14         $scope.reqStatus = 0;
15         $scope.repos = response.data;
16         console.log(response);
17       }, function (err) {
18         $scope.reqStatus = 2;
19         $scope.repos = [];
20         console.log("ERROR: ", err);
21       })
22   }
23 })
Note that reqStatus is a variable we use to show one of the labels indication the status. storing the list of repositories (response.data) inside $scope.repos is trivial and same as what we did before when we discussed iteration. Also we wrapped the request inside the if () so that it wont get fired when the input is empty.
In the final draft of our HTML, we just added the ng-show directives to show one of the labels, and added the ng-repeat to ul
 1 <div class="row">
 2   <div class="col col-sm-6 col-sm-offset-3 form-group">
 3     <input
 4     	ng-model-options="{ debounce: 500 }"
 5     	class="form-control"
 6     	type="text"
 7     	placeholder="enter username" style="margin : 20px"
 8     />
 9     <label ng-show="reqStatus == 0" class="label label-success"> Result is here</label>
10     <label ng-show="reqStatus == 1" class="label label-warning"> Searching </label>
11     <label ng-show="reqStatus == 2" class="label label-danger"> No result found!</label>
12   </div>
13 </div>
14 <div class="row">
15   <ul class="list-group">
16      <li ng-repeat="repo in repos" class="list-group-item">
17      	<strong> {{ repo.name }} </strong> : {{ repo.description }}
18      </li>
19   </ul>
20 </div>
This example turned out to be better than what i had expected! Not only that we used our main topics, $http and $watch, we also used some forms and ngClass. Perfect!
Further reading and challenges and the code
The code until the end of this section can be viewed here.
Controller events and communication
There are many situations where you want two or more controllers to communicate with each other. Like Sending a change event, propagate user updates, etc. It’s always a good pattern to break even one page of your application with different responsibilities into different controllers. This will help you have a much cleaner and maintainable code, but you have to take the burden of controller communication.
Before we start, let’s recap a fact about $scope and controller. You probably have understood it till now and have a clear vision of what they are, but it’s a very common mistake for newcomers to Angular to think that controllers and scopes are the same thing. Yes Yes, a controller will create a scope with it but this does not imply a one to one relation! As you remember, we mentioned that directives can have a $scope, you can also identify all scopes inside your HTML by searching for class="ng-scope". So aside from remembering that a $scope and a controller are not the same thing, and not related strictly, keep the following simple definitions in mind:
- Controller is one of main blocks of an angular application (and technically nothing more that a simple javascript object).
- Scope is an object that can be used for data binding between javascript code and HTML. and turns out that each controller, after it’s initialization, will be given a $scope to work with!
Moving forward. The reason that we emphasized on the difference of controllers and scopes was that all of the functions and API’s for events in Angular are actually the properties of scopes, not controllers, and therefore could be used with scopes created by directives and so on. Perhaps a better title of this section was Scope events and communication. But, since it’s much more common to use it with controllers I decided to go with Controller events and communication.
One last reminder is that scopes inside a module can have a parent (one direct parent and many ancestors), one or more children and one or more siblings.
Angular provides a simple API for communication and it’s quite similar to any other Publish/Subscribe based system:
 1 // will listen to an event with title 'someEventName'
 2 $scope.on("someEventName", function(evnet, args){
 3 	// do something with args
 4 });
 5
 6 // will send an event downwards - to children -
 7 // with title 'someEventName' and a data
 8 // var eventParam = 1
 9 // var eventParam = 'hello mellow'
10 var eventParam = { anyKey : 'can have any value' }
11 $scope.$broadcast("someEventName", evnetParam);
12
13 // same as $broadcast but it will go upwards
14 // (to the parents and ancestors)
15 $scope.emit("someEventName", eventParam);
Inside $on('...', function (evt, data) {}) the callback function takes two arguments, evt, data in this case (as you know, names are not important here!). The first argument is an object with information about the event itself, and the second is the data that we send with the event (second argument to $broadcast and $emit)
Without further detail, let’s try and implement this with our last example. Here is what we are going to do: Move the list of repositories from the last section to a new controller inside mainCtrl. the main controller will watch for user input changes, make the http call and then it will notify the repoListCtrl for changes.
 1 myApp.controller('repoListCtrl' , function($scope){
 2 	$scope.repos = [];
 3
 4 	$scope.$on('repo_update', function(evt, args) {
 5 		if ( args.status ) {
 6 			$scope.repos = args.repos;
 7 		}
 8 		else {
 9 			$scope.repos = [] ;
10 		}
11 	})
12 })
13
14
15 myApp.controller("mainCtrl", function($scope) {
16   $scope.$watch("username", function (n, o) {
17     if (n) {
18       $scope.reqStatus = 1;
19       $http({
20         method: 'GET',
21         url: 'https://api.github.com/users/' + n + '/repos',
22       })
23       .then(function (response) {
24         $scope.reqStatus = 0;
25         $scope.$broadcast("repo_update", {
26           status: true,
27           repos: response.data
28         })
29       }, function (err) {
30         $scope.reqStatus = 2;
31         $scope.$broadcast("repo_update", {
32           status: false,
33           repos: null
34         })
35       })
36
37     } // end of if
38   }) // end of $watch
39
40 })
and add this controller inside HTML:
1 <div ng-controller="repoListCtrl" class="row">
2   <ul class="list-group">
3     ..
4     <!-- nothing needs to change here, since the name of repos property is still the same!\
5  -->
6   </ul>
7 </div>
And hopefully, now everything works just as before! A few things to notice:
- we used $broadcast to send an event from a parent to a child
- the names of event - obviously - have to be the same. a good pattern is to use a provides ( a
.service()or.constant()to share these types of CONSTANT strings inside an app.
Unsubscribing
One small thing is left behind here. what we subscribe to an event, but any time in the future, change our mind and what un unsubscribe? You could achieve this by wrapping the content of you event handler inside an if statement, but we both know thats too messy!
1 $scope.$on('..' ,function() {
2 	if () {
3
4 	}
5 })
The correct way to do this is to store the value returned by $on(). This value is an unsubscribe function that we can call it any time later to unsubscribe from the event and any further events will be ignored.
1 var unsubscribe = $scope.$on('..', function() { ... }) ;
2
3 // later on
4 // probably inside a callback or something
5 unsubscribe();
Easy as that!
As you play around a little with the code and events, you might find two main flaws here. there is no way to send an event between:
- sibling scopes
- from a service to scope or vica versa
Fixing this requires us to get familiar with a new scope called #rootScope, which we’ll get to it in the next section.
Further reading and challenges and the code:
- Add a
RepoServicewith public functions for fetching a list of repositories, and storing it locally. as a challenge only allow this service to make http calls and store a permanent list of repositories. controllers will only allow to call this service (either synchronously or asynchronously) to get the list. try different approaches to implement this. This is important because using controllers for data management is like a Tabu in Angular (because of many consequences) and you should get familiar with this pattern of Service/Ctrl for data management.
The code until the end of this section can be viewed here.
The great $rootScope
Until now, you have learned fairly enough about how controllers are nested and each have a parent and so forth, so i’m not gonna repeat anything here and get to the main point directly.
Even if you do not do ANYTHING inside your app, just by creating a module, a $scope (aka $rootScope) will be created for it when you assign to an HTML tag with ng-app. You don’t believe me? go and open your editor. Make sure that the mainCtrl (ng-controller) and myApp (ng-app) are not on the same tag (ng-controller directive is inside ng-app) and watch the classes of the tag containing ng-app. I Know! there is a ng-scope class there! (as an example, <body ng-app=‘…’ class='ng-scope'> .. ). There was no controller on this tag so it must be something that Angular created! And indeed it is! A top level $scope with no parent itself (sad, isn’t it?) called: $rootScope.
This mighty scope has some interesting properties.
- as mentioned, it has to parent
- since it’s a scope, it can be treated as a scope! it can be injected into controllers, directives and services, data and functions assigned to it can be used or triggered from the HTML etc.
- since it is at the highest level, an event broadcasted downwards from $rootScope reaches everyone
- due to same reason, data binded (bound or binded?) to this scope is accessible everywhere
The last property above might turn on a light on your head:
So, this scope is everywhere, no need for scope communication, no data duplication, easy as pie! let’s build the entire app inside this scope. Or use it whenever we face a problem we can’t solve.
I have a serious argument to make with every reader at this very moment. The light that a mentioned above about using rootScope whenever we face a problem. remember it? Turn IT OFF. don’t get me wrong, i’m not saying don’t use rootScope! i’m saying it is not a plan B for any problem. I’ve seen many many many .. many application that used rootScope excessively and it never leads to anything good.
So what should we use rootScope for? as the name suggests, it should be used for data of functionality that is really spread throughout the _entire_ app by nature. Global data like date and time, events that are global like handling a keyboard press event, and so on. I personally will forgive you if you use rootScope for these purposes!
There are many more situation that the idea of using rootScope pops into our mind, and to be honest it’s nor mine or anyone’s decision to clearly say that doing it is good or not. The developer facing the challenge should decide and the main rule to follow, aside from the generality criteria mentioned above, is that it should not harm the main architecture of your application.
As mentioned above $rootScope can be injected from anywhere.Testing this feature is left for the reader to do in this chapter, since writing some:
1 $rootScope.test = "Hello World"
2 // and that saying *Yaaaaay* after printing it somewhere!
is now fairly below our level!
so you should go on and do the importing
1 myApp.controller("anyCtrl", function($scope, $rootScope) {
2 	console.log($rootScope) ;
3 	// i highly suggest inspecting this scope at least once by logging it!
4 	// or use an Angular specific debug plugin inside chrome or firefox
5 });
6
7 myApp.service("anyService", function($rootScope) {});
8
9 myApp.directive("anyDirective", function($rootScope) {});
and assign values to them from different places and check how they change. But, there is one thing to note here. You probably want to display the values inside rootScope inside the HTML (otherwise it wouldn’t be fun and somehow pointless). We mentioned that accessing the parent controller is possible via $parent property. For example:
1 <span>
2 	{{ ownPorperty }} // equal to $socpe.ownPropery
3 	{{ $parent.prop }} // equal to $scop.$parent.prop
4 </span>
So this means that we should call $parent a specific number of times in HTML (depending on inside which controller we are now) like $parent.$parent.$parent... ? That sounds silly. Good news: rootScope is accessible everywhere by calling the $root. so inside your HTML just write :
1 <span>
2 	{{ $root.prop }} // equal to $rootScope.prop
3 </sapn>
Using $rootScope for $broadcasting events
Aside from everything said, there is an other famous use case for rootScope. recall from the last section that sending a message between siblings, and from service to controller has no straight ways.
Before getting into using rootScope for solving this I want to give a bad news. You already know the answer to both of these questions! at least some cases of it in a general manner. Let’s first review some other solutions.
For managing sibling controllers, a straight forward way is to wrap them inside a third top level manager controller (if it makes sense to have this extra controller!). If firstCtrl and secondCtrl are sibling and they want to send events or messages to one another, you could easily do this with:
1 <div ng-controller="managerCtrl">
2 	<div ng-controller="firstCtrl"> ... </div>
3 	<div ng-controller="secondCtrl"> ... </div>
4 </div>
and use the managerCtrl as a transport way to share state between two child controller.
And for the controller/service problem, yes you don’t have a direct way of sending an event from a service to controller, but remember that you can listen to change in any value returned by the service from your controller (which in many cases is like an event) with $watch. remember something like this?
1 $scope.$watch(
2 function() {return aService.getvalue() },
3 function(n, o) {
4 	...
5 })
And passing an event from the controller to the service? Well you have a reference to your service inside your controller/directive (by injecting it), just use a function that the service expose as an event! Is that bad? No! we just had to think a little more out of the box, right?
Now, back to implementing these with $rootScope. Yet again, we’er not gonna re-write any code since it’s 100% equal to what we had with $scope, it’s just called $rootScope this time.
To pass an event between a service and a controller, both parties could listen on rootScope and also broadcast on rootScope. note that when a scope broadcasts a message, it reaches that scope too.
 1 // inside any scope. controller, directive etc
 2 // just import the rootScope
 3
 4 //send something
 5 $rootScope.$broadcast("title", null) ;
 6
 7 // wait for something
 8 $rootScope.$on("anotherTitle", function(evt, data){}) ;
 9
10 // same goes for services.
Using this technique for messages between sibling scopes should be clear at this point. both the sender and receiver send and listen on $rootScope. Simple as that.
There are two small considerations about this technique. First, it might violate my personal rule of “restriction of using rootScope for non-general purposes” a little. So if there is a better way, give that a try too. Secondly, a message sent through rootScope, will reach every other scope who listens on rootScope, and every other scope is allowed to listen on rootScope. You don’t have the Upwards or Downwards option for sending, so make sure the names of messages are clear and elegant enough, to cause no confusion.
Further reading and challenges and the code:
Note on $parent and scopes inheritance?
The code until the end of this section can be viewed here.
Module lifecycle and configuration
So far, all that we have learned was about the world inside a module, meaning that it was:
Call a constructor with a name and it somehow magically enables you too bootstrap an application that can have some controllers , directives, etc.
1 var someApp = angular.module('someApp', []);
But there has to more that that, right? It indeed is, the main functionality (at least from our point of view) of a module (aside from being the infrastructure of other components) is to provide a set of run and configuration blocks that get applied during the bootstrap process, before the actual app starts!
Module Configuration and Run block
To get started, I want you to pay close attention to the following quotes from the official documentation:
- Configuration blocks - get executed during the provider registrations and configuration phase. Only providers and constants can be injected into configuration blocks. This is to prevent accidental instantiation of services before they have been fully configured.
- Run blocks - get executed after the injector is created and are used to kickstart the application. Only instances and constants can be injected into run blocks. This is to prevent further system configuration during application run time.
The key point here is about a mysterious component called injector. We prevent going deep into boring details, so just think of injector as a component that has the duty of preparing any service for being injected. This means that when you write:
1 app.controller('name', function($scope, $http, someService) {
2 	// the injector takes care of instantiating $http service and someService ( if needed ) a\
3 nd return an `instance`
4 })
Now let’s go back to the definition.
- The configuration block is applied during the provider registrations and configuration phase.
- The run block is applied after the injector is created.
This can be translated into this:
- The configuration block is applied for configuring providers, not services themselves
- The run block is applied after the injector is created.
And long story, from your point of view, what matters is that: You can’t inject your own services and bootstrap them or configure them inside a configuration block, but run blocks can be used for this purpose.
So what is the point of having a configuration block if service can cont be used inside them? Well, there is a reason for everything!
There are a set of very important objects in angular named Providers, we mentioned them in the early chapters briefly and said they are like a service, but they are like parents to all other service types. It can create objects and return them, but services are a singleTon object that just expose a set a functions or values. To abstract this, Angular itself has
- $http Service
- $http Provider
And $httpProvider is actually what creates the $http service and passes is out, when it is being injected. Perhaps the most important difference that this makes is that by allowing Only Providers to create Services, Providers can have control and ensure that each Service is unique (aka Singleton ) inside the entire application. This property is very important when it comes to using service. This is why we insisted and will insist on using services for data management, they keep the data unique and persisted!
And recall from above, Providers can be configured inside configuration. As an example we will see in this chapter that there is a good probability that you want to modify something inside the $http, say you want to add a header to all of the outgoing requests. $httpProvider can be used and configured inside configuration block to do this.
Modifying HTTP Provider
As mentioned above, it is very likely that you wish to add a specific value to all of your http request. JSON Web Tokes, for example, are usually sent to server inside a specific header, like any other authentication mechanisms. To achieve this, you can either add them manually:
1 $http({
2 	method: 'GET',
3 	headers: {'additional-header': 'hello $http'} ,
4 	...
5 })
To each request, which is madness!
Another cleaner way might be to write a service to manage http requests. The controllers will ask this service to make the call, and this service will know how to send the request. A general markup for this service could be something like this:
 1 app.factory('cutomHttp', function($http) {
 2 	return : {
 3 		get: function(url, data) {
 4 			$http({
 5 				method: "GET",
 6 				headers: {'something-for-all': 'data'},
 7 				data: data,
 8 				url: url
 9 			})
10 				.then(
11 					function() {
12 						// do something with promise
13 					},
14 					function() {
15 						// do something with promise
16 					}
17 				)
18 		}
19 	}
20
21 })
Although such service, if implemented correctly (the above code is far from being correct, it was meant to just give you a sense) could be something to rely on, I don’t personally suggest this because Angular provides a way to achieve this is a much more sophisticated way:
HTTP Interceptors
Angular uses a pipeline for both sending and receiving a http request. This means that each http request, before being sent out, will pass through an array of functions, and same story when being received. each of these functions (aka Interceptors) inside the array have access to the data associated with the request, its configuration such as url and headers. you can even use these interceptors as filters, check some conditions and if they are met, change the data being sent with the request, change its url, or even cancel that request!
Lets see these interceptors in action.
Add the following .config() block to your application, immediately after defining myApp:
1 myApp.config(function ($httpProvider) {
2   console.log($httpProvider);
3 })
As mentioned before, $httpProvider is the provider responsible for creating $http and other related services, and configuring them.
You can see in your logs that an interceptors array does live inside $httpProvider. But so far, it is empty.
Let’s fill this array! Any interceptor added to this array must met the following conditions:
- It must be a factory (there are some backdoor ways to mock a service, but let’s think about the right way here!)
- The factory can expose one or more of the following keys as a public API :
-
request: a function called right after the$httpservice has been given an order to send a request. At this stage, you can change the request data, configuration or even cancel it. -
requestError: this function only catches requests that could not be send (this is different from Coming back with a response error). Rejecting a request from being sent out can happen by other interceptor. -
response: In contrast torequestkey, this function gets called right after the response has arrived. The response object can be modified in the function and then returned for further usage. -
responseError: A response might be caught by the responseError either because of being rejected by previous response interceptors, or because of any server errors, which is equal to having a response statusCode, like 500 or 404.
-
Let’s create an interceptor, in the simplest way possible and see what we can do with it:
 1 myApp.factory("customInterceptor", function() {
 2 	return {
 3 		request: function(config) {
 4 			console.log('request : ', config);
 5 		} ,
 6 		response: function(response) {
 7 			console.log('response', response);
 8 			return response
 9 		},
10 		responseError: function(response) {
11 			console.log('responseError', response);
12 			return response
13 		}
14 	}
15 })
16
17 // And then to apply this interceptor
18
19 myApp.config(function ($httpProvider) {
20 	$httpProvider.interceptors.push('customInterceptor')
21 })
Now go and play around with the github search that we had before. Since we are modifying the $httpProvider and our requests were made using $http, the interceptor array will apply to all of them. You should also notice how responseError gets called when we search for a username that does not exist, since the search requests returns with a 404 error status.
One important key to notice here is that we did not injected customInterceptor into the ``.config() block, ***because we weren't allowed to do so***! Config blocks run before all of the services and factories are initialized, as you remember. Instead, we just passed a name to the $httpProvider.interceptors.push() so that later on, when an actual instance of customInterceptor` is created, it can be used.
Interceptors for authentication
Using auth interceptor for authentication should be now clear to you. We can’t cover this entirely now, because we need an actual REST API with authentication and so on and so on! But at least we can talk about it briefly.
Assume that you have a .factory(), name AuthService and this service checks the localStorage of user’s browser to see if an access token exists or not, and performs token refreshing operation etc.
The simplest form of adding a token to all of your http request be done like this:
 1 myApp.factory("customInterceptor", function(AuthService) {
 2 	return {
 3 		request: function(config) {
 4 			if ( AuthService.hasToken ) {
 5 				config.headers.auth = AuthService.getToken() ;
 6 			}
 7 			return config ;
 8 		} ,
 9 		...
10 	}
11 })
Interceptors for error handling
One very useful application of interceptors is global error handling. Consider a larger application with many many AJAX calls, and each of them could go wrong for different reasons. The least that you want to do is to have an error box or a modal informing the user that some error has happened.
The Horrible way to do this would be to repeat the same operation on each error callback
 1 $http.get(url1).then(
 2 	function success() {},
 3 	function error() {
 4 		// some sort of error handling
 5 	}
 6 )
 7
 8 $http.get(ur2).then(
 9 	function success() {},
10 	function error() {
11 		// again
12 		// some sort of error handling
13 	}
14 )
15
16 // you are going to hell!
If you want to act cleaver, you would create a general error handling service/directive - or just a function - to avoid code duplication in this scenario. This is a good solution. I am not against it and have used it personally.
But if you even want to make thing more easier, and more clean, you should use the responseError key inside the interceptor. It is pretty clear how to do this, but just to remind you about it, recall our last plain interceptor services. As you might have inspected, any error such as 404 etc. will be caught inside responseError:
1 myApp.factory("customInterceptor", function() {
2 	return {
3 		responseError: function(response) {
4 			// show an error message here, displaying some serve
5 			// side errors or status code or ..
6 			return response
7 		}
8 	}
9 })
Cool thing here is that, if this level of error handling is enough, you can even omit handling the error callback of $http().
We can take this even one step further and change the callback that will be called after interceptors pipeline is over, in other words, even when a request has come back with an error status code, we can give it another try (in any way, think of a simple resend in the simplest case) and if it succeeds, pass it to the success callback.
To achieve this, we should get familiar with a library used by Angular to handle promises, $q. Before going to the next section about this library, Let’s stop for a second and think about how we are placing our application components (by component I simply mean just a pice of code doing a specific task). We mentioned before that the error handling could be used inside the callback of a $http call, even in a smart way. But we introduced another better way. Same story applies to request recovery or retry. We COULD simply give a request a second chance inside the error callback, whats wrong with that? nothing in particular. It is not going to be some evil code that will crash definitely and so forth. But let me say it this way: it wouldn’t be a clean and beautiful code that you’re going to love forever. Why is that? I have mentioned before that codes with a specific task should be separated in Angular. We enforced using a service for making http calls, not the controller, like ten time until now. Here, we are separating the code for the same reason again.
The controller’s duty is to control the data on the UI. So we moved the http calls to a service. Could we make a http call inside the controller? Yes but it would ugly as hell.
And now
The http requests’s duty is to make a call with appropriate payload, and return it to someone, if the response comes. So we move the logic about showing error message or retry (which are irrelevant) away. could we do error handling inside an http callback? could we perform retry inside an http callback? Absolutely, but it would be ugly as hell, again!
We’ll discuss these issues about module and component cohesion and coupling later on in a separate chapter. For now, let’s just learn how $q works and use it to modify interceptors!
Perform Async operations using $q
We briefly described $q before as a tool for creating promises. He also mentioned how to use a promise (with .then()) and saw it in action with $http. Now, we’re going to see how to create promises, or change their behaviors.
To recap on the operation of a promises, consider a simple mock async operation with setTimeout. The function simply takes some time to finish. If this function wants to leverage the promise capabilities, it should:
- create a deferred object and return in at soon as possible (aka.
$q.defer()). - It should then perform its operation, and when desired, call one of the methods of the deferred object,
.reject()or.resolve().
The returned deferred object, is actually the object that has that .then() method, which we saw a lot so far!
To make this more clear, consider the following snippet:
 1 // assume that Angular's $q is available
 2
 3 var someAsyncFn = function (name) {
 4 	// create the promise object, aka the deferred object
 5 	var defer = $q.defer() ;
 6
 7 	// prepare for async operatio
 8 	setTimeout(funciton() {
 9 		if ( canHello ) { // some condition, trivial
10 			defer.resolve('resolve message') ;
11 		} else {
12 			defer.reject('reject reason');
13 		}
14 	}, 10000);
15
16 	// this promise will have a .then method!
17 	// note that we return the promise,
18 	// but to timeOut has not yet executed!
19 	return defer.promise
20 }
21
22 // to call Async
23
24 var deferredPromise = someAsyncFn('Ted');
25
26 deferredPromise.then(
27 	function (message) {
28 		/* note that the message that we passed
29 		to .resolve() will come here!
30 		 */
31 	},
32 	function (reason) {} // reject callback
33 )
And that’s it with promises! Although there is more to it than this, but this is enough to get you started at this point.
Another good news is that now, you almost completely know how and why each of the callbacks of the promise after a http call gets invoked. So the $http will return a promise, and this promise will get rejected or resolved somewhere along the way.. interesting ..
Let’s reveal another piece of information, and after that, I will hope to see a lightbulb above your head, indicating that you have suddenly understood how to manipulate the promise callbacks, in other words, how to make pass a request from the responseError to successCallback (aka first callback) of the http promise. Here is goes:
A quote from AngularJS website :
request: interceptors get called with a http config object. The function is free to modify the config object or create a new one. The function needs to return the config object directly, or a promise containing the config or a new config object.
(The bolded rule applies for all four of the request, response, responseError, requestError);
You saw that? This means that we must not always return the config object, instead we can return a promise, and if we later call the resolve on that promise? Or reject it? You got my point!
If we create promise inside an interceptor and resolve it, assuming that we have only one interceptor, the success callback of $http will be invoked, and if we reject it, the error callback.
A pseudo code to show this more realistic could be:
 1 myApp.factory("customInterceptor", function($q, AuthService) {
 2 	// we inject the $q service
 3 	// and an Imaginary service called AuthService
 4 	// like the other example about authorization header
 5
 6 	return {
 7 	  responseError: function(response) {
 8 		// since we know that session expiration is a common
 9 		// situation, we check it here
10
11 		if ( response.statusCode == 401 ) { // 401 Unauthorized
12 		  // create a defer object
13 		  var defer = $q.defer() ;
14
15 		  // this refreshing may take some time!
16 		  AuthService.tryRefreshingSession( function (err, success) {
17 		    // reject or resolve the promise.
18 			  if ( err ) {
19 				  defer.reject(err) ;
20 			  }
21 			  else {
22 				  defer.resolve(success) ;
23 			  }
24 		  })
25
26 			// don't wait for the authService, return the promise
27 			// to have a non-blocking code.
28 			return defer.promise;
29 			}
30
31 			else {
32 				// the normal situation
33 				return response;
34 			}
35 		}
36 	}
37 })
If this code seems too confusing, you could also test this with a much more simpler case! Go the interceptor that we added with logging to our github search. Implement the following responseError:
1 responseError: function (response) {
2       // to test things, we pass the responseError to
3       // success callback by calling resolve
4       console.log('responseError', response);
5       return $q.resolve(response);
6 }
7 ...
Place some logs after inside $http({}).then() and see for yourself that when you search a username that does not exist, and status code is 404, which callback gets called? Since we are resolving all failed requests, the error callback will not be called.
Further reading, challenges and the code
- Create a
timestamphttp interceptor and measure the time it takes to perform each of the requests. - A very good example of promise chain by Ben Nadel.
The code until the end of this section can be viewed here.
Routing Config
Another common example of using configuration block is to set up some routes. Angular uses client side routing to navigate user through different pages inside an application. It’s clear that this routing is different from the original browser routing using anchor tags, and the key difference is not involving any refreshing. This method follows the Single page application guideline, avoiding repetitive page refreshing while the user is navigating and working with the application.
Crash course on Single page applications
The entire concept of Single Page Application (aka. SPA) is more to cover in this book (you can read more about them at the end of this chapter). Just to give you a minimal view of the difference between SPAs and traditional websites, pay attention to the following comparison:
- In a Traditional website. in order to complete some task, post a comment for example, you would fill some forms. Then you would hit submit. The page reloads, All of the static content of the website will flush and have to come back (in some cases, your browser cache helps in this part). You stare at a blank screen for a second or to. Finally you see a message indication that one of your inputs were invalid. After a few tries you post a comment. The pages refreshes again and redirects to a page with list of comments (note that this contains a lot of process on the server too, new database query, new page rendering etc.) and you see the new list of comments.
- In a Single Page Application, You would start filling a form, after hitting submit, you see a mature loading indicating that you should wait. Client side form validation shows a popup about a field being filled incorrectly. Still no refresh. You refill the form and finally, the form gets sent out and another popup will show that. Since the client side application knows that the request has arrived successfully and the server has responded with a success status, it can add the comment that you’ve just created to the list of comments that it already has, without needing to bother the server again.
In the Second scenario, both the server and the client had less to do and worked more efficiently, and definitely a better user experience will be delivered to the user.
So far we have learned some of the techniques required to deliver a better user experience to the user. We know how to validate user inputs and forms, how to show messages and modal etc. The key missing part is displaying multiple pages, without refreshing. This is because naturally we cant fit everything in one page. We could place all of the html required in one file and show/hide portions from it to emulate navigation, but that would be inefficient in terms of static file size, and it would lead to one mega HTML file which is not preferable. The correct way is to use client side routing:
Client side routing with ngRoute
Enough with details, let’s go the real deal. In order t enable Angular routing in your application you need to add another module to your application, ngRoute, you can get it from the official github repository, bower, a CDN etc.
1 <script src="path/to/angular.js"></script>
2 <script src="http://ajax.googleapis.com/ajax/libs/angularjs/1.4.8/angular-route.js"></scri\
3 pt>
4 <script src="path/to/your/files,js"></script>
Note that this should be included after Angular and before your javascript files.
After including the script, you have to indicate that our application module, myApp, depends on ngRoute, but how? Remember that empty array that was always there inside the module constructor? That’s how!
1 var myApp = angular.module('myApp', ['ngRoute']) ;
That’s it! each module has a unique name, our module is called myApp as an example. By adding the unique name to the array, we define module dependencies. Of course, you need to have the appropriate javascript file linked inside your main HTML file in the correct order, if required.
Next, we must add some routing configurations. As the name suggests, this must happen inside the .cinfig() block. We are going to modify the $routeProvider to define some routes.
The bare minimum configuration of a route is:
- A templateUrl
- A controller
- Defining the route entry point, aka
ng-viewdirective
The first two should be clear to you. For each route, we define which html file should be displayed, and which controller should take control over it. The last thing to define is the ng-view directive. This directive indicates the parent tag, inside which the html file indicated by templateUrl should be shown. For example, if you want to have the entire page change with navigation, you could simple apply ng-view to the <body> tag. If you wanted to have a fix header and footer inside your application, you could do something like:
 1 <body ng-app="myApp">
 2 	<div class="header">
 3 		header content
 4 	</div>
 5
 6 	<div ng-view></div> // Routing will change the content of this
 7
 8 	<div class="footer">
 9 		footer content
10 	</div>
11 </body>
In fact, let’s implement something similar to this!
Go to the html file that we had before. remove the entire content and put it inside a separate file inside view/home.html (relative to your index.html). Remove the ng-controller from it because we will soon define the controller inside the route config. Place this inside your body tag:
 1 <div class="nav">
 2     <ol class="breadcrumb">
 3       <li>
 4 			  <!-- leave the href empty for now -->
 5         <a href=""> Home </a>
 6       </li>
 7
 8       <li>
 9         <a href=""> About </a>
10       </li>
11
12       <li>
13         <a href=""> Github </a>
14       </li>
15
16     </ol>
17 </div>
18 <div class="container" ng-view></div>
Next, go to your .config() block inside main.js file and and place the following config :
 1 myApp.config(function ($httpProvider, $routeProvider) {
 2   // What we had before
 3 	// note that we injected $routeProvider
 4   $httpProvider.interceptors.push('customInterceptor');
 5
 6   $routeProvider
 7     .when("/", {
 8       templateUrl: "/view/home.html"
 9     })
10     .when("/github", {
11       templateUrl: "/view/github.html"
12     })
13     .when("/about", {
14       templateUrl: "/view/about.html"
15     })
16 })
As the routing suggests, go and create github.html and about.html and put some trivial content inside them.
So far so good. This must be enough for your app to load as ngView! refresh your app. You should now see the new nav bar at the top of the page. Also, the content of view/home.html must be rendered below it (since we linke to root path, / to it!). But something seems wring inside it! yes. because currently, it has no controller
Just to help you catch up, you can download the snapshot of the code at this phase form here.
Next, add just a single line to configuration of your / path :
1 .when("/", {
2       templateUrl: "/view/home.html",
3       controller: 'mainCtrl'
4 })
now you should be able to see all of the previous demos working. Next add the following values to href on links on the navbar.
 1 <ol class="breadcrumb">
 2     <li>
 3       <a ng-href="#/"> Home </a>
 4     </li>
 5     <li>
 6       <a ng-href="#/about"> About </a>
 7     </li>
 8     <li>
 9       <a ng-href="#/github"> Github </a>
10     </li>
11 </ol>
(The difference between href and ng-href is expainedhere)
Keep in mind that all of this navigation must happen inside the browser! If you don’t start the route names with a # it will not be treated as client side routing, a full refresh will happen and that is not what we wanted! There is a way to get rid of this #, which will be mentioned at the end if this chapter.
At this point, you should be able to navigate through your app with the links at the top of the page. One thing to notice is that we did not declare a controller for rest of our routes. No worries, they are optional.
The last point that might catch your eyes is that since we had an http interceptor monitoring and logging the entire requests going in and out, now you can see that a request for the html file corresponding to each page will be sent as we navigate in our application. This helps reducing the total size of the static content transferred to client, and to have more control over caching it.
Controlling the route using $location
Is’s likely that you don’t want to change your route with an anchor tag. Perhaps you want to navigate the user using a logic implemented inside a controller, a service etc. These are all possible using the $location service. This service is a wrapper around the window.location and enables us to operate on the current location.
You can list all of the functions that $location has here, but the one that we want to use particularly is .path(). this function is a getter/setter function, meaning that if you call it with no parameters, it will return the current path. And if you call it with a parameter, it will set that parameter as the current path.
As an example, assume that you wish to place a custom back button inside the github page. First, we need to add a controller for this page. Also, create a function inside this page to navigate us back to home page.
1 myApp.controller('githubCtrl', function($scope, $location) {
2 	$scope.homePath = function () {
3 		$location.path('/');
4 	}
5 })
Note that we do not need to place the # here since Angular will take care of it for us.
Next, inside the github page template:
1 <button class="btn btn-warning" ng-click="homePath()"> Back to Home </button>
And finally, declare this controller for github path.
1 .when("/github", {
2       templateUrl: "/view/github.html",
3       controller: "githubCtrl"
4     })
And we’re done!
Passing route parameters with $route
A query parameter is a parameter embedded inside the URL of the page. It generally has the following format:
1 http[s]://domainName.domain/path?par1=val1&par2=val2&par3=vale3
Existence of these parameters are optional. You can check this by entering
1 http://127.0.0.1:8080/#/github?a=123123
inside your browser. As you see, the browser will not pay attention to it. If you wish to just read parameters optionally (which is rare to be honest!), You can access them using a service named $route, which holds general information about the current route. In order to access to query parameters, log $route.current.params (in fact, log $route.current too, much useful information can be found there too!).
1 myApp.controller('githubCtrl', function ($scope, $location, $route) {
2   console.log($route.current);
3   $scope.homePath = function () {
4     $location.path('/');
5   }
6 })
now try entering a URL with some params and see the console for logs.
There is a common case where you want to explicitly define a path parameter for one of your routes. Note that path parameters are a little more that query parameters. They have the following format:
1 http://127.0.0.1:8080/#/github/param1/param2
Path parameters could really distinguish routes from one another. In order to declare one for the /github path add the following to route config:
1 .when("/github/:username", {
2       templateUrl: "/view/github.html",
3       controller: "githubCtrl"
4     })
Note that parameters inside a path start with :. This is necessary for Angular, in order to understand that this part of the path is a Path parameter not a fixed part. This means that if we now enter #/github inside our browser, this path will not be resolved, but any Url a format like "/github/:username" will resolve with this path.
Enter "/github/Kianenigma" inside your browser and see to logs once more. Important thing here is that we can still add some query parameters like ?param=val. Once again, they’re optional.
There is another simpler way for accessing route parameters, a service called $routeParams. This is actually an object containing only route and query parameters, if any are available.
1 myApp.controller('githubCtrl', function ($scope, $location, $route, $routeParams) {
2   console.log($route.current);
3   console.log($routeParams);
4   ...
5 })
You should see that it contains similar values.
This chapter contains much more information about routing placed under the Further reading section. This is because i tried to make the main contents minimal and fluent as possible. If you want to learn a handful of other details about routing, don’t consider this chapter over and read the last part!
Further reading, challenges and the code
- Read more about single page applications here.
- Note that for cleaner code, you can have multiple
.run()or.config()blocks in each module. - Challenge: you now have list of repositories, and you know how to navigate to a new page. create a new
repoDetailroute and controller. user should navigate to it after clicking on a repo name inside the list. pass the name of this repo to the controller of this new page via path parameters, fetch some new datas such as commits, stars and issues of this repo and display them. you can visit github API for more information. - The The code until the end of this section can be viewed here
Removing The Hash.
The hash thing is annoying you, right? Good news, we can get rid of it! And this turns out to be quite easy! In the simplest case, you can inject the $locationProvider and call: $locationProvider.html5Mode(true);
1 $locationProvider.html5Mode({
2     enabled: true,
3     requireBase: false
4  });
Remember that your should remove the # from all of your href attributes!
The story actually doesn’t end here. There some more detail about HTML5 routing mode. You can read more about them here
But the bad news is that from now on, Your app will no longer refresh in any url other than / and will Officially have only one entry point: /. Before you could mock this by entering an address like /#/path and it worked, but not any more!
This is bad actually, for Two reasons
- It will drive you crazy during development.
- In production, sub pages inside your page will not have a unique and valid URL, hence they will not be indexed by search engines which is not good. Solving both the entry point problem and being CEO friendly are well beyond the scope of this book and require server side assistant. You can easy find out more about them by searching the topics in google.
Listen to route change events
You can listen to events such as:
- $routeChangeStart
- $routeChangeSuccess
- $routeChangeError
From any scope (with the same $scope.$on()), since they are broadcasted from $rootScope down. Although you must be careful that the controller must live in order to respond to this event! if we redirect from /home to /about, the following code inside githubCtrl will have no use!
1 $scope.$on("$routeChangeSuccess", function (evt) {
2     console.log(evt);
3 })
A safer way, if we want to listen to these events globally is to bind them to $rootScope, and where? If we place them inside individual route controllers, they will be created and destroyed (without being unsubscribed, which is horrible!). The best place is inside the .run() block:
1 myApp.run(function ($rootScope) {
2   $rootScope.$on("$routeChangeSuccess", function (evt) {
3     console.log(evt);
4   })
5 })
Here, you have access to all services can easily and create your event listeners.
A good way to use these events is to create an error page or global error notification. the $routeChangeError will be fired whenever the user enters an invalid route (assuming that you don’t have the .otherwise() config), or when a resolve fails (describe in the following section).
Using the .otherwise()
an alternative way for having safer routes is to declare an .otherwise() at the end of the config. this block will be used if non of the routes match with the url. The common pattern is to use the redirectTo key:
 1   $routeProvider
 2     .when("/", {
 3       templateUrl: "/view/home.html",
 4       controller: 'mainCtrl'
 5     })
 6     .when("/github/:username", {
 7       templateUrl: "/view/github.html",
 8       controller: "githubCtrl"
 9     })
10     .when("/about", {
11       templateUrl: "/view/about.html"
12     })
13
14   .otherwise({
15     redirectTo: '/'
16   })
Go and enter an invalid url like /blah/blah/blah/fooo/fooo/bazzz and see where it takes you!
Using resolve for preprocessing on a route
Similar to http provider stack, where a set of functions were executed before each http request, resolve has the same functionality for route changes. You can define a set of functions or promises to be executed/resolved before routing to a specific address.
The resolve property inside each route will define these prerequisites. Each key inside resolve must have a function associated with it. this function can return a value immediately, or it can return a promise. Here we are going to examine it with the promise. In the simplest form, return a promise inside the function and, and resolve the promise with some delay:
 1   $routeProvider
 2     ...
 3     .when("/github/:username", {
 4       templateUrl: "/view/github.html",
 5       controller: "githubCtrl",
 6       resolve: {
 7 	      repo: function ($q, $timeout) {
 8             var defer = $q.defer();
 9             $timeout(function () {
10               defer.resolve({ data: 'data' })
11             }, 3000)
12             return defer.promise;
13           }
14       }
15     })
16     ...
This will cause the route to /github to be loaded with a 3 second delay, because we are resolving a promise inside after 3 seconds. A good practice is to perform authentication or meta data gathering steps inside resolve.
The last cool thing about resolve is that the key name, repo is now available inside the githubCtrl and the value that we have passed to it as data will be placed inside it. Check this:
1 myApp.controller('githubCtrl', function ($scope, repo){
2   console.log(repo);
3   ..
4 }) ;
Note on href, ng-href, src, ng-src
Angular provides an ng- version for almost all common html attributes. The important thing is that some of them, well they don’t do much! at least when a static value is being placed inside it.
Go and change one of the ng-href attributes to href. Now navigate inside the app. No difference, right? The key difference is that with ng-href you can use template syntax inside links, which is very helpful
1 <a ng-href="http://yourdomain.com/users/{{userId}}/post/{{postId}}">title</a>
Cool thing is that unlike href, if we change $scope.userId or $scope.postId from our controller, the links will update!
Note that because of this common usage, ng-href is probably one of the only directives that we must use {{}} inside it. As you might remember, directives like ng-if, ng-model did not require {{}}.
Similarly, src and ng-src behave exactly the same. with ng-src you can do things like:
html
<img ng-href="http://media.domain.com/users/{{userId}}/post/{{postId}}.jpg" />
More sophisticated routing : UI-Router
Angular-UI router is another alternative for having routing in your app. it offers more flexibility and more functionality such as nested views, easier parameter management etc. But, keep in mind that if your routing requirements are simple, you can still stick to the official ngRoute module. it’s simpler, minimal and official.
Refactoring to a large scale application
In the previous chapters we learned a lot about Angular, but there was one main flow. It was mostly about controllers! this is not a bad thing at first, but soon or late, when your project scales into a real deal, a real Web app, you’re going to face a problem: You’ll end up with an some fat controller-oriented code and if you are hoping for some clean, testable and maintainable code, you’re going to want to change that. Collaboration becomes suddenly hard, scope functions and properties become too coupled and changing anything might cause the app to crash and that’s when you are doomed to refactor, yes I said refactor, not you’re doomed to fail.
Refactoring an application is a natural part of its lifecycle. You simply can’t start an application and design it beforehand 100% correct! Soon or late you’ll have to refactor because you have had some wrong estimations, and that’s completely fine. Don’t’ think of it as ‘Oh my god! I’ve been doing it all wrong for the past month and now i have to re write everything from scratch!’. If you don’t face the problems I mentioned above, that’s when you have to be worried.
In Angular, this happens mostly because all tutorials on Angular, almost always start with controllers, and the developer learning suddenly finds himself/herself looking at a tool - controller - that almost everything can be implemented using it and says:
Hey! this controller thing is like magic! I can do everything with it, why bother implementing a service or a directive?
To describe this, aside from the scalability problem, overusing controllers can be viewed as eating a meal, but only using a fork! That’s not logical, right?
To explain even more, recall to the last chapter where we argued about implementing something using a separate controller, or just use to rootScope to get it working. This argument is valid, but here we are thinking about everything from one step higher, we are thinking a little bigger! We are arguing what should be implemented using controllers/rootScope, and what shouldn’t.
This chapter is going to be rather short, but understanding is very important, it somehow guaranties that you can use the knowledge you gave learned so far, properly.
Controllers are meant to control the UI, no more
One of the most common mistakes that I see very often on Angular js projects is overusing a controller, for purposes that are way beyond the main intention of a controller.
A Controller’s main duty is to manage to data that needs to be bounded to the UI. No more no less. Of course, This includes some functions as well. And by data that needs to be bounded, we mean $scope properties that are currently being shown to the user. So far we have mentioned this point a few times in previous chapters. As a last emphasis, pay attention to the following example:
A VERY wrong thing to do:
 1 myApp/controller('mainCtrl', function($http) {
 2 	$scope.data = [] ;
 3 	$scope.getData = function() {
 4
 5       // 1) don't make http calls inside controller
 6 	  $http.get('domain.com/api/')
 7
 8 	    .then(function (response) {
 9 	      // 2) don't do data reformation or preprocessing inside controller
10 	      var _data = response.data.map(function () {..})
11
12 		  // 3) don't do any validation inside controller
13 		  if ( checkIfOk(_data) ) {
14 			$scope.data = _data
15 		  }
16 	    }, function (response) {
17 	      // 4) don't de error handling, specially in a repetitive way here
18 		  $scope.showErrorModal(response);
19 		})
20 	}
21
22 	...
23
24 	// at the end of the controller
25 	// call all of the datas that need to be fetched initially
26 	// 5) preferably, use resolve
27 	$scope.getData() ;
28 })
The code above is just one mock controller with one mock function, and it’s already looking bad. Think about what would happen if you had a dozen of each of these functions and many many controllers. The best case is that:
The code inside your controller should be as clean and minimal as possible, so that by looking at it you can understand a general overview of what’s happening.
I think we have mentioned most of the details about why this code is not good, and how should it be refactored. Think about it one more time and then go to the next section to see a better version of this code.
Separating data logic and helper functions into Services
Data Services
One of the first steps for having a cleaner code is to place all of the data logic inside a separate service. Well, not a service, a service per each data entity. Let’s implement such service for our repository list search from last chapter.
Inside your main script file, add:
1 myApp.factory('githubService', function ($http) {
2   var getRepoListByUser = function (user) {
3     return $http.get('https://api.github.com/users/' + user + '/repos')
4   }
5   return {
6     getRepoListByUser: getRepoListByUser
7   }
8 })
And then, inside your mainCtrl replace:
1 // inside $scope.$watch
2 $http.({
3 	method: "get",
4 	url: 'https://api.github.com/users/' + n + '/repos'
5 }).then(...)
with
1 // note that you must inject githubService
2 githubService.getRepoListByUser(n).then(...)
You might say that the change is not that significant. In terms of number of lines of code, we now have 2 lines less, was that such a big deal? Yes. because:
- Keep in mind that this is just a tutorial, many more steps are usually performed before each request such as data validation etc.
- even if the number of lines of code were the same, it would still be different, it’s a matter of readability here. If i were the one seeing the previous code (in the last section with all of the logic and http calls inside a controller) before refactoring into a service, i would think:
So there’s a http request here.. and it hits an API in guthub which i have no idea what it is.. and it might change so let’s hope that doesn’t happen.. and this http call code is mixed with rest of the logic, like data reformating and UI logic.. ok.. I can get what’s happening here.. can I?
But when is see the new code, i see:
There is a service which operates on github API and it has a method which return a promise which will resolve to a list of repos. and even if the API changes, we can just modify this service and changes will apply everywhere.
you can feel the difference, right?
Like before, you have the option of using a callback or a promise. you can wait for the promise to resolve inside the service and then pass the data back as a callback. My personal way is to have the data returned by the callback separated into Data and Status to show the success or failure (somehow overwriting the original callback):
 1 	// inside repoService
 2
 3   var getRepoListByUser = function (user, callback) {
 4     return $http.get('https://api.github.com/users/' + user + '/repos')
 5     .then(
 6 		function(response) {
 7 		  callback( response,  true )
 8 		},
 9 		function(error) {
10 		  callback( error,false )
11 	 }
12 	)
13   }
14   return {
15     getRepoListByUser: getRepoListByUser
16   }
17 })
and then call it using:
1 githubService.getRepoListByUser(n, function(data, status) {
2 	// if checking is required
3 	if ( status ) {}
4 	else {}
5
6 	// note that as mentioned before, managing error outside
7 	// the controller is a better idea
8 	// but anyway! just to cover all situations
9 })
Helper functions
I don’t exactly remember when and how i came up with this word helper function! By helper function I mean stateless functions that operate on a data, return a modified version or boolean value (very similar to functional programming concepts) indication a status etc. The key point is that they are not a part of the main business logic and they are stateless. Some great examples are validation functions. reformatting functions (preparing a data to be send via http or after being received via http), Utility functions etc. They are all best candidates for being implemented via a service, both for readability of the code and reusability.
Using Directives for reusable components
We covered directives before, now we are going to focus on one implementation case. As you might remember, we implemented a cool button that changed it’s color while and after doing some async process, using ngClass. That WAS cool, indeed. but now when you want to have a dozens of it inside your application. You don’t want to copy and paste the same logic over and over, do you?
Let’s first explain how we are going to implement this:
We’re going to create a generic progress button, it’s going to take a function as input via data binding, run that function when a click event happens, and then change its state when the function callback returns.
Before going into the main code, there is something to explain here. We mentioned that angular provides wrappers around famous async function ($timeout) or event listeners (ng-click). This is because of the way angular handles data binding between javascript models (aka $scope properties) and UI. go and replace a $timeout with setTimeout() and change a value inside it. You’ll see that no error happens but the value won’t update inside HTML. in these case, we can use scope.$apply() which enforces a rendering cycle update to be performed, therefor all changes will reflect inside the UI. You can read more about $apply in the last chapter. Here, because we are binding a native event listener, .bind('click'), we need to use $apply() to reflect our changes to the UI. Let’s see the code:
 1 myApp.directive('progressBtn', function () {
 2   return {
 3     scope: {
 4       fn: '<fn'
 5     },
 6     restrict: 'AE',
 7     template: `<button class='btn btn-sm' ng-class='classes'>` +
 8 			  `{{ text }} </button>`,
 9     link: function (scope, elem, attr, ctrl) {
10       scope.classes = 'btn-success';
11       scope.text = "Click me";
12       elem.bind('click', function () {
13         scope.$apply(function () {
14           scope.classes = 'btn-warning';
15           scope.text = 'Now wait!';
16         });
17         scope.fn(function () {
18 					// after the fn function
19 					// is complete and its callback
20 					// is invoked:
21           scope.$apply(function () {
22             scope.classes = 'btn-success';
23             scope.text = "Click me";
24           });
25         })
26       })
27     }
28   }
29 })
Let’s go through this code step by step:
- create a directive with one way data binding property,
<fn - Set initial values for button class and text when the button is being created,
link()function. - Change these values when the button is clikced
- wrap all changes inside
$apply()so that they will reflect inside the UI
In order to use this directive:
1 <progress-btn fn="someFunc"></progress-btn>
and inside the parent controller:
1 $scope.someFunc = function (callback) {
2     $timeout(function () {
3       callback()
4     }, 2000)
5   }
Note that:
- unlike last few examples, here chose the callback based function, it’s good to get familiar with both of them! You can try and implement this using a promise as a challenge.
- You can extend this example so that the directive return a value to the parent scope after doing the promise (in different ways!). There are actually many libraries around for such progress button. Go on and create one for yourself and publish it!
The code until the end of this section could be found here.
Using constants for cleaner code
Another simple trick to have a cleaner code is to use constants for reusing, well, .. constant values (was that to obvious?). Constant strings such as error messages, api url prefixes are the most common usages:
 1 myApp.constant('global', {
 2 	'host': 'http://localhost', // for development
 3 	//'host': 'xx.yy.zz.qq', // a real ip for production
 4 	'port': 3000, // if it's is going to be variable
 5 })
 6
 7 // now you can easily use them everywhere
 8 // when making an http call
 9
10 $http.get(global.host + global.port + 'api/a/postfix/').then(...);
Module level scaling and File structure
We’ve had a horrible module and file structure since now. It’s acceptable for learning but not in production . There are two main thing to change.
- Use more modules
- Use a better file structure
There are two levels for doing this.
1- Grouping similar objects
You’ll probably start with a messed up code (like the one that we currently have), and then you want to re organize. For medium level projects, it’s common to group similar objects and functions together inside a module. By similar objects I mean one module for controller, one module for services etc.
 1 var controllers = angular.module('app.controllers', []);
 2 controllers.controller('fooCtrl', function($scope) {}) ;
 3 controllers.controller('barCtrl', function($scope) {}) ;
 4
 5 var services = angular.module('app.services', []) ;
 6 services.services('buzService', function($http) {});
 7 services.factory('buzFactory', function($http) {});
 8
 9 // this will be the main app
10 // routing and config will happen here.
11 // all of the controllers and services are available
12 // and injectable since they are declared as dependency
13 var app = angular.module('app', ['app.controllers', 'app.services']);
Of course, your file structure will change accordingly. You should now place your files like :
 1 index.html
 2 app.js
 3 ./controllers
 4 	fooCtrl.js
 5 	barCtrl.js
 6 ./services
 7 	buzService.js
 8 	buzFactory.js
 9 ./views
10 	foo.html
11 	bar.html
12 	buz.html
You just have to be carful to import all of the files in the correct order of dependency inside your main HTML file.
2- Grouping similar features
For much bigger projects, a better pattern is to place similar features inside a separate module. feature is an abstract phrase here, in most cases it could be translated to a page or an data entity. As an example, if your site has login, search and edit as main features:
 1 var loginModule = angular.module('loginModule', []);
 2 loginModule.controller('loginCtrl', function($scope) {});
 3 loginModule.service('loginService', function($http) {}) ;
 4
 5 var searchModule = angular.moduel('searchModule', []) ;
 6 searchModule.controller('searchController', function($scope) {});
 7 searchModule.service('searchService', function($http) {});
 8
 9 ...
10
11
12 var app = angular.module('app', ['loginModule', 'searchModule']);
Variables defined for each module are available globally, meaning that it’s ok to define loginModule in a file and use it inside another file to create a controller for it. You also have the choice of using angular.module('') with no second parameter as a getter for a module.
each of these modules can also depend on one another, this is really implementation dependent, but the key point is that you have 100% freedom to organize your modules, so make the best out of it!
Appendix and further reading
Congratulations! you are almost done with this book. In this last chapter, we are going to cover some of the missed point that weren’t really fit for any of the previous chapters (or I just wanted to spare them for this chapter!).
A better way for injecting dependencies
Sa far, we have injected all of our services using the Implicit Annotation method. this means that must pass the service as an argument, with the exact same name, so that Angular’s injector can find it. But you have probably seen that in minified javascript code, the names of the parameters are replaced with shorter names! so this method of dependency injection will not work in minified code:
1 myApp.controller('aName', function($scope, myService) {})
2
3 // will translate to
4 myApp.controller('aName', function(a, b) {}) // => crash
There are two other ways for injecting a dependency, one recommended by Angular team and thats what we are going to mention now:
Use wrap the entire controller definition inside an array, with the last index being the actual controller function and the previous indexes being the name of dependencies, in order, to be injected:
1 myApp.controller('aName', ['$scope', 'myService' function($scope, myService) {
2
3 }])
Note that now then names placed inside the function arguments are trivial, the first argument will be the first index in the array and so on. We could even do:
1 myApp.controller('aName', ['$scope', 'myService' function(SCOPE, MYSERVICE) {
2
3 }])
which is not recommended. So in this method, you must be very carful to keep the dependencies inside the array and function in order, synced.
NOTE: This syntax is not restricted to controllers! that was just an example! Anywhere inside your app, where you have a function with arguments being the dependencies (and sensitive to name), you can replace it with :
1 ['arg1', 'arg2', ... , function(arg1, arg2, ...)];
Providers
We mentioned many types of services, .service(), .constant(), .factory(), .value(). But one of them was left behind: .provider(). In chapter 5, you learned that providers are parents to other types of services, they create services, and their main difference is that they are available inside the .config() phase. This somehow answers one question: When should we implement a provider?
When you need to have a service, but it’s behavior might vary on each client, hence needs to be configured inside the
.config()block.
A Provider, is very similar to to a service, the main difference is that it must implement a $get() method, which indicated how the service is instantiated. It’s good to even think of services and providers as coupled pairs, because each service MUST have a provider, and if we don’t declared it, Angular will create one for us, under the hood. This provider has the same name as our Service, with a Provider postfix. Without changing any code, go to a .config() block and try to inject an argument name: githubServiceProvider. YES! no error raises because we had such provider. we have created the githubService, and angular created a provider for it on the fly. As you see, it has the $get method too.
Let’s extend our githubService with a realistic example and turn in into a provider! By doing this, we prevent Angular from creating a default Provider for it and instead, use our Provider. The githubService currently makes http calls, but let’s assume that we want to configure the API prefix (‘https://api.github.com/’). This is how we’re going to do this:
- Upgrade the githubService to a provider.
- add a private variable for keeping the prefix inside it, with get/set functions.
- give it a
$getmethod to create the githubService when being injected, and pass the private API prefix to it. Note that the$getmethod will be creating an instance of the githubService - Note that we don’t change the name form
githubServicetogithubServiceProvider! As you saw, angular will create a provider with the appropriate prefix for each service.
First, we move the githubService declaration to a separate function. We still give it the $http, and an additional prefix:
1 var _githubService = function ($http, prefix) {
2   var getRepoListByUser = function (user) {
3     return $http.get(prefix + user + '/repos')
4   }
5   return {
6     getRepoListByUser: getRepoListByUser
7   }
8 }
Next, we change the .factory() to .provider() and give it the internal prefix variable, and a $get() method. Inside the $get() method we create an instance of _githubService() and pass the prefix and the $http to it:
 1 myApp.provider('githubService', function () {
 2   var apiPrefix = 'https://api.github.com/';
 3
 4   this.setAPIPrefix = function (aPrefix) {
 5     apiPrefix = aPrefix;
 6   }
 7
 8   this.getAPIPrefix = function () {
 9     return apiPrefix;
10   }
11
12   this.$get = function ($http) {
13     return new _githubService($http, apiPrefix);
14   }
15 })
Note that we could use the better injection method inside $get() and write:
1 this.$get = ['$http', function ($http) {
2   return new _githubService($http, apiPrefix);
3 }]
And that’s it! check the log inside the .config() again and see the new githubServiceProvider. Now you can do something:
1 myApp.config(function ($httpProvider, $routeProvider, $locationProvider, githubServiceProv\
2 ider) {
3   // which doesn't work obviously, but you get the point!
4   githubServiceProvider.setAPIPrefix('http://blah.blah');
5
6   // rest of the code
7   $httpProvider.interceptors.push('customInterceptor');
8
9 })
Two types of people: this vs $scope
Angular provides an alternative way to implement a controller, without having a magical $scope in the middle, at least for data binding. The way through is that, you can bind all of the properties and functions that you want to expose to the UI, to this inside the controller, and then use to controllerAs syntax:
1 myApp.controller('mainCtrl', function() {
2   // note that we don't need to inject scope
3   this.data = 'hello' ;
4 })
and then inside the HTML:
1 <div ng-controller='mainCtrl as ctrl'>
2   {{ ctrl.data }}
3 </div>
consequently, you can declare route controllers as controllerAs instead of controller. This syntactic sugar was added to Angular at version 1.2 and started to gain attention immediately, But still it seems that the old $scope way is more popular. It’s good to know both and the important point is to stick to one of them. None of them is specifically better, it really depends on you and which you find easier. Some people like me think that scope is better because it’s easier to understand. Some think that this is better and closer to real javascript objects.
There are some slight differences that you have to notice:
-
thishas some tricks to learn, if you are not familiar with them already. perhaps the most obvious one is that each function will create its own context, hence will have a separatethis, therefor you probably want to do something like :1myApp.controller('mainCtrl',function(){2varself=this;3// and use self from now on45self.data='hello';6})to deal with this.
- Using
this, your HTML files will be a little bit cleaner and easier to understand. Specially when we have nested controllers:1<divng-controller="fooCtrl">2<divng-controller="barCtrl">3<divng-controller="buzCtrl">4{{ prop }}5{{ $parent.prop }}6{{ $parent.$parent.prop }}7</div>8</div>9</div>But with controllerAs:
1<divng-controller="fooCtrl as foo">2<divng-controller="barCtrl as bar">3<divng-controller="buzCtrl as buz">4{{ buz.prop }}5{{ bar.prop }}6{{ foo.prop }}7</div>8</div>9</div>Which is easier to understand.
- Even if you hate scope, you still need it for some of the methods that it has, such as
$broadcast,$onand$watch. In these cases you have to inject it normally and use it. Keep in mind that even if you inject$scopefor these functions, don’t mix up your data binding between$scopeandthis! - Note that if you use controllerAs and you inject
$scopeto have$watch, you need to watch changes similar to how you watched for changes inside a Service:1myApp.controller('mainCtrl',function($scope){2varself=this;3self.data='hello';45$scope.$watch(function(){returnself.data},function(n,o))67// $scope.$watch(function() {return this.data}, function(n, o))8// Note that this wont work, because of the 'this' issue!910// or use:11// $scope.$watch(angular.bind(this, function() {return self.data}), function(n, o))12})
Note on $scope.$apply
As mentioned before, Angular provides directives and wrappers for most common async operations, but in case you want to perform an async operation, and if it’s not inside Angular’s context, you have to wrap it inside .$apply(). Try changing a $scope property inside setTimeout instead $timeout. This is common, specially when we want to modify and override native HTML behavior. We have already mentioned how this works, now we want to introduce something new: Using $scope.$apply(), specially in unnecessary situations can lead to errors inside the console. This is because when an .$apply() phase (aka .$digest) is taking place, requesting another one to happen will raise an error. Whenever you face this problem, and you Really HAVE TO used .$apply() this useful gist for having a safe Apply might help. This function simple checks for a $digest phase and then performs the $apply();
Controller before destroy
If you bind events inside your event, or any other type of async operation, like $on(), and if your controller is not meant to live forever, meaning that it belongs to a page, it’s important to undo everything when the user leaves the page and the controller is about to be destroyed. To do this, you can use the $destroy event of the $scope:
1 $scope.$on("$destroy", function () {
2   // unsubscribe from events.
3 })
Style guide and best practices
Now that you are finished with this book, I highly recommend reading a good Style Guide for angular, they help you both increase your knowledge, and organize them.