
Table of Contents
Working with faces messages (DRAFT)
In this chapter, you will see several approaches for combining the rich looking PrimeFaces messages with OmniFaces techniques for obtaining more flexible faces messages and less verbose code. Among others, we will discuss about specifying multiple client ID in the for attribute and about generating a global single message whenever validation fails. Basically, we will exemplify on ERROR type messages.
Faces messages with multiple client IDs in the for attribute
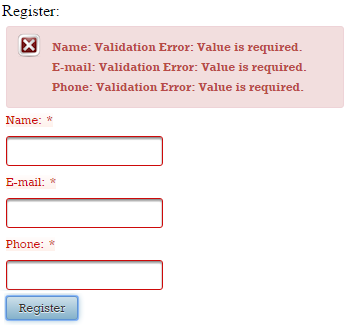
In order to display faces messages, PrimeFaces comes with <p:messages/> and <p:message/>. Typically, when you want to display all messages, you use <p:messages/>, as below (display all error messages):
<h:form>
 <h:panelGrid id="gridId" columns="1" cellpadding="2">

  <p:messages/>

  <p:outputLabel for="nameId" value="Name:" />
  <p:inputText id="nameId" required="true" />

  <p:outputLabel for="emailId" value="E-mail:" />
  <p:inputText id="emailId" required="true" />

  <p:outputLabel for="phoneId" value="Phone:" />
  <p:inputText id="phoneId" required="true" />

 </h:panelGrid>

 <p:commandButton id="submitButtonId" value="Register" update="gridId" />
</h:form>
In the below figure, you can see the error messages caused by the fact that we didn’t fill any of the above inputs (this is the effect of the built-in required validator):
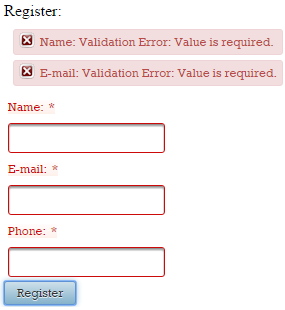
But, if you want to display messages for a certain component or a certain group of components, you use <p:message/> with for attribute, as below (display error messages only for nameId and emailId, but not for phoneId):
<h:form>
 <h:panelGrid id="gridId" columns="1" cellpadding="2">

  <p:message for="nameId" />
  <p:message for="emailId" />

  <p:outputLabel for="nameId" value="Name:" />
  <p:inputText id="nameId" required="true" />

  <p:outputLabel for="emailId" value="E-mail:" />
  <p:inputText id="emailId" required="true" />

  <p:outputLabel for="phoneId" value="Phone:" />
  <p:inputText id="phoneId" required="true" />

 </h:panelGrid>

 <p:commandButton id="submitButtonId" value="Register" update="gridId" />
</h:form>

In such a case, we can use OmniFaces, <o:messages/>. Among other features, this component allows multiple client IDs space separated in the for attribute. For example, the above code can be re-written as below (notice that we tried to keep as much as possible from PrimeFaces error messages styles):
<h:form>
 <h:panelGrid id="gridId" columns="1" cellpadding="2">

  <o:messages for="nameId emailId"
              errorClass="ui-message ui-message-error ui-widget ui-corner-all"
              errorStyle="margin:5px;" />

  <p:outputLabel for="nameId" value="Name:" />
  <p:inputText id="nameId" required="true" />

  <p:outputLabel for="emailId" value="E-mail:" />
  <p:inputText id="emailId" required="true" />

  <p:outputLabel for="phoneId" value="Phone:" />
  <p:inputText id="phoneId" required="true" />

 </h:panelGrid>

 <p:commandButton id="submitButtonId" value="Register" update="gridId" />
</h:form>

But, if we want to obtain the same look as in PrimeFaces, we need to exploit another feature of <o:messages/>. This component supports the var attribute which sets the current FacesMessage in the request scope and disables the default table/list rendering. This practically allows us to loop through the faces messages list in a completely stateless fashion (the faces messages list is accessible in the page via, facesContext.messageList) and output them as we want. For example, after we inspect the HTML code of an a PrimeFaces error message, we can do this:
<h:form>
 <h:panelGrid id="gridId" columns="1" cellpadding="2">

  <o:messages for="nameId emailId" var="msgs">
   <div class="ui-message ui-message-error ui-widget ui-corner-all"
        aria-live="polite"
        style="margin:5px;">

    <span class="ui-messages-error-icon" style="height:16px; width:16px;
                 margin-top:0; background-position:0 -96px;" />

    <span class="ui-message-error-detail">#{msgs.detail}</span>
   </div>
  </o:messages>

  <p:outputLabel for="nameId" value="Name:" />
  <p:inputText id="nameId" required="true" />

  <p:outputLabel for="emailId" value="E-mail:" />
  <p:inputText id="emailId" required="true" />

  <p:outputLabel for="phoneId" value="Phone:" />
  <p:inputText id="phoneId" required="true" />

 </h:panelGrid>
 <p:commandButton id="submitButtonId" value="Register" update="gridId" />
</h:form>
The complete application is named, MultipleForComponents.
So, in our hypothetical case with eight inputs, we have:
<o:messages for="input1 input2 input3 input4 input5 input6 input7 input8"
            errorClass="ui-message ui-message-error ui-widget ui-corner-all"
            errorStyle="margin: 5px;">
</o:messages>
or
<o:messages for="input1 input2 input3 input4 input5 input6 input7 input8"
            var="msgs">

 <div class="ui-message ui-message-error ui-widget ui-corner-all"
      aria-live="polite"
      style="margin:5px;">

  <span class="ui-messages-error-icon" style="height:16px; width:16px;
               margin-top:0; background-position:0 -96px;"/>

  <span class="ui-message-error-detail">#{msgs.detail}</span>
 </div>
</o:messages>
You can use <o:messages/> to refer to non-input components, which in turn contain input components. For example:
<h:form>
 <h:panelGrid id="gridId" columns="1" cellpadding="2">

  <o:messages for="inputs"
              errorClass="ui-message ui-message-error ui-widget ui-corner-all"
              errorStyle="margin:5px;"/>

  <p:outputLabel for="nameId" value="Name:" />
  <p:inputText id="nameId" required="true" />

  <h:panelGroup id="inputs">
   <h:panelGrid id="subgridId" columns="1">
    <p:outputLabel for="emailId" value="E-mail:" />
    <p:inputText id="emailId" required="true" />

    <p:outputLabel for="phoneId" value="Phone:" />
    <p:inputText id="phoneId" required="true" />
   </h:panelGrid>
  </h:panelGroup>
 </h:panelGrid>

 <p:commandButton id="submitButtonId" value="Register" update="gridId" />
</h:form>
You can also combine non-input components that contain inputs with other input components:
<h:form>
 <h:panelGrid id="gridId" columns="1" cellpadding="2">

  <o:messages for=" nameId inputs"
              errorClass="ui-message ui-message-error ui-widget ui-corner-all"
              errorStyle="margin:5px;"/>

  <p:outputLabel for="nameId" value="Name:" />
  <p:inputText id="nameId" required="true" />

  <h:panelGroup id="inputs">
   <h:panelGrid id="subgridId" columns="1">
    <p:outputLabel for="emailId" value="E-mail:" />
    <p:inputText id="emailId" required="true" />

    <p:outputLabel for="phoneId" value="Phone:" />
    <p:inputText id="phoneId" required="true" />
   </h:panelGrid>
  </h:panelGroup>
 </h:panelGrid>

 <p:commandButton id="submitButtonId" value="Register" update="gridId" />
</h:form>
Working with links and request parameters (DRAFT)
In this chapter, we will discuss about several gaps of UIParameter. This component is exposed to JSF page authors via the <f:param/> tag, and it is usually used for attaching extra request parameters to links (<p:link/>), external URLs (<h:outputLink/>), command buttons/links (<p:commandButton/> and <p:commandLink/>) and formatted output (<h:outputFormat/>). Among others, we will focus on passing object into generated links and creating complex labels.
Use <p:link/> and <o:param/> to pass objects into generated link
In order to generate a link (HTML <a href>), PrimeFaces comes with <p:link/>. If you check the PrimeFaces Showcase, you can see a simple example (listed below):
<p:link outcome="productDetail" value="Bookmark">
 <f:param name="productId" value="10" />
</p:link>
As you can see, the generated link contains a request parameter also. The productId request parameter is “attached” to the generated link via the <f:param> tag.
For example, let’s suppose that we collect from the end user a 10 digit phone number, as below:
<p:outputLabel for="phone" value="Phone Number: " />
<p:inputText id="phone" required="true" value="#{dataBean.number}" />
Let’s assume that a 10 digit phone number is composed as follows:
- the first three numbers are the area code, called the national destination code (NDC)
- the following three numbers known as the exchange
- the last four numbers at the end of a 10 digits number are the subscriber number
Knowing this, we will now create a POJO class to represent these phone number parts (notice the toString()):
public class PhoneNumber implements Serializable {

 private static final long serialVersionUID = 1L;

 private String areacode;
 private String exchange;
 private String subscriber;

 public PhoneNumber(String areacode, String exchange, String subscriber) {
  this.areacode = areacode;
  this.exchange = exchange;
  this.subscriber = subscriber;
 }

 // getters and setters

 // equals() and hashCode()

 @Override
 public String toString() {
  return "PhoneNumber{" + "areacode=" + areacode + ", exchange="
                        + exchange + ", subscriber=" + subscriber + "}";
 }
}
Instances of this POJO are used via a simple bean named, DataBean (for brevity, we skip its source code). The property that stores the instance is named, number (e.g. #{dataBean.number}).
In order to split the provided phone number and represent it as an instance of the PhoneNumber class, we need to attach a converter (for brevity, we skip the converter source code):
<p:inputText id="phone" required="true"
             value="#{dataBean.number}"
             converter="phoneNumberConverter"/>
After the user submits the 10 digits phone number, we want to display a link of type: Dial Phone Number. The HTML behind this link is an <a> tag (of course, the number request parameter should reflect the provided phone number):
<a href="/.../dial.xhtml?number=0727890877">
 Dial Phone Number
</a>
In the browser address bar it will appear as:
So, this link should be created like below:
<p:link value="Dial Phone Number" outcome="dial">
 <f:param name="number" value="#{dataBean.number}"/>
</p:link>
But, this will generate the following link (notice the effect of invoking toString()):
Well, this link is definitely not the desired one! In order to obtain the desired link, we can write a proper toString() implementation or to break down the DRY principle. But, even better is to use the OmniFaces <o:param/>. This component allows us to pass an object as a request parameter into a link. Practically, <o:param> allows us to indicate the needed converter via the converter attribute, as below:
<p:link value="Dial Phone Number" outcome="dial">
 <o:param name="number" value="#{dataBean.number}"
          converter="phoneNumberConverter"/>
</p:link>
You can see the result in the below figure:
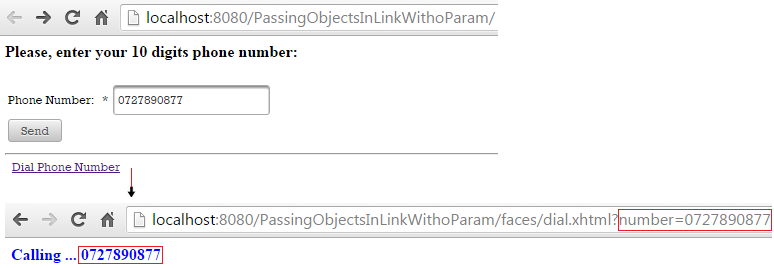
The complete application is named, PassingObjectsInLinkWithoParam.
Create complex labels
The <f:param/> cannot supply JSF/HTML in parameterized messages (<h:outputFormat/>). Let’s suppose that we want to use a link as a parameter of an un−escaped <h:outputFormat/>, which is nested in a <p:outputLabel/>, as below:
<h:form>
 <h:panelGrid columns="4">
  <p:outputLabel for="zipCodeId">
   <h:outputFormat value="#{msg['ZIPCODE']} ({0}):" escape="false">
    <f:param>
     <p:link value="see samples"
             outcome="#{view.locale eq 'en' ? 'sample_en':'sample_fr'}">
      <f:param name="locale" value="#{view.locale}" />
     </p:link>
    </f:param>
   </h:outputFormat>
  </p:outputLabel>
  <p:inputText id="zipCodeId" required="true" />
  <p:message for="zipCodeId" />
  <p:commandButton value="Dial"/>
 </h:panelGrid>
</h:form>
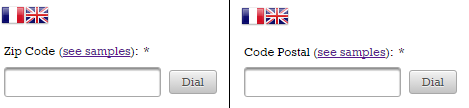
So we have a label that contains a simple text and a link. The link gets modified (points different outcomes) depending on the selected language (English or French). The above code will produce the following output (left side - English, right side - French):
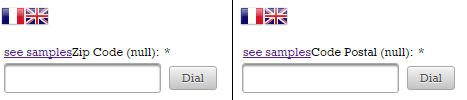
The problem can be solved by replacing the <f:param/> with OmniFaces’ <o:param>. The <o:param/> allows the use of JSF and HTML as parameter values.
<h:form>
 <h:panelGrid columns="4">
  <p:outputLabel for="zipCodeId">
   <h:outputFormat value="#{msg['ZIPCODE']} ({0}):" escape="false">
    <o:param>
     <p:link value="see samples"
             outcome="#{view.locale eq 'en' ? 'sample_en':'sample_fr'}">
      <o:param name="locale" value="#{view.locale}" />
     </p:link>
    </o:param>
   </h:outputFormat>
  </p:outputLabel>
  <p:inputText id="zipCodeId" required="true" />
  <p:message for="zipCodeId" />
  <p:commandButton value="Dial"/>
 </h:panelGrid>
</h:form>
This time the result will be like this (everything looks fine for both, English and French):
The complete application is named, ComplexLabelsWithOutputFormat.
Using <h:outputFormat/> output as input parameter
Let’s suppose that we want to use the output of <h:outputFormat/> as a tooltip for multiple commands (command links and buttons).
In other words, you cannot write something like this:
<p:commandLink ... title="<h:outputFormat value="...">
                           <f:param value="..."/>
                          </h:outputFormat>"
/>
It is practically pretty hard to obtain the desired result. However, OmniFaces provides an extension to <h:outputFormat/> that is capable of accomplishing such tasks. This component is exposed to JSF page authors via <o:outputFormat/> tag. More precisely, this component has the ability to capture the <h:outputFormat> output and expose it in the request scope under a variable specified as the value of the var attribute. Let’s see how to use <h:outputFormat/> output as an input/parameter:
<h:form>
 <o:outputFormat value="#{msg['ZIPCODE']}, {0}" var="_zip">
  <f:param value="#{view.locale eq 'en' ? 'UK':'France'}" />
 </o:outputFormat>
 <p:commandLink value="#{msg['ZIPCODE']}" title="#{_zip}" />
 <p:commandButton value="#{msg['ZIPCODE']}" title="#{_zip}" />
</h:form>
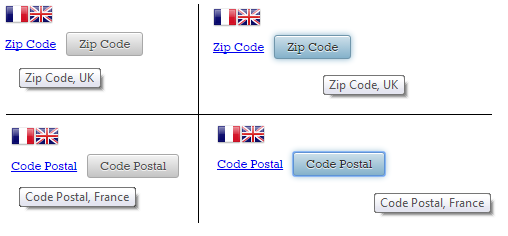
Notice that the variable name is prefixed with underscore character (_). This is an OmniFaces recommendation for avoiding possible conflicts with other variables in the page. Below you can see the output of this case:
The complete application is named, OutputFormatAsInputParameter.
Working with JavaScript resources (DRAFT)
Working in JSF with JavaScript resources seems to be a pretty simple task. Starting with JSF 2.0, all the web resources, such as CSS, JavaScript, and images are loaded from a folder named resources, present under the root of your web application or from /META-INF/resources in JAR files. A folder under the resources folder is known as a library or theme, which is like a collection of client artifacts (e.g. your company name).
After we build the resources folder structure and add the JavaScript resources, we simply plug in the <h:outputScript/> tag into the XHTML page.
In this chapter we will “dissect” this topic a little bit more. Among other things, we will discuss how to execute a snippet of JavaScript after each request (AJAX/non-AJAX), how to load resources from CDN URLs, how to combine JavaScript resources for achieving optimal performance and how to deffer JavaScript resources loading after the page has been completely loaded.
Executing a JavaScript snippet after each AJAX/non-AJAX request
Let’s suppose that we want to execute a piece of JavaScript code after each request in a page (AJAX, non-AJAX). Requests are typically fired via command buttons (<p:commandButton/>) and command links (<p:commandLink/>). By default, these commands fire AJAX requests (the default value of the ajax attribute is true), so let’s take a look at this first case:
Executing a JavaScript snippet after each AJAX request
PrimeFaces commands provide an attribute named, oncomplete. The value of this attribute represents the client side callback to be executed when the AJAX request is completed. We can practically do this:
<h:body>
 <h:form>
  <p:commandButton value="Generate Random"
     oncomplete="document.getElementById('panelId').innerHTML=Math.random();"/>
 </h:form>

 <h:panelGroup id="panelId"/>
</h:body>
Or, we can wrap the JavaScript code into a function, as below:
<h:head>
 <script type='text/javascript'>
  function generateRandom(){
   document.getElementById('panelId').innerHTML=Math.random();
  }
 </script>
</h:head>

<h:body>
 <h:form>
  <p:commandButton value="Generate Random" oncomplete="generateRandom();"/>
 </h:form>

 <h:panelGroup id="panelId"/>
</h:body>
Notice that in both cases the execution of the JavaScript code is tied up in the command button. For example, if we have more command buttons/links in this page and each of them causes the execution of this snippet of JavaScript code then we would need to duplicate the JavaScript code or the JavaScript method invocation in the oncomplete attribute. We can however, provide other custom approaches such as using the update attribute to point to a component that contains the JavaScript code. On a separate note we could also exploit the jsf.ajax.addOnEvent but this is another subject. The following example causes the execution of the JavaScript only at initial request (at POST−AJAX, the JavaScript code will not be executed!):
<h:body>
 <h:form>
  <p:commandButton value="Generate Random"/>
 </h:form>

 <h:panelGroup id="panelId"/>

 <script type='text/javascript'>
  document.getElementById('panelId').innerHTML = Math.random();
 </script>
</h:body>
Executing a JavaScript snippet after each non-AJAX request
In the case of a non-AJAX requests, the view is re-rendered, so the JavaScript code is executed after each non-AJAX request. The only thing we have to keep in mind is to place the JavaScript code at the end of the <body/>. This is needed to ensure that the entire DOM tree of the page is populated and safe to be referenced from the JavaScript code. For example, the case below will not work (upon the firing of each request, it will cause an error like: TypeError: document.getElementById(...) is null; this occurs because when the JavaScript code is executed the DOM tree doesn’t contain the HTML code corresponding to the panelId ID):
<head>
 <script type='text/javascript'>
  document.getElementById('panelId').innerHTML = Math.random();
 </script>
</h:head>

<h:body>
 <h:form>
  <p:commandButton value="Generate Random" ajax="false"/>
 </h:form>

 <h:panelGroup id="panelId"/>
</h:body>
But, this will have the desired effect:
<h:body>
 <h:form>
  <p:commandButton value="Generate Random" ajax="false"/>
 </h:form>

 <h:panelGroup id="panelId"/>
 <script type='text/javascript'>
  document.getElementById('panelId').innerHTML = Math.random();
 </script>
</h:body>
Using the OmniFaces OnloadScript component
A quick and general approach consists of using the OmniFaces OnloadScript component. This component is exposed to JSF page authors via <o:onloadScript/> tag. Basically, you nest the JavaScript code that should be executed in the <o:onloadScript/> tag and OmniFaces will take care of the rest. It doesn’t matter where in page you place the <o:onloadScript/>, because OmniFaces will take care of rendering and executing it at the end of the <body/> after each AJAX/non-AJAX request. For example, both commands below (AJAX and non-AJAX) will cause the execution of the JavaScript code nested in <o:onloadScript/>, while the JavaScript placed in the oncomplete attribute of the AJAX based command is executed only at the end of such request:
<h:head>
 <o:onloadScript>
  document.getElementById('panelId').innerHTML = Math.random();
 </o:onloadScript>
</h:head>

<h:body>
 <h:form>
  <p:commandButton value="Generate Random (non-AJAX)" ajax="false"/>
 </h:form>

 <h:form>
  <p:commandButton value="Generate Random (AJAX)"
                   oncomplete="alert('AJAX request complete!');"/>
 </h:form>

 <h:panelGroup id="panelId"/>
</h:body>
The complete application is named, ExecuteScriptAfterEachRequest.
Initializing PrimeFaces components via view parameters (DRAFT)
View parameters (UIViewParameter) were introduced in JSF 2.0. They appear nested in the metadata section (<f:metadata>) and their main goal is to allow the developer to provide bookmarkable URLs. Although it is not mandatory, they are initialized via request parameters. As you will see in this chapter, view parameters can be used to transform a query string (the part after ? in an URL) into managed bean properties used to initialize PrimeFaces components. A quick code sketch will look like this:
<h:link outcome="B.xhtml"...>
<f:param name="myParamName" value="myParamValue"/>
</h:link>
// page B.xhtml
<f:metadata>
// myProperty is initialized via myParamValue and it will further initialize
// PrimeFaces component property
<f:viewParam name=" myParamName " value="#{myBean.myProperty}"/>
</f:metadata>
View parameters are stateful and this raises several issues, of which will be the discussion of this chapter.
Suppressing the invocation of the setter/converter/validator at each postback
Again to reiterate, view parameters are stateful and hence they need to be initialized only once. This is a good thing from the perspective of availability. A stateful component is available in the current view over postbacks, and in the case of view parameters, this is true even if they no longer appear in the URL (they may appear only at initial request). But, there are a few drawbacks of this behavior:
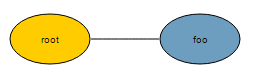
In order to highlight these issues, let’s have the following scenario: we want to initialize the PrimeFaces Mindmap component via a query string of type: ...?nodes=root|node_A|node_B. This should produce the below figure (for simplicity we use a mindmap with a single level):

We have multiple approaches for accomplishing this, but obviously, we will choose to use view parameters for transforming the request parameters into mindmap nodes. The root, node_A, and node_B are strings, whereas mindmap relies on MindmapNode class.
In order to transform the query string into a MindmapNode instance, we will use a custom converter (NodesConverter) and in order to ensure that we do it right, we will use a custom validator (NodesValidator). But, let’s see some code lines (notice that the request parameter and the view parameter have the same name nodes):
<f:metadata>
 <f:viewParam name="nodes" value="#{mindmapViewBean.root}" required="true"
              converter="nodesConverter" validator="nodesValidator"/>
</f:metadata>

<h:body>
 <h:panelGrid columns="2">
  <p:messages/>
  <h:form>
   <p:commandButton value="Reset Mindmap"
                    action="#{mindmapViewBean.resetMindMap()}" ajax="false"/>
  </h:form>
 </h:panelGrid>
 <p:mindmap value="#{mindmapViewBean.root}"
            style="width: 450px; height: 400px; border: 1px solid black;">
  <p:ajax event="select" listener="#{mindmapViewBean.onNodeSelect}" />
 </p:mindmap>
 <h:form>
  <p:commandButton value="Unrelated to Mindmap" ajax="false"/>
 </h:form>
</h:body>
The MindmapViewBean is responsible of storing the mindmap (nodes).Keeping up with simplicity and in order to highlight the issues at hand we implement a few logs:
@Named
@ViewScoped
public class MindmapViewBean implements Serializable {

 private static final Logger LOG =
         Logger.getLogger(MindmapViewBean.class.getName());

 private MindmapNode root;

 public MindmapViewBean() {
  LOG.info("MindmapViewBean#constructor ...");
 }

 public MindmapNode getRoot() {
  return root;
 }

 public void setRoot(MindmapNode root) {
  LOG.info("MindmapViewBean#setter ...");
  this.root = root;
 }

 public String resetMindMap(){
  LOG.info("MindmapViewBean#resetMindMap() ...");
  return "index?faces-redirect=true&includeViewParams=true";
 }

 public void onNodeSelect(SelectEvent event) {
  LOG.info("MindmapViewBean#onNodeSelect() ...");
 }
}
The root is populated from a custom converter. This is responsible of splitting the root|node_A|node_B string and creating the mindmap (getAsObject()) and viceversa (getAsString()). The code is pretty simple:
@FacesConverter("nodesConverter")
public class NodesConverter implements Converter {

 private static final Logger LOG =
         Logger.getLogger(NodesConverter.class.getName());

 @Override
 public Object getAsObject(FacesContext context,
               UIComponent component, String value) {

  LOG.info("NodesConverter#getAsObject() ...");

  if ((value != null) && (!value.isEmpty())) {

       String[] nodes = value.split("\\|");

       // create mindmap root
       MindmapNode root = new
                   DefaultMindmapNode(nodes[0], nodes[0], "FFCC00", false);

       // add children to root
       if (nodes.length > 1) {
           for (int i = 1; i < nodes.length; i++) {
                root.addNode(new DefaultMindmapNode(nodes[i],
                             nodes[i], "6e9ebf", true));
           }
       }
       return root;
  }

  return null;
 }

 @Override
 public String getAsString(FacesContext context,
               UIComponent component, Object value) {

  LOG.info("NodesConverter#getAsString() ...");

  if (value != null) {
      String queryString = ((DefaultMindmapNode) value).getLabel() + "|";
      List<MindmapNode> nodes = ((DefaultMindmapNode) value).getChildren();
      for (MindmapNode node : nodes) {
           queryString = queryString + node.getLabel() + "|";
      }
      return queryString;
  }
  return "";
 }
}
Besides the built-in required validator, you might in some cases need a validator. We can add a custom validator that would ensure that our mindmap has children. Furthermore, we will not accept a mindmap that contains only the root. Obviously, you could accomplish this check by using the above converter. But remember that we need to expose all the issues of view parameters, including calling valdiators at each postback. Moreover, the application is “shaped” for revealing what may happen if we don’t correctly understand how view parameters works. So the custom validator looks like this:
@FacesValidator("nodesValidator")
public class NodesValidator implements Validator {

 private static final Logger LOG =
         Logger.getLogger(NodesValidator.class.getName());

 @Override
 public void validate(FacesContext context, UIComponent component,
                      Object value) throws ValidatorException {

  LOG.info("NodesValidator#validate() ...");

  if (((MindmapNode)value).getChildren().isEmpty()) {
      throw new ValidatorException(new FacesMessage(FacesMessage.SEVERITY_ERROR,
        "You cannot have a mindmap only with a root !", null));
  }
 }
}
Assuming we have some hypothetical cases where the URLs are bookmarked:
- URL without query string (
http://localhost:8080/SuppressViewParamInvocations/). In this case, we see the error message caused by the built-inrequiredvalidator,j_idt1: Validation Error: Value is required.. This is the expected behavior:

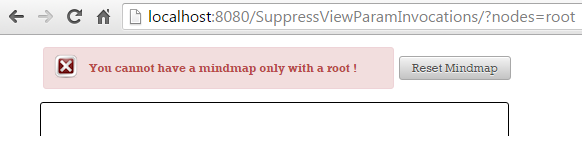
Now, let’s focus on what happens if we press the Reset Mindmap button. When this button is pressed, we simply call a managed bean method that performs some tasks (not relevant) and redirect to the same view by including the view parameters. At postback, you see the same error message caused by the required built-in validator. This is normal since we never provided a query string. But the thing that may look strange (even if it shouldn’t) is the fact that this is not a redirect (the resetMindMap() method is not called). Since the required view parameter is not provided, each postback will “stop” in the Process Validation phase, and “jump” to the Render Response phase. The fact that the validators/converters are invoked at each postback (even if there is no query string) is also suggested by the logs:
So, instead of being redirected and seeing the required built-in validator error message again, we just see this message without redirection. The resetMindMap() method is not called. This is happening for the Unrelated to Mindmap button also (dummy button to fire POST via forward mechanism). Let’s examine the second use case.
- URL with wrong query string (
http://.../SuppressViewParamInvocations/?nodes=root). In this case, we see the error message caused by the custom validator,You cannot have a mindmap only with a root !. This is the expected behavior:
Since we provide a value for the view parameter, the built-in required validator is successfully passed at initial request. But, the validation fails in our custom validator, which doesn’t accept a mindmap that contains only the root. This means that the flow “jumps” in Render Response phase, and the view parameter is not set in state. At postback (fired via Reset Mindmap button) we will receive the built-in required validator error message, j_idt1: Validation Error: Value is required.. This in normal since at initial request the view parameter was not set in state, and at postback the query string is not available, so there is no view parameter. The fact that the validators/converters are invoked at each postback (even if there is no query string) is suggested by the logs also:
Again instead of being redirected, we keep seeing the required built-in validator error message without redirection. The resetMindMap() method is not called. This is happening to the Unrelated to Mindmap button also (dummy button to fire POST via forward mechanism). Let’s examine the third use case.
- URL with valid query string (
http://.../?nodes=root|node_A|node_B). This query string will successfully pass through conversion and validation and the mindmap will be displayed on to screen. This is the expected behavior:
If we press the Reset Mindmap button, then everything will act as expected. The mindmap will be reset to the initial status via the query string attached due to the effect of the includeViewParams=true (see resetMindMap() method). But, if we click on one of the nodes (which fires an AJAX select event) and continue by pressing the Reset Mindmap button, then we will see the error message from the built-in required validator, j_idt1: Validation Error: Value is required.. This is an unexpected behavior. Click again on Reset Mindmap button and everything works fine.
Moreover, let’s press the Unrelated Mindmap button and check the logs. Even if this is a postback, there is no query string and this action is not even related to mindmap, the converters, validators and setters are still invoked at each request:
So, in the above three cases we have identified several issues that disqualify view parameters for this job. But, if we add the OmniFaces namespace (xmlns:o="http://omnifaces.org/ui") in the XHTML page and replace the stateful <f:viewParam/> with the stateless <o:viewParam/> then all the issues will disappear like magic:
<f:metadata>
 <o:viewParam name="nodes" value="#{mindmapViewBean.root}" required="true"
              converter="nodesConverter" validator="nodesValidator"/>
</f:metadata>
Now, let’s see what happens in our three use cases:
- URL without the query string (
http://.../SuppressViewParamInvocations/). In this case, we see the error message caused by the built-inrequiredvalidatornodes: Validation Error: Value is required.. This is the expected behavior. This time, when you press theReset Mindmapbutton, the logs reveal that the redirect take place; the constructor ofMindmapViewBeanis invoked after each press and the built-inrequiredvalidator fails each time at initial request. TheresetMindMap()method is called as expected:
- URL with the wrong query string (
http://.../SuppressViewParamInvocations/?nodes=root). In this case, at the initial request, we see the error message caused by our custom validator,You cannot only have a mindmap with a root !. This is the expected behavior. Since the view parameter doesn’t pass the validation process it will not be set in state. At postbacks when you press theReset Mindmapbutton, you will see the effect of the built-inrequiredvalidator. But, theresetMindMap()method is called as expected and the redirection takes place:
This is confirmed by the Unrelated Mindmap button also. This button fires a POST requests via forward mechanism, but the required validator is not invoked!
- URL with valid query string (
http://.../?nodes=root|node_A|node_B). This query string will successfully pass through conversion and validation and the mindmap will be displayed on screen. This is the expected behavior.
This time pressing the Reset Mindmap button works as expected. Remember previously, the issue caused by clicking a node (firing an AJAX select event) and afterwards clicking the Reset Mindmap button ? Well, this issue is now solved. The POSTs via forward mechanism (e.g. pressing Unrelated Minmap button) will skip the invocation of converters/validators and setters attached to view parameters. This is a big win! Stateless mode avoids unnecessary conversions, validations and models updating on postbacks.
Supply a label for messages
Moreover, pay attention to the error messages label! OmniFaces provides a default value for the label attribute. When the label attribute is omitted, the name attribute will be used as the label. For example, when the label attribute is not set on <o:viewParam/> and a validation error occurs when using the required built-in validator, the following message will be generated:
Supply a default value
Note that, starting with OmniFaces 2.2, the ViewParam component also supports the optional default attribute. This attribute allows us to indicate a default value, and OmniFaces will in turn rely on this value in the case where the actual request parameter is null or empty. For example, you may want to initialize the mind map, as below:
<f:metadata>
 <o:viewParam name="nodes" value="#{mindmapViewBean.root}" default="root|foo"
              required="true" converter="nodesConverter"
              validator="nodesValidator"/>
</f:metadata>
Now, if you don’t supply a query string (e.g. http://localhost:8080/SuppressViewParamInvocations) the mindmap will look like below (this way you don’t need the required built-in validator):
Suppressing invocation of the converter regardless the null values
OmniFaces doesn’t allow null view parameters to become empty strings nor does it allow null parameters from participating in query string. This is done automatically by the OmniFaces implementation, so you don’t have to configure anything. OmniFaces analyzes each view parameter value and takes care of preventing any such occurrence and it does this by not calling the attached converters. By default, when you are using the includeViewParams, the null view parameters with attached converters are still null when the query string is prepared. For example, if we use <f:viewParam/>, remove validators from our view parameter, omit the nodes request parameter and click on the Reset Mindmap button, you will see this:
http://localhost:8080/SuppressViewParamInvocations/faces/index.xhtml?nodes=
Notice that nodes was attached with an empty string value. If we switch to <o:viewParam/> then we will obtain the expected result:
http://localhost:8080/SuppressViewParamInvocations/faces/index.xhtml
Support bean validation and triggering validate events on null value
The standard UIViewParameter implementation uses in JSF 2.0-2.2 an internal “is required” check when the submitted value is null, hereby completely bypassing the standard UIInput validation, including any bean validation annotations and even the PreValidateEvent and PostValidateEvent events. For example, in Mojarra, the UIViewParameter implementation is adjusted to deal with null values in presence of the built-in required validator. Well, UIInput assumes that a null value means don’t check, but UIViewParameter doesn’t accept null values and the built-in required validator:
// Mojarra 2.2.9, UIViewParameter source code
...
if (getSubmittedValue() == null && myIsRequired()) {
     String requiredMessageStr = getRequiredMessage();
     FacesMessage message;
     if (null != requiredMessageStr) {
         message = new FacesMessage(FacesMessage.SEVERITY_ERROR,
                                 requiredMessageStr,
                                 requiredMessageStr);
     } else {
        message = MessageFactory.getMessage(context, REQUIRED_MESSAGE_ID,
                          MessageFactory.getLabel(context, this));
     }
     context.addMessage(getClientId(context), message);
     setValid(false);
     context.validationFailed();
     context.renderResponse();
 } else {
     super.processValidators(context);
 }
...
The myIsRequired() method is a private method that checks the well-known isRequired() and another private method, named isRequiredViaNestedRequiredValidator() - its name is self explanatory:
// Mojarra 2.2.9, UIViewParameter source code
private boolean myIsRequired() {
 return super.isRequired() || isRequiredViaNestedRequiredValidator();
}
The workaround was added in OmniFaces 2.0. In JSF 2.3, this has been fixed and effectuated when javax.faces.INTERPRET_EMPTY_STRING_SUBMITTED_VALUES_AS_NULL context param is set to true.
The complete application is named, SuppressViewParamInvocations.
Well, I hope you enjoyed this chapter and learned a bunch of interesting stuff. Not only are view parameters used to initialize PrimeFaces components but coupled with, OmniFaces’ stateless view parameters, you can create bookmarkable URLs that provide initial state of components.
Related articles: