Tables
Changing Table and Column Width
When we define a table in Asciidoctor the columns all have the same width and the table will the whole width of the page. Of course we can change this when we define the table. We can change the table width with the width attribute. We specify the column width with the cols attribute.
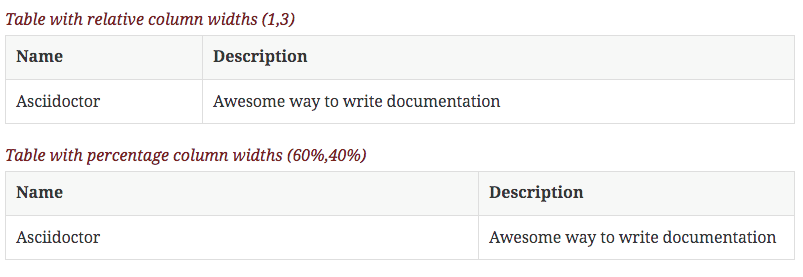
First we will change the width of the columns. We can specify proportional integer values or a percentage to specify the width of a column. In the following sample Asciidoctor file we use proportional values in the first table. The first column has value 1 and the second column value 3. This means the second column should be 3 times as wide as the first column. In the second table the column width is defined with percentage values. The first column should occupy 60% of the table width and the last column the rest.
When we transform the Asciidoctor source to HTML we get the following result:
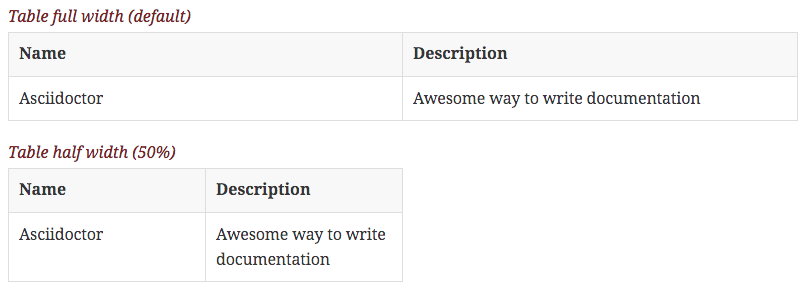
We see in the examples that the width of the table is the same as the width of the page. To make a smaller table we set the width attribute for a table. The value must be a percentage. Let's create a sample Asciidoctor file and define a table with a width of 50%:
And if we look at the generated HTML for example we can see the second table is half the width of the first:
Written with Asciidoctor 1.5.1.
Original post written on November 7, 2014
Table Column and Cell Alignment
Creating a table with Asciidoctor is a breeze. The syntax is very clear and the HTML output shows a very nice looking table. But there is also a lot of configuration we can do when we define a table. For example by default all columns are left aligned, but we can change this to have values centered or right aligned in columns. We can even set the vertical alignment for columns. And if this is not enough we can change the horizontal and vertical alignment per cell.
Let's start with a simple table with three columns. We want the first column to be centered, the middle column to be left aligned and the last column should be right aligned. To achieve this we must configure the cols attribute for our table definition. We use the following symbols to define the alignment:\
-
<: left align values (default) -
>: right align values -
^: center values
We create a new Asciidoctor file with the following contents:
When we create HTML output from this source we get the following output:

We have now defined the horizontal alignment. To include vertical alignment we must add dot (.) to the horizontal alignment value and then the vertical alignment value. The following vertical alignment values can be used:\
-
<: top align values (default) -
>: bottom align values -
^: center values
In the following sample Asciidoctor file we add vertical alignment configuration to our previous table:
We get the following HTML table when we process that source file:

Finally we can alter the horizontal and vertical alignment per cell. We use the alignment configuration symbols before the pipe symbol (|) of a cell definition. This overrules any alignment configuration set in the cols definition. In the next Asciidoctor file we combine all these settings for a table:
And when we look at the output we see all alignment configuration applied to our table:

Written with Asciidoctor 1.5.0.
Original post written on November 6, 2014
Changing Table and Column Width
When we define a table in Asciidoctor the columns all have the same width and the table will the whole width of the page. Of course we can change this when we define the table. We can change the table width with the width attribute. We specify the column width with the cols attribute.
First we will change the width of the columns. We can specify proportional integer values or a percentage to specify the width of a column. In the following sample Asciidoctor file we use proportional values in the first table. The first column has value 1 and the second column value 3. This means the second column should be 3 times as wide as the first column. In the second table the column width is defined with percentage values. The first column should occupy 60% of the table width and the last column the rest.
When we transform the Asciidoctor source to HTML we get the following result:
We see in the examples that the width of the table is the same as the width of the page. To make a smaller table we set the width attribute for a table. The value must be a percentage. Let's create a sample Asciidoctor file and define a table with a width of 50%:
And if we look at the generated HTML for example we can see the second table is half the width of the first:
Written with Asciidoctor 1.5.1.
Original post written on November 7, 2014
Span Cell over Rows and Columns
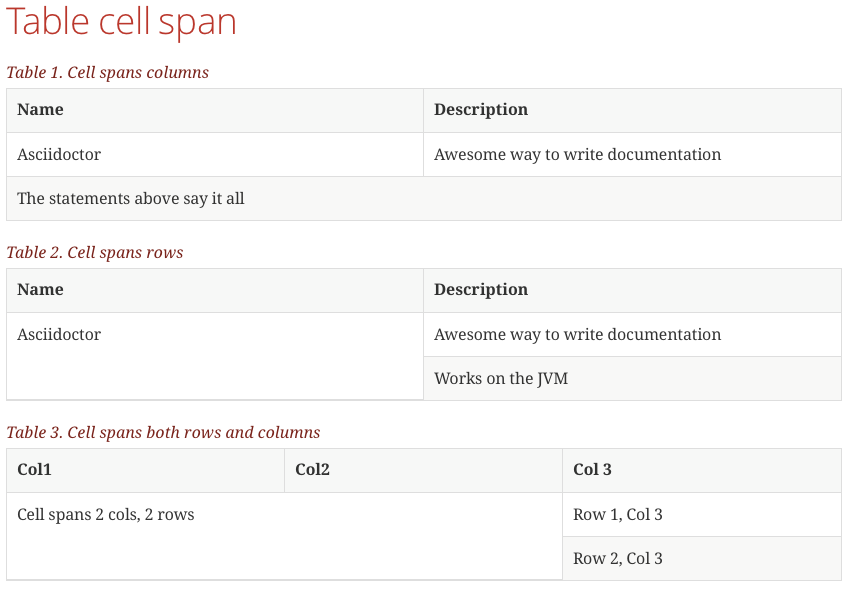
When we define a table in Asciidoctor we might want to span a cell over multiple columns or rows, instead of just a single column or row. We can do this using a cell specifier with the following format: column-span.row-span+. The values for column-span and row-span define the number of columns and rows the cell must span. We put the cell specifier before the pipe symbol (|) in our table definition.
In the following example Asciidoctor markup we have three tables. In the first table we span a cell over 2 columns, the second table spans a cell over 2 rows and in the final table we span a cell over both 2 columns and rows.
If we transform our source to HTML we get the following tables:
Written with Asciidoctor 1.5.1.
Original post written on December 4, 2014
Repeating Cell Contents
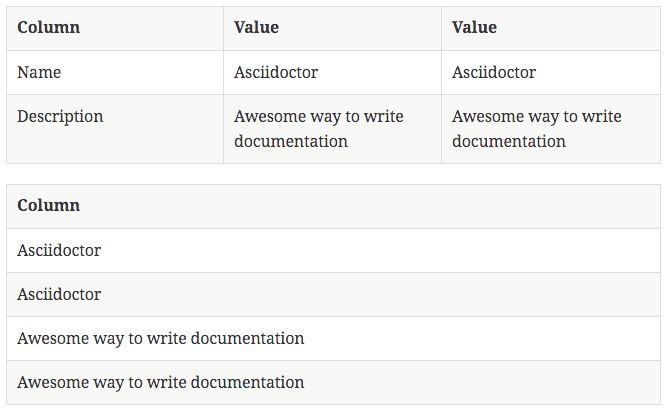
With Asciidoctor we can repeat cell contents if we prefix the cell separator pipe symbol (|) with the number of times we want to repeat the cell followed by an asterisk (*).
In the following example Asciidoctor source file we define two tables and add 2* to cells that we want to repeat two times:
When we generate a HTML document from this source we see the following result:
Written with Asciidoctor 1.5.1.
Original post written on December 2, 2014
Using Asciidoc in Tables
When we define a table in Asciidoctor and want to use Asciidoc in a table cell it is not interpreted as Asciidoc by default. The text is literally shown and this might not be what we expect. But we can force Asciidoctor to interpret the cell contents as Asciidoctor.
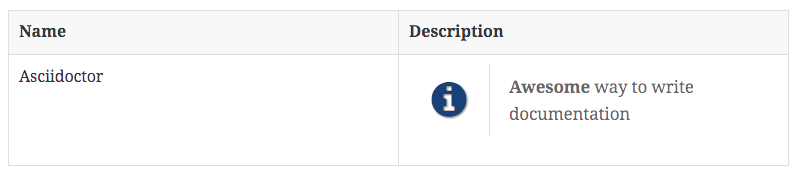
Let's start with a very simple table. The last cell of the first row contains some Asciidoc markup:
When we transform this Asciidoctor source to HTML we see the following output:

Notice that we don't get a nice image for our NOTE is not shown as image when it used in a table cell.
To change this behavior we can configure the table. We can configure a column to have Asciidoc content that needs to be interpreted or we can configure at cell level we want the contents to be interpreted as Asciidoc. We use the character a in the cols attribute when we define the table. Or we use the character a before the table cell separator (|). In the next sample Asciidoctor file we use both ways to make sure the cell contents is Asciidoc markup that needs to be transformed as well:
Once we have defined the table we get the following generated HTML:
And this time the cell contents is transformed as well.
Written with Asciidoctor 1.5.1.
Original post written on November 10, 2014
Styling Columns and Cells in Tables
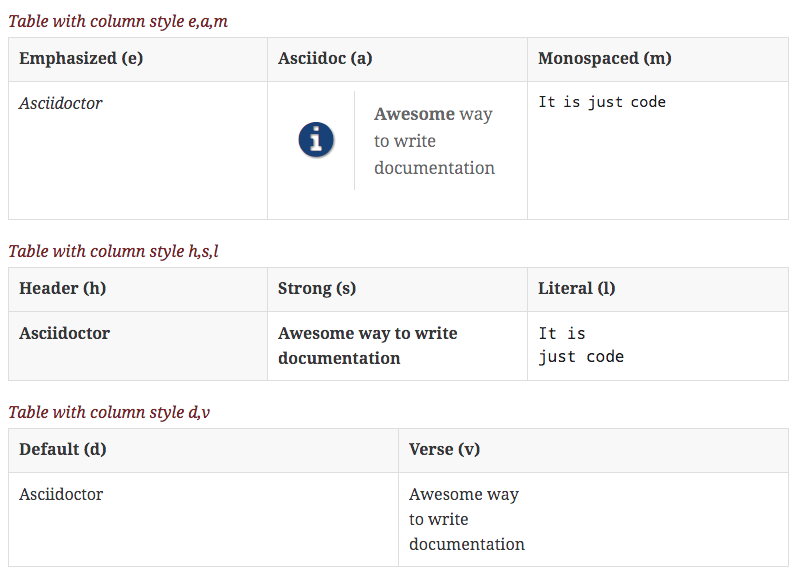
In a previous post we learned how to use Asciidoc markup in a table. The a character is just one of many styles we can define in our table. In this blog post we see which style options we have. We can either use the cols attribute to define a style for a whole column or specify per cell the style.
We can use the following styles:\
-
e: emphasized -
a: Asciidoc markup -
m: monospace -
h: header style, all column values are styled as header -
s: strong -
l: literal, text is shown in monospace font and line breaks are kept -
d: default -
v: verse, keeps line breaks
The following Asciidoctor source uses the different styles as cols attribute values:
When we transform this into HTML using the Asciidoctor HTML backend we get the following result:
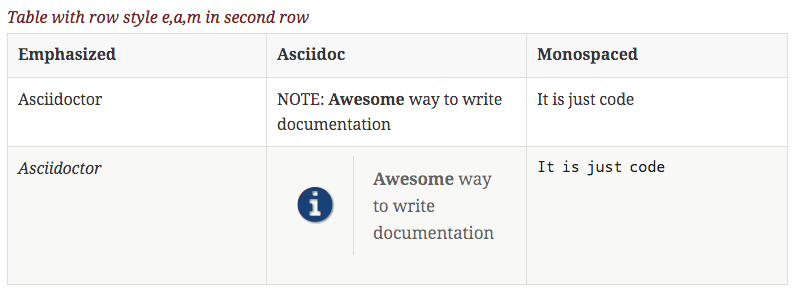
We can also override a column styling per cell. We must put the correct styling character before the pipe symbol (|), so the contents of the cell is styled differently:
And the following HTML is generated when we process this Asciidoctor source:
Written with Asciidoctor 1.5.1.
Original post written on November 10, 2014
Nested Tables
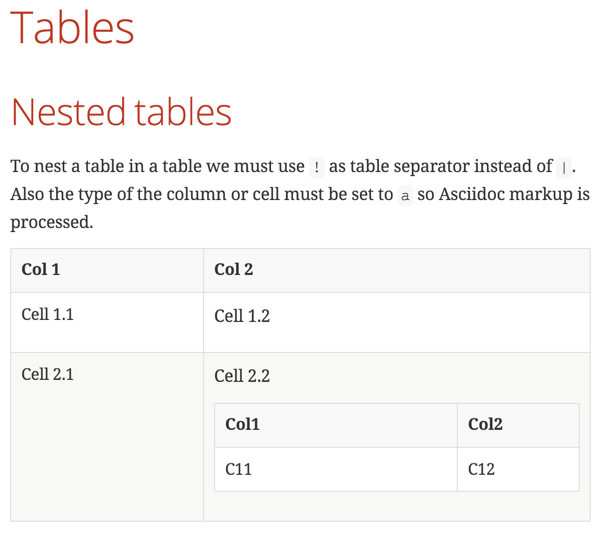
Defining tables in Asciidoctor is very easy. The start and end of the table are defined by |===. But if we want to add a new table to a table cell we cannot use the same syntax. To define a nested table we must replace the | separator with !. So instead of |=== to indicate the table boundaries we use !===. Also the cell separators are now ! instead of |. Finally we must make sure the table cell or column supports Asciidoc markup, so the table is properly created. We must configure the cell or column with a so the nested table is created.
In the following example Asciidoctor markup we have a simple table with a nested table in the second column and row. Notice we can still apply all table configuration to the nested table as well:
When we run Asciidoctor to create HTML for this markup we get the following result:
Written with Asciidoctor 1.5.5.
Original post written on April 26, 2017
Escaping Pipe Symbol in Tables
To define a table in Asciidoc is easy. Table cells are separated basically by pipe symbols (|). But if we want to use a pipe-symbol as cell content we need to escape the pipe-symbol with a backslash (\)
The following Asciidoc code is transformed to a correct HTML table output:
The generated HTML table looks like this for example:
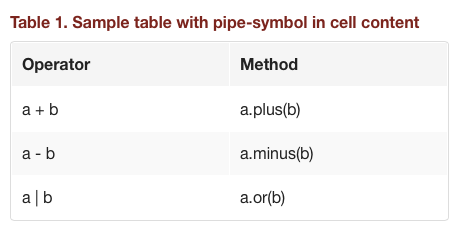
Generated with Asciidoctor 0.1.4.
Original post written on June 4, 2014
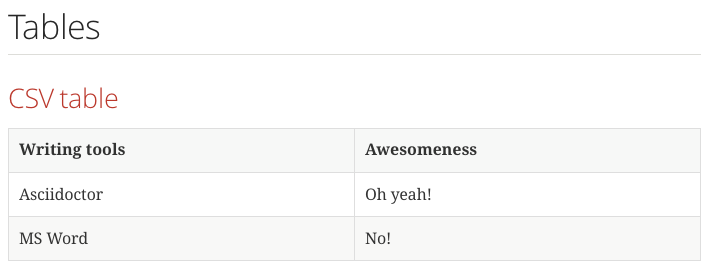
CSV and DSV Tables
With Asciidoctor we can create tables where the header and rows are in CSV (Comma Separated Values) and DSV (Delimiter Separated Values) format. Normally we use a pipe-symbol (|) to separate cell values. This is actually PSV (Prefix Separated Values) :-).
In the following Asciidoctor markup we create a very simple table with a header and two rows using CSV:
We generate this into HTML and we get the following result:
Asciidoctor provides also another way to define the above table:
The previous samples used a comma to separate values, but we can also use colon (:). The next sample contains tables defined with DSV:
With the include directive we can also include data from an external CSV of DSV file to create a table (of course also the traditional pipe-symbol separated format can be in an external file):
The file tools.cv has the following contents:
Code written with Asciidoctor 1.5.0.
Original post written on November 5, 2014
Using Tab Separated Data In A Table
In a previous post we learned how to use data in CSV and DSV format. Recently we can also include tab separated values (TSV) in a Asciidoctor table. We must set the table attribute format to the value tsv. The data can be inside the document, but also defined in an external file which we add with the include macro.
In the following example markup we have a table with inline tab separated values. A second table includes an external file with tab delimited values:
When we convert our Asciidoctor markup to HTML we get the following result:
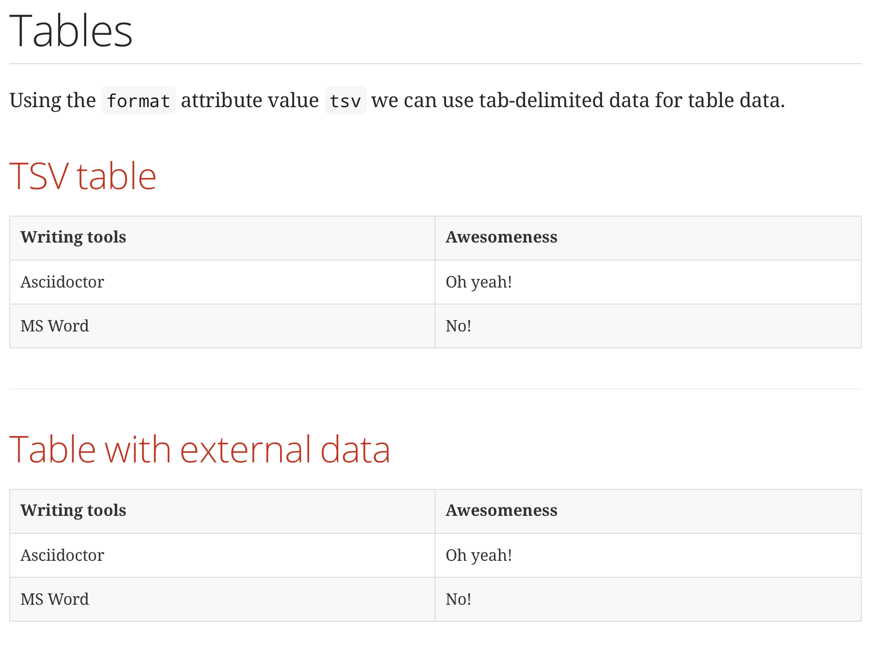
Written with Asciidoctor 1.5.6.1.
Original post written on October 5, 2017