
Table of Contents
-
- 30 Minute Dinner Rolls
- 100% Spelt Bread
- Almond Butter
- Apple Barley Pudding
- Apple Multigrain Muffins
- Applesauce
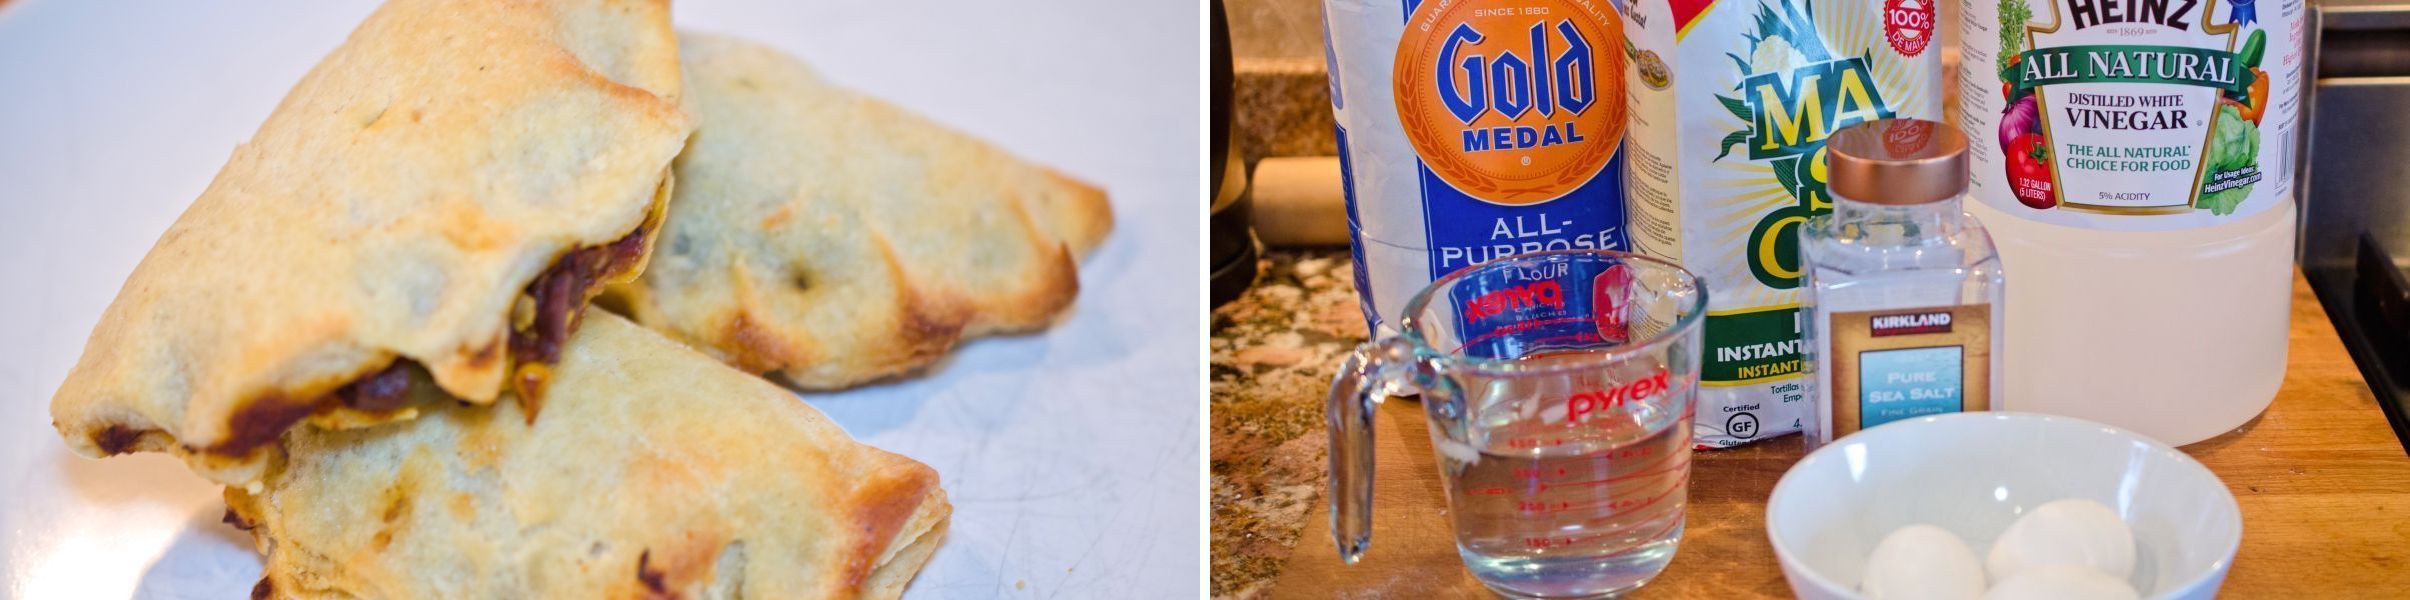
- Apricot Pocket Pies
- Avocado Salsa
- Bacalhau com natas
- Bacon Brussels Sprouts
- Baked Beans
- Baked Chicken Nuggets
- Baked Chicken Wings
- Baked Salmon
- Baked Shredded Pork Flautas
- Baked Sweet Potato Fries
- Banana Walnut Multigrain Muffins
- Barbecue Sauce
- Basil Pesto
- BBQ Pork Pizza
- Beef & Black Bean Empañadas (with a little tamale flare)
- Beef Stir Fry
- Beef Stroganoff
- Blackberry Bread Pudding
- Blackened Catfish
- Blueberry Multigrain Muffins
- Bouillabaisse
- Broiled Lobster Tail
- Butterfinger
- Buttermilk Spelt Pancakes
30 Minute Dinner Rolls
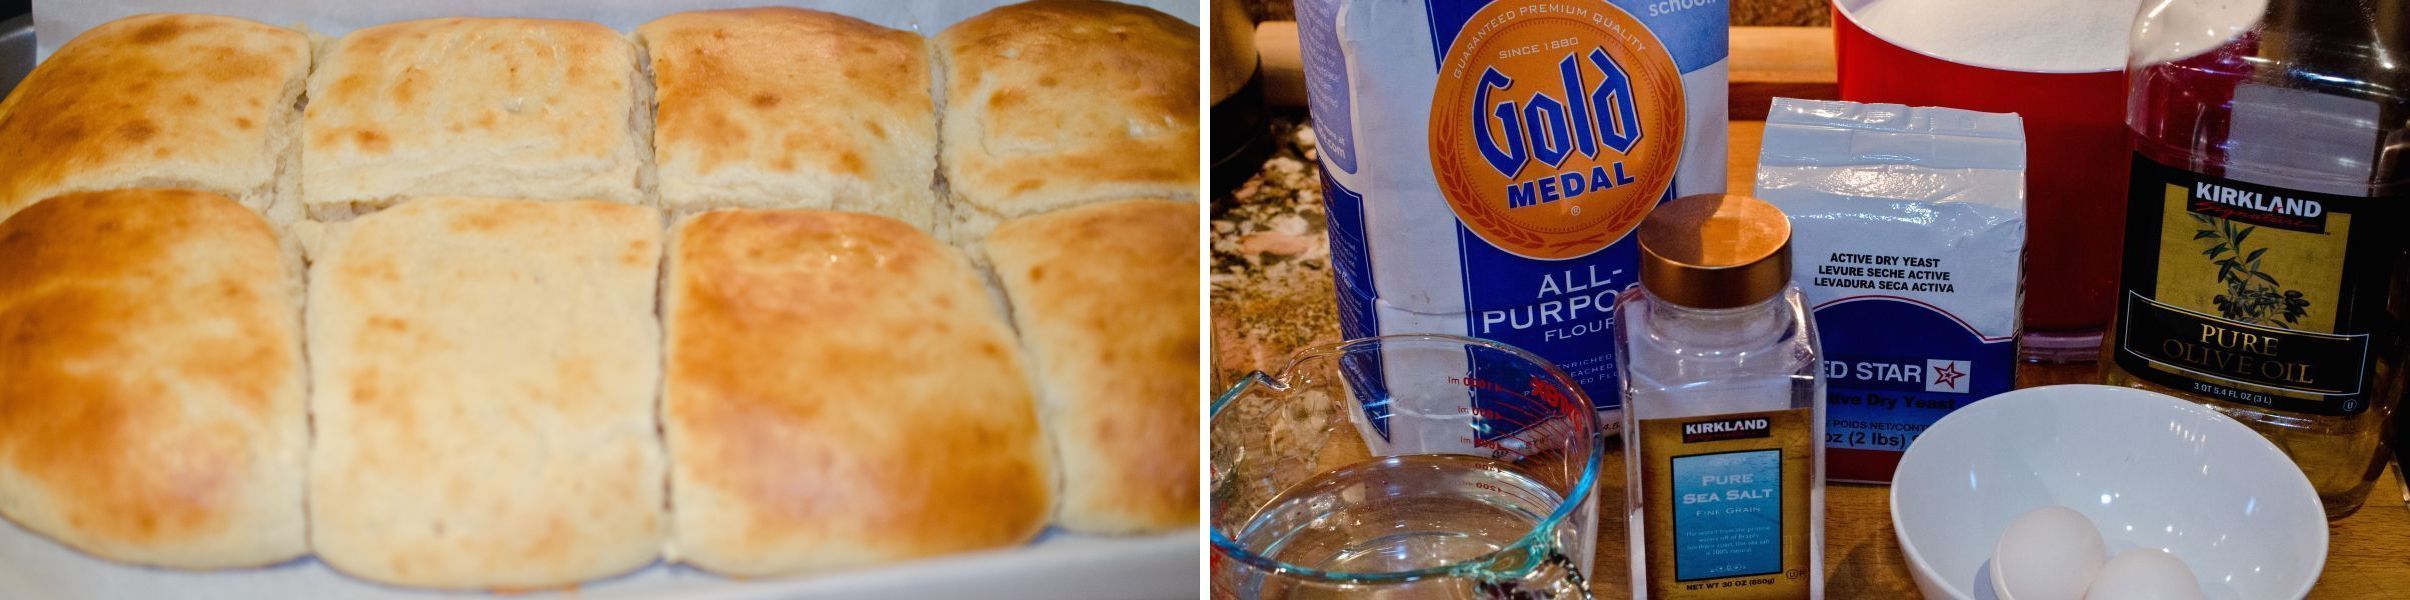
Look at those. Can you smell the yeast yummy goodness?
I needed to make bread for dinner tonight really fast. While searching the internet I found the recipe to use here. I followed the recipe mostly, with only a slight change of oil. The rolls smelled divine and my children were very happy to come to the dinner table tonight. When I get my WonderMill back next week, this will be a recipe I’ll be testing with spelt.
Preheat oven to 400 Fahrenheit
Add water, sugar, yeast, and oil to mixing bowl. Mix until combined. Rest for 15 minutes.
Add flour and salt. Mix until combined.
Place parchment paper in cookie sheet, use a Silpat or spray with cooking spray. Form dough into 12 balls (my advice make them smaller than mine and use flour), I wore gloves and rubbed olive oil on my hands. Allow to rise for 10-15 minutes.
Bake for 10 minutes or until golden brown. I brushed mine with olive oil.
Enjoy!
100% Spelt Bread
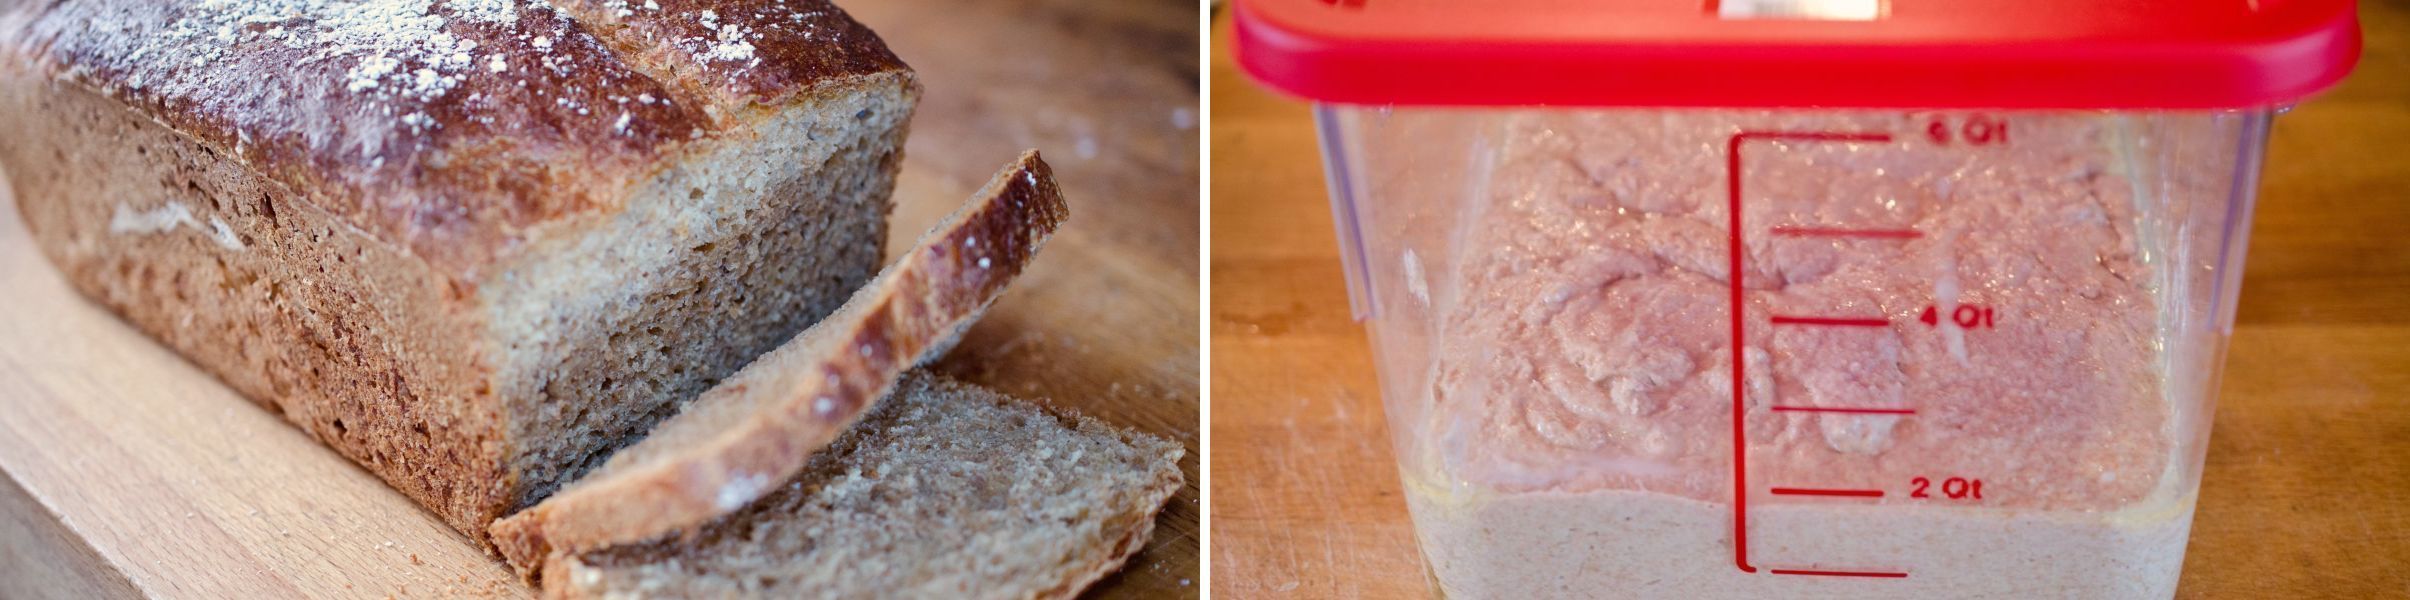
I have a family that LOVES bread, so I had to experiment making bread with Spelt since I decided I was converting to Spelt. I found a bread recipe for 100% Whole Wheat Bread and adapted it for Spelt with the most success of all the recipes I have tried. This recipe makes three 1 1/2 lb loaves in 9 x 4 x 3 inch pans. I also milled my own flour using my WonderMill. I only have one pan so thankfully this dough lasts in the refrigerator for two weeks. You will need warm water, warm milk, instant yeast, Kosher salt, honey, oil, and spelt flour or whole wheat flour will also work.
Look at that beautiful loaf of homemade bread, want some?
Mix water(microwave for 30 seconds), milk(microwave for 30 seconds), honey, instant yeast, Kosher salt, and vegetable oil in the bowl of a stand mixer with dough hook. Allow to rest until yeast foams(5 minutes).
Add flour and mix with dough hook until incorporated.
Yes this is a wet dough.
Spray lidded container(5 quart) with oil. Get hands wet and remove dough and place in container.
Allow dough to rest for two hours. At this point you may use the dough to make bread or refrigerate for up two weeks.
Remove 1 1/2 lbs of dough(you have three loaves worth), knead with some flour and pull the side under and create a loaf and place in a greased pan(I also added flour to the pan). Allow bread to rise for 1 hour 40 minutes.
You can give the dough a little help being warm by placing it on a heating pad set to medium.
Preheat oven to 350 Fahrenheit twenty minutes before rise time ends. Flour top of dough, and slash. Pour 1 cup of hot water into an oven safe pan(broiler pan would work) at bottom of oven, and quickly place the dough in the bread pan in the middle of the oven. Bake the bread for 50 to 60 minutes.
Enjoy!
Almond Butter
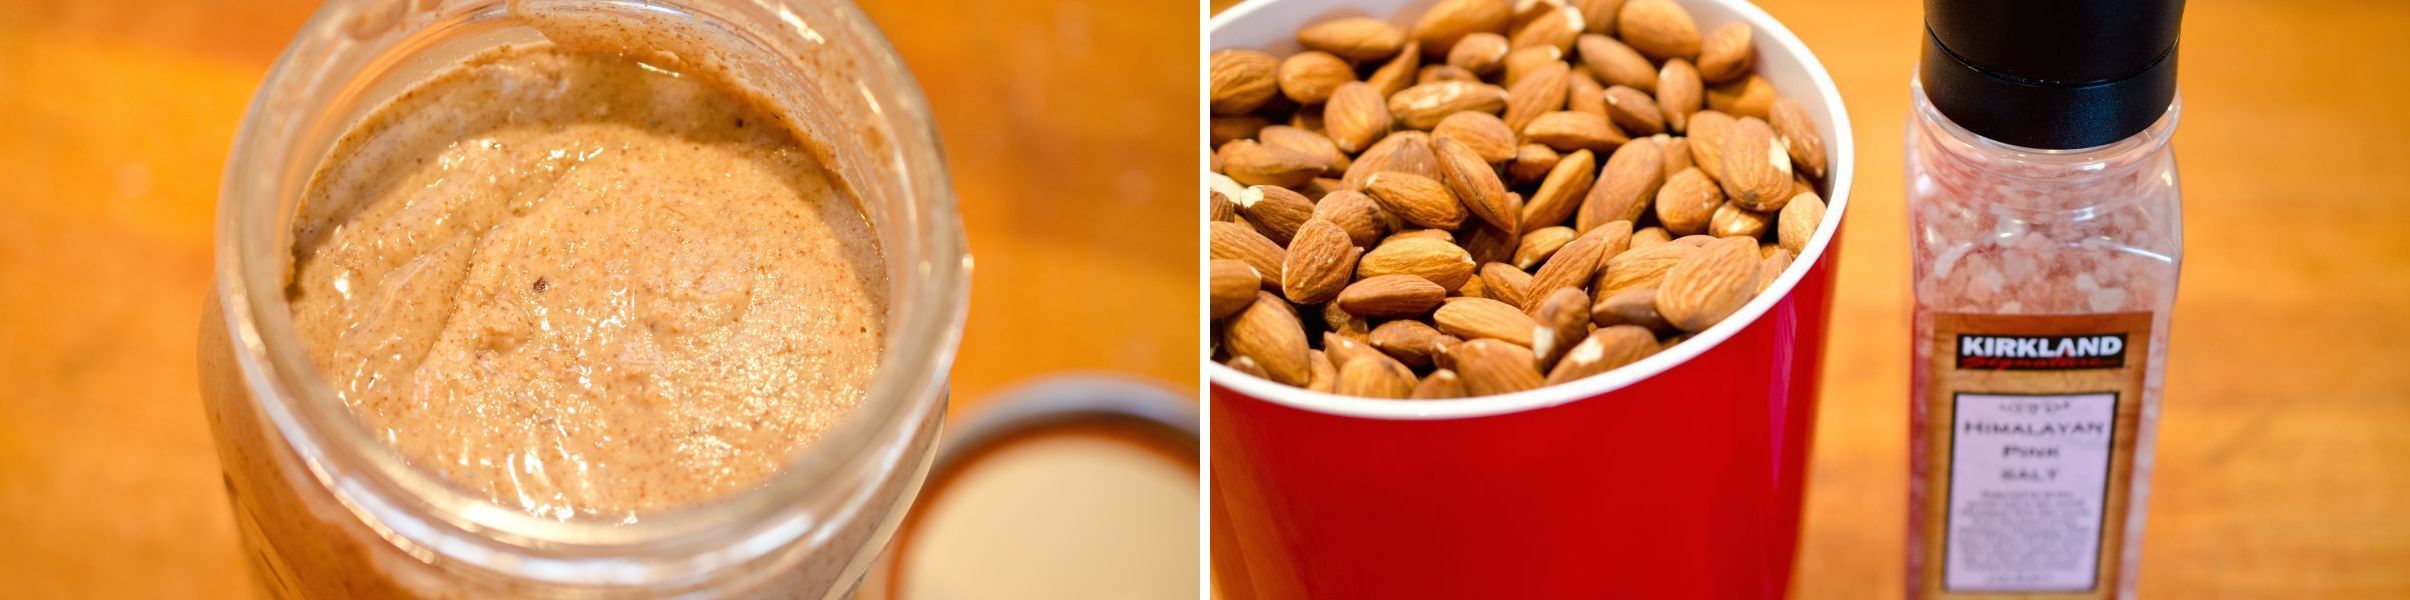
My daughter Haley really likes Almond Butter and honey sandwiches. I bought a Costco sized Almond Butter and recently opened and mixed it. The next day we got a notice in the mail from the manufacturer. They were recalling the almond butter because of possible salmonella poisoning. Oh my goodness, my thoughts immediately turned to my dear daughter and her love of almond butter sandwiches in her school lunch. Since I love any reason to try to make a homemade version of food, this was a blessing in disguise. Amazingly I didn’t have the right kitchen appliance to make almond butter. But, I have a friend who kindly allowed me to borrow hers. Thank you Leah for letting me use your food processor. This is the simplest recipe EVER!
Beautiful, wonderfully fragrant, and completely fresh and homemade!
Preheat Oven to 350 Fahrenheit
Place almonds on cookie sheets, roast for 10-12 minutes.
Allow almonds to cool for around ten minutes.
Place the almonds in a food processor with salt.
Process the almonds. Stop occasionally to scrape the almonds from the sides.
Keep processing until a smooth paste/butter forms.
Scrape almond butter into a clean lidded jar. Refrigerate, and
Enjoy!
Apple Barley Pudding

While searching for an Irish dessert, I came upon this dessert and decided I could do this. I have all the ingredients. This is a simple dessert I found on the website European Cuisines. The author of the post explained this dessert was created by farmers who grew barley and needed to use apples that had been stored over the year and were best used cooked. The recipe and history can be seen here.
I liked layering this pudding. It’s a very simple and yummy dessert.
Peel, core and slice apples.
Add the water to a heavy pot, add the barley, and bring to a boil. Add the sliced apples and
cook gently until both the barley and the apples are soft (normally about half an hour).
When the barley is cooked, and the apples are in pieces, remove from heat and puree with
immersion blender.
Return mixture to stove and stir in lemon extract, and 4 tablespoons cane sugar and cook over
medium flame until it boils.
Boil mixture for 5 minutes.
Remove from heat and allow to cool.
Pour mixture into bowl and place in refrigerator to get cold.
After pudding is cold, blend in a blender if the barley is not completely pureed.
Add heavy whipping cream, 2 tablespoons cane sugar, and vanilla to mixing bowl of a stand mixer.
Attach whisk and whisk until stiff peaks form.
Layer apple barley pudding and cream together in glasses.
Enjoy!
Apple Multigrain Muffins

I feel like the muffin girl this week. I made more muffins today. Since we had apples, that is what I used. My children like muffins, and truthfully three of my four children prefer their apples by themselves. My friends Bridget and Whitney came to help me make more muffins too. Three pairs of hands really does make the process more fun, as long as we aren’t trying to be in each others spaces at the same time.
This muffin isn’t very pretty, but it tasted really yummy.
Preheat oven to 375 Fahrenheit
I doubled the recipe when I made it, hence the double ingredients.
Add sugars (1/2 the turbinado sugar), butter, baking soda, salt and baking powder together in
mixing bowl and beat with whisk attachment until…
Fluffy has been achieved.
Peel, core, and dice the apples.
Add eggs and whisk until combined. Remove bowl from mixer and using a spatula stir in
buttermilk, and finally add flour, cinnamon…
Let the batter get to know the apples and let them join in holy muffindom.
The batter is ready to be baked.
If you are smarter than I was while making these muffins, you will not try to make these without muffin papers, DON’T DO IT. I warn you in advance, these muffins are very soft and delicious
and don’t have an ounce of backbone to them and will fall apart without that muffin paper.
Sprinkle the other half of the turbinado sugar on the muffins.
Bake muffins in oven for 25-30 minutes, check doneness with toothpick.
I overfilled my muffin pans. Don’t make that mistake either.
Enjoy!
Applesauce
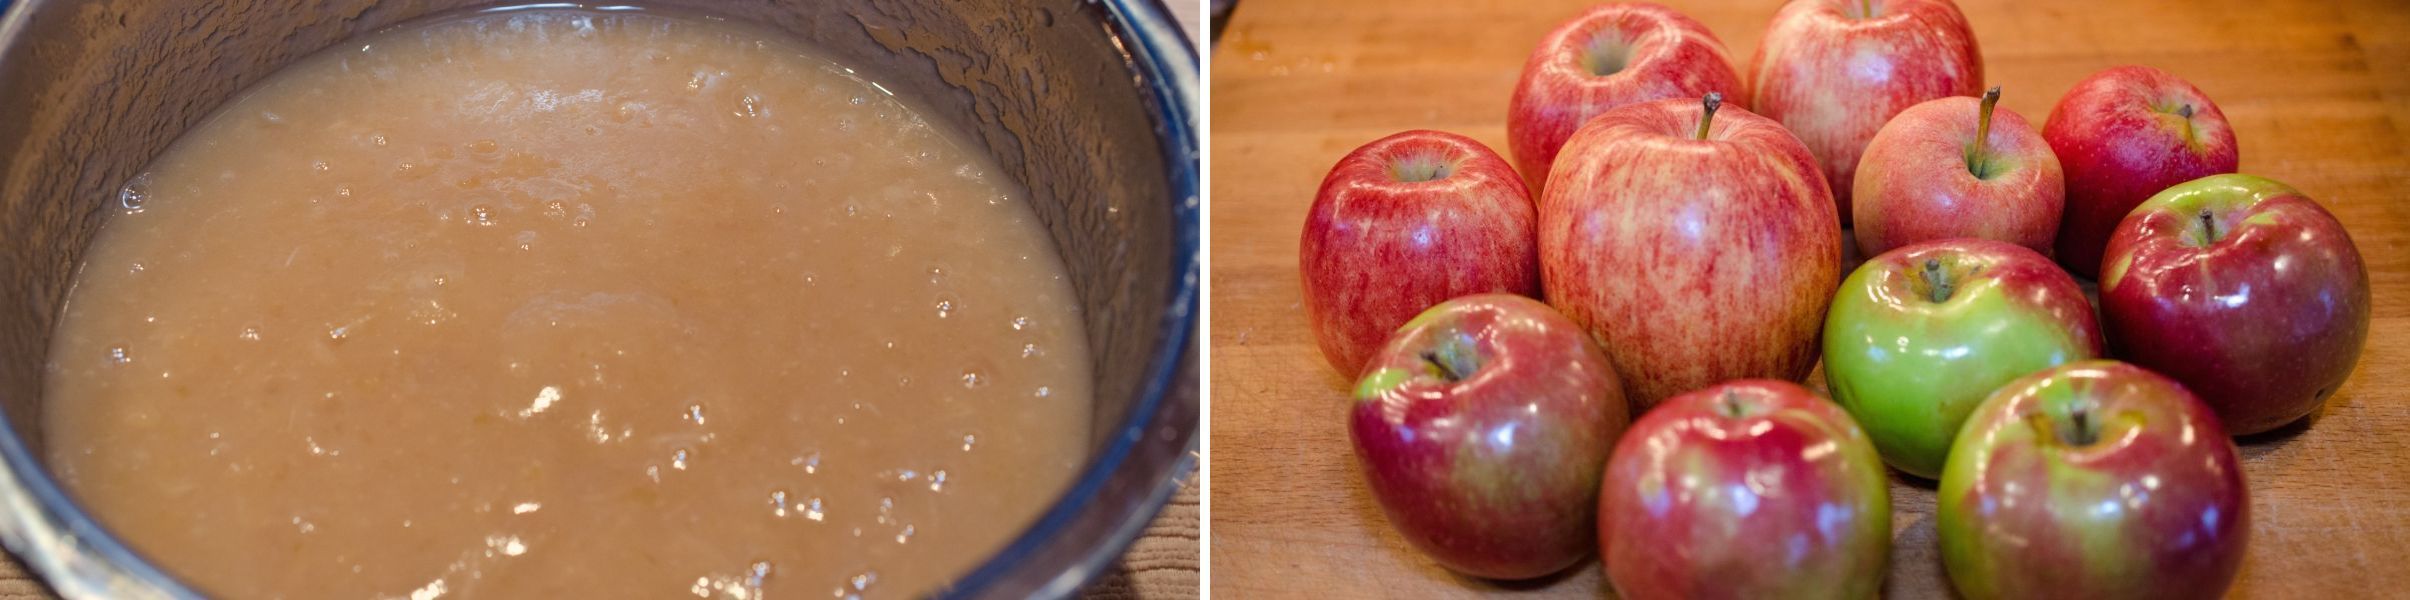
As a child, my family had an apple tree that we harvested from each year. The day would start with everyone, including my parents, picking up apples from the ground and off the tree. These apples were cleaned, cooked, and pushed through a food mill and canned in quart size jars. Our apple tree produced very sour green apples that were only good for making applesauce. Making applesauce was a long tiring, hot, and sticky process but I don’t regret having that time with my family even with the work that was involved. I learned last year that I could make my own applesauce in my pressure cooker and with a lot less work. For dinner we were having pork chops so my husband of course said we must have applesauce. No, I don’t know why those two go together. Would you like to see this iconic duo mentioned in a silly scene in The Brady Bunch? Check out the video here. On to the fun!
Applesauce is one of my comfort foods. It reminds me of home and family.
Put apples into pressure cooker with water and sugar. Cover with lid and set pressure to High for 10 minutes.
Using an immersion blender, food mill, or blender, blend the apples to your desired consistency.
We now have applesauce. Add cinnamon.
Enjoy!
Apricot Pocket Pies
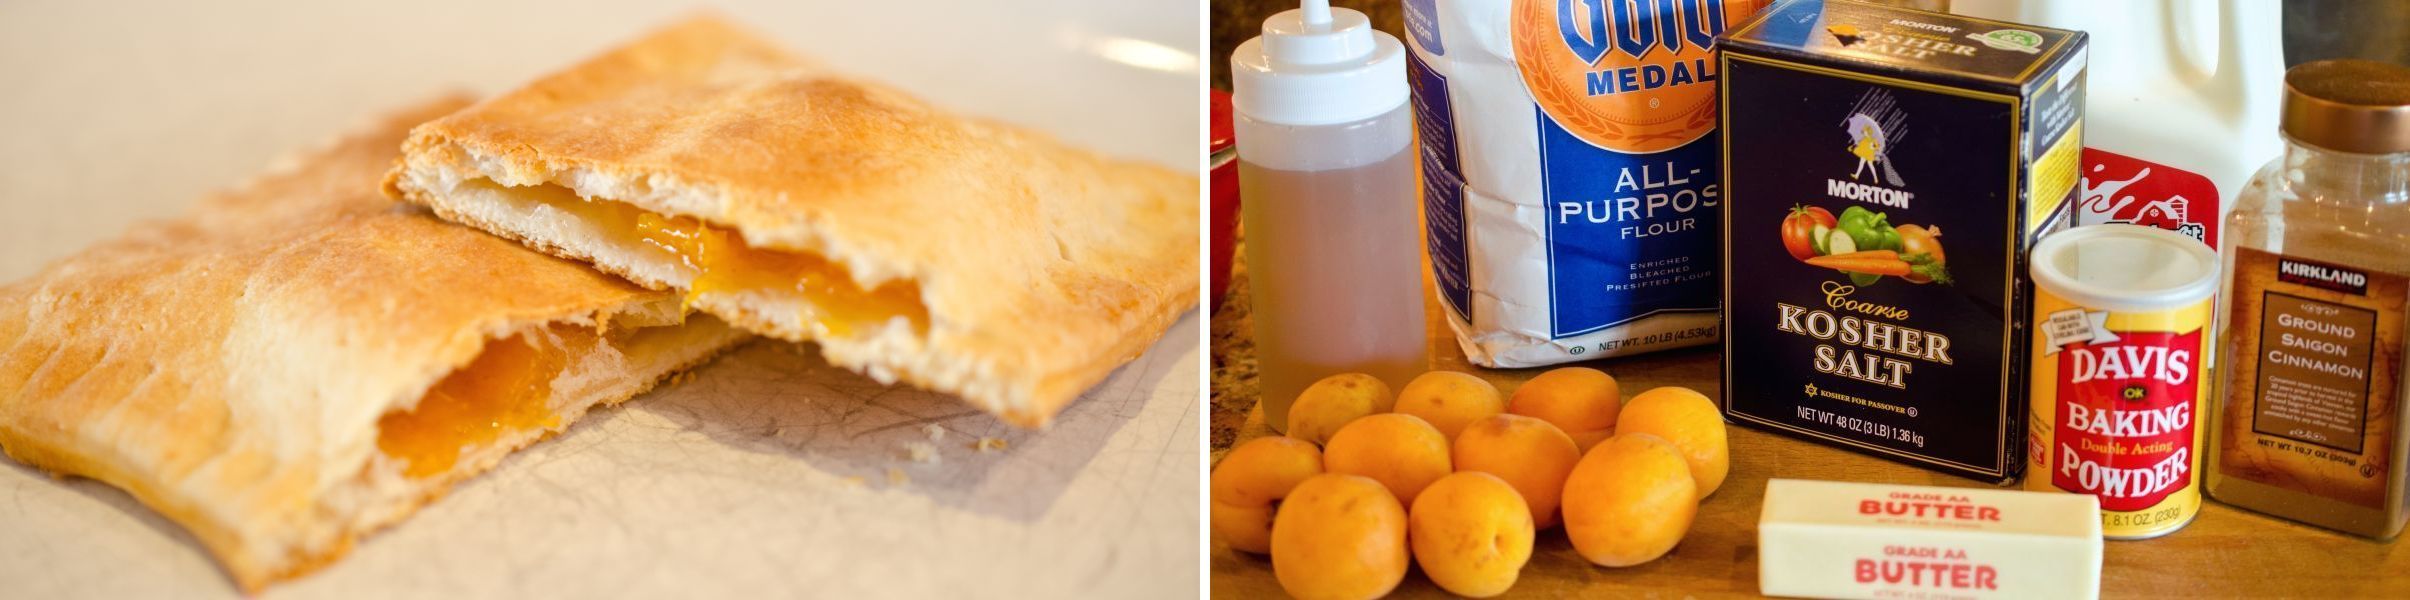
A long time ago, wives would cook small amounts of pre-cooked meats and fruits inside a biscuit like crust called pocket pies. In 1963, Post Cereal company announced a new product to compliment their cereal, Pop Tarts. Pop Tarts being the commercialized version of the the pocket pie. I remember having Pop Tarts when I was a kid and thinking these are so cool, a breakfast food you heat up in a toaster. One of my favorite shows is Good Eats with Alton Brown. He had an episode on Pocket Pies. That was when I learned Pop Tarts aren’t very yummy, but the homemade pocket pies are really delicious. My daughter Haley asked me to make Pop Tarts today, she meant pocket pies. As a child my family was blessed to have an apricot tree. While we had an apricot tree we had sweet ripe delicious apricots that my dad made into jam. Apricots are a fruit best picked when ripe. They don’t ripen off the tree, sadly. Another sad fact, I have come to realize, not accept mind you, is that the produce sold here in Queens is not as good as the produce I bought in California. For that reason, my apricot filling for this recipe needs a lot of sugar. If by chance you have an apricot tree, which I do know a couple of people who do, or you have access to ripe apricots, then this recipe is for you. It can be changed to suit your purpose. Another great aspect of this recipe, is you don’t have to fill these pocket pies with apricots, you can use whatever fruit you want (or use jam instead of making a filling). A special thanks to my Haley girl for photographing me while I put these together.
The flaky, layer goodness and fresh filling really do make these superior to those dry versions
in the foil packets.
Wash, removes pits, and dice apricots into 1/2 inch cubes.
Place a medium non-stick skillet over a medium-high flame. Add all the filling ingredients at once.
Stir and cook.
Reduce heat to low, after mixture comes to a boil. Cook and reduce the sauce until thickened.
Preheat oven to 350 Fahrenheit.
Add flour, salt, and baking powder to a medium size bowl. Mix dry ingredients.
Add cold butter to flour mixture. Using your fingers, lightly mix the flour and butter together to
make butter and flour globules.
Add milk to dough and knead for 20 turns, until a ball forms.
Divide dough into four balls. Roll out each ball on a floured surface. Roll to 1/8 inch thickness.
Cut dough with pizza cutter and rolling pin as a guide to get a straight rectangle.
Cut into four wide strips vertically.
Cut once horizontally to create 8 rectangles.
Spread 2 teaspoons apricot filling on bottom four rectangles.
Dock top four rectangles with fork. Poke holes in dough with fork.
Mix egg and water in a bowl or cup to create egg wash. This will be our glue.
Dip your finger into the egg wash or use a pastry brush to brush/rub egg wash onto outside
border of all the rectangles.
Place docked dough rectangle on filling and press edges. Push from middle out gently,
to remove air pockets.
Bake pocket pies on an un-greased sheet pan for 15-20 minutes. The pocket pies should not
look browned on top. The pocket pies are par-cooked.
The rest of the cooking will take place in a toaster or toaster oven.
Enjoy!
Avocado Salsa

As many of you already know, I am originally from California. I was born and raised in California. Two years ago, on October 20, we moved to Queens New York. One of my favorite restaurant condiments from my California days comes from the restaurant El Pollo Loco. Sadly they don’t have a location here. The condiment in question is their Avocado Salsa. I wanted that avocado salsa to go with my pork and potato flautas. This recipe is my take on the salsa, since I did not have the ingredients for the copycat recipe I found online. This avocado salsa is better than the restaurant sauce, at least I think it is.
Silky, creamy, lime flavored, avocado goodness waiting to be paired with your favorite Mexican food.
Remove avocado from skin and place in blender along with rough chopped onion and the other ingredients.
Blend until smooth.
That’s it, you now have avocado salsa.
Pour salsa into lidded container to store in the refrigerator, if you have any left after the meal.
Enjoy!
Bacalhau com natas
We are celebrating a favorite recipe from Portugal. According to Wikipedia “Bacalhau com natas (literally “cod with cream”) is a popular way of cooking salted cod (bacalhau) in Portugal. It is an oven-baked dish consisting of layers of bacalhau, onion, diced fried potato and cream. Using dairy products such as cream or cheese is not common in traditional Portuguese main courses, however the popularity of this dish—in households and restaurants—make it a classic. The origin of this dish is unclear, but a similar one using cod and cream was invented by chef João Ribeiro in the 1930s.” The reference can be found here. I used fresh cod for my recipe, supposedly this recipe used dried salted cod because it was more widely available than fresh.
Bacalhau com Natas, not sure how to say this, but it was yummy.
Preheat oven to 450 Fahrenheit
Clean potatoes and thinly slice.
Peel onion, cut in half and thinly slice.
Preheat 10 inch skillet, add 3 tablespoons butter and 3 tablespoons olive oil. Sauté onions and
potatoes until tender.
Place potatoes and onions in oven proof dish, 12 inch oval ceramic if you have one or 9x13 glass dish.
Melt remaining 3 tablespoons butter in pan that you just emptied potatoes and onions from.
When butter stops foaming add flour and whisk. Cook flour for 3 minutes.
Add milk, cream, salt, pepper, and whisk until thickened.
Place fillets on potatoes, sprinkle salt and pepper on fillets.
Pour cream over fish and potatoes.
Bake for 15-20 minutes, until golden and bubbly.
Enjoy!
Bacon Brussels Sprouts
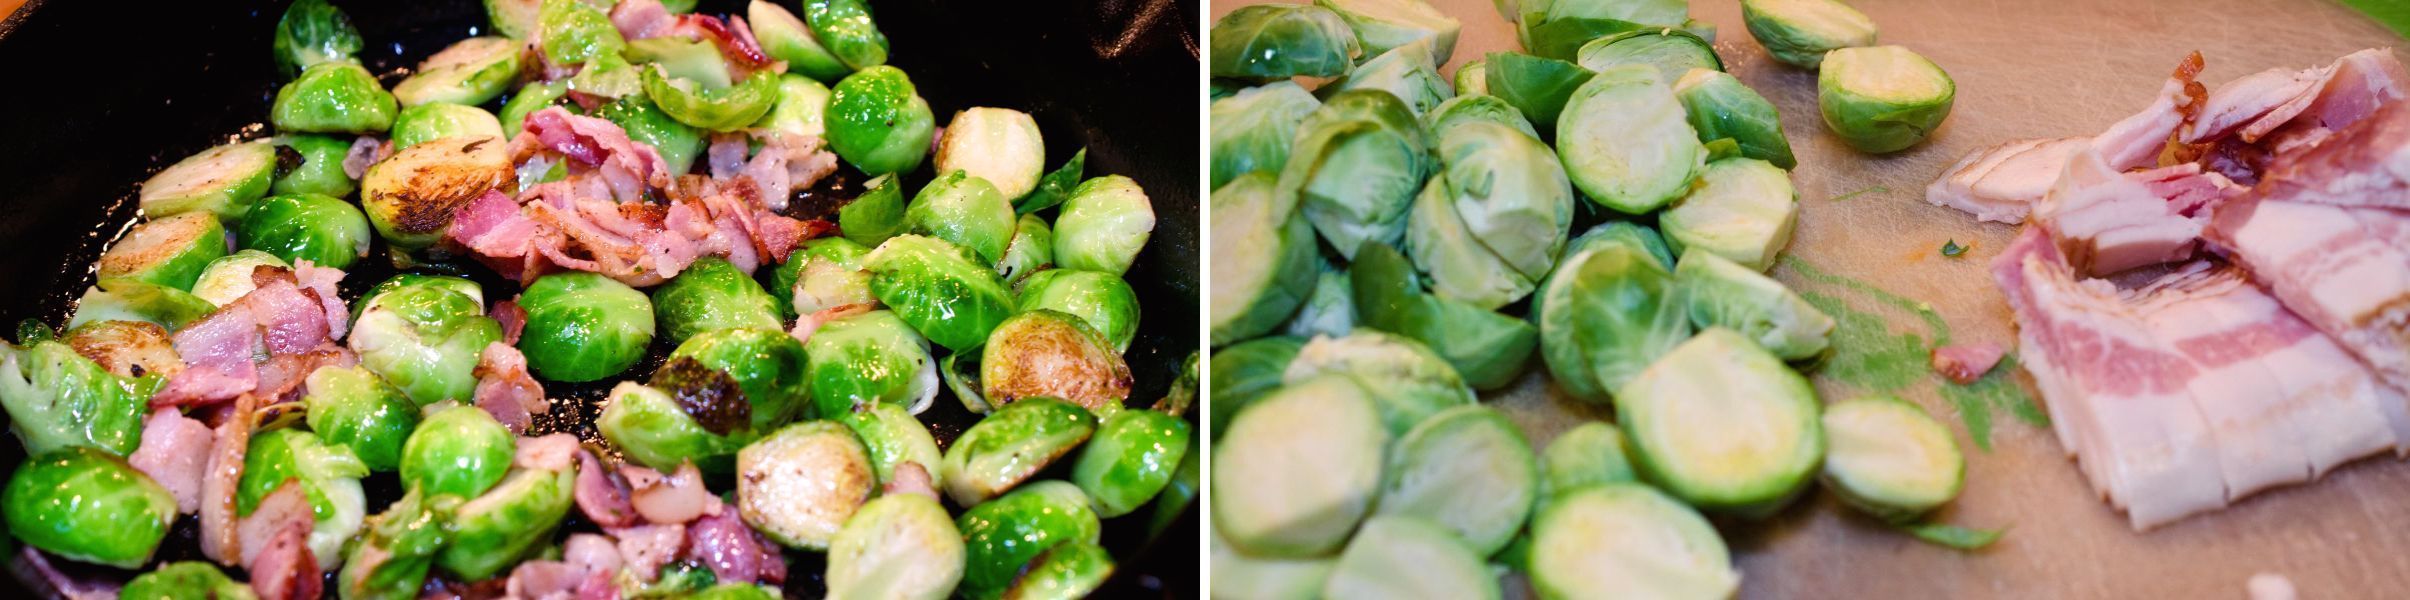
My sister-in-law Kandi, has a signature dish that my youngest daughter looked forward to every Christmas dinner. Since we don’t live near my sister-in-law, we have to improvise. This is my own version. I believe she has a different recipe.
Bacon and Brussels Sprouts, why yes bacon totally makes this better.
Cut dried ends off Brussels Sprouts. Remove outer layer of the Sprouts, and cut in half length wise.
Cut bacon into 1/2 inch pieces.
Preheat 12 inch cast iron skillet over medium-high heat.
Sauté bacon and Brussels Sprouts together.
Cook with lid on until tender.
All done.
Serve with chicken nuggets (Recipe found Here)
Enjoy!
Baked Beans
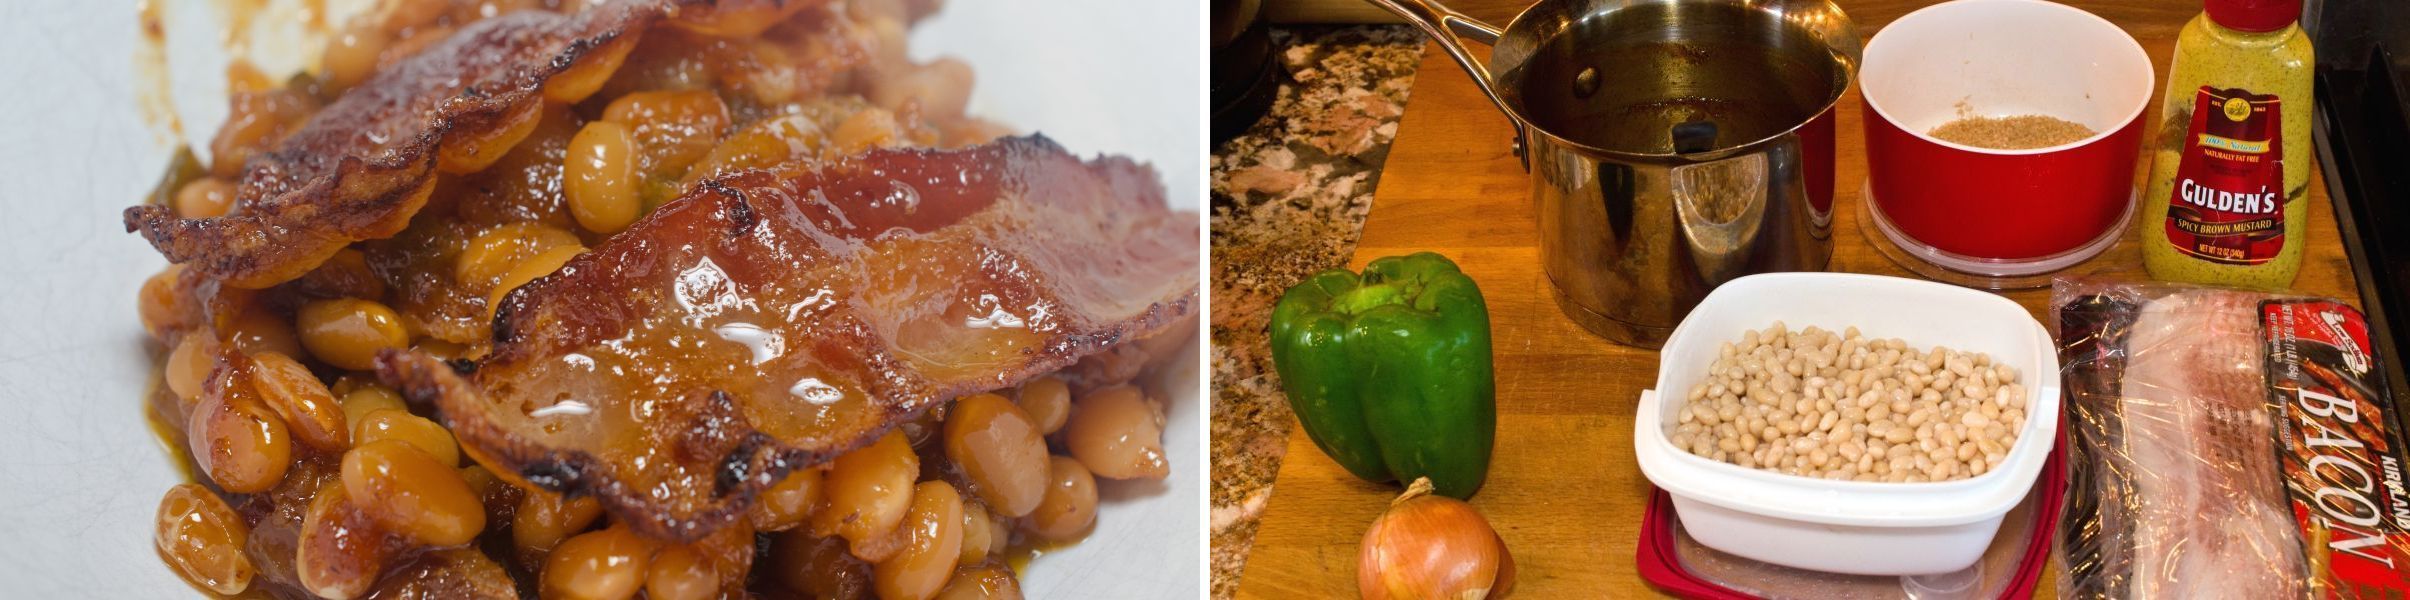
Every once in awhile my refrigerator surprises me with just the right leftover to make something I enjoy eating, and it didn’t even take much effort. Today was one of those days, a spontaneous recipe came to my mind. Remember when I made white bean and vegetable soup? I used only half of the brined beans and put the other half in my refrigerator. My mind immediately thought of those beans today and decided it was time to make baked beans. Granted, neither my mind nor my body knows how to make baked beans from scratch. When I looked up a recipe, I was surprised to find that almost all of the recipes started with a can of pork and beans. This won’t do. I have uncooked beans and a van frozen on the street. The buses are not working in my favor (late and sporadic). Only one answer, make it up, find the ingredients that produce the wonderful flavor of baked beans and make it or fake it. I should mention, none of my family like beans. So, when I make beans, it is really just for me and so this recipe doesn’t feed a family (you’ll need to double it if you are feeding more than two people).
What do you think for my very first totally from scratch baked beans?
Dice onion and bell pepper.
Saute vegetables in your choice of 2 tablespoons of oil. I used Olive Oil.
Cut six slices of bacon into 1 inch pieces.
Saute bacon slightly, to render some of the fat (reduce the fat).
Just a little golden brown, and a little less fatty.
Add all the ingredients (only add 1/2 cup of the barbecue sauce) and enough water to cover beans by two inches, to a pressure cooker pot, or a stock pot. Cover with lid, set pressure cooker to high for 30 minutes. Cook on stove-top on medium until boiling, reduce heat and simmer for 1-2 hours until beans are tender.
Preheat oven to 325 Fahrenheit
Using a slotted spoon or fine mesh spoon ladle everything into an oven safe dish. I used a 9 inch
square non-stick metal pan.
Add 2 tablespoons molasses and 1/2 cup of barbecue sauce.
Cook the remaining 6 pieces of bacon slightly, until some fat is rendered and golden brown.
The beans with the extra goodness added.
Place bacon on beans. Bake in oven for 1 1/2 hours.
Do you see the difference? Oh my goodness does this smell spectacular?
I dished some up for me and my friend Whitney and she said they were even better then her
mom’s. The good news is, you can make baked beans from dry beans to finish and they taste
amazing. Whitney’s husband love’s baked beans so I sent the other half home with her. Again
this doesn’t make very much, so remember if you are cooking for a family, double it.
Enjoy!
Baked Chicken Nuggets
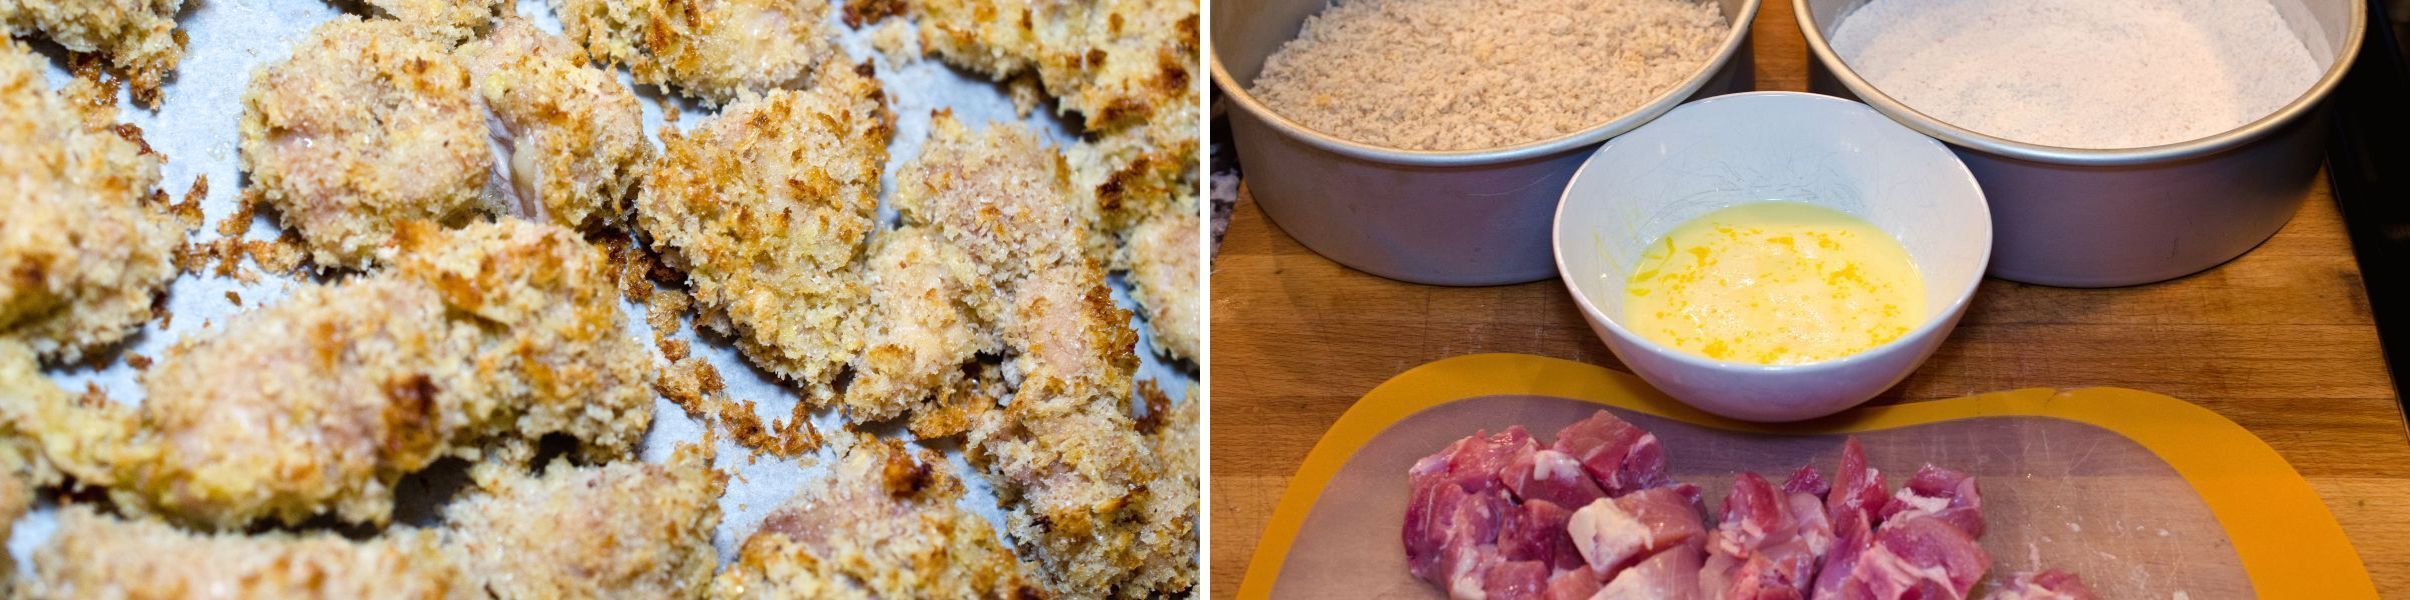
I explained in my Panko Bread Crumb post, that my son was wanting chicken nuggets with bread crumbs. When I make chicken nuggets with Panko bread crumbs, I bake them instead of frying them. This recipe actually evolved to a whole new level since I totally made a mistake. Good news though, my mistake turned out to be a huge success with my picky son and my Chinese teenager who said he doesn’t like chicken. Want to know my mistake? I bought chicken thighs instead of chicken tenders. The benefits of the chicken thighs as my family found out are they are more moist and they almost melt in your mouth versus the sometimes dry and dense chicken tenders.
Baked Chicken Nuggets, so much better than those nuggets sold at the store.
Preheat Oven to 425 Fahrenheit
Beat eggs in a large dish.
Place chicken and flour in a gallon size Ziploc bag and shake to coat.
Pour bread crumbs into large dish.
Dip floured chicken into egg mixture.
Move chicken from egg mixture to Panko Bread Crumbs and coat.
Place chicken on parchment paper lined cookie sheet.
Bake chicken for 15-20 minutes.
Remove from oven and serve with your favorite dipping sauce.
Enjoy!
Baked Chicken Wings
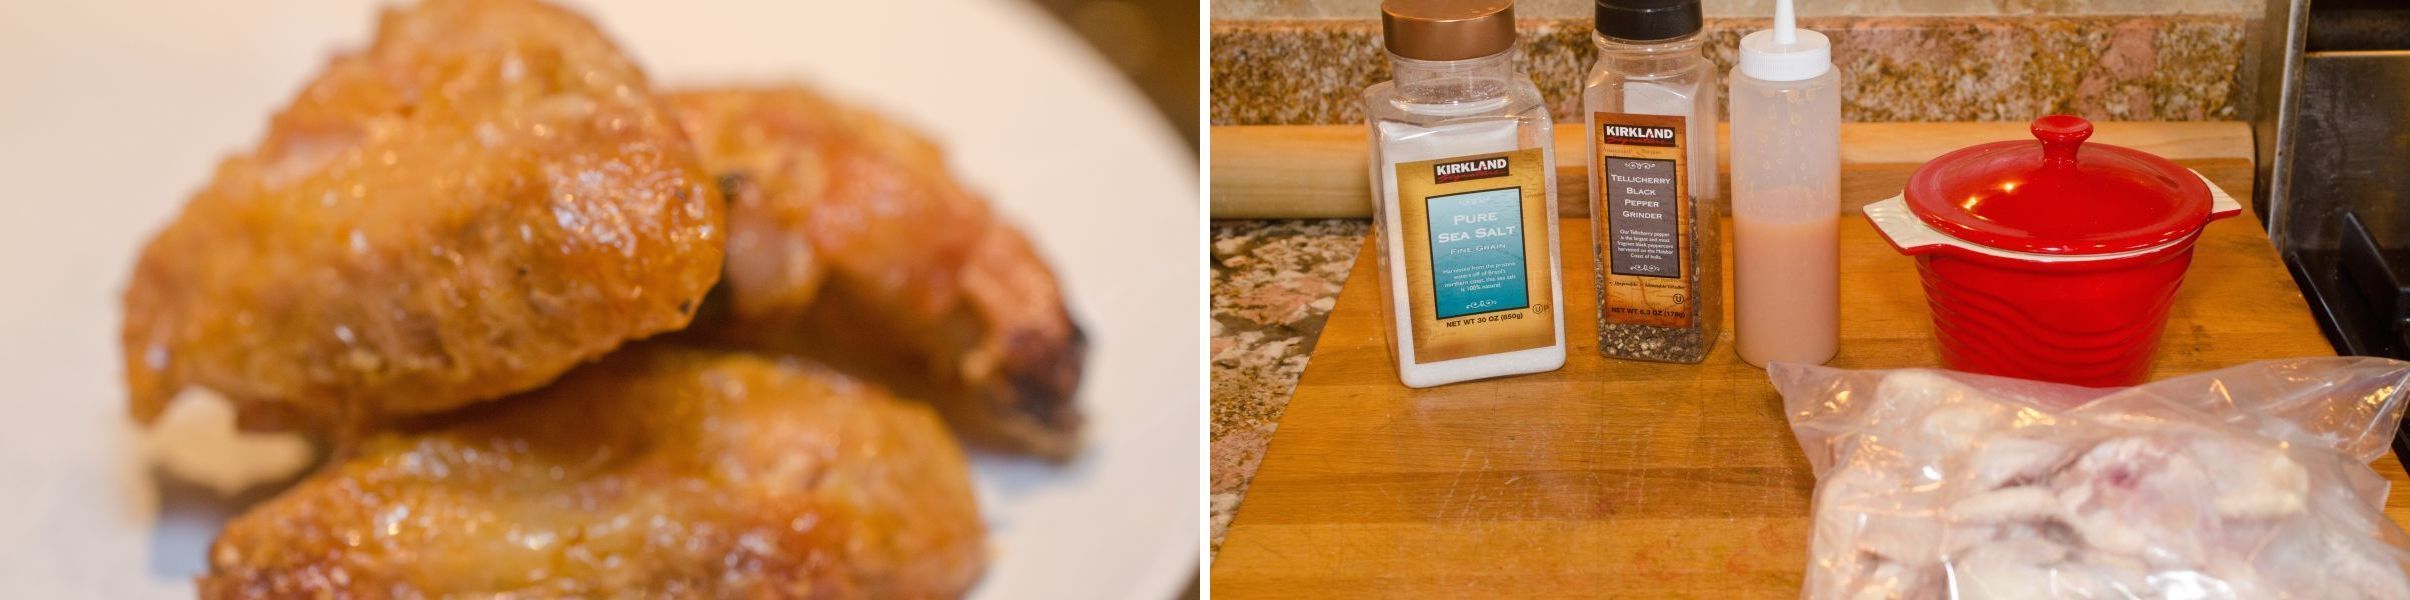
Chicken wings are David’s favorite part of the chicken. He had requested chicken wings as part of our February menu and I finally got around to making them. Chicken wings are a yummy iconic Super Bowl snack, I think, I’m not sure. We don’t watch any sports at all, I married a nerd. Most of the chicken wings are fried and then tossed with a spicy sauce and served with a bleu cheese dip. My wings are baked, not fried, and I used my homemade hot sauce to flavor them.
Don’t these look delicious?
Preheat Oven to 400 Fahrenheit
Remove chicken wing tips.
Pat the chicken dry.
Place the chicken wings on aluminum foil lined sheet pan.
Cook butter, hot sauce, salt, and freshly ground pepper over medium flame until mixed and melted.
Bake chicken wings for 45-50 minutes.
Toss chicken wings and sauce in large bowl.
Enjoy!
Baked Salmon
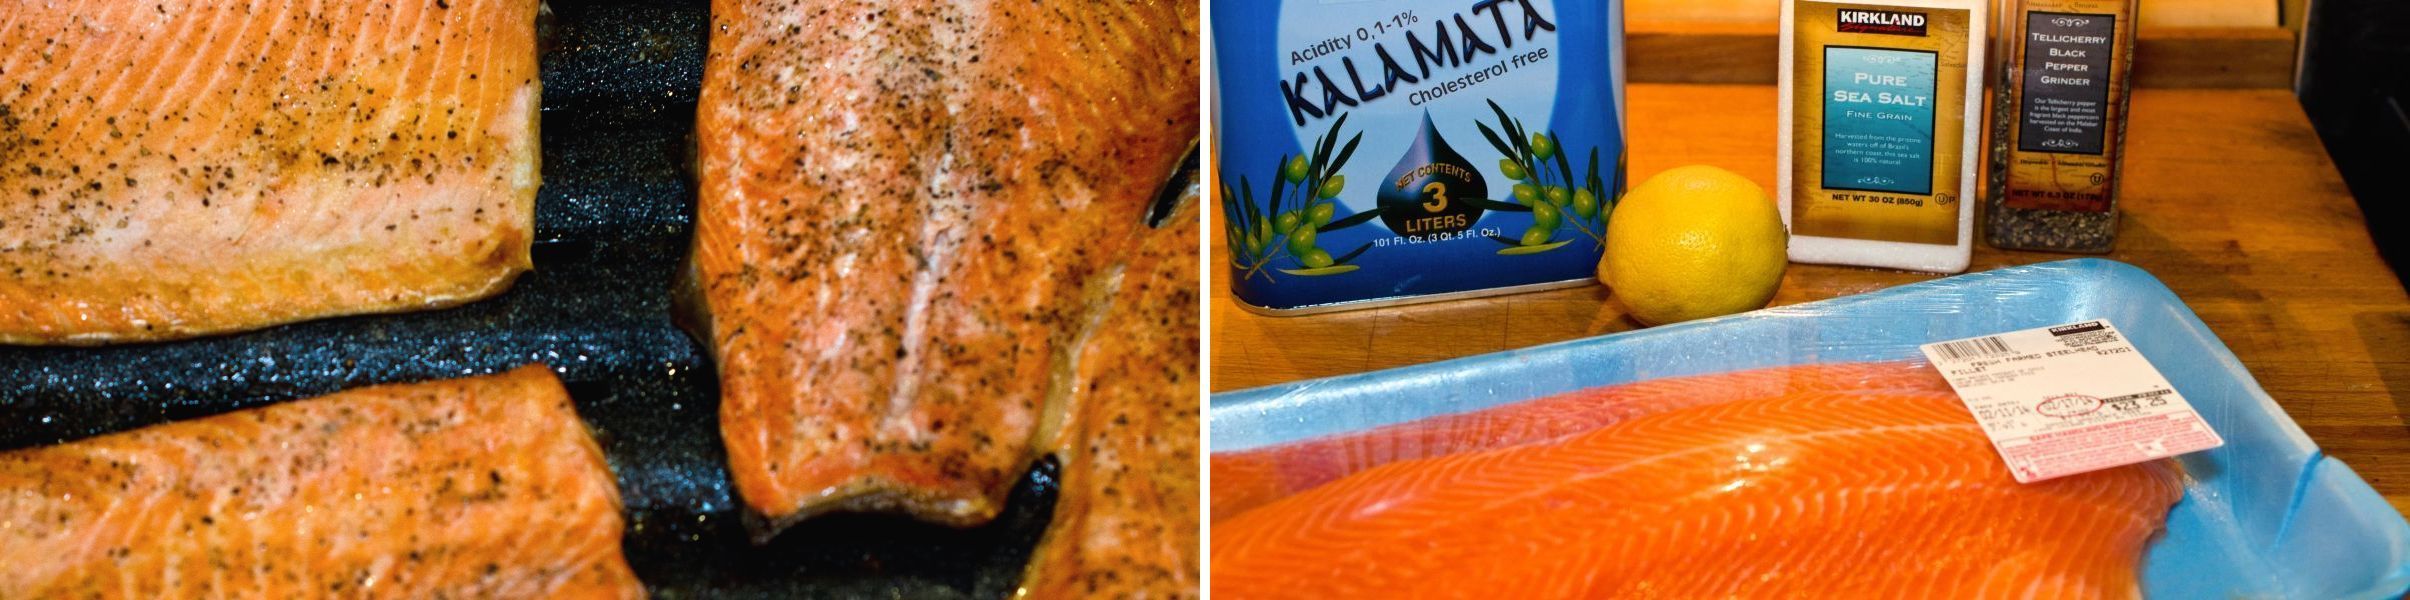
As part of our new dinner schedule, we have been enjoying a different red meat/seafood/white meat each day of the week. Today’s dinner menu called for salmon. With the help of my good friend Angela, I was able to stock up at Costco for our winter storm coming tomorrow and buy salmon for tonight’s dinner. I have been truly blessed with really supportive friends who have helped me by chauffeuring me around for grocery shopping and other errands. In no way was I going to be able to buy as much as I did and be able to come home on the bus. It was a challenge to fit my normal stocking up pile in her small SUV, versus my usual large minivan storage. Tonight’s baked salmon is simple. You are going to love the taste and how easy it was to make.
Look at that wonderful meal, and yes it was delicious. Stay tuned for the next post about the sweet potato fries.
Preheat oven to 450 Fahrenheit
Oil the skin side of the salmon and place on broiler pan or cookie sheet. Sprinkle lots of salt and some pepper on the meat side. Squeeze the lemon juice on all the fillets. Place salmon in oven and bake for 15-20 minutes.
Isn’t it pretty? This was the first meal our Chinese teenager did not salt his food! It was a food miracle. He also told us that he likes eating the skin too.
Enjoy!
Baked Shredded Pork Flautas
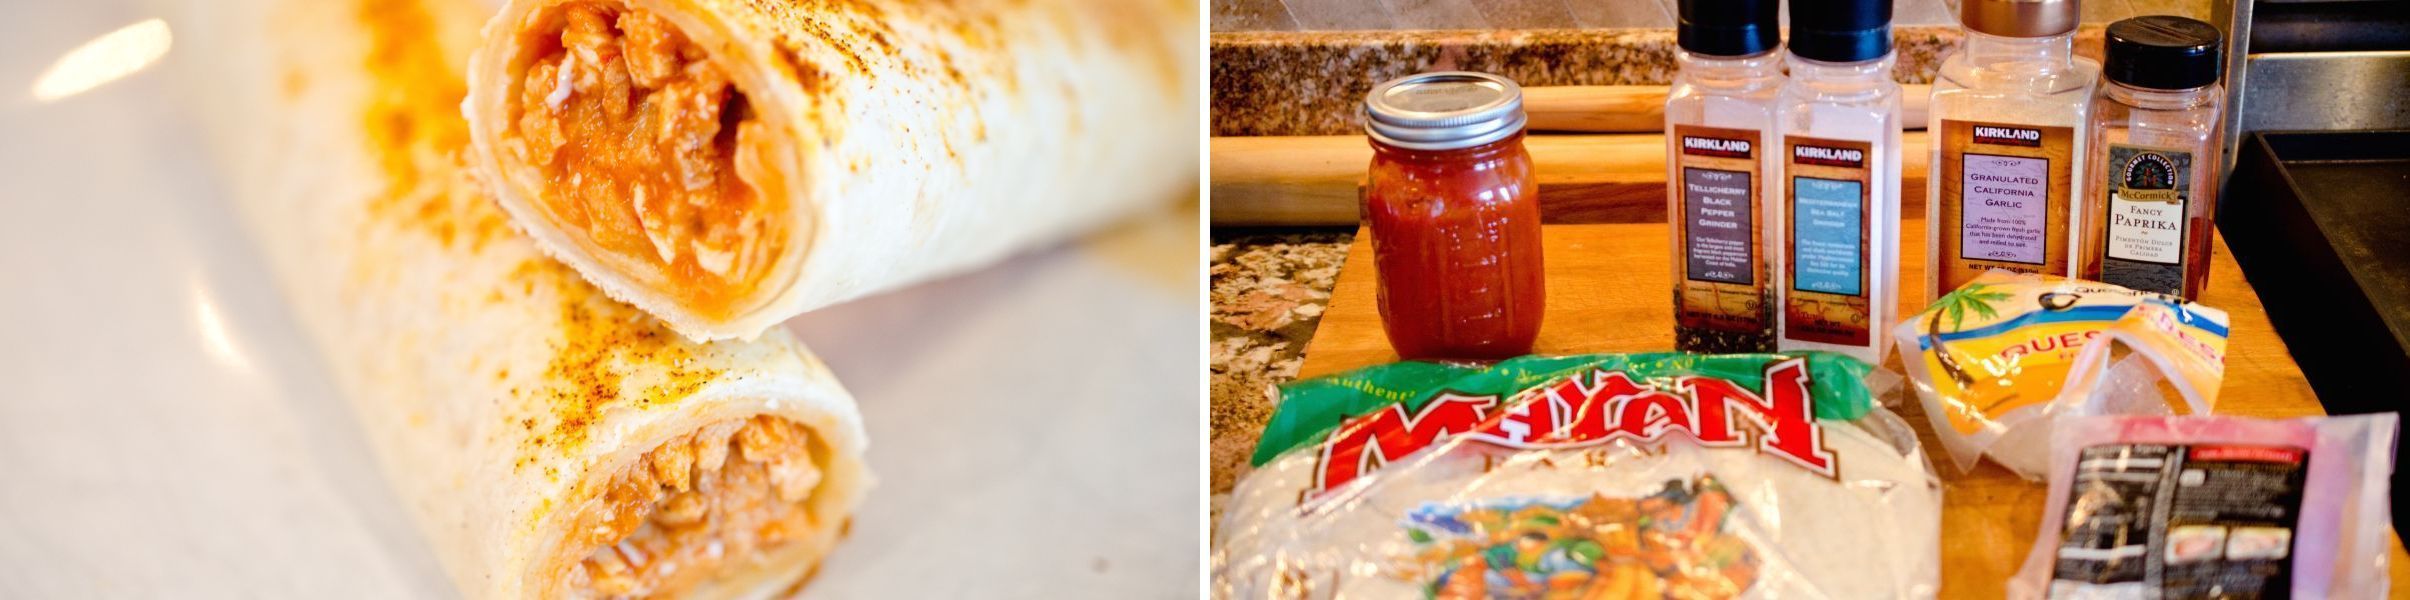
I love Mexican food, and growing up in California, is probably the main reason for that. I try to make Mexican food as often as my family allows. We can’t have Mexican food too often since my son’s will only eat one Mexican dish, quesadillas. My sister Jenifer lived with us for a short time, when we lived in our first house in California, and she introduced flautas to me. She made them with mashed potatoes. I have filled them with mashed potatoes and with shredded chicken. The potato flautas I made were fried, but I have learned they are just as yummy baked. This recipe uses shredded pork, and they are baked. What is the difference between a flauta and a taquito? Flautas are made with flour tortillas and taquitos are made with corn tortillas.
This is how to feed a craving for Mexican food, so yummy.
Combine garlic, salt, pepper, and paprika in a small bowl. Mix.
Butterfly the roast and rub all over with spice blend.
I used a rotisserie to cook mine. Place in the kabob basket.
Cook pork in rotisserie for 35 minutes.
Preheat the oven to 500 Fahrenheit
Shred the pork with your hands or two forks.
Pour enchilada sauce over shredded pork in medium sauce pan on medium heat. Stir, cover with lid and cook for five minutes after it boils.
Using tongs, place 1/4 cup shredded pork on the tortilla along one of the sides and add 1-2 tablespoons cheese.
Brush vegetable oil on a cookie sheet. Roll the flautas in the oil on the pan so all sides are coated with oil.
Sprinkle smoked paprika and garlic on the flautas.
Bake the flautas for 10-15 minutes, until brown on the edges.
Dip in the remaining enchilada sauce, enjoy with some homemade guacamole like the recipe I posted here or maybe some sour cream.
Enjoy!
Baked Sweet Potato Fries
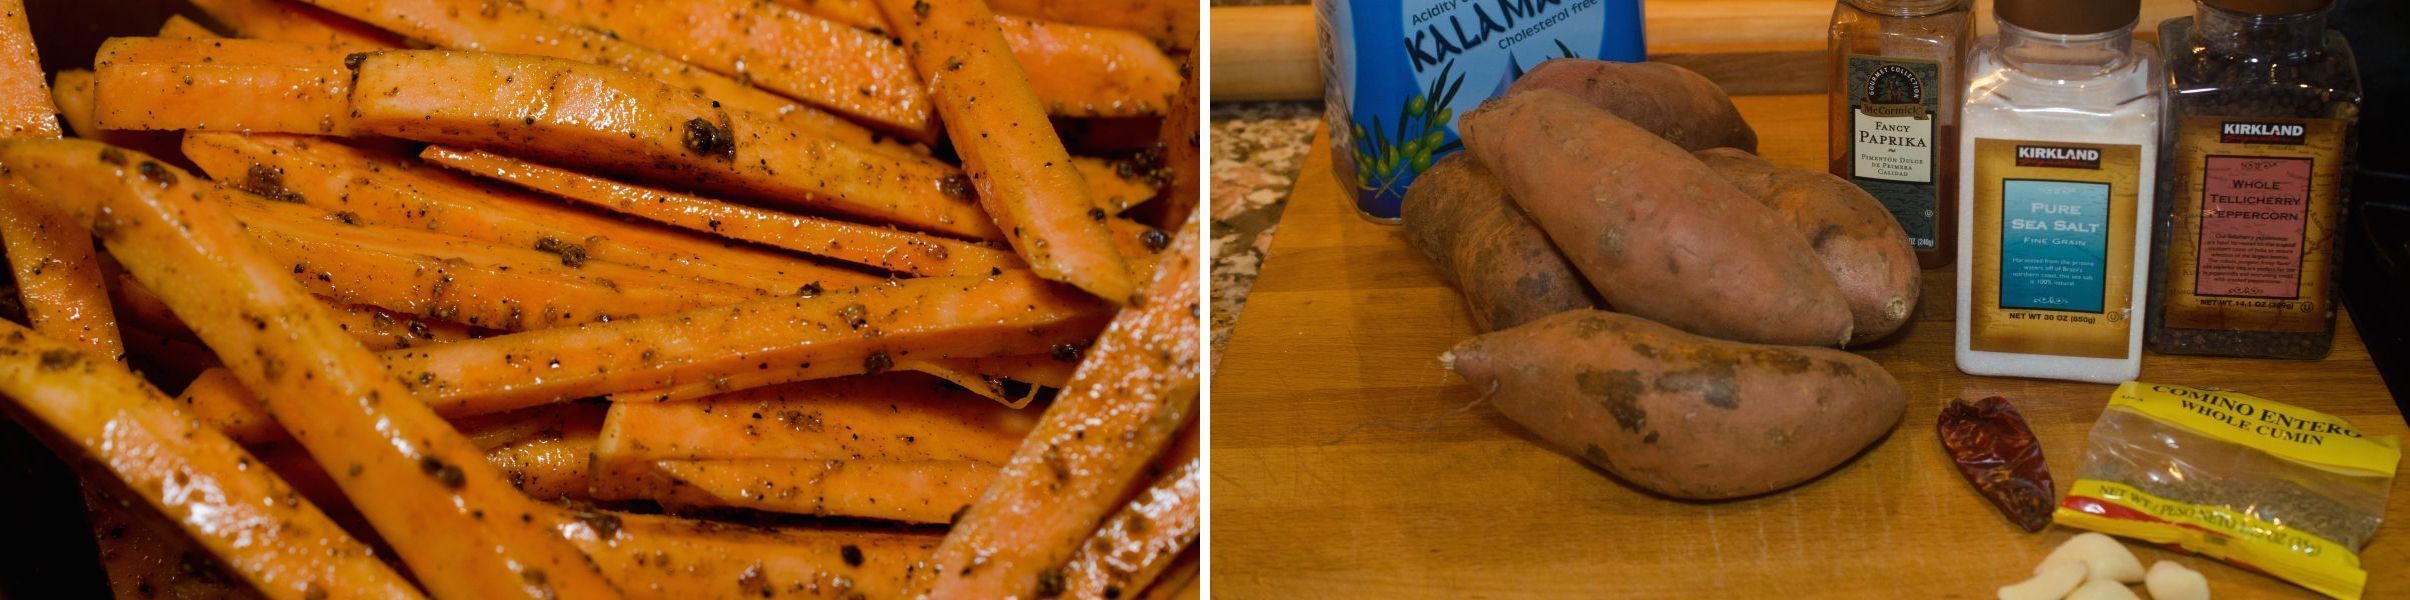
A few years ago, my husband took me to a burger restaurant in California called Ruby’s. It’s a restaurant that my sister-in-law Rachelle LOVES. I ordered a burger, and on the side they offer all you can eat fries. I picked sweet potato fries, and oh my goodness I was hooked from then on. A good friend of mine, that I grew up with, Mese has a sandwich shop in California in my family’s home town. He has my favorite sandwich, The Black Friday, and it is served with sweet potato fries too, SO YUMMY! These are not fried like those at the two restaurants. I added a lot of spices and flavor and baked mine, so they aren’t like the simple down home fried variety. You can leave out the chili if you want.
Sweet and spicy, a wonderful combination.
Preheat oven to 450 Fahrenheit
Peel sweet potatoes, and cut into french fry sticks, 1/2 inch.
Soak sweet potatoes in ice water for 30 minutes.
Toast cumin and peppercorns in dry pan over medium burner.
Soak chili in hot water for 10 minutes.
Grind pepper, salt, paprika, and cumin in spice/coffee grinder.
Press garlic through garlic press into pan with ground spice mixture, sliced chili pepper and olive oil.
Cook spice paste over medium flame for 1 minute, or until it bubbles and boils.
Dry the sweet potatoes on paper towels.
Toss potatoes and spice mixture in a large bowl.
Look at the spices and glossy potatoes, so pretty.
Bakes potatoes on parchment paper lined cookie sheets for 20-25 minutes.
Remove fries from oven.
Enjoy!
Banana Walnut Multigrain Muffins
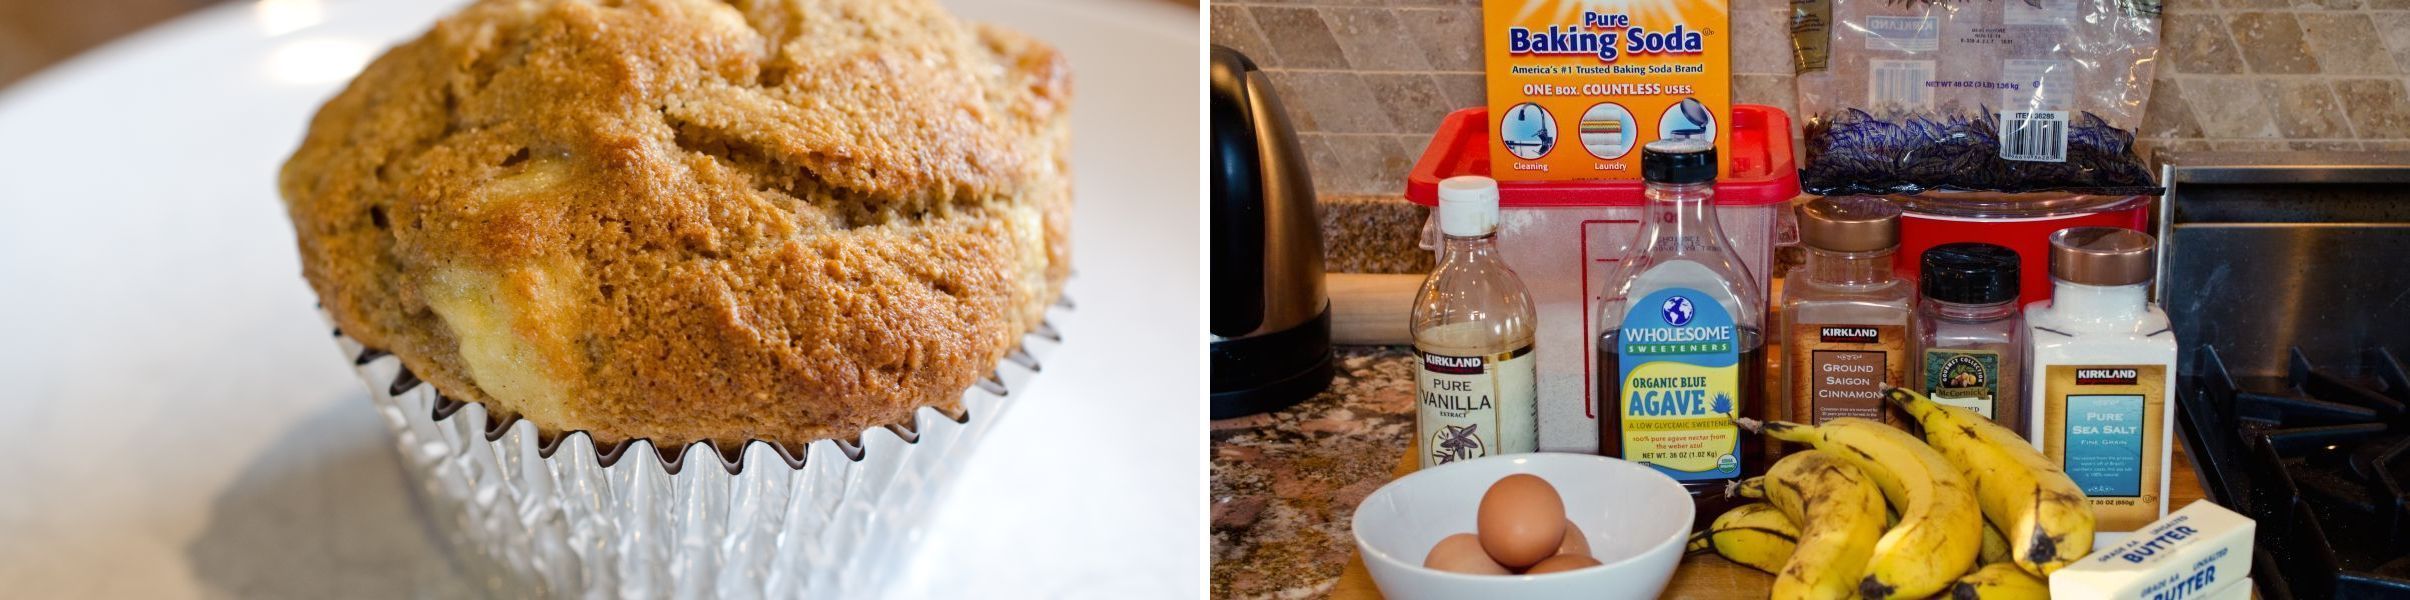
This week when I bought all that wonderful $1 produce. I bought a bag of bananas too. Those banana’s were just begging me to make them into muffins. I know what you’re thinking. My goodness, this woman is obsessed with muffins. What is her problem? Good news, this will be my last muffin recipe for a while. The muffin girl is retiring her quest to make all sorts of muffins. I’ll make them, just not new recipes to share with you. I have found my four go to muffin recipes as of today! Go forth today knowing I have given you a sure foundation of muffins to create your own muffindom, and you didn’t have to go to Drury Lane!
THIS is the culmination of muffindom!
Preheat oven to 350 Fahrenheit
Cream butter, sugar, cinnamon, nutmeg, and baking soda in a mixer with a whisk.
Add bananas, and agave, beat till smooth.
Add eggs and beat till smooth.
Add walnuts, and flour and stir with a silicone spatula or wooden spoon.
This batter is ready for baking.
Make sure you use muffin liners! This recipe makes 12 muffins, I doubled it for my family.
Place filled muffin pans in oven and bake for 23-28 minutes, check if they are done with a toothpick.
They are done!
This is a wonderful end to my muffin week.
Enjoy!
Barbecue Sauce

We ran out of barbecue sauce last month, and I haven’t needed it truthfully. Today I did see a need for barbecue sauce and felt inspired to make it myself for the first time. I love barbecue sauce. It adds so much flavor to meat, poultry, and food in general and reminds me of my California roots.
Homemade barbecue sauce, what could be better?
Pour all ingredients in a blender.
Blend all ingredients together until smooth.
Pour sauce into sauce pan over medium-high heat and bring to boil.
After boiling, simmer for five minutes. I love the color, the smell is incredible too.
Bottle it up. I had enough for a pint and some left over for my baked beans (stay tuned for this recipe).
Enjoy!
Basil Pesto
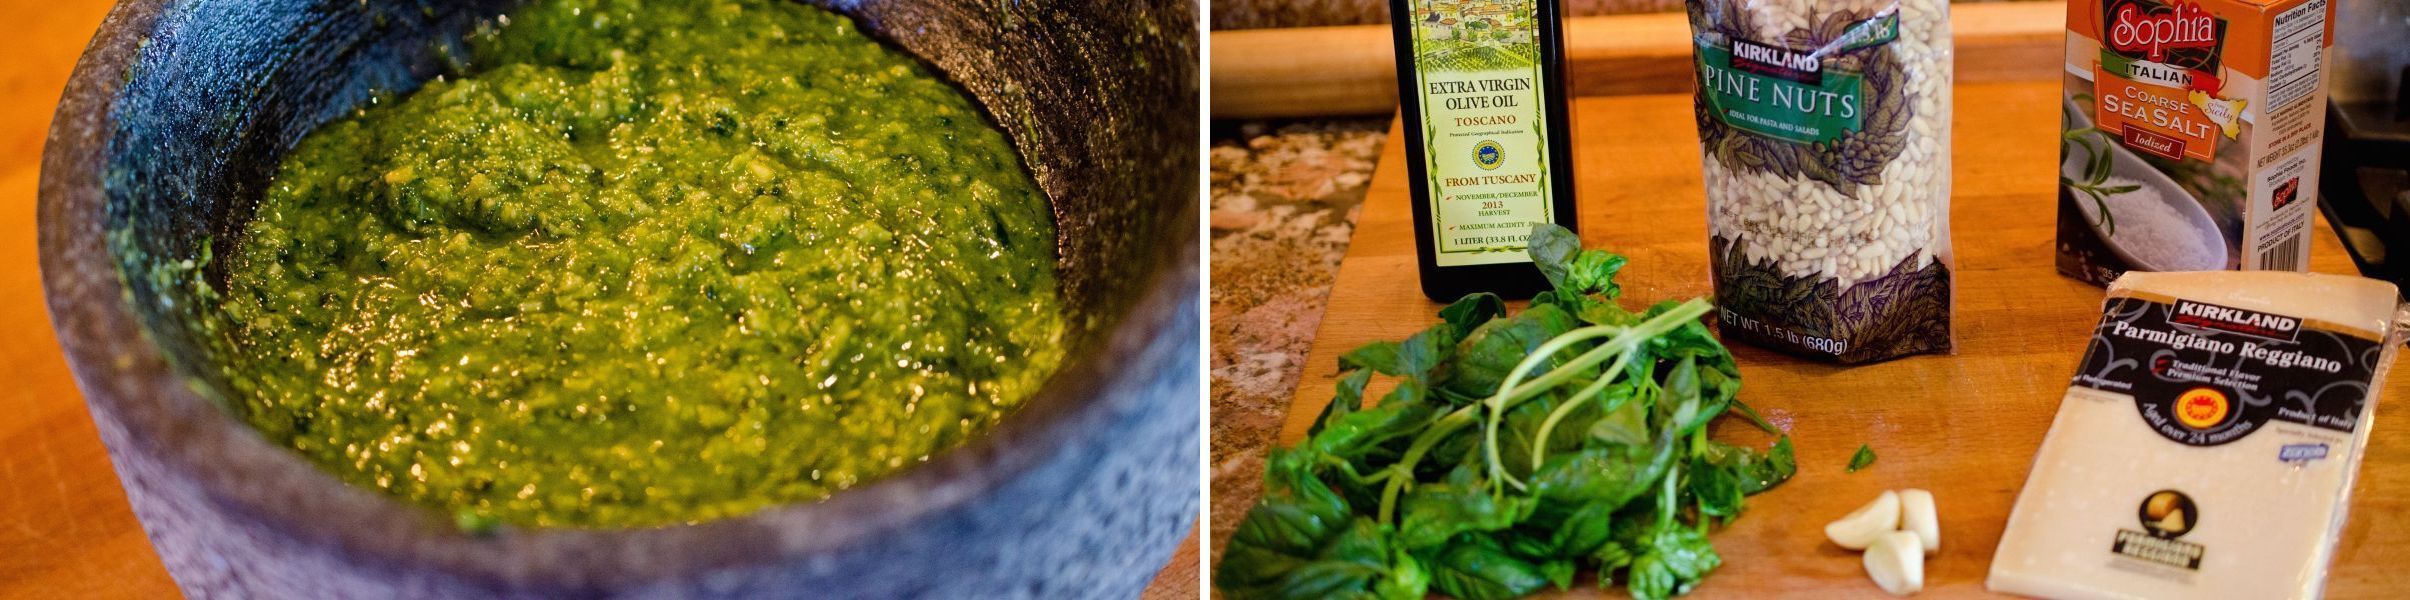
I bought a mortar and pestle for my birthday yesterday. It is an 8 1/2 inch stone mortar from Costco. I saw it last year in Costco as well, but I second guessed myself and didn’t buy it, so when it came back, it was time to get it. The mortar and pestle have to be seasoned. Seasoning refers to smoothing the stone and rubbing it with ingredients. I decided to shortcut the long process of grinding rice and waiting between grinding and used a wire brush attached to a plug in drill. After putting my nose to the grind stone so to speak, I then ground some rice with the pestle and cleaned the grit. The seasoning process was long but, I did prevail, and no stone dust was found in our pesto thankfully. This is as traditional a pesto recipe as I can muster. Yes, it was worth the effort. The mortar and pestle do create a superior pesto versus the American chopped pesto.
This pesto is delicious and well worth the effort.
Place garlic and salt in mortar and begin crushing it with the pestle until a paste is formed.
Rinse basil and remove leaves from stems.
Cut basil leaves into small pieces.
Place basil in mortar and begin crushing it into the garlic with the pestle creating a smooth paste.
Slowly adding 1 teaspoon of olive oil at a time. Mix with the pestle and continue until the oil is all added.
Sprinkle the cheese in the mortar and mix with the pestle.
Add the pine nuts and crush them with the pestle until smooth and combined.
Beautiful color!
Enjoy!
BBQ Pork Pizza
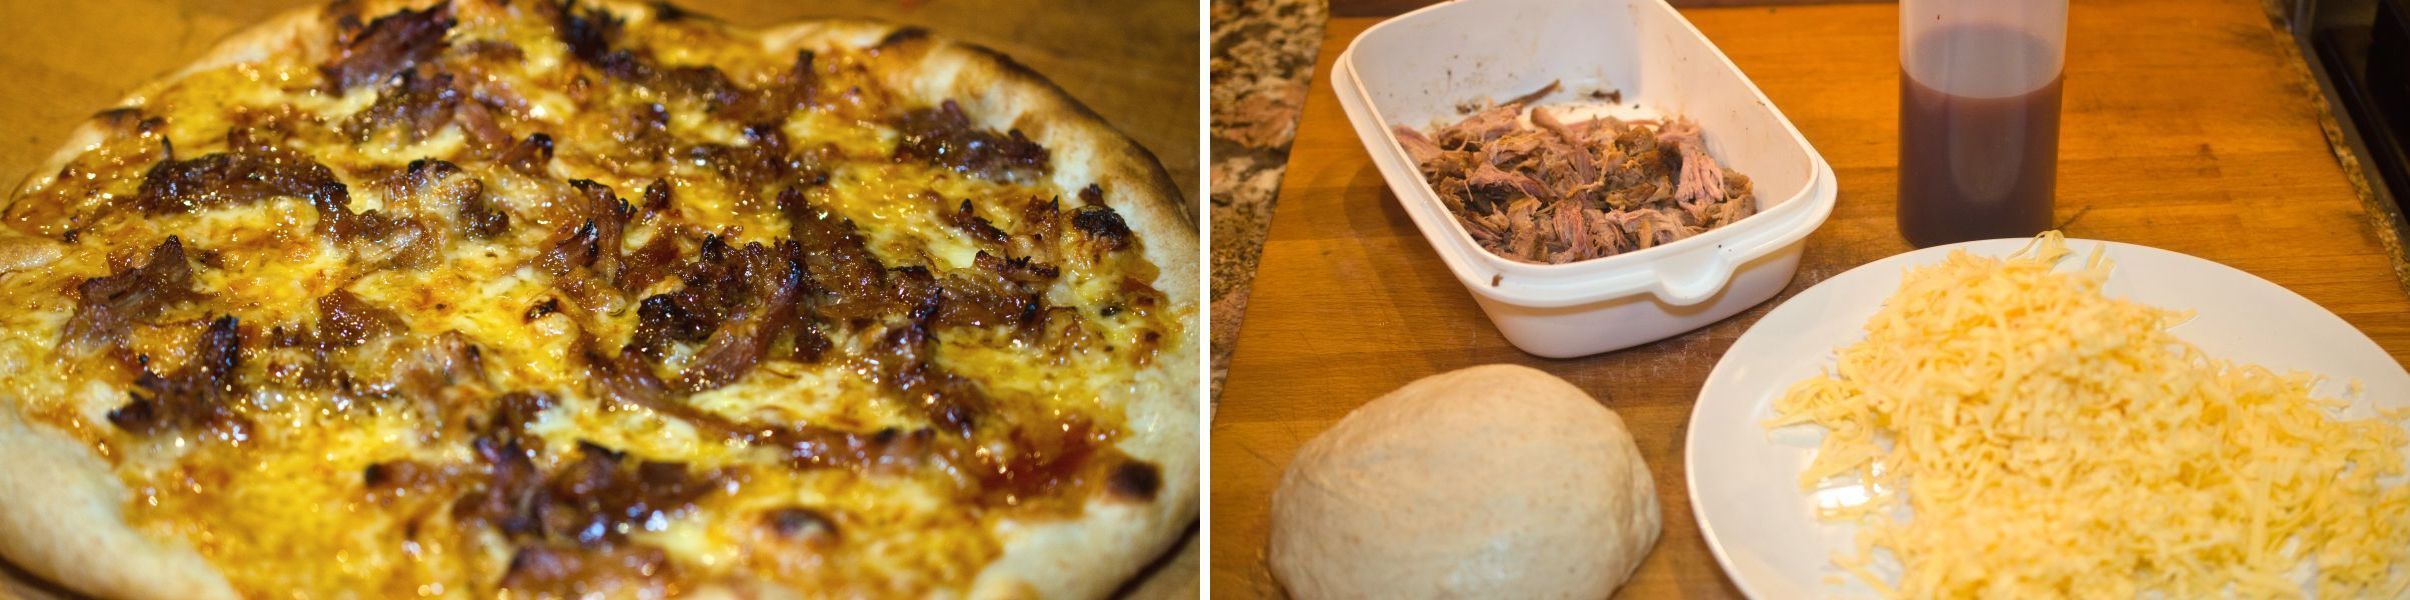
I don’t often try out a different topping combination for pizza night since my children only like pepperoni and cheese but my refrigerator had left over Rotisserie Carnita’s that were seriously needing to go on a BBQ Pork Pizza. My friend Whitney and I created this recipe together.
This was the best use of my left overs ever!
Preheat Pizza Stone in Oven to 500 Fahrenheit
Roll out pizza dough to a thin 12 inch round.
Sprinkle cornmeal on pizza peel or inverted cookie sheet.
Place pizza round on cornmeal, make sure the pizza round can slide on the cornmeal.
Mix Carnitas with 3/4 cup BBQ sauce.
Pour 3/4 cup BBQ sauce on pizza dough round, spread around dough (or drizzle since my sauce is in a squeeze bottle) leaving the outer 1 inch clear of sauce.
Sprinkle cheese on pizza.
Sprinkle Carnitas on cheese.
Drizzle remaining 1/4 cup BBQ sauce on pizza.
Slide pizza onto stone in oven and bake for 5-8 minutes, remove when cheese is bubbly and starting to brown.
Place pizza on large cutting board and let rest for 3 minutes before slicing.
Enjoy!
Beef & Black Bean Empañadas (with a little tamale flare)
What do I mean by an empañada with a tamale flare? I changed the recipe and included Maseka so it tastes like a tamale but has the look and portability of an empañada (as in you can pick it up and it won’t crumble between your fingertips or require a fork and knife to eat). I enjoy making and eating Mexican food. Of course, I’m fairly certain my gringo heritage and my lack of a Mexican grandmother, as I pointed out before, means my knowledge is limited as to what authentic Mexican food is truly like. Forgive me as I share with you a recipe I came up with on my own that has a Mexican flare to it.
If an empañada and a tamale got together.
For the filling I used leftover chili. Did you make the chili I posted about here? I drained it in a large sieve over a large bowl, I needed a less wet filling.
Preheat oven to 375 Farenheit
Add all ingredients to a bowl. Using your fingers break apart the butter into pea size pieces, then use the pastry blender to finish incorporating all the butter throughout the flour.
Put out a large sheet of parchment paper on work surface. Dust with flour and roll out dough to a large rectangle about 1/8 inch thick.
Cut dough using a 4 inch round cookie cutter. Place 1 tablespoon of filling in the middle. Fold over, press edges and crimp, if you would like, or use a fork.
My husband kindly photographed my impressive empañada skills.
Brush with egg wash (1 egg yolk, and 1 tablespoon water mixed).
Bake on a parchment paper lined cookie sheet for 10 minutes, maybe more.
Check your food after 10 minutes.
I love how they turned out.
By the way, I had to test one before we went to our church potluck, and yes it tasted like a tamale; but so much more portable. I have memories of eating tamales my mom bought from a local Mexican store and topped with canned chili. Don’t mock me, it was really good. This is for you mom. Thanks for the idea.
Enjoy!
Beef Stir Fry

My family went to Maryland to visit friends two and a half weeks ago and I completely left my laptop power supply and cord at our friends house. It was torture. I had to read and send emails on my phone and auto correct made it impossible to write intelligible emails. When it comes to my recipes, I couldn’t upload my photo’s and edit them and post on my blog. I am so sorry for not posting sooner. Thankfully, my friend brought me my cord and I can now leave my computer power rationing behind me and post all the recipes that I have ready to share. Hopefully the recipes I have to share make up for my absence, be brutal, you can chastise me if these recipes don’t hold up to what you expected from my absence. Okay, now that I have explained and given my pathetic excuse for not blogging, here you go, the moment you have been waiting for.
This recipe came about after a night of wanting to make an easy dinner, and no I didn’t photograph it. My husband took the leftovers to work and he and his co-worker shared them. The co-worker being Fernando, you remember him right? Anyway he said, this is very good stir fry. She’s gonna post this right? To which I said, no I didn’t photograph the process, and he said well then you have to make it again. Finally, I made it again, and photographed my process. This is a simple stir-fry, as in a few ingredients but with a lot of flavor and color. I love stir-fry’s because of the color and all the vegetables you can cook together. Stir fry is like the Chinese equivalent of the American casserole but a lot faster and maybe even healthier? Who knows, anyway recipe time.
I have an extreme need to create a rainbow when stir-frying, the taste and textures worked well.
Combine 2 tablespoons soy sauce, 2 tablespoons toasted sesame seed oil and 2 tablespoons spice sauce in a small bowl and whisk together. Place beef in a large bowl, pour sauce onto beef and stir. Allow beef to marinate for 20 minutes on the counter.
Rinse all vegetables. Cut squash and zucchini into half moon slices, 1/4 inch thick. Cut carrots at a slight angle and into slices. Cut bell peppers into 1/4 sticks. Cut mushrooms into slices. Cut green onion also at an angle and include white part. Place harder vegetables, carrots, broccoli, and bell peppers together. Place softer vegetables together, the squash, zucchini, mushrooms, and green onions. Organizing the vegetables will allow you to stir fry them more quickly and also reminds you which vegetables will need to go in first since they take longer to stir fry.
A word of warning, stir frying is accomplished in a preheated wok at the highest temperature your burner can provide. Turn on exhaust fans and open windows, this will be a very smoking hot process.
Mix the rest of the soy sauce, toasted sesame seed oil, and spice sauce
Once you have everything you need next to your wok, you can start, I mean everything. You need all ingredients, the remaining sauces/oil mixed together and of course a wok spatula. Preheat the wok over high heat. When you begin to see smoke add 1-2 tablespoons of vegetable oil and half the beef. We don’t want to crowd the beef, we want to sear it quickly. Continually move the beef around the wok, one layer. When you see an even seer all over the beef immediately remove the beef to the bowl you had at the ready and repeat with the remaining beef.
That beef is done. Yes, you will create a lot of smoke, hence the need for excellent ventilation.
Place the wok back on the high burner. Add another 2 tablespoons oil and the hard vegetables:
broccoli, carrots, and bell peppers. Stir and add 1/4 cup water, cover with lid and allow to steam just until the vegetables are bright and slightly cooked. Stir fry vegetables are NOT MUSHY, really they aren’t. My husband dislikes mushy vegetables thankfully. Remove lid and add mushrooms, zucchini, and squash, stir fry until softened. Add the sauce and stir.
Bring back the beef, and add the water, stir until thoroughly combined. Mix a cornstarch slurry with cornstarch and cold water, start with 1 tablespoon cornstarch and enough cold water to create
slurry. Move the stir fry enough to create a small opening to see the sauce, when you see it is bubbling, add the cornstarch and stir. When the sauce is your desired thickness it is done.
Add the green onions and serve over steamed rice.
Enjoy!
Beef Stroganoff
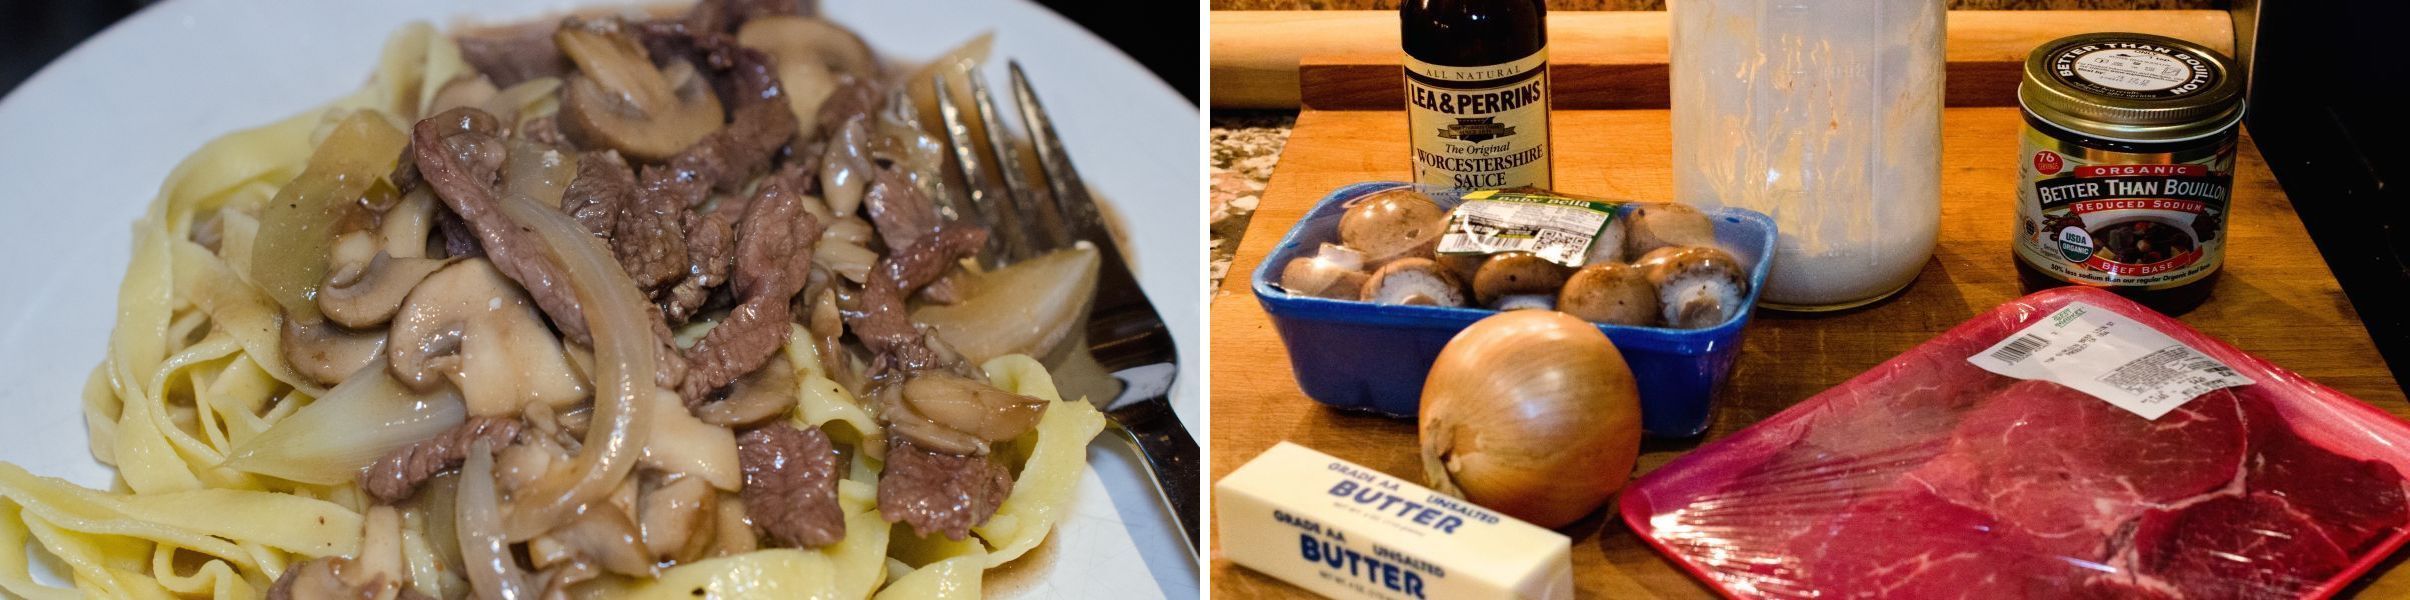
Many years ago when my oldest daughter was a baby and learning to walk, we went to Kansas to visit my husband’s oldest brother. My sister in law made beef stroganoff. It was completely different from what my mom made and so delicious. My mom, like every other mother of the 80s, used cream soup, you know the red can brand, for many casserole type meals. For beef stroganoff she used cream of mushroom soup, cream of chicken soup (sour cream if she had it), ground beef, and egg noodles. My sister in law had used sliced beef that had been sauteed and was in a gravy type sauce and served over egg noodles. When I got home, I searched recipe books (before Google) looking for a recipe that sounded similar to what I had enjoyed so much. I found a recipe and made beef stroganoff. It was awesome. To this day I make it in a similar fashion to that recipe I found so many years ago. I don’t have the recipe, so I make it from memory and also in my own way.
It was delicious, you should try it, oh wait we ate it all (sorry).
Slice steak against the grain. Whatever direction the grooves/lines in the meat are going, turn your meat 90 degrees and slice thinly. Sprinkle with salt and pepper.
Peel, then cut onion in half and slice thinly, slice mushrooms thinly.
Add butter and olive oil to a preheated pan set to medium high. Add beef and saute just until browned, only 2-3 minutes or so. DO NOT OVERCOOK THE BEEF!
Remove beef and set aside in a bowl.
Add more butter, olive oil, mushrooms, and onion. Saute for a couple of minutes until onion is translucent.
Add one tablespoon of Better Than Bouillon to pan. Add 2 cups hot water, Worcestershire sauce, and a sprinkle of garlic powder (optional). Mix together 2 tablespoons of corn starch and cold water. Now you can add the beef back in. When Beef Stroganoff is boiling, add corn starch mixture. Only
add enough to make it the thickness you want. Remove from heat and add yogurt or sour cream, my mother in law assured me many years ago this is the ingredient that makes Beef Stroganoff.
Boil fresh noodles for 30 seconds or dry egg noodles according to package. Drain, put back in pan and toss with butter
Plate up some noodles and pour Beef Stroganoff on top.
Enjoy!
Blackberry Bread Pudding
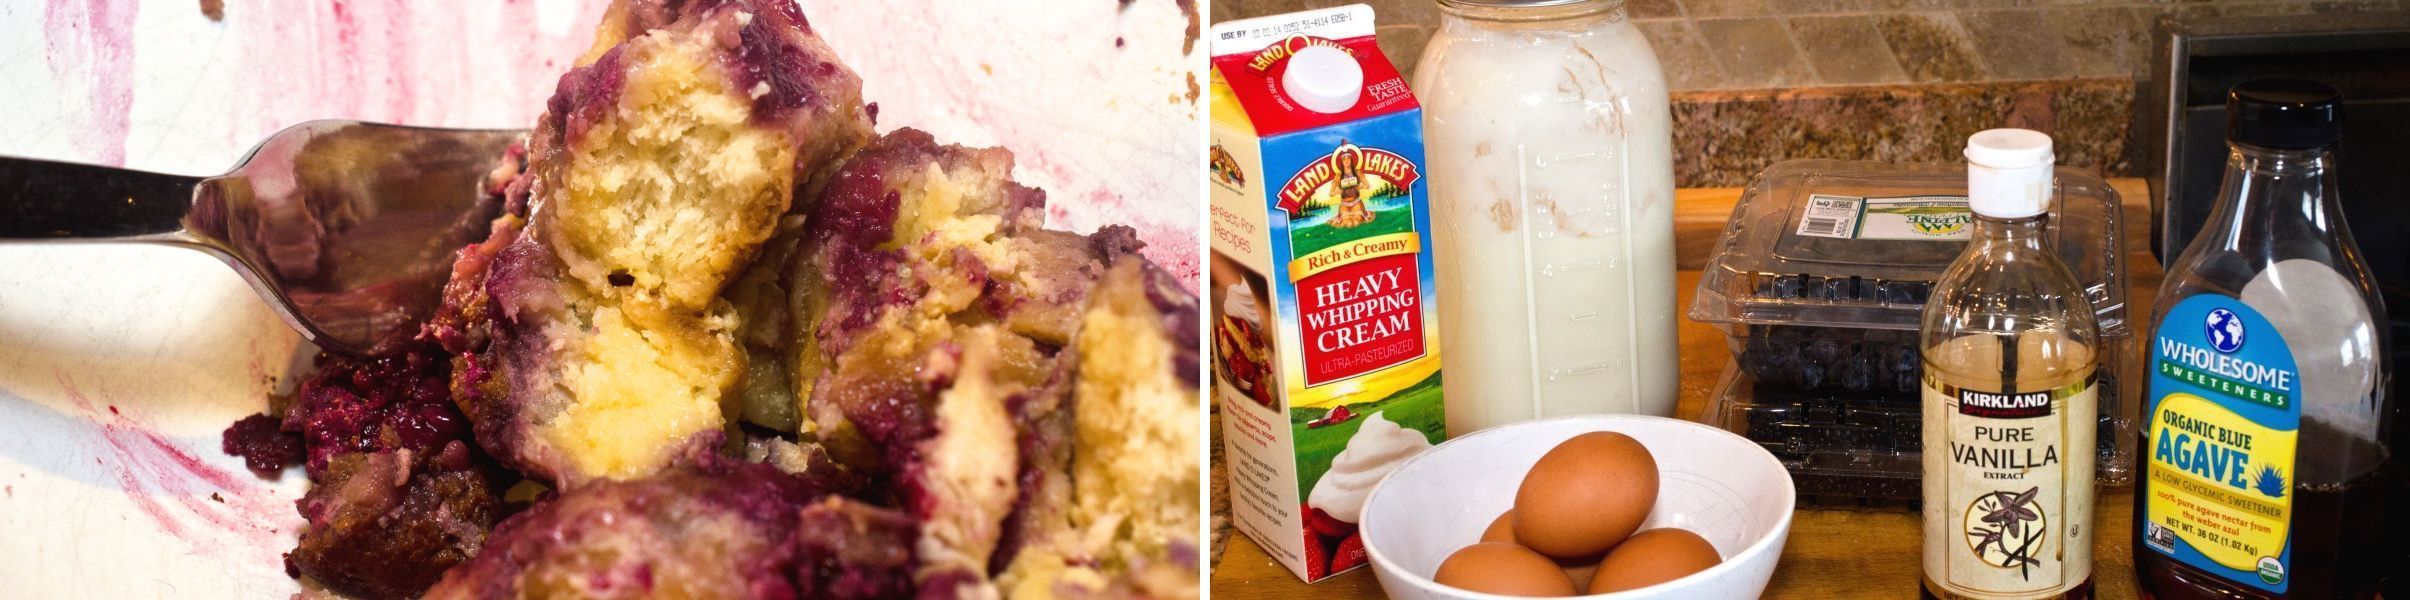
I pinned a recipe for blackberry pudding with lemon sauce recently and bought the blackberries and was ready to make it today when I realized the recipe used canned biscuits. I don’t buy canned biscuits and store bought yogurt. Well since I don’t buy either of those foods anymore that meant it was time to start over and remake the recipe my way. This pudding has very little added sugar versus the pinned recipe and I used Agave instead of sugar, I substituted and changed the desert and well it is similar to the recipe but with my own spin.
It isn’t very pretty, but it does taste yummy.
Preheat oven to 425 Fahrenheit
Mix flour and coconut oil together creating small pea size balls. Add buttermilk and knead dough lightly, create a ball.
Roll out dough to 1/2 inch thickness. Cut into triangles. Place on coconut oil greased cookie sheet. Brush coconut oil on biscuits.
Bake biscuits for 10 minutes.
Break biscuits into 1 inch pieces and put in greased 9x13 cake pan or round 9 inch tall cake pan.
Lower oven temperature 350 Fahrenheit
Add ingredients to bowl, do not add fruit.
Beat with whisk, until mixed. After mixing add fruit and stir.
Pour ingredients onto bread.
Bake for 40-50 minutes.
Test center with toothpick, does it come out clean?
Again it isn’t pretty in a bowl, but it tastes yummy.
Enjoy!
Blackened Catfish

While doing my weekly grocery shopping, the catfish was calling my name, and I decided it was time to try and prepare it myself. I have eaten catfish once in my lifetime I think, and since I have been preparing a different fish every week, this was the week for catfish. Fried catfish seemed a little too much frying for me, so I decided to make blackened catfish. My fish didn’t turn out very blackened, most likely because I used fresh ingredients rather then dried. Dried spices do blacken, hence the name. This is my personal experience speaking. In no way am I able to accurately tell you why blackened catfish is called that, but I’m guessing it is because the spice rubbed on the catfish blackens when it is pan fried.
Flavorful exterior, flaky moist inside.
Peel and finely dice 1/2 of the onion.
If you have a molcajete or a mortar and pestle, bring them out, otherwise process this in a blender or food processor.
Place onion, garlic and salt in molcajete or blender. Grind or blend into a paste.
Add paprika and red pepper flakes. Grind or blend until smooth.
Squeeze lemon juice and add olive oil. Stir or blend until smooth.
Brush paste onto both sides of catfish filets, allow to marinate for 15 minutes.
Add 4 tablespoons of butter to large sauté pan over medium heat.
Fry catfish filets until interior flesh is opaque and flaky, 3-5 minutes on each side.
Remove from pan and place on serving platter or plate.
Enjoy!
Blueberry Multigrain Muffins
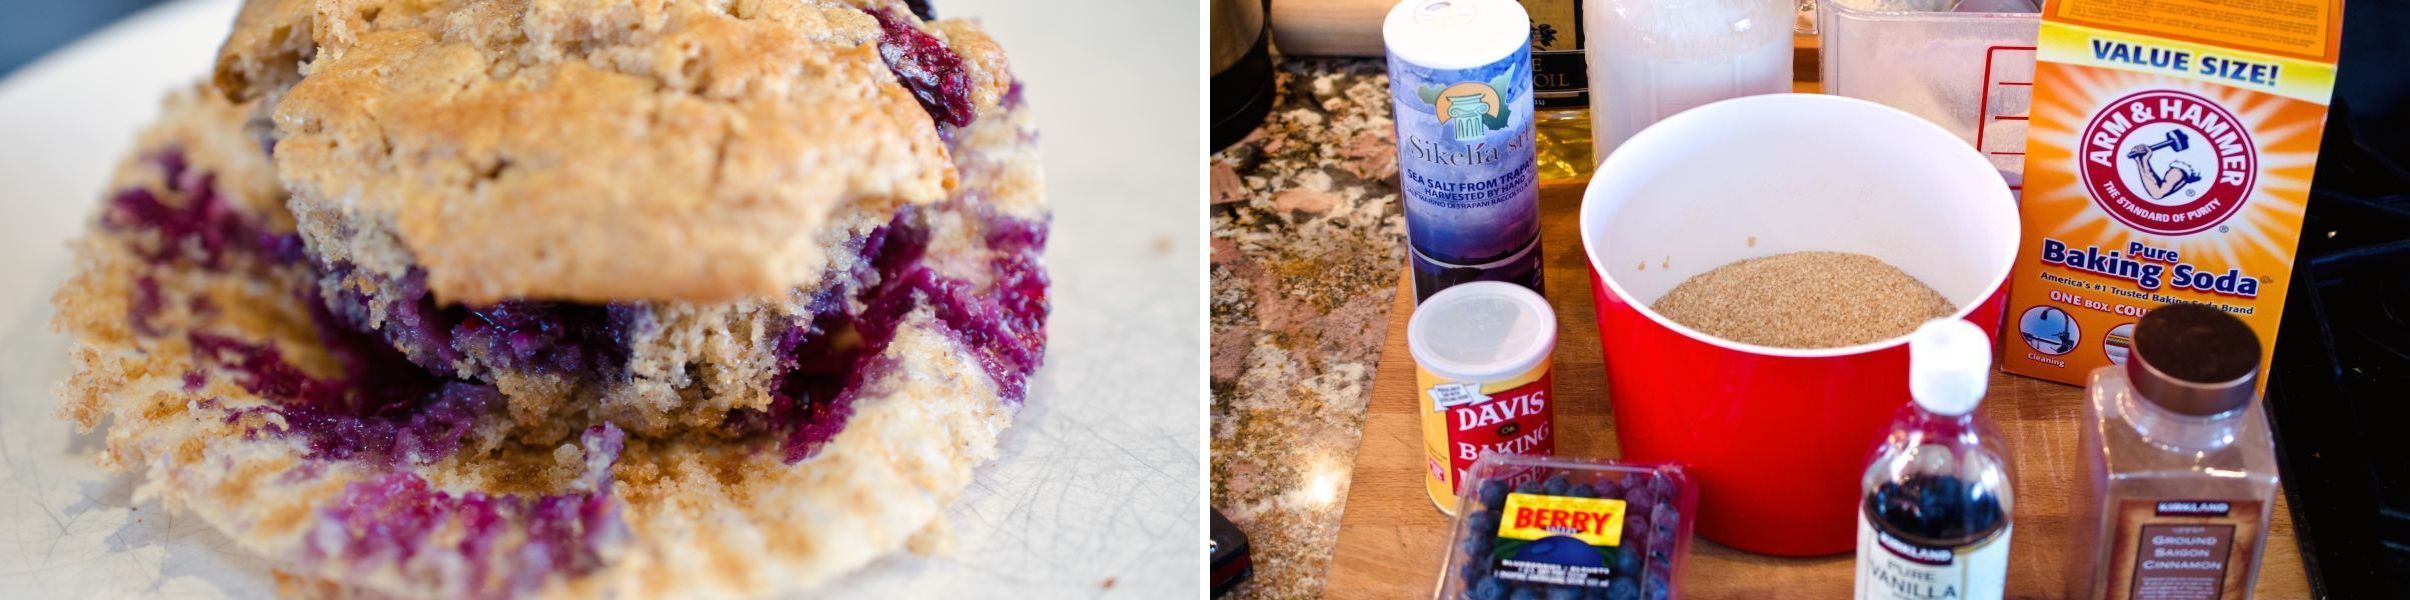
We needed to balance out the chocolate muffin morning with a fruit muffin, right? Of course. These muffins smelled amazing! This recipe is also from the King Arthur Flour website and yes I changed it. This recipe uses Chef Brad’s Wonder Flour (equal parts brown rice, spelt, and pearled barley milled together finely) too.
It tasted just as delicious as it looks, just in case you were wondering.
Preheat oven to 400 Fahrenheit.
Pour sugar, salt, cinnamon, flour, baking powder, baking soda, and blueberries into a bowl and stir until combined.
Pour oil, buttermilk, and vanilla into another bowl and whisk together.
Add the wet ingredients to the dry.
Using a rubber spatula mix gently together.
Pour batter evenly into muffin paper lined muffin pan. This recipe makes 12 muffins.
Bake muffins for 18-20 minutes or until toothpick inserted comes out clean.
Remove from oven.
Enjoy!
Bouillabaisse

In our church, we bring meals to new moms after they have a baby. Today I volunteered to bring dinner to a new mom and her husband. I was told to avoid starches since the new mom has diabetes. I wanted to make ratatouille again and a fish soup with it so bouillabaisse seemed like the best choice. French food sounded like a good idea for dinner. My bouillabaisse is simple and does not have as much seafood variety as you would find in France.
I love soup, and since we had a torrential downpour today, this was even more comforting today.
Rinse and cut tomatoes into quarters. Peel and dice the onion. Slice the leek, only the white and the light green portion.
Place 2 of each fish fillets in a pressure cooker pot, add tomatoes, 5 sprigs of thyme, onion, leeks, salt, and enough water to bring to the 16 cups line.
Cook in pressure cooker on high for 30 minutes.
Strain fish broth through a fine mesh sieve into a large stock pot over a medium high flame.
Remove thyme from stems. Slice scallions and the other leek.
Cube the remaining fish fillets. Remove any small bones if you find any.
Add leeks, scallion, thyme, and fish to boiling broth.
Cook until fish becomes opaque.
Add paprika to soup.
Serve with a nice crusty french bread like we did.
Enjoy!
Broiled Lobster Tail
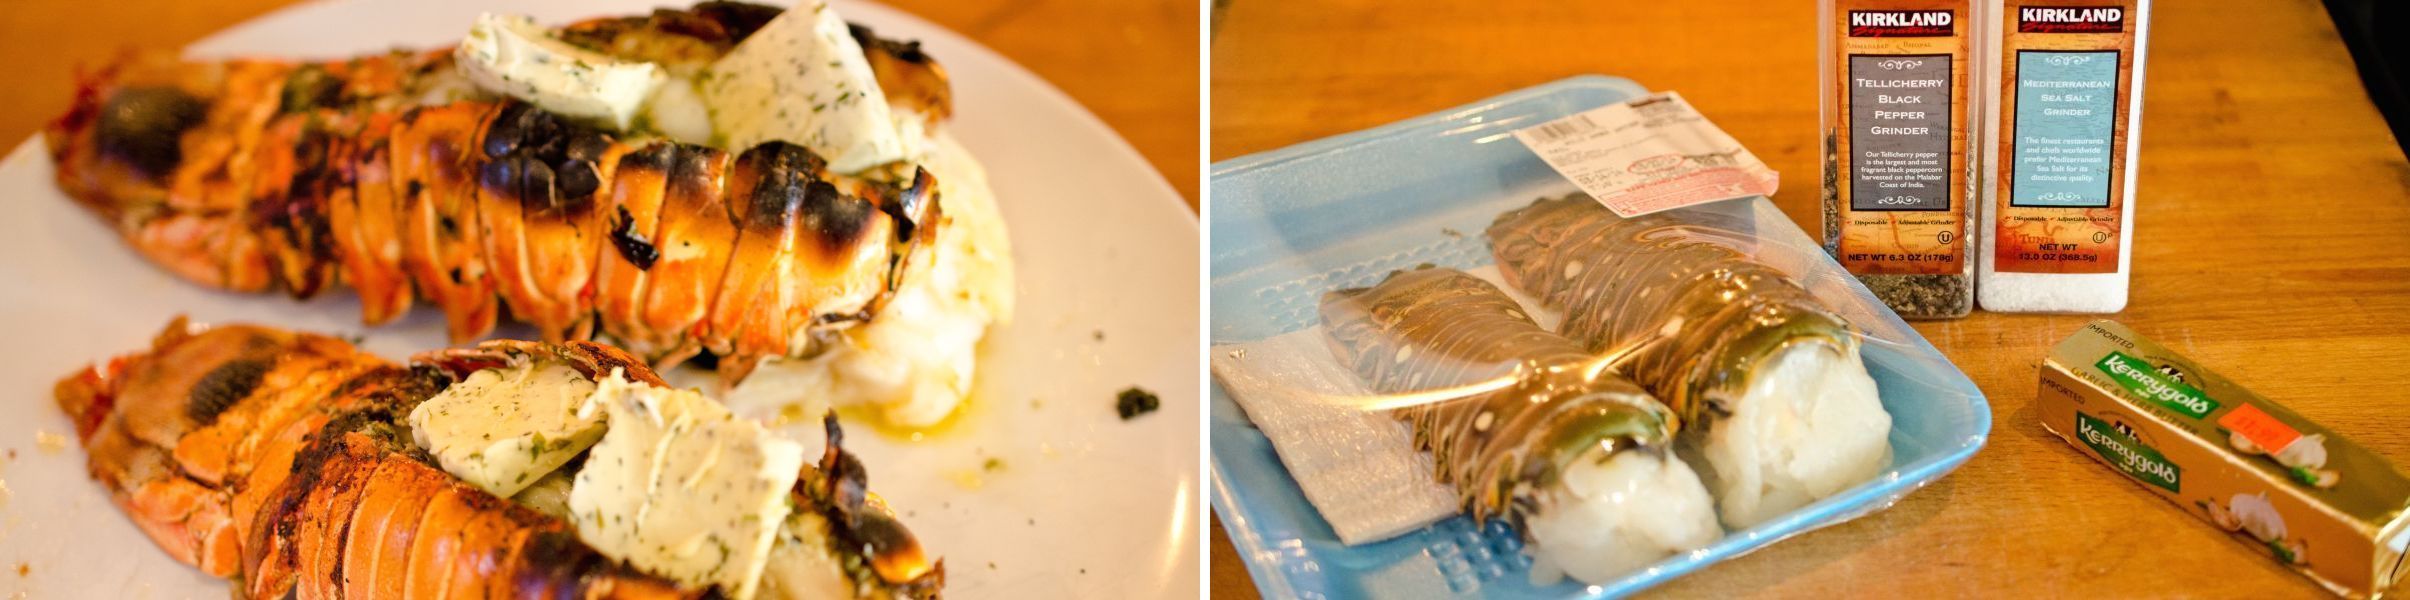
I must admit I have never prepared lobster tail, and I think I have only eaten it once at the Yosemite Lodge while on my honeymoon. Lobster tail was our Chinese teenager’s contribution to dinner this week. I was happy to oblige, but a little daunted by this crustacean, I mean it is expensive seafood. After much reading and searching, I think I came up with a way to prepare the lobster tail, and now I will share the tale of how I prepared it. Like that play on words, huh? Maybe my tale of tails was a bit of overkill. Sorry it’s been an early morning.
I’m told by our Chinese teenager that the lobster tail was good. Sadly, I was organizing Girl Scout cookies, so I missed it.
Snip the top of the lobster tail straight down to the end of the tail.
Begin pulling apart the shell of the lobster tail outward to expose the flesh and release it slightly since it is attached.
Holding open the shell of the lobster, sprinkle salt and pepper on the flesh.
Slice half the butter into 1/4 inch pats and place inside shell on the lobster meat.
Place lobster tails on aluminum foil lined broiler pan.
Place the top rack of your oven in the middle of the oven.
Put pan with lobster tail on rack and turn on broiler to high.
Place a ball of aluminum in between the door of the oven and the oven to keep the door from closing. (This will trick the oven into keeping the broiler flame on.
Broil lobster for 8-10 minutes or the flesh becomes opaque.
Remove lobster from oven and slice the remaining butter into pats and place on cooked lobster tail flesh.
Enjoy!
Butterfinger
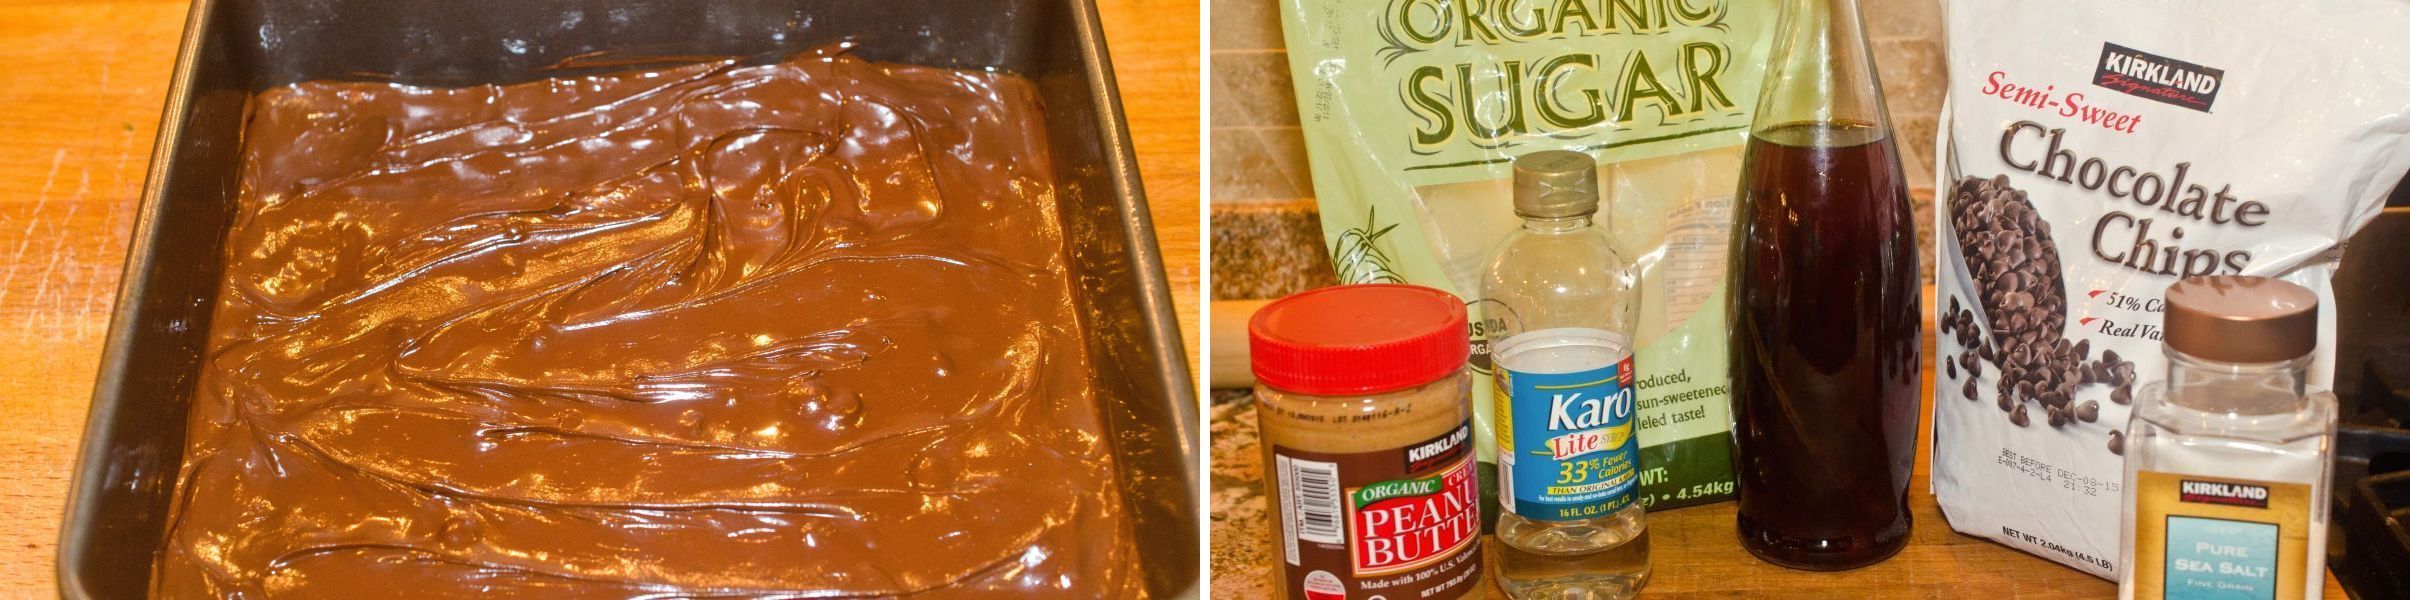
My favorite candy bar, for as long as I can remember, is the Butterfinger. It is a crispy, chocolate, peanut butter goodness, in a yellow wrapper. Butterfingers are so yummy and in a milkshake you make something even more amazing. When I was in High School, I worked at Hogi Yogi, a sandwich and yogurt fast food restaurant. We used a special blending machine to add toppings to frozen yogurt. One of the toppings was Butterfingers. Mixed into frozen yogurt it was truly dessert Heaven on Earth. I have been mulling over this candy bar and how to make it at home. While searching for a recipe, I learned a majority of the recipes on the World Wide Web included Candy Corn as a main ingredient. My goal is to make a Butterfinger without one of the ingredients being processed candy already. Finally I stumbled upon a recipe that didn’t include Candy Corn, so I knew I had found candy making gold.
This Butterfinger is so much better than the store-bought version.

|
You will need a candy thermometer. |
In a clean medium sized sauce pan, combine the sugar, corn syrup and water. With clean hands, mix these ingredients together until no grains of sugar remain. Wipe down the sides of the pan with a little more water to remove any sugar crystals.
On a medium-high heat, cook the sugar until it reaches 290 degrees Fahrenheit
Mix peanut butter, salt, and vanilla extract in a small bowl. Microwave the peanut butter for 30 seconds.
When the sugar mixture reaches 290 degrees Fahrenheit, quickly pour the warm peanut butter mixture into the sugar mixture. Stir well.
Pour into a buttered pan. Spread with an offset spatula.
Allow the mixture to cool for about 5 minutes and top with the chocolate chips. Allow them to melt and spread with an offset spatula.
Cool in the refrigerator for about 30 minutes.
Remove from the pan and cut into desired squares, rectangles, or eat all of it at once!
Enjoy!
Buttermilk Spelt Pancakes
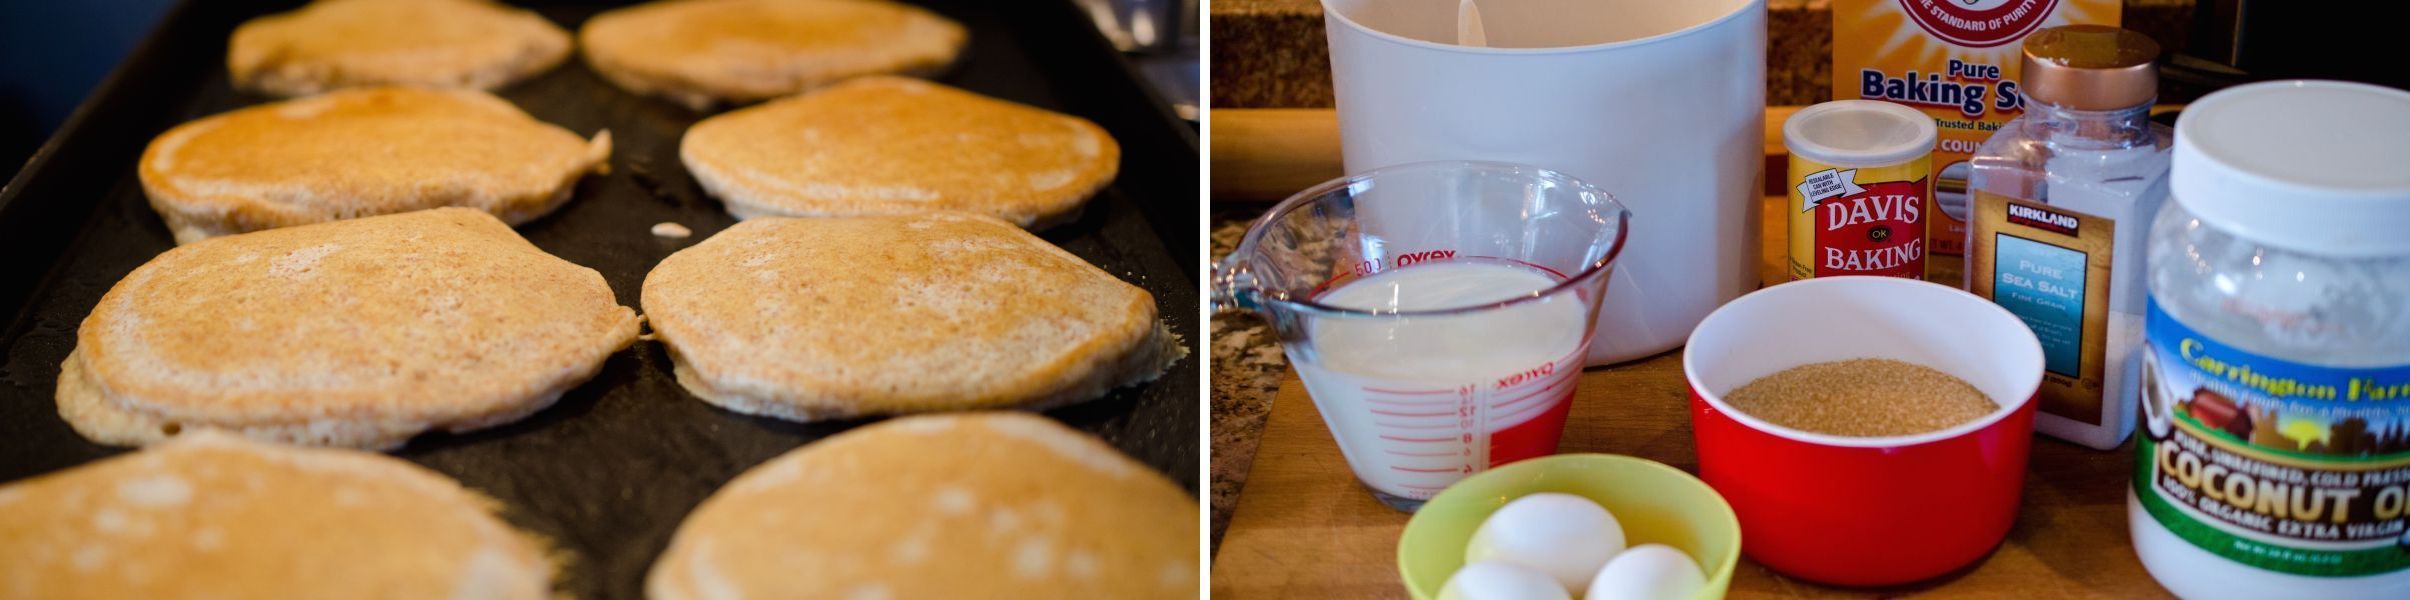
Yummy! Homemade Pancakes.
My children LOVE pancakes. We have eaten pancakes for breakfast, lunch, and dinner. These pancakes are the best pancakes I have ever made. This recipe is the culmination of many attempts at the perfect pancakes. These pancakes will change your life, well not really but they are that yummy.
Separate the three eggs, put the yokes in a bowl, put the egg whites in a mixer and beat them until they form stiff peaks. Remove the egg whites to a plate, bowl, whatever you want and put them aside.
Put coconut oil, buttermilk, and egg yolks in the mixing bowl and mix.
Add the flour, Baking Powder, Baking Soda, and salt. Mix the batter till just mixed. Do Not Over-mix!
Gently add half the egg whites and fold in, this half can be added quickly. the second half should be folded in slowly, we don’t want to deflate the egg whites.
Let the batter rest while you pre-heat the griddle.

|
Would you like Gingerbread pancakes, my sons don’t like these so I didn’t get to make them this way. The ingredients to add for Gingerbread cookies are: 2 tablespoons molasses, 1/2 teaspoon cinnamon, 1/2 teaspoon nutmeg, 1 teaspoon ginger. |
I used a 1/4 cup ladle to pour batter on the griddle.
Beautiful pancakes, that is why I use a ladle to pour.
Flip the pancakes when you see bubbles around the edge.
Enjoy!