Table of Contents
Introduction
The idea for this book started with a series of blog posts I wrote some time ago exploring building a Backbone.js app using tests. I initially wanted to just consolidate these blog posts into a book, however once I started jotting down what I wanted to put into this series, I decided there was more to write about.
In the Front end and JavaScript world we have come a long way since the heady days of table based layouts sprinkled with Macromedia roll over scripts to make web pages interactive. The lines between back end and front end application code has almost blurred completely, you could argue it no longer exists when you consider Isomorpic apps. Our tooling has changed substantially as well: at our disposal we have package managers (for both back and front end), build tools, unit test frameworks and deployment tools.
Conventions
Before we get started here are few conventions to be aware of. Where ever you see a statement like below starting with > this is a command you type from the terminal window
1 > menaing a command typed at the console
Whereas as the following typicallys is code or a configuration to be added to a file:
1 code
2 or
3 config
What we will be building
Over the coming pages and posts we will explore how to build a web app guided by tests, using a toolset that will allow you to deploy with each commit to the cloud. We’ll making use of JavaScript across the whole stack to build a small weather app using forecast.io’s API. The app itself will use the browser’s Geolocation API to figure out where your user is and retrieve a weekly weather forecast for that location.
How we will build it
Plain and simple, we’ll build this app guided by tests, using a continuous delivery model and have it deployed using Codeship’s CD service to a Heroku instance.
The focus of this book is really about setting you on the right path to delivering quality software reliably and continuously. By the end you should have the confidence to push every commit to ‘production’.
We will be making extensive use of the following tools:
- Node.js
- Grunt
- Karma
- Jasmine
- Cucumber
- Selenium
What you will need
There are few pre-requisits you will need to get this app built. You will need to sign up for some services, grab a code/etxt editor, set up a version control system and finally get your Node.js environment configured.
Services you wil need to sign up for
As I mentioned for our weather forecast API, we’ll be using forecast.io, so you might want to go and sign up for a developer account as you will need a key to access the API.
You should also sign up for a Github or Bitbucket account if you don’t already have one, we’ll need this for version control and our CI service.
So that we can reliably deploy our app, we’ll make use of Codeship’s hosted Continuous Integration service. Sign up for the free service to get started.
To host our app we’ll make use of Heroku’s cloud computing service. They also offer a free service to help you get started.
That should cover the things you need to sign up for.
Code editor
You will need a decent IDE (I recommend WebStorm) or Text Editor (Sublime is very popular with many of my co-workers).
Cloud9’s browser based editor (though calling it just an editor, is doing it a bit of a disservice) Is another option I can recommend.
Version control: Git
Using Version Control for every project is a must, regardless of size or complexity. If you don’t already have Git installed you should do so. There are many ways to install the necessary binaries and the Git website has all the necessary links. If you are on a Mac though, then I would recommend using Homebrew to install the binaries.
If you are new to Git then I recommend taking the Git Immersion guided tour.
Node.js and NPM
We’ll be making extensive use of JavaScript and various libraries throughout the book, so you will need to install Node.js and NPM. Once again if you are on a Mac though, then I would recommend using Homebrew to install the binaries.
NPM will allow us to resolve all of the dependencies we need in order to achieve our goal of building and delivering a web app guided by tests.
Bower
Bower is handy tool to manage your front end library dependencies, so I recommed installing it as well.
Grunt
Grunt will be our build and automation tool. If you haven’t used Grunt before, be sure to check out the Getting Started guide, as it explains how to create a Gruntfile as well as install and use Grunt plugins.
With all that installed and configured, it’s time to get started!
Getting started
The first thing I like to do with any project is to get our build pipeline set up and start deploying code to our ‘production’ environment. To that end we need to look at building the simplest thing possible to validate our testing infrastructure works, our CI envinronment can pick up changes on commit and after a succesful build deploy the changes.
I will assume you have signed up and installed all of the software outlined in the What you will need section.
Setting up our project
Open up a terminal window and navigate to the location you want to store your project files.
I use a mac, so most of the commands listed here are *nix based and for the most part they shouls also work on a windows machine.
Once there let’s create a project folder and change into it:
1 > mkdir weatherly && cd weatherly
Let’s initilise our github repository:
1 > git init
2 > Initialized empty Git repository in /Users/gregstewart/Projects/github/weather\
3 ly/.git/
Before we go any further let’s create a .gitignore file in the root of our project and add the following lines to it:
1 node_modules
2 .idea
Once down let’s commit this change quickly:
1 > git add .gitignore
2 > git commit -m "Adding folders to the ignore list"
From a folder perspective I like to create a distribution folder and an app folder to hold the source, so let’s go ahead and add these folders as well.
1 > mkdir app
2 > mkdir dist
We’ll start by using bower to grab some of our front end dependencies. Let’s start by creating a bower.json file by typing bower init, fill in the details as you see fit, but here’s what I selected:
 1 {
 2 	name: 'weatherly',
 3 	version: '0.0.0',
 4 	authors: [
 5 		'Greg Stewart <gregs@tcias.co.uk>'
 6 	],
 7 	description: 'Building a web app guided by tests',
 8 	moduleType: [
 9 		'commonjs'
10 	],
11 	license: 'MIT',
12 	homepage: 'http://www.tcias.co.uk/',
13 	private: true,
14 	ignore: [
15 		'**/.*',
16 		'node_modules',
17 		'bower_components',
18 		'test',
19 		'tests'
20 	]
21 }
Everybody likes a bit of Bootstrap so let’s start with that package :
1 > bower install bootstrap --save
The --save flag at the end of the command means that the dependecy will be added to our bower.jon file during the installation of the package. We are doing this because we do not want to check in any external dependencies into our repository, instead at build/CI time we’ll restore these using bower.
So let’s edit our .gitignore file to make sure we don’t accidentally commit these files:
1 node_modules
2 .idea
3 bower_components
And let’s add this change to our repo:
1 > git add .gitignore
2 > git commit -m "Adding bower_components to the ignore list"
To round things off let’s install HTML5 boilerplate
1 > bower install html5-boilerplate
You may have noticed that I decided not to add this package to our bower.json file, simply because we’ll copy the files we need into our app folder:
1 > mv bower_components/html5-boilerplate/css app/
2 > mv bower_components/html5-boilerplate/img app/
3 > mv bower_components/html5-boilerplate/*.html app/
4 > mv bower_components/html5-boilerplate/*.png app/
5 > mv bower_components/html5-boilerplate/*.xml app/
6 > mv bower_components/html5-boilerplate/*.ico app/
7 > mv bower_components/html5-boilerplate/*.txt app/
In your editor of choice open up the app/index.html file and add the following:
 1 <!DOCTYPE html>
 2 <!--[if lt IE 7]>      <html class="no-js lt-ie9 lt-ie8 lt-ie7"> <![endif]-->
 3 <!--[if IE 7]>         <html class="no-js lt-ie9 lt-ie8"> <![endif]-->
 4 <!--[if IE 8]>         <html class="no-js lt-ie9"> <![endif]-->
 5 <!--[if gt IE 8]><!--> <html class="no-js"> <!--<![endif]-->
 6 	<head>
 7     	<meta charset="utf-8">
 8     	<meta http-equiv="X-UA-Compatible" content="IE=edge">
 9     	<title>Weatherly - Forecast for London</title>
10     	<meta name="description" content="">
11 	    <meta name="viewport" content="width=device-width, initial-scale=1">
12
13         <!-- Place favicon.ico and apple-touch-icon.png in the root directory -->
14
15     	<link rel="stylesheet" href="css/main.css">
16 	</head>
17 	<body>
18     	<!--[if lt IE 7]>
19         	<p class="browsehappy">You are using an <strong>outdated</strong> brows\
20 er. Please <a href="http://browsehappy.com/">upgrade your browser</a> to improve\
21  your experience.</p>
22     	<![endif]-->
23
24     	<!-- Add your site or application content here -->
25     	<div class="container">
26         	<div class="header">
27             	<ul class="nav nav-pills pull-right">
28                 	<li class="active"><a href="#">Home</a></li>
29                 	<li><a href="#">About</a></li>
30                		<li><a href="#">Contact</a></li>
31             	</ul>
32             	<h3 class="text-muted">test</h3>
33         	</div>
34
35         	<div class="jumbotron">
36             	<h1>London Right Now</h1>
37             	<p class="temperature">14 degrees</p>
38             	<p>Mostly cloudy - feels like 14 degrees</p>
39         	</div>
40
41         	<div class="row marketing">
42             	<div class="col-lg-6">
43                 	<h4>NEXT HOUR</h4>
44                 	<p>Mostly cloudy for the hour.</p>
45
46                 	<h4>NEXT 24 HOURS</h4>
47                		<p>Mostly cloudy until tomorrow afternoon.</p>
48             	</div>
49         	</div>
50
51         	<div class="footer">
52             	<p><span class="glyphicon glyphicon-heart"></span> from Weatherly</\
53 p>
54         	</div>
55
56     	</div>
57     	<p></p>
58
59     	<script src="//ajax.googleapis.com/ajax/libs/jquery/1.10.2/jquery.min.js"><\
60 /script>
61     	<script>window.jQuery || document.write('<script src="js/vendor/jquery-1.10\
62 .2.min.js"><\/script>')</script>
63
64     	<!-- Google Analytics: change UA-XXXXX-X to be your site's ID. -->
65     	<script>
66         	(function(b,o,i,l,e,r){b.GoogleAnalyticsObject=l;b[l]||(b[l]=
67                	 function(){(b[l].q=b[l].q||[]).push(arguments)});b[l].l=+new Da\
68 te;
69             	e=o.createElement(i);r=o.getElementsByTagName(i)[0];
70             	e.src='//www.google-analytics.com/analytics.js';
71             	r.parentNode.insertBefore(e,r)}(window,document,'script','ga'));
72         	ga('create','UA-XXXXX-X');ga('send','pageview');
73     	</script>
74 	</body>
75 </html>
If you open up the file in your browser you should see something like this hopefully:

Rendered HTML
Not exactly something to write home about, but it’s enough for us to get started setting up our little server, writing a functional test and deploying something to our Heroku instance. We’ll make this a lot prettier later on in the book when we deal with setting up Grunt to build our JavaScript and CSS assets.
The last thing we’ll do is commit all of our changes to our local repository:
1 > git add .
2 > git commit -m "Added Bootstrap/Modernizr to bower.json, moved the skeleton of \
3 the HTML5 boilerplate to the app folder and created a base index page for our we\
4 ather forecat app."
At this stage it’s a good idea to also push the changes to our remote repository. If you have followed the What you will need section, you will hopefully have created a Github account. If not go ahead and to that now. Then create a repository called weatherly, here’s what I entered:
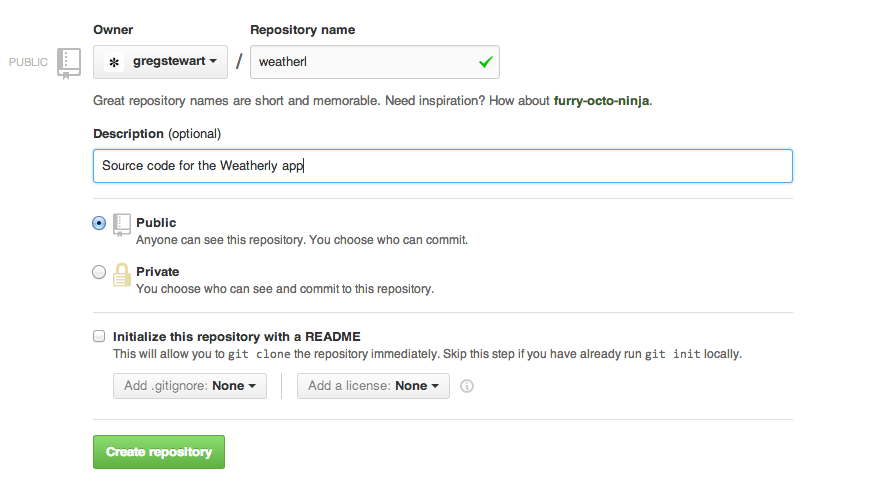
Creating your weatherly repository
To push our changes to the remote repository, you will need to tell your local repository where it is (be sure to replace the <account_name> with your actual account name):</account_name>
1 > git remote add origin https://github.com/<account_name>/weatherly.git
Now you can push your changes:
1 > git push -u origin master
Recap
Before we move on let’s just quickly recap what we have done so far:
- created our app folder structure
- initialised our git repo
- created a Git ignore file
- used bower to manage some of our front end dependencies:
- Bootstrap
- Modernizr
- HTML5 boilerplate
- created a very basic index.html page
- pushed all of the changes to our remote git repository
Writing our first functional test
__TODO I seem to mainly refer to the tests as end to end test, I should rename this section to reflect this __
What is a functional test? Wikipedia tells us:
Functional testing is a quality assurance (QA) process[1] and a type of black box testing that bases its test cases on the specifications of the software component under test. Functions are tested by feeding them input and examining the output, and internal program structure is rarely considered (not like in white-box testing).[2] Functional Testing usually describes what the system does.
Throughout this section and in future you may find me refering to these kind of tests as Functional Tests, End-to-end, Feature tests or indeed User Journey tests. Confusing I know, I will try my best to keep it to feature and end-to-end tests, but be prepared when discussing this topic to come across the same variety of breadth of names for Functional tests.
With the definition out of the way, let’s go through the steps necessary in order to write our first functional test. We needed a test page, which we built in the previous section, now let’s set up a simple Node.js webserver to host the page.
Web server: Express
A good practice to follow while working with Git is to create a branch for each feature that you are working on, so let’s go ahead and create a new branch for this item of work.
1 > git checkout -b web-server
Make sure you are in the root of our project and not in the app/ folder
Since we’ll be using Node.js we can use NPM to manage the dependencies. These dependencies are stored in a folder called node_modules. Since we don’t want to check any node modules/packages into our repository we added that folder to our .gitignore file in when we first set up the project. If we don’t add those packages to our repository you may be wondering how our CI and Heroku instance will now how to run the app. To that end we’ll use a handy file called package.json. When we run NPM we can not only install dependencies, we can also add them to our package.json file and our target envinronments can read this file and install these packages for us.
Typing npm init allows us to create our package.json, here’s what I answered when prompted:
 1 This utility will walk you through creating a package.json file.
 2 It only covers the most common items, and tries to guess sane defaults.
 3
 4 See `npm help json` for definitive documentation on these fields
 5 and exactly what they do.
 6
 7 Use `npm install <pkg> --save` afterwards to install a package and
 8 save it as a dependency in the package.json file.
 9
10 Press ^C at any time to quit.
11 name: (weatherly)
12 version: (0.0.0)
13 description: Building a web app guided by tests
14 entry point: (index.js)
15 test command: grunt test
16 git repository: (https://github.com/gregstewart/weatherly.git)
17 keywords:
18 author: Greg Stewart
19 license: (ISC) MIT
20 About to write to /Users/gregstewart/Projects/github/weatherly/package.json:
21
22 {
23 	"name": "weatherly",
24 	"version": "0.0.0",
25 	"description": "Building a web app guided by tests",
26 	"main": "index.js",
27 	"scripts": {
28 		"test": "grunt test"
29 	},
30 	"repository": {
31 		"type": "git",
32 		"url": "https://github.com/gregstewart/weatherly.git"
33 	},
34 	"author": "Greg Stewart",
35 	"license": "MIT",
36 	"bugs": {
37 		"url": "https://github.com/gregstewart/weatherly/issues"
38 	},
39   	"homepage": "https://github.com/gregstewart/weatherly"
40 }
41
42 Is this ok? (yes) yes
As you can see it autocompleted a bunch of information for you, such as the project name, version number and Git details. Let’s add that file to our repo before going any further:
1 > git add package.json
2 > git commit -m "Created package.json file"
Now let’s go ahead and install a web server module. We’ll just use express.
1 > npm install express --save
Similar to how we used Bower, by specifying --save the dependecy was added to our package.json file, if you open it up you should see the following toward the end of the file:
1 "dependencies": {
2 	"express": "^4.4.5"
3 }
Next create a new file called server.js in the root of our project and add the following content:
1 var express = require('express');
2 var app = express();
3
4 app.use(express.static(__dirname + '/app'));
5
6 var server = app.listen(3000, function() {
7   console.log('Listening on port %d', server.address().port);
8 });
And to start our server type:
1 > npm start
If you now open your browser and hit http://localhost:3000 you should once again see:

Rendered HTML hosted by our Connect server
The process that runs our server is not daemonised and will continue to run until we close the console or type ^C. Go ahead and kill the server. Next we add those changes to our repository, merge these changes back into master and finally push to origin:
1 > git add server.js
2 > git add package.json
3 > git commit -m "Installed Connect and created a very basic web server for our a\
4 pp"
5 > git checkout master
6 > git merge web-server
7 > git push
Cucumber, WebDriver and Selenium
For our functional tests I have chosen Cucumber.js and WebDriver.js with Selenium. I chose this combination because I believe this will give you greater felxibility in the long wrong, especially if you plan on using different languages in your toolchain. You can find Ruby, Java and .Net versions of Cucumber, WebDriver and Selenium.
Once again we’ll create a dedicated branch for this work:
1 > git checkout -b functional-test
Selenium
Selenium uses Java, so you will need to make sure you have it installed.
We could install the binaries manually, but since I plan using Grunt to automate tasks around starting and stopping the server, we might as well use [grunt-selenium-webdriver] (https://www.npmjs.org/package/grunt-selenium-webdriver) module as this includes everything that we need, including the jar file for the Selenium Server.
1 > npm install grunt-selenium-webdriver --save-dev
We use the --save-dev flag to indicate that we want to add this dependency to our package.json file, however only for development purposes (meaning that when we deploy to our ‘production’ environment, e.g. Heroku, it won’t install the package during deployment). With that done let’s create a Grunt task to start the Selenium server (just in case you missed it in the Getting Started section you can find more information on Grunt and tasks over at the official Grunt.js website). The first thing we’ll need is a Gruntfile.js, so add one to the root of your project and edit it to contain the following:
 1 module.exports = function(grunt) {
 2 	'use strict';
 3
 4 	grunt.initConfig({
 5 	});
 6
 7 	grunt.loadNpmTasks('grunt-selenium-webdriver');
 8
 9 	grunt.registerTask('e2e', [
10 		'selenium_start',
11 		'selenium_stop'
12 	]);
13 };
Save the changes and at the command line type: grunt e2e and you should see something like this:
1 Running "selenium_start" task
2 seleniumrc webdriver ready on 127.0.0.1:4444
3
4 Running "selenium_stop" task
5
6 Done, without errors.
This told grunt to execute a task called e2e and confirms that the selenium server started properly at the following address 127.0.0.1:4444 and then was shutdown again (apparently it is not necessary to shutdown the server with a stop task).
Using Grunt to start and stop the express server
Let’s also add a step to stop and start our web server when we are running our frunctional tests. To that end we’ll install another grunt module:
1 > npm install grunt-express-server --save-dev
And we’ll edit our Grunt file so that it looks for our server.js and we can control the starting and stopping of our server:
 1 module.exports = function(grunt) {
 2 	'use strict';
 3
 4 	grunt.initConfig({
 5 		express: {
 6   			test: {
 7     			options: {
 8       				script: './server.js'
 9     			}
10   			}
11 		}
12 	});
13
14 	grunt.loadNpmTasks('grunt-express-server');
15 	grunt.loadNpmTasks('grunt-selenium-webdriver');
16
17 	grunt.registerTask('e2e', [
18 		'selenium_start',
19 		'express:test',
20 		'selenium_stop',
21 		'express:test:stop'
22 		]);
23 };
If we now run grunt e2e, we should see the following output:
 1 Running "selenium_start" task
 2 seleniumrc webdriver ready on 127.0.0.1:4444
 3
 4 Running "express:test" (express) task
 5 Starting background Express server
 6 Listening on port 3000
 7
 8 Running "selenium_stop" task
 9
10 Running "express:test:stop" (express) task
WebDriver
The next thing we need to do is install WebDriver.js and we are then nearly ready to write our first feature test:
1 > npm install webdriverjs --save-dev
WebDriver is the glue between Selenium and Cucumber.
Cucumber
The final piece of the puzzle is Cucumber.js:
1 > npm install cucumber --save-dev
Our first test
Features are written using the Gherkin syntax, and this is what our first feature looks like:
1 Feature: Using our awesome weather app
2 	As a user of weatherly
3 	I should be able to see the weather information for my location
4
5 	Scenario: Viewing the homepage
6 		Given I am on the home page
7 		When I view the main content area
8 		Then I should see the temperature for my location
I like to store these and the associated code in a e2e directory under a parent tests folder. So go ahead and create that folder structure under the root of our project. Then create a features folder and save the above feature contents to a file called using-weatherly.feature.
If we were to run our cucumber tests now using > cucumber.js tests/e2e/features/using-weatherly.feature we would see the following output:
 1 UUU
 2
 3 1 scenario (1 undefined)
 4 3 steps (3 undefined)
 5
 6 You can implement step definitions for undefined steps with these snippets:
 7
 8 this.Given(/^I am on the home page$/, function (callback) {
 9 	// express the regexp above with the code you wish you had
10 	callback.pending();
11 });
12
13 this.When(/^I view the main content area$/, function (callback) {
14 	// express the regexp above with the code you wish you had
15 	callback.pending();
16 });
17
18 this.Then(/^I should see the temperature for my location$/, function (callback) {
19 	// express the regexp above with the code you wish you had
20 	callback.pending();
21 });
This is extremely useful output. While it’s clear that the code to execute the steps in the feature are undefined, the output actually gives snippets to create our step definitions. So let’s go ahead and create our step definition. Inside of our functional test folder, create a steps folder and add a file called using-weatherly-step-definitions.js with the following content:
 1 var UsingWeatherlyStepDefinitions = function () {
 2 	'use strict';
 3
 4 	this.Given(/^I am on the home page$/, function (callback) {
 5   		// express the regexp above with the code you wish you had
 6   		callback.pending();
 7 	});
 8
 9 	this.When(/^I view the main content area$/, function (callback) {
10   		// express the regexp above with the code you wish you had
11   		callback.pending();
12 	});
13
14 	this.Then(/^I should see the temperature for my location$/, function (callback)\
15  {
16   		// express the regexp above with the code you wish you had
17   		callback.pending();
18 	});
19 };
20
21 module.exports = UsingWeatherlyStepDefinitions;
Let’s try and execute our feature test again with > cucumber.js tests/e2e/features/using-weatherly.feature --require tests/e2e/steps/using-weatherly-step-definitions.js and now we should see:
1 P--
2
3 1 scenario (1 pending)
4 3 steps (1 pending, 2 skipped)
Time to flesh out the steps to do some work and check for elements on the page while the tests are running. We’ll make use of Chai.js as our assertion library, so let’s go ahead and install this module:
1 > npm install chai --save-dev
The first bit of code we’ll add to our tests is a World object, which will initialise our browser (read WebDriver) and add a few helper methods (visit and hasText). As our browser we are using PhantomJS, but if you would like to see the test running in say FireFox, simply replace browserName: 'phantomjs' with browserName: 'firefox'.
Note that other browsers such as Chrome and IE require special drivers which you can download from the Selenium website
Here’s our world object (world.js), which we save into a folder called support under tests/e2e:
 1 'use strict';
 2
 3 var webdriverjs = require('webdriverjs');
 4 /*jshint -W079 */
 5 var expect = require('chai').expect;
 6
 7 var client = webdriverjs.remote({ desiredCapabilities: {browserName: 'phantomjs'\
 8 }, logLevel: 'silent' });
 9
10 client.addCommand('hasText', function (selector, text, callback) {
11     this.getText(selector, function (error, result) {
12         expect(result).to.have.string(text);
13         callback();
14     });
15 });
16
17 client.init();
18
19
20 var World = function World(callback) {
21     this.browser = client;
22
23     this.port = process.env.PORT || 3000;
24
25     this.visit = function (url, callback) {
26         this.browser.url(url, callback);
27     };
28
29     callback(); // tell Cucumber we're finished and to use 'this' as the world i\
30 nstance
31 };
32
33 exports.World = World;
Please note that if when running the tests you come across the message shown below (logging in verbose mode here), this simply (indeed simply…) means that webdriverjs cannot find phatomjs in your PATH.
 1 ================================================================================\
 2 ====
 3 Selenium 2.0/webdriver protocol bindings implementation with helper commands in \
 4 nodejs.
 5 For a complete list of commands, visit http://webdriver.io/docs.html.
 6
 7 ================================================================================\
 8 ====
 9
10 [09:51:45]:  ERROR      Couldn't get a session ID - undefined
11 Fatal error: [init()] <=
12 An unknown server-side error occurred while processing the command.
Now let’s re-visit our using-weatherly-step-definitions.js and replace the contents with the following code:
 1 var UsingWeatherlyStepDefinitions = function () {
 2     'use strict';
 3
 4     this.World = require('../support/world.js').World;
 5
 6     this.Given(/^I am on the home page$/, function (callback) {
 7       this.visit('http://localhost:' + this.port + '/', callback);
 8     });
 9
10     this.When(/^I view the main content area$/, function (callback) {
11       this.browser.hasText('.jumbotron h1', 'London Right Now', callback);
12     });
13
14     this.Then(/^I should see the temperature for my location$/, function (callba\
15 ck) {
16       this.browser.hasText('p.temperature', '14 degrees', callback);
17     });
18 };
19
20 module.exports = UsingWeatherlyStepDefinitions;
The first step opens the site, and then we assert that the header element displays London Right Now and that the element with our temperature shows 14 degrees
If we were to once again try and execute our feature test, we would get an error telling us that it can’t connect to the selenium server. So let’s wrap all of this into our e2e grunt task. Let’s start by adding another module to our setup:
1 > npm install grunt-cucumber --save-dev
And let’s edit our Gruntfile.js to look like this now:
 1 module.exports = function(grunt) {
 2 	'use strict';
 3
 4 	grunt.initConfig({
 5 		express: {
 6   			test: {
 7     			options: {
 8       				script: './server.js'
 9     			}
10   			}
11 		},
12 		cucumberjs: {
13   			src: 'tests/e2e/features/',
14   			options: {
15     			steps: 'tests/e2e/steps/'
16   			}
17 		}
18 	});
19
20 	grunt.loadNpmTasks('grunt-express-server');
21 	grunt.loadNpmTasks('grunt-selenium-webdriver');
22 	grunt.loadNpmTasks('grunt-cucumber');
23
24 	grunt.registerTask('e2e', [
25 		'selenium_start',
26 		'express:test',
27 		'cucumberjs',
28 		'selenium_stop',
29 		'express:test:stop'
30 	]);
31 };
Now type > grunt e2e and you should see the following output:
 1 Running "selenium_start" task
 2 seleniumrc webdriver ready on 127.0.0.1:4444
 3
 4 Running "express:test" (express) task
 5 Starting background Express server
 6 Listening on port 3000
 7
 8 Running "cucumberjs:src" (cucumberjs) task
 9 ...
10
11 1 scenario (1 passed)
12 3 steps (3 passed)
13
14 Running "selenium_stop" task
15
16 Running "express:test:stop" (express) task
17 Stopping Express server
18
19 Done, without errors.
With that done we can commit our changes to our repository:
1 > git add .
2 > git commit -m "Scenario: Viewing the homepage, created and implemented"
3 > git checkout master
4 > git merge functional-test
5 > git push
Recap
To sum things up in this section we created a set of grunt tasks that:
- start our selenium server
- start our express server that hosts our page
- execute the features and steps we defined with cucumberjs
- output the result to the console
- closes down the services after finishing the tests
We also wrote a feature test that:
- open a browser
- check the contents for a header
- check for an element that holds the current temperature
Continuous delivery
In the previous part we wrote our first functional test (or feature test or end 2 end test) and automated the running using a set of Grunt tasks. Now we will put these tasks to good use and have our Continuous Integration server run the test with each commit to our remote repository. There are two parts two Continuous Delivery: Continuous Integration and Continuous Deployment. These two best practices were best defined in the blog post over at Treehouse, do read the article, but here’s the tl;rd:
Continuous Integration is the practice of testing each change done to your codebase automatically and as early as possible. But this paves the way for the more important process: Continuous Deployment.
Continuous Deployment follows your tests to push your changes to either a staging or production system. This makes sure a version of your code is always accessible.
In this ection we’ll focus on Continuous Integration. As always before starting we’ll create a dedicated branch for our work:
1 git checkout -b ci
Setting up our Continuous Integration environment using Codeship
In the what you will need section I suggested signing up for a few services, if you haven’t by now created an account with either Github and Codeship now is the time! Also if you haven’t already now is the time to connect your Githuib account with Codeship. You can do this by looking under your account settings for connected services:
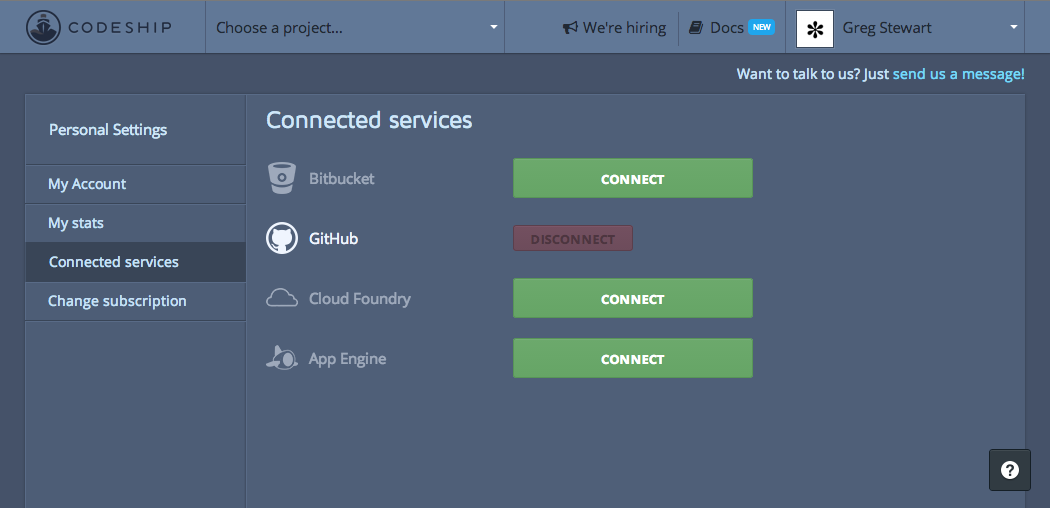
Link your Github account to Codeship
To get started we need to create a new project:
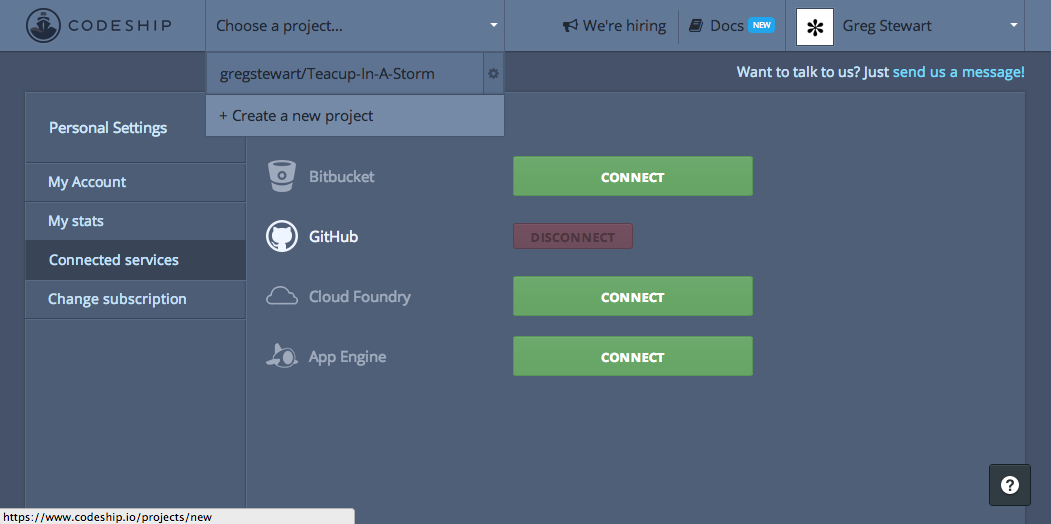
Create a new project
This starts starts a three step process:
- Connect to your source code provider
- Choose your repository
- Setup test commands
The first step is easy, choose the Github option, then for step two choose the weatherly repository from the list.
If you hadn’t already signed up for Github and hadn’t pushed your changes to it, then the repository won’t be showing up in the list. Link your local repository and push all changes up before continuing.
Not it’s time to set up the third step, set up out test commands. From the drop down labelled Select your technology to prepopulate basic commands choose node.js.
Next we need to tackle the section: Modify your Setup Commands. The instructions tell us that it can use the Node.js version specified in our package.json file, given that we have not added this information previously let’s go ahead and do that now. If you are unsure of the version of Node.js simply type:
1 node --version
In my case the output was 0.10.28, below is my package.json file, look for the block labelled with engines:
 1 {
 2 	"name": "weatherly",
 3 	"version": "0.0.0",
 4 	"description": "Building a web app guided by tests",
 5 	"main": "index.js",
 6 	"engines" : {
 7 		"node" : "~0.10.28"
 8 	},
 9 	"scripts": {
10 		"test": "grunt test"
11 	},
12 	"repository": {
13 		"type": "git",
14 		"url": "https://github.com/gregstewart/weatherly.git"
15 	},
16 	"author": "Greg Stewart",
17 	"license": "MIT",
18 	"bugs": {
19 		"url": "https://github.com/gregstewart/weatherly/issues"
20 	},
21 	"homepage": "https://github.com/gregstewart/weatherly",
22 	"dependencies": {
23 		"express": "^4.4.5"
24 	},
25 	"devDependencies": {
26 		"chai": "^1.9.1",
27 		"cucumber": "^0.4.0",
28 		"grunt": "^0.4.5",
29 		"grunt-cucumber": "^0.2.3",
30 		"grunt-express-server": "^0.4.17",
31 		"grunt-selenium-webdriver": "^0.2.420",
32 		"webdriverjs": "^1.7.1"
33 	}
34 }
With that added we can edit the set up commands to look as follows:
1 npm install
2 npm install grunt-cli
Now let’s edit the Modify your Test Commands section. In the previous chapter we created a set of tasks to run our tests and wrapped them in a grunt command grunt e2e. Let’s add this command to our configuration:
1 grunt e2e
That’s hit the big save button. Right now we are ready to push some changes to our repository. Luckily we have a configuration change ready to push!
1 git add package.json
2 git commit -m "Added node version to the configuration for CI"
3 git checkout master
4 git merge ci
5 git push
And with that go over to your codeship dashboard and if it all went well, then you should see something like this:
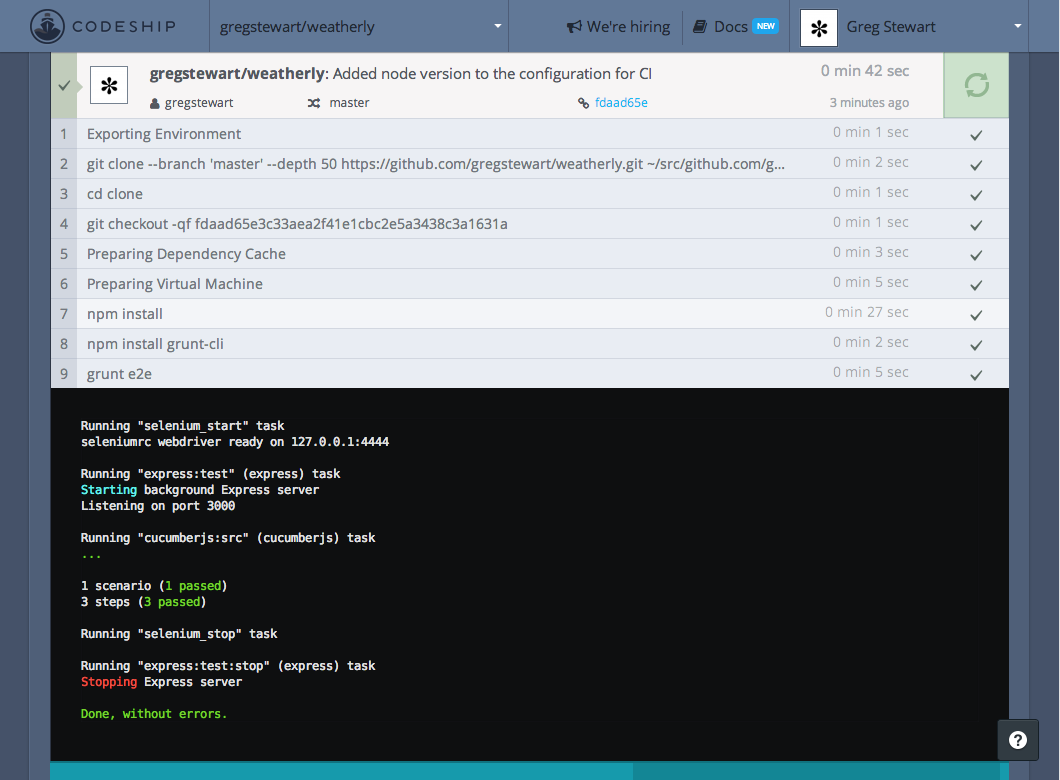
First CI run!
You have to admit that setting this up was a breeze. Now we are ready to configure our Continous Deployment to Heroku.
Setting up Continous Deployment to Heroku
Before we configure our CI server to to deploy our code to Heroku on a successful build, we’ll need to create a new app through our Heroku dashboard:
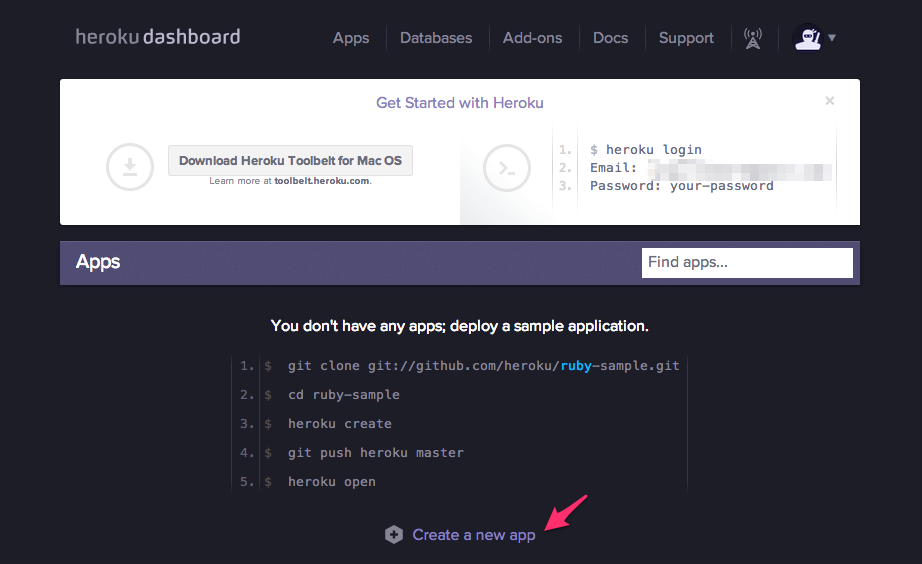
Heroku dashboard
And click on the Create a new app link and complete the dialogue box.
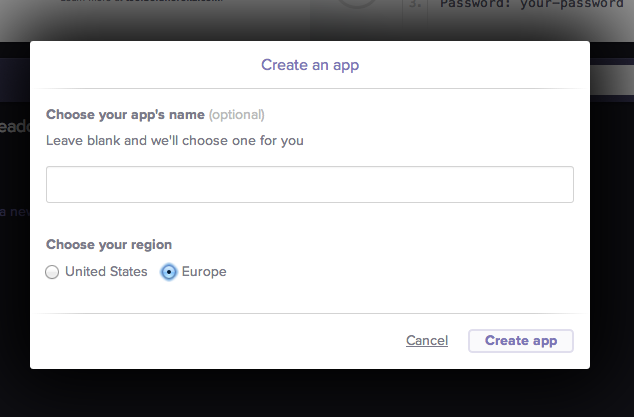
Creating a new app
The name weatherly was already taken so I left it blank to get one assigned, if you do this as well, just be sure to make a note of it as we’ll need it shortly. I choose Europe, well because I live in Europe, so feel free to choose what ever region makes sense to you.
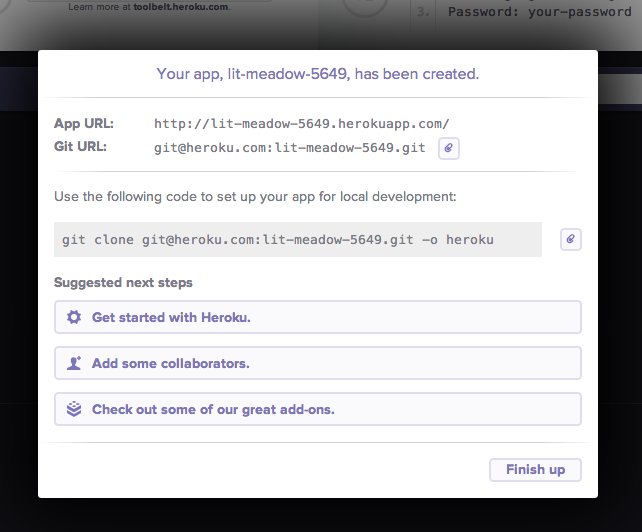
Confirmation screen
Armed with this information let’s head back to our project on Codeship and let’s configure our deployment. From the project settings choose the Deployment tab and from the targets select Heroku. You will need your Heroku app name (see above) and your Heroku api key which you can find under your account settings under the Heroku dashboard:
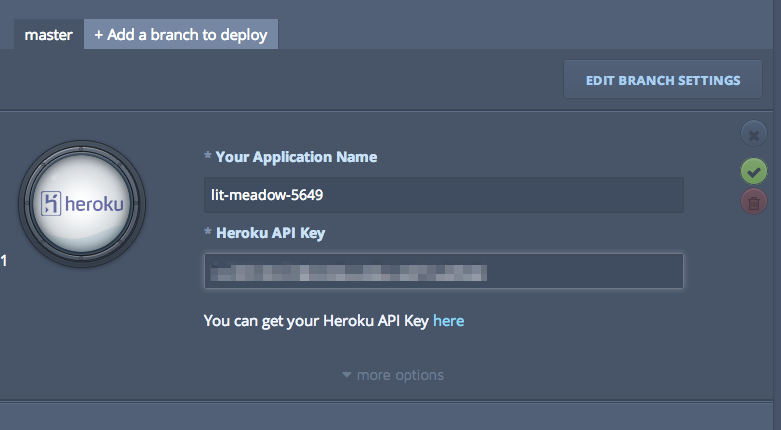
Codeship settings for heroku deployment
We will be deploying from our master branch. Once you are happy with your settings click on the little green tick icon to save the information. Time to test our set up! We just need to make one little change to our app configuration which is handy because that will allow us to commit and a change and verify the whole process from start to finish. In the previous section we have configured our web server to listen on port 3000, well Heroku assigns a part dynamically, so we to account for that by editing our server.js file by adding process.env.PORT to our listen function:
1 var express = require('express');
2 var app = express();
3
4 app.use(express.static(__dirname + '/app'));
5
6 var server = app.listen(process.env.PORT || 3000, function() {
7 	console.log('Listening on port %d', server.address().port);
8 });
Now let’s commit the change:
1 git add server.js
2 git commit -m "Server configured to handle dynamic port allocation"
3 git push
If we check our build dashboard we should see a succesful build and deployment to our Heroku instance:
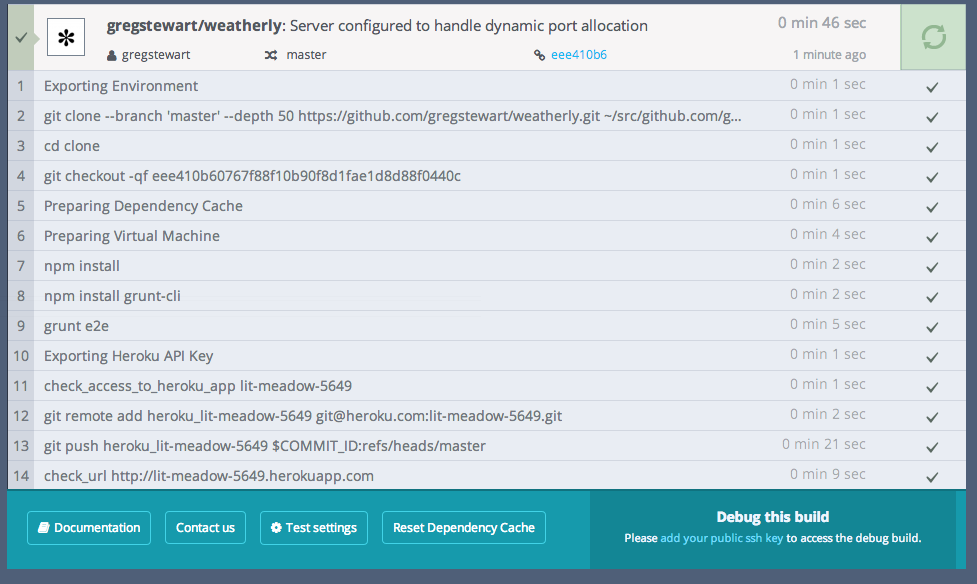
Successful build and deployment
The build process checks that we get a 200 response back and marks the build as successful, so let’s open up our browser to see the results of our work:
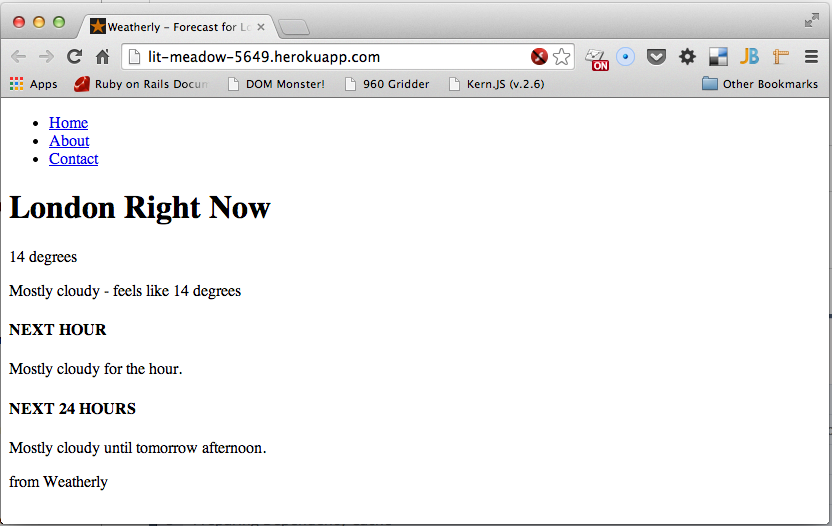
Weatherly running on Heroku
And there you are your Continuous Delivery pipeline has been created and in less than a minute we go from commit to production!
Recap
In this last section we:
- configued our ci envinronment
- it runs our feature test
- created a Heroku app
- configured our CI environment to deploy to that instance
- modified our web server to handle dynamic port allocation
Refactoring our build file
Before we move on to generating our assets, we are going to take a small detour and refactor our build file. In the upcoming sections we will be adding more tasks to it and it will be become difficult to get an overview of what is happening in there.
Here’s what our Gruntfile.js currently looks like:
 1 module.exports = function(grunt) {
 2 	'use strict';
 3
 4 	grunt.initConfig({
 5 		express: {
 6   			test: {
 7     			options: {
 8       				script: './server.js'
 9     			}
10   			}
11 		},
12 		cucumberjs: {
13   			src: 'tests/e2e/features/',
14   			options: {
15     			steps: 'tests/e2e/steps/'
16   			}
17 		}
18 	});
19
20 	grunt.loadNpmTasks('grunt-express-server');
21 	grunt.loadNpmTasks('grunt-selenium-webdriver');
22 	grunt.loadNpmTasks('grunt-cucumber');
23
24 	grunt.registerTask('e2e', [
25 		'selenium_start',
26 		'express:test',
27 		'cucumberjs',
28 		'selenium_stop',
29 		'express:test:stop'
30 	]);
31 };
And here’s what it will end up looking like once we are done:
 1 module.exports = function(grunt) {
 2 	'use strict';
 3
 4    	grunt.loadTasks('build');
 5
 6 	grunt.registerTask('e2e', [
 7 		'selenium_start',
 8 		'express:test',
 9 		'cucumberjs',
10 		'selenium_stop',
11 		'express:test:stop'
12 	]);
13 };
We kick things off as always with a new branch:
1 git checkout -b refactor-gruntfile
Create a new folder in the root of our project called build, this is where we will put our specfici grunt tasks. Let’s start with the express configuration. In our build folder create a file called express.js and add the following:
 1 (function(module) {
 2     'use strict';
 3     var config = {
 4         test: {
 5             options: {
 6                 script: './server.js'
 7             }
 8         }
 9     };
10
11     module.exports = function(grunt) {
12         grunt.loadNpmTasks('grunt-express-server');
13
14         grunt.config('express', config);
15     };
16 })(module);
We hav basically taken all of the Express configuration out of the Gruntfile.js and moved the loading of the npm task into this file. In order for Grunt to now load this file we can use the grunt.loadTasks('build'); directive.
 1 module.exports = function(grunt) {
 2 	'use strict';
 3
 4 	grunt.initConfig({
 5 		cucumberjs: {
 6   			src: 'tests/e2e/features/',
 7   			options: {
 8     			steps: 'tests/e2e/steps/'
 9   			}
10 		}
11 	});
12
13 	grunt.loadTasks('build');
14
15 	grunt.loadNpmTasks('grunt-express-server');
16 	grunt.loadNpmTasks('grunt-selenium-webdriver');
17 	grunt.loadNpmTasks('grunt-cucumber');
18
19 	grunt.registerTask('e2e', [
20 		'selenium_start',
21 		'express:test',
22 		'cucumberjs',
23 		'selenium_stop',
24 		'express:test:stop'
25 	]);
26 };
Running > grunt e2e again should confirm that all is still well and our end to end test still work. Next let’s move the Cucumber task into build\cucumber.js
 1 (function(module) {
 2     'use strict';
 3     var config = {
 4         src: 'tests/e2e/features/',
 5         options: {
 6             steps: 'tests/e2e/steps/'
 7         }
 8     };
 9
10     module.exports = function(grunt) {
11         grunt.loadNpmTasks('grunt-selenium-webdriver');
12         grunt.loadNpmTasks('grunt-cucumber');
13
14         grunt.config('cucumberjs', config);
15     };
16 })(module);
Once we have removed the configuration of the task and the loading of these we are in the state described at the outset of this chapter:
 1 module.exports = function(grunt) {
 2 	'use strict';
 3
 4    	grunt.loadTasks('build');
 5
 6 	grunt.registerTask('e2e', [
 7 		'selenium_start',
 8 		'express:test',
 9 		'cucumberjs',
10 		'selenium_stop',
11 		'express:test:stop'
12 	]);
13 };
Let’s validate things once more time: > grunt e2e and you should see the following output:
 1 Running "selenium_start" task
 2 seleniumrc webdriver ready on 127.0.0.1:4444
 3
 4 Running "express:test" (express) task
 5 Starting background Express server
 6 Listening on port 3000
 7
 8 Running "cucumberjs:src" (cucumberjs) task
 9 ...
10
11 1 scenario (1 passed)
12 3 steps (3 passed)
13
14 Running "selenium_stop" task
15
16 Running "express:test:stop" (express) task
17 Stopping Express server
18
19 Done, without errors.
With that done we can commit our changes to our repository:
1 > git add .
2 > git commit -m "Refactored our Gruntfile"
3 > git checkout master
4 > git merge refactor-gruntfile
5 > git push
Extending our build file by linting our code
To appreciate how convenient this approach is, let’s add a new task to lint our code:
1 checkout -b jshint-task
I like using JSHint, it’s prescriptive enough without being overbearing. You can install it using:
1 npm install grunt-contrib-jshint --save-dev
You can override the settings by either by specifying a .jshintrc file. This is a good idea particularly if you working as part of a team as you can share the configuration and thus all adhere to the conventions of the project. Let’s create a placeholder file:
1 touch .jshintrc
Here are a few settings that have been useful in previous projects to get the call rolling:
 1 {
 2     "strict": true,
 3     "unused": true,
 4     "undef": true,
 5     "camelcase": true,
 6     "curly": true,
 7     "eqeqeq": true,
 8     "forin": true,
 9     "indent": 4,
10     "newcap": true,
11     "trailing": true,
12     "maxdepth": 2,
13     "browser": true,
14     "devel": true,
15     "node": true,
16     "quotmark": true,
17
18     "globals": {
19         "sinon": false,
20         "define": false,
21         "beforeEach": false,
22         "afterEach": false,
23         "expect": false,
24         "describe": false,
25         "it": false,
26         "xdescribe": false,
27         "ddescribe": false,
28         "xit": false,
29         "iit": false,
30         "jasmine": false
31     }
32 }
Now for defining the task, create a build/lint.js file with the following content:
 1  (function (module) {
 2     var config = {
 3         options: {
 4             jshintrc: './.jshintrc'
 5         },
 6         source: {
 7             src: [
 8                 './Gruntfile.js',
 9                 './build/**/*.js',
10                 './tests/**/*.js',
11                 './js/**/*.js',
12             ]
13         },
14     };
15
16     module.exports = function (grunt) {
17         grunt.loadNpmTasks('grunt-contrib-jshint');
18
19         grunt.config('jshint', config);
20     }
21 })(module);
You can now run this task using > grunt jshint:
1 Running "jshint:source" (jshint) task
2 >> 5 files lint free.
3
4 Done, without errors.
You can add this task to a watcher, but I find that it slows the feedback loop, instead I add to a pre-commit hook, so that this only runs before I check my code in. We will also add it to our CI process, just in case someone forgets to add it to their pre-commit hook. To add a pre-commit hookl we need to do is create the following file .git/hooks/pre-commit with the following content:
1 #!/bin/sh
2 #
3 # Pre-commit hooks
4
5 # Run lint task before committing
6 grunt jshint
Add exit code.
To test this, let’s commit and merge:
 1 git add .
 2 git commit -m "Added linting"
 3
 4 Running "jshint:source" (jshint) task
 5
 6 build/lint.js
 7   2 |    var config = {
 8          ^ Missing "use strict" statement.
 9  15 |    }
10           ^ Missing semicolon.
11  21 |    }
12           ^ Missing semicolon.
13
14 >> 3 errors in 5 files
15 Warning: Task "jshint:source" failed. Use --force to continue.
Oh lucky we added linting! Let’s fix the problem:
 1 (function (module) {
 2     'use strict';
 3     var config = {
 4         options: {
 5             jshintrc: './.jshintrc'
 6         },
 7         source: {
 8             src: [
 9                 './Gruntfile.js',
10                 './build/**/*.js',
11                 './node_modules/weatherly/**/*.js',
12                 './tests/**/*.js',
13                 './js/**/*.js'
14             ]
15         }
16     };
17
18     module.exports = function (grunt) {
19         grunt.loadNpmTasks('grunt-contrib-jshint');
20
21         grunt.config('jshint', config);
22     };
23 })(module);
And now let’s ammend our commit:
1 git add .
2 git commit -m "Added linting"
3 Running "jshint:source" (jshint) task
4 >> 5 files lint free.
5
6 Done, without errors.
7 [jshint-task 8126006] Fixing linting issues
8 8 files changed, 30 insertions(+), 30 deletions(-)
9 rewrite build/lint.js (99%)
Now we can merge our changes in:
1 git checkout master
2 git merge jshint-task
3 git push
Recap
We split our tasks into individual modules and introduced grunt.loadTasks directive to pull these modules into our build file. We then added a new lint task to make sure our code was ship shape.
Building our assets
Now that we have a pipeline up and running it’s time to turn our attention to dealing with building our code and assets and figure out how are our app will consume these. We do not want to check in our generated assets, however Heroku deploys using a git mechanism.
Let’s start by creating some tasks to generate our css, then concatenate and ulgyfy our JS and we’ll finish by deploying these assets to Heroku as part of a successful build. We’ll also add some tasks to run these tasks on our local machine and have these re-generated when we save changes to the file.
1 git checkout -c generate-assets
TODO: why do we generate our assets?
Compile our less to css
Let’s tackle with our CSS files. The first thing we want to do is add the destination folder for our css content to the .gitignore list:
1 node_modules
2 .idea
3 bower_components
4 phantomjsdriver.log
5 app/css/
Under our source folder let’s create a less folder and create a main.less file in it. Here’s content of the file:
1 @import '../../bower_components/bootstrap/less/bootstrap';
Our build tasks will take this import directive and create us a nice main.css file that we can then use in our app.
1 npm install grunt-contrib-less --save-dev
And now let’s create a task to generate our css files by adding a less.js file to our build folder:
 1 (function(module) {
 2     'use strict';
 3     var config = {
 4         production: {
 5             options: {
 6                 paths: ['app/css/'],
 7                 cleancss: true
 8             },
 9             files: {
10                 'app/css/main.css': 'src/less/main.less'
11             }
12         }
13     };
14
15     module.exports = function(grunt) {
16         grunt.loadNpmTasks('grunt-contrib-less');
17
18         grunt.config('less', config);
19     };
20 })(module);
To invoke this we could just type grunt less:production, but will doing more building of assets, so let’s wrap this in a custom task in our Gruntfile.js
 1 module.exports = function (grunt) {
 2     'use strict';
 3
 4     grunt.loadTasks('build');
 5
 6     grunt.registerTask('generate', ['less:production']);
 7
 8     grunt.registerTask('e2e', [
 9         'selenium_start',
10         'express:test',
11         'cucumberjs',
12         'selenium_stop',
13         'express:test:stop'
14     ]);
15 };
When you run > grunt generate, you should see the following output:
1 Running "less:production" (less) task
2 File app/css/main.css created: 131.45 kB → 108.43 kB
If you were to start up our server and browse to localhost:3000, our UI should have more of a Bootstrap feel to it!

Rendered HTML with generated css
Now bootstrap also needs some fonts, so let’s move these across as part of the build.
1 npm install grunt-contrib-copy --save-dev
And add a simple task to copy our fonts across as well, create a copy.js in our build folder:
 1 (function(module) {
 2     'use strict';
 3     var config = {
 4         fonts: {
 5             expand: true,
 6             src: ['bower_components/bootstrap/fonts/*'],
 7             dest: 'app/fonts/',
 8             filter: 'isFile',
 9             flatten: true
10         }
11     };
12
13     module.exports = function(grunt) {
14         grunt.loadNpmTasks('grunt-contrib-copy');
15
16         grunt.config('copy', config);
17     };
18 })(module);
Let’s add this opying of fonts to our generate task, by editing our Gruntfile.js.
 1 module.exports = function (grunt) {
 2     'use strict';
 3
 4     grunt.loadTasks('build');
 5
 6     grunt.registerTask('generate', ['less:production', 'copy:fonts']);
 7
 8     grunt.registerTask('e2e', [
 9         'selenium_start',
10         'express:test',
11         'cucumberjs',
12         'selenium_stop',
13         'express:test:stop'
14     ]);
15 };
Running >grunt generate task should now also copy our fonts across.
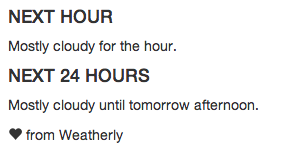
Fonts now included
This is great, but how do we get this to run as part of our successful build?
Heroku build packs
Heroku has a way to run commands after a build, these come in the form of build packs. Luckily for us someone has already gone through the effort of creating one to run Grunt after an install.
I have to say it’s not ideal, however given Heroku’s git based deployment approach, we have little choice but to generate these as part of the deployement. Typicall you would rely on the build to generate a package with all of the generated assets ready for consumption. This works though and does not force us to commit our generated assets into our repository.
So here’s how you go about installing our Build Pack for Grunt (be sure to replace --app lit-meadow-5649 with your actual heroku app name):
1 heroku login
2
3 heroku config:add BUILDPACK_URL=https://github.com/mbuchetics/heroku-buildpack-n\
4 odejs-grunt.git --app lit-meadow-5649
5
6 heroku config:set NODE_ENV=production --app lit-meadow-5649
Then we modify our Gruntfile to include a new heroku:production task, which basically references our build task:
 1 module.exports = function (grunt) {
 2 	'use strict';
 3
 4     grunt.loadTasks('build');
 5
 6     grunt.registerTask('generate', ['less:production', 'copy:fonts']);
 7     grunt.registerTask('e2e', [
 8         'selenium_start',
 9         'express:test',
10         'cucumberjs',
11         'selenium_stop',
12         'express:test:stop'
13     ]);
14
15     grunt.registerTask('heroku:production', 'generate');
16 };
The final step involves re-jigging package.json to include those newly added grunt tasks as a general dependency:
 1     {
 2     "name": "weatherly",
 3     "version": "0.0.0",
 4     "description": "Building a web app guided by tests",
 5     "main": "index.js",
 6     "engines": {
 7         "node": "~0.10.28"
 8     },
 9     "scripts": {
10         "test": "grunt test"
11     },
12     "repository": {
13         "type": "git",
14         "url": "https://github.com/gregstewart/weatherly.git"
15     },
16     "author": "Greg Stewart",
17     "license": "MIT",
18     "bugs": {
19         "url": "https://github.com/gregstewart/weatherly/issues"
20     },
21     "homepage": "https://github.com/gregstewart/weatherly",
22     "dependencies": {
23         "express": "^4.4.5",
24         "grunt-contrib-copy": "^0.5.0",
25         "grunt-contrib-less": "^0.11.3"
26     },
27     "devDependencies": {
28         "chai": "^1.9.1",
29         "cucumber": "^0.4.0",
30         "grunt": "^0.4.5",
31         "grunt-contrib-copy": "^0.5.0",
32         "grunt-contrib-less": "^0.11.3",
33         "grunt-cucumber": "^0.2.3",
34         "grunt-express-server": "^0.4.17",
35         "grunt-selenium-webdriver": "^0.2.420",
36         "webdriverjs": "^1.7.1"
37     }
38 }
This is another thing about this approach that I am not a fan of, having to move what are essentially development dependencies into our production dependencies.
Now we are nearly ready to test this out, however there is one more task we need to add. Since we are using Bower for some of our front end components and we haven’t checked these into our repository, we’ll need to restore them from our bower.json file. Let’s first install a new grunt package to assist us:
1 npm install grunt-bower-task --save
Once again we create a specific bower.js file in our build folder:
 1 (function(module) {
 2     'use strict';
 3     var config = {
 4         install: {
 5             options: {
 6                 cleanTargetDir: false,
 7                 targetDir: './bower_components'
 8             }
 9         }
10     };
11
12     module.exports = function(grunt) {
13         grunt.loadNpmTasks('grunt-bower-task');
14
15         grunt.config('bower', config);
16     };
17 })(module);
Annd register a task in our Gruntfile.js
 1 module.exports = function (grunt) {
 2 	'use strict';
 3
 4     grunt.loadTasks('build');
 5
 6     grunt.registerTask('generate', ['less:production', 'copy:fonts']);
 7 	grunt.registerTask('build', ['bower:install', 'generate']);
 8
 9     grunt.registerTask('e2e', [
10         'selenium_start',
11         'express:test',
12         'cucumberjs',
13         'selenium_stop',
14         'express:test:stop'
15     ]);
16
17     grunt.registerTask('heroku:production', 'build');
18 };
With that let’s push these changes and see if we can’t have a more nicely styled page appear on our Heroku app!
1 git add .
2 git commit -m "Generate less as part of the build and copy fonts to app folder"
3 git checkout master
4 git merge code-build
5 git push origin master
Concatenate and minify our JavaScript
Having generated our CSS at build time, it’s time to turn our attention to concatenating and minifying our JavaScript.
If you recall in our getting started section we set up our project and used Bower to manage our front end dependencies. For our code we will be Browserify and adopting a CommonJS approach to dealing with modules and dependencies.
TODO: CommonJS vs AMD and why
To get started first create a our source directory for our JavaScript, we’ll store our source under:
1 > mkdir node_modules/weatherly/js
Storing them under node_modules has a great benefit when using browserify, you no longer need require your files using relative paths such as this little beauty:
1 var model = require('../../src/js/model/TodaysWeather');
Typing all this out will get tedius very quickly. Time for a file to test our build process, call it TodaysWeather.js and let’s save it under a sub folder called models:
1 > mkdir node_modules/weatherly/js/models
2 > touch node_modules/weatherly/js/models/TodaysWeather.js
And add the following to that file:
1 var TodaysWeather = function () {
2     console.log('test');
3 };
4
5 module.exports = TodaysWeather;
At this point you may be wondering how we are going to commit the code under node_modules/weatherly/js, given how we have set up our .gitignore file. I will come to that shortly.
With that done let’s install a grunt task for Browserify
1 npm install grunt-browserify --save
The reason we have chosen a grunt task is that we will use this to export our source so that browsers can understand module.exports and use it to concatenate our code.
We’ll skip through a few steps below by creating a browserify.js file and editing our Gruntfile.js to include the task we just installed, define the steps to build our JavaScript and include it into our build task:
 1 (function(module) {
 2     'use strict';
 3     var config = {
 4         code: {
 5            	dest: 'app/js/main.min.js',
 6             src: 'node_modules/weatherly/js/**/*.js'            			}
 7     };
 8
 9     module.exports = function(grunt) {
10         grunt.loadNpmTasks('grunt-browserify');
11
12         grunt.config('browserify', config);
13     };
14 })(module);
The Gruntfile.js:
 1 module.exports = function (grunt) {
 2 	'use strict';
 3
 4 	grunt.loadTasks('build');
 5
 6 	grunt.registerTask('generate', ['less:production', 'copy:fonts', 'browserify:co\
 7 de']);
 8 	grunt.registerTask('build', ['bower:install', 'generate']);
 9 	grunt.registerTask('e2e', [
10         'selenium_start',
11         'express:test',
12         'cucumberjs',
13         'selenium_stop',
14         'express:test:stop'
15     ]);
16
17     grunt.registerTask('heroku:production', 'build');
18 };
If we now run our generate task you should find a main.min.js file under app/js, which contains a bunch of Browserify and our test file. However you will notice that while it’s concatenated it’s not minified. Let’s fix this.
I chose to go with Uglifyify, as always let’s just install it:
1 npm install uglifyify --save
And then edit our browserify.js file and telling the task to use it is a transform:
 1 (function(module) {
 2     'use strict';
 3     var config = {
 4         code: {
 5             dest: 'app/js/main.min.js',
 6             src: 'node_modules/weatherly/js/**/*.js',
 7             options: {
 8                 transform: ['uglifyify']
 9             }
10         }
11     };
12
13     module.exports = function(grunt) {
14         grunt.loadNpmTasks('grunt-browserify');
15
16         grunt.config('browserify', config);
17     };
18 })(module);
If you now run our generate task, the contents of main should be nicely minified. Now all that’s left to do is edit our index.html file and add our generated JavaScript file:
 1 <!DOCTYPE html>
 2 <!--[if lt IE 7]>      <html class="no-js lt-ie9 lt-ie8 lt-ie7"> <![endif]-->
 3 <!--[if IE 7]>         <html class="no-js lt-ie9 lt-ie8"> <![endif]-->
 4 <!--[if IE 8]>         <html class="no-js lt-ie9"> <![endif]-->
 5 <!--[if gt IE 8]><!--> <html class="no-js"> <!--<![endif]-->
 6     <head>
 7         <meta charset="utf-8">
 8         <meta http-equiv="X-UA-Compatible" content="IE=edge">
 9         <title>Weatherly - Forecast for London</title>
10         <meta name="description" content="">
11         <meta name="viewport" content="width=device-width, initial-scale=1">
12
13         <!-- Place favicon.ico and apple-touch-icon.png in the root directory -->
14
15         <link rel="stylesheet" href="css/main.css">
16     </head>
17     <body>
18         <!--[if lt IE 7]>
19             <p class="browsehappy">You are using an <strong>outdated</strong> br\
20 owser. Please <a href="http://browsehappy.com/">upgrade your browser</a> to impr\
21 ove your experience.</p>
22         <![endif]-->
23
24         <!-- Add your site or application content here -->
25         <div class="container">
26             <div class="header">
27                 <ul class="nav nav-pills pull-right">
28                     <li class="active"><a href="#">Home</a></li>
29                     <li><a href="#">About</a></li>
30                     <li><a href="#">Contact</a></li>
31                 </ul>
32             </div>
33
34             <div class="jumbotron">
35                 <h1>London Right Now</h1>
36                 <p class="temperature">14 degrees</p>
37                 <p>Mostly cloudy - feels like 14 degrees</p>
38             </div>
39
40             <div class="row marketing">
41                 <div class="col-lg-6">
42                     <h4>NEXT HOUR</h4>
43                     <p>Mostly cloudy for the hour.</p>
44
45                     <h4>NEXT 24 HOURS</h4>
46                     <p>Mostly cloudy until tomorrow afternoon.</p>
47                 </div>
48             </div>
49
50             <div class="footer">
51                 <p><span class="glyphicon glyphicon-heart"></span> from Weatherl\
52 y</p>
53             </div>
54
55         </div>
56         <p></p>
57
58         <script src="//ajax.googleapis.com/ajax/libs/jquery/1.10.2/jquery.min.js\
59 "></script>
60         <script>window.jQuery || document.write('<script src="js/vendor/jquery-1\
61 .10.2.min.js"><\/script>')</script>
62
63         <!-- Google Analytics: change UA-XXXXX-X to be your site's ID. -->
64         <script>
65             (function(b,o,i,l,e,r){b.GoogleAnalyticsObject=l;b[l]||(b[l]=
66                     function(){(b[l].q=b[l].q||[]).push(arguments)});b[l].l=+new\
67  Date;
68                 e=o.createElement(i);r=o.getElementsByTagName(i)[0];
69                 e.src='//www.google-analytics.com/analytics.js';
70                 r.parentNode.insertBefore(e,r)}(window,document,'script','ga'));
71             ga('create','UA-XXXXX-X');ga('send','pageview');
72         </script>
73         <script src="js/main.min.js"></script>
74     </body>
75 </html>
Before we commit our changes let’s edit our .gitignore file one more time and tell it not to include our generated JavaScript:
1 node_modules
2 .idea
3 bower_components
4 phantomjsdriver.log
5 app/css/
6 app/fonts/
7 app/js/
While are here let’s fix our git configuration so that it includes our app code by editing our .gitignore file to look as follows:
1 .idea
2 bower_components
3 phantomjsdriver.log
4 app/css/
5 app/fonts/
6 app/js/
7 node_modules/*
8 !node_modules/weatherly
By changing the blanket exclusion rule for our node_modules to one using exceptions, we can now commit the weatherly code that sits under our node_modules folder. That’s what the last two lines do:
1 node_modules/*
2 !node_modules/weatherly
Now when you type git add . it will include all if your changes:
 1 > git status
 2 > # On branch generate-assets
 3 > # Changes to be committed:
 4 > #   (use "git reset HEAD <file>..." to unstage)
 5 > #
 6 > #	modified:   .gitignore
 7 > #	modified:   Gruntfile.js
 8 > #	new file:   node_modules/weatherly/js/model/TodaysWeather.js
 9 > #	modified:   package.json
10 > #	modified:   app/index.html
11 > #
12 > # Changes not staged for commit:
13 > #   (use "git add/rm <file>..." to update what will be committed)
14 > #   (use "git checkout -- <file>..." to discard changes in working directory)
15 > #
Let’s commit, merge and push to our remote repository:
1 git add .
2 git commit -m "JavaScript browserified and uglyfied"
3 git checkout master
4 git merge generate-assets
5 git push
TODO recap for the chapter
Unit tests
Up until now we have been very much focused on setting up our build pipeline and writing a high level feature tests. And while I promised that it was time to write some code, we do have do a few more setup steps to carry out before we can get stuck in. To get confidence in our code we will be writing JavaScript modules using tests and we want those tests to run all the time (i.e. with each save). To that end we need to set up some more tasks to run those tests for us and add them to our build process.
Setting up our unit test runner using karma
I have chosen Karma as our Unit test runner, if you are new to Karma I suggest you take a peak at some of the videos on the site. It comes with a variety of plugins and supports basically all of the popular unit test frameworks. As our testing framework we will use Jasmine.
Before going to far, let’s quickly create a few folders in the root of our project. You should already have a node_modules/weatherly/src/js, which is where we will store all of our JavaScript source code. We already have a task to concatenate/minify and move it to our app folder. Now we just need to create a unit folder for our unit tests. So the structure of our code and tests will look as follows:
1 -> tests
2 	-> unit
3 -> node_modules
4 	-> weatherly
5 		->js
As with all tasks, let’s create a new branch:
1 > git checkout -b test-runner
And then let’s install the package and add it to our package.json file:
1 > npm install karma --save-dev
Ok time to create our Karma configuration file, typically you would type in the root of your project:
1 > karma init karma.conf.js
This would guide you through the process of setting up your test runner, here’s how I answered the setup questions:
 1 Which testing framework do you want to use ?
 2 Press tab to list possible options. Enter to move to the next question.
 3 > jasmine
 4
 5 Do you want to use Require.js ?
 6 This will add Require.js plugin.
 7 Press tab to list possible options. Enter to move to the next question.
 8 > no
 9
10 Do you want to capture any browsers automatically ?
11 Press tab to list possible options. Enter empty string to move to the next quest\
12 ion.
13 > PhantomJS
14 >
15
16 What is the location of your source and test files ?
17 You can use glob patterns, eg. "js/*.js" or "test/**/*Spec.js".
18 Enter empty string to move to the next question.
19 > node_modules/weatherly/js/**/*.js,
20 > tests/unit/**/*.js
21 >
22
23 Should any of the files included by the previous patterns be excluded ?
24 You can use glob patterns, eg. "**/*.swp".
25 Enter empty string to move to the next question.
26 >
27
28 Do you want Karma to watch all the files and run the tests on change ?
29 Press tab to list possible options.
30 > no
31
32 Config file generated at "/Users/writer/Projects/github/weatherly/karma.conf.js".
And here’s the corresponding configuration that was generated:
 1 // Karma configuration
 2 // Generated on Sun Jul 20 2014 16:18:54 GMT+0100 (BST)
 3
 4 module.exports = function (config) {
 5     config.set({
 6
 7         // base path that will be used to resolve all patterns (eg. files, exclu\
 8 de)
 9         basePath: '',
10
11
12         // frameworks to use
13         // available frameworks: https://npmjs.org/browse/keyword/karma-adapter
14         frameworks: ['jasmine'],
15
16
17         // list of files / patterns to load in the browser
18         files: [
19             'node_modules/weatherly/js/**/*.js',
20             'tests/unit/**/*.js'
21         ],
22
23
24         // list of files to exclude
25         exclude: [
26         ],
27
28
29         // preprocess matching files before serving them to the browser
30         // available preprocessors: https://npmjs.org/browse/keyword/karma-prepr\
31 ocessor
32         preprocessors: {
33         },
34
35
36         // test results reporter to use
37         // possible values: 'dots', 'progress'
38         // available reporters: https://npmjs.org/browse/keyword/karma-reporter
39         reporters: ['progress'],
40
41
42         // web server port
43         port: 9876,
44
45
46         // enable / disable colors in the output (reporters and logs)
47         colors: true,
48
49
50         // level of logging
51         // possible values: config.LOG_DISABLE || config.LOG_ERROR || config.LOG\
52 _WARN || config.LOG_INFO || config.LOG_DEBUG
53         logLevel: config.LOG_INFO,
54
55
56         // enable / disable watching file and executing tests whenever any file \
57 changes
58         autoWatch: false,
59
60
61         // start these browsers
62         // available browser launchers: https://npmjs.org/browse/keyword/karma-l\
63 auncher
64         browsers: ['PhantomJS'],
65
66
67         // Continuous Integration mode
68         // if true, Karma captures browsers, runs the tests and exits
69         singleRun: false
70     });
71 };
Let’s take it for a spin:
1 > karma start
2 > INFO [karma]: Karma v0.12.17 server started at http://localhost:9876/
3 > INFO [launcher]: Starting browser PhantomJS
4 > WARN [watcher]: Pattern "/Users/writer/Projects/github/weatherly/tests/unit/**\
5 /*.js" does not match any file.
6 > INFO [PhantomJS 1.9.7 (Mac OS X)]: Connected on socket iqriF61DkEH0qp-sXlwR wi\
7 th id 10962078
8 > PhantomJS 1.9.7 (Mac OS X): Executed 0 of 0 ERROR (0.003 secs / 0 secs)
So we got an error, but that is because we have no tests. Let’s wrap this into a grunt task:
1 > npm install grunt-karma --save-dev
Create a build\test.js file:
 1 (function (module) {
 2     'use strict';
 3     var config = {
 4         karma: {
 5         	unit: {
 6             	configFile: 'karma.conf.js'
 7         	}
 8     	}
 9     };
10
11     module.exports = function (grunt) {
12         grunt.loadNpmTasks('grunt-karma');
13
14         grunt.config('karma', config);
15     };
16 })(module);
Let’s try this out our new grunt task:
 1 > grunt karma:unit
 2
 3 > Running "karma:unit" (karma) task
 4 > INFO [karma]: Karma v0.12.17 server started at http://localhost:9876/
 5 > INFO [launcher]: Starting browser PhantomJS
 6 > WARN [watcher]: Pattern "/Users/gregstewart/Projects/github/weatherly/src/js/*\
 7 */*.js" does not match any file.
 8 > WARN [watcher]: Pattern "/Users/gregstewart/Projects/github/weatherly/tests/un\
 9 it/**/*.js" does not match any file.
10 > INFO [PhantomJS 1.9.7 (Mac OS X)]: Connected on socket QO4qLCSO-4DZVO7eaRky wi\
11 th id 9893379
12 > PhantomJS 1.9.7 (Mac OS X): Executed 0 of 0 ERROR (0.003 secs / 0 secs)
13 > Warning: Task "karma:unit" failed. Use --force to continue.
14
15 > Aborted due to warnings.
Similar output, with the difference that our process terminated this time because of the warnings about no files macthing our pattern. We’ll fix this issue by writing our very first unit test!
Writing and running our first unit test
In the previous chapter we created a source folder and added a sample module, to confirm our build process for our JavaScript assets worked. Let’s go ahead and create one test file, as well as some of the folder structure for our project:
1 > mkdir tests/unit/
2 > mkdir tests/unit/model/
3 > touch tests/unit/model/TodaysWeather-spec.js
What we want to do know is validate our Karma configuration before we starting our real tests, so let’s add a sample test to our TodaysWeather-spec.js:
1 'use strict';
2 /* exported TodaysWeather */
3 var TodaysWeather = require('weatherly/js/model/TodaysWeather');
4
5 describe('Today \'s weather', function () {
6 	it('should return 2', function () {
7    		expect(1+1).toBe(2);
8     });
9 });
We could try and run our Karma task again, but this would only result in an error, because we are using the CommonJS module approach and we would see an error stating that module is not defined, because our module under tests uses:
1 module.exports = TodaysWeather;
We need to somehow tell our test runner that we use the CommonJS module type and resolve module and require. Once again we will resort to a npm module: karma-commonjs:
1 > npm install karma-commonjs --save-dev
Next we need to update our karma.conf.js file:
 1 // Karma configuration
 2 // Generated on Sun Jul 20 2014 16:18:54 GMT+0100 (BST)
 3
 4 module.exports = function (config) {
 5     config.set({
 6
 7         // base path that will be used to resolve all patterns (eg. files, exclu\
 8 de)
 9         basePath: '',
10
11
12         // frameworks to use
13         // available frameworks: https://npmjs.org/browse/keyword/karma-adapter
14         frameworks: ['jasmine', 'commonjs'],
15
16
17         // list of files / patterns to load in the browser
18         files: [
19             'node_modules/weatherly/js/**/*.js',
20             'tests/unit/**/*.js'
21         ],
22
23
24         // list of files to exclude
25         exclude: [
26         ],
27
28
29         // preprocess matching files before serving them to the browser
30         // available preprocessors: https://npmjs.org/browse/keyword/karma-prepr\
31 ocessor
32         preprocessors: {
33             'node_modules/weatherly/js/**/*.js': ['commonjs'],
34             'tests/unit/**/*.js': ['commonjs']
35         },
36
37
38         // test results reporter to use
39         // possible values: 'dots', 'progress'
40         // available reporters: https://npmjs.org/browse/keyword/karma-reporter
41         reporters: ['progress'],
42
43
44         // web server port
45         port: 9876,
46
47
48         // enable / disable colors in the output (reporters and logs)
49         colors: true,
50
51
52         // level of logging
53         // possible values: config.LOG_DISABLE || config.LOG_ERROR || config.LOG\
54 _WARN || config.LOG_INFO || config.LOG_DEBUG
55         logLevel: config.LOG_INFO,
56
57
58         // enable / disable watching file and executing tests whenever any file \
59 changes
60         autoWatch: false,
61
62
63         // start these browsers
64         // available browser launchers: https://npmjs.org/browse/keyword/karma-l\
65 auncher
66         browsers: ['PhantomJS'],
67
68
69         // Continuous Integration mode
70         // if true, Karma captures browsers, runs the tests and exits
71         singleRun: true
72     });
73 };
We added commonjs to the frameworks block and then configured the preprocessor block to process our source and test files using our chosen module type. Let’s try this again:
1 > grunt karma:unit
2 > Running "karma:unit" (karma) task
3 > INFO [karma]: Karma v0.12.17 server started at http://localhost:9876/
4 > INFO [launcher]: Starting browser PhantomJS
5 > INFO [PhantomJS 1.9.7 (Mac OS X)]: Connected on socket 3i335x4S_5GG88E7TsOM wi\
6 th id 58512369
7 > PhantomJS 1.9.7 (Mac OS X): Executed 1 of 1 SUCCESS (0.005 secs / 0.002 secs)
8
9 > Done, without errors.
Perfect!
Running our tests as part of the build
Now that we have our test runner set up’ let’s add it to our build process. This is going to require us to register a new task as we will need to do a few things:
- build our assets
- run our unit tests
- run our end to end tests
Let’s go ahead and create a task called test in our Gruntfile and configure it to execute these tasks:
 1 module.exports = function (grunt) {
 2 	'use strict';
 3
 4     grunt.registerTask('generate', ['less:production', 'copy:fonts', 'browserify\
 5 :code']);
 6     grunt.registerTask('build', ['bower:install', 'generate']);
 7
 8     grunt.registerTask('e2e', [
 9         'selenium_start',
10         'express:test',
11         'cucumberjs',
12         'selenium_stop',
13         'express:test:stop'
14     ]);
15
16     grunt.registerTask('test', ['build', 'karma:unit', 'e2e']);
17
18     grunt.registerTask('heroku:production', 'build');
19 };
And let’s make sure everything runs as intended:
 1 > grunt test
 2 > Running "less:production" (less) task
 3 > File app/css/main.css created: 131.45 kB → 108.43 kB
 4
 5 > Running "copy:fonts" (copy) task
 6 > Copied 4 files
 7
 8 > Running "browserify:dist" (browserify) task
 9
10 > Running "karma:unit" (karma) task
11 > INFO [karma]: Karma v0.12.17 server started at http://localhost:9876/
12 > INFO [launcher]: Starting browser PhantomJS
13 > INFO [PhantomJS 1.9.7 (Mac OS X)]: Connected on socket 1kikUD-UC4_Gd6Qh9T49 wi\
14 th id 53180162
15 > PhantomJS 1.9.7 (Mac OS X): Executed 1 of 1 SUCCESS (0.002 secs / 0.002 secs)
16
17 > Running "selenium_start" task
18 > seleniumrc webdriver ready on 127.0.0.1:4444
19
20 > Running "express:test" (express) task
21 > Starting background Express server
22 > Listening on port 3000
23
24 > Running "cucumberjs:src" (cucumberjs) task
25 > ...
26
27 > 1 scenario (1 passed)
28 > 3 steps (3 passed)
29
30 > Running "selenium_stop" task
31
32 > Running "express:test:stop" (express) task
33 > Stopping Express server
34
35 > Done, without errors.
If you recall we configured our build to execute grunt e2e, we need to update this now to execute grunt test. Log into to your Codeship dashboard and edit the test configuration:
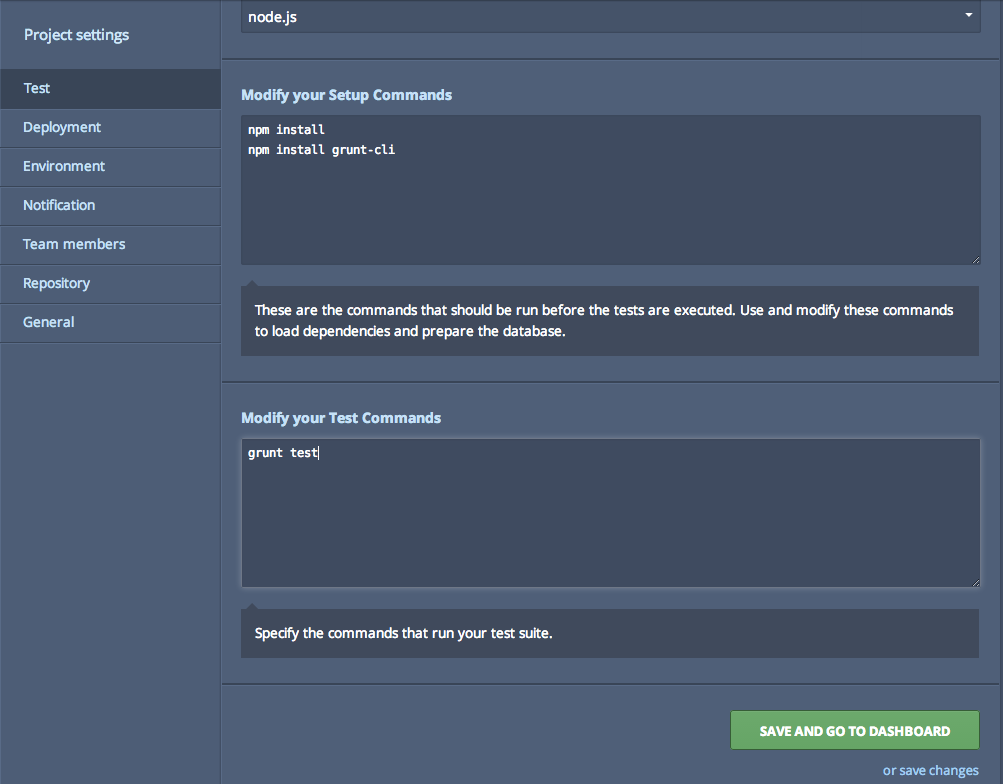
Codeship dashboard with updating test configuration
Ready to give this is a spin?
> git status > git add . > git commit -m “Karma test configuration added and new build test task created” > git checkout master > git merge test-runner > git pushIf we keep an eye on our dashboard we should see a build kicked-off and test task being executed:
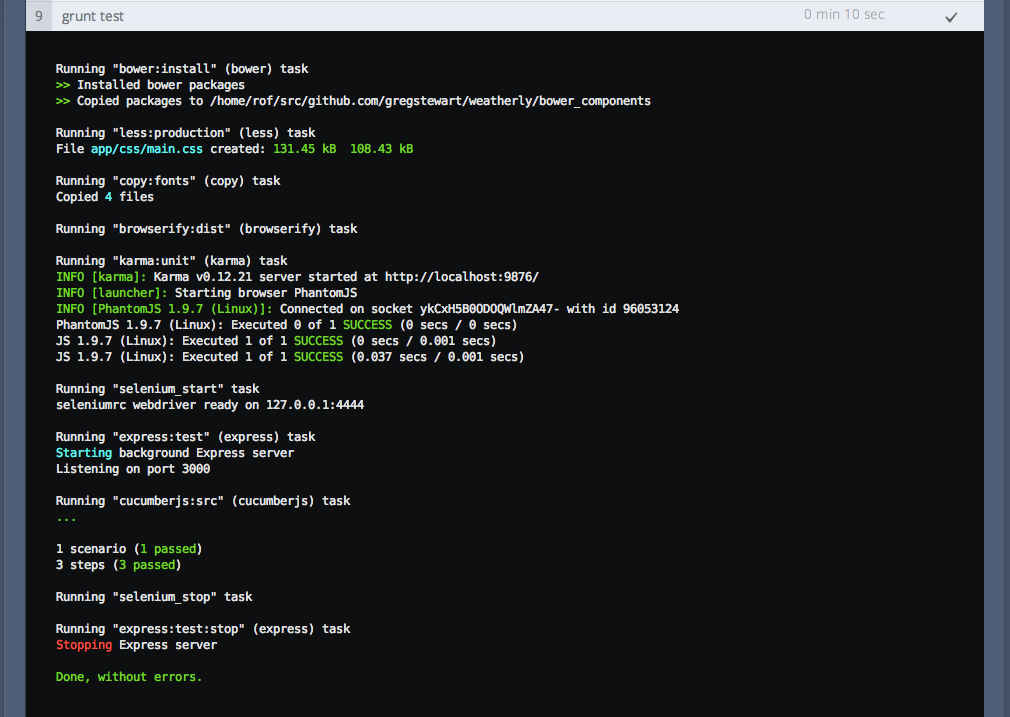
Codeship dashboard with updating test configuration
Continuously running our tests
So far so good. While it’s it’s nice to have our tests execute manually, let’s automate this. Could it be as simple as setting the karma.conf.js setting singleRun to false and autoWatch to true, well kind of. When running things on our build server we still want the single run to be true, however for local development purposes it should always run. So let’s tackle this:
1 > git checkout -b run-tests-continuously
Let’start by modifying our karma.conf.js file to run tests continuously:
 1 // Karma configuration
 2 // Generated on Sun Jul 20 2014 16:18:54 GMT+0100 (BST)
 3
 4 module.exports = function (config) {
 5     config.set({
 6
 7         // base path that will be used to resolve all patterns (eg. files, exclu\
 8 de)
 9         basePath: '',
10
11
12         // frameworks to use
13         // available frameworks: https://npmjs.org/browse/keyword/karma-adapter
14         frameworks: ['jasmine', 'commonjs'],
15
16
17         // list of files / patterns to load in the browser
18         files: [
19             'node_modules/weatherly/js/**/*.js',
20             'tests/unit/**/*.js'
21         ],
22
23
24         // list of files to exclude
25         exclude: [
26         ],
27
28
29         // preprocess matching files before serving them to the browser
30         // available preprocessors: https://npmjs.org/browse/keyword/karma-prepr\
31 ocessor
32         preprocessors: {
33             'node_modules/weatherly/js/**/*.js': ['commonjs'],
34             'tests/unit/**/*.js': ['commonjs']
35         },
36
37
38         // test results reporter to use
39         // possible values: 'dots', 'progress'
40         // available reporters: https://npmjs.org/browse/keyword/karma-reporter
41         reporters: ['progress'],
42
43
44         // web server port
45         port: 9876,
46
47
48         // enable / disable colors in the output (reporters and logs)
49         colors: true,
50
51
52         // level of logging
53         // possible values: config.LOG_DISABLE || config.LOG_ERROR || config.LOG\
54 _WARN || config.LOG_INFO || config.LOG_DEBUG
55         logLevel: config.LOG_INFO,
56
57
58         // enable / disable watching file and executing tests whenever any file \
59 changes
60         autoWatch: true,
61
62
63         // start these browsers
64         // available browser launchers: https://npmjs.org/browse/keyword/karma-l\
65 auncher
66         browsers: ['PhantomJS'],
67
68
69         // Continuous Integration mode
70         // if true, Karma captures browsers, runs the tests and exits
71         singleRun: false
72     });
73 };
Try this out by running grunt karma:unit and after the first run has completed making a change to our source TodaysWeather file:
 1 > grunt karma:unit
 2 > Running "karma:unit" (karma) task
 3 > INFO [karma]: Karma v0.12.17 server started at http://localhost:9876/
 4 > INFO [launcher]: Starting browser PhantomJS
 5 > INFO [PhantomJS 1.9.7 (Mac OS X)]: Connected on socket 9k2m2-j9Ets37p7sWD2Y wi\
 6 th id 21051890
 7 > PhantomJS 1.9.7 (Mac OS X): Executed 1 of 1 SUCCESS (0.007 secs / 0.003 secs)
 8 > INFO [watcher]: Changed file "/Users/gregstewart/Projects/github/weatherly/nod\
 9 e_modules/weatherly/js/model/TodaysWeather.js".
10 > PhantomJS 1.9.7 (Mac OS X): Executed 1 of 1 SUCCESS (0.005 secs / 0.002 secs)
Exactly what we wanted. Let’s now tackle our build versus development problem. We will just create a seperate build task in our test.js file that uses the same configuration file but overrides the properties we need for our build environment:
 1 (function (module) {
 2     'use strict';
 3     var config = {
 4         dev: {
 5             configFile: 'karma.conf.js'
 6         },
 7         ci: {
 8             configFile: 'karma.conf.js',
 9             singleRun: true,
10             autoWatch: false
11         }
12     };
13
14     module.exports = function (grunt) {
15         grunt.loadNpmTasks('grunt-karma');
16
17         grunt.config('karma', config);
18     };
19 })(module);
I took the chance to rename the karma:unit task to karma:dev and create a karma:ci task. The next thing was update the test task in our Gruntfile.js to also execute karma:ci instead of karma:unit.
 1 module.exports = function (grunt) {
 2     'use strict';
 3
 4     grunt.loadTasks('build');
 5
 6     grunt.registerTask('generate', ['less:production', 'copy:fonts', 'browserify\
 7 :code']);
 8     grunt.registerTask('build', ['bower:install', 'generate']);
 9
10     grunt.registerTask('e2e', [
11         'selenium_start',
12         'express:test',
13         'cucumberjs',
14         'selenium_stop',
15         'express:test:stop'
16     ]);
17
18     grunt.registerTask('test', ['build', 'karma:ci', 'e2e']);
19     grunt.registerTask('heroku:production', 'build');
20 };
Let’s test all those changes:
 1 > grunt test
 2 > Running "bower:install" (bower) task
 3 > >> Installed bower packages
 4 > >> Copied packages to /Users/gregstewart/Projects/github/weatherly/bower_compo\
 5 nents
 6
 7 > Running "less:production" (less) task
 8 > File app/css/main.css created: 131.45 kB → 108.43 kB
 9
10 > Running "copy:fonts" (copy) task
11 > Copied 4 files
12
13 > Running "browserify:code" (browserify) task
14
15 > Running "karma:ci" (karma) task
16 > INFO [karma]: Karma v0.12.17 server started at http://localhost:9876/
17 > INFO [launcher]: Starting browser PhantomJS
18 > INFO [PhantomJS 1.9.7 (Mac OS X)]: Connected on socket 67MYRP0HFPzhHE9wY3vt wi\
19 th id 58848767
20 > PhantomJS 1.9.7 (Mac OS X): Executed 1 of 1 SUCCESS (0.002 secs / 0.002 secs)
21
22 > Running "selenium_start" task
23 > seleniumrc webdriver ready on 127.0.0.1:4444
24
25 > Running "express:test" (express) task
26 > Starting background Express server
27 > Listening on port 3000
28
29 > Running "cucumberjs:src" (cucumberjs) task
30 > ...
31
32 > 1 scenario (1 passed)
33 > 3 steps (3 passed)
34
35 > Running "selenium_stop" task
36
37 > Running "express:test:stop" (express) task
38 > Stopping Express server
39
40 > Done, without errors.
Time to commit our changes back to master and push to origin and see the whole thing go through our build pipeline:
1 > git add .
2 > git commit -m "Run tests continuously in dev and single run on CI"
3 > git checkout master
4 > git merge run-tests-continuously
5 > git push
Now check your CI server and you should see the following if it all went to plan:
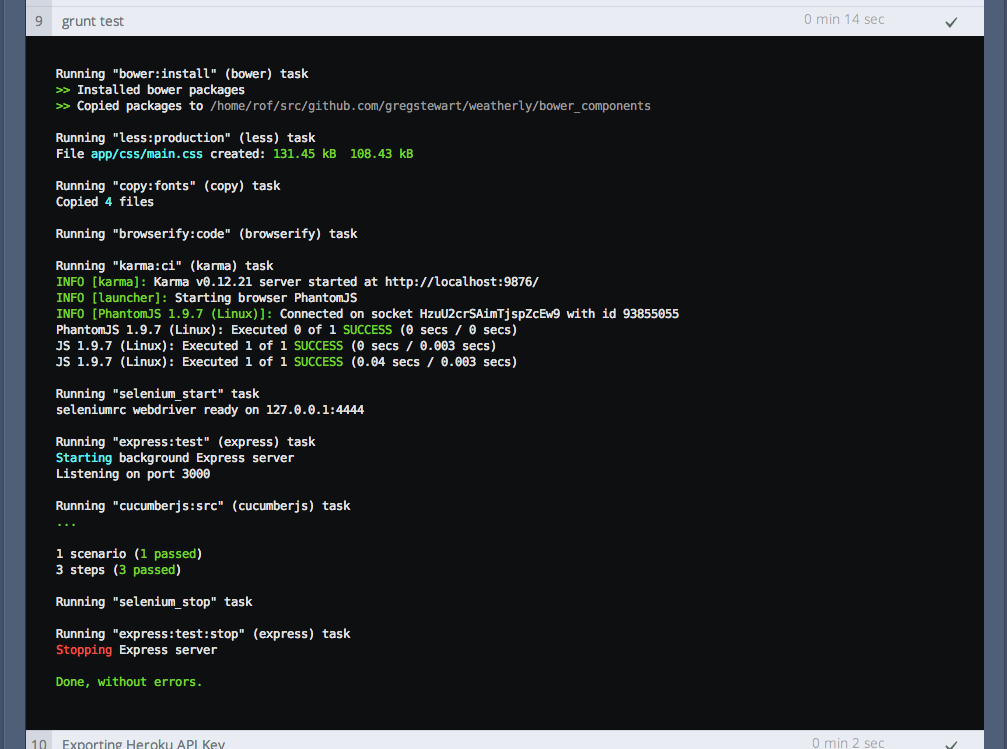
Codeship dashboard with updated ci test configuration
Adding code coverage
A little bonus while we are setting up test infrastructure, code coverage. Now code coverage is one of these topics that sparks almost fanatical discussions, however I find a useful tool to make sure I have covered all of the important parts of my code. Lucky for us, it’s easy to add support to Karma all we need is a plugin:
1 > git checkout -b code-coverage
2 > npm install karma-coverage --save-dev
And modify our karma.conf.js file:
 1 // Karma configuration
 2 // Generated on Sun Jul 20 2014 16:18:54 GMT+0100 (BST)
 3
 4 module.exports = function (config) {
 5     config.set({
 6
 7         // base path that will be used to resolve all patterns (eg. files, exclu\
 8 de)
 9         basePath: '',
10
11
12         // frameworks to use
13         // available frameworks: https://npmjs.org/browse/keyword/karma-adapter
14         frameworks: ['jasmine', 'commonjs'],
15
16
17         // list of files / patterns to load in the browser
18         files: [
19             'node_modules/weatherly/js/**/*.js',
20             'tests/unit/**/*.js'
21         ],
22
23
24         // list of files to exclude
25         exclude: [
26         ],
27
28
29         // preprocess matching files before serving them to the browser
30         // available preprocessors: https://npmjs.org/browse/keyword/karma-prepr\
31 ocessor
32         preprocessors: {
33             'node_modules/weatherly/js/**/*.js': ['commonjs', 'coverage'],
34             'tests/unit/**/*.js': ['commonjs'],
35         },
36
37
38         // test results reporter to use
39         // possible values: 'dots', 'progress'
40         // available reporters: https://npmjs.org/browse/keyword/karma-reporter
41         reporters: ['progress', 'coverage'],
42
43         coverageReporter: {
44             reporters: [
45                 { type: 'html'},
46                 { type: 'text-summary' }
47             ],
48             dir: 'reports/coverage'
49         },
50
51         // web server port
52         port: 9876,
53
54
55         // enable / disable colors in the output (reporters and logs)
56         colors: true,
57
58
59         // level of logging
60         // possible values: config.LOG_DISABLE || config.LOG_ERROR || config.LOG\
61 _WARN || config.LOG_INFO || config.LOG_DEBUG
62         logLevel: config.LOG_INFO,
63
64
65         // enable / disable watching file and executing tests whenever any file \
66 changes
67         autoWatch: true,
68
69
70         // start these browsers
71         // available browser launchers: https://npmjs.org/browse/keyword/karma-l\
72 auncher
73         browsers: ['PhantomJS'],
74
75
76         // Continuous Integration mode
77         // if true, Karma captures browsers, runs the tests and exits
78         singleRun: false
79     });
80 };
Running our grunt karma:dev task yields the following output:
 1 > Running "karma:dev" (karma) task
 2 > INFO [karma]: Karma v0.12.17 server started at http://localhost:9876/
 3 > INFO [launcher]: Starting browser PhantomJS
 4 > INFO [PhantomJS 1.9.7 (Mac OS X)]: Connected on socket OVbmSp9OmFMK23l5jA2J wi\
 5 th id 80988698
 6 > PhantomJS 1.9.7 (Mac OS X): Executed 1 of 1 SUCCESS (0.005 secs / 0.002 secs)
 7
 8 > =============================== Coverage summary =============================\
 9 ==
10 > Statements   : 83.33% ( 5/6 )
11 > Branches     : 100% ( 2/2 )
12 > Functions    : 50% ( 1/2 )
13 > Lines        : 66.67% ( 2/3 )
14 > ==============================================================================\
15 ==
16 > ^C
17 > Done, without errors.
There’s more information in the shape of an HTML report to be found under reports/coverage/. Here’s a what that looks like

Istanbule code coverage report
One final thing before we close off this section. You may not want to run your coverage report as part the CI process. If you do then ignore this part. By editing our test.js and for our karma:ci task overriding the reporter step with reporters: ['progress'] we can skip this step for our build.
 1 (function (module) {
 2     'use strict';
 3     var config = {
 4         dev: {
 5             configFile: 'karma.conf.js'
 6         },
 7         ci: {
 8             configFile: 'karma.conf.js',
 9             singleRun: true,
10             autoWatch: false,
11             reporters: ['progress']
12         }
13     };
14
15     module.exports = function (grunt) {
16         grunt.loadNpmTasks('grunt-karma');
17
18         grunt.config('karma', config);
19     };
20 })(module);
We also do not want to commit our reports to our repos, so another .gitignore tweak is needed:
1 .idea
2 bower_components
3 reports
4 phantomjsdriver.log
5 app/css
6 app/fonts
7 app/js
8 node_modules/*
9 !node_modules/weatherly
Time to commit and merge our changes:
1 > git add .
2 > git commit -m "added coverage to dev process"
3 > git checkout master
4 > git merge code-coverage
5 > git push
Linting as part of the build
Since we are about to write some code we should circle back to adding the lint task to ci process. This is really straight forward now:
1 git checkout -b linting-the-build
Open up Gruntfile.js and add the jshint task to our test task.
 1  module.exports = function (grunt) {
 2     'use strict';
 3
 4     grunt.loadTasks('build');
 5
 6     grunt.registerTask('generate', ['less:production', 'copy:fonts', 'browserify\
 7 :code']);
 8     grunt.registerTask('build', ['bower:install', 'generate']);
 9
10     grunt.registerTask('e2e', [
11         'selenium_start',
12         'express:test',
13         'cucumberjs',
14         'selenium_stop',
15         'express:test:stop'
16     ]);
17
18     grunt.registerTask('test', ['jshint', 'build', 'karma:ci', 'e2e']);
19     grunt.registerTask('heroku:production', 'build');
20 };
To verify it works locally just type > grunt test
 1 Running "jshint:source" (jshint) task
 2 >> 5 files lint free.
 3
 4 Running "bower:install" (bower) task
 5 >> Installed bower packages
 6 >> Copied packages to /Users/gregstewart/Projects/github/weatherly/bower_compone\
 7 nts
 8
 9 Running "less:production" (less) task
10 File app/css/main.css created: 131.45 kB → 108.43 kB
11
12 Running "copy:fonts" (copy) task
13 Copied 4 files
14
15 Running "browserify:code" (browserify) task
16
17 Running "karma:ci" (karma) task
18 INFO [karma]: Karma v0.12.17 server started at http://localhost:9876/
19 INFO [launcher]: Starting browser PhantomJS
20 INFO [PhantomJS 1.9.7 (Mac OS X)]: Connected on socket lR_IEn9s3FvaphN90JfV with\
21  id 32288954
22 PhantomJS 1.9.7 (Mac OS X): Executed 1 of 1 SUCCESS (0.002 secs / 0.002 secs)
23
24 Running "selenium_start" task
25 seleniumrc webdriver ready on 127.0.0.1:4444
26
27 Running "express:test" (express) task
28 Starting background Express server
29 Listening on port 3000
30
31 Running "cucumberjs:src" (cucumberjs) task
32 ...
33
34 1 scenario (1 passed)
35 3 steps (3 passed)
36
37 Running "selenium_stop" task
38
39 Running "express:test:stop" (express) task
40 Stopping Express server
41
42 Done, without errors.
Looking good let’s commit the change and watch it go through the build:
1 git add .
2 git commit -m "Added lint to ci/test task"
3 git checkout master
4 git pull origin master
5 git merge linting-the-build
6 git push origin  master
Recap
We covered quite a bit of ground here:
- we set up Karma
- wrote a very basic unit test to validate the test runner was working
- configured the tests for local continuous testing and single run during the build
- added code coverage to our tooling
- added linting to our ci run as well
With that onwards to development guided by tests!
