Afternoon 1: Sprites, the Game Loop, and Basic Physics
In this first part, we’ll go over how to draw and move objects on our game.
Sprite Basics
Draw Bullet Sprite
Let’s start with something basic – drawing an object on the game stage. The most basic object in Phaser is the Sprite. So for our first piece of code, let’s load then draw a bullet sprite on our game by making the following modifications to game.js. (All of the code examples in this tutorial refer to game.js unless otherwise noted.)
preload: function () {
this.load.image('sea', 'assets/sea.png');
this.load.image('bullet', 'assets/bullet.png');
},
create: function () {
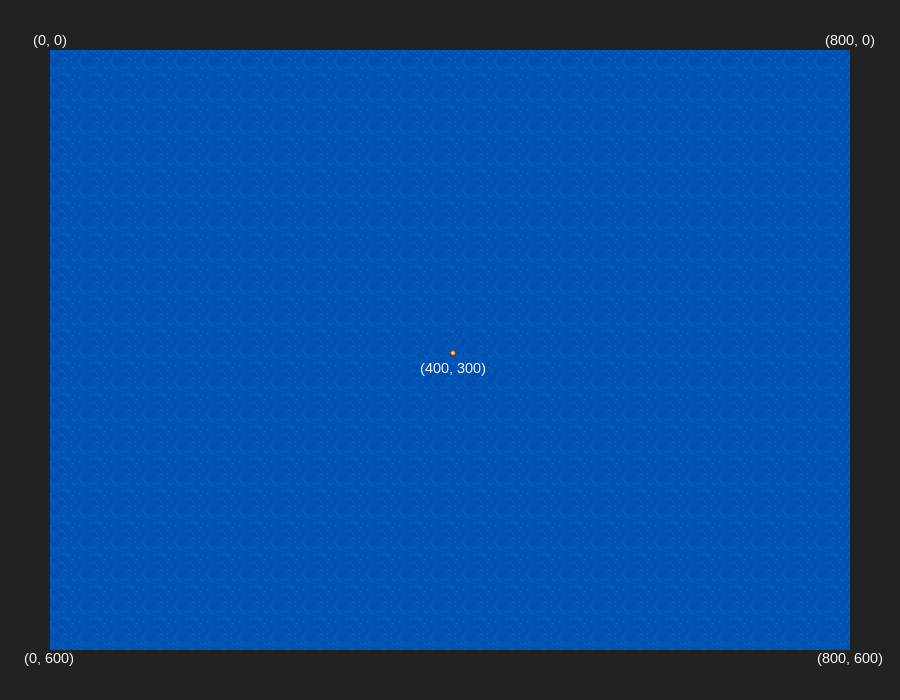
this.sea = this.add.tileSprite(0, 0, 800, 600, 'sea');
this.bullet = this.add.sprite(400, 300, 'bullet');
}
We called the following functions:
-
load.image()- loads an image (e.g.assets/bullet.png) and assigns it a name (e.g.bullet) which we use later. -
add.sprite()- accepts the x-y coordinates of our sprite and the name of the sprite which we assigned in theload.image()function.
Screen Coordinates vs Cartesian Coordinates
At around middle school, children learn about the Cartesian coordinate system where points, defined by an ordered pair (x, y), can be plotted on a plane. The center is (0, 0), x-values increase as you go right, while y-values increase as you go up.
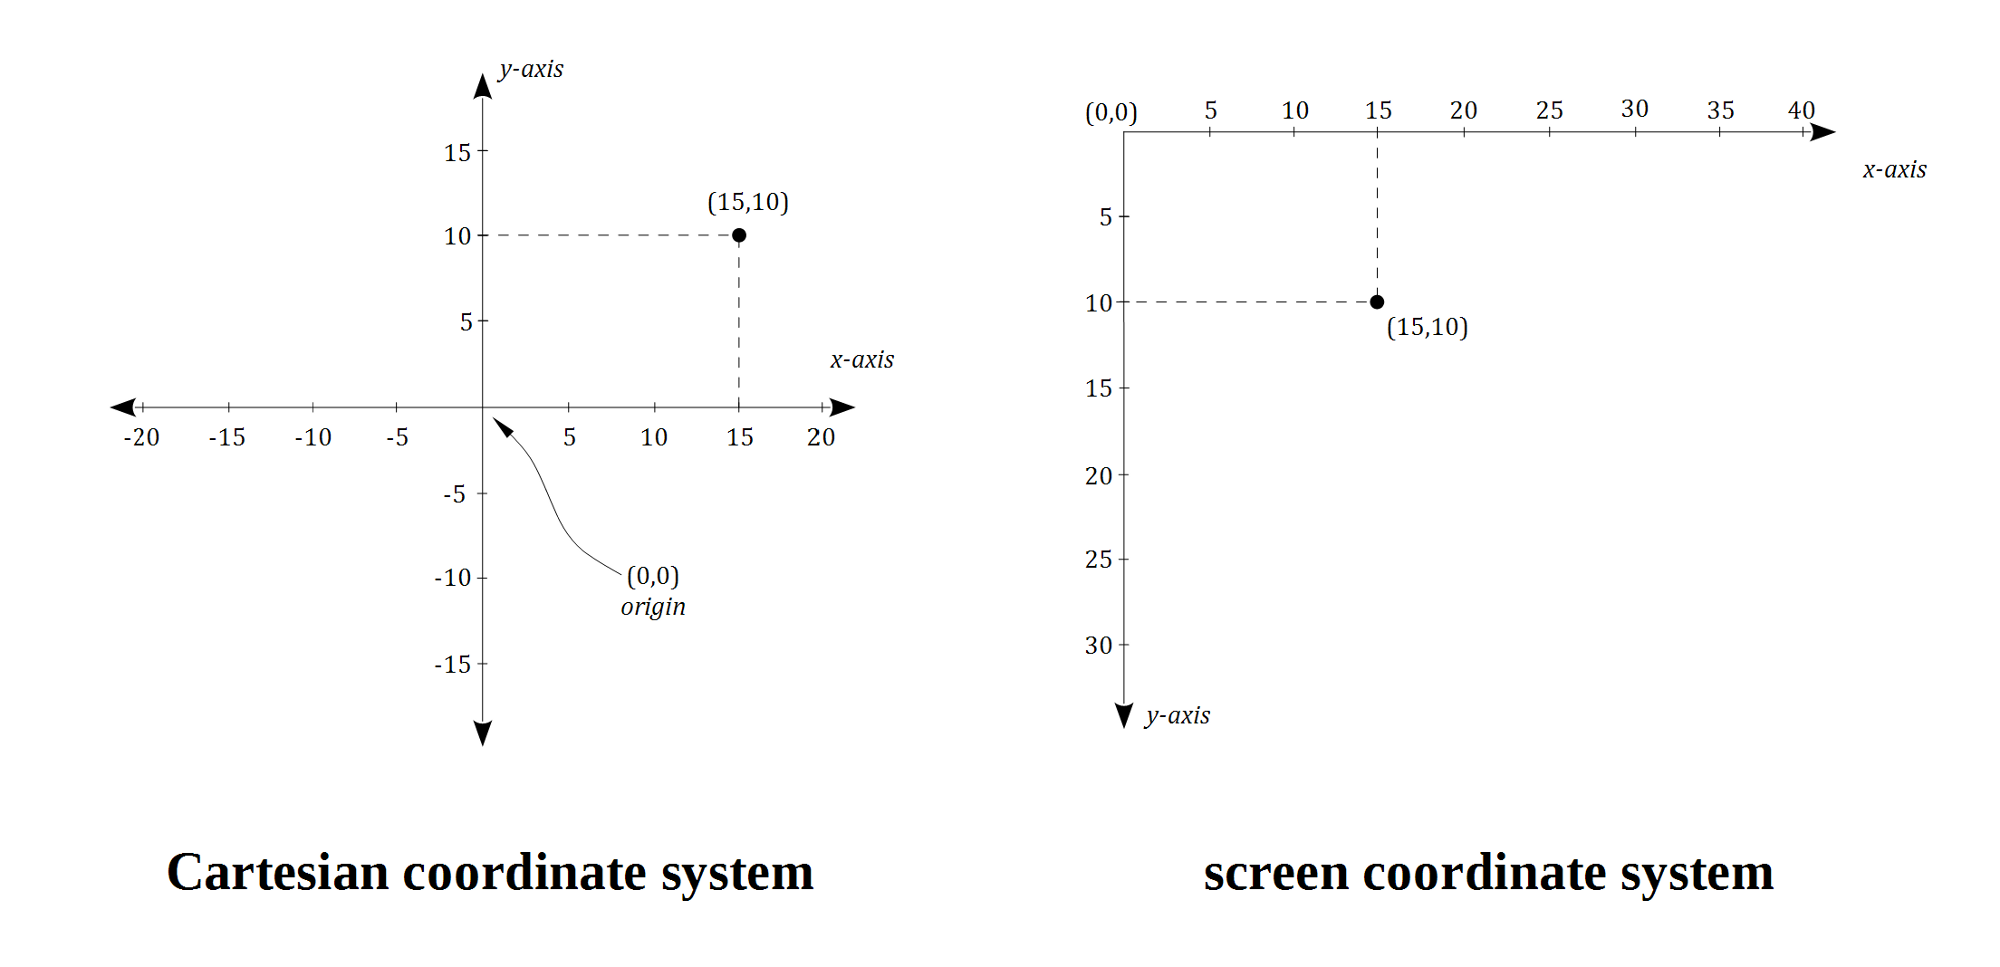
However, computer displays do not use Cartesian coordinates as is but instead use a variation: instead of being at the center, (0, 0) represents the point at the top-left, and instead of decreasing, y-values increase as you go down. This picture illustrates the screen coordinate system in our game at the moment:
Draw Enemy Animation
Let’s then proceed with something more complicated, an animated sprite.
We first load a sprite sheet, an image containing multiple frames, in the pre-loading function.
  preload: function () {
    this.load.image('sea', 'assets/sea.png');
    this.load.image('bullet', 'assets/bullet.png');
    this.load.spritesheet('greenEnemy', 'assets/enemy.png', 32, 32);
  },
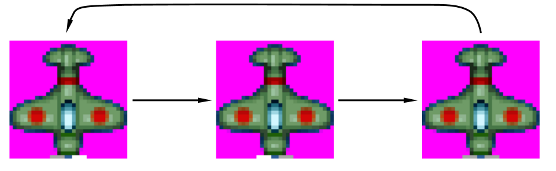
Instead of load.image(), we used load.spritesheet() to load our sprite sheet. The two additional arguments are the width and height of the individual frames. Since we defined 32 for both width and height, Phaser will load the sprite sheet and divide it into individual frames like so:
Now that the sprite sheet is loaded, we can now add it into our game:
  create: function() {

    this.sea = this.add.tileSprite(0, 0, 800, 600, 'sea');

    this.enemy = this.add.sprite(400, 200, 'greenEnemy');
    this.enemy.animations.add('fly', [ 0, 1, 2 ], 20, true);
    this.enemy.play('fly');

    this.bullet = this.add.sprite(400, 300, 'bullet');
  }
The animations.add() function specified the animation: its name, followed by the sequence of frames in an array, followed by the speed of the animation (in frames per second), and a flag telling whether the animation loops or not. So in this piece of code, we defined the fly animation that loops the first 3 frames of the green enemy sprite sheet, an animation of the propeller spinning:
Set Object Anchor
The sprites share the same x-coordinate, so by default they are left-aligned.
For games, however, most of the time we want the x-y coordinates to be the center of the sprite. We can do that in Phaser by modifying the anchor settings:
    this.enemy = this.add.sprite(400, 300, 'greenEnemy');
    this.enemy.animations.add('fly', [ 0, 1, 2 ], 20, true);
    this.enemy.play('fly');
    this.enemy.anchor.setTo(0.5, 0.5);

    this.bullet = this.add.sprite(400, 400, 'bullet');
    this.bullet.anchor.setTo(0.5, 0.5);
The (0.5, 0.5) centers the sprite. On the other hand, (0, 0) will mean that the x-y coordinate defines the top-left of the sprite. Similarly, (1, 1) put the x-y at the bottom right of the sprite.
The Game Loop
The following is an oversimplified diagram on what happens when Phaser games run:
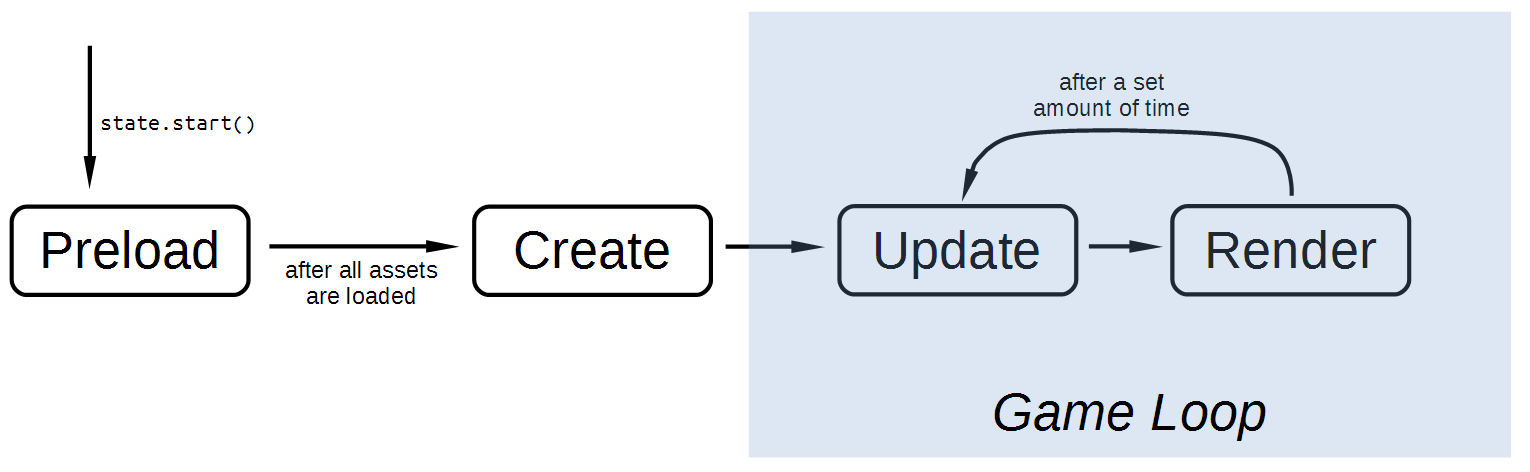
- Preload - The game starts with a pre-load section where all assets are pre-loaded. Without pre-loading, the game will stutter or hang in the middle of gameplay because it has to load assets.
- Create - After pre-loading all assets, we can now setup the initial state of the game.
- Update - At a set interval (usually 60 times per second), this function is called to update the game state. All updates to the game are done here. For example, checking if the character has collided with the enemy, spawning an enemy at a random location, moving a character to the left because the player pressed the left arrow key, etc.
- Render - coming after Update, here is where the latest state of the game is drawn (rendered) to the screen.
The update-render loop is what’s called the Game Loop, and is the heart of almost every computer game. You can read more about the Game Loop at the Game Programming Patterns site.
Move Bullet via update()
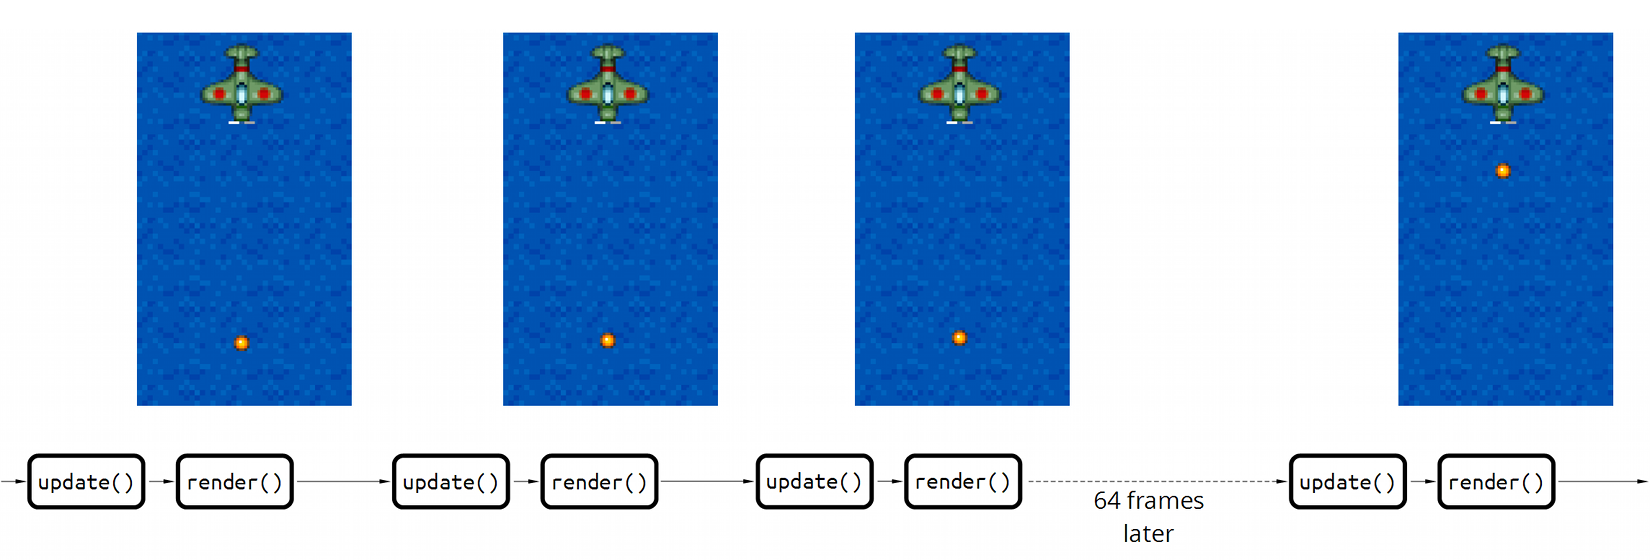
Now that we know how the game loop is implemented in Phaser, let’s move our bullet sprite vertically by reducing its y-coordinate in the update() function:
  update: function () {
    this.sea.tilePosition.y += 0.2;
    this.bullet.y -= 1;
  },
As mentioned above, Phaser will call the update() function at a regular interval, effectively moving the bullet upwards at a rate of around 60 pixels per second.
This is how you move sprites in most basic game libraries/frameworks. In Phaser, though, we can let the physics engine do almost all of the dirty work for us.
Apply Physics
Phaser comes with 2 physics systems, Arcade and P2. Arcade is the default and the simplest, and so we’ll use that.
(And besides, the version of Phaser bundled with the basic template, phaser-arcarde-physics.min.js, contains only Arcade physics to reduce download file size.)
Velocity
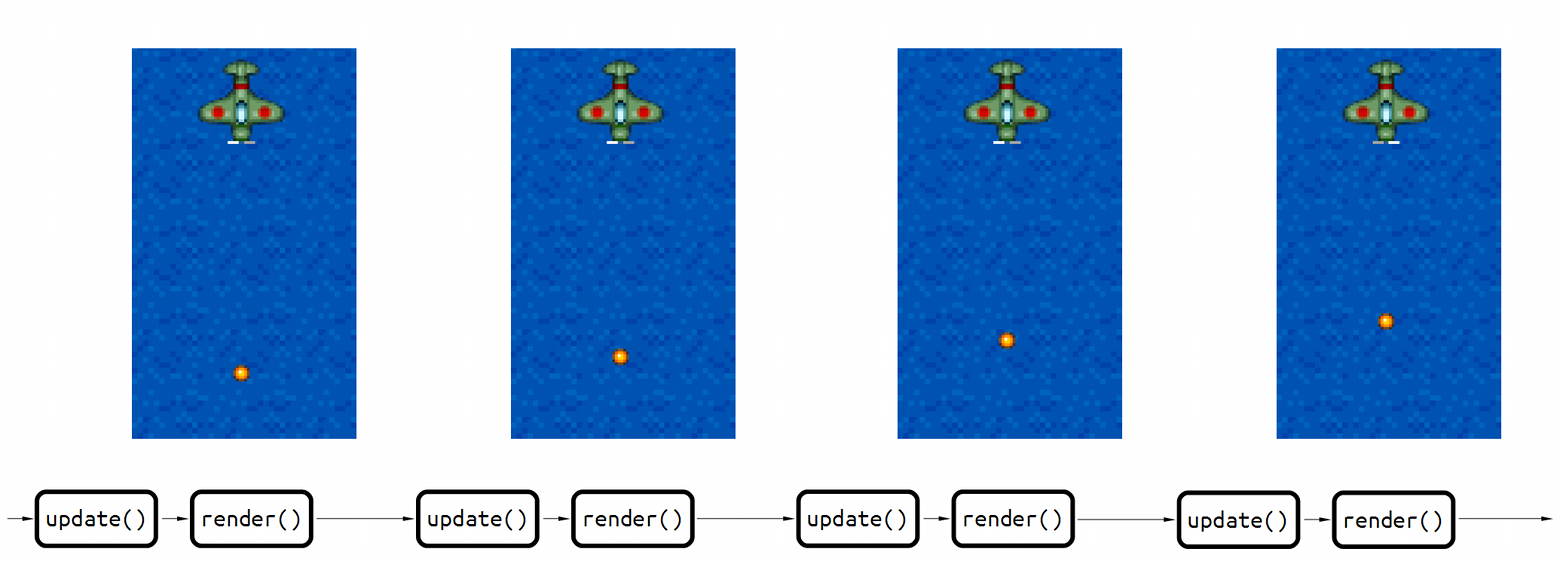
Once we put our bullet into the Arcade physics system, we can now set its velocity and let the system handle all the other calculations (e.g. future position).
    this.bullet = this.add.sprite(400, 400, 'bullet');
    this.bullet.anchor.setTo(0.5, 0.5);
    this.physics.enable(this.bullet, Phaser.Physics.ARCADE);
    this.bullet.body.velocity.y = -500;

  },

  update: function () {
    this.sea.tilePosition.y += 0.2;
    this.bullet.y -= 1;
  },
With the physics enabled and velocity set, our sprite’s coordinates will now be updated by the this.physics.update(); call rather than our update code. In this case, “velocity.y = -500” is 500 pixels per second upward; at 60 frames per second, each update call will move the bullet up 8-9 pixels.
Show Body Debug
Arcade physics is limited to axis-aligned bounding box (AABB) collision checking only. In simpler terms, all objects under Arcade are rectangles.
We can view these rectangles by rendering these areas with the debugger. First we add the enemy sprite to the physics system:
    this.enemy.play('fly');
    this.enemy.anchor.setTo(0.5, 0.5);
    this.physics.enable(this.enemy, Phaser.Physics.ARCADE);

    this.bullet = this.add.sprite(400, 300, 'bullet');
Then we add the debugging code under our currently nonexistent render() function:
30   update: function () {
31     this.sea.tilePosition.y += 0.2;
32   },
33
34   render: function() {
35     this.game.debug.body(this.bullet);
36     this.game.debug.body(this.enemy);
37   },
Collision
Once added to the physics system, checking collision and overlapping is only a matter of calling the right functions:
  update: function () {
    this.sea.tilePosition.y += 0.2;
    this.physics.arcade.overlap(
      this.bullet, this.enemy, this.enemyHit, null, this
    );
  },
The overlap() function requires a callback which will be called in case the objects overlap. Here’s the enemyHit() function:
42   enemyHit: function (bullet, enemy) {
43     bullet.kill();
44     enemy.kill();
45   },
Being common situation in games, Phaser provides us with a sprite.kill() function for “killing” sprites. Calling this function both marks the sprite as dead and invisible, effectively removing the sprite from the game.
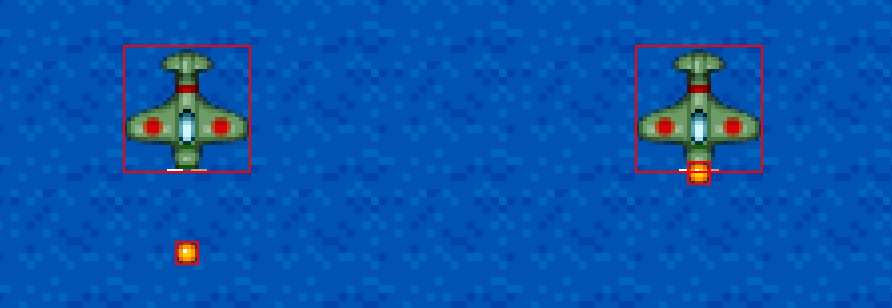
Here’s the collision in action:
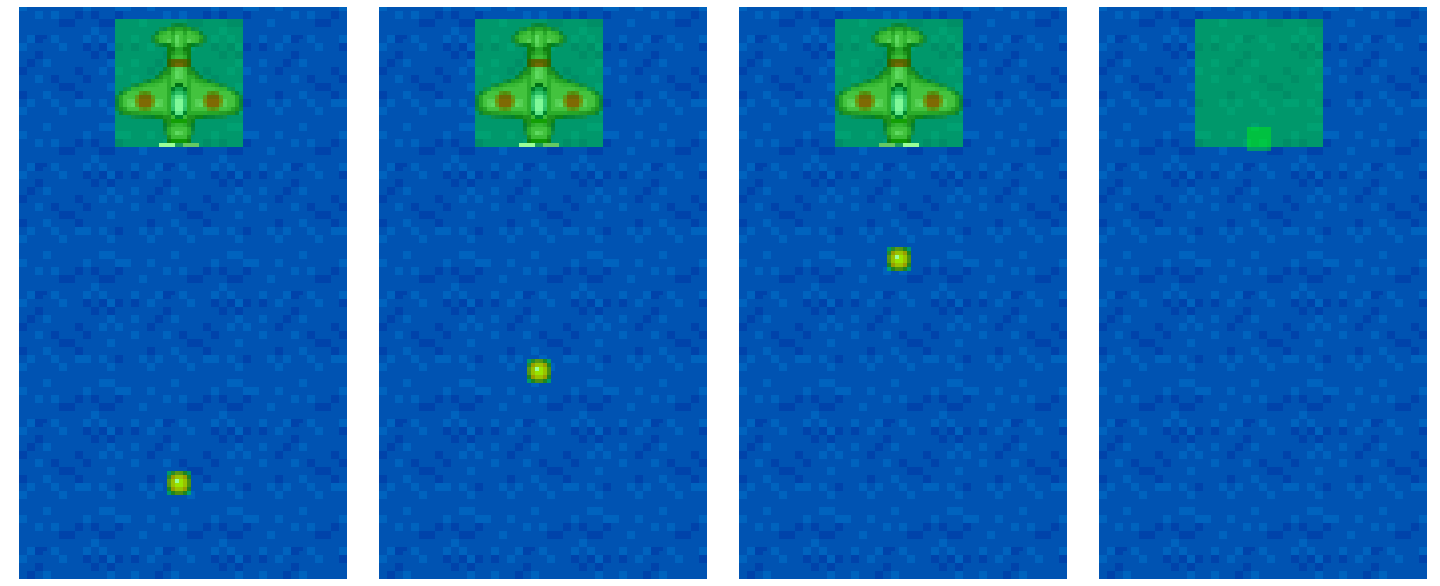
With debug on, we can see that the sprite is still at that location but it’s invisible and the physics engine ignores it (i.e. it no longer moves).
Remove Debugging
Debugging isn’t really required in this workshop so you should probably remove or comment out the debugging code when you’re done testing.
  render: function() {
    this.game.debug.body(this.bullet);
    this.game.debug.body(this.enemy);
  },
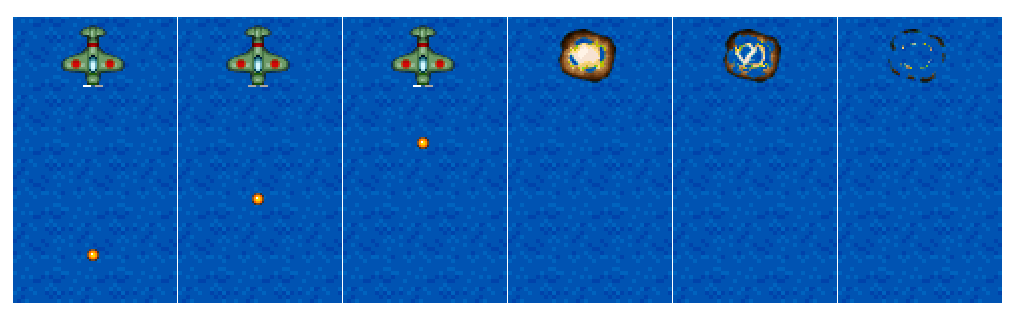
Explosion
Before we proceed to the next lesson, let’s improve our collision handling by adding an explosion animation in the place of the enemy. Here’s the animation pre-loading:
  preload: function () {
    this.load.image('sea', 'assets/sea.png');
    this.load.image('bullet', 'assets/bullet.png');
    this.load.spritesheet('greenEnemy', 'assets/enemy.png', 32, 32);
    this.load.spritesheet('explosion', 'assets/explosion.png', 32, 32);
  },

Then the actual explosion:
  enemyHit: function (bullet, enemy) {
    bullet.kill();
    enemy.kill();
    var explosion = this.add.sprite(enemy.x, enemy.y, 'explosion');
    explosion.anchor.setTo(0.5, 0.5);
    explosion.animations.add('boom');
    explosion.play('boom', 15, false, true);
  },
Here we used a different way to setup animations. This time we used animations.add() with only the name of the animation. Lacking the other arguments, the boom animation uses all frames of the sprite sheet, runs at 60 fps, and doesn’t loop.
We want to tweak the settings of this animation, so we add them to the explosion.play() call as additional arguments:
-
15- set the frames per second -
false- don’t loop the animation -
true- kill the sprite at the end of the animation
The last argument the most convenient to us; without it we’ll need to register an event handler callback to perform the sprite killing, and event handling is a much later lesson. In the meantime, enjoy your improved “shooting down an enemy” animation: