Views
Introduction
Because Handlebars templates in Ember.js are so powerful, the majority of your application’s user interface will be described using them. If you are coming from other JavaScript libraries, you may be surprised at how few views you have to create.
Views in Ember.js are typically only created for the following reasons:
- When you need sophisticated handling of user events
- When you want to create a re-usable component
Often, both of these requirements will be present at the same time.
Event Handling
The role of the view in an Ember.js application is to translate primitive browser events into events that have meaning to your application.
For example, imagine you have a list of todo items. Next to each todo is a button to delete that item:
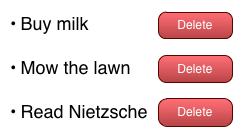
Todo List
The view is responsible for turning a primitive event (a click) into a semantic event: delete this todo! These semantic events are first sent up to the controller, or if no method is defined there, your application’s router, which is responsible for reacting to the event based on the current state of the application.
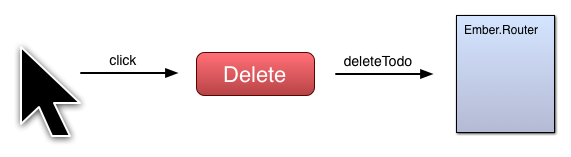
Todo List
Defining A View
You can use Ember.View to render a Handlebars template and insert it into the DOM.
To tell the view which template to use, set its templateName property. For example, if I had a <script> tag like this:
1 <html>
2   <head>
3     <script type="text/x-handlebars" data-template-name="say-hello">
4       Hello, <b>{{view.name}}</b>
5     </script>
6   </head>
7 </html>
I would set the templateName property to "say-hello".
1 var view = Ember.View.create({
2   templateName: 'say-hello',
3   name: "Bob"
4 });
Note: For the remainder of the guide, the templateName property will be omitted from most examples. You can assume that if we show a code sample that includes an Ember.View and a Handlebars template, the view has been configured to display that template via the templateName property.
You can append views to the document by calling appendTo:
1 view.appendTo('#container');
As a shorthand, you can append a view to the document body by calling append:
1 view.append();
To remove a view from the document, call remove:
1 view.remove();
Handling Events
Instead of having to register event listeners on elements you’d like to respond to, simply implement the name of the event you want to respond to as a method on your view.
For example, imagine we have a template like this:
1 {{#view "clickable"}}
2 This is a clickable area!
3 {{/view}}
Let’s implement App.ClickableView such that when it is
clicked, an alert is displayed:
1 App.ClickableView = Ember.View.extend({
2   click: function(evt) {
3     alert("ClickableView was clicked!");
4   }
5 });
Events bubble up from the target view to each parent view in succession,
until the root view. These values are read-only. If you want to
manually manage views in JavaScript (instead of creating them using
the {{view}} helper in Handlebars), see the Ember.ContainerView
documentation below.
Sending Events
To have the click event from App.ClickableView affect the state of your application, simply send an event to the view’s controller:
 1 App.ClickableView = Ember.View.extend({
 2   click: function(evt) {
 3     this.get('controller').send('turnItUp', 11);
 4   }
 5 });
 6 ````
 7
 8 If the controller has an action handler called `turnItUp`, it will be called:
 9
10
11 ````javascript
12 App.PlaybackController = Ember.ObjectController.extend({
13   actions: {
14     turnItUp: function(level){
15       //Do your thing
16     }
17   }
18 });
19 ````
20
21 If it doesn't, the message will be passed to the current route:
22
23 ````javascript
24 App.PlaybackRoute = Ember.Route.extend({
25   actions: {
26     turnItUp: function(level){
27       //This won't be called if it's defined on App.PlaybackController
28     }
29   }
30 });
31 ````
32
33 To see a full listing of the `Ember.View` built-in events, see the
34 documentation section on [Event Names](http://emberjs.com/api/classes/Ember.View\
35 .html#toc_event-names).
36
37 ## Adding Layouts to Views
38
39 Views can have a secondary template that wraps their main template. Like templat\
40 es,
41 layouts are Handlebars templates that will be inserted inside the
42 view's tag.
43
44 To tell a view which layout template to use, set its `layoutName` property.
45
46 To tell the layout template where to insert the main template, use the Handlebar\
47 s `{{yield}}` helper.
48 The HTML contents of a view's rendered `template` will be inserted where the `{{\
49 yield}}` helper is.
50
51 First, you define the following layout template:
52
53 ```html
54 <script type="text/x-handlebars" data-template-name="my_layout">
55   <div class="content-wrapper">
56     {{yield}}
57   </div>
58 </script>
And then the following main template:
1 <script type="text/x-handlebars" data-template-name="my_content">
2   Hello, <b>{{view.name}}</b>!
3 </script>
Finally, you define a view, and instruct it to wrap the template with the defined layout:
1 AViewWithLayout = Ember.View.extend({
2   name: 'Teddy',
3   layoutName: 'my_layout',
4   templateName: 'my_content'
5 });
This will result in view instances containing the following HTML
1 <div class="content-wrapper">
2   Hello, <b>Teddy</b>!
3 </div>
Applying Layouts in Practice
Layouts are extremely useful when you have a view with a common wrapper and behavior, but its main template might change. One possible scenario is a Popup View.
You can define your popup layout template:
1 <script type="text/x-handlebars" data-template-name="popup">
2   <div class="popup">
3     <button class="popup-dismiss">x</button>
4     <div class="popup-content">
5     {{yield}}
6     </div>
7   </div>
8 </script>
Then define your popup view:
1 App.PopupView = Ember.View.extend({
2   layoutName: 'popup'
3 });
Now you can re-use your popup with different templates:
 1 {{#view "popup"}}
 2   <form>
 3     <label for="name">Name:</label>
 4     <input id="name" type="text" />
 5   </form>
 6 {{/view}}
 7
 8 {{#view "popup"}}
 9   <p> Thank you for signing up! </p>
10 {{/view}}
Customizing A Views Element
A view is represented by a single DOM element on the page. You can change what kind of element is created by
changing the tagName property.
1 App.MyView = Ember.View.extend({
2   tagName: 'span'
3 });
You can also specify which class names are applied to the view by setting its classNames property to an array of strings:
1 App.MyView = Ember.View.extend({
2   classNames: ['my-view']
3 });
If you want class names to be determined by the state of properties on the view, you can use class name bindings. If you bind to a Boolean property, the class name will be added or removed depending on the value:
1 App.MyView = Ember.View.extend({
2   classNameBindings: ['isUrgent'],
3   isUrgent: true
4 });
This would render a view like this:
1 <div class="ember-view is-urgent">
If isUrgent is changed to false, then the is-urgent class name will be removed.
By default, the name of the Boolean property is dasherized. You can customize the class name applied by delimiting it with a colon:
1 App.MyView = Ember.View.extend({
2   classNameBindings: ['isUrgent:urgent'],
3   isUrgent: true
4 });
This would render this HTML:
1 <div class="ember-view urgent">
Besides the custom class name for the value being true, you can also specify a class name which is used when the value is false:
1 App.MyView = Ember.View.extend({
2   classNameBindings: ['isEnabled:enabled:disabled'],
3   isEnabled: false
4 });
This would render this HTML:
1 <div class="ember-view disabled">
You can also specify to only add a class when the property is false by declaring classNameBindings like this:
1 App.MyView = Ember.View.extend({
2   classNameBindings: ['isEnabled::disabled'],
3   isEnabled: false
4 });
This would render this HTML:
1 <div class="ember-view disabled">
If the isEnabled property is set to true, no class name is added:
1 <div class="ember-view">
If the bound value is a string, that value will be added as a class name without modification:
1 App.MyView = Ember.View.extend({
2   classNameBindings: ['priority'],
3   priority: 'highestPriority'
4 });
This would render this HTML:
1 <div class="ember-view highestPriority">
Attribute Bindings on a View
You can bind attributes to the DOM element that represents a view by using attributeBindings:
1 App.MyView = Ember.View.extend({
2   tagName: 'a',
3   attributeBindings: ['href'],
4   href: "http://emberjs.com"
5 });
You can also bind these attributes to differently named properties:
1 App.MyView = Ember.View.extend({
2   tagName: 'a',
3   attributeBindings: ['customHref:href'],
4   customHref: "http://emberjs.com"
5 });
Customizing a View’s Element from Handlebars
When you append a view, it creates a new HTML element that holds its content. If your view has any child views, they will also be displayed as child nodes of the parent’s HTML element.
By default, new instances of Ember.View create a <div> element. You can
override this by passing a tagName parameter:
1 {{view "info" tagName="span"}}
You can also assign an ID attribute to the view’s HTML element by passing an id parameter:
1 {{view "info" id="info-view"}}
This makes it easy to style using CSS ID selectors:
1 /** Give the view a red background. **/
2 #info-view {
3   background-color: red;
4 }
You can assign class names similarly:
1 {{view "info" class="info urgent"}}
You can bind class names to a property of the view by using classBinding instead of class. The same behavior as described in bind-attr applies:
1 App.AlertView = Ember.View.extend({
2   priority: "p4",
3   isUrgent: true
4 });
1 {{view "alert" classBinding="isUrgent priority"}}
This yields a view wrapper that will look something like this:
1 <div id="ember420" class="ember-view is-urgent p4"></div>
Built-In Views
Ember comes pre-packaged with a set of views for building a basic controls like text inputs, check boxes, and select lists. Usually, these views will be used via the input helpers. However, the base views may be helpful in creating custom form behaviors.
For example, here we have created a custom text field that toggles a dirty property:
1 // {{view "myText" value=name inputDidChange=nameDidChange}}
2 App.MyText = Ember.TextField.extend({
3   inputDidChange: false,
4   change: function() {
5     this.set('inputDidChange', true);
6   }
7 });
Ember itself provides one additional view not covered by the input helpers, and this is the select box view.
This class can also be customized by extending it. To use the select view bundled with Ember, call it via the view helper:
1 {{view Ember.Select content=people
2                     optionLabelPath="content.fullName"
3                     optionValuePath="content.id"
4                     prompt="Pick a person:"
5                     selection=selectedPerson}}
The select view is extremely feature-rich, and may perform badly when rendering many items. Due to this, it has not yet been converted into an component or helper like other inputs.
Manually Managing View Hierachy
Ember.ContainerView
As you probably know by now, views usually create their child views
by using the {{view}} helper. However, it is sometimes useful to
manually manage a view’s child views.
Ember.ContainerView
is the way to do just that.
As you programmatically add or remove views to a ContainerView,
those views’ rendered HTML are added or removed from the DOM to
match.
 1 var container = Ember.ContainerView.create();
 2 container.append();
 3
 4 var firstView = App.FirstView.create(),
 5     secondView = App.SecondView.create();
 6
 7 container.pushObject(firstView);
 8 container.pushObject(secondView);
 9
10 // When the rendering completes, the DOM
11 // will contain a `div` for the ContainerView
12 // and nested inside of it, a `div` for each of
13 // firstView and secondView.
Defining the Initial Views of a Container View
There are a few ways to specify which initial child views a
ContainerView should render. The most straight-forward way is to add
them in init:
 1 var container = Ember.ContainerView.create({
 2   init: function() {
 3     this._super();
 4     this.pushObject(App.FirstView.create());
 5     this.pushObject(App.SecondView.create());
 6   }
 7 });
 8
 9 container.objectAt(0).toString(); //=> '<App.FirstView:ember123>'
10 container.objectAt(1).toString(); //=> '<App.SecondView:ember124>'
As a shorthand, you can specify a childViews property that will be
consulted on instantiation of the ContainerView also. This example is
equivalent to the one above:
1 var container = Ember.ContainerView.extend({
2   childViews: [App.FirstView, App.SecondView]
3 });
4
5 container.objectAt(0).toString(); //=> '<App.FirstView:ember123>'
6 container.objectAt(1).toString(); //=> '<App.SecondView:ember124>'
Another bit of syntactic sugar is available as an option as well:
specifying string names in the childViews property that correspond
to properties on the ContainerView. This style is less intuitive
at first but has the added bonus that each named property will
be updated to reference its instantiated child view:
 1 var container = Ember.ContainerView.create({
 2   childViews: ['firstView', 'secondView'],
 3   firstView: App.FirstView,
 4   secondView: App.SecondView
 5 });
 6
 7 container.objectAt(0).toString(); //=> '<App.FirstView:ember123>'
 8 container.objectAt(1).toString(); //=> '<App.SecondView:ember124>'
 9
10 container.get('firstView').toString(); //=> '<App.FirstView:ember123>'
11 container.get('secondView').toString(); //=> '<App.SecondView:ember124>'
It Feels Like an Array Because it is an Array
You may have noticed that some of these examples use pushObject to add
a child view, just like you would interact with an Ember array.
Ember.ContainerView
gains its collection-like behavior by mixing in
Ember.MutableArray. That means
that you can manipulate the collection of views very expressively, using
methods like pushObject, popObject, shiftObject, unshiftObject, insertAt,
removeAt, or any other method you would use to interact with an Ember array.