Getting Started
Welcome to Ember.js! This guide will take you through creating a simple application using Ember.js and briefly explain the core concepts behind the framework. This guide assumes you are already familiar with basic web technologies like JavaScript, HTML, and CSS and development technologies like your browser’s web inspector.
In this guide we will walk through the steps of building the popular TodoMVC demo application.
Planning The Application
TodoMVC, despite its small size, contains most of the behaviors typical in modern single page applications. Before continuing, take a moment to understand how TodoMVC works from the user’s perspective.
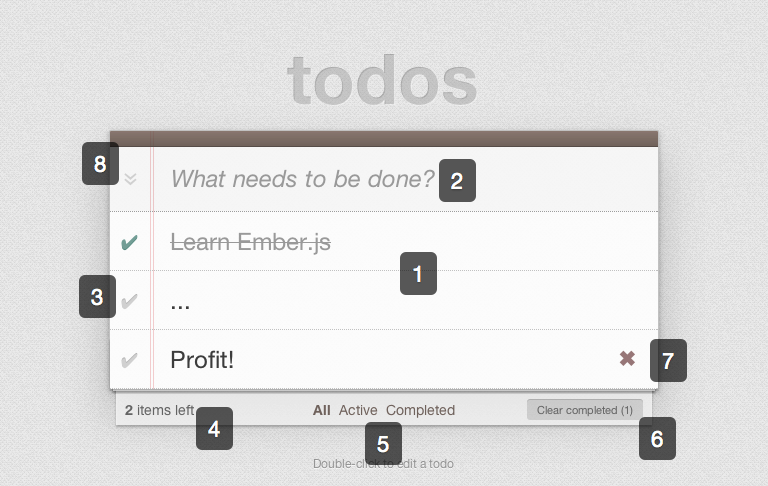
TodoMVC has the following main features:
TODO MVC
- It displays a list of todos for a user to see. This list will grow and shrink as the user adds and removes todos.
- It accepts text in an
<input>for entry of new todos. Hitting the<enter>key creates the new item and displays it in the list below. - It provides a checkbox to toggle between complete and incomplete states for each todo. New todos start as incomplete.
- It displays the number of incomplete todos and keeps this count updated as new todos are added and existing todos are completed.
- It provides links for the user to navigate between lists showing all, incomplete, and completed todos.
- It provides a button to remove all completed todos and informs the user of the number of completed todos. This button will not be visible if there are no completed todos.
- It provides a button to remove a single specific todo. This button displays as a user hovers over a todo and takes the form of a red X.
- It provides a checkbox to toggle all existing todos between complete and incomplete states. Further, when all todos are completed this checkbox becomes checked without user interaction.
- It allows a user to double click to show a textfield for editing a single todo. Hitting the
<enter>key or moving focus outside of this textfield will persist the changed text. - It retains a user’s todos between application loads by using the browser’s
localstoragemechanism.
You can interact with a completed version of the application by visiting the TodoMVC site.
Creating a Static Mockup
Before adding any code, we can roughly sketch out the layout of our application. In your text editor, create a new file and name it index.html. This file will contain the HTML templates of our completed application and trigger requests for the additional image, stylesheet, and JavaScript resources.
To start, add the following text to index.html:
 1 <!doctype html>
 2 <html>
 3   <head>
 4     <meta charset="utf-8">
 5     <title>Ember.js • TodoMVC</title>
 6     <link rel="stylesheet" href="style.css">
 7   </head>
 8   <body>
 9     <section id="todoapp">
10       <header id="header">
11         <h1>todos</h1>
12         <input type="text" id="new-todo" placeholder="What needs to be done?" />
13       </header>
14
15       <section id="main">
16         <ul id="todo-list">
17           <li class="completed">
18             <input type="checkbox" class="toggle">
19             <label>Learn Ember.js</label><button class="destroy"></button>
20           </li>
21           <li>
22             <input type="checkbox" class="toggle">
23             <label>...</label><button class="destroy"></button>
24           </li>
25           <li>
26             <input type="checkbox" class="toggle">
27             <label>Profit!</label><button class="destroy"></button>
28           </li>
29         </ul>
30
31         <input type="checkbox" id="toggle-all">
32       </section>
33
34       <footer id="footer">
35         <span id="todo-count">
36           <strong>2</strong> todos left
37         </span>
38         <ul id="filters">
39           <li>
40             <a href="all" class="selected">All</a>
41           </li>
42           <li>
43             <a href="active">Active</a>
44           </li>
45           <li>
46             <a href="completed">Completed</a>
47           </li>
48         </ul>
49
50         <button id="clear-completed">
51           Clear completed (1)
52         </button>
53       </footer>
54     </section>
55
56     <footer id="info">
57       <p>Double-click to edit a todo</p>
58     </footer>
59   </body>
60 </html>
The associated stylesheet and background image for this project should be downloaded and placed in the same directory as index.html
Open index.html in your web browser to ensure that all assets are loading correctly. You should see the TodoMVC application with three hard-coded <li> elements where the text of each todo will appear.
Live Preview
Additional Resources
Obtaining Ember.Js And Dependencies
TodoMVC has a few dependencies:
For this example, all of these resources should be stored in the folder js/libs located in the same location as index.html. Update your index.html to load these files by placing <script> tags just before your closing </body> tag in the following order:
1 <!-- ... additional lines truncated for brevity ... -->
2   <script src="js/libs/jquery-1.10.2.min.js"></script>
3   <script src="js/libs/handlebars-1.0.0.js"></script>
4   <script src="js/libs/ember.js"></script>
5   <script src="js/libs/ember-data.js"></script>
6 </body>
7 <!-- ... additional lines truncated for brevity ... -->
Reload your web browser to ensure that all files have been referenced correctly and no errors occur.
If you are using a package manager, such as bower, make sure to checkout the Getting Ember guide for info on other ways to get Ember.js (this guide is dependant on ember-data v1.0 or greater so please be sure to use the latest beta).
Live Preview
Additional Resources
Next, we will create an Ember.js application, a route (‘/’), and convert our static mockup into a Handlebars template.
Inside your js directory, add a file for the application at js/application.js and a file for the router at js/router.js. You may place these files anywhere you like (even just putting all code into the same file), but this guide will assume you have separated them into their own files and named them as indicated.
Inside js/application.js add the following code:
1 window.Todos = Ember.Application.create();
This will create a new instance of Ember.Application and make it available as a variable named Todos within your browser’s JavaScript environment.
Inside js/router.js add the following code:
1 Todos.Router.map(function() {
2   this.resource('todos', { path: '/' });
3 });
This will tell Ember.js to detect when the application’s URL matches '/' and to render the todos template.
Next, update your index.html to wrap the inner contents of <body> in a Handlebars script tag and include js/application.js and js/router.js after Ember.js and other javascript dependencies:
 1 <!-- ... additional lines truncated for brevity ... -->
 2 <body>
 3   <script type="text/x-handlebars" data-template-name="todos">
 4
 5     <section id="todoapp">
 6       {{! ... additional lines truncated for brevity ... }}
 7     </section>
 8
 9     <footer id="info">
10       <p>Double-click to edit a todo</p>
11     </footer>
12
13   </script>
14
15   <!-- ... Ember.js and other javascript dependencies ... -->
16   <script src="js/application.js"></script>
17   <script src="js/router.js"></script>
18 </body>
19 <!-- ... additional lines truncated for brevity ... -->
Reload your web browser to ensure that all files have been referenced correctly and no errors occur.
Live Preview
Additional Resources
- Changes in this step in
diffformat - Handlebars Guide
- Ember.Application Guide
- Ember.Application API Documentation
Modeling Data
Next we will create a model class to describe todo items.
Create a file at js/models/todo.js and put the following code inside:
1 Todos.Todo = DS.Model.extend({
2   title: DS.attr('string'),
3   isCompleted: DS.attr('boolean')
4 });
This code creates a new class Todo and places it within your application’s namespace. Each todo will have two attributes: title and isCompleted.
You may place this file anywhere you like (even just putting all code into the same file), but this guide will assume you have created a file and named it as indicated.
Finally, update your index.html to include a reference to this new file:
1 <!-- ... additional lines truncated for brevity ... -->
2   <script src="js/models/todo.js"></script>
3 </body>
4 <!-- ... additional lines truncated for brevity ... -->
Reload your web browser to ensure that all files have been referenced correctly and no errors occur.
Live Preview
Additional Resources
Using Fixtures
Now we’ll add fixture data. Fixtures are a way to put sample data into an application before connecting the application to long-term persistence.
First, update js/application.js to indicate that your application’s ApplicationAdapter
is an extension of the DS.FixtureAdapter. Adapters are responsible for communicating with a source of data for your application. Typically this will be a web service API, but in this case we are using an adapter designed to load fixture data:
1 window.Todos = Ember.Application.create();
2
3 Todos.ApplicationAdapter = DS.FixtureAdapter.extend();
Next, update the file at js/models/todo.js to include the following fixture data:
 1 // ... additional lines truncated for brevity ...
 2 Todos.Todo.FIXTURES = [
 3  {
 4    id: 1,
 5    title: 'Learn Ember.js',
 6    isCompleted: true
 7  },
 8  {
 9    id: 2,
10    title: '...',
11    isCompleted: false
12  },
13  {
14    id: 3,
15    title: 'Profit!',
16    isCompleted: false
17  }
18 ];
Reload your web browser to ensure that all files have been referenced correctly and no errors occur.
Live Preview
Additional Resources
Displaying Model Data
Next we’ll update our application to display dynamic todos, replacing our hard coded section in the todos template.
Inside the file js/router.js implement a TodosRoute class with a model function that returns all the existing todos:
1 // ... additional lines truncated for brevity ...
2 Todos.TodosRoute = Ember.Route.extend({
3   model: function() {
4     return this.store.find('todo');
5   }
6 });
Because we hadn’t implemented this class before, Ember.js provided a Route for us with the default behavior of rendering a matching template named todos using its naming conventions for object creation.
Now that we need custom behavior (returning a specific set of models), we implement the class and add the desired behavior.
Update index.html to replace the static <li> elements with a Handlebars {{each}} helper and a dynamic {{title}} for each item.
 1 {{! ... additional lines truncated for brevity ... }}
 2 <ul id="todo-list">
 3   {{#each}}
 4     <li>
 5       <input type="checkbox" class="toggle">
 6       <label>{{title}}</label><button class="destroy"></button>
 7     </li>
 8   {{/each}}
 9 </ul>
10 {{! ... additional lines truncated for brevity ... }}
The template loops over the content of its controller. This controller is an instance of ArrayController that Ember.js has provided for us as the container for our models. Because we don’t need custom behavior for this object yet, we can use the default object provided by the framework.
Reload your web browser to ensure that all files have been referenced correctly and no errors occur.
Live Preview
Additional Resources
Displaying A Model’s Complete State
TodoMVC strikes through completed todos by applying a CSS class completed to the <li> element. Update index.html to apply a CSS class to this element when a todo’s isCompleted property is true:
1 {{! ... additional lines truncated for brevity ... }}
2 <li {{bind-attr class="isCompleted:completed"}}>
3   <input type="checkbox" class="toggle">
4   <label>{{title}}</label><button class="destroy"></button>
5 </li>
6 {{! ... additional lines truncated for brevity ... }}
This code will apply the CSS class completed when the todo’s isCompleted property is true and remove it when the property becomes false.
The first fixture todo in our application has an isCompleted property of true. Reload the application to see the first todo is now decorated with a strike-through to visually indicate it has been completed.
Live Preview
Additional Resources
- Changes in this step in
diffformat - bind-attr API documentation
- bind and bind-attr article by Peter Wagenet
Creating A New Model Instance
Next we’ll update our static HTML <input> to an Ember view that can expose more complex behaviors. Update index.html to replace the new todo <input> with an {{input}} helper:
1 {{! ... additional lines truncated for brevity ... }}
2 <h1>todos</h1>
3 {{input type="text" id="new-todo" placeholder="What needs to be done?"
4               value=newTitle action="createTodo"}}
5 {{! ... additional lines truncated for brevity ... }}
This will render an <input> element at this location with the same id and placeholder attributes applied. It will also connect the newTitle property of this template’s controller to the value attribute of the <input>. When one changes, the other will automatically update to remain synchronized.
Additionally, we connect user interaction (pressing the <enter> key) to a method createTodo on this template’s controller.
Because we have not needed a custom controller behavior until this point, Ember.js provided a default controller object for this template. To handle our new behavior, we can implement the controller class Ember.js expects to find according to its naming conventions and add our custom behavior. This new controller class will automatically be associated with this template for us.
Add a js/controllers/todos_controller.js file. You may place this file anywhere you like (even just putting all code into the same file), but this guide will assume you have created the file and named it as indicated.
Inside js/controllers/todos_controller.js implement the controller Ember.js expects to find according to its naming conventions:
 1 Todos.TodosController = Ember.ArrayController.extend({
 2   actions: {
 3     createTodo: function() {
 4       // Get the todo title set by the "New Todo" text field
 5       var title = this.get('newTitle');
 6       if (!title) { return false; }
 7       if (!title.trim()) { return; }
 8
 9       // Create the new Todo model
10       var todo = this.store.createRecord('todo', {
11         title: title,
12         isCompleted: false
13       });
14
15       // Clear the "New Todo" text field
16       this.set('newTitle', '');
17
18       // Save the new model
19       todo.save();
20     }
21   }
22 });
This controller will now respond to user action by using its newTitle property as the title of a new todo whose isCompleted property is false. Then it will clear its newTitle property which will synchronize to the template and reset the textfield. Finally, it persists any unsaved changes on the todo.
In index.html include js/controllers/todos_controller.js as a dependency:
1 <!--- ... additional lines truncated for brevity ... -->
2    <script src="js/models/todo.js"></script>
3    <script src="js/controllers/todos_controller.js"></script>
4  </body>
5  <!--- ... additional lines truncated for brevity ... -->
Reload your web browser to ensure that all files have been referenced correctly and no errors occur. You should now be able to add additional todos by entering a title in the <input> and hitting the <enter> key.
Live Preview
Additional Resources
- Changes in this step in
diffformat - Ember.TextField API documention
- Ember Controller Guide
- Naming Conventions Guide
Marking a Model as Complete or Incomplete
In this step we’ll update our application to allow a user to mark a todo as complete or incomplete and persist the updated information.
In index.html update your template to wrap each todo in its own controller by adding an itemController argument to the {{each}} Handlebars helper. Then convert our static <input type="checkbox"> into a {{input}} helper:
1 {{! ... additional lines truncated for brevity ... }}
2 {{#each itemController="todo"}}
3   <li {{bind-attr class="isCompleted:completed"}}>
4     {{input type="checkbox" checked=isCompleted class="toggle"}}
5     <label>{{title}}</label><button class="destroy"></button>
6   </li>
7 {{/each}}
8 {{! ... additional lines truncated for brevity ... }}
When this {{input}} is rendered it will ask for the current value of the controller’s isCompleted property. When a user clicks this input, it will set the value of the controller’s isCompleted property to either true or false depending on the new checked value of the input.
Implement the controller for each todo by matching the name used as the itemController value to a class in your application Todos.TodoController. Create a new file at js/controllers/todo_controller.js for this code. You may place this file anywhere you like (even just putting all code into the same file), but this guide will assume you have created the file and named it as indicated.
Inside js/controllers/todo_controller.js add code for Todos.TodoController and its isCompleted property:
 1 Todos.TodoController = Ember.ObjectController.extend({
 2   isCompleted: function(key, value){
 3     var model = this.get('model');
 4
 5     if (value === undefined) {
 6       // property being used as a getter
 7       return model.get('isCompleted');
 8     } else {
 9       // property being used as a setter
10       model.set('isCompleted', value);
11       model.save();
12       return value;
13     }
14   }.property('model.isCompleted')
15 });
When called from the template to display the current isCompleted state of the todo, this property will proxy that question to its underlying model. When called with a value because a user has toggled the checkbox in the template, this property will set the isCompleted property of its model to the passed value (true or false), persist the model update, and return the passed value so the checkbox will display correctly.
The isCompleted function is marked a computed property whose value is dependent on the value of model.isCompleted.
In index.html include js/controllers/todo_controller.js as a dependency:
1 <!--- ... additional lines truncated for brevity ... -->
2    <script src="js/models/todo.js"></script>
3    <script src="js/controllers/todos_controller.js"></script>
4    <script src="js/controllers/todo_controller.js"></script>
5  </body>
6  <!--- ... additional lines truncated for brevity ... -->
Reload your web browser to ensure that all files have been referenced correctly and no errors occur. You should now be able to change the isCompleted property of a todo.
Live Preview
Additional Resources
- Changes in this step in
diffformat - Ember.Checkbox API documentation
- Ember Controller Guide
- Computed Properties Guide
- Naming Conventions Guide
Displaying the Number of Incomplete Todos
Next we’ll update our template’s hard-coded count of completed todos to reflect the actual number of completed todos. Update index.html to use two properties:
1 {{! ... additional lines truncated for brevity ... }}
2 <span id="todo-count">
3   <strong>{{remaining}}</strong> {{inflection}} left
4 </span>
5 {{! ... additional lines truncated for brevity ... }}
Implement these properties as part of this template’s controller, the Todos.TodosController:
 1 // ... additional lines truncated for brevity ...
 2 actions: {
 3   // ... additional lines truncated for brevity ...
 4 },
 5
 6 remaining: function() {
 7   return this.filterBy('isCompleted', false).get('length');
 8 }.property('@each.isCompleted'),
 9
10 inflection: function() {
11   var remaining = this.get('remaining');
12   return remaining === 1 ? 'item' : 'items';
13 }.property('remaining')
14 // ... additional lines truncated for brevity ...
The remaining property will return the number of todos whose isCompleted property is false. If the isCompleted value of any todo changes, this property will be recomputed. If the value has changed, the section of the template displaying the count will be automatically updated to reflect the new value.
The inflection property will return either a plural or singular version of the word “item” depending on how many todos are currently in the list. The section of the template displaying the count will be automatically updated to reflect the new value.
Reload your web browser to ensure that no errors occur. You should now see an accurate number for remaining todos.
Live Preview
Additional Resources
Toggling Between Showing and Editing States
TodoMVC allows users to double click each todo to display a text <input> element where the todo’s title can be updated. Additionally the <li> element for each todo obtains the CSS class editing for style and positioning.
We’ll update the application to allow users to toggle into this editing state for a todo. In index.html update the contents of the {{each}} Handlebars helper to:
 1  {{! ... additional lines truncated for brevity ... }}
 2 {{#each itemController="todo"}}
 3   <li {{bind-attr class="isCompleted:completed isEditing:editing"}}>
 4     {{#if isEditing}}
 5       <input class="edit">
 6     {{else}}
 7       {{input type="checkbox" checked=isCompleted class="toggle"}}
 8       <label {{action "editTodo" on="doubleClick"}}>{{title}}</label><button cla\
 9 ss="destroy"></button>
10     {{/if}}
11   </li>
12 {{/each}}
13  {{! ... additional lines truncated for brevity ... }}
The above code applies three new behaviors to our application: it applies the CSS class editing when the controller’s isEditing property is true and removes it when the isEditing property is false. We add a new {{action}} helper to the <label> so double-clicks will call editTodo on
this todo’s controller. Finally, we wrap our todo in a Handlebars {{if}} helper so a text <input> will display when we are editing and the todos title will display when we are not editing.
Inside js/controllers/todo_controller.js we’ll implement the matching logic for this template behavior:
 1 Todos.TodoController = Ember.ObjectController.extend({
 2   actions: {
 3     editTodo: function() {
 4       this.set('isEditing', true);
 5     }
 6   },
 7
 8   isEditing: false,
 9
10 // ... additional lines truncated for brevity ...
Above we defined an initial isEditing value of false for controllers of this type and said that when the editTodo action is called it should set the isEditing property of this controller to true. This will automatically trigger the sections of template that use isEditing to update their rendered content.
Reload your web browser to ensure that no errors occur. You can now double-click a todo to edit it.
Live Preview
Additional Resources
- Changes in this step in
diffformat - Handlebars Conditionals Guide
- bind-attr API documentation
- action API documentation
- bind and bindAttr article by Peter Wagenet
Accepting Edits
In the previous step we updated TodoMVC to allow a user to toggle the display of a text <input> for editing a todo’s title. Next, we’ll add the behavior that immediately focuses the <input> when it appears, accepts user input and, when the user presses the <enter> key or moves focus away from the editing <input> element, persists these changes, then redisplays the todo with its newly updated text.
To accomplish this, we’ll create a new custom component and register it with Handlebars to make it available to our templates.
Create a new file js/views/edit_todo_view.js. You may place this file anywhere you like (even just putting all code into the same file), but this guide will assume you have created the file and named it as indicated.
In js/views/edit_todo_view.js create an extension of Ember.TextField and register it as
a helper:
1 Todos.EditTodoView = Ember.TextField.extend({
2   didInsertElement: function() {
3     this.$().focus();
4   }
5 });
6
7 Ember.Handlebars.helper('edit-todo', Todos.EditTodoView);
In index.html require this new file:
1 <!--- ... additional lines truncated for brevity ... -->
2   <script src="js/controllers/todo_controller.js"></script>
3   <script src="js/views/edit_todo_view.js"></script>
4 </body>
5 <!--- ... additional lines truncated for brevity ... -->
In index.html replace the static <input> element with our custom {{edit-todo}} component, connecting the value property, and actions:
1 {{! ... additional lines truncated for brevity ... }}
2 {{#if isEditing}}
3   {{edit-todo class="edit" value=title focus-out="acceptChanges"
4                            insert-newline="acceptChanges"}}
5 {{else}}
6 {{! ... additional lines truncated for brevity ... }}
Pressing the <enter> key will trigger the acceptChanges event on the instance of TodoController. Moving focus away from the <input> will trigger the focus-out event, calling a method acceptChanges on this view’s instance of TodoController.
Additionally, we connect the value property of this <input> to the title property of this instance of TodoController. We will not implement a title property on the controller so it will retain the default behavior of proxying all requests to its model.
A CSS class edit is applied for styling.
In js/controllers/todo_controller.js, add the method acceptChanges that we called from EditTodoView:
 1 // ... additional lines truncated for brevity ...
 2 actions: {
 3   editTodo: function() {
 4     this.set('isEditing', true);
 5   },
 6   acceptChanges: function() {
 7     this.set('isEditing', false);
 8
 9     if (Ember.isEmpty(this.get('model.title'))) {
10       this.send('removeTodo');
11     } else {
12       this.get('model').save();
13     }
14   },
15   removeTodo: function () {
16     var todo = this.get('model');
17     todo.deleteRecord();
18     todo.save();
19   }
20 },
21 // ... additional lines truncated for brevity ...
This method will set the controller’s isEditing property to false and commit all changes made to the todo.
Live Preview
Additional Resources
Deleting a Model
TodoMVC displays a button for removing todos next to each todo when its <li> is hovered. Clicking this button will remove the todo and update the display of remaining incomplete todos and remaining completed todos appropriately.
In index.html update the static <button> element to include an {{action}} Handlebars helper:
1 {{! ... additional lines truncated for brevity ... }}
2 <button {{action "removeTodo"}} class="destroy"></button>
3 {{! ... additional lines truncated for brevity ... }}
This will call the removeTodo action defined in the previous chapter and will delete the todo locally and then persist this data change.
Because the todo is no longer part of the collection of all todos, its <li> element in the page will be automatically removed for us. If the deleted todo was incomplete, the count of remaining todos will be decreased by one and the display of this number will be automatically re-rendered. If the new count results in an inflection change between “todo” and “todos” this area of the page will be automatically re-rendered.
Reload your web browser to ensure that there are no errors and the behaviors described above occurs.
Live Preview
Additional Resources
Adding Child Routes
Next we will split our single template into a set of nested templates so we can transition between different lists of todos in reaction to user interaction.
In index.html move the entire <ul> of todos into a new template named todos/index by adding a new Handlebars template <script> tag inside the <body> of the document:
 1 <!--- ... additional lines truncated for brevity ... -->
 2 <body>
 3 <script type="text/x-handlebars" data-template-name="todos/index">
 4   <ul id="todo-list">
 5     {{#each itemController="todo"}}
 6       <li {{bind-attr class="isCompleted:completed isEditing:editing"}}>
 7         {{#if isEditing}}
 8           {{edit-todo class="edit" value=title focus-out="acceptChanges" insert-\
 9 newline="acceptChanges"}}
10         {{else}}
11           {{input type="checkbox" checked=isCompleted class="toggle"}}
12           <label {{action "editTodo" on="doubleClick"}}>{{title}}</label><button\
13  {{action "removeTodo"}} class="destroy"></button>
14         {{/if}}
15       </li>
16     {{/each}}
17   </ul>
18 </script>
19 <!--- ... additional lines truncated for brevity ... -->
Still within index.html place a Handlebars {{outlet}} helper where the <ul> was previously:
1 {{! ... additional lines truncated for brevity ... }}
2 <section id="main">
3   {{outlet}}
4
5   <input type="checkbox" id="toggle-all">
6 </section>
7 {{! ... additional lines truncated for brevity ... }}
The {{outlet}} Handlebars helper designates an area of a template that will dynamically update as we transition between routes. Our first new child route will fill this area with the list of all todos in the application.
In js/router.js update the router to change the todos mapping, with an additional empty function parameter so it can accept child routes, and add this first index route:
 1 Todos.Router.map(function () {
 2   this.resource('todos', { path: '/' }, function () {
 3     // additional child routes will go here later
 4   });
 5 });
 6
 7 // ... additional lines truncated for brevity ...
 8
 9 Todos.TodosIndexRoute = Ember.Route.extend({
10   model: function() {
11     return this.modelFor('todos');
12   }
13 });
When the application loads at the url '/' Ember.js will enter the todos route and render the todos template as before. It will also transition into the todos.index route and fill the {{outlet}} in the todos template with the todos/index template. The model data for this template is the result of the model method of TodosIndexRoute, which indicates that the
model for this route is the same model as for the TodosRoute.
This mapping is described in more detail in the Naming Conventions Guide.
Live Preview
Additional Resources
- Changes in this step in
diffformat - Ember Router Guide
- Ember Controller Guide
- outlet API documentation
Transitioning to Show Only Incomplete Todos
Next we’ll update the application so a user can navigate to a url where only todos that are not complete are displayed.
In index.html convert the <a> tag for ‘Active’ todos into a Handlebars {{link-to}} helper and remove the active class from the <a> tag for ‘All’:
 1 {{! ... additional lines truncated for brevity ... }}
 2 <li>
 3   <a href="all">All</a>
 4 </li>
 5 <li>
 6   {{#link-to "todos.active" activeClass="selected"}}Active{{/link-to}}
 7 </li>
 8 <li>
 9   <a href="completed">Completed</a>
10 </li>
11 {{! ... additional lines truncated for brevity ... }}
In js/router.js update the router to recognize this new path and implement a matching route:
 1 Todos.Router.map(function() {
 2   this.resource('todos', { path: '/' }, function() {
 3     // additional child routes
 4     this.route('active');
 5   });
 6 });
 7
 8 // ... additional lines truncated for brevity ...
 9 Todos.TodosActiveRoute = Ember.Route.extend({
10   model: function(){
11     return this.store.filter('todo', function(todo) {
12       return !todo.get('isCompleted');
13     });
14   },
15   renderTemplate: function(controller) {
16     this.render('todos/index', {controller: controller});
17   }
18 });
The model data for this route is the collection of todos whose isCompleted property is false. When a todo’s isCompleted property changes this collection will automatically update to add or remove the todo appropriately.
Normally transitioning into a new route changes the template rendered into the parent {{outlet}}, but in this case we’d like to reuse the existing todos/index template. We can accomplish this by implementing the renderTemplate method and calling render ourselves with the specific template and controller options.
Reload your web browser to ensure that there are no errors and the behavior described above occurs.
Live Preview
[Ember.js • TodoMVC[(http://jsbin.com/arITiZu)
Additional Resources
- Changes in this step in
diffformat - link-to API documentation
- Route#renderTemplate API documentation
- Route#render API documentation
- Ember Router Guide
Transitioning to Show Only Complete Todos
Next we’ll update the application so a user can navigate to a url where only todos that have already been completed are displayed.
In index.html convert the <a> tag for ‘Completed’ todos into a Handlebars {{link-to}} helper:
 1 {{! ... additional lines truncated for brevity ... }}
 2 <li>
 3   <a href="all">All</a>
 4 </li>
 5 <li>
 6   {{#link-to "todos.active" activeClass="selected"}}Active{{/link-to}}
 7 </li>
 8 <li>
 9   {{#link-to "todos.completed" activeClass="selected"}}Completed{{/link-to}}
10 </li>
11 {{! ... additional lines truncated for brevity ... }}
In js/router.js update the router to recognize this new path and implement a matching route:
 1 Todos.Router.map(function() {
 2   this.resource('todos', { path: '/' }, function() {
 3     // additional child routes
 4     this.route('active');
 5     this.route('completed');
 6   });
 7 });
 8
 9 // ... additional lines truncated for brevity ...
10
11 Todos.TodosCompletedRoute = Ember.Route.extend({
12   model: function() {
13     return this.store.filter('todo', function(todo) {
14       return todo.get('isCompleted');
15     });
16   },
17   renderTemplate: function(controller) {
18     this.render('todos/index', {controller: controller});
19   }
20 });
The model data for this route is the collection of todos whose isCompleted property is true. Just like we recently saw with the similar function for the active todos, changes to a todo’s isCompleted property will automatically cause this collection to refresh, updating the UI accordingly.
TodosCompletedRoute has a similar purpose to the active todos - to reuse the existing todos/index template, rather than having to create a new template.
Reload your web browser to ensure that there are no errors and the behavior described above occurs.
Live Preview
Additional Resources
- Changes in this step in
diffformat - link-to API documentation
- Route#renderTemplate API documentation
- Route#render API documentation
- Ember Router Guide
Transitioning back to Show All Todos
Next we can update the application to allow navigating back to the list of all todos.
In index.html convert the <a> tag for ‘All’ todos into a Handlebars {{link-to}} helper:
 1 {{! ... additional lines truncated for brevity ... }}
 2 <li>
 3   {{#link-to "todos.index" activeClass="selected"}}All{{/link-to}}
 4 </li>
 5 <li>
 6   {{#link-to "todos.active" activeClass="selected"}}Active{{/link-to}}
 7 </li>
 8 <li>
 9   {{#link-to "todos.completed" activeClass="selected"}}Completed{{/link-to}}
10 </li>
11 {{! ... additional lines truncated for brevity ... }}
Reload your web browser to ensure that there are no errors. You should be able to navigate between urls for all, active, and completed todos.
Live Preview
Additional Resources
Displaying a Button to Remove All Completed Todos
TodoMVC allows users to delete all completed todos at once by clicking a button. This button is visible only when there are any completed todos, displays the number of completed todos, and removes all completed todos from the application when clicked.
In this step, we’ll implement that behavior. In index.html update the static <button> for clearing all completed todos:
1 {{! ... additional lines truncated for brevity ... }}
2 {{#if hasCompleted}}
3   <button id="clear-completed" {{action "clearCompleted"}}>
4     Clear completed ({{completed}})
5   </button>
6 {{/if}}
7 {{! ... additional lines truncated for brevity ... }}
In js/controllers/todos_controller.js implement the matching properties and a method that will clear completed todos and persist these changes when the button is clicked:
 1 // ... additional lines truncated for brevity ...
 2 actions: {
 3   clearCompleted: function() {
 4     var completed = this.filterBy('isCompleted', true);
 5     completed.invoke('deleteRecord');
 6     completed.invoke('save');
 7   },
 8   // ... additional lines truncated for brevity ...
 9 },
10 hasCompleted: function() {
11   return this.get('completed') > 0;
12 }.property('completed'),
13
14 completed: function() {
15   return this.filterBy('isCompleted', true).get('length');
16 }.property('@each.isCompleted'),
17 // ... additional lines truncated for brevity ...
The completed and clearCompleted methods both invoke the filterBy method, which is part of the ArrayController API and returns an instance of EmberArray which contains only the items for which the callback returns true. The clearCompleted method also invokes the invoke method which is part of the EmberArray API. invoke will execute a method on each object in the Array if the method exists on that object.
Reload your web browser to ensure that there are no errors and the behavior described above occurs.
Live Preview
Additional Resources
Indicating When All Todos Are Complete
Next we’ll update our template to indicate when all todos have been completed. In index.html replace the static checkbox <input> with an {{input}}:
1 {{! ... additional lines truncated for brevity ... }}
2 <section id="main">
3   {{outlet}}
4   {{input type="checkbox" id="toggle-all" checked=allAreDone}}
5 </section>
6 {{! ... additional lines truncated for brevity ... }}
This checkbox will be checked when the controller property allAreDone is true and unchecked when the property allAreDone is false.
In js/controllers/todos_controller.js implement the matching allAreDone property:
1 // ... additional lines truncated for brevity ...
2 allAreDone: function(key, value) {
3   return !!this.get('length') && this.isEvery('isCompleted');
4 }.property('@each.isCompleted')
5 // ... additional lines truncated for brevity ...
This property will be true if the controller has any todos and every todo’s isCompleted property is true. If the isCompleted property of any todo changes, this property will be recomputed. If the return value has changed, sections of the template that need to update will be automatically updated for us.
Reload your web browser to ensure that there are no errors and the behavior described above occurs.
Live Preview
Additional Resources
Toggling All Todos Between Complete and Incomplete
TodoMVC allows users to toggle all existing todos into either a complete or incomplete state. It uses the same checkbox that becomes checked when all todos are completed and unchecked when one or more todos remain incomplete.
To implement this behavior update the allAreDone property in js/controllers/todos_controller.js to handle both getting and setting behavior:
 1 // ... additional lines truncated for brevity ...
 2 allAreDone: function(key, value) {
 3   if (value === undefined) {
 4     return !!this.get('length') && this.isEvery('isCompleted', true);
 5   } else {
 6     this.setEach('isCompleted', value);
 7     this.invoke('save');
 8     return value;
 9   }
10 }.property('@each.isCompleted')
11 // ... additional lines truncated for brevity ...
If no value argument is passed this property is being used to populate the current value of the checkbox. If a value is passed it indicates the checkbox was used by a user and we should set the isCompleted property of each todo to this new value.
The count of remaining todos and completed todos used elsewhere in the template automatically re-render for us if necessary.
Reload your web browser to ensure that there are no errors and the behavior described above occurs.
Live Preview
Additional Resources
Replacing the Fixture Adapter with Another Adapter
Finally we’ll replace our fixture data with real persistence so todos will remain between application loads by replacing the fixture adapter with a localstorage-aware adapter instead.
Change js/application.js to:
1 window.Todos = Ember.Application.create();
2
3 Todos.ApplicationAdapter = DS.LSAdapter.extend({
4   namespace: 'todos-emberjs'
5 });
The local storage adapter, written by Ryan Florence, can be downloaded from its source. Add it to your project as js/libs/localstorage_adapter.js. You may place this file anywhere you like (even just putting all code into the same file), but this guide will assume you have created the file and named it as indicated.
In index.html include js/libs/localstorage_adapter.js as a dependency:
1 <!--- ... additional lines truncated for brevity ... -->
2 <script src="js/libs/ember-data.js"></script>
3 <script src="js/libs/localstorage_adapter.js"></script>
4 <script src="js/application.js"></script>
5  <!--- ... additional lines truncated for brevity ... -->
Reload your application. Todos you manage will now persist after the application has been closed.