Controllers
Introduction
Controllers
In Ember.js, controllers allow you to decorate your models with display logic. In general, your models will have properties that are saved to the server, while controllers will have properties that your app does not need to save to the server.
For example, if you were building a blog, you would have a
BlogPost model that you would present in a blog_post template.
Your BlogPost model would have properties like:
titleintrobodyauthor
Your template would bind to these properties in the blog_post
template:
 1 <h1>{{title}}</h1>
 2 <h2>by {{author}}</h2>
 3
 4 <div class='intro'>
 5   {{intro}}
 6 </div>
 7 <hr>
 8 <div class='body'>
 9   {{body}}
10 </div>
In this simple example, we don’t have any display-specific properties or actions just yet. For now, our controller just acts as a pass-through (or “proxy”) for the model properties. (Remember that a controller gets the model it represents from its route handler.)
Let’s say we wanted to add a feature that would allow the user to
toggle the display of the body section. To implement this, we would
first modify our template to show the body only if the value of a
new isExpanded property is true.
 1 <h1>{{title}}</h1>
 2 <h2>by {{author}}</h2>
 3
 4 <div class='intro'>
 5   {{intro}}
 6 </div>
 7 <hr>
 8
 9 {{#if isExpanded}}
10   <button {{action 'toggleProperty' 'isExpanded'}}>Hide Body</button>
11   <div class='body'>
12     {{body}}
13   </div>
14 {{else}}
15   <button {{action 'toggleProperty' 'isExpanded'}}>Show Body</button>
16 {{/if}}
You might think you should put this property on the model, but whether the body is expanded or not is strictly a display concern.
Putting this property on the controller cleanly separates logic related to your data model from logic related to what you display on the screen. This makes it easy to unit-test your model without having to worry about logic related to your display creeping into your test setup.
A Note on Coupling
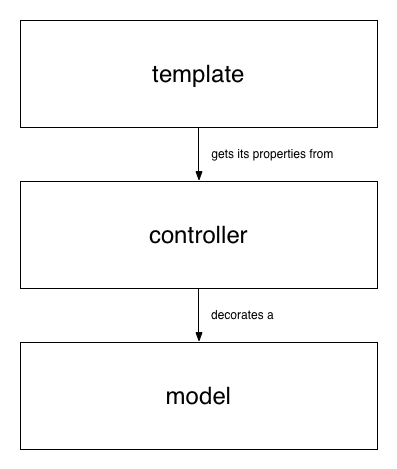
In Ember.js, templates get their properties from controllers, which decorate a model.
This means that templates know about controllers and controllers know about models, but the reverse is not true. A model knows nothing about which (if any) controllers are decorating it, and controller does not know which views are presenting its properties.
 Objects
This also means that as far as a template is concerned, all of its properties come from its controller, and it doesn’t need to know about the model directly.
In practice, Ember.js will create a template’s controller once for the entire application, but the controller’s model may change throughout the lifetime of the application without requiring that the view knows anything about those mechanics.
This makes it easy to test a template in isolation by rendering it with a controller object that contains the properties the template expects. From the template’s perspective, a controller is simply an object that provides its data.
Representing Models
Templates are always connected to controllers, not models. This makes it easy to separate display-specific properties from model specific properties, and to swap out the controller’s model as the user navigates around the page.
For convenience, Ember.js provides controllers that proxy
properties from their models so that you can say {{name}} in your
template rather than {{model.name}}. An Ember.ArrayController
proxies properties from an Array, and an Ember.ObjectController
proxies properties from an object.
If your controller is an ArrayController, you can iterate directly
over the controller using {{#each controller}}. This keeps the
template from having to know about how the controller is implemented
and makes isolation testing and refactoring easier.
Storing Application Properties
Not all properties in your application need to be saved to the server. Any time you need to store information only for the lifetime of this application run, you should store it on a controller.
For example, imagine your application has a search field that
is always present. You could store a search property on your
ApplicationController, and bind the search field in the `
application` template to that property, like this:
1 <!-- application.handlebars -->
2 <header>
3   {{input type="text" value=search action="query"}}
4 </header>
5
6 {{outlet}}
 1 App.ApplicationController = Ember.Controller.extend({
 2   // the initial value of the `search` property
 3   search: '',
 4
 5   actions: {
 6     query: function() {
 7       // the current value of the text field
 8       var query = this.get('search');
 9       this.transitionToRoute('search', { query: query });
10     }
11   }
12 });
The application template stores its properties and sends its
actions to the ApplicationController. In this case, when the user
hits enter, the application will transition to the search route,
passing the query as a parameter.
Representing A Single Model With ObjectController
Use Ember.ObjectController to represent a single model. To tell an
ObjectController which model to represent, set its model
property in your route’s setupController method.
When a template asks an ObjectController for the value of a property, the controller
looks for a property with the same name on itself first before checking
the model.
For example, imagine you are writing a music player. You have defined
your SongController to represent the currently playing song.
1 App.SongController = Ember.ObjectController.extend({
2   soundVolume: 1
3 });
In the Song route, you set the model of the controller to the
currently playing song:
1 App.SongRoute = Ember.Route.extend({
2   setupController: function(controller, song) {
3     controller.set('model', song);
4   }
5 });
In your template, you want to display the name of the currently playing song, as well as the volume at which it is playing.
1 <p>
2   <strong>Song</strong>: {{name}} by {{artist}}
3 </p>
4 <p>
5   <strong>Current Volume</strong>: {{soundVolume}}
6 </p>
Because name and artist are persisted information, and thus stored
on the model, the controller looks them up there and provides them to
the template.
soundVolume, however, is specific to the current user’s session, and
thus stored on the controller. The controller can return its own value
without consulting the model.
The advantage of this architecture is that it is easy to get started by accessing the properties of the model via the object controller. If, however, you need to transform a model property for a template, there is a well-defined place to do so without adding view-specific concerns to the model.
For example, imagine we want to display the duration of the song:
1 <p>
2   <strong>Song</strong>: {{name}} by {{artist}}
3 </p>
4 <p>
5   <strong>Duration</strong>: {{duration}}
6 </p>
This is saved on the server as an integer representing the number of seconds, so our first attempt looks like this:
1 <p>
2   <strong>Song</strong>: 4 Minute Warning by Radiohead
3 </p>
4 <p>
5   <strong>Duration</strong>: 257
6 </p>
Since our users are humans and not robots, however, we’d like to display the duration as a formatted string.
This is very easy to do by defining a computed property on the controller which transforms the model’s value into a human-readable format for the template:
1 App.SongController = Ember.ObjectController.extend({
2   duration: function() {
3     var duration = this.get('model.duration'),
4          minutes = Math.floor(duration / 60),
5          seconds = duration % 60;
6
7     return [minutes, seconds].join(':');
8   }.property('model.duration')
9 });
Now, the output of our template is a lot friendlier:
1 <p>
2   <strong>Song</strong>: 4 Minute Warning by Radiohead
3 </p>
4 <p>
5   <strong>Duration</strong>: 4:17
6 </p>
Representing Multiple Models With ArrayController
You can use Ember.ArrayController to represent an array of models. To tell an
ArrayController which models to represent, set its model property
in your route’s setupController method.
You can treat an ArrayController just like its underlying array. For
example, imagine we want to display the current playlist. In our route,
we setup our SongsController to represent the songs in the playlist:
1 App.SongsRoute = Ember.Route.extend({
2   setupController: function(controller, playlist) {
3     controller.set('model', playlist.get('songs'));
4   }
5 });
In the songs template, we can use the {{#each}} helper to display
each song:
1 <h1>Playlist</h1>
2
3 <ul>
4   {{#each}}
5     <li>{{name}} by {{artist}}</li>
6   {{/each}}
7 </ul>
You can use the ArrayController to collect aggregate information about
the models it represents. For example, imagine we want to display the
number of songs that are over 30 seconds long. We can add a new computed
property called longSongCount to the controller:
1 App.SongsController = Ember.ArrayController.extend({
2   longSongCount: function() {
3     var longSongs = this.filter(function(song) {
4       return song.get('duration') > 30;
5     });
6     return longSongs.get('length');
7   }.property('@each.duration')
8 });
Now we can use this property in our template:
1 <ul>
2   {{#each}}
3     <li>{{name}} by {{artist}}</li>
4   {{/each}}
5 </ul>
6
7 {{longSongCount}} songs over 30 seconds.
Sorting
The Ember.ArrayController uses the Ember.SortableMixin to allow sorting
of content. There are two properties that can be set in order to set up sorting:
1 App.SongsController = Ember.ArrayController.extend({
2   sortProperties: ['name', 'artist'],
3   sortAscending: true // false for descending
4 });
Item Controller
It is often useful to specify a controller to decorate individual items in
the ArrayController while iterating over them. This can be done by
creating an ObjectController:
1 App.SongController = Ember.ObjectController.extend({
2   fullName: function() {
3
4     return this.get('name') + ' by ' + this.get('artist');
5
6   }.property('name', 'artist')
7 });
Then, the ArrayController itemController property must be set to
the decorating controller.
1 App.SongsController = Ember.ArrayController.extend({
2   itemController: 'song'
3 });
1 {{#each controller}}
2   <li>{{fullName}}</li>
3 {{/each}}
or you could setup the itemController directly in the template:
1 App.SongsController = Ember.ArrayController.extend({
2 });
1 {{#each controller itemController="song"}}
2   <li>{{fullName}}</li>
3 {{/each}}
Managing Dependencies Between Controllers
Sometimes, especially when nesting resources, we find ourselves needing to have some kind of connection between two controllers. Let’s take this router as an example:
1 App.Router.map(function() {
2   this.resource("post", { path: "/posts/:post_id" }, function() {
3     this.resource("comments", { path: "/comments" });
4   });
5 });
If we visit a /posts/1/comments URL, our Post model will get
loaded into a PostController’s model, which means it is not directly
accessible in the CommentsController. We might however want to display
some information about it in the comments template.
To be able to do this we define our CommentsController to need the PostController
which has our desired Post model.
1 App.CommentsController = Ember.ArrayController.extend({
2   needs: "post"
3 });
This tells Ember that our CommentsController should be able to access
its parent PostController, which can be done via controllers.post
(either in the template or in the controller itself).
1 <h1>Comments for {{controllers.post.title}}</h1>
2
3 <ul>
4   {{#each comments}}
5     <li>{{text}}</li>
6   {{/each}}
7 </ul>
We can also create an aliased property to give ourselves a shorter way to access
the PostController (since it is an ObjectController, we don’t need
or want the Post instance directly).
1 App.CommentsController = Ember.ArrayController.extend({
2   needs: "post",
3   post: Ember.computed.alias("controllers.post")
4 });
If you want to connect multiple controllers together, you can specify an array of controller names:
1 App.AnotherController = Ember.Controller.extend({
2   needs: ['post', 'comments']
3 });
For more information about dependecy injection and needs in Ember.js,
see the dependency injection guide.
For more information about aliases, see the API docs for
aliased properties.