Models
Introduction
Models
In Ember, every route has an associated model. This model is set by
implementing a route’s model hook, by passing the model as an argument
to {{link-to}}, or by calling a route’s transitionTo() method.
See Specifying a Route’s Model for more information on setting a route’s model.
For simple applications, you can get by using jQuery to load JSON data from a server, then use those JSON objects as models.
However, using a model library that manages finding models, making changes, and saving them back to the server can dramatically simplify your code while improving the robustness and performance of your application.
Many Ember apps use Ember Data to handle this. Ember Data is a library that integrates tightly with Ember.js to make it easy to retrieve records from a server, cache them for performance, save updates back to the server, and create new records on the client.
Without any configuration, Ember Data can load and save records and their relationships served via a RESTful JSON API, provided it follows certain conventions.
If you need to integrate your Ember.js app with existing JSON APIs that do not follow strong conventions, Ember Data is designed to be easily configurable to work with whatever data your server returns.
Ember Data is also designed to work with streaming APIs like socket.io, Firebase, or WebSockets. You can open a socket to your server and push changes to records into the store whenever they occur.
Currently, Ember Data ships as a separate library from Ember.js. Until Ember Data is included as part of the standard distribution, you can get a copy of the latest passing build from emberjs.com/builds:
Core Concepts
Learning to use Ember Data is easiest once you understand some of the concepts that underpin its design.
Store
The store is the central repository of records in your application. You can think of the store as a cache of all of the records available in your app. Both your application’s controllers and routes have access to this shared store; when they need to display or modify a record, they will first ask the store for it.
This instance of DS.Store is created for you automatically and is shared
among all of the objects in your application.
You will use the store to retrieve records, as well to create new ones.
For example, we might want to find an App.Person model with the ID of
1 from our route’s model hook:
1 App.IndexRoute = Ember.Route.extend({
2   model: function() {
3     return this.store.find('person', 1);
4   }
5 });
Models
A model is a class that defines the properties and behavior of the data that you present to the user. Anything that the user expects to see if they leave your app and come back later (or if they refresh the page) should be represented by a model.
For example, if you were writing a web application for placing orders at
a restaurant, you might have models like Order, LineItem, and
MenuItem.
Fetching orders becomes very easy:
1 this.store.find('order');
Models define the type of data that will be provided by your server. For
example, a Person model might have a firstName attribute that is a
string, and a birthday attribute that is a date:
1 App.Person = DS.Model.extend({
2   firstName: DS.attr('string'),
3   birthday:  DS.attr('date')
4 });
A model also describes its relationships with other objects. For
example, an Order may have many LineItems, and a LineItem may
belong to a particular Order.
1 App.Order = DS.Model.extend({
2   lineItems: DS.hasMany('lineItem')
3 });
4
5 App.LineItem = DS.Model.extend({
6   order: DS.belongsTo('order')
7 });
Models don’t have any data themselves; they just define the properties and behavior of specific instances, which are called records.
Records
A record is an instance of a model that contains data loaded from a server. Your application can also create new records and save them back to the server.
A record is uniquely identified by its model type and id.
For example, if you were writing a contact management app, you might
have a model called Person. An individual record in your app might
have a type of Person and an ID of 1 or steve-buscemi.
1 this.store.find('person', 1); // => { id: 1, name: 'steve-buscemi' }
IDs are usually assigned by the server when you save them for the first time, but you can also generate IDs client-side.
Adapter
An adapter is an object that knows about your particular server backend and is responsible for translating requests for and changes to records into the appropriate calls to your server.
For example, if your application asks for a person record with an ID
of 1, how should Ember Data load it? Is it over HTTP or a WebSocket?
If it’s HTTP, is the URL /person/1 or /resources/people/1?
The adapter is responsible for answering all of these questions. Whenever your app asks the store for a record that it doesn’t have cached, it will ask the adapter for it. If you change a record and save it, the store will hand the record to the adapter to send the appropriate data to your server and confirm that the save was successful.
Serializer
A serializer is responsible for turning a raw JSON payload returned from your server into a record object.
JSON APIs may represent attributes and relationships in many different
ways. For example, some attribute names may be camelCased and others
may be under_scored. Representing relationships is even more diverse:
they may be encoded as an array of IDs, an array of embedded objects, or
as foreign keys.
When the adapter gets a payload back for a particular record, it will give that payload to the serializer to normalize into the form that Ember Data is expecting.
While most people will use a serializer for normalizing JSON, because
Ember Data treats these payloads as opaque objects, there’s no reason
they couldn’t be binary data stored in a Blob or
ArrayBuffer.
Automatic Caching
The store will automatically cache records for you. If a record had already been loaded, asking for it a second time will always return the same object instance. This minimizes the number of round-trips to the server, and allows your application to render its UI to the user as fast as possible.
For example, the first time your application asks the store for a
person record with an ID of 1, it will fetch that information from
your server.
However, the next time your app asks for a person with ID 1, the
store will notice that it had already retrieved and cached that
information from the server. Instead of sending another request for the
same information, it will give your application the same record it had
provided it the first time. This feature—always returning the same
record object, no matter how many times you look it up—is sometimes
called an identity map.
Using an identity map is important because it ensures that changes you make in one part of your UI are propagated to other parts of the UI. It also means that you don’t have to manually keep records in sync—you can ask for a record by ID and not have to worry about whether other parts of your application have already asked for and loaded it.
Architecture Overview
The first time your application asks the store for a record, the store sees that it doesn’t have a local copy and requests it from your adapter. Your adapter will go and retrieve the record from your persistence layer; typically, this will be a JSON representation of the record served from an HTTP server.
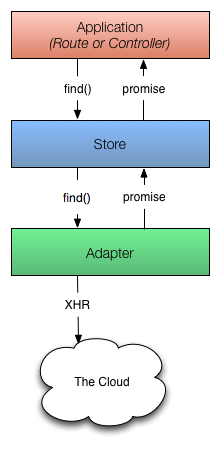
Diagram showing process for finding an unloaded record
As illustrated in the diagram above, the adapter cannot always return the requested record immediately. In this case, the adapter must make an asynchronous request to the server, and only when that request finishes loading can the record be created with its backing data.
Because of this asynchronicity, the store immediately returns a
promise from the find() method. Similarly, any requests that the
store makes to the adapter also return promises.
Once the request to the server returns with a JSON payload for the requested record, the adapter resolves the promise it returned to the store with the JSON.
The store then takes that JSON, initializes the record with the JSON data, and resolves the promise returned to your application with the newly-loaded record.
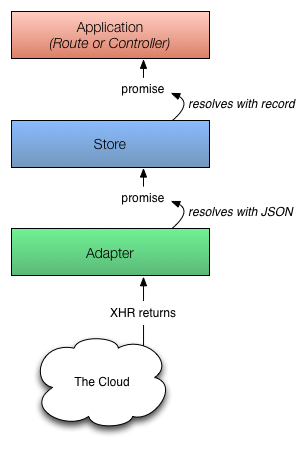
Diagram showing process for finding an unloaded record after the payload has returned from the server
Let’s look at what happens if you request a record that the store already has in its cache.
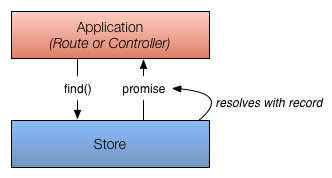
Diagram showing process for finding an unloaded record after the payload has returned from the server
In this case, because the store already knew about the record, it returns a promise that it resolves with the record immediately. It does not need to ask the adapter (and, therefore, the server) for a copy since it already has it saved locally.
These are the core concepts you should understand to get the most out of Ember Data. The following sections go into more depth about each of these concepts, and how to use them together.
Defining Models
A model is a class that defines the properties and behavior of the data that you present to the user. Anything that the user expects to see if they leave your app and come back later (or if they refresh the page) should be represented by a model.
Make sure to include ember-data.js after ember.js
1 <script type="text/javascript" src="ember.js"></script>
2 <script type="text/javascript" src="ember-data.js"></script>
For every model in your application, create a subclass of DS.Model:
1 App.Person = DS.Model.extend();
After you have defined a model class, you can start finding and creating
records of that type. When interacting with the store, you will need to
specify a record’s type using the model name. For example, the store’s
find() method expects a string as the first argument to tell it what
type of record to find:
1 store.find('person', 1);
The table below shows how model names map to model classes.
Defining Attributes
You can specify which attributes a model has by using DS.attr.
1 var attr = DS.attr;
2
3 App.Person = DS.Model.extend({
4   firstName: attr(),
5   lastName: attr(),
6   birthday: attr()
7 });
Attributes are used when turning the JSON payload returned from your server into a record, and when serializing a record to save back to the server after it has been modified.
You can use attributes just like any other property, including as part of a computed property. Frequently, you will want to define computed properties that combine or transform primitive attributes.
 1 var attr = DS.attr;
 2
 3 App.Person = DS.Model.extend({
 4   firstName: attr(),
 5   lastName: attr(),
 6
 7   fullName: function() {
 8     return this.get('firstName') + ' ' + this.get('lastName');
 9   }.property('firstName', 'lastName')
10 });
For more about adding computed properties to your classes, see Computed Properties.
If you don’t specify the type of the attribute, it will be whatever was
provided by the server. You can make sure that an attribute is always
coerced into a particular type by passing a type to attr:
1 App.Person = DS.Model.extend({
2   birthday: DS.attr('date')
3 });
The default adapter supports attribute types of string,
number, boolean, and date. Custom adapters may offer additional
attribute types, and new types can be registered as transforms. See the
documentation section on the REST Adapter.
Please note: Ember Data serializes and deserializes dates according to
ISO 8601. For example: 2014-05-27T12:54:01
Options
DS.attr takes an optional hash as a second parameter:
-
defaultValue: Pass a string or a function to be called to set the attribute to a default value if none is supplied.Example
1varattr=DS.attr;23App.User=DS.Model.extend({4username:attr('string'),5email:attr('string'),6verified:attr('boolean',{defaultValue:false}),7createdAt:DS.attr('string',{8defaultValue:function(){returnnewDate();}9})10});
Defining Relationships
Ember Data includes several built-in relationship types to help you define how your models relate to each other.
One-to-One
To declare a one-to-one relationship between two models, use
DS.belongsTo:
1 App.User = DS.Model.extend({
2   profile: DS.belongsTo('profile')
3 });
4
5 App.Profile = DS.Model.extend({
6   user: DS.belongsTo('user')
7 });
One-to-Many
To declare a one-to-many relationship between two models, use
DS.belongsTo in combination with DS.hasMany, like this:
1 App.Post = DS.Model.extend({
2   comments: DS.hasMany('comment')
3 });
4
5 App.Comment = DS.Model.extend({
6   post: DS.belongsTo('post')
7 });
Many-to-Many
To declare a many-to-many relationship between two models, use
DS.hasMany:
1 App.Post = DS.Model.extend({
2   tags: DS.hasMany('tag')
3 });
4
5 App.Tag = DS.Model.extend({
6   posts: DS.hasMany('post')
7 });
Explicit Inverses
Ember Data will do its best to discover which relationships map to one
another. In the one-to-many code above, for example, Ember Data can figure out that
changing the comments relationship should update the post
relationship on the inverse because post is the only relationship to
that model.
However, sometimes you may have multiple belongsTo/hasManys for the
same type. You can specify which property on the related model is the
inverse using DS.hasMany’s inverse option:
 1 var belongsTo = DS.belongsTo,
 2     hasMany = DS.hasMany;
 3
 4 App.Comment = DS.Model.extend({
 5   onePost: belongsTo('post'),
 6   twoPost: belongsTo('post'),
 7   redPost: belongsTo('post'),
 8   bluePost: belongsTo('post')
 9 });
10
11
12 App.Post = DS.Model.extend({
13   comments: hasMany('comment', {
14     inverse: 'redPost'
15   })
16 });
You can also specify an inverse on a belongsTo, which works how you’d expect.
Reflexive relation
When you want to define a reflexive relation, you must either explicitly define the other side, and set the explicit inverse accordingly, and if you don’t need the other side, set the inverse to null.
1 var belongsTo = DS.belongsTo,
2     hasMany = DS.hasMany;
3
4 App.Folder = DS.Model.extend({
5   children: hasMany('folder', {inverse: 'parent'}),
6   parent: belongsTo('folder', {inverse: 'children'})
7 });
or
1 var belongsTo = DS.belongsTo,
2
3 App.Folder = DS.Model.extend({
4   parent: belongsTo('folder', {inverse: null})
5 });
Creating Deleting Records
You can create records by calling the createRecord method on the store.
1 store.createRecord('post', {
2   title: 'Rails is Omakase',
3   body: 'Lorem ipsum'
4 });
The store object is available in controllers and routes using this.store.
Although createRecord is fairly straightforward, the only thing to watch out for
is that you cannot assign a promise as a relationship, currently.
For example, if you want to set the author property of a post, this would not work
if the user with id isn’t already loaded into the store:
1 var store = this.store;
2
3 store.createRecord('post', {
4   title: 'Rails is Omakase',
5   body: 'Lorem ipsum',
6   author: store.find('user', 1)
7 });
However, you can easily set the relationship after the promise has fulfilled:
 1 var store = this.store;
 2
 3 var post = store.createRecord('post', {
 4   title: 'Rails is Omakase',
 5   body: 'Lorem ipsum'
 6 });
 7
 8 store.find('user', 1).then(function(user) {
 9   post.set('author', user);
10 });
Deleting Records
Deleting records is just as straightforward as creating records. Just call deleteRecord()
on any instance of DS.Model. This flags the record as isDeleted and thus removes
it from all() queries on the store. The deletion can then be persisted using save().
Alternatively, you can use the destroyRecord method to delete and persist at the same time.
 1 store.find('post', 1).then(function (post) {
 2   post.deleteRecord();
 3   post.get('isDeleted'); // => true
 4   post.save(); // => DELETE to /posts/1
 5 });
 6
 7 // OR
 8 store.find('post', 2).then(function (post) {
 9   post.destroyRecord(); // => DELETE to /posts/2
10 });
Pushing Records Into The Store
One way to think about the store is as a cache of all of the records that have been loaded by your application. If a route or a controller in your app asks for a record, the store can return it immediately if it is in the cache. Otherwise, the store must ask the adapter to load it, which usually means a trip over the network to retrieve it from the server.
Instead of waiting for the app to request a record, however, you can push records into the store’s cache ahead of time.
This is useful if you have a good sense of what records the user will need next. When they click on a link, instead of waiting for a network request to finish, Ember.js can render the new template immediately. It feels instantaneous.
Another use case for pushing in records is if your application has a streaming connection to a backend. If a record is created or modified, you want to update the UI immediately.
Pushing Records
To push a record into the store, call the store’s push() method.
For example, imagine we want to preload some data into the store when the application boots for the first time.
We can use the ApplicationRoute to do so. The ApplicationRoute is
the top-most route in the route hierarchy, and its model hook gets
called once when the app starts up.
 1 var attr = DS.attr;
 2
 3 App.Album = DS.Model.extend({
 4   title: attr(),
 5   artist: attr(),
 6   songCount: attr()
 7 });
 8
 9 App.ApplicationRoute = Ember.Route.extend({
10   model: function() {
11     this.store.push('album', {
12       id: 1,
13       title: "Fewer Moving Parts",
14       artist: "David Bazan",
15       songCount: 10
16     });
17
18     this.store.push('album', {
19       id: 2,
20       title: "Calgary b/w I Can't Make You Love Me/Nick Of Time",
21       artist: "Bon Iver",
22       songCount: 2
23     });
24   }
25 });
Persisting Records
Records in Ember Data are persisted on a per-instance basis.
Call save() on any instance of DS.Model and it will make a network request.
Here are a few examples:
1 var post = store.createRecord('post', {
2   title: 'Rails is Omakase',
3   body: 'Lorem ipsum'
4 });
5
6 post.save(); // => POST to '/posts'
1 store.find('post', 1).then(function (post) {
2   post.get('title'); // => "Rails is Omakase"
3
4   post.set('title', 'A new post');
5
6   post.save(); // => PUT to '/posts/1'
7 });
Promises
save() returns a promise, so it is extremely easy to handle success and failure scenarios.
Here’s a common pattern:
 1 var post = store.createRecord('post', {
 2   title: 'Rails is Omakase',
 3   body: 'Lorem ipsum'
 4 });
 5
 6 var self = this;
 7
 8 function transitionToPost(post) {
 9   self.transitionToRoute('posts.show', post);
10 }
11
12 function failure(reason) {
13   // handle the error
14 }
15
16 post.save().then(transitionToPost).catch(failure);
17
18 // => POST to '/posts'
19 // => transitioning to posts.show route
Promises even make it easy to work with failed network requests:
 1 var post = store.createRecord('post', {
 2   title: 'Rails is Omakase',
 3   body: 'Lorem ipsum'
 4 });
 5
 6 var self = this;
 7
 8 var onSuccess = function(post) {
 9   self.transitionToRoute('posts.show', post);
10 };
11
12 var onFail = function(post) {
13   // deal with the failure here
14 };
15
16 post.save().then(onSuccess, onFail);
17
18 // => POST to '/posts'
19 // => transitioning to posts.show route
You can read more about promises here, but here is another example showing how to retry persisting:
 1 function retry(callback, nTimes) {
 2   // if the promise fails
 3   return callback().catch(function(reason) {
 4     // if we haven't hit the retry limit
 5     if (nTimes-- > 0) {
 6       // retry again with the result of calling the retry callback
 7       // and the new retry limit
 8       return retry(callback, nTimes);
 9     }
10
11     // otherwise, if we hit the retry limit, rethrow the error
12     throw reason;
13   });
14 }
15
16 // try to save the post up to 5 times
17 retry(function() {
18   return post.save();
19 }, 5);
Finding Records
The Ember Data store provides a simple interface for finding records of a single
type through the store object’s find method. Internally, the store
uses find, findAll, and findQuery based on the supplied arguments.
The first argument to store.find() is always the record type. The optional second
argument determines if a request is made for all records, a single record, or a query.
Finding All Records of a Type
1 var posts = this.store.find('post'); // => GET /posts
To get a list of records already loaded into the store, without making
another network request, use all instead.
1 var posts = this.store.all('post'); // => no network request
find returns a DS.PromiseArray that fulfills to a DS.RecordArray and all
directly returns a DS.RecordArray.
It’s important to note that DS.RecordArray is not a JavaScript array.
It is an object that implements Ember.Enumerable. This is important
because, for example, if you want to retrieve records by index, the [] notation
will not work–you’ll have to use objectAt(index) instead.
Finding a Single Record
If you provide a number or string as the second argument to store.find(),
Ember Data will assume that you are passing in an ID and attempt to retrieve a record of the type passed in as the first argument with that ID. This will
return a promise that fulfills with the requested record:
1 var aSinglePost = this.store.find('post', 1); // => GET /posts/1
Querying For Records
If you provide a plain object as the second argument to find, Ember Data will
make a GET request with the object serialized as query params. This method returns
DS.PromiseArray in the same way as find with no second argument.
For example, we could search for all person models who have the name of
Peter:
1 var peters = this.store.find('person', { name: "Peter" }); // => GET to /persons\
2 ?name='Peter'
Integrating with the Route’s Model Hook
As discussed in Specifying a Route’s Model, routes are responsible for telling their template which model to render.
Ember.Route’s model hook supports asynchronous values
out-of-the-box. If you return a promise from the model hook, the
router will wait until the promise has fulfilled to render the
template.
This makes it easy to write apps with asynchronous data using Ember
Data. Just return the requested record from the model hook, and let
Ember deal with figuring out whether a network request is needed or not.
 1 App.Router.map(function() {
 2   this.resource('posts');
 3   this.resource('post', { path: ':post_id' });
 4 });
 5
 6 App.PostsRoute = Ember.Route.extend({
 7   model: function() {
 8     return this.store.find('post');
 9   }
10 });
11
12 App.PostRoute = Ember.Route.extend({
13   model: function(params) {
14     return this.store.find('post', params.post_id);
15   }
16 })
Working With Records
Modifying Attributes
Once a record has been loaded, you can begin making changes to its attributes. Attributes behave just like normal properties in Ember.js objects. Making changes is as simple as setting the attribute you want to change:
1 var tyrion = this.store.find('person', 1);
2 // ...after the record has loaded
3 tyrion.set('firstName', "Yollo");
All of the Ember.js conveniences are available for
modifying attributes. For example, you can use Ember.Object’s
incrementProperty helper:
1 person.incrementProperty('age'); // Happy birthday!
You can tell if a record has outstanding changes that have not yet been
saved by checking its isDirty property. You can also see what parts of
the record were changed and what the original value was using the
changedAttributes function. changedAttributes returns an object,
whose keys are the changed properties and values are an array of values
[oldValue, newValue].
1 person.get('isAdmin');      //=> false
2 person.get('isDirty');      //=> false
3 person.set('isAdmin', true);
4 person.get('isDirty');      //=> true
5 person.changedAttributes(); //=> { isAdmin: [false, true] }
At this point, you can either persist your changes via save() or you
can rollback your changes. Calling rollback() reverts all the
changedAttributes to their original value.
1 person.get('isDirty');      //=> true
2 person.changedAttributes(); //=> { isAdmin: [false, true] }
3
4 person.rollback();
5
6 person.get('isDirty');      //=> false
7 person.get('isAdmin');      //=> false
8 person.changedAttributes(); //=> {}
Using Fixtures
When developing client-side applications, your server may not have an API ready to develop against. The FixtureAdapter allows you to begin developing Ember.js apps now, and switch to another adapter when your API is ready to consume without any changes to your application code.
Getting Started
Using the fixture adapter entails three very simple setup steps:
- Create a new store using the fixture adapter and attach it to your app.
- Define your model using
DS.Model.extend. - Attach fixtures(also known as sample data) to the model’s class.
Creating a Fixture Adapter
Simply attach it as the ApplicationAdapter property on your instance
of Ember.Application:
1 var App = Ember.Application.create();
2 App.ApplicationAdapter = DS.FixtureAdapter;
Define Your Model
You should refer to Defining a Model for a more in-depth guide on using Ember Data Models, but for the purposes of demonstration we’ll use an example modeling people who document Ember.js.
1 App.Documenter = DS.Model.extend({
2   firstName: DS.attr( 'string' ),
3   lastName: DS.attr( 'string' )
4 });
Attach Fixtures to the Model Class
Attaching fixtures couldn’t be simpler. Just attach a collection of plain
JavaScript objects to your Model’s class under the FIXTURES property:
1 App.Documenter.FIXTURES = [
2   { id: 1, firstName: 'Trek', lastName: 'Glowacki' },
3   { id: 2, firstName: 'Tom' , lastName: 'Dale'     }
4 ];
That’s it! You can now use all of methods for Finding Records in your application. For example:
1 App.DocumenterRoute = Ember.Route.extend({
2   model: function() {
3     return this.store.find('documenter', 1); // returns a promise that will reso\
4 lve
5                                              // with the record representing Tre\
6 k Glowacki
7   }
8 });
Naming Conventions
Unlike the REST Adapter, the Fixture Adapter does not make any assumptions
about the naming conventions of your model. As you saw in the example above,
if you declare the attribute as firstName during DS.Model.extend, you use
firstName to represent the same field in your fixture data.
Importantly, you should make sure that each record in your fixture data has
a uniquely identifiable field. By default, Ember Data assumes this key
is called id. Should you not provide an id field in your fixtures, or
not override the primary key, the Fixture Adapter will throw an error.
The REST Adapter
By default, your store will use DS.RESTAdapter to load and save records. The RESTAdapter assumes that the URLs and JSON associated with each model are conventional; this means that, if you follow the rules, you will not need to configure the adapter or write any code in order to get started.
URL Conventions
The REST adapter is smart enough to determine the URLs it communicates
with based on the name of the model. For example, if you ask for a
Post by ID:
1 store.find('post', 1).then(function(post) {
2 });
The REST adapter will automatically send a GET request to /posts/1.
The actions you can take on a record map onto the following URLs in the REST adapter:
Pluralization Customization
Irregular or uncountable pluralizations can be specified via Ember.Inflector.inflector:
1 var inflector = Ember.Inflector.inflector;
2
3 inflector.irregular('formula', 'formulae');
4 inflector.uncountable('advice');
This will tell the REST adapter that requests for App.Formula requests
should go to /formulae/1 instead of /formulas/1.
Endpoint Path Customization
Endpoint paths can be prefixed with a namespace by setting the namespace
property on the adapter:
1 App.ApplicationAdapter = DS.RESTAdapter.extend({
2   namespace: 'api/1'
3 });
Requests for App.Person would now target /api/1/people/1.
Host Customization
An adapter can target other hosts by setting the host property.
1 App.ApplicationAdapter = DS.RESTAdapter.extend({
2   host: 'https://api.example.com'
3 });
Requests for App.Person would now target https://api.example.com/people/1.
JSON Conventions
When requesting a record, the REST adapter expects your server to return a JSON representation of the record that conforms to the following conventions.
JSON Root
The primary record being returned should be in a named root. For
example, if you request a record from /people/123, the response should
be nested inside a property called person:
1 {
2   "person": {
3     "firstName": "Jeff",
4     "lastName": "Atwood"
5   }
6 }
Note: Although after destroyRecord or deleteRecord/save the adapter expects an empty object e.g. {} to be returned from the server after destroying a record.
If you don’t have the option to change the data that the server responds with, you can override the DS.JSONSerializer#extractDeleteRecord, like so:
1 extractDeleteRecord: function(store, type, payload) {
2   // payload is {delete: true} and then ember data wants to go ahead and set
3   // the new properties, return null so it doesn't try to do that
4   return null;
5 }
Attribute Names
Attribute names should be camelized. For example, if you have a model like this:
1 App.Person = DS.Model.extend({
2   firstName: DS.attr('string'),
3   lastName:  DS.attr('string'),
4
5   isPersonOfTheYear: DS.attr('boolean')
6 });
The JSON returned from your server should look like this:
1 {
2   "person": {
3     "firstName": "Barack",
4     "lastName": "Obama",
5     "isPersonOfTheYear": true
6   }
7 }
Irregular keys can be mapped with a custom serializer. If the JSON for
the Person model has a key of lastNameOfPerson, and the desired
attribute name is simply lastName, then create a custom Serializer
for the model and override the normalizeHash property.
 1 App.Person = DS.Model.extend({
 2   lastName: DS.attr('string')
 3 });
 4
 5 App.PersonSerializer = DS.RESTSerializer.extend({
 6   normalizeHash: {
 7     lastNameOfPerson: function(hash) {
 8       hash.lastName = hash.lastNameOfPerson;
 9       delete hash.lastNameOfPerson;
10
11       return hash;
12     }
13   }
14 });
Relationships
References to other records should be done by ID. For example, if you
have a model with a hasMany relationship:
1 App.Post = DS.Model.extend({
2   comments: DS.hasMany('comment', {async: true})
3 });
The JSON should encode the relationship as an array of IDs:
1 {
2   "post": {
3     "comments": [1, 2, 3]
4   }
5 }
Comments for a post can be loaded by post.get('comments'). The REST adapter
will send a GET request to /comments?ids[]=1&ids[]=2&ids[]=3.
Any belongsTo relationships in the JSON representation should be the
camelized version of the Ember Data model’s name, with the string
Id appended. For example, if you have a model:
1 App.Comment = DS.Model.extend({
2   post: DS.belongsTo('post')
3 });
The JSON should encode the relationship as an ID to another record:
1 {
2   "comment": {
3     "post": 1
4   }
5 }
If needed these naming conventions can be overwritten by implementing
the keyForRelationship method.
1  App.ApplicationSerializer = DS.RESTSerializer.extend({
2    keyForRelationship: function(key, relationship) {
3       return key + 'Ids';
4    }
5  });
Sideloaded Relationships
To reduce the number of HTTP requests necessary, you can sideload additional records in your JSON response. Sideloaded records live outside the JSON root, and are represented as an array of hashes:
 1 {
 2   "post": {
 3     "id": 1,
 4     "title": "Node is not omakase",
 5     "comments": [1, 2, 3]
 6   },
 7
 8   "comments": [{
 9     "id": 1,
10     "body": "But is it _lightweight_ omakase?"
11   },
12   {
13     "id": 2,
14     "body": "I for one welcome our new omakase overlords"
15   },
16   {
17     "id": 3,
18     "body": "Put me on the fast track to a delicious dinner"
19   }]
20 }
Creating Custom Transformations
In some circumstances, the built in attribute types of string,
number, boolean, and date may be inadequate. For example, a
server may return a non-standard date format.
Ember Data can have new JSON transforms registered for use as attributes:
 1 App.CoordinatePointTransform = DS.Transform.extend({
 2   serialize: function(value) {
 3     return [value.get('x'), value.get('y')];
 4   },
 5   deserialize: function(value) {
 6     return Ember.create({ x: value[0], y: value[1] });
 7   }
 8 });
 9
10 App.Cursor = DS.Model.extend({
11   position: DS.attr('coordinatePoint')
12 });
When coordinatePoint is received from the API, it is
expected to be an array:
1 {
2   cursor: {
3     position: [4,9]
4   }
5 }
But once loaded on a model instance, it will behave as an object:
1 var cursor = App.Cursor.find(1);
2 cursor.get('position.x'); //=> 4
3 cursor.get('position.y'); //=> 9
If position is modified and saved, it will pass through the
serialize function in the transform and again be presented as
an array in JSON.
Connecting to an HTTP Server
If your Ember application needs to load JSON data from an HTTP server, this guide will walk you through the process of configuring Ember Data to load records in whatever format your server returns.
The store uses an object called an adapter to know how to
communicate over the network. By default, the store will use
DS.RESTAdapter, an adapter that communicates with an HTTP server by
transmitting JSON via XHR.
This guide is divided into two sections. The first section covers what the default behavior of the adapter is, including what URLs it will request records from and what format it expects the JSON to be in.
The second section covers how to override these default settings to customize things like which URLs data is requested from and how the JSON data is structured.
URL Conventions
The REST adapter uses the name of the model to determine what URL to send JSON to.
For example, if you ask for an App.Photo record by ID:
1 App.PhotoRoute = Ember.Route.extend({
2   model: function(params) {
3     return this.store.find('photo', params.photo_id);
4   }
5 });
The REST adapter will automatically send a GET request to /photos/1.
The actions you can take on a record map onto the following URLs in the REST adapter:
JSON Conventions
Given the following models:
1 App.Post = DS.Model.extend({
2   title:    DS.attr(),
3   comments: DS.hasMany('comment'),
4   user:     DS.belongsTo('user')
5 });
6
7 App.Comment = DS.Model.extend({
8   body: DS.attr()
9 });
Ember Data expects that a GET request to /posts/1 would
return the JSON in the following format:
 1 {
 2   "post": {
 3     "id": 1,
 4     "title": "Rails is omakase",
 5     "comments": ["1", "2"],
 6     "user" : "dhh"
 7   },
 8
 9   "comments": [{
10     "id": "1",
11     "body": "Rails is unagi"
12   }, {
13     "id": "2",
14     "body": "Omakase O_o"
15   }]
16 }
To quickly prototype a model and see the expected JSON, try using the Ember Data Model Maker by Andy Crum.
Customizing the Adapter
To customize the REST adapter, define a subclass of DS.RESTAdapter and
name it App.ApplicationAdapter. You can then override its properties
and methods to customize how records are retrieved and saved.
Customizing a Specific Model
It’s entirely possible that you need to define options for just one model instead of an application-wide customization. In that case, you can create an adapter named after the model you are specifying:
1 App.PostAdapter = DS.RESTAdapter.extend({
2   namespace: 'api/v2',
3   host: 'https://api.example2.com'
4 });
5
6 App.PhotoAdapter = DS.RESTAdapter.extend({
7   namespace: 'api/v1',
8   host: 'https://api.example.com'
9 });
This allows you to easily connect to multiple API versions simultaneously or interact with different domains on a per model basis.
Customizing URLs
URL Prefix
If your JSON API lives somewhere other than on the host root, you can set a prefix that will be added to all requests.
For example, if you are using a versioned JSON API, a request for a
particular person might go to /api/v1/people/1.
In that case, set namespace property to api/v1.
1 App.ApplicationAdapter = DS.RESTAdapter.extend({
2   namespace: 'api/v1'
3 });
Requests for a person with ID 1 would now go to /api/v1/people/1.
URL Host
If your JSON API runs on a different domain than the one serving your Ember app, you can change the host used to make HTTP requests.
Note that in order for this to work, you will need to be using a browser that supports CORS, and your server will need to be configured to send the correct CORS headers.
To change the host that requests are sent to, set the host property:
1 App.ApplicationAdapter = DS.RESTAdapter.extend({
2   host: 'https://api.example.com'
3 });
Requests for a person with ID 1 would now target https://api.example.com/people/1.
Custom HTTP Headers
Some APIs require HTTP headers, e.g. to provide an API key. Arbitrary
headers can be set as key/value pairs on the RESTAdapter’s headers
property and Ember Data will send them along with each ajax request.
For Example
1 App.ApplicationAdapter = DS.RESTAdapter.extend({
2   headers: {
3     'API_KEY': 'secret key',
4     'ANOTHER_HEADER': 'Some header value'
5   }
6 });
Requests for any resource will include the following HTTP headers.
1 ANOTHER_HEADER: Some header value
2 API_KEY: secret key
Handling Metadata
Along with the records returned from your store, you’ll likely need to handle some kind of metadata. Metadata is data that goes along with a specific model or type instead of a record.
Pagination is a common example of using metadata. Imagine a blog with far more posts than you can display at once. You might query it like so:
1 var result = this.store.find("post", {
2   limit: 10,
3   offset: 0
4 });
To get different pages of data, you’d simply change your offset in increments of 10. So far, so good. But how do you know how many pages of data you have? Your server would need to return the total number of records as a piece of metadata.
By default, Ember Data’s JSON deserializer looks for a meta key:
 1 {
 2   "post": {
 3     "id": 1,
 4     "title": "Progressive Enhancement is Dead",
 5     "comments": ["1", "2"],
 6     "links": {
 7       "user": "/people/tomdale"
 8     },
 9     // ...
10   },
11
12   "meta": {
13     "total": 100
14   }
15 }
The metadata for a specific type is then set to the contents of meta. You can access it either with store.metadataFor, which is updated any time any query is made against the same type:
1 var meta = this.store.metadataFor("post");
Or you can access the metadata just for this query:
1 var meta = result.get("content.meta");
Now, meta.total can be used to calculate how many pages of posts you’ll have.
You can also customize metadata extraction by overriding the extractMeta method. For example, if instead of a meta object, your server simply returned:
1 {
2   "post": [
3     // ...
4   ],
5   "total": 100
6 }
You could extract it like so:
 1 App.ApplicationSerializer = DS.RESTSerializer.extend({
 2   extractMeta: function(store, type, payload) {
 3     if (payload && payload.total) {
 4       store.metaForType(type, { total: payload.total });  // sets the metadata f\
 5 or "post"
 6       delete payload.total;  // keeps ember data from trying to parse "total" as\
 7  a record
 8     }
 9   }
10 });
Customizing Adpters
In Ember Data, the logic for communicating with a backend data store
lives in the Adapter. Ember Data’s Adapter has some built-in
assumptions of how a REST API should look. If
your backend conventions differ from these assumptions Ember Data
makes it easy to change its functionality by swapping out or extending
the default Adapter.
Some reasons for customizing an Adapter include using
underscores_case in your urls, using a medium other than REST to
communicate with your backend API or even using a
local backend.
Extending Adapters is a natural process in Ember Data. Ember takes the position that you should extend an adapter to add different functionality instead of adding a flag. This results in code that is more testable, easier to understand and reduces bloat for people who may want to subclass your adapter.
If your backend has some consistent rules you can define an
ApplicationAdapter. The ApplicationAdapter will get priority over
the default Adapter, however it will still be superseded by model
specific Adapters.
1 App.ApplicationAdapter = DS.RESTAdapter.extend({
2   // Application specific overrides go here
3 });
If you have one model that has exceptional rules for communicating with its backend than the others you can create a Model specific Adapter by naming an adapter “ModelName” + “Adapter”.
1 App.PostAdapter = DS.RESTAdapter.extend({
2   namespace: 'api/v1'
3 });
By default Ember Data comes with several builtin adapters. Feel free to use these adapters as a starting point for creating your own custom adapter.
- DS.Adapter is the basic adapter with no functionality. It is generally a good starting point if you want to create an adapter that is radically different from the other Ember adapters.
- DS.FixtureAdapter is an adapter that loads records from memory. Its primarily used for development and testing.
-
DS.RESTAdapter is the most
commonly extended adapter. The
RESTAdapterallows your store to communicate with an HTTP server by transmitting JSON via XHR. Most Ember.js apps that consume a JSON API should use the REST adapter. -
DS.ActiveModelAdapter
is a specialized version of the
RESTAdapterthat is set up to work out of the box with Rails-style REST APIs.
Customizing the RESTAdapter
The DS.RESTAdapter is the most commonly extended adapter that ships with Ember Data. It has a handful of hooks that are commonly used to extend it to work with non-standard backends.
Endpoint Path Customization
The namespace property can be used to prefix requests with a
specific url namespace.
1 App.ApplicationAdapter = DS.RESTAdapter.extend({
2   namespace: 'api/1'
3 });
Requests for App.Person would now target /api/1/people/1.
Host Customization
By default the adapter will target the current domain. If you would
like to specify a new domain you can do so by setting the host
property on the adapter.
1 App.ApplicationAdapter = DS.RESTAdapter.extend({
2   host: 'https://api.example.com'
3 });
Requests for App.Person would now target https://api.example.com/people/1.
Path Customization
By default the RESTAdapter will attempt to pluralize and camelCase
the model name to generate the path name. If this convention does not
conform to your backend you can override the pathForType method.
For example, if you did not want to pluralize model names and needed
underscore_case instead of camelCase you could override the
pathForType method like this:
1 App.ApplicationAdapter = DS.RESTAdapter.extend({
2   pathForType: function(type) {
3     return Ember.String.underscore(type);
4   }
5 });
Requests for App.Person would now target /person/1.
Requests for App.UserProfile would now target /user_profile/1.
Authoring Adapters
The defaultSerializer property can be used to specify the serializer
that will be used by this adapter. This is only used when a model
specific serializer or ApplicationSerializer are not defined.
In an application, it is often easier to specify an
ApplicationSerializer. However, if you are the author of a community
adapter it is important to remember to set this property to ensure
Ember does the right thing in the case a user of your adapter
does not specify an ApplicationSerializer.
1 MyCustomAdapterAdapter = DS.RESTAdapter.extend({
2   defaultSerializer: '-default'
3 });
Community Adapters
If none of the builtin Ember Data Adapters work for your backend, be sure to check out some of the community maintained Ember Data Adapters. Some good places to look for Ember Data Adapters include:
Frequently Asked Questions
Should I use a query or a filter to search records?
It depends on how many records you want to search and whether they have been loaded into the store.
Queries are useful for doing searches of hundreds, thousands, or even millions of records. You just hand the search options to your server, and it is responsible for handing you back the list of records that match. Because the response from the server includes the ID of all of the records that matched, it doesn’t matter if the store hadn’t loaded them previously; it sees that they are not in the cache and can request the records by ID if necessary.
The downside of queries is that they do not live update, they are slower, and they require that your server support the kind of queries that you wish to perform.
Because the server decides which records match the query, not the store,
queries do not live update. If you want to update them, you must
manually call reload() and wait for the server to respond. If you
create a new record on the client, it will not show up in the results
until you both save the new record to the server and reload the query
results.
Because the store must confer with your server to determine the results of a query, it necessitates a network request. This can feel slow to users, especially if they are on a slow connection or your server is slow to respond. The typical speed of JavaScript web applications can heighten the perceived slowness when the server must be consulted.
Lastly, performing queries requires collaboration between the store and your server. By default, Ember Data will send the search options that you pass as the body of an HTTP request to your server. If your server does not support requests in this format, you will need to either change your server to do so, or customize how queries are sent by creating a custom adapter.
Filters, on the other hand, perform a live search of all of the records in the store’s cache. As soon as a new record is loaded into the store, the filter will check to see if the record matches, and if so, add it to the array of search results. If that array is displayed in a template, it will update automatically.
Filters also take into account newly created records that have not been saved, and records that have been modified but not yet saved. If you want records to show up in search results as soon as they are created or modified on the client, you should use a filter.
Keep in mind that records will not show up in a filter if the store
doesn’t know about them. You can ensure that a record is in the store by
using the store’s push() method.
There is also a limit to how many records you can reasonably keep in memory and search before you start hitting performance issues.
Finally, keep in mind that you can combine queries and filters to take advantage of their respective strengths and weaknesses. Remember that records returned by a query to the server are cached in the store. You can use this fact to perform a filter, passing it a query that starts matching records into the store, and a filter function that matches the same records.
This will offload searching all of the possible records to the server, while still creating a live updating list that includes records created and modified on the client.
 1 App.PostsFavoritedRoute = Ember.Route.extend({
 2   model: function() {
 3     var store = this.store;
 4
 5     // Create a filter for all favorited posts that will be displayed in
 6     // the template. Any favorited posts that are already in the store
 7     // will be displayed immediately;
 8     // Kick off a query to the server for all posts that
 9     // the user has favorited. As results from the query are
10     // returned from the server, they will also begin to appear.
11     return store.filter('post', { favorited: true }, function(post) {
12       return post.get('isFavorited');
13     });
14   }
15 });
How do I inform Ember Data about new records created on the backend?
When you request a record using Ember Data’s store.find method, Ember
will automatically load the data into the store. This allows Ember to
avoid the latency of making a round trip to the backend next time
that record is requested. Additionally, loading a record into the
store will update any RecordArrays (e.g. the result of
store.filter or store.all) that should include that record. This
means any data bindings or computed properties that depend on the
RecordArray will automatically be synced to include the new or
updated record values.
Some applications may want to add or update records in the store
without requesting the record via store.find. To accomplish this you
can use the DS.Store’s push, pushPayload, or update
methods. This is useful for web applications that have a channel
(such as SSE or
Web Sockets) to
notify it of new or updated records on the backend.
push
is the simplest way to load records to Ember Data’s store. When using
push it is important to remember to deserialize the JSON object
before pushing it into the store. push only accepts one record at a
time. If you would like to load an array of records to the store you
can call
pushMany.
1 socket.on('message', function (message) {
2   var type = store.modelFor(message.model);
3   var serializer = store.serializerFor(type.typeKey);
4   var record = serializer.extractSingle(store, type, message.data);
5   store.push(message.model, record);
6 });
pushPayload
is a convenience wrapper for store#push that will deserialize
payloads if the model’s Serializer implements a pushPayload
method. It is important to note this method will not work with the
JSONSerializer because it does not implement a pushPayload
method.
1 socket.on('message', function (message) {
2   store.pushPayload(message.model, message.data);
3 });
update
works like a push except it can handle partial attributes without
overwriting the existing record properties. This method is useful if
your web application only receives notifications of the changed
attributes on a model. Like push it is important to remember to
deserialize the JSON object before calling update.
 1 socket.on('message', function (message) {
 2   var hash = message.data;
 3   var type = store.modelFor(message.model);
 4   var fields = Ember.get(type, 'fields');
 5   fields.forEach(function(field) {
 6     var payloadField = Ember.String.underscore(field);
 7     if (field === payloadField) { return; }
 8       hash[field] = hash[payloadField];
 9       delete hash[payloadField];
10   });
11   store.push(message.model, hash);
12 });