Understanding Ember.js
The View Layer
This guide goes into extreme detail about the Ember.js view layer. It is intended for an experienced Ember developer, and includes details that are unnecessary for getting started with Ember.
Ember.js has a sophisticated system for creating, managing and rendering a hierarchy of views that connect to the browser’s DOM. Views are responsible for responding to user events, like clicks, drags, and scrolls, as well as updating the contents of the DOM when the data underlying the view changes.
View hierarchies are usually created by evaluating a Handlebars template. As the template is evaluated, child views are added. As the templates for those child views are evaluated, they may have child views added, and so on, until an entire hierarchy is created.
Even if you do not explicitly create child views from your Handlebars templates, Ember.js internally uses the view system to update bound values. For example, every Handlebars expression {{value}} creates a view behind-the-scenes that knows how to update the bound value if it changes.
You can also dynamically make changes to the view hierarchy at application runtime using the Ember.ContainerView class. Rather than being template-driven, a container view exposes an array of child view instances that can be manually managed.
Views and templates work in tandem to provide a robust system for creating whatever user interface you dream up. End users should be isolated from the complexities of things like timing issues while rendering and event propagation. Application developers should be able to describe their UI once, as a string of Handlebars markup, and then carry on with their application without having to worry about making sure that it remains up-to-date.
What problems does it solve?
Child Views
In a typical client-side application, views may represent elements nested inside of each other in the DOM. In the naïve solution to this problem, separate view objects represent each DOM element, and ad-hoc references help the various view object keep track of the views conceptually nested inside of them.
Here is a simple example, representing one main app view, a collection nested inside of it, and individual items nested inside of the collection.
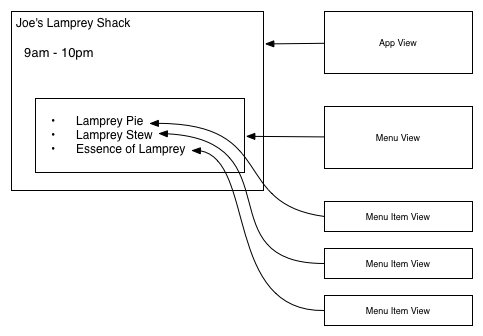
This system works well at first glance, but imagine that we want to open Joe’s Lamprey Shack at 8am instead of 9am. In this situation, we will want to re-render the App View. Because the developer needed to build up the references to the children on an ad-hoc basis, this re-rendering process has several problems.
In order to re-render the App View, the App View must also manually re-render the child views and re-insert them into App View’s element. If implemented perfectly, this process works well, but it relies upon a perfect, ad hoc implementation of a view hierarchy. If any single view fails to implement this precisely, the entire re-render will fail.
In order to avoid these problems, Ember’s view hierarchy has the concept of child views baked in.
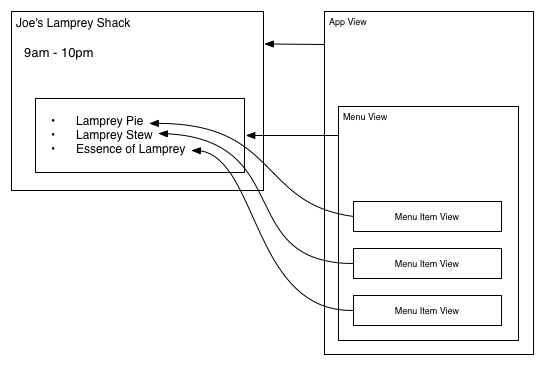
When the App View re-renders, Ember is responsible for re-rendering and inserting the child views, not application code. This also means that Ember can perform any memory management for you, such as cleaning up observers and bindings.
Not only does this eliminate quite a bit of boilerplate code, but it eliminates the possibility that an imperfectly implemented view hierarchy will cause unexpected failures.
Event Delegation
In the past, web developers have added event listeners to individual elements in order to know when the user interacts with them. For example, you might have a <div> element on which you register a function that gets called when the user clicks it.
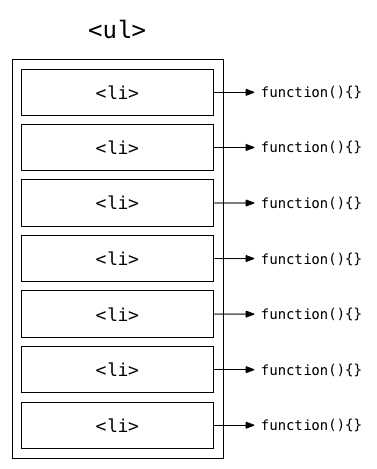
However, this approach often does not scale when dealing with large numbers of interactive elements. For example, imagine a <ul> with 100 <li>s in it, with a delete button next to each item. Since the behavior is the same for all of these items, it would be inefficient to create 100 event listeners, one for each delete button.
To solve this problem, developers discovered a technique called “event delegation”. Instead of registering a listener on each element in question, you can register a single listener for the containing element and use event.target to identify which element the user clicked on.
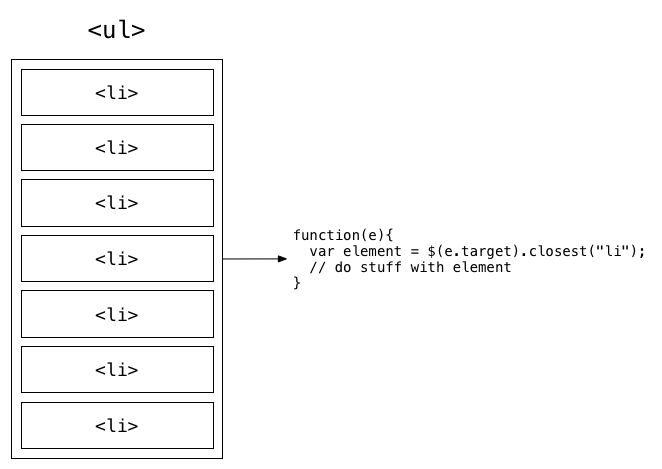
Implementing this is a bit tricky, because some events (like focus, blur and change) don’t bubble. Fortunately, jQuery has solved this problem thoroughly; using jQuery’s on method reliably works for all native browser events.
Other JavaScript frameworks tackle this problem in one of two ways. In the first approach, they ask you to implement the naïve solution yourself, creating a separate view for each element. When you create the view, it sets up an event listener on the view’s element. If you had a list of 500 items, you would create 500 views and each would set up a listener on its own element.
In the second approach, the framework builds in event delegation at the view level. When creating a view, you can supply a list of events to delegate and a method to call when the event occurs. This leaves identifying the context of the click (for example, which item in the list) to the method receiving the event.
You are now faced with an uncomfortable choice: create a new view for each item and lose the benefits of event delegation, or create a single view for all of the items and have to store information about the underlying JavaScript object in the DOM.
In order to solve this problem, Ember delegates all events to the application’s root element (usually the document body) using jQuery. When an event occurs, Ember identifies the nearest view that handles the event and invokes its event handler. This means that you can create views to hold a JavaScript context, but still get the benefit of event delegation.
Further, because Ember registers only one event for the entire Ember application, creating new views never requires setting up event listeners, making re-renders efficient and less error-prone. When a view has child views, this also means that there is no need to manually undelegate views that the re-render process replaces.
The Rendering Pipeline
Most web applications specify their user interface using the markup of a particular templating language. For Ember.js, we’ve done the work to make templates written using the Handlebars templating language automatically update when the values used inside of them are changed.
While the process of displaying a template is automatic for developers, under the hood there are a series of steps that must be taken to go from the original template to the final, live DOM representation that the user sees.
This is the approximate lifecycle of an Ember view:
1. Template Compilation
The application’s templates are loaded over the network or as part of the application payload in string form. When the application loads, it sends the template string to Handlebars to be compiled into a function. Once compiled, the template function is saved, and can be used by multiple views repeatedly, each time they need to re-render.
This step may be omitted in applications where the templates are pre-compiled on the server. In those cases, the template is transferred not as the original, human-readable template string but as the compiled code.
Because Ember is responsible for template compilation, you don’t have to do any additional work to ensure that compiled templates are reused.
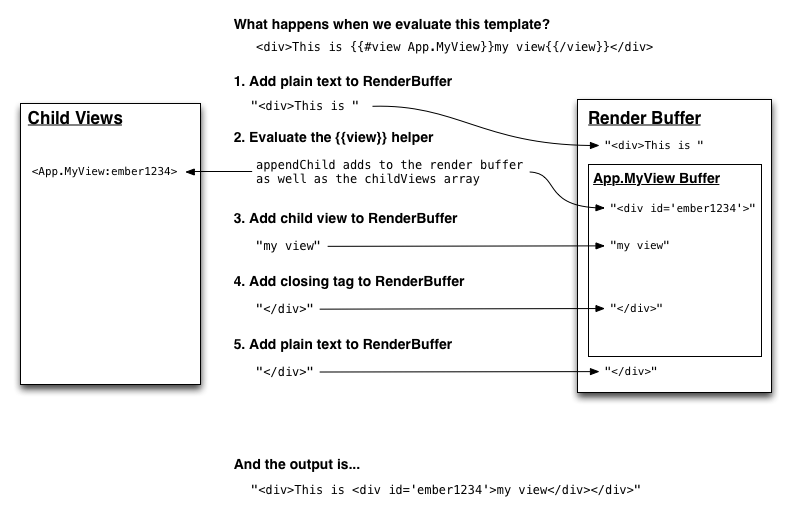
2. String Concatenation
A view’s rendering process is kickstarted when the application calls append or appendTo on the view. Calling append or appendTo schedules the view to be rendered and inserted later. This allows any deferred logic in your application (such as binding synchronization) to happen before rendering the element.
To begin the rendering process, Ember creates a RenderBuffer and gives it to the view to append its contents to. During this process, a view can create and render child views. When it does so, the parent view creates and assigns a RenderBuffer for the child, and links it to the parent’s RenderBuffer.
Ember flushes the binding synchronization queue before rendering each view. By syncing bindings before rendering each view, Ember guarantees that it will not render stale data it needs to replace right away.
Once the main view has finished rendering, the render process has created a tree of views (the “view hierarchy”), linked to a tree of buffers. By walking down the tree of buffers and converting them into Strings, we have a String that we can insert into the DOM.
Here is a simple example:
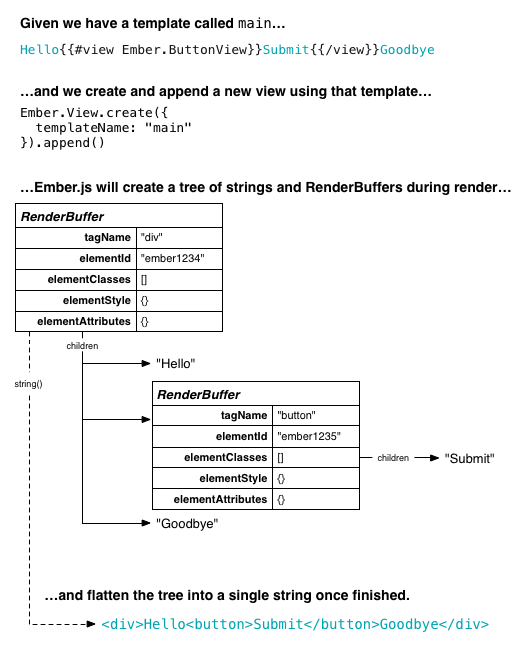
In addition to children (Strings and other RenderBuffers), a RenderBuffer also encapsulates the element’s tag name, id, classes, style, and other attributes. This makes it possible for the render process to modify one of these properties (style, for example), even after its child Strings have rendered. Because many of these properties are controlled via bindings (e.g. using bind-attr), this makes the process robust and transparent.
3. Element Creation and Insertion
At the end of the rendering process, the root view asks the RenderBuffer for its element. The RenderBuffer takes its completed string and uses jQuery to convert it into an element. The view assigns that element to its element property and places it into the correct place in the DOM (the location specified in appendTo or the application’s root element if the application used append).
While the parent view assigns its element directly, each child views looks up its element lazily. It does this by looking for an element whose id matches its elementId property. Unless explicitly provided, the rendering process generates an elementId property and assigns its value to the view’s RenderBuffer, which allows the view to find its element as needed.
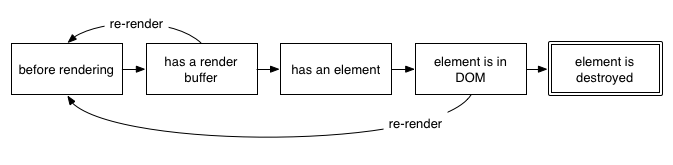
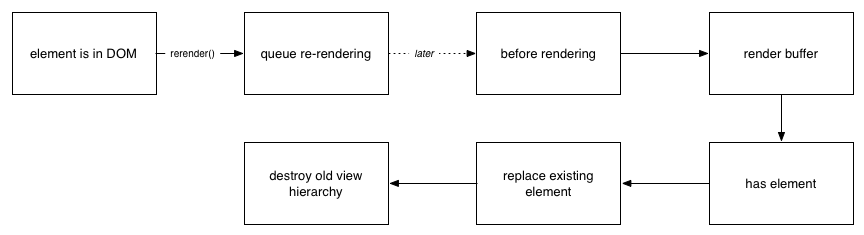
4. Re-Rendering
After the view inserts itself into the DOM, either Ember or the application may want to re-render the view. They can trigger a re-render by calling the rerender method on a view.
Rerendering will repeat steps 2 and 3 above, with two exceptions:
- Instead of inserting the element into an explicitly specified location,
rerenderreplaces the existing element with the new element. - In addition to rendering a new element, it also removes the old element and destroys its children. This allows Ember to automatically handle unregistering appropriate bindings and observers when re-rendering a view. This makes observers on a path more viable, because the process of registering and unregistering all of the nested observers is automatic.
The most common cause of a view re-render is when the value bound to a Handlebars expression ({{foo}}) changes. Internally, Ember creates a simple view for each expression, and registers an observer on the path. When the path changes, Ember updates the area of the DOM with the new value.
Another common case is an {{#if}} or {{#with}} block. When rendering a template, Ember creates a virtual view for these block helpers. These virtual views do not appear in the publicly available view hierarchy (when getting parentView and childViews from a view), but they exist to enable consistent re-rendering.
When the path passed to an {{#if}} or {{#with}} changes, Ember automatically re-renders the virtual view, which will replace its contents, and importantly, destroy all child views to free up their memory.
In addition to these cases, the application may sometimes want to explicitly re-render a view (usually a ContainerView, see below). In this case, the application can call rerender directly, and Ember will queue up a re-rendering job, with the same semantics.
The process looks something like:
The View Hierarchy
Parent and Child Views
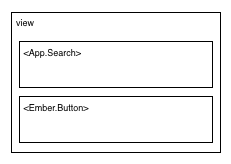
As Ember renders a templated view, it will generate a view hierarchy. Let’s assume we have a template form.
1 {{view App.Search placeholder="Search"}}
2 {{#view Ember.Button}}Go!{{/view}}
And we insert it into the DOM like this:
1 var view = Ember.View.create({
2   templateName: 'form'
3 }).append();
This will create a small view hierarchy that looks like this:
You can move around in the view hierarchy using the parentView and childViews properties.
1 var children = view.get('childViews') // [ <App.Search>, <Ember.Button> ]
2 children.objectAt(0).get('parentView') // view
One common use of the parentView method is inside of an instance of a child view.
1 App.Search = Ember.View.extend({
2   didInsertElement: function() {
3     // this.get('parentView') in here references `view`
4   }
5 })
Lifecycle Hooks
In order to make it easy to take action at different points during your view’s lifecycle, there are several hooks you can implement.
-
willInsertElement: This hook is called after the view has been rendered but before it has been inserted into the DOM. It does not provide access to the view’selement. -
didInsertElement: This hook is called immediately after the view has been inserted into the DOM. It provides access to the view’selementand is most useful for integration with an external library. Any explicit DOM setup code should be limited to this hook. -
willDestroyElement: This hook is called immediately before the element is removed from the DOM. This is your opportunity to tear down any external state associated with the DOM node. LikedidInsertElement, it is most useful for integration with external libraries. -
willClearRender: This hook is called immediately before a view is re-rendered. This is useful if you want to perform some teardown immediately before a view is re-rendered. -
becameVisible: This hook is called after a view’sisVisibleproperty, or one of its ancestor’sisVisibleproperty, changes to true and the associated element becomes visible. Note that this hook is only reliable if all visibility is routed through theisVisibleproperty. -
becameHidden: This hook is called after a view’sisVisibleproperty, or one of its ancestor’sisVisibleproperty, changes to false and the associated element becomes hidden. Note that this hook is only reliable if all visibility is routed through theisVisibleproperty.
Apps can implement these hooks by defining a method by the hook’s name on the view. Alternatively, it is possible to register a listener for the hook on a view:
1 view.on('willClearRender', function() {
2   // do something with view
3 });
Virtual Views
As described above, Handlebars creates views in the view hierarchy to
represent bound values. Every time you use a Handlebars expression,
whether it’s a simple value or a block helper like {{#with}} or
{{#if}}, Handlebars creates a new view.
Because Ember uses these views for internal bookkeeping only,
they are hidden from the view’s public parentView and childViews
API. The public view hierarchy reflects only views created using the
{{view}} helper or through ContainerView (see below).
For example, consider the following Handlebars template:
 1 <h1>Joe's Lamprey Shack</h1>
 2 {{controller.restaurantHours}}
 3
 4 {{#view App.FDAContactForm}}
 5   If you are experiencing discomfort from eating at Joe's Lamprey Shack,
 6 please use the form below to submit a complaint to the FDA.
 7
 8   {{#if controller.allowComplaints}}
 9     {{view Ember.TextArea valueBinding="controller.complaint"}}
10     <button {{action 'submitComplaint'}}>Submit</button>
11   {{/if}}
12 {{/view}}
Rendering this template would create a hierarchy like this:
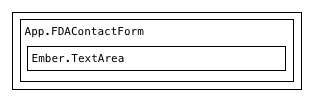
Behind the scenes, Ember tracks additional virtual views for the Handlebars expressions:
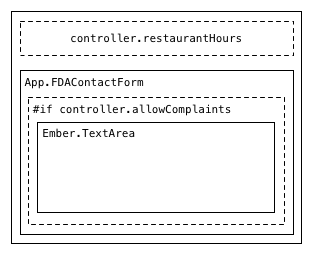
From inside of the TextArea, the parentView would point to the
FDAContactForm and the FDAContactForm’s childViews would be an
array of the single TextArea view.
You can see the internal view hierarchy by asking for the _parentView
or _childViews, which will include virtual views:
1 var _childViews = view.get('_childViews');
2 console.log(_childViews.objectAt(0).toString());
3 //> <Ember._HandlebarsBoundView:ember1234>
Warning! You may not rely on these internal APIs in application code. They may change at any time and have no public contract. The return value may not be observable or bindable. It may not be an Ember object. If you feel the need to use them, please contact us so we can expose a better public API for your use-case.
Bottom line: This API is like XML. If you think you have a use for it, you may not yet understand the problem enough. Reconsider!
Event Bubbling
One responsibility of views is to respond to primitive user events and translate them into events that have semantic meaning for your application.
For example, a delete button translates the primitive click event into
the application-specific “remove this item from an array.”
In order to respond to user events, create a new view subclass that implements that event as a method:
1 App.DeleteButton = Ember.View.create({
2   click: function(event) {
3     var item = this.get('model');
4     this.get('controller').send('deleteItem', item);
5   }
6 });
When you create a new Ember.Application instance, it registers an event
handler for each native browser event using jQuery’s event delegation
API. When the user triggers an event, the application’s event dispatcher
will find the view nearest to the event target that implements the
event.
A view implements an event by defining a method corresponding to the
event name. When the event name is made up of multiple words (like
mouseup) the method name should be the camelized form of the event
name (mouseUp).
Events will bubble up the view hierarchy until the event reaches the root view. An event handler can stop propagation using the same techniques as normal jQuery event handlers:
-
return falsefrom the method event.stopPropagation
For example, imagine you defined the following view classes:
 1 App.GrandparentView = Ember.View.extend({
 2   click: function() {
 3     console.log('Grandparent!');
 4   }
 5 });
 6
 7 App.ParentView = Ember.View.extend({
 8   click: function() {
 9     console.log('Parent!');
10     return false;
11   }
12 });
13
14 App.ChildView = Ember.View.extend({
15   click: function() {
16     console.log('Child!');
17   }
18 });
And here’s the Handlebars template that uses them:
1 {{#view App.GrandparentView}}
2   {{#view App.ParentView}}
3     {{#view App.ChildView}}
4       <h1>Click me!</h1>
5     {{/view}}
6   {{/view}}
7 {{/view}}
If you clicked on the <h1>, you’d see the following output in your
browser’s console:
1 Child!
2 Parent!
You can see that Ember invokes the handler on the child-most view that
received the event. The event continues to bubble to the ParentView,
but does not reach the GrandparentView because ParentView returns
false from its event handler.
You can use normal event bubbling techniques to implement familiar
patterns. For example, you could implement a FormView that defines a
submit method. Because the browser triggers the submit event when
the user hits enter in a text field, defining a submit method on the
form view will “just work”.
1 App.FormView = Ember.View.extend({
2   tagName: "form",
3
4   submit: function(event) {
5     // will be invoked whenever the user triggers
6     // the browser's `submit` method
7   }
8 });
1 {{#view App.FormView}}
2   {{view Ember.TextField valueBinding="controller.firstName"}}
3   {{view Ember.TextField valueBinding="controller.lastName"}}
4   <button type="submit">Done</button>
5 {{/view}}
Adding New Events
Ember comes with built-in support for the following native browser events:
You can add additional events to the event dispatcher when you create a new application:
1 App = Ember.Application.create({
2   customEvents: {
3     // add support for the loadedmetadata media
4     // player event
5     'loadedmetadata': "loadedMetadata"
6   }
7 });
In order for this to work for a custom event, the HTML5 spec must define the event as “bubbling”, or jQuery must have provided an event delegation shim for the event.
Templated Views
As you’ve seen so far in this guide, the majority of views that you will use in your application are backed by a template. When using templates, you do not need to programmatically create your view hierarchy because the template creates it for you.
While rendering, the view’s template can append views to its child views
array. Internally, the template’s {{view}} helper calls the view’s
appendChild method.
Calling appendChild does two things:
- Adds the child view to the
childViewsarray. - Immediately renders the child view and adds it to the parent’s render buffer.
You may not call appendChild on a view after it has left the rendering
state. A template renders “mixed content” (both views and plain text) so
the parent view does not know exactly where to insert the new child view
once the rendering process has completed.
In the example above, imagine trying to insert a new view inside of
the parent view’s childViews array. Should it go immediately
after the closing </div> of App.MyView? Or should it go after the
closing </div> of the entire view? There is no good answer that will
always be correct.
Because of this ambiguity, the only way to create a view hierarchy using
templates is via the {{view}} helper, which always inserts views
in the right place relative to any plain text.
While this works for most situations, occasionally you may want to have
direct, programmatic control of a view’s children. In that case, you can
use Ember.ContainerView, which explicitly exposes a public API for
doing so.
Container Views
Container views contain no plain text. They are composed entirely of their child views (which may themselves be template-backed).
ContainerView exposes two public APIs for changing its contents:
- A writable
childViewsarray into which you can insertEmber.Viewinstances. - A
currentViewproperty that, when set, inserts the new value into the child views array. If there was a previous value ofcurrentView, it is removed from thechildViewsarray.
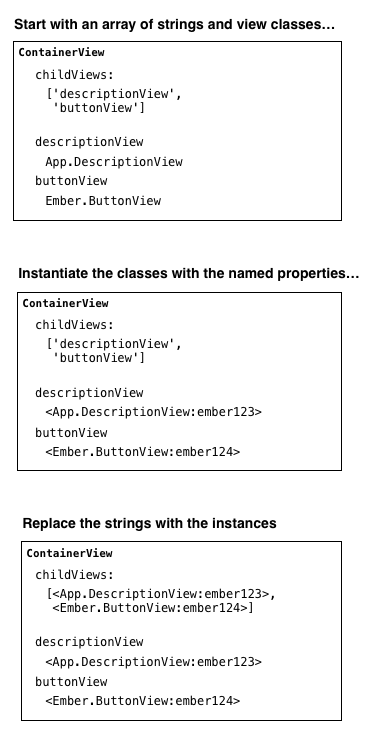
Here is an example of using the childViews API to create a view that
starts with a hypothetical DescriptionView and can add a new button at
any time by calling the addButton method:
 1 App.ToolbarView = Ember.ContainerView.create({
 2   init: function() {
 3     var childViews = this.get('childViews');
 4     var descriptionView = App.DescriptionView.create();
 5
 6     childViews.pushObject(descriptionView);
 7     this.addButton();
 8
 9     return this._super();
10   },
11
12   addButton: function() {
13     var childViews = this.get('childViews');
14     var button = Ember.ButtonView.create();
15
16     childViews.pushObject(button);
17   }
18 });
As you can see in the example above, we initialize the ContainerView
with two views, and can add additional views during runtime. There is a
convenient shorthand for doing this view setup without having to
override the init method:
 1 App.ToolbarView = Ember.ContainerView.create({
 2   childViews: ['descriptionView', 'buttonView'],
 3
 4   descriptionView: App.DescriptionView,
 5   buttonView: Ember.ButtonView,
 6
 7   addButton: function() {
 8     var childViews = this.get('childViews');
 9     var button = Ember.ButtonView.create();
10
11     childViews.pushObject(button);
12   }
13 });
As you can see above, when using this shorthand, you specify the
childViews as an array of strings. At initialization time, each of the
strings is used as a key to look up a view instance or class. That view
is automatically instantiated, if necessary, and added to the
childViews array.
Template Scopes
Standard Handlebars templates have the concept of a context–the object from which expressions will be looked up.
Some helpers, like {{#with}}, change the context inside their block.
Others, like {{#if}}, preserve the context. These are called
“context-preserving helpers.”
When a Handlebars template in an Ember app uses an expression
({{#if foo.bar}}), Ember will automatically set up an
observer for that path on the current context.
If the object referenced by the path changes, Ember will automatically re-render the block with the appropriate context. In the case of a context-preserving helper, Ember will re-use the original context when re-rendering the block. Otherwise, Ember will use the new value of the path as the context.
1 {{#if controller.isAuthenticated}}
2   <h1>Welcome {{controller.name}}</h1>
3 {{/if}}
4
5 {{#with controller.user}}
6   <p>You have {{notificationCount}} notifications.</p>
7 {{/with}}
In the above template, when the isAuthenticated property changes from
false to true, Ember will render the block, using the original outer
scope as its context.
The {{#with}} helper changes the context of its block to the user
property on the current controller. When the user property changes,
Ember re-renders the block, using the new value of controller.user as
its context.
View Scope
In addition to the Handlebars context, templates in Ember also have the
notion of the current view. No matter what the current context is, the
view property always references the closest view.
Note that the view property never references the internal views
created for block expressions like {{#if}}. This allows you to
differentiate between Handlebars contexts, which always work the way
they do in vanilla Handlebars, and the view hierarchy.
Because view points to an Ember.View instance, you can access any
properties on the view by using an expression like view.propertyName.
You can get access to a view’s parent using view.parentView.
For example, imagine you had a view with the following properties:
1 App.MenuItemView = Ember.View.create({
2   templateName: 'menu_item_view',
3   bulletText: '*'
4 });
…and the following template:
1 {{#with controller}}
2   {{view.bulletText}} {{name}}
3 {{/with}}
Even though the Handlebars context has changed to the current
controller, you can still access the view’s bulletText by referencing
view.bulletText.
Template Variables
So far in this guide, we’ve been handwaving around the use of the
controller property in our Handlebars templates. Where does it come
from?
Handlebars contexts in Ember can inherit variables from their parent contexts. Before Ember looks up a variable in the current context, it first checks in its template variables. As a template creates new Handlebars scope, they automatically inherit the variables from their parent scope.
Ember defines these view and controller variables, so they are
always found first when an expression uses the view or controller
names.
As described above, Ember sets the view variable on the Handlebars
context whenever a template uses the {{#view}} helper. Initially,
Ember sets the view variable to the view rendering the template.
Ember sets the controller variable on the Handlebars context whenever
a rendered view has a controller property. If a view has no
controller property, it inherits the controller variable from the
most recent view with one.
Other Variables
Handlebars helpers in Ember may also specify variables. For example, the
{{#with controller.person as tom}} form specifies a tom variable
that descendent scopes can access. Even if a child context has a tom
property, the tom variable will supersede it.
This form has one major benefit: it allows you to shorten long paths without losing access to the parent scope.
It is especially important in the {{#each}} helper, which provides
the {{#each person in people}} form.
In this form, descendent context have access to the person variable,
but remain in the same scope as where the template invoked the each.
1 {{#with controller.preferences}}
2   <h1>Title</h1>
3   <ul>
4   {{#each person in controller.people}}
5     {{! prefix here is controller.preferences.prefix }}
6     <li>{{prefix}}: {{person.fullName}}</li>
7   {{/each}}
8   <ul>
9 {{/with}}
Note that these variables inherit through ContainerViews, even though
they are not part of the Handlebars context hierarchy.
Accessing Template Variables from Views
In most cases, you will need to access these template variables from inside your templates. In some unusual cases, you may want to access the variables in-scope from your view’s JavaScript code.
You can do this by accessing the view’s templateVariables property,
which will return a JavaScript object containing the variables that were
in scope when the view was rendered. ContainerViews also have access
to this property, which references the template variables in the most
recent template-backed view.
At present, you may not observe or bind a path containing
templateVariables.
Managing Asynchrony
Many Ember concepts, like bindings and computed properties, are designed to help manage asynchronous behavior.
Without Ember
We’ll start by taking a look at ways to manage asynchronous behavior using jQuery or event-based MVC frameworks.
Let’s use the most common asynchronous behavior in a web application, making an Ajax request, as an example. The browser APIs for making Ajax requests provide an asynchronous API. jQuery’s wrapper does as well:
1 jQuery.getJSON('/posts/1', function(post) {
2   $("#post").html("<h1>" + post.title + "</h1>" +
3     "<div>" + post.body + "</div>");
4 });
In a raw jQuery application, you would use this callback to make whatever changes you needed to make to the DOM.
When using an event-based MVC framework, you move the logic out of the callback and into model and view objects. This improves things, but doesn’t get rid of the need to explicitly deal with asynchronous callbacks:
 1 Post = Model.extend({
 2   author: function() {
 3     return [this.salutation, this.name].join(' ')
 4   },
 5
 6   toJSON: function() {
 7     var json = Model.prototype.toJSON.call(this);
 8     json.author = this.author();
 9     return json;
10   }
11 });
12
13 PostView = View.extend({
14   init: function(model) {
15     model.bind('change', this.render, this);
16   },
17
18   template: _.template("<h1><%= title %></h1><h2><%= author %></h2><div><%= body\
19  %></div>"),
20
21   render: function() {
22     jQuery(this.element).html(this.template(this.model.toJSON());
23     return this;
24   }
25 });
26
27 var post = Post.create();
28 var postView = PostView.create({ model: post });
29 jQuery('#posts').append(postView.render().el);
30
31 jQuery.getJSON('/posts/1', function(json) {
32   // set all of the JSON properties on the model
33   post.set(json);
34 });
This example doesn’t use any particular JavaScript library beyond jQuery, but its approach is typical of event-driven MVC frameworks. It helps organize the asynchronous events, but asynchronous behavior is still the core programming model.
Ember’s Approach
In general, Ember’s goal is to eliminate explicit forms of asynchronous behavior. As we’ll see later, this gives Ember the ability to coalesce multiple events that have the same result.
It also provides a higher level of abstraction, eliminating the need to manually register and unregister event listeners to perform most common tasks.
You would normally use ember-data for this example, but let’s see how you would model the above example using jQuery for Ajax in Ember.
 1 App.Post = Ember.Object.extend({
 2
 3 });
 4
 5 App.PostController = Ember.ObjectController.extend({
 6   author: function() {
 7     return [this.get('salutation'), this.get('name')].join(' ');
 8   }.property('salutation', 'name')
 9 });
10
11 App.PostView = Ember.View.extend({
12   // the controller is the initial context for the template
13   controller: null,
14   template: Ember.Handlebars.compile("<h1>{{title}}</h1><h2>{{author}}</h2><div>\
15 {{body}}</div>")
16 });
17
18 var post = App.Post.create();
19 var postController = App.PostController.create({ model: post });
20
21 App.PostView.create({ controller: postController }).appendTo('body');
22
23 jQuery.getJSON("/posts/1", function(json) {
24   post.setProperties(json);
25 });
In contrast to the above examples, the Ember approach eliminates the
need to explicitly register an observer when the post’s properties
change.
The {{title}}, {{author}} and {{body}} template elements are bound
to those properties on the PostController. When the PostController’s
model changes, it automatically propagates those changes to the DOM.
Using a computed property for author eliminated the need to explicitly
invoke the computation in a callback when the underlying property
changed.
Instead, Ember’s binding system automatically follows the trail from the
salutation and name set in the getJSON callback to the computed
property in the PostController and all the way into the DOM.
Benefits
Because Ember is usually responsible for propagating changes, it can guarantee that a single change is only propagated one time in response to each user event.
Let’s take another look at the author computed property.
1 App.PostController = Ember.ObjectController.extend({
2   author: function() {
3     return [this.get('salutation'), this.get('name')].join(' ');
4   }.property('salutation', 'name')
5 });
Because we have specified that it depends on both salutation and
name, changes to either of those two dependencies will invalidate the
property, which will trigger an update to the {{author}} property in
the DOM.
Imagine that in response to a user event, I do something like this:
1 post.set('salutation', "Mrs.");
2 post.set('name', "Katz");
You might imagine that these changes will cause the computed property to be invalidated twice, causing two updates to the DOM. And in fact, that is exactly what would happen when using an event-driven framework.
In Ember, the computed property will only recompute once, and the DOM will only update once.
How?
When you make a change to a property in Ember, it does not immediately propagate that change. Instead, it invalidates any dependent properties immediately, but queues the actual change to happen later.
Changing both the salutation and name properties invalidates the
author property twice, but the queue is smart enough to coalesce those
changes.
Once all of the event handlers for the current user event have finished,
Ember flushes the queue, propagating the changes downward. In this case,
that means that the invalidated author property will invalidate the
{{author}} in the DOM, which will make a single request to recompute
the information and update itself once.
This mechanism is fundamental to Ember. In Ember, you should always assume that the side-effects of a change you make will happen later. By making that assumption, you allow Ember to coalesce repetitions of the same side-effect into a single call.
In general, the goal of evented systems is to decouple the data manipulation from the side effects produced by listeners, so you shouldn’t assume synchronous side effects even in a more event-focused system. The fact that side effects don’t propagate immediately in Ember eliminates the temptation to cheat and accidentally couple code together that should be separate.
Side-Effect Callbacks
Since you can’t rely on synchronous side-effects, you may be wondering how to make sure that certain actions happen at the right time.
For example, imagine that you have a view that contains a button, and
you want to use jQuery UI to style the button. Since a view’s append
method, like everything else in Ember, defers its side-effects, how can
you execute the jQuery UI code at the right time?
The answer is lifecycle callbacks.
 1 App.Button = Ember.View.extend({
 2   tagName: 'button',
 3   template: Ember.Handlebars.compile("{{view.title}}"),
 4
 5   didInsertElement: function() {
 6     this.$().button();
 7   }
 8 });
 9
10 var button = App.Button.create({
11   title: "Hi jQuery UI!"
12 }).appendTo('#something');
In this case, as soon as the button actually appears in the DOM, Ember
will trigger the didInsertElement callback, and you can do whatever
work you want.
The lifecycle callbacks approach has several benefits, even if we didn’t have to worry about deferred insertion.
First, relying on synchronous insertion means leaving it up to the
caller of appendTo to trigger any behavior that needs to run
immediately after appending. As your application grows, you may find
that you create the same view in many places, and now need to worry
about that concern everywhere.
The lifecycle callback eliminates the coupling between the code that instantiates the view and its post-append behavior. In general, we find that making it impossible to rely on synchronous side-effects leads to better design in general.
Second, because everything about the lifecycle of a view is inside the view itself, it is very easy for Ember to re-render parts of the DOM on-demand.
For example, if this button was inside of an {{#if}} block, and Ember
needed to switch from the main branch to the else section, Ember can
easily instantiate the view and call the lifecycle callbacks.
Because Ember forces you to define a fully-defined view, it can take control of creating and inserting views in appropriate situations.
This also means that all of the code for working with the DOM is in a few sanctioned parts of your application, so Ember has more freedom in the parts of the render process outside of these callbacks.
Observers
In some rare cases, you will want to perform certain behavior after a property’s changes have propagated. As in the previous section, Ember provides a mechanism to hook into the property change notifications.
Let’s go back to our salutation example.
1 App.PostController = Ember.ObjectController.extend({
2   author: function() {
3     return [this.get('salutation'), this.get('name')].join(' ');
4   }.property('salutation', 'name')
5 });
If we want to be notified when the author changes, we can register an observer. Let’s say that the view object wants to be notified:
1 App.PostView = Ember.View.extend({
2   controller: null,
3   template: Ember.Handlebars.compile("<h1>{{title}}</h1><h2>{{author}}</h2><div>\
4 {{body}}</div>"),
5
6   authorDidChange: function() {
7     alert("New author name: " + this.get('controller.author'));
8   }.observes('controller.author')
9 });
Ember triggers observers after it successfully propagates the change. In
this case, that means that Ember will only call the authorDidChange
callback once in response to each user event, even if both of salutation
and name changed.
This gives you the benefits of executing code after the property has changed, without forcing all property changes to be synchronous. This basically means that if you need to do some manual work in response to a change in a computed property, you get the same coalescing benefits as Ember’s binding system.
Finally, you can also register observers manually, outside of an object definition:
 1 App.PostView = Ember.View.extend({
 2   controller: null,
 3   template: Ember.Handlebars.compile("<h1>{{title}}</h1><h2>{{author}}</h2><div>\
 4 {{body}}</div>"),
 5
 6   didInsertElement: function() {
 7     this.addObserver('controller.author', function() {
 8       alert("New author name: " + this.get('controller.author'));
 9     });
10   }
11 });
However, when you use the object definition syntax, Ember will
automatically tear down the observers when the object is destroyed. For
example, if an {{#if}} statement changes from truthy to falsy, Ember
destroys all of the views defined inside the block. As part of that
process, Ember also disconnects all bindings and inline observers.
If you define an observer manually, you need to make sure you remove it.
In general, you will want to remove observers in the opposite callback
to when you created it. In this case, you will want to remove the
callback in willDestroyElement.
 1 App.PostView = Ember.View.extend({
 2   controller: null,
 3   template: Ember.Handlebars.compile("<h1>{{title}}</h1><h2>{{author}}</h2><div>\
 4 {{body}}</div>"),
 5
 6   didInsertElement: function() {
 7     this.addObserver('controller.author', function() {
 8       alert("New author name: " + this.get('controller.author'));
 9     });
10   },
11
12   willDestroyElement: function() {
13     this.removeObserver('controller.author');
14   }
15 });
If you added the observer in the init method, you would want to tear
it down in the willDestroy callback.
In general, you will very rarely want to register a manual observer in this way. Because of the memory management guarantees, we strongly recommend that you define your observers as part of the object definition if possible.
Routing
There’s an entire page dedicated to managing async within the Ember Router: Asynchronous Routing
Keeping Templates Up-to-Date
In order to know which part of your HTML to update when an underlying property changes, Handlebars will insert marker elements with a unique ID. If you look at your application while it’s running, you might notice these extra elements:
1 My new car is
2 <script id="metamorph-0-start" type="text/x-placeholder"></script>
3 blue
4 <script id="metamorph-0-end" type="text/x-placeholder"></script>.
Because all Handlebars expressions are wrapped in these markers, make sure each HTML tag stays inside the same block. For example, you shouldn’t do this:
1 {{! Don't do it! }}
2 <div {{#if isUrgent}}class="urgent"{{/if}}>
If you want to avoid your property output getting wrapped in these markers, use the unbound helper:
1 My new car is {{unbound color}}.
Your output will be free of markers, but be careful, because the output won’t be automatically updated!
1 My new car is blue.
Debugging
Debugging Ember and Ember Data
Here are some tips you can use to help debug your Ember application.
Also, check out the ember-extension project, which adds an Ember tab to Chrome DevTools that allows you to inspect Ember objects in your application.
Routing
Log router transitions
 1 window.App = Ember.Application.create({
 2   // Basic logging, e.g. "Transitioned into 'post'"
 3   LOG_TRANSITIONS: true,
 4
 5   // Extremely detailed logging, highlighting every internal
 6   // step made while transitioning into a route, including
 7   // `beforeModel`, `model`, and `afterModel` hooks, and
 8   // information about redirects and aborted transitions
 9   LOG_TRANSITIONS_INTERNAL: true
10 });
View all registered routes
1 Ember.keys(App.Router.router.recognizer.names)
Get current route name / path
Ember installs the current route name and path on your
app’s ApplicationController as the properties
currentRouteName and currentPath. currentRouteName’s
value (e.g. "comments.edit") can be used as the destination parameter of
transitionTo and the {{linkTo}} Handlebars helper, while
currentPath serves as a full descriptor of each
parent route that has been entered (e.g.
"admin.posts.show.comments.edit").
 1 // From within a Route
 2 this.controllerFor("application").get("currentRouteName");
 3 this.controllerFor("application").get("currentPath");
 4
 5 // From within a controller, after specifying `needs: ['application']`
 6 this.get('controllers.application.currentRouteName');
 7 this.get('controllers.application.currentPath');
 8
 9 // From the console:
10 App.__container__.lookup("controller:application").get("currentRouteName")
11 App.__container__.lookup("controller:application").get("currentPath")
Views / Templates
Log view lookups
1 window.App = Ember.Application.create({
2   LOG_VIEW_LOOKUPS: true
3 });
Get the View object from its DOM Element’s ID
1 Ember.View.views['ember605']
View all registered templates
1 Ember.keys(Ember.TEMPLATES)
Handlebars Debugging Helpers
1 {{debugger}}
2 {{log record}}
Controllers
Log generated controller
1 window.App = Ember.Application.create({
2   LOG_ACTIVE_GENERATION: true
3 });
Ember Data
View ember-data’s identity map
1 // all records in memory
2 App.__container__.lookup('store:main').recordCache
3
4 // attributes
5 App.__container__.lookup('store:main').recordCache[2].get('data.attributes')
6
7 // loaded associations
8 App.__container__.lookup('store:main').recordCache[2].get('comments')
Observers / Binding
See all observers for a object, key
1 Ember.observersFor(comments, keyName);
Log object bindings
1 Ember.LOG_BINDINGS = true
Miscellaneous
View an instance of something from the container
1 App.__container__.lookup("controller:posts")
2 App.__container__.lookup("route:application")
Dealing with deprecations
1 Ember.ENV.RAISE_ON_DEPRECATION = true
2 Ember.LOG_STACKTRACE_ON_DEPRECATION = true
Implement an Ember.onerror hook to log all errors in production
1 Ember.onerror = function(error) {
2     Em.$.ajax('/error-notification', {
3       type: 'POST',
4       data: {
5         stack: error.stack,
6         otherInformation: 'exception message'
7       }
8     });
9 }
Import the console
If you are using imports with Ember, be sure to import the console:
1 Ember = {
2   imports: {
3     Handlebars: Handlebars,
4     jQuery: $,
5     console: window.console
6   }
7 };
Errors within an RSVP.Promise
There are times when dealing with promises that it seems like any errors
are being ‘swallowed’, and not properly raised. This makes it extremely
difficult to track down where a given issue is coming from. Thankfully,
RSVP has a solution for this problem built in.
You can provide an onerror function that will be called with the error
details if any errors occur within your promise. This function can be anything
but a common practice is to call console.assert to dump the error to the
console.
1 Ember.RSVP.configure('onerror', function(error) {
2   Ember.Logger.assert(false, error);
3 });
Errors within Ember.run.later (Backburner.js)
Backburner has support for stitching the stacktraces together so that you can
track down where an erroring Ember.run.later is being initiated from. Unfortunately,
this is quite slow and is not appropriate for production or even normal development.
To enable this mode you can set:
1 Ember.run.backburner.DEBUG = true;
The Run Loop
Ember’s internals and most of the code you will write in your applications takes place in a run loop. The run loop is used to batch, and order (or reorder) work in a way that is most effective and efficient.
It does so by scheduling work on specific queues. These queues have a priority, and are processed to completion in priority order.
Why is this useful?
Very often, batching similar work has benefits. Web browsers do something quite similar by batching changes to the DOM.
Consider the following HTML snippet:
1 <div id="foo"></div>
2 <div id="bar"></div>
3 <div id="baz"></div>
and executing the following code:
1 foo.style.height = "500px" // write
2 foo.offsetHeight // read (recalculate style, layout, expensive!)
3
4 bar.style.height = "400px" // write
5 bar.offsetHeight // read (recalculate style, layout, expensive!)
6
7 baz.style.height = "200px" // write
8 baz.offsetHeight // read (recalculate style, layout, expensive!)
In this example, the sequence of code forced the browser to recalculate style, and relayout after each step. However, if we were able to batch similar jobs together, the browser would have only needed to recalulate the style and layout once.
1 foo.style.height = "500px" // write
2 bar.style.height = "400px" // write
3 baz.style.height = "200px" // write
4
5 foo.offsetHeight // read (recalculate style, layout, expensive!)
6 bar.offsetHeight // read (fast since style and layout is already known)
7 baz.offsetHeight // read (fast since style and layout is already known)
Interestingly, this pattern holds true for many other types of work. Essentially, batching similar work allows for better pipelining, and further optimization.
Let’s look at a similar example that is optimized in Ember, starting with a User object:
1 var User = Ember.Object.extend({
2   firstName: null,
3   lastName: null,
4   fullName: function() {
5     return this.get('firstName') + ' ' + this.get('lastName');
6   }.property('firstName', 'lastName')
7 });
and a template to display its attributes:
1 {{firstName}}
2 {{fullName}}
If we execute the following code without the run loop:
1 var user = User.create({firstName:'Tom', lastName:'Huda'});
2 user.set('firstName', 'Yehuda');
3 // {{firstName}} and {{fullName}} are updated
4
5 user.set('lastName', 'Katz');
6 // {{lastName}} and {{fullName}} are updated
We see that the browser will rerender the template twice.
1 var user = User.create({firstName:'Tom', lastName:'Huda'});
2 user.set('firstName', 'Yehuda');
3 user.set('lastName', 'Katz');
4
5 // {{firstName}}  {{lastName}} and {{fullName}} are updated
However, if we have the run loop in the above code, the browser will only rerender the template once the attributes have all been set.
1 var user = User.create({firstName:'Tom', lastName:'Huda'});
2 user.set('firstName', 'Yehuda');
3 user.set('lastName', 'Katz');
4 user.set('firstName', 'Tom');
5 user.set('lastName', 'Huda');
In the above example with the run loop, since the user’s attributes end up at the same values as before execution, the template will not even rerender!
It is of course possible to optimize these scenarios on a case-by-case basis, but getting them for free is much nicer. Using the run loop, we can apply these classes of optimizations not only for each scenario, but holistically app-wide.
How does the Run Loop work in Ember?
As mentioned earlier, we schedule work (in the form of function invocations) on queues, and these queues are processed to completion in priority order.
What are the queues, and what is their priority order?
1 Ember.run.queues
2 // => ["sync", "actions", "routerTransitions", "render", "afterRender", "destroy\
3 "]
Because the priority is first to last, the “sync” queue has higher priority than the “render” or “destroy” queue.
What happens in these queues?
- The
syncqueue contains binding synchronization jobs - The
actionsqueue is the general work queue and will typically contain scheduled tasks e.g. promises - The
routerTransitionsqueue contains transition jobs in the router - The
renderqueue contains jobs meant for rendering, these will typically update the DOM - The
afterRendercontains jobs meant to be run after all previously scheduled render tasks are complete. This is often good for 3rd-party DOM manipulation libraries, that should only be run after an entire tree of DOM has been updated - The
destroyqueue contains jobs to finish the teardown of objects other jobs have scheduled to destroy
In what order are jobs executed on the queues?
The algorithm works this way:
- Let the highest priority queue with pending jobs be:
CURRENT_QUEUE, if there are no queues with pending jobs the run loop is complete - Let a new temporary queue be defined as
WORK_QUEUE - Move jobs from
CURRENT_QUEUEintoWORK_QUEUE - Process all the jobs sequentially in
WORK_QUEUE - Return to Step 1
An example of the internals
Rather than writing the higher level app code that internally invokes the various run loop scheduling functions, we have stripped away the covers, and shown the raw run-loop interactions.
Working with this API directly is not common in most Ember apps, but understanding this example will help you to understand the run-loops algorithm, which will make you a better Ember developer.
http://emberjs.com.s3.amazonaws.com/run-loop-guide/index.html
FAQs
What do I need to know to get started with Ember?
For basic Ember app development scenarios, nothing. All common paths are paved nicely for you and don’t require working with the run loop directly.
What do I need to know to actually build an app?
It is possible to build good apps without working with the run loop directly, so if you don’t feel the need to do so, don’t.
What scenarios will require me to understand the run loop?
The most common case you will run into is integrating with a non-Ember API that includes some sort of asynchronous callback. For example:
- AJAX callbacks
- DOM update and event callbacks
- Websocket callbacks
-
setTimeoutandsetIntervalcallbacks -
postMessageandmessageChannelevent handlers
You should begin a run loop when the callback fires.
How do I tell Ember to start a run loop?
1 $('a').click(function(){
2   Ember.run(function(){  // begin loop
3     // Code that results in jobs being scheduled goes here
4   }); // end loop, jobs are flushed and executed
5 });
What happens if I forget to start a run loop in an async handler?
As mentioned above, you should wrap any non-Ember async callbacks in Ember.run.
If you don’t, Ember will try to approximate a beginning and end for you. Here
is some pseudocode to describe what happens:
 1 $('a').click(function(){
 2   // Ember or runloop related code.
 3   Ember.run.start();
 4
 5   // 1. we detect you need a run-loop
 6   // 2. we start one for you, but we don't really know when it ends, so we guess
 7
 8   nextTick(function() {
 9     Ember.run.end()
10   }, 0);
11 });
This is suboptimal because the current JS frame is allowed to end before the run loop is flushed, which sometimes means the browser will take the opportunity to do other things, like garbage collection. GC running in between data changing and DOM rerendering can cause visual lag and should be minimized.
When I am in testing mode, why are run-loop autoruns disabled?
Some of Ember’s test helpers are promises that wait for the run loop to empty before resolving. This leads to resolving too early if there is code that is outside the run loop and gives erroneous test failures. Disabling autoruns help you identify these scenarios and helps both your testing and your application!