7. Advanced MDG Techniques
In this chapter I will cover some of the more advanced things you can do with a MDG. Probably most users can live fine with the possibilities that have been explained so far. Alas, you often get appetite while you eat.
7.1 Creating a Shape Script
One really nice thing is that you can adorn the stereotypes from your MDG with an icon. For elements this can be displayed either as shape or iconic in some compass position of the element rectangle. Connectors can also be assigned different shapes. In the first case you should remember that the resulting diagram should not become a bling-bling PowerPoint. So don’t overdo this. Create a new shape only for a few important stereotypes and use icons (if at all) for the rest.
To make an example, we create a (simple) shape for the Bike. Open the attributes of its stereotype and add a new one called _image. Now click the ellipsis button in the Initial Value which will open the shape script22 editor where you paste the following script23:
 1 shape main{
 2   fixedAspectRatio = true; // can't set this conditional
 3   if(HasProperty('rectanglenotation','0')) {
 4     drawnativeshape();
 5   } else {
 6     MoveTo(10,10);
 7     PrintWrapped("#name# #tag:style#");
 8     ellipse(0,60,30,100); // front wheel
 9     ellipse(50,60,80,100); // rear wheel
10     if (HasTag("style", "Barebone")) {
11       ellipse(5,65,25,95); // front wheel
12       ellipse(55,65,75,95); // rear wheel
13     }
14     if (HasTag("style", "Dragster")) {
15       ellipse(3,63,27,97); // front wheel
16       ellipse(57,67,73,93); // rear wheel
17     }
18     MoveTo(25,60); // frame
19     LineTo(50,60);
20     LineTo(65,80);
21     LineTo(25,60);
22     MoveTo(15,80); // fork
23     LineTo(30,50);
24   }
25 }
Once you re-generated and applied the MDG you will see a bike symbol rather than the rectangle element. Further you will notice that the wheel shape will change with certain settings of the style TV.
As a second example we will add some cogwheel24 to symbolize the Gear just as decoration in the top right area of the element. Just do as above but use the following script:
 1 decoration gear {
 2   orientation = "NE";
 3   setfillcolor(50, 100, 200);
 4   StartPath();
 5   MoveTo(0,50); LineTo(15,60); LineTo(8,80); LineTo(26,78); LineTo(31,100);
 6   LineTo(44,84); LineTo(58,96); LineTo(60,74); LineTo(78,71); LineTo(67,53);
 7   LineTo(80,37); LineTo(62,31); LineTo(63,9); LineTo(47,18); LineTo(37,0);
 8   LineTo(29,20); LineTo(12,16); LineTo(16,37); LineTo(0,50);
 9   EndPath();
10   FillAndStrokePath();
11 }
7.2 Multiple Metaclasses
In the previous example we just had stereotypes that extended a single Class metatype. But of course you can extend others and more than one metaclass. You will do that by drawing an Extends relation to more than one metaclass.
Deprecated is one versatile stereotype that I use to flag elements. The package metaclasses should contain all the metaclasses which have been deployed in the current MDG. So once the Deprecated stereotype is created just draw Extends relations to all the metaclasses. Optionally add a string attribute name Deprecation reason and one _image attribute containing
1 shape main{
2   SetFillColor(250, 250, 0);
3   DrawNativeShape();
4 }
When you apply this stereotype to any of your MDG elements (using the ellipsis button and the profile drop down) you will instantly see the element in diagrams in a yellow color. Since the Deprecated stereotype will be a secondary one its shape script is applied after the primary and replace it (sic!)25.
Multiple metaclasses in toolboxes
If your stereotype is used in a toolbox and it extends more than one metaclass you need to tell EA which of the extensions you actually mean with the menu entry. This is done by suffixing the name with (<baseMDG>::<baseMeta>). Let us assume that in the sample domain we also need a general Tool class plus a Tool package to keep the tools one needs to build a bike from. The first is already present since Tool extends Class. We add a new metaclass for Package and draw an extension from Tool. Time to save the profile — at the right location.

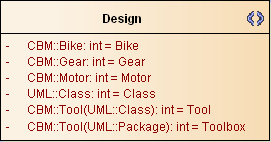
Now we put two additional entries in the Design toolbox. One CBM::Tool(UML::Class) for the tool itself and CBM::Tool(UML::Package) for the package.
Saving the toolbox diagram — mind the right location once again — the re-generated MDG will now show two new entries for Tool and Toolbox.

While the first will create a Tool class the second will create a Tool stereotyped package for which you have to supply just the name.
7.3 Reference Elements by Tagged Values
In our sample we had a couple of associations where I said they will be ignored in the profile. Sometimes you want those relations to show up somehow in your model. This is the place where the so-called RefGUIDs come into play. These are simply TVs like we already defined via attributes in the stereotype. But they can be assigned from a selection which offers just a certain set of elements.
In our example we do have an association from Requirements Spec to Customer. You can just stereotype this association with <<taggedValue>> (available from the ellipsis button) and, once re-generated, your MDG will offer a TV for Requirements Spec that can be filled with Customer elements. To test that, you need to create elements for both stereotypes in the sandbox. Since we have not added them to any toolbox it is necessary to create plain class elements and set their stereotype manually from the ellipsis/profile dropdown for the MDG. To assign the Customer TV in the Requirements Spec you need to click the ellipsis button in the TV value field. The selection window that pops up will allow you to select one of the Customer stereotyped elements.
7.4 Creating a Composite Diagram
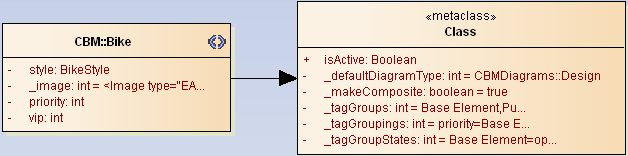
Another common use is to create a composite diagram along with an element. Usually if you create a composite diagram for an element EA will create one that is related to the metaclass (e.g. for a Class it creates a Composite diagram). In order to create one of the MDG-defined diagrams there needs to be a new metaclass in the profile. Assuming we want to have our Bike going along with a Design diagram we need to add a Class metaclass, add an attribute _defaultDiagramType, assign an Initial Value of CBMDiagrams::Design and move the Extension from the currently related Class metaclass to the newly created.

When you apply these changes and create a new composite diagram for a Bike element it will now be a Design diagram rather than a Composite.
Taking this one step further. Sometimes you want elements to be created as composite at once. This is simply done by adding the attribute _makeComposite with the Initial Value set to true in the new metaclass.

Now when you create a new Bike element it will be composite with a Design diagram inside.
7.5 Patterns
You probably know UML patterns from various books like Design Patterns. Patterns from the latter can already be created in EA if you enable the Gang of Four Patterns MDG. Like these standard patterns you can include your own patterns in your MDG.
In order to add a pattern you first need to create one. This is done by drawing a class diagram. E.g. in our example domain we want to create a basic bike that comes with motor, gear and an empty toolbox.
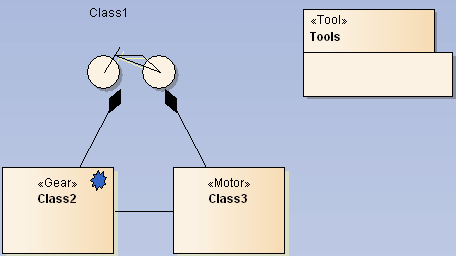
This is best placed in a Patterns package inside the MDG package. The diagram itself should be named after the pattern. In this case we simply call it Bike (as it contains the basic bike parts). As you notice the diagram uses elements from the MDG itself. This can easily be done by deploying the MDG in the MDG design repository itself.
Once the diagram is finished it needs to be saved as UML pattern. The menu for that is found in the main menu Diagram/Advanced/Save Diagram as UML Pattern... (and not the diagram pane context where you only can save it as profile, which is something completely different, and not in the context in the browser where you find none of the save options — EAUI).
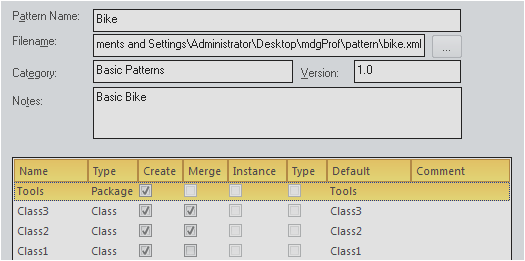
The file should be placed inside the folder where all the other MDG stuff is already located. I chose a pattern sub-directory and saved the pattern with the same file name as the pattern itself.
In the dialog I ticked the Merge option for Class2 and Class3. This will allow to use existing classes to take place the according pattern position rather than creating new classes.
After the pattern itself has been created we need to create a toolbox entry in order to get access to the pattern. This is rather straight forward. We will just add it to the Design toolbox.
The format of the entry is <profileID>::<patternName>(UMLPattern). This will be shown with a
 icon. In the chapter Toolbox menus I will show how to change that to a more pleasing icon.
When re-creating the MDG you need to check the Patterns mark in the generation dialog. So you will be asked to locate the exported pattern in the following dialog session.
The pattern is now ready to use. When you select the pattern EA will pop up the pattern creation dialog. Since we made Class2 and Class3 miscible you can choose the Merge instead of the Create and locate the existing classes to be used.
Of course there is more about patterns. But using just these basic steps will give you a powerful tool to improve your MDG already.
7.6 Extending Other MDGs
A quite common use case is to extend some existing MDG (e.g. Archimate or BPMN). Luckily this got more convenient with the new EA releases. For example we want to add a Sales Channel that extends the BPMN2.0::Pool to our profile.
First you need to enable the BPMN2.0 MDG. Now we temporarily create a BPMN2.0::Pool in order to find out which metaclass it extends. Once created delete the stereotype from the dummy pool element and you can see its base metaclass
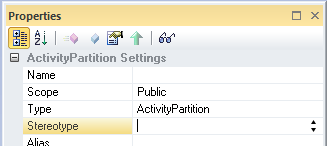
which in this case is ActivityPartition. Now you can safely throw that dummy element away.
The next step is to create that metaclass from the Metaclass toolbox by ticking the appropriate entry. Do not click OK but switch to the Stereotypes tabs. Select BPMN2.0 from the drop down and tick the Pool (you might want to sort the entries first — EAUI). Now when you click OK EA will create a stereotype (from BPMN2.0) and an ActivityPartition metaclass. Extend the first with the latter.
Finally we create a new stereotype Sales Channel, eventually add a priority attribute and draw a generalization to the Pool.

To test this, create a Other/UML/Activity/Partition (since we have not put it in any toolbox) and there from its stereotype choose Sales Channel from our MDG. You will now see all the TVs from BPMN2.0 along with the own priority TV.
7.7 Icons
As already mentioned it is possible to change the icon which appears with a stereotype in either the toolbox or for instantiated elements in the project browser. There are two ways to create such icons. One for stereotypes in general and another for just toolboxes.
Stereotypes
In order to improve readability of the toolboxes it is possible to replace the standard icons which are derived from the metatype. Instead you can create icons from your (shape scripted) stereotypes and supply them to be shown in menus and the project browser.
First you need to create a 16x16 pixel BMP icon for the stereotype26. Since we already have a folder for MDG stuff it is best to add an icons folder therein.
Next the stereotype in question must be adapted. For the CBM::Bike EA will currently show a simple class icon. To replace that with something more unique you need to add two attributes to the stereotype. One is Icon with an Initial Value containing the file path to the BMP27.
The other one is _metatype which must contain a unique string. In this case we can simply choose it to be Bike28.
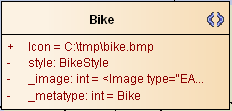
Once you re-created the MDG the CBM::Bike will appear with the new icon in the toolbox and in the project browser.
In case you used my template BMP: I know, I’m not an artist.
Toolbox menus
If you want to show an icon only in the menu (or if you have just-menu entries like patterns and sub-menus) the icon needs to be defined in a different way. So the according toolbox diagram needs some additions. We will add an icon for the Bike pattern.
In the Design toolbox icon we need to create two elements. One metaclass named ToolboxItemImage and a stereotype which must be named CBM::Bike(UMLPattern). Additionally this stereotype needs an attribute named Icon with an Initial Value containing the file name of the icon (here we will be using the bikeRaw icon from the resources).
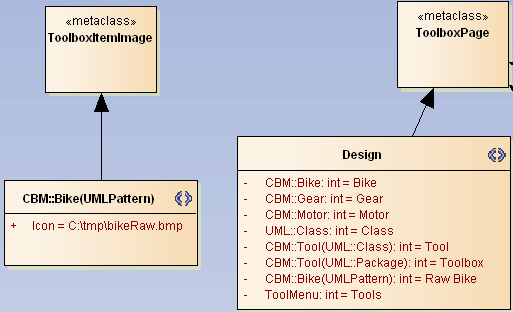
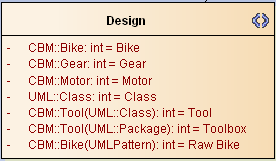
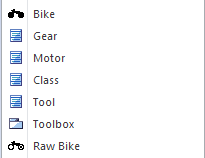
Finally when the MDG is regenerated the Design toolbox looks like this:
7.8 Adding Searches
If you have created custom searches29 that you want to distribute with your MDG you can simply do that during the MDG generation. You just need to tick the Searches option
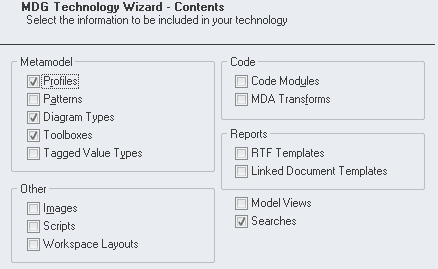
and in the course of the generation process you will be prompted which of your custom searches to include. With the new MDG the Find dropdown will have an entry for your MDG where the included searches are present.

There are a couple of further entries besides the searches. Here’s a short walk-through:
Tagged Value Types
With this option you can define TVs you may add to arbitrary elements. Usually you will define drop down lists or RefGUIDs that link to your stereotypes. But there is another use yet. When you look at the Paper stereotype you find that once you create such an element the TV date will be a plain string. This can be made a calendar drop down by adding a Default TV Type named date and setting the Detail to Type=Date;.

When you include that in the newly generated MDG you will find that the TV date in a Paper now has turned into a calendar drop down.
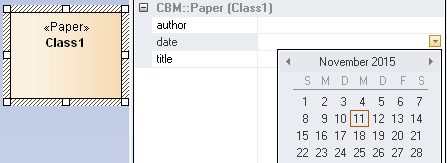
Well, EA will now turn all TVs in your MDG that are named date into calendar drop downs. Probably not the most elegant way but if you know that it works this way it’s somehow viable.
And more
The remaining options during MDG generation will in parts be too broad to be covered in detail. So I will just list the options with a short explanation of their use.
Images- From the images imported via
Project/Settings/Imagesyou can select those to be part of the MDG. They will then be shown in the latter dialog as originating from the MDG. And of course you can use them for theAppearance/Select Alternate Image...option of elements. Scripts- Any script you created locally can be included. These scripts will then appear under a group named after the MDG.
Workspace Layouts- If you need to supply some common workspace layouts with your MDG you can setup individual sets in your MDG repository. Once exported these working sets will appear under
View/Perspectives/Workspaces30. Here the entry has theTypeTechnology and as name <profileID>::<workspaceName>.
Code Modules- Here you can include either modified code templates for a language and/or that of a language defined especially four your needs.
MDA Transforms- This is used to export transformations defined in
Package/Model Transformation (MDA)/MDA Transformation Templates... RTF Templates- Your RTF templates defined with Documentation/Generate Documentation (F8)/Templates can be included in the MDG.
Linked Document Templates- In the
View/Resources/Linked Document Templates/Modelyou can create templates from the context menu. These can then be included in the MDG. Model Views- Model views which have been defined with
View/Model Viewscan be included here.
7.9 Tag Grouping
Once you got the idea of adding TVs to your stereotypes you eventually see the need to add more and more and all of a sudden you have so many that you loose track. A good way to overcome that situation is by grouping TVs. These groups can be defined individually per stereotype but also in a way that influences multiple stereotypes.
As an example we start introducing groups for the Bike which we name Base Element, Purchase and Other. This is done by adding an attribute _tagGroups to the metaclass which is extended by Bike and assigning it the Initial Value
Base Element,Purchase,Other
which is simply a comma separated list. The next step is to define which TVs belong to which group. The names in this relation list can come from more than one stereotype. E.g. we will define a TV _tagGroupings with an Initial Value of
priority=Base Element;state=Base Element;delay=Purchase;vip=Other;
That means that a TV named priority in any stereotype extending this metaclass will appear in the group Base Element, etc.
Next we need to tell which of the groups shall appear expanded or collapsed. This is done with the attribute _tagGroupStates where we assign
Base Element=open;Purchase=open;Other=closed
So the first two groups will appear expanded while the last is collapsed. Finally we will put two (sic!) TVs into Bike, namely priority and vip.
Once you saved the profile and re-generated the MDG a newly created Bike will appear as this:

The TV vip will be unhidden once you click the plus-symbol near Other. The group Purchase is empty as the Bike does not have any TVs defined in this group.
I leave it to you to extend this metaclass by another stereotype. E.g. you can use Frame and move it’s extension around to this metaclass. Then you can add a delay TV (from the _tagGroupings above). In that case a newly created Frame would show the delay TV in the group Purchase.