Part 1: Just the basics
Without going much into advanced aspects, such as applying TDD to object-oriented systems where multiple objects collaborate (which is a topic of part 2), I introduce the basic TDD philosophy and practices. In terms of design, most of the examples will be about methods of a single object being exercised. The goal is to focus on the core of TDD before going into its specific applications and to slowly introduce some concepts in an easy to grasp manner.
After reading part 1, you will be able to effectively develop classes that have no dependencies on other classes (and on operating system resources) using TDD.
Motivation – the first step to learning TDD
I’m writing this book because I’m an enthusiast of Test-Driven Development (TDD). I believe that TDD is a major improvement over other software development methodologies that I have used to deliver quality software. I also believe that this is true not only for me, but for many other software developers. This raises the question: why don’t more people learn and use TDD as their software delivery method of choice? In my professional life, I haven’t seen the adoption rate to be high enough to justify the claim that TDD is now mainstream.
I have to respect you for deciding to pick up a book, rather than building your understanding of TDD on the foundation of urban legends and your imagination. I am honored and happy that you chose this one, no matter if this is your first book on TDD or one of many you have opened up in your learning endeavors. As much as I hope you will read this book from cover to cover, I am aware that this doesn’t always happen. That makes me want to ask you an important question that may help you decide whether you want to read on: why do you want to learn TDD?
By questioning your motivation, I’m not trying to discourage you from reading this book. Rather, I’d like you to reconsider the goal you want to achieve by reading it. Over time, I have noticed that some of us (myself included) may think we need to learn something (as opposed to wanting to learn something) for various reasons, such as getting a promotion at work, gaining a certificate, adding something to our CV, or just “staying up to date” with recent hypes. Unfortunately, my observation is that Test-Driven Development tends to fall into this category for many people. Such motivation may be difficult to sustain over the long term.
Another source of motivation may be imagining TDD as something it is not. Some of us may only have a vague knowledge of what the real costs and benefits of TDD are. Knowing that TDD is valued and praised by others, we may conclude that it has to be good for us as well. We may have a vague understanding of the reasons, such as “the code will be more tested” for example. As we don’t know the real “why” of TDD, we may make up some reasons to practice test-first development, like “to ensure tests are written for everything”. Don’t get me wrong, these statements might be partially true, but they miss a lot of the essence of TDD. If TDD does not bring the benefits we imagine it might bring, disappointment may creep in. I have heard such disappointed practitioners saying “I don’t need TDD, because I need tests that give me confidence on a broader scope” or “Why do I need unit tests1 when I already have integration tests, smoke tests, sanity tests, exploration tests, etc…?” Many times, I have seen TDD abandoned before it is even understood.
Is learning TDD a high priority for you? Are you determined to try it out and learn it? If you’re not, hey, I heard the new series of Game of Thrones is on TV, why don’t you check it out instead? Okay, I’m just teasing, but as some say, TDD is “easy to learn, hard to master”2, so without some grit to move on, it will be difficult. Especially since I plan to introduce the content slowly and gradually so that you can get a better explanation of some of the practices and techniques.
What TDD feels like
My brother and I liked to play video games in our childhood – one of the most memorable being Tekken 3 – a Japanese tournament beat’em up for Sony Playstation. Beating the game with all the warriors and unlocking all hidden bonuses, mini-games, etc. took about a day. Some could say the game had nothing to offer since then. Why is it then that we spent more than a year on it?
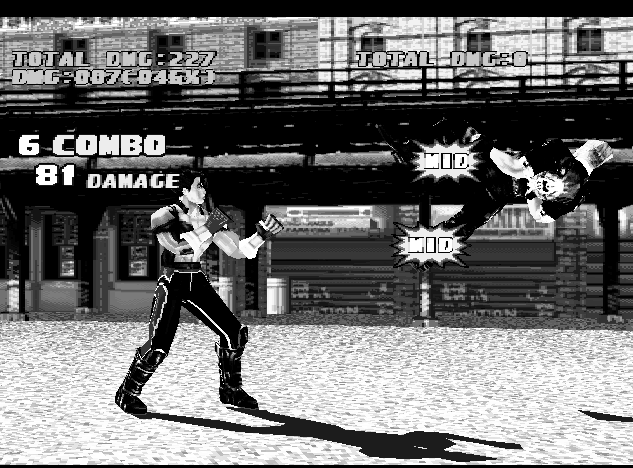
It is because each fighter in the game had a lot of combos, kicks, and punches that could be mixed in a variety of ways. Some of them were only usable in certain situations, others were something I could throw at my opponent almost anytime without a big risk of being exposed to counterattacks. I could side-step to evade enemy’s attacks and, most of all, I could kick another fighter up in the air where they could not block my attacks and I was able to land some nice attacks on them before they fell. These in-the-air techniques were called “juggles”. Some magazines published lists of new juggles each month and the hype has stayed in the gaming community for well over a year.
Yes, Tekken was easy to learn – I could put one hour into training the core moves of a character and then be able to “use” this character, but I knew that what would make me a great fighter was the experience and knowledge on which techniques were risky and which were not, which ones could be used in which situations, which ones, if used one after another, gave the opponent little chance to counterattack, etc. No wonder that soon many tournaments sprang, where players could clash for glory, fame, and rewards. Even today, you can watch some of those old matches on youtube.
TDD is like Tekken. You probably heard the mantra “red-green-refactor” or the general advice “write your test first, then the code”, maybe you even did some experiments on your own where you were trying to implement a bubble-sort algorithm or other simple stuff by starting with a test. But that is all like practicing Tekken by trying out each move on its own on a dummy opponent, without the context of real-world issues that make the fight challenging. And while I think such exercises are very useful (in fact, I do a lot of them), I find an immense benefit in understanding the bigger picture of real-world TDD usage as well.
Some people I talk to about TDD sum up what I say to them as, “This is demotivating – there are so many things I have to watch out for, that it makes me never want to start!”. Easy, don’t panic – remember the first time you tried to ride a bike – you might have been far back then from knowing traffic regulations and following road signs, but that didn’t keep you away, did it?
I find TDD very exciting and it makes me excited about writing code as well. Some guys of my age already think they know all about coding, are bored with it and cannot wait until they move to management or requirements or business analysis, but hey! I have a new set of techniques that makes my coding career challenging again! And it is a skill that I can apply to many different technologies and languages, making me a better developer overall! Isn’t that something worth aiming for?
Let’s get it started!
In this chapter, I tried to provoke you to rethink your attitude and motivation. If you are still determined to learn TDD with me by reading this book, which I hope you are, then let’s get to work!
The essential tools
Ever watched Karate Kid, either the old version or the new one? The thing they have in common is that when the “kid” starts learning karate (or kung-fu) from his master, he is given a basic, repetitive task (like taking off a jacket and putting it on again), not knowing yet where it would lead him. Or look at the first Rocky film (yeah, the one starring Sylvester Stallone), where Rocky chases a chicken to train agility.
When I first tried to learn how to play guitar, I found two pieces of advice on the web: the first was to start by mastering a single, difficult song. The second was to play with a single string, learn how to make it sound in different ways and try to play some melodies by ear just with this one string. Do I have to tell you that the second piece of advice worked better?
Honestly, I could dive right into the core techniques of TDD, but I feel this would be like putting you on a ring with a demanding opponent – you would most probably be discouraged before gaining the necessary skills. So, instead of explaining how to win a race, in this chapter we will take a look at what shiny cars we will be driving.
In other words, I will give you a brief tour of the three tools we will use throughout this book.
In this chapter, I will oversimplify some things just to get you up and running without getting into the philosophy of TDD yet (think: physics lessons in primary school). Don’t worry about it :-), I will make up for it in the coming chapters!
Test framework
The first tool we’ll use is a test framework. A test framework allows us to specify and execute our tests.
Let’s assume for the sake of this introduction that we have an application that accepts two numbers from the command line, multiplies them and prints the result on the console. The code is pretty straightforward:
 1 public static void Main(string[] args)
 2 {
 3   try
 4   {
 5     int firstNumber = Int32.Parse(args[0]);
 6     int secondNumber = Int32.Parse(args[1]);
 7
 8     var result =
 9       new Multiplication(firstNumber, secondNumber).Perform();
10
11     Console.WriteLine("Result is: " + result);
12   }
13   catch(Exception e)
14   {
15     Console.WriteLine("Multiplication failed because of: " + e);
16   }
17 }
Now, let’s assume we want to check whether this application produces correct results. The most obvious way would be to invoke it from the command line manually with some exemplary arguments, then check the output to the console and compare it with what we expected to see. Such testing session could look like this:
1 C:\MultiplicationApp\MultiplicationApp.exe 3 7
2 21
3 C:\MultiplicationApp\
As you can see, our application produces a result of 21 for the multiplication of 3 by 7. This is correct, so we assume the application has passed the test.
Now, what if the application also performed addition, subtraction, division, calculus, etc.? How many times would we have to invoke the application manually to make sure every operation works correctly? Wouldn’t that be time-consuming? But wait, we are programmers, right? So we can write programs to do the testing for us! For example, here is a source code of a program that uses the Multiplication class, but in a slightly different way than the original application:
 1 public static void Main(string[] args)
 2 {
 3   var multiplication = new Multiplication(3,7);
 4
 5   var result = multiplication.Perform();
 6
 7   if(result != 21)
 8   {
 9     throw new Exception("Failed! Expected: 21 but was: " + result);
10   }
11 }
It looks simple, isn’t it? Now, let’s use this code as a basis to build a very primitive test framework, just to show the pieces that such frameworks consist of. As a step in that direction, we can extract the verification of the result into a reusable method – after all, we will be adding division in a second, remember? So here goes:
 1 public static void Main(string[] args)
 2 {
 3   var multiplication = new Multiplication(3,7);
 4
 5   var result = multiplication.Perform();
 6
 7   AssertTwoIntegersAreEqual(expected: 21, actual: result);
 8 }
 9
10 //extracted code:
11 public static void AssertTwoIntegersAreEqual(
12   int expected, int actual)
13 {
14   if(actual != expected)
15   {
16     throw new Exception(
17       "Failed! Expected: "
18         + expected + " but was: " + actual);
19   }
20 }
Note that I started the name of this extracted method with “Assert” – we will get back to the naming soon, for now just assume that this is a good name for a method that verifies that a result matches our expectation. Let’s take one last round and extract the test itself so that its code is in a separate method. This method can be given a name that describes what the test is about:
 1 public static void Main(string[] args)
 2 {
 3   Multiplication_ShouldResultInAMultiplicationOfTwoPassedNumbers();
 4 }
 5
 6 public void
 7 Multiplication_ShouldResultInAMultiplicationOfTwoPassedNumbers()
 8 {
 9   //Assuming...
10   var multiplication = new Multiplication(3,7);
11
12   //when this happens:
13   var result = multiplication.Perform();
14
15   //then the result should be...
16   AssertTwoIntegersAreEqual(expected: 21, actual: result);
17 }
18
19 public static void AssertTwoIntegersAreEqual(
20   int expected, int actual)
21 {
22   if(actual != expected)
23   {
24     throw new Exception(
25     "Failed! Expected: " + expected + " but was: " + actual);
26   }
27 }
And we’re done. Now if we need another test, e.g. for division, we can just add a new method call to the Main() method and implement it. Inside this new test, we can reuse the AssertTwoIntegersAreEqual() method, since the check for division would also be about comparing two integer values.
As you see, we can easily write automated checks like this, using our primitive methods. However, this approach has some disadvantages:
- Every time we add a new test, we have to update the
Main()method with a call to the new test. If we forget to add such a call, the test will never be run. At first, it isn’t a big deal, but as soon as we have dozens of tests, an omission will become hard to notice. - Imagine your system consists of more than one application – you would have some problems trying to gather summary results for all of the applications that your system consists of.
- Soon you’ll need to write a lot of other methods similar to
AssertTwoIntegersAreEqual()– the one we already have compares two integers for equality, but what if we wanted to check a different condition, e.g. that one integer is greater than another? What if we wanted to check the equality not for integers, but characters, strings, floats, etc.? What if we wanted to check some conditions on collections, e.g. that a collection is sorted or that all items in the collection are unique? - Given a test fails, it would be hard to navigate from the command line output to the corresponding line of the source in your IDE. Wouldn’t it be easier if you could click on the error message to take you immediately to the code where the failure occurred?
For these and other reasons, advanced automated test frameworks were created such as CppUnit (for C++), JUnit (for Java) or NUnit (C#). Such frameworks are in principle based on the very idea that I sketched above, plus they make up for the deficiencies of our primitive approach. They derive their structure and functionality from Smalltalk’s SUnit and are collectively referred to as xUnit family of test frameworks.
To be honest, I can’t wait to show you how the test we just wrote looks like when a test framework is used. But first, let’s recap what we’ve got in our straightforward approach to writing automated tests and introduce some terminology that will help us understand how automated test frameworks solve our issues:
- The
Main()method serves as a Test List – a place where it is decided which tests to run. - The
Multiplication_ShouldResultInAMultiplicationOfTwoPassedNumbers()method is a Test Method. - The
AssertTwoIntegersAreEqual()method is an Assertion – a condition that, when not met, ends a test with failure.
To our joy, those three elements are present as well when we use a test framework. Moreover, they are far more advanced than what we have. To illustrate this, here is (finally!) the same test we wrote above, now using the xUnit.Net test framework:
 1 [Fact] public void
 2 Multiplication_ShouldResultInAMultiplicationOfTwoPassedNumbers()
 3 {
 4   //Assuming...
 5   var multiplication = new Multiplication(3,7);
 6
 7   //when this happens:
 8   var result = multiplication.Perform();
 9
10   //then the result should be...
11   Assert.Equal(21, result);
12 }
Looking at the example, we can see that the test method itself is the only thing that’s left – the two methods (the test list and assertion) that we previously had are gone now. Well, to tell you the truth, they are not literally gone – it’s just that the test framework offers far better replacements, so we used them instead. Let’s reiterate the three elements of the previous version of the test that I promised would be present after the transition to the test framework:
- The Test List is now created automatically by the framework from all methods marked with a
[Fact]attribute. There’s no need to maintain one or more central lists anymore, so theMain()method is no more. - The Test Method is present and looks almost the same as before.
- The Assertion takes the form of a call to the static
Assert.Equal()method – the xUnit.NET framework is bundled with a wide range of assertion methods, so I used one of them. Of course, no one stops you from writing your custom assertion if the built-in assertion methods don’t offer what you are looking for.
Phew, I hope I made the transition quite painless for you. Now the last thing to add – as there is no Main() method anymore in the last example, you surely must wonder how we run those tests, right? Ok, the last big secret unveiled – we use an external application for this (we will refer to it using the term Test Runner) – we tell it which assemblies to run and then it loads them, runs them, reports the results, etc. A Test Runner can take various forms, e.g. it can be a console application, a GUI application or a plugin for an IDE. Here is an example of a test runner provided by a plugin for Visual Studio IDE called Resharper:
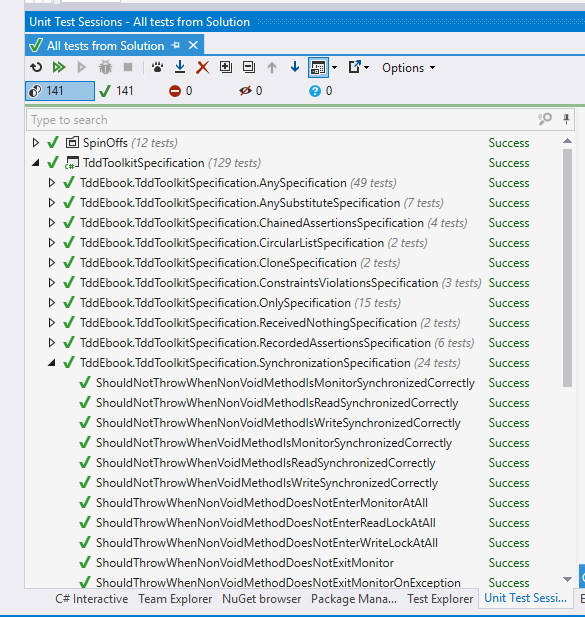
Mocking framework
When we want to test a class that depends on other classes, we may think it’s a good idea to include those classes in the test as well. This, however, does not allow us to test a single object or a small cluster of objects in isolation, where we would be able to verify that just a small part of the application works correctly. Thankfully, if we make our classes depend on interfaces rather than other classes, we can easily implement those interfaces with special “fake” classes that can be crafted in a way that makes our testing easier. For example, objects of such classes may contain pre-programmed return values for some methods. They can also record the methods that are invoked on them and allow the test to verify whether the communication between our object under test and its dependencies is correct.
Nowadays, we can rely on tools to generate such a “fake” implementation of a given interface for us and let us use this generated implementation in place of a real object in tests. This happens in a different way, depending on a language. Sometimes, the interface implementations can be generated at runtime (like in Java or C#), sometimes we have to rely more on compile-time generation (e.g. in C++).
Narrowing it down to C# – a mocking framework is just that – a mechanism that allows us to create objects (called “mock objects” or just “mocks”), that adhere to a certain interface, at runtime. It works like this: the type of the interface we want to have implemented is usually passed to a special method which returns a mock object based on that interface (we’ll see an example in a few seconds). Aside from the creation of mock objects, such a framework provides an API to configure the mocks on how they behave when certain methods are called on them and allows us to inspect which calls they received. This is a very powerful feature, because we can simulate or verify conditions that would be difficult to achieve or observe using only production code. Mocking frameworks are not as old as test frameworks so they haven’t been used in TDD since the very beginning.
I’ll give you a quick example of a mocking framework in action now and defer further explanation of their purpose to later chapters, as the full description of mocks and their place in TDD is not so easy to convey.
Let’s pretend that we have a class that allows placing orders and then puts these orders into a database (using an implementation of an interface called OrderDatabase). Besides, it handles any exception that may occur, by writing it into a log. The class itself does not do any important stuff, but let’s try to imagine hard that this is some serious domain logic. Here’s the code for this class:
 1 public class OrderProcessing
 2 {
 3   OrderDatabase _orderDatabase; //OrderDatabase is an interface
 4   Log _log;
 5
 6   //we get the database object  from outside the class:
 7   public OrderProcessing(
 8     OrderDatabase database,
 9     Log log)
10   {
11     _orderDatabase = database;
12     _log = log;
13   }
14
15   //other code...
16
17   public void Place(Order order)
18   {
19     try
20     {
21       _orderDatabase.Insert(order);
22     }
23     catch(Exception e)
24     {
25       _log.Write("Could not insert an order. Reason: " + e);
26     }
27   }
28
29   //other code...
30 }
Now, imagine we need to test it – how do we do that? I can already see you shake your head and say: “Let’s just create a database connection, invoke the Place() method and see if the record is added properly into the database”. If we did that, the first test would look like this:
 1 [Fact] public void
 2 ShouldInsertNewOrderToDatabaseWhenOrderIsPlaced()
 3 {
 4   //GIVEN
 5   var orderDatabase = new MySqlOrderDatabase(); //uses real database
 6   orderDatabase.Connect();
 7   orderDatabase.Clean(); //clean up after potential previous tests
 8   var orderProcessing = new OrderProcessing(orderDatabase, new FileLog());
 9   var order = new Order(
10     name: "Grzesiek",
11     surname: "Galezowski",
12     product: "Agile Acceptance Testing",
13     date: DateTime.Now,
14     quantity: 1);
15
16   //WHEN
17   orderProcessing.Place(order);
18
19   //THEN
20   var allOrders = orderDatabase.SelectAllOrders();
21   Assert.Contains(order, allOrders);
22 }
At the beginning of the test, we open a connection to the database and clean all existing orders in it (more on that shortly), then create an order object, insert it into the database and query the database for all orders it contains. At the end, we assert that the order we tried to insert is among all orders in the database.
Why do we clean up the database at the beginning of the test? Remember that a database provides persistent storage. If we don’t clean it up before executing the logic of this test, the database may already contain the item we are trying to add, e.g. from previous executions of this test. The database might not allow us to add the same item again and the test would fail. Ouch! It hurts so bad, because we wanted our tests to prove something works, but it looks like it can fail even when the logic is coded correctly. Of what use would be such a test if it couldn’t reliably tell us whether the implemented logic is correct or not? So, to make sure that the state of the persistent storage is the same every time we run this test, we clean up the database before each run.
Now that the test is ready, did we get what we wanted from it? I would be hesitant to answer “yes”. There are several reasons for that:
- The test will most probably be slow because accessing the database is relatively slow. It is not uncommon to have more than a thousand tests in a suite and I don’t want to wait half an hour for results every time I run them. Do you?
- Everyone who wants to run this test will have to set up a special environment, e.g. a local database on their machine. What if their setup is slightly different from ours? What if the schema gets outdated – will everyone manage to notice it and update the schema of their local databases accordingly? Should we re-run our database creation script only to ensure we have got the latest schema available to run your tests against?
- There may be no implementation of the database engine for the operating system running on our development machine if our target is an exotic or mobile platform.
- Note that the test we wrote is only one out of two. We still have to write another one for the scenario where inserting an order ends with an exception. How do we setup the database in a state where it throws an exception? It is possible, but requires significant effort (e.g. deleting a table and recreating it after the test, for use by other tests that might need it to run correctly), which may lead some to the conclusion that it is not worth writing such tests at all.
Now, let’s try to approach this problem differently. Let’s assume that the MySqlOrderDatabase that queries a real database query is already tested (this is because I don’t want to get into a discussion on testing database queries just yet – we’ll get to it in later chapters) and that the only thing we need to test is the OrderProcessing class (remember, we’re trying to imagine really hard that there is some serious domain logic coded here). In this situation we can leave the MySqlOrderDatabase out of the test and instead create another, fake implementation of the OrderDatabase that acts as if it was a connection to a database but does not write to a real database at all – it only stores the inserted records in a list in memory. The code for such a fake connection could look like this:
 1 public class FakeOrderDatabase : OrderDatabase
 2 {
 3   public Order _receivedArgument;
 4
 5   public void Insert(Order order)
 6   {
 7     _receivedArgument = order;
 8   }
 9
10   public List<Order> SelectAllOrders()
11   {
12     return new List<Order>() { _receivedOrder };
13   }
14 }
Note that the fake order database is an instance of a custom class that implements the same interface as MySqlOrderDatabase. Thus, if we try, we can make the tested code use our fake without knowing.
Let’s replace the real implementation of the order database by the fake instance in the test:
 1 [Fact] public void
 2 ShouldInsertNewOrderToDatabaseWhenOrderIsPlaced()
 3 {
 4   //GIVEN
 5   var orderDatabase = new FakeOrderDatabase();
 6   var orderProcessing = new OrderProcessing(orderDatabase, new FileLog());
 7   var order = new Order(
 8     name: "Grzesiek",
 9     surname: "Galezowski",
10     product: "Agile Acceptance Testing",
11     date: DateTime.Now,
12     quantity: 1);
13
14   //WHEN
15   orderProcessing.Place(order);
16
17   //THEN
18   var allOrders = orderDatabase.SelectAllOrders();
19   Assert.Contains(order, allOrders);
20 }
Note that we do not clean the fake database object as we did with the real database since we create a fresh object each time the test is run and the results are stored in a memory location different for each instance. The test will also be much quicker now because we are not accessing the database anymore. What’s more, we can now easily write a test for the error case. How? Just make another fake class, implemented like this:
 1 public class ExplodingOrderDatabase : OrderDatabase
 2 {
 3   public void Insert(Order order)
 4   {
 5     throw new Exception();
 6   }
 7
 8   public List<Order> SelectAllOrders()
 9   {
10   }
11 }
Ok, so far so good, but now we have two classes of fake objects to maintain (and chances are we will need even more). Any method added to the OrderDatabase interface must also be added to each of these fake classes. We can spare some coding by making our mocks a bit more generic so that their behavior can be configured using lambda expressions:
 1 public class ConfigurableOrderDatabase : OrderDatabase
 2 {
 3   public Action<Order> doWhenInsertCalled;
 4   public Func<List<Order>> doWhenSelectAllOrdersCalled;
 5
 6   public void Insert(Order order)
 7   {
 8     doWhenInsertCalled(order);
 9   }
10
11   public List<Order> SelectAllOrders()
12   {
13     return doWhenSelectAllOrdersCalled();
14   }
15 }
Now, we don’t have to create additional classes for new scenarios, but our syntax becomes awkward. Here’s how we configure the fake order database to remember and yield the inserted order:
1 var db = new ConfigurableOrderDatabase();
2 Order gotOrder = null;
3 db.doWhenInsertCalled = o => {gotOrder = o;};
4 db.doWhenSelectAllOrdersCalled = () => new List<Order>() { gotOrder };
And if we want it to throw an exception when anything is inserted:
1 var db = new ConfigurableOrderDatabase();
2 db.doWhenInsertCalled = o => {throw new Exception();};
Thankfully, some smart programmers created libraries that provide further automation in such scenarios. One such a library is NSubstitute. It provides an API in a form of C# extension methods, which is why it might seem a bit magical at first, especially if you’re not familiar with C#. Don’t worry, you’ll get used to it.
Using NSubstitute, our first test can be rewritten as:
 1 [Fact] public void
 2 ShouldInsertNewOrderToDatabaseWhenOrderisPlaced()
 3 {
 4   //GIVEN
 5   var orderDatabase = Substitute.For<OrderDatabase>();
 6   var orderProcessing = new OrderProcessing(orderDatabase, new FileLog());
 7   var order = new Order(
 8     name: "Grzesiek",
 9     surname: "Galezowski",
10     product: "Agile Acceptance Testing",
11     date: DateTime.Now,
12     quantity: 1);
13
14   //WHEN
15   orderProcessing.Place(order);
16
17   //THEN
18   orderDatabase.Received(1).Insert(order);
19 }
Note that we don’t need the SelectAllOrders() method on the database connection interface anymore. It was there only to make writing the test easier – no production code used it. We can delete the method and get rid of some more maintenance trouble. Instead of the call to SelectAllOrders(), mocks created by NSubstitute record all calls received and allow us to use a special method called Received() on them (see the last line of this test), which is actually a camouflaged assertion that checks whether the Insert() method was called with the order object as parameter.
This explanation of mock objects is very shallow and its purpose is only to get you up and running. We’ll get back to mocks later as we’ve only scratched the surface here.
Anonymous values generator
Looking at the test data in the previous section we see that many values are specified literally, e.g. in the following code:
1 var order = new Order(
2   name: "Grzesiek",
3   surname: "Galezowski",
4   product: "Agile Acceptance Testing",
5   date: DateTime.Now,
6   quantity: 1);
the name, surname, product, date, and quantity are very specific. This might suggest that the exact values are important from the perspective of the behavior we are testing. On the other hand, when we look at the tested code again:
 1 public void Place(Order order)
 2 {
 3   try
 4   {
 5     this.orderDatabase.Insert(order);
 6   }
 7   catch(Exception e)
 8   {
 9     this.log.Write("Could not insert an order. Reason: " + e);
10   }
11 }
we can spot that these values are not used anywhere – the tested class does not use or check them in any way. These values are important from the database point of view, but we already took the real database out of the picture. Doesn’t it trouble you that we fill the order object with so many values that are irrelevant to the test logic itself and that clutter the structure of the test with needless details? To remove this clutter let’s introduce a method with a descriptive name to create the order and hide the details we don’t need from the reader of the test:
 1 [Fact] public void
 2 ShouldInsertNewOrderToDatabase()
 3 {
 4   //GIVEN
 5   var orderDatabase = Substitute.For<OrderDatabase>();
 6   var orderProcessing = new OrderProcessing(orderDatabase, new FileLog());
 7   var order = AnonymousOrder();
 8
 9   //WHEN
10   orderProcessing.Place(order);
11
12   //THEN
13   orderDatabase.Received(1).Insert(order);
14 }
15
16 public Order AnonymousOrder()
17 {
18   return new Order(
19     name: "Grzesiek",
20     surname: "Galezowski",
21     product: "Agile Acceptance Testing",
22     date: DateTime.Now,
23     quantity: 1);
24 }
Now, that’s better. Not only did we make the test shorter, we also provided a hint to the reader that the actual values used to create an order don’t matter from the perspective of tested order-processing logic. Hence the name AnonymousOrder().
By the way, wouldn’t it be nice if we didn’t have to provide the anonymous objects ourselves, but could rely on another library to generate these for us? Surprise, surprise, there is one! It’s called Autofixture. It is an example of a so-called anonymous values generator (although its creator likes to say that it is also an implementation of the Test Data Builder pattern, but let’s skip this discussion here).
After changing our test to use AutoFixture, we arrive at the following:
 1 private Fixture any = new Fixture();
 2
 3 [Fact] public void
 4 ShouldInsertNewOrderToDatabase()
 5 {
 6   //GIVEN
 7   var orderDatabase = Substitute.For<OrderDatabase>();
 8   var orderProcessing = new OrderProcessing(orderDatabase, new FileLog());
 9   var order = any.Create<Order>();
10
11   //WHEN
12   orderProcessing.Place(order);
13
14   //THEN
15   orderDatabase.Received(1).Insert(order);
16 }
In this test, we use an instance of a Fixture class (which is a part of AutoFixture) to create anonymous values for us via a method called Create(). This allows us to remove the AnonymousOrder() method, thus making our test setup shorter.
Nice, huh? AutoFixture has a lot of advanced features, but to keep things simple I like to hide its use behind a static class called Any. The simplest implementation of such class would look like this:
1 public static class Any
2 {
3   private static any = new Fixture();
4
5   public static T Instance<T>()
6   {
7     return any.Create<T>();
8   }
9 }
In the next chapters, we’ll see many different methods from the Any type, plus the full explanation of the philosophy behind it. The more you use this class, the more it grows with other methods for creating customized objects.
Summary
This chapter introduced the three tools we’ll use in this book that, when mastered, will make your test-driven development flow smoother. If this chapter leaves you with insufficient justification for their use, don’t worry – we will dive into the philosophy behind them in the coming chapters. For now, I just want you to get familiar with the tools themselves and their syntax. Go on, download these tools, launch them, try to write something simple with them. You don’t need to understand their full purpose yet, just go out and play :-).
It’s not (only) a test
Is the role of a test only to “verify” or “check” whether a piece of software works? Surely, this is a significant part of its runtime value, i.e. the value that we get when we execute the test. However, when we limit our perspective on tests only to this, it could lead us to a conclusion that the only thing that is valuable about having a test is to be able to execute it and view the result. Such acts as designing a test or implementing a test would only have the value of producing something we can run. Reading a test would only have value when debugging. Is this really true?
In this chapter, I argue that the acts of designing, implementing, compiling and reading a test are all very valuable activities. And they let us treat tests as something more than just “automated checks”.
When a test becomes something more
I studied in Łódź, a large city in the center of Poland. As probably all other students in all other countries, we have had lectures, exercises and exams. The exams were pretty difficult. As my computer science group was on the faculty of electronic and electric engineering, we had to grasp a lot of classes that didn’t have anything to do with programming. For instance: electrotechnics, solid-state physics or electronic and electrical metrology.
Knowing that exams were difficult and that it was hard to learn everything during the semester, the lecturers would sometimes give us exemplary exams from previous years. The questions were different from the actual exams that we were to take, but the structure and kinds of questions asked (practice vs. theory etc.) were similar. We would usually get these exemplary questions before we started learning really hard (which was usually at the end of a semester). Guess what happened then? As you might suspect, we did not use the tests we received just to “verify” or “check” our knowledge after we finished learning. Quite the contrary – examining those tests was the very first step of our preparation. Why was that so? What use were the tests when we knew we wouldn’t know most of the answers?
I guess my lecturers would disagree with me, but I find it quite amusing that what we were really doing back then was similar to “lean software development”. Lean is a philosophy where, among other things, there is a rigorous emphasis on eliminating waste. Every feature or product that is produced but is not needed by anyone, is considered a waste. That’s because if something is not needed, there is no reason to assume it will ever be needed. In that case, the entire feature or product adds no value. Even if it ever will be needed, it very likely will require rework to fit the customer’s needs at that time. In such a case, the work that went into the parts of the original solution that had to be reworked is a waste – it had a cost, but brought no benefit (I am not talking about such things as customer demos, but finished, polished features or products).
So, to eliminate waste, we usually try to “pull features from demand” instead of “pushing them” into a product, hoping they can become useful one day. In other words, every feature is there to satisfy a concrete need. If not, the effort is considered wasted and the money drowned.
Going back to the exams example, why can the approach of first looking through the exemplary tests be considered “lean”? That’s because, when we treat passing an exam as our goal, then everything that does not put us closer to this goal is considered wasteful. Let’s suppose the exam concerns theory only – why then practice the exercises? It would probably pay off a lot more to study the theoretical side of the topics. Such knowledge could be obtained from those exemplary tests. So, the tests were a kind of specification of what was needed to pass the exam. It allowed us to pull the value (i.e. our knowledge) from the demand (information obtained from realistic tests) rather that push it from the implementation (i.e. learning everything in a coursebook chapter after chapter).
So the tests became something more. They proved very valuable before the “implementation” (i.e. learning for the exam) because:
- they helped us focus on what was needed to reach our goal
- they brought our attention away from what was not needed to reach our goal
That was the value of a test before learning. Note that the tests we would usually receive were not exactly what we would encounter at the time of the exam, so we still had to guess. Yet, the role of a test as a specification of a need was already visible.
Taking it to the software development land
I chose this lengthy metaphor to show you that a writing a “test” is really another way of specifying a requirement or a need and that it’s not counterintuitive to think about it this way – it occurs in our everyday lives. This is also true in software development. Let’s take the following “test” and see what kind of needs it specifies:
1 var reporting = new ReportingFeature();
2 var anyPowerUser = Any.Of(Users.Admin, Users.Auditor);
3 Assert.True(reporting.CanBePerformedBy(anyPowerUser));
(In this example, we used Any.Of() method that returns any enumeration value from the specified list. Here, we say “give me a value that is either Users.Admin or Users.Auditor”.)
Let’s look at those (only!) three lines of code and imagine that the production code that makes this “test” pass does not exist yet. What can we learn from these three lines about what this production code needs to supply? Count with me:
- We need a reporting feature.
- We need to support the notion of users and privileges.
- We need to support the concept of a power user, who is either an administrator or an auditor.
- Power users need to be allowed to use the reporting feature (note that it does not specify which other users should or should not be able to use this feature – we would need a separate “test” for that).
Also, we are already after the phase of designing an API (because the test is already using it) that will fulfill the need. Don’t you think this is already quite some information about the application functionality from just three lines of code?
A Specification rather than a test suite
I hope you can see now that what we called “a test” can also be seen as a kind of specification. This is also the answer to the question I raised at the beginning of this chapter.
In reality, the role of a test, if written before production code, can be broken down even further:
- designing a scenario – is when we specify our requirements by giving concrete examples of behaviors we expect
- writing the test code – is when we specify an API through which we want to use the code that we are testing
- compiling – is when we get feedback on whether the production code has the classes and methods required by the specification we wrote. If it doesn’t, the compilation will fail.
- execution – is where we get feedback on whether the production code exhibits the behaviors that the specification describes
- reading – is where we use the already written specification to obtain knowledge about the production code.
Thus, the name “test” seems like narrowing down what we are doing here too much. My feeling is that maybe a different name would be better – hence the term specification.
The discovery of the tests’ role as a specification is quite recent and there is no uniform terminology connected to it yet. Some like to call the process of using tests as specifications Specification By Example to say that the tests are examples that help specify and clarify the functionality being developed. Some use the term BDD (Behavior-Driven Development) to emphasize that writing tests is really about analyzing and describing behaviors. Also, you might encounter different names for some particular elements of this approach, for example, a “test” can be referred to as a “spec”, or an “example”, or a “behavior description”, or a “specification statement” or “a fact about the system” (as you already saw in the chapter on tools, the xUnit.NET framework marks each “test” with a [Fact] attribute, suggesting that by writing it, we are stating a single fact about the developed code. By the way, xUnit.NET also allows us to state ‘theories’ about our code, but let’s leave this topic for another time).
Given this variety in terminology, I’d like to make a deal: to be consistent throughout this book, I will establish a naming convention, but leave you with the freedom to follow your own if you so desire. The reason for this naming convention is pedagogical – I am not trying to create a movement to change established terms or to invent a new methodology or anything – I hope that by using this terminology throughout the book, you’ll look at some things differently3. So, let’s agree that for the sake of this book:
- Specification Statement (or simply Statement, with a capital ‘S’)
- will be used instead of the words “test” and “test method”
- Specification (or simply Spec, also with a capital ‘S’)
- will be used instead of the words “test suite” and “test list”
- False Statement
- will be used instead of “failing test”
- True Statement
- will be used instead of “passing test”
From time to time I’ll refer back to the “traditional” terminology, because it is better established and because you may have already heard some other established terms and wonder how they should be understood in the context of thinking of tests as a specification.
The differences between executable and “traditional” specifications
You may be familiar with requirements specifications or design specifications that are written in plain English or another spoken language. However, our Specifications differ from them in several ways. In particular, the kind of Specification that we create by writing tests:
- Is not completely written up-front like many of such “traditional” specs have been written (which doesn’t mean it’s written after the code is done – more on this in the next chapters).
- Is executable – you can run it to see whether the code adheres to the specification or not. This lowers the risk of inaccuracies in the Specification and falling out of sync with the production code.
- Is written in source code rather than in spoken language – which is both good, as the structure and formality of code leave less room for misunderstanding, and challenging, as great care must be taken to keep such specification readable.
Statement-first programming
What’s the point of writing a specification after the fact?
One of the best known thing about TDD is that a failing test for a behavior of a piece of code is written before this behavior is implemented. This concept is often called “test-first development” and seems controversial to many.
In the previous chapter, I said that in TDD a “test” takes an additional role – one of a statement that is part of a specification. If we put it this way, then the whole controversial concept of “writing a test before the code” does not pose a problem at all. Quite the contrary – it only seems natural to specify what we expect from a piece of code to do before we attempt to write it. Does the other way round even make sense? A specification written after completing the implementation is nothing more than an attempt at documenting the existing solution. Sure, such attempts can provide some value when done as a kind of reverse-engineering (i.e. writing the specification for something that was implemented long ago and for which we uncover the previously implicit business rules or policies as we document the existing solution) – it has an excitement of discovery in it, but doing so just after we made all the decisions ourselves doesn’t seem to me like a productive way to spend my time, not to mention that I find it dead boring (you can check whether you’re like me on this one. Try implementing a simple calculator app and then write specification for it just after it is implemented and manually verified to work). Anyway, I hardly find specifying how something should work after it works creative. Maybe that’s the reason why, throughout the years, I have observed the specifications written after a feature is implemented to be much less complete than the ones written before the implementation.
Oh, and did I tell you that without a specification of any kind we don’t know whether we are done implementing our changes or not? This is because, to determine if the change is complete, we need to compare the implemented functionality to “something”, even if this “something” is only in the customer’s head. in TDD, we “compare” it to expectations set by a suite of automated tests.
Another thing I mentioned in the previous chapter is that we approach writing a Specification of executable Statements differently from writing a textual design or requirements specification: even though a behavior is implemented after its Specification is ready, we do not write the Specification entirely up-front. The usual sequence is to specify a bit first and then code a bit, repeating it one Statement at a time. When doing TDD, we are traversing repeatedly through a few phases that make up a cycle. We like these cycles to be short, so that we get feedback early and often. This is essential because it allows us to move forward, confident that what we already have works as we intended. It also enables us to make the next cycle more efficient thanks to the knowledge we gained in the previous cycle (if you don’t believe me that fast feedback matters, ask yourself a question: “how many times a day do I compile the code I’m working on?”).
Reading so much about cycles, it is probably no surprise that the traditional illustration of the TDD process is modeled visually as a circular flow:
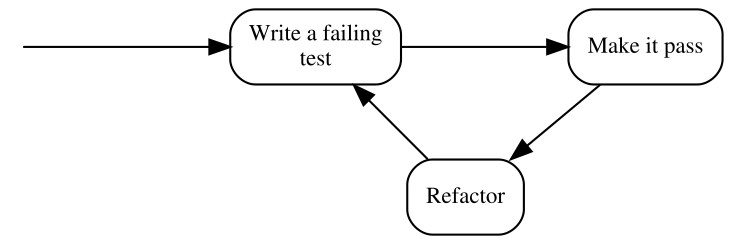
Note that the above form uses the traditional terminology of TDD, so before I explain the steps, here’s a similar illustration that uses our terms of Specification and Statements:
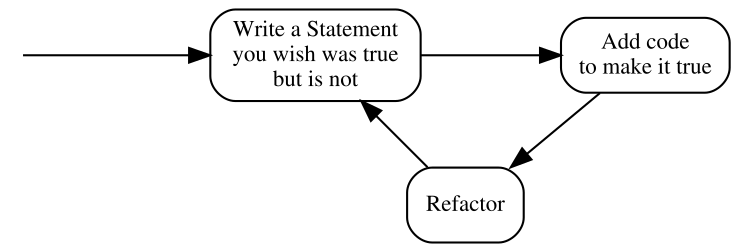
The second version seems more like common sense than the first one – specifying how something should behave before putting that behavior in place is way more intuitive than testing something that does not yet exist.
Anyway, these three steps deserve some explanation. In the coming chapters, I’ll give you some examples of how this process works in practice and introduce an expanded version, but in the meantime, it suffices to say that:
- Write a Statement you wish were true but is not
- means that the Statement evaluates to false. In the test list, it appears as failing, which most xUnit frameworks mark with red color.
- Add code to make it true
- means that we write just enough code to make the Statement true. In the test list, it appears as passing, which most xUnit frameworks mark with green color. Later in the course of the book, you’ll see how little can be “just enough”.
- Refactor
- is a step that I have silently ignored so far and will do so for several more chapters. Don’t worry, we’ll get back to it eventually. For now, it’s important to be aware that the executable Specification can act as a safety net while we are improving the quality of the code without changing its externally visible behavior: by running the Specification often, we quickly discover any mistake we make in the process.
By the way, this process is sometimes referred to as “Red-Green-Refactor”, because of the colors that xUnit tools display for failing and passing test. I am just mentioning it here for the record – I will not be using this term further in the book.
“Test-First” means seeing a failure
Explaining the illustration with the TDD process above, I pointed out that we are supposed to write a Statement that we wish was true but is not. It means that not only do we have to write a Statement before we provide an implementation that makes it true, we also have to evaluate it (i.e. run it) and watch it fail its assertions before we provide the implementation.
Why is it so important? Isn’t it enough to write the Statement first? Why run it and watch it fail? There are several reasons and I will try to outline some of them briefly.
The main reason for writing a Statement and watching it fail is that otherwise, I don’t have any proof that the Statement can ever fail.
Every accurate Statement fails when it isn’t fulfilled and passes when it is. That’s one of the main reasons why we write it – to see this transition from red to green, which means that what previously was not implemented (and we had a proof for that) is now working (and we have a proof). Observing the transition proves that we made progress.
Another thing to note is that, after being fulfilled, the Statement becomes a part of the executable specification and starts failing as soon as the code stops fulfilling it, for example as a result of a mistake made during code refactoring.
Seeing a Statement proven as false gives us valuable feedback. If we run a Statement only after the behavior it describes has been implemented and it is evaluated as true, how do we know whether it accurately describes a need? We never saw it failing, so what proof do we have that it ever will?
The first time I encountered this argument was before I started thinking of tests as an executable specification. “Seriously?” – I thought – “I know what I’m writing. If I make my tests small enough, it is self-evident that I am describing the correct behavior. This is paranoid”. However, life quickly verified my claims and I was forced to withdraw my arguments. Let me describe three of the ways I experienced how one can write a Statement that is always true, whether the code is correct or not. There are more ways, however, I think giving you three should be an illustration enough.
Test-first allowed me to avoid the following situations where Statements cheated me into thinking they were fulfilled even when they shouldn’t be:
1. Accidental omission of including a Statement in a Specification
It’s usually insufficient to just write the code of a Statement – we also have to let the test runner know that a method we wrote is a Statement (not e.g. just a helper method) and it needs to be evaluated, i.e. ran by the runner.
Most xUnit frameworks have some kind of mechanism to mark methods as Statements, whether by using attributes (C#, e.g. [Fact]) or annotations (Java, e.g @Test), or by using macros (C and C++), or by using a naming convention. We have to use such a mechanism to let the runner know that it should execute such methods.
Let’s take xUnit.Net as an example. To turn a method into a Statement in xUnit.Net, we have to mark it with the [Fact] attribute like this:
1 public class CalculatorSpecification
2 {
3   [Fact]
4   public void ShouldDisplayAdditionResultAsSumOfArguments()
5   {
6     //...
7   }
8 }
There is a chance that we forget to decorate a method with the [Fact] attribute – in such a case, this method is never executed by the test runner. However funny it may sound, this is exactly what happened to me several times. Let’s take the above Statement as an example and imagine that we are writing this Statement post-factum as a unit test in an environment that has, let’s say, more than thirty Statements already written and passing. We have written the code and now we are just creating test after test to ensure the code works. Test – pass, test – pass, test – pass. When I execute tests, I almost always run more than one at a time, since it’s easier for me than selecting what to evaluate each time. Besides, I get more confidence this way that I don’t make a mistake and break something that is already working. Let’s imagine we are doing the same here. Then the workflow is really: Test – all pass, test – all pass, test – all pass…
Over time, I have learned to use code snippets mechanism of my IDE to generate a template body for my Statements. Still, in the early days, I have occasionally written something like this:
 1 public class CalculatorSpecification
 2 {
 3   //... some Statements here
 4
 5   //oops... forgot to insert the attribute!
 6   public void ShouldDisplayZeroWhenResetIsPerformed()
 7   {
 8     //...
 9   }
10 }
As you can see, the [Fact] attribute is missing, which means this Statement will not be executed. This has happened not only because of not using code generators – sometimes – to create a new Statement – it made sense to copy-paste an existing Statement, change the name and few lines of code4. I didn’t always remember to include the [Fact] attribute in the copied source code. The compiler was not complaining as well.
The reason I didn’t see my mistake was that I was running more than one test at a time – when I got a green bar (i.e. all Statements proven true), I assumed that the Statement I just wrote works as well. It was unattractive for me to search for each new Statement in the list and make sure it’s there. The more important reason, however, was that the absence of the [Fact] attribute did not disturb my workflow: test – all pass, test – all pass, test – all pass… In other words, my process did not give me any feedback that I made a mistake. So, in such a case, what I end up with is a Statement that not only will never be proven false – it won’t be evaluated at all.
How does treating tests as Statements and evaluating them before making them true help here? The fundamental difference is that the workflow of TDD is: test – fail – pass, test – fail – pass, test – fail – pass… In other words, we expect each Statement to be proven false at least once. So every time we miss the “fail” stage, we get feedback from our process that something suspicious is happening. This allows us to investigate and fix the problem if necessary.
2. Misplacing Statement setup
Ok, this may sound even funnier, but it happened to me a couple of times as well, so I assume it may happen to you one day, especially if you are in a hurry.
Consider the following toy example: we want to validate a simple data structure that models a frame of data that can arrive via a network. The structure looks like this:
1 public class Frame
2 {
3   public int timeSlot;
4 }
and we need to write a Specification for a Validation class that accepts a Frame object as an argument and checks whether the time slot (whatever it is) inside it is correct. The correctness is determined by comparing the time slot to a maximum allowed value specified in a constant called TimeSlot.MaxAllowed (so it’s a constant defined in a TimeSlot class). If the frame time slot is higher than the maximum allowed, it is assumed incorrect and the validation should return false. Otherwise, true should be returned.
Let’s take a look at the following Statement which specifies that setting a value higher than allowed to a field of a frame should make the validation fail:
 1 [Fact]
 2 public void ShouldRecognizeTimeSlotAboveMaximumAllowedAsInvalid()
 3 {
 4   var frame = new Frame();
 5   var validation = new Validation();
 6   var timeSlotAboveMaximumAllowed = TimeSlot.MaxAllowed + 1;
 7   var result = validation.PerformForTimeSlotIn(frame);
 8   frame.timeSlot = timeSlotAboveMaximumAllowed;
 9   Assert.False(result);
10 }
Note how the method PerformForTimeSlotIn(), which triggers the specified behavior, is accidentally called before value of timeSlotAboveMaximumAllowed is set up and thus, this value is not taken into account at the moment when the validation is executed. If, for example, we make a mistake in the implementation of the Validation class so that it returns false for values below the maximum and not above, such mistake may go unnoticed, because the Statement will always be true.
Again, this is a toy example – I just used it as an illustration of something that can happen when dealing with more complex cases.
3. Using static data inside the production code
Once in a while, we have to jump in and add some new Statements to an existing Specification and some logic to the class it describes. Let’s assume that the class and its Specification were written by someone else than us. Imagine the code we are talking about is a wrapper around our product XML configuration file. We decide to write our Statements after applying the changes (“well”, we may say, “we’re all protected by the Specification that is already in place, so we can make our change without the risk of accidentally breaking existing functionality, and then just test our changes and it’s all good…”).
We start coding… done. Now we start writing this new Statement that describes the functionality we just added. After examining the Specification class, we can see that it has a member field like this:
1 public class XmlConfigurationSpecification
2 {
3   XmlConfiguration config = new XmlConfiguration(xmlFixtureString);
4
5   //...
What it does is it sets up an object used by every Statement. So, each Statement uses a config object initialized with the same xmlConfiguration string value. Another quick examination leads us to discover the following content of the xmlFixtureString:
 1 <config>
 2   <section name="General Settings">
 3     <subsection name="Network Related">
 4       <parameter name="IP">192.168.3.2</parameter>
 5       <parameter name="Port">9000</parameter>
 6       <parameter name="Protocol">AHJ-112</parameter>
 7     </subsection>
 8       <subsection name="User Related">
 9       <parameter name="login">Johnny</parameter>
10       <parameter name="Role">Admin</parameter>
11       <parameter name="Password Expiry (days)">30</parameter>
12     </subsection>
13     <!-- and so on and on and on...-->
14   </section>
15 </config>
The string is already pretty large and messy since it contains all information that is required by the existing Statements. Let’s assume we need to write tests for a little corner case that does not need all this crap inside this string. So, we decide to start afresh and create a separate object of the XmlConfiguration class with your own, minimal string. Our Statement begins like this:
1 string customFixture = CreateMyOwnFixtureForThisTestOnly();
2 var configuration = new XmlConfiguration(customFixture);
3 ...
And goes on with the scenario. When we execute it, it passes – cool… not. Ok, what’s wrong with this? At first sight, everything’s OK, until we read the source code of XmlConfiguration class carefully. Inside, we can see, how the XML string is stored:
1 private static string xmlText; //note the static keyword!
It’s a static field, which means that its value is retained between instances. What the…? Well, well, here’s what happened: the author of this class applied a small optimization. He thought: “In this app, the configuration is only modified by members of the support staff and to do it, they have to shut down the system, so, there is no need to read the XML file every time an XmlConfiguration object is created. I can save some CPU cycles and I/O operations by reading it only once when the first object is created. Later objects will just use the same XML!”. Good for him, not so good for us. Why? Because, depending on the order in which the Statements are evaluated, either the original XML string will be used for all Statements or your custom one! Thus the Statements in this Specification may pass or fail for the wrong reason – because they accidentally use the wrong XML.
Starting development from a Statement that we expect to fail may help when such a Statement passes even though the behavior it describes is not implemented yet.
“Test-After” often ends up as “Test-Never”
Consider again the question I already asked in this chapter: did you ever have to write requirements or a design document for something that you already implemented? Was it fun? Was it valuable? Was it creative? As for me, my answer to these questions is no. I observed that the same answer applied to formulating my executable Specification. By observing myself and other developers, I concluded that after we’ve written the code, we have little motivation to specify what we wrote – some of the pieces of code “we can just see are correct”, other pieces “we already saw working” when we compiled and deployed our changes and ran a few manual checks… The design is ready… Specification? Maybe next time… Thus, the Specification may never get to be written at all and if it is written, I often find that it covers most of the main flow of the program, but lacks some Statements saying what should happen in case of errors, etc.
Another reason for ending up not writing the Specification might be time pressure, especially in teams that are not yet mature or not have very strong professional ethics. Many times, I have seen people reacting to pressure by dropping everything besides writing the code that directly implements a feature. Among the things that get dropped are design, requirements and tests. And learning as well. I have seen many times teams that, when under pressure, stopped experimenting and learning and reverted to old “safe” behaviors in a mindset of “saving a sinking ship” and “hoping for the best”. As in such situations, I’ve seen pressure raise as the project approached its deadline or milestone, leaving Specification until the end means that it’s very likely to get dropped, especially in the case when the changes are (to a degree) tested manually later anyway.
On the other hand, when doing TDD (as we will see in the coming chapters) our Specification grows together with the production code, so there is much less temptation to drop it entirely. Moreover, In TDD, a written Specification Statement is not an addition to the code, but rather a reason to write the code. Creating an executable Specification becomes an indispensable part of implementing a feature.
“Test-After” often leads to design rework
I like reading and watching Uncle Bob (Robert C. Martin). One day I was listening to his keynote at Ruby Midwest 2011, called Architecture The Lost Years. At the end, Robert made some digressions, one of them about TDD. He said that writing tests after the code is not TDD and instead called it “a waste of time”.
My initial thought was that the comment was maybe a bit too exaggerated and only about missing all the benefits that starting with a false Statement brings me: the ability to see the Statement fail, the ability to do a clean-sheet analysis, etc. However, now I feel that there’s much more to it, thanks to something I learned from Amir Kolsky and Scott Bain – to be able to write a maintainable Specification for a piece of code, the code must have a high level of testability. We will talk about this quality in part 2 of this book, but for now let’s assume the following simplified definition: the higher testability of a piece of code (e.g. a class), the easier it is to write a Statement for its behavior.
Now, where’s the waste in writing the Specification after the code is written? To find out, let’s compare the Statement-first and code-first approaches. In the Statement-first workflow for new (non-legacy) code, my workflow and approach to testability usually look like this:
- Write a Statement that is false to start with (during this step, detect and correct testability issues even before the production code is written).
- Write code to make the Statement true.
And here’s what I often see programmers do when they write the code first (extra steps marked with strong text):
- Write some production code without considering how it will be tested (after this step, the testability is often suboptimal as it’s usually not being considered at this point).
- Start writing a unit test (this might not seem like an extra step, since it’s also present in the previous approach, but once you reach the step 5, you’ll know what I mean).
- Notice that unit testing the code we wrote is cumbersome and unsustainable and the tests become looking messy as they try to work around the testability issues.
- Decide to improve testability by restructuring the code, e.g. to be able to isolate objects and use techniques such as mock objects.
- Write unit tests (this time it should be easier as the testability of the tested is better).
What is the equivalent of the marked steps in the Statement-first approach? There is none! Doing these things is a waste of time! Sadly, this is a waste I encounter a lot.
Summary
In this chapter, I tried to show you that the choice of when we write our Specification often makes a huge difference and that there are numerous benefits of starting with a Statement. When we consider the Specification as what it really is – not only as a suite of tests that check runtime correctness – then the Statement-first approach becomes less awkward and less counter-intuitive.
Practicing what we have already learned
And now, a taste of things to come!
– Shang Tsung, Mortal Kombat The Movie
The above quote took place just before a fighting scene in which a nameless warrior jumped at Sub-Zero only to be frozen and broken into multiple pieces upon hitting the wall. The scene was not spectacular in terms of fighting technique or length. Also, the nameless guy didn’t even try hard – the only thing he did was to jump only to be hit by a freezing ball, which, by the way, he actually could see coming. It looked a lot like the fight was set up only to showcase Sub-Zero’s freezing ability. Guess what? In this chapter, we’re going to do roughly the same thing – set up a fake, easy scenario just to showcase some of the basic TDD elements!
The previous chapter was filled with a lot of theory and philosophy, don’t you think? I hope you didn’t fall asleep while reading it. To tell you the truth, we need to grasp much more theory until we can write real-world applications using TDD. To compensate for this somehow, I propose we take a side trip from the trail and try what we already learned in a quick and easy example. As we go through the example, you might wonder how on earth could you possibly write real applications the way we will write our simple program. Don’t worry, I will not show you all the tricks yet, so treat it as a “taste of things to come”. In other words, the example will be as close to real-world problems as the fight between Sub-Zero and the nameless ninja was to real martial arts fight, but will show you some of the elements of the TDD process.
Let me tell you a story
Meet Johnny and Benjamin, two developers from Buthig Company. Johnny is quite fluent in programming and Test-Driven Development, while Benjamin is an intern under Johnny’s mentorship and is eager to learn TDD. They are on their way to their customer, Jane, who requested their presence as she wants them to write a small program for her. Along with them, we will see how they interact with the customer and how Benjamin tries to understand the basics of TDD. Like you, Benjamin is a novice so his questions may reflect yours. However, if you find anything explained in not enough detail, do not worry – in the next chapters, we will be expanding on this material.
Act 1: The Car
Johnny: How do you feel about your first assignment?
Benjamin: I am pretty excited! I hope I can learn some of the TDD stuff you promised to teach me.
Johnny: Not only TDD, but we are also gonna use some of the practices associated with a process called Acceptance Test-Driven Development, albeit in a simplified form.
Benjamin: Acceptance Test-Driven Development? What is that?
Johnny: While TDD is usually referred to as a development technique, Acceptance Test-Driven Development (ATDD) is something more of a collaboration method. Both ATDD and TDD have a bit of analysis in them and work very well together as both use the same underlying principles, just on different levels. We will need only a small subset of what ATDD has to offer, so don’t get over-excited.
Benjamin: Sure. Who’s our customer?
Johnny: Her name’s Jane. She runs a small shop nearby and wants us to write an application for her new mobile. You’ll get the chance to meet her in a minute as we’re almost there.
Act 2: The Customer’s Site
Johnny: Hi, Jane, how are you?
Jane: Thanks, I’m fine, how about you?
Johnny: Me too, thanks. Benjamin, this is Jane, our customer. Jane, this is Benjamin, we’ll work together on the task you have for us.
Benjamin: Hi, nice to meet you.
Jane: Hello, nice to meet you too.
Johnny: So, can you tell us a bit about the software you need us to write?
Jane: Sure. Recently, I bought a new smartphone as a replacement for my old one. The thing is, I am really used to the calculator application that ran on my previous phone and I cannot find a counterpart for my current device.
Benjamin: Can’t you just use another calculator app? There are probably plenty of them available to download from the web.
Jane: That’s right. I checked them all and none has the same behavior as the one I have used for my tax calculations. You see, this app was like a right hand to me and it had some nice shortcuts that made my life easier.
Johnny: So you want us to reproduce the application to run on your new device?
Jane: Exactly.
Johnny: Are you aware that apart from the fancy features that you were using we will have to allocate some effort to implement the basics that all the calculators have?
Jane: Sure, I am OK with that. I got used to my calculator application so much that if I use something else for more than a few months, I will have to pay a psychotherapist instead of you guys. Apart from that, writing a calculator app seems like an easy task in my mind, so the cost isn’t going to be overwhelming, right?
Johnny: I think I get it. Let’s get it going then. We will be implementing the functionality incrementally, starting with the most essential features. Which feature of the calculator would you consider the most essential?
Jane: That would be the addition of numbers, I guess.
Johnny: Ok, that will be our target for the first iteration. After the iteration, we will deliver this part of the functionality for you to try out and give us some feedback. However, before we can even deliver the addition feature, we will have to implement displaying digits on the screen as you enter them. Is that correct?
Jane: Yes, I need the display stuff to work as well – it’s a prerequisite for other features, so…
Johnny: Ok then, this is a simple functionality, so let me suggest some user stories as I understand what you already said and you will correct me where I am wrong. Here we go:
- In order to know that the calculator is turned on, As a taxpayer I want to see “0” on the screen as soon as I turn it on.
- In order to see what numbers I am currently operating on, As a taxpayer, I want the calculator to display the values I enter
- In order to calculate the sum of my different incomes, As a taxpayer I want the calculator to enable addition of multiple numbers
What do you think?
Jane: The stories pretty much reflect what I want for the first iteration. I don’t think I have any corrections to make.
Johnny: Now we’ll take each story and collect some examples of how it should work.
Benjamin: Johnny, don’t you think it is obvious enough to proceed with implementation straight away?
Johnny: Trust me, Benjamin, if there is one word I fear most in communication, it is “obvious”. Miscommunication happens most often around things that people consider obvious, simply because other people do not.
Jane: Ok, I’m in. What do I do?
Johnny: Let’s go through the stories one by one and see if we can find some key examples of how the features should work. The first story is…
In order to know that the calculator is turned on, As a taxpayer I want to see “0” on the screen as soon as I turn it on.
Jane: I don’t think there’s much to talk about. If you display “0”, I will be happy. That’s all.
Johnny: Let’s write this example down using a table:
| key sequence | Displayed output | Notes |
|---|---|---|
| N/A | 0 | Initial displayed value |
Benjamin: That makes me wonder… what should happen when I press “0” again at this stage?
Johnny: Good catch, that’s what these examples are for – they make our thinking concrete. As Ken Pugh says5: “Often the complete understanding of a concept does not occur until someone tries to use the concept”. Normally, we would put the “pressing zero multiple times” example on a TODO list and leave it for later, because it’s a part of a different story. However, it looks like we’re done with the current story, so let’s move straight ahead. The next story is about displaying entered digits. How about it, Jane?
Jane: Agree.
Johnny: Benjamin?
Benjamin: Yes, go ahead.
In order to see what numbers I am currently operating on, As a taxpayer, I want the calculator to display the values I enter
Johnny: Let’s begin with the case raised by Benjamin. What should happen when I input “0” multiple times after I only have “0” on the display?
Jane: A single “0” should be displayed, no matter how many times I press “0”.
Johnny: Do you mean this?
| key sequence | Displayed output | Notes |
|---|---|---|
| 0,0,0 | 0 | Zero is a special case – it is displayed only once |
Jane: That’s right. Other than this, the digits should just show on the screen, like this:
| key sequence | Displayed output | Notes |
|---|---|---|
| 1,2,3 | 123 | Entered digits are displayed |
Benjamin: How about this:
| key sequence | Displayed output | Notes |
|---|---|---|
| 1,2,3,4,5,6,7,1,2,3,4,5,6 | 1234567123456? | Entered digits are displayed? |
Jane: Actually, no. My old calculator app has a limit of six digits that I can enter, so it should be:
| key sequence | Displayed output | Notes |
|---|---|---|
| 1,2,3,4,5,6,7,1,2,3,4,5,6 | 123456 | Display limited to six digits |
Johnny: Another good catch, Benjamin!
Benjamin: I think I’m beginning to understand why you like working with examples!
Johnny: Good. Is there anything else, Jane?
Jane: No, that’s pretty much it. Let’s start working on another story.
In order to calculate the sum of my different incomes, As a taxpayer I want the calculator to enable addition of multiple numbers
Johnny: Is the following scenario the only one we have to support?
| key sequence | Displayed output | Notes |
|---|---|---|
| 2,+,3,+,4,= | 9 | Simple addition of numbers |
Jane: This scenario is correct, however, there is also a case when I start with “+” without inputting any number before. This should be treated as adding to zero:
| key sequence | Displayed output | Notes |
|---|---|---|
| +,1,= | 1 | Addition shortcut – treated as 0+1 |
Benjamin: How about when the output is a number longer than six digits limit? Is it OK that we truncate it like this?
| key sequence | Displayed output | Notes |
|---|---|---|
| 9,9,9,9,9,9,+,9,9,9,9,9,9,= | 199999 | Our display is limited to six digits only |
Jane: Sure, I don’t mind. I don’t add such big numbers anyway.
Johnny: There is still one question we missed. Let’s say that I input a number, then press “+” and then another number without asking for result with “=”. What should I see?
Jane: Every time you press “+”, the calculator should consider entering current number finished and overwrite it as soon as you press any other digit:
| key sequence | Displayed output | Notes |
|---|---|---|
| 2,+,3 | 3 | Digits entered after + operator are treated as digits of a new number, the previous one is stored |
Jane: Oh, and asking for the result just after the calculator is turned on should result in “0”.
| key sequence | Displayed output | Notes |
|---|---|---|
| = | 0 | Result key in itself does nothing |
Johnny: Let’s sum up our discoveries:
| key sequence | Displayed output | Notes |
|---|---|---|
| N/A | 0 | Initial displayed value |
| 1,2,3 | 123 | Entered digits are displayed |
| 0,0,0 | 0 | Zero is a special case – it is displayed only once |
| 1,2,3,4,5,6,7 | 123456 | Our display is limited to six digits only |
| 2,+,3 | 3 | Digits entered after + operator are treated as digits of a new number, the previous one is stored |
| = | 0 | Result key in itself does nothing |
| +,1,= | 1 | Addition shortcut – treated as 0+1 |
| 2,+,3,+,4,= | 9 | Simple addition of numbers |
| 9,9,9,9,9,9,+,9,9,9,9,9,9,= | 199999 | Our display is limited to six digits only |
Johnny: The limiting of digits displayed looks like a whole new feature, so I suggest we add it to the backlog and do it in another sprint. In this sprint, we will not handle such a situation at all. How about that, Jane?
Jane: Fine with me. It looks like a lot of work. Nice that we discovered it up-front. For me, the limiting capability seemed so obvious that I didn’t even think it would be worth mentioning.
Johnny: See? That’s why I don’t like the word “obvious”. Jane, we will get back to you if any more questions arise. For now, I think we know enough to implement these three stories for you.
Jane: good luck!
Act 3: Test-Driven Development
Benjamin: Wow, that was cool. Was that Acceptance Test-Driven Development?
Johnny: In a greatly simplified version, yes. The reason I took you with me was to show you the similarities between working with the customer the way we did and working with the code using TDD process. They are both applying the same set of principles, just on different levels.
Benjamin: I’m dying to see it with my own eyes. Shall we start?
Johnny: Sure. If we followed the ATDD process, we would start writing what we call acceptance-level specification. In our case, however, a unit-level specification will be enough. Let’s take the first example:
Statement 1: Calculator should display 0 on creation
| key sequence | Displayed output | Notes |
|---|---|---|
| N/A | 0 | Initial displayed value |
Johnny: Benjamin, try to write the first Statement.
Benjamin: Oh boy, I don’t know how to start.
Johnny: Start by writing the statement in plain English. What should the calculator do?
Benjamin: It should display “0” when I turn the application on.
Johnny: In our case, “turning on” is creating a calculator. Let’s write it down as a method name:
 1 public class CalculatorSpecification
 2 {
 3
 4 [Fact] public void
 5 ShouldDisplay0WhenCreated()
 6 {
 7
 8 }
 9
10 }
Benjamin: Why is the name of the class CalculatorSpecification and the name of the method ShouldDisplay0WhenCreated?
Johnny: It is a naming convention. There are many others, but this is the one that I like. In this convention, the rule is that when you take the name of the class without the Specification part followed by the name of the method, it should form a legit sentence. For instance, if I apply it to what we wrote, it would make a sentence: “Calculator should display 0 when created”.
Benjamin: Ah, I see now. So it’s a statement of behavior, isn’t it?
Johnny: That’s right. Now, the second trick I can sell to you is that if you don’t know what code to start your Statement with, start with the expected result. In our case, we are expecting that the behavior will end up as displaying “0”, right? So let’s just write it in the form of an assertion.
Benjamin: You mean something like this?
 1 public class CalculatorSpecification
 2 {
 3
 4 [Fact] public void
 5 ShouldDisplay0WhenCreated()
 6 {
 7  Assert.Equal("0", displayedResult);
 8 }
 9
10 }
Johnny: Precisely.
Benjamin: But that doesn’t even compile. What use is it?
Johnny: The code not compiling is the feedback that you needed to proceed. While before you didn’t know where to start, now you have a clear goal – make this code compile. Firstly, where do you get the displayed value from?
Benjamin: From the calculator display, of course!
Johnny: Then write down how you get the value from the display.
Benjamin: Like how?
Johnny: Like this:
 1 public class CalculatorSpecification
 2 {
 3
 4 [Fact] public void
 5 ShouldDisplay0WhenCreated()
 6 {
 7  var displayedResult = calculator.Display();
 8
 9  Assert.Equal("0", displayedResult);
10 }
11
12 }
Benjamin: I see. Now the calculator is not created anywhere. I need to create it somewhere now or it will not compile – this is how I know that it’s my next step. Is this how it works?
Johnny: Yes, you are catching on quickly.
Benjamin: Ok then, here goes:
 1 public class CalculatorSpecification
 2 {
 3
 4 [Fact] public void
 5 ShouldDisplay0WhenCreated()
 6 {
 7  var calculator = new Calculator();
 8
 9  var displayedResult = calculator.Display();
10
11  Assert.Equal("0", displayedResult);
12 }
13
14 }
Johnny: Bravo!
Benjamin: The code doesn’t compile yet, because I don’t have the Calculator class defined at all…
Johnny: Sounds like a good reason to create it.
Benjamin: OK.
1 public class Calculator
2 {
3 }
Benjamin: Looks like the Display() method is missing too. I’ll add it.
1 public class Calculator
2 {
3   public string Display()
4   {
5     return "0";
6   }
7 }
Johnny: Hey hey, not so fast!
Benjamin: What?
Johnny: You already provided an implementation of Display() that will make our current Statement true. Remember its name? ShouldDisplay0WhenCreated – and that’s exactly what the code you wrote does. Before we arrive at this point, let’s make sure this Statement can ever be evaluated as false. You won’t achieve this by providing a correct implementation out of the box. So for now, let’s change it to this:
1 public class Calculator
2 {
3   public string Display()
4   {
5     return "Once upon a time in Africa";
6   }
7 }
Johnny: Look, now we can run the Specification and watch that Statement evaluate to false, because it expects “0”, but gets “Once upon a time in Africa”.
Benjamin: Running… Ok, it is false. By the way, do you always use such silly values to make Statements false?
Johnny: Hahaha, no, I just did it to emphasize the point. Normally, I would write return ""; or something similarly simple. Now we can evaluate the Statement and see it turn false. Hence, we’re sure that we have not yet implemented what is required for the Statement to be true.
Benjamin: I think I get it. For now, the Statement shows that we do not have something we need and gives us a reason to add this “thing”. When we do so, this Statement will show that we do have what we need. So what do we do now?
Johnny: Write the simplest thing that makes this Statement true.
Benjamin: like this?
1 public class Calculator
2 {
3   public string Display()
4   {
5     return "0";
6   }
7 }
Johnny: Yes.
Benjamin: But that is not a real implementation. What is the value behind putting in a hardcoded string? The final implementation is not going to be like this for sure!
Johnny: You’re right. The final implementation is most probably going to be different. What we did, however, is still valuable because:
- You’re one step closer to implementing the final solution
- This feeling that this is not the final implementation points you towards writing more Statements. When there are enough Statements to make your implementation complete, it usually means that you have a complete Specification of class behaviors as well.
- If you treat making every Statement true as an achievement, this practice allows you to evolve your code without losing what you already achieved. If by accident you break any of the behaviors you’ve already implemented, the Specification is going to tell you because one of the existing Statements that were previously true will turn false. You can then either fix it or undo your changes using version control and start over from the point where all existing Statements were true.
Benjamin: Ok, so it looks like there are some benefits after all. Still, I’ll have to get used to this way of working.
Johnny: Don’t worry, this approach is an important part of TDD, so you will grasp it in no time. Now, before we go ahead with the next Statement, let’s look at what we already achieved. First, we wrote a Statement that turned out false. Then, we wrote just enough code to make the Statement true. Time for a step called Refactoring. In this step, we will take a look at the Statement and the code and remove duplication. Can you see what is duplicated between the Statement and the code?
Benjamin: both of them contain the literal “0”. The Statement has it here:
1 Assert.Equal("0", displayedResult);
and the implementation here:
1 return "0";
Johnny: Good, let’s eliminate this duplication by introducing a constant called InitialValue. The Statement will now look like this:
1 [Fact] public void
2 ShouldDisplayInitialValueWhenCreated()
3 {
4  var calculator = new Calculator();
5
6  var displayedResult = calculator.Display();
7
8  Assert.Equal(Calculator.InitialValue, displayedResult);
9 }
and the implementation:
1 public class Calculator
2 {
3   public const string InitialValue = "0";
4   public string Display()
5   {
6     return InitialValue;
7   }
8 }
Benjamin: The code looks better and having the “0” constant in one place will make it more maintainable. However, I think the Statement in its current form is weaker than before. I mean, we can change the InitialValue to anything and the Statement will still be true since it does not state that this constant needs to have a value of “0”.
Johnny: That’s right. We need to add it to our TODO list to handle this case. Can you write it down?
Benjamin: Sure. I will write it as “TODO: 0 should be used as an initial value.”
Johnny: Ok. We should handle it now, especially since it’s part of the story we are currently implementing, but I will leave it for later just to show you the power of TODO list in TDD – whatever is on the list, we can forget and get back to when we have nothing better to do. Our next item from the list is this:
Statement 2: Calculator should display entered digits
| key sequence | Displayed output | Notes |
|---|---|---|
| 1,2,3 | 123 | Entered digits are displayed |
Johnny: Benjamin, can you come up with a Statement for this behavior?
Benjamin: I’ll try. Here goes:
 1 [Fact] public void
 2 ShouldDisplayEnteredDigits()
 3 {
 4   var calculator = new Calculator();
 5
 6   calculator.Enter(1);
 7   calculator.Enter(2);
 8   calculator.Enter(3);
 9   var displayedValue = calculator.Display();
10
11   Assert.Equal("123", displayedValue);
12 }
Johnny: I see that you’re learning fast. You got the parts about naming and structuring a Statement right. There’s one thing we will have to work on here though.
Benjamin: What is it?
Johnny: When we talked to Jane, we used examples with real values. These real values were extremely helpful in pinning down the corner cases and uncovering missing scenarios. They were easier to imagine as well, so they were a perfect suit for conversation. If we were automating these examples on the acceptance level, we would use those real values as well. When we write unit-level Statements, however, we use a different technique to get this kind of specification more abstract. First of all, let me enumerate the weaknesses of the approach you just used:
- Making a method
Enter()accept an integer value suggests that one can enter more than one digit at once, e.g.calculator.Enter(123), which is not what we want. We could detect such cases and throw exceptions if the value is outside the 0-9 range, but there are better ways when we know we will only be supporting ten digits (0,1,2,3,4,5,6,7,8,9). - The Statement does not clearly show the relationship between input and output. Of course, in this simple case, it’s pretty self-evident that the sum is a concatenation of entered digits. In general case, however, we don’t want anyone reading our Specification in the future to have to guess such things.
- The name of the Statement suggests that what you wrote is true for any value, while in reality, it’s true only for digits other than “0” since the behavior for “0” is different (no matter how many times we enter “0”, the result is just “0”). There are some good ways to communicate it.
Hence, I propose the following:
 1 [Fact] public void
 2 ShouldDisplayAllEnteredDigitsThatAreNotLeadingZeroes()
 3 {
 4  //GIVEN
 5  var calculator = new Calculator();
 6  var nonZeroDigit = Any.OtherThan(DigitKeys.Zero);
 7  var anyDigit1 = Any.Of<DigitKeys>();
 8  var anyDigit2 = Any.Of<DigitKeys>();
 9
10  //WHEN
11  calculator.Enter(nonZeroDigit);
12  calculator.Enter(anyDigit1);
13  calculator.Enter(anyDigit2);
14
15  //THEN
16  Assert.Equal(
17   string.Format("{0}{1}{2}",
18    (int)nonZeroDigit,
19    (int)anyDigit1,
20    (int)anyDigit2
21   ),
22   calculator.Display()
23  );
24 }
Benjamin: Johnny, I’m lost! Can you explain what’s going on here?
Johnny: Sure, what do you want to know?
Benjamin: For instance, what is this DigitKeys type doing here?
Johnny: It is supposed to be an enumeration (note that it does not exist yet, we just assume that we have it) to hold all the possible digits a user can enter, which are from the range of 0-9. This is to ensure that the user will not write calculator.Enter(123). Instead of allowing our users to enter any number and then detecting errors, we are giving them a choice from among only the valid values.
Benjamin: Now I get it. So how about the Any.OtherThan() and Any.Of()? What do they do?
Johnny: They are methods from a small utility library I’m using when writing unit-level Specifications. Any.OtherThan() returns any value from enumeration besides the one passed as an argument. Hence, the call Any.OtherThan(DigitKeys.Zero) means “any of the values contained in DigitKeys enumeration, but not DigitKeys.Zero”.
The Any.Of() is simpler – it just returns any value in an enumeration.
Note that by saying:
1  var nonZeroDigit = Any.OtherThan(DigitKeys.Zero);
2  var anyDigit1 = Any.Of<DigitKeys>();
3  var anyDigit2 = Any.Of<DigitKeys>();
I specify explicitly, that the first value entered must be other than “0” and that this constraint does not apply to the second digit, the third one and so on.
By the way, this technique of using generated values instead of literals has its own principles and constraints which you have to know to use it effectively. Let’s leave this topic for now and I promise I’ll give you a detailed lecture on it later. Agreed?
Benjamin: You better do, because for now, I feel a bit uneasy with generating the values – it seems like the Statement we are writing is getting less deterministic this way. The last question – what about those weird comments you put in the code? GIVEN? WHEN? THEN?
Johnny: Yes, this is a convention that I use, not only in writing, but in thinking as well. I like to think about every behavior in terms of three elements: assumptions (given), trigger (when) and expected result (then). Using the words, we can summarize the Statement we are writing in the following way: “Given a calculator, when I enter some digits, the first one being non-zero, then they should all be displayed in the order they were entered”. This is also something that I will tell you more about later.
Benjamin: Sure, for now, I need just enough detail to be able to keep going – we can talk about the principles, pros, and cons later. By the way, the following sequence of casts looks a little bit ugly:
1 string.Format("{0}{1}{2}",
2  (int)nonZeroDigit,
3  (int)anyDigit1,
4  (int)anyDigit2
5 )
Johnny: We will get back to it and make it “smarter” in a second after we make this statement true. For now, we need something obvious. Something we know works. Let’s evaluate this Statement. What is the result?
Benjamin: Failed: expected “351”, but was “0”.
Johnny: Good, now let’s write some code to make this Statement true. First, we’re going to introduce an enumeration of digits. This enum will contain the digit we use in the Statement (which is DigitKeys.Zero) and some bogus values:
1 public enum DigitKeys
2 {
3  Zero = 0,
4  TODO1, //TODO - bogus value for now
5  TODO2, //TODO - bogus value for now
6  TODO3, //TODO - bogus value for now
7  TODO4, //TODO - bogus value for now
8 }
Benjamin: What’s with all those bogus values? Shouldn’t we correctly define values for all the digits we support?
Johnny: Nope, not yet. We still don’t have a Statement that would say what digits are supported and which would make us add them, right?
Benjamin: You say you need a Statement for an element to be in an enum?
Johnny: This is a specification we are writing, remember? It should say somewhere which digits we support, shouldn’t it?
Benjamin: It’s difficult to agree with, I mean, I can see the values in the enum, should I test for something when there’s not complexity involved?
Johnny: Again, we’re not only testing but also we’re specifying. I will try to give you more arguments later. For now, just bear with me and note that when we get to specify the enum elements, adding such a Statement will be almost effortless.
Benjamin: OK.
Johnny: Now for the implementation. Just to remind you – what we have so far looks like this:
1 public class Calculator
2 {
3  public const string InitialValue = "0";
4  public string Display()
5  {
6   return InitialValue;
7  }
8 }
This does not support displaying multiple digits yet (as we just proved, because the Statement saying they are supported turned out false). So let’s change the code to handle this case:
 1 public class Calculator
 2 {
 3  public const string InitialValue = "0";
 4  private int _result = 0;
 5
 6  public void Enter(DigitKeys digit)
 7  {
 8   _result *= 10;
 9   _result += (int)digit;
10  }
11
12  public string Display()
13  {
14   return _result.ToString();
15  }
16 }
Johnny: Now the Statement is true so we can go back to it and make it a little bit prettier. Let’s take a second look at it:
 1 [Fact] public void
 2 ShouldDisplayAllEnteredDigitsThatAreNotLeadingZeroes()
 3 {
 4  //GIVEN
 5  var calculator = new Calculator();
 6  var nonZeroDigit = Any.OtherThan(DigitKeys.Zero);
 7  var anyDigit1 = Any.Of<DigitKeys>();
 8  var anyDigit2 = Any.Of<DigitKeys>();
 9
10  //WHEN
11  calculator.Enter(nonZeroDigit);
12  calculator.Enter(anyDigit1);
13  calculator.Enter(anyDigit2);
14
15  //THEN
16  Assert.Equal(
17   string.Format("{0}{1}{2}",
18    (int)nonZeroDigit,
19    (int)anyDigit1,
20    (int)anyDigit2
21   ),
22   calculator.Display()
23  );
24 }
Johnny: Remember you said that you don’t like the part where string.Format() is used?
Benjamin: Yeah, it seems a bit unreadable.
Johnny: Let’s extract this part into a utility method and make it more general – we will need a way of constructing expected displayed output in many of our future Statements. Here is my go at this helper method:
 1 string StringConsistingOf(params DigitKeys[] digits)
 2 {
 3  var result = string.Empty;
 4
 5  foreach(var digit in digits)
 6  {
 7   result += (int)digit;
 8  }
 9  return result;
10 }
Note that this is more general as it supports any number of parameters. And the Statement after this extraction looks like this:
 1 [Fact] public void
 2 ShouldDisplayAllEnteredDigitsThatAreNotLeadingZeroes()
 3 {
 4  //GIVEN
 5  var calculator = new Calculator();
 6  var nonZeroDigit = Any.OtherThan(DigitKeys.Zero);
 7  var anyDigit1 = Any.Of<DigitKeys>();
 8  var anyDigit2 = Any.Of<DigitKeys>();
 9
10  //WHEN
11  calculator.Enter(nonZeroDigit);
12  calculator.Enter(anyDigit1);
13  calculator.Enter(anyDigit2);
14
15  //THEN
16  Assert.Equal(
17   StringConsistingOf(nonZeroDigit, anyDigit1, anyDigit2),
18   calculator.Display()
19  );
20 }
Benjamin: Looks better to me. The Statement is still evaluated as true, which means we got it right, didn’t we?
Johnny: Not exactly. With moves such as this one, I like to be extra careful and double-check whether the Statement still describes the behavior accurately. To make sure that’s still the case, let’s comment out the body of the Enter() method and see if this Statement would still turn out false:
1 public void Enter(DigitKeys digit)
2 {
3  //_result *= 10;
4  //_result += (int)digit;
5 }
Benjamin: Running… Ok, it is false now. Expected “243”, got “0”.
Johnny: Good, now we’re pretty sure it works OK. Let’s uncomment the lines we just commented out and move forward.
Benjamin: But wait, there is one thing that troubles me.
Johnny: I think I know – I was wondering if you’d catch it. Go ahead.
Benjamin: What troubles me is these two lines:
1 public const string InitialValue = "0";
2 private int _result = 0;
Isn’t this a duplication? I mean, it’s not exactly a code duplication, but in both lines, the value of 0 has the same intent. Shouldn’t we remove this duplication somehow?
Johnny: Yes, let’s do it. My preference would be to change the InitialValue to int instead of string and use that. But I can’t do it in a single step as I have the two Statements depending on InitialValue being a string. if I just changed the type to int, I would break those tests as well as the implementation and I always want to be fixing one thing at a time.
Benjamin: So what do we do?
Johnny: Well, my first step would be to go to the Statements that use InitialValue and use a ToString() method there. For example, in the Statement ShouldDisplayInitialValueWhenCreated(), I have an assertion:
1 Assert.Equal(Calculator.InitialValue, displayedResult);
which I can change to:
1 Assert.Equal(Calculator.InitialValue.ToString(), displayedResult);
Benjamin: But calling ToString() on a string just returns the same value, what’s the point?
Johnny: The point is to make the type of whatever’s on the left side of .ToString() irrelevant. Then I will be able to change that type without breaking the Statement. The new implementation of Calculator class will look like this:
 1 public class Calculator
 2 {
 3  public const int InitialValue = 0;
 4  private int _result = InitialValue;
 5
 6  public void Enter(DigitKeys digit)
 7  {
 8   _result *= 10;
 9   _result += (int)digit;
10  }
11
12  public string Display()
13  {
14   return _result.ToString();
15  }
16 }
Benjamin: Oh, I see. And the Statements are still evaluated as true.
Johnny: Yes. Shall we take on another Statement?
Statement 3: Calculator should display only one zero digit if it is the only entered digit even if it is entered multiple times
Johnny: Benjamin, this should be easy for you, so go ahead and try it. It is really a variation of the previous Statement.
Benjamin: Let me try… ok, here it is:
 1 [Fact] public void
 2 ShouldDisplayOnlyOneZeroDigitWhenItIsTheOnlyEnteredDigitEvenIfItIsEnteredMultiple\
 3 Times()
 4 {
 5  //GIVEN
 6  var calculator = new Calculator();
 7
 8  //WHEN
 9  calculator.Enter(DigitKeys.Zero);
10  calculator.Enter(DigitKeys.Zero);
11  calculator.Enter(DigitKeys.Zero);
12
13  //THEN
14  Assert.Equal(
15   StringConsistingOf(DigitKeys.Zero),
16   calculator.Display()
17  );
18 }
Johnny: Good, you’re learning fast! Let’s evaluate this Statement.
Benjamin: It seems that our current code already fulfills the Statement. Should I try to comment-out some code to make sure this Statement can fail just like you did in the previous Statement?
Johnny: That would be a wise thing to do. When a Statement turns out true without requiring you to change any production code, it’s always suspicious. Just like you said, we have to change production code for a second to force this Statement to become false, then undo this modification to make it true again. This isn’t as obvious as previously, so let me do it. I will mark all the added lines with //+ comment so that you can see them easily:
 1 public class Calculator
 2 {
 3  public const int InitialValue = 0;
 4  private int _result = InitialValue;
 5  string _fakeResult = "0"; //+
 6
 7  public void Enter(DigitKeys digit)
 8  {
 9   _result *= 10;
10   _result += (int)digit;
11   if(digit == DigitKeys.Zero) //+
12   {  //+
13    _fakeResult += "0";  //+
14   } //+
15  }
16
17  public string Display()
18  {
19   if(_result == 0)  //+
20   {  //+
21    return _fakeResult;  //+
22   }  //+
23   return _result.ToString();
24  }
25 }
Benjamin: Wow, looks like a lot of code just to make the Statement false! Is it worth the hassle? We will undo this whole change in a second anyway…
Johnny: Depends on how confident you want to feel. I would say that it’s usually worth it – at least you know that you got everything right. It might seem like a lot of work, but it only took me about a minute to add this code and imagine you got it wrong and had to debug it on a production environment. Now that would be a waste of time.
Benjamin: Ok, I think I get it. Since we saw this Statement turn false, I will undo this change to make it true again.
Johnny: Sure.
Epilogue
Time to leave Johnny and Benjamin, at least for now. I planned to make this chapter longer, and cover all the other operations, but I fear this would make it boring. You should have a feel of how the TDD cycle looks like, especially since Johnny and Benjamin had a lot of conversations on many other topics in the meantime. I will be revisiting these topics later in the book. For now, if you felt lost or unconvinced on any of the topics mentioned by Johnny, don’t worry – I don’t expect you to be proficient with any of the techniques shown in this chapter just yet. The time will come for that.
Sorting out the bits
In the last chapter, there has been a lively conversation between Johnny and Benjamin. Even in such a short session, Benjamin, as a TDD novice, had a lot of questions and a lot of things he needed to be sorted out. We will pick up all those questions that were not already answered and try to answer in the coming chapters. Here are the questions:
- How to name a Statement?
- How to start writing a Statement?
- How is TDD about analysis and what does this “GIVEN-WHEN-THEN” mean?
- What exactly is the scope of a Statement? A class, a method, or something else?
- What is the role of TODO list in TDD?
- Why use anonymous generated values instead of literals as the input of a specified behavior?
- Why and how to use the
Anyclass? - What code to extract from a Statement to shared utility methods?
- Why such a strange approach to creating enumerated constants?
A lot of questions, isn’t it? Unfortunately, TDD has this high entry barrier, at least for someone used to the traditional way of writing code. Anyway, that is what this tutorial is for – to answer such questions and lower this barrier. Thus, we will try to answer those questions one by one.
How to start?
Whenever I sat down with someone who was about to write code in a Statement-first manner for the first time, the person would stare at the screen, then at me, then would say: “what now?”. It’s easy to say: “You know how to write code, you know how to write a test for it, just this time start with the latter rather than the first”, but for many people, this is something that blocks them completely. If you are one of them, don’t worry – you’re not alone. I decided to dedicate this chapter solely to techniques for kicking off a Statement when there is no code.
Start with a good name
I already said that a Statement is a description of behavior expressed in code. A thought process leading to creating such an executable Statement might look like the following sequence of questions:
- What is the scope of the behavior I’m trying to specify? Example answer: I’m trying to specify a behavior of a
Calculatorclass. - What is the behavior of a
Calculatorclass I’m trying to specify? Example answer: it should display all entered digits that are not leading zeroes. - How to specify this behavior through code? Example answer:
[Fact] public void ShouldDisplayAllEnteredDigitsThatAreNotLeadingZeroes() ...(i.e. a piece of code).
Note that before writing any code, there are at least two questions that can be answered in the human language. Many times answering these questions first before starting to write the code of the Statement makes things easier. Even though, this can still be a challenging process. To apply this advice successfully, some knowledge on how to properly name Statements is required. I know not everybody pays attention to naming their Statements, mainly because the Statements are often considered second-level citizens – as long as they run and “prove the code doesn’t contain defects”, they are considered sufficient. We will take a look at some examples of bad names and then I’ll go into some rules of good naming.
Consequences of bad naming
I have seen many people not caring about how their Statements are named. This is a symptom of treating the Specification as garbage or leftovers – I consider this approach dangerous because I have seen it lead to Specifications that are hard to maintain and that look more like lumps of code put together accidentally in a haste than a kind of “living documentation”. Imagine that your Specification consists of Statements named like this:
TrySendPacket()TrySendPacket2()testSendingManyPackets()testWrongPacketOrder1()testWrongPacketOrder2()
and see how difficult it is to answer the following questions:
- How do you know what situation each Statement describes?
- How do you know whether the Statement describes a single situation or several at the same time?
- How do you know whether the assertions inside those Statements are the right ones assuming each Statement was written by someone else or a long time ago?
- How do you know whether the Statement should stay or be removed from the Specification when you modify the functionality described by this Statement?
- If your changes in production code make a Statement turn false, how do you know whether the Statement is no longer correct or the production code is wrong?
- How do you know whether you will not introduce a duplicate Statement for a scenario when adding to a Specification that was created by another team member?
- How do you estimate, by looking at the runner tool report, whether the fix for a failing Statement will be easy or not?
- What do you answer new developers in your team when they ask you “what is this Statement for?”
- How do you know when your Specification is complete if you can’t tell from the Statement names what behaviors you already have covered and what not?
What does a good name contain?
To be of any use, the name of a Statement has to describe its expected behavior. At the minimum, it should describe what happens under what circumstances. Let’s take a look at one of the names Steve Freeman and Nat Pryce came up with in their great book Growing Object-Oriented Software Guided By Tests:
1 notifiesListenersThatServerIsUnavailableWhenCannotConnectToItsMonitoringPort()
Note a few things about the name of the Statement:
- It describes a behavior of an instance of a specific class. Note that it doesn’t contain the name of the method that triggers the behavior, because what is specified is not a single method, but the behavior itself (this will be covered in more detail in the coming chapters). The Statement name simply tells what an instance does (“notifies listeners that server is unavailable”) under certain circumstances (“when cannot connect to its monitoring port”). It is important for me because I can derive such a description from thinking about the responsibilities of a class without the need to know any of its method signatures or the code that’s inside the class. Hence, this is something I can come up with before implementing – I just need to know why I created this class and build on this knowledge.
- The name is relatively long. Really, really, really don’t worry about it. As long as you are describing a single behavior, I’d say it’s fine. I’ve seen people hesitate to give long names to Statements because they tried to apply the same rules to those names as to the names of methods in production code. In production code, a long method name can be a sign that the method has too many responsibilities or that insufficient abstraction level is used to describe the functionality and that the name may needlessly reveal implementation details. My opinion is that these two reasons don’t apply as much to Statements. In the case of Statements, the methods are not invoked by anyone besides the automatic test runner, so they will not obfuscate any code that would need to call them with their long names. Besides, the Statements’ names need not be as abstract as production code method names – they can reveal more.
Alternatively, we could put all the information in a comment instead of the Statement name and leave the name short, like this:
1[Fact]2//Notifies listeners that server3//is unavailable when cannot connect4//to its monitoring port5publicvoidStatement_002()6{7//...8}however, there are two downsides to this. First, we now have to add an extra piece of information (
Statement_002) only to satisfy the compiler, because every method needs to have a name anyway – and there is usually no value a human could derive from a name such asStatement_002. The second downside is that when the Statement turns false, the test runner shows the following line:Statement_002: FAILED– note that all the information included in the comment is missing from the failure report. I consider it much more valuable to receive a report like:notifiesListenersThatServerIsUnavailableWhenCannotConnectToItsMonitoringPort: FAILEDbecause in such a case, a lot of information about the Statement that fails is available from the test runner report.
- Using a name that describes a single behavior allows me to find out quickly why the Statement turned false. Let’s say a Statement is true when I start refactoring, but at one point it turns false and the report in the runner looks like this:
TrySendingHttpRequest: FAILED– it only tells me that an attempt was made to send an HTTP request, but, for instance, doesn’t tell me whether the object I specified in that Statement is some kind of sender that should try to send this request under some circumstances, or if it is a receiver that should handle such a request properly. To learn what went wrong, I have to go open the source code of the Statement. On the other hand, when I have a Statement namedShouldRespondWithAnAckWheneverItReceivesAnHttpRequest, then if it turns false, I know what’s broken – the object no longer responds with an ACK to an HTTP request. This may be enough to identify which part of the code is at fault and which of my changes made the Statement false.
My favorite convention
There are many conventions for naming Statements appropriately. My favorite is the one developed by Dan North, where each Statement name begins with the word Should. So for example, I would name a Statement:
ShouldReportAllErrorsSortedAlphabeticallyWhenErrorsOccurDuringSearch()
The name of the Specification (i.e. class name) answers the question “who should do it?”, i.e. when I have a class named SortingOperation and want to say that it “should sort all items in ascending order when performed”, I say it like this:
1 public class SortingOperationSpecification
2 {
3  [Fact] public void
4  ShouldSortAllItemsInAscendingOrderWhenPerformed()
5  {
6  }
7 }
By writing the above, I say that “Sorting operation (this is derived from the Specification class name) should sort all items in ascending order when performed (this is derived from the name of the Statement)”.
The word “should” was introduced by Dan to weaken the statement following it and thus to allow questioning what you are stating and ask yourself the question: “should it really?”. If this causes uncertainty, then it is high time to talk to a domain expert and make sure you understand well what you need to accomplish. If you are not a native English speaker, the “should” prefix will probably have a weaker influence on you – this is one of the reasons why I don’t insist on you using it. I like it though6.
When devising a name, it’s important to put the main focus on what result or action is expected from an object, not e.g. from one of its methods. If you don’t do that, it may quickly become troublesome. As an example, one of my colleagues was specifying a class UserId (which consisted of a user name and some other information) and wrote the following name for the Statement about the comparison of two identifiers:
EqualOperationShouldFailForTwoInstancesWithTheSameUserName().
Note that this name is not written from the perspective of a single object, but rather from the perspective of an operation that is executed on it. We stopped thinking in terms of object responsibilities and started thinking in terms of operation correctness. To reflect an object perspective, this name should be something more like:
ShouldNotBeEqualToAnotherIdThatHasDifferentUserName().
When I find myself having trouble with naming like this, I suspect one of the following may be the case:
- I am not specifying a behavior of a class, but rather the outcome of a method.
- I am specifying more than one behavior.
- The behavior is too complicated and hence I need to change my design (more on this later).
- I am naming the behavior of an abstraction that is too low-level, putting too many details in the name. I usually only come to this conclusion when all the previous points fail me.
Can’t the name really become too long?
A few paragraphs ago, I mentioned you shouldn’t worry about the length of Statement names, but I have to admit that the name can become too long occasionally. A rule I try to follow is that the name of a Statement should be easier to read than its content. Thus, if it takes me less time to understand the point of a Statement by reading its body than by reading its name, then I consider the name too long. If this is the case, I try to apply the heuristics described above to find and fix the root cause of the problem.
Start by filling the GIVEN-WHEN-THEN structure with the obvious
This technique can be used as an extension to the previous one (i.e. starting with a good name), by inserting one more question to the question sequence we followed the last time:
- What is the scope of the behavior I’m trying to specify? Example answer: I’m trying to specify the behavior of a
Calculatorclass. - What is the behavior of a
Calculatorclass I’m trying to specify? Example answer: it should display all entered digits that are not leading zeroes. - What is the context (“GIVEN”) of the behavior, the action (“WHEN”) that triggers it and the expected reaction (“THEN”) of the specified object? Example answer: Given I turn on the calculator, when I enter any digit that’s not a 0 followed by any digits, then they should be visible on the display.
- How to specify this behavior through code? Example answer:
[Fact] public void ShouldDisplayAllEnteredDigitsThatAreNotLeadingZeroes() ...(i.e. a piece of code).
Alternatively, it can be used without the naming step, when it’s harder to come up with a name than with a GIVEN-WHEN-THEN structure. In other words, a GIVEN-WHEN-THEN structure can be easily derived from a good name and vice versa.
This technique is about taking the GIVEN, WHEN and THEN parts and translating them into code in an almost literal, brute-force way (without paying attention to missing classes, methods or variables), and then adding all the missing pieces that are required for the code to compile and run.
Example
Let’s try it out on a simple problem of comparing two users for equality. We assume that two users should be equal to each other if they have the same name:
1 Given a user with any name
2 When I compare it to another user with the same name
3 Then it should appear equal to this other user
Let’s start with the translation part. Again, remember we’re trying to make the translation as literal as possible without paying attention to all the missing pieces for now.
The first line:
1 Given a user with any name
can be translated literally to the following piece of code:
1 var user = new User(anyName);
Note that we don’t have the User class yet and we don’t bother for now with what anyName really is. It’s OK.
Then the second line:
1 When I compare it to another user with the same name
can be written as:
1 user.Equals(anotherUserWithTheSameName);
Great! Again, we don’t care what anotherUserWithTheSameName is yet. We treat it as a placeholder. Now the last line:
1 Then it should appear equal to this other user
and its translation into the code:
1 Assert.True(usersAreEqual);
Ok, so now that the literal translation is complete, let’s put all the parts together and see what’s missing to make this code compile:
 1 [Fact] public void
 2 ShouldAppearEqualToAnotherUserWithTheSameName()
 3 {
 4   //GIVEN
 5   var user = new User(anyName);
 6
 7   //WHEN
 8   user.Equals(anotherUserWithTheSameName);
 9
10   //THEN
11   Assert.True(usersAreEqual);
12 }
As we expected, this doesn’t compile. Notably, our compiler might point us towards the following gaps:
- Variable
anyNameis not declared. - Object
anotherUserWithTheSameNameis not declared. - Variable
usersAreEqualis both not declared and it does not hold the comparison result. - If this is our first Statement, we might not even have the
Userclass defined at all.
The compiler created a kind of a small TODO list for us, which is nice. Note that while we don’t have a compiling piece of code, filling the gaps to make it compile boils down to making a few trivial declarations and assignments:
-
anyNamecan be defined as:var anyName = Any.String(); -
anotherUserWithTheSameNamecan be defined as:var anotherUserWithTheSameName = new User(anyName); -
usersAreEqualcan be defined as variable which we assign the comparison result to:var usersAreEqual = user.Equals(anotherUserWithTheSameName); - If class
Userdoes not yet exist, we can add it by simply stating:1publicclassUser2{3publicUser(stringname){}4}
Putting it all together again, after filling the gaps, gives us:
 1 [Fact] public void
 2 ShouldAppearEqualToAnotherUserWithTheSameName()
 3 {
 4   //GIVEN
 5   var anyName = Any.String();
 6   var user = new User(anyName);
 7   var anotherUserWithTheSameName = new User(anyName);
 8
 9   //WHEN
10   var usersAreEqual = user.Equals(anotherUserWithTheSameName);
11
12   //THEN
13   Assert.True(usersAreEqual);
14 }
And that’s it – the Statement itself is complete!
Start from the end
This is a technique that I suggest to people that seem to have no idea how to start. I got it from Kent Beck’s book Test-Driven Development by Example. It seems funny at first glance, but I found it quite powerful at times. The trick is to write the Statement “backward”, i.e. starting with what the result verification (in terms of the GIVEN-WHEN-THEN structure, we would say that we start with our THEN part).
This works well when we are quite sure of what the outcome in our scenario should be, but not quite so sure of how to get there.
Example
Imagine we are writing a class containing the rules for granting or denying access to a reporting functionality. This reporting functionality is based on roles. We have no idea what the API should look like and how to write our Statement, but we do know one thing: in our domain, the access can be either granted or denied. Let’s take the first case we can think of – the “access granted” case – and, as we are moving backward from the end, let’s begin with the following assertion:
1 //THEN
2 Assert.True(accessGranted);
Ok, that part was easy, but did we make any progress with that? Of course we did – we now have code that does not compile, with the error caused by the variable accessGranted. Now, in contrast to the previous approach where we translated a GIVEN-WHEN-THEN structure into a Statement, our goal is not to make this compile as soon as possible. Instead, we need to answer the question: how do I know whether the access is granted or not? The answer: it is the result of the authorization of the allowed role. Ok, so let’s just write it down in code, ignoring everything that stands in our way:
1 //WHEN
2 var accessGranted
3  = access.ToReportingIsGrantedTo(roleAllowedToUseReporting);
For now, try to resist the urge to define a class or variable to make the compiler happy, as that may throw you off the track and steal your focus from what is important. The key to doing TDD successfully is to learn to use something that does not exist yet as if it existed and not worry until needed.
Note that we don’t know what roleAllowedToUseReporting is, neither do we know what access object stands for, but that didn’t stop us from writing this line. Also, the ToReportingIsGrantedTo() method is just taken off the top of our head. It’s not defined anywhere, it just made sense to write it like this, because it is the most direct translation of what we had in mind.
Anyway, this new line answers the question about where we take the accessGranted value from, but it also makes us ask further questions:
- Where does the
accessvariable come from? - Where does the
roleAllowedToUseReportingvariable come from?
As for access, we don’t have anything specific to say about it other than that it is an object of a class that is not defined yet. What we need to do now is to pretend that we have such a class (but let’s not define it yet). How do we call it? The instance name is access, so it’s quite straightforward to name the class Access and instantiate it in the simplest way we can think of:
1 //GIVEN
2 var access = new Access();
Now for the roleAllowedToUseReporting. The first question that comes to mind when looking at this is: which roles are allowed to use reporting? Let’s assume that in our domain, this is either an Administrator or an Auditor. Thus, we know what is going to be the value of this variable. As for the type, there are various ways we can model a role, but the most obvious one for a type that has few possible values is an enum7. So:
1 //GIVEN
2 var roleAllowedToUseReporting = Any.Of(Roles.Admin, Roles.Auditor);
And so, working our way backward, we have arrived at the final solution (in the code below, I already gave the Statement a name – this is the last step):
 1 [Fact] public void
 2 ShouldAllowAccessToReportingWhenAskedForEitherAdministratorOrAuditor()
 3 {
 4  //GIVEN
 5  var roleAllowedToUseReporting = Any.Of(Roles.Admin, Roles.Auditor);
 6  var access = new Access();
 7
 8  //WHEN
 9  var accessGranted
10      = access.ToReportingIsGrantedTo(roleAllowedToUseReporting);
11
12  //THEN
13  Assert.True(accessGranted);
14 }
Using what we learned by formulating the Statement, it was easy to give it a name.
Start by invoking a method if you have one
If preconditions for this approach are met, it’s the most straightforward one and I use it a lot8.
Many times, we have to add a new class that implements an already existing interface. The interface imposes what methods the new class must support. If the method signatures are already decided, we can start our Statement with a call to one of the methods and then figure out the rest of the context we need to make it run properly.
Example
Imagine we have an application that, among other things, handles importing an existing database exported from another instance of the application. Given that the database is large and importing it can be a lengthy process, a message box is displayed each time a user performs the import. Assuming the user’s name is Johnny, the message box displays the message “Johnny, please sit down and enjoy your coffee for a few minutes as we take time to import your database.” The class that implements this looks like:
 1 public class FriendlyMessages
 2 {
 3   public string
 4   HoldOnASecondWhileWeImportYourDatabase(string userName)
 5   {
 6     return string.Format("{0}, "
 7       + "please sit down and enjoy your coffee "
 8       + "for a few minutes as we take time "
 9       + "to import your database",
10       userName);
11   }
12 }
Now, imagine that we want to ship a trial version of the application with some features disabled, one of which is the database import. One of the things we need to do is display a message saying that this is a trial version and that the import feature is locked. We can do this by extracting an interface from the FriendlyMessages class and implement this interface in a new class used when the application is run as the trial version. The extracted interface looks like this:
1 public interface Messages
2 {
3   string HoldOnASecondWhileWeImportYourDatabase(string userName);
4 }
So our new implementation is forced to support the HoldOnASecondWhileWeImportYourDatabase() method. Let’s call this new class TrialVersionMessages (but don’t create it yet!) and we can write a Statement for its behavior. Assuming we don’t know where to start, we just start with creating an object of the class (we already know the name) and invoking the method we already know we need to implement:
 1 [Fact]
 2 public void TODO()
 3 {
 4  //GIVEN
 5  var trialMessages = new TrialVersionMessages();
 6
 7  //WHEN
 8  trialMessages.HoldOnASecondWhileWeImportYourDatabase();
 9
10  //THEN
11  Assert.True(false); //so we don't forget this later
12 }
As you can see, we added an assertion that always fails at the end to remind ourselves that the Statement is not finished yet. As we don’t have any relevant assertions yet, the Statement will otherwise be considered as true as soon as it compiles and runs and we may not notice that it’s incomplete. As it currently stands, the Statement doesn’t compile anyway, because there’s no TrialVersionMessages class yet. Let’s create one with as little implementation as possible:
1 public class TrialVersionMessages : Messages
2 {
3  public string HoldOnASecondWhileWeImportYourDatabase(string userName)
4  {
5    throw new NotImplementedException();
6  }
7 }
Note that there’s only as much implementation in this class as required to compile this code. Still, the Statement won’t compile yet. This is because the method HoldOnASecondWhileWeImportYourDatabase() takes a string argument and we didn’t pass any in the Statement. This makes us ask the question of what this argument is and what its role is in the behavior triggered by the HoldOnASecondWhileWeImportYourDatabase() method It looks like it’s a user name. Thus, we can add it to the Statement like this:
 1 [Fact]
 2 public void TODO()
 3 {
 4  //GIVEN
 5  var trialMessages = new TrialVersionMessages();
 6  var userName = Any.String();
 7
 8  //WHEN
 9  trialMessages.
10   HoldOnASecondWhileWeImportYourDatabase(userName);
11
12  //THEN
13  Assert.True(false); //to remember about it
14 }
Now, this compiles but is considered false because of the guard assertion that we put at the end. Our goal is to substitute it with a proper assertion for the expected result. The return value of the call to HoldOnASecondWhileWeImportYourDatabase is a string message, so all we need to do is to come up with the message that we expect in case of the trial version:
 1 [Fact]
 2 public void TODO()
 3 {
 4  //GIVEN
 5  var trialMessages = new TrialVersionMessages();
 6  var userName = Any.String();
 7  var expectedMessage =
 8   string.Format(
 9     "{0}, better get some pocket money and buy a full version!",
10     userName);
11
12  //WHEN
13  var message = trialMessages.
14   HoldOnASecondWhileWeImportYourDatabase(userName);
15
16  //THEN
17  Assert.Equal(expectedMessage, message);
18 }
All what is left is to find a good name for the Statement. This isn’t an issue since we already specified the desired behavior in the code, so we can just summarize it as something like ShouldCreateAPromptForFullVersionPurchaseWhenAskedForImportDatabaseMessage().
Summary
When I’m stuck and don’t know how to start writing a new failing Statement, the techniques from this chapter help me push things in the right direction. Note that the examples given are simplistic and built on an assumption that there is only one object that takes some kind of input parameter and returns a well-defined result. However, this isn’t how most of the object-oriented world is built. In that world, we often have objects that communicate with other objects, send messages, invoke methods on each other and these methods often don’t have any return values but are instead declared as void. Even though, all of the techniques described in this chapter will still work in such a case and we’ll revisit them as soon as we learn how to do TDD in the larger object-oriented world (after the introduction of the concept of mock objects in Part 2). Here, I tried to keep it simple.
How is TDD about analysis and what does “GIVEN-WHEN-THEN” mean?
During the work on the calculator code, Johnny mentioned that TDD is, among other things, about analysis. This chapter further explores this concept. Let’s start by answering the following question:
Is there a commonality between analysis and TDD?
From Wikipedia:
Analysis is the process of breaking a complex topic or substance into smaller parts to gain a better understanding of it.
Thus, for TDD to be about analysis, it would have to fulfill two conditions:
- It would have to be a process of breaking a complex topic into smaller parts
- It would have to allow gaining a better understanding of such smaller parts
In the story about Johnny, Benjamin and Jane, I included a part where they analyze requirements using concrete examples. Johnny explained that this is a part of a process called Acceptance Test-Driven Development. This process, followed by the three characters, fulfilled both mentioned conditions for it to be considered analytical. But what about TDD itself?
Although I used parts of the ATDD process in the story to make the analysis part more obvious, similar things happen at pure technical levels. For example, when starting development with a failing application-wide Statement (i.e. one that covers a behavior of an application as a whole. We will talk about the levels of granularity of Statements later. For now, the only thing you need to know is that the so-called “unit tests level” is not the only level of granularity we write Statements on), we may encounter a situation where we need to call a web method and make an assertion on its result. This makes us think: how should this method be named? What are the scenarios it supports? What do I expect to get out of it? How should I, as its user, be notified about errors? Many times, this leads us to either a conversation (if there is another stakeholder that needs to be involved in the decision) or rethinking our assumptions. The same applies on “unit level” - if a class implements a domain rule, there might be some good domain-related questions resulting from trying to write a Statement for it. If a class implements a technical rule, there might be some technical questions to discuss with other developers, etc. This is how we gain a better understanding of the topic we are analyzing, which makes TDD fulfill the second of the two requirements for it to be an analysis method.
But what about the first requirement? What about breaking a complex logic into smaller parts?
If you go back to Johnny and Benjamin’s story, you will note that when talking to a customer and when writing code, they used a TODO list. This list was first filled with whatever scenarios they came up with, but later, they would add smaller units of work. When doing TDD, I do the same, essentially decomposing complex topics into smaller items and putting them on the TODO list (this is one of the practices that serve decomposition. The other one is mocking, but let’s leave that for now). Thanks to this, I can focus on one thing at a time, crossing off item after item from the list after it’s done. If I learn something new or encounter a new issue that needs our attention, I can add it to the TODO list and get back to it later, for now continuing my work on the current item of focus.
An example TODO list from the middle of an implementation task may look like this (don’t read through it, I put it here just to give you a glimpse - you’re not supposed to understand what the list items are about either):
- Create an entry point to the module (top-level abstraction)
- Implement main workflow of the module
- Implement
Messageinterface - Implement
MessageFactoryinterface - Implement
ValidationRulesinterface - Implement behavior required from Wrap method in
LocationMessageFactoryclass - Implement behavior required from ValidateWith method in
LocationMessageclass for Speed field - Implement behavior required from ValidateWith method in
LocationMessageclass for Age field - Implement behavior required from ValidateWith method in
LocationMessageclass for Sender field
Note that some of the items are already crossed off as done, while others remain pending and waiting to be addressed. All these items are what the article on Wikipedia calls “smaller parts” - a result of breaking down a bigger topic.
For me, the arguments that I gave you are enough to think that TDD is about analysis. The next question is: are there any tools we can use to aid and inform this analysis part of TDD? The answer is yes and you already saw both of them in this book, so now we’re going to have a closer look.
Gherkin
Hungry? Too bad, because the Gherkin I am going to tell you about is not edible. It is a notation and a way of thinking about behaviors of the specified piece of code. It can be applied on different levels of granularity – any behavior, whether of a whole system or a single class, may be described using Gherkin.
We already used this notation, we just didn’t name it so. Gherkin is the GIVEN-WHEN-THEN structure that you can see everywhere, even as comments in the code samples. This time, we are stamping a name on it and analyzing it further.
In Gherkin, a behavior description consists mostly of three parts:
- Given – a context
- When – a cause
- Then – an effect
In other words, the emphasis is on causality in a given context. There’s also a fourth keyword: And9 – we can use it to add more context, more causes or more effects. You’ll have a chance to see an example in a few seconds
As I said, there are different levels you can apply it to. Here is an example of such a behavior description from the perspective of its end-user (this is called acceptance-level Statement):
1 Given a bag of tea costs $202 And there is a discount saying "pay half for a second bag"
3 When I buy two bags
4 Then I should be charged $30And here is one for unit-level (note again the line starting with “And” that adds to the context):
1 Given a list with 2 items
2 When I add another item
3 And check items count
4 Then the count should be 3
While on acceptance level we put such behavior descriptions together with code as a single whole (If this doesn’t ring a bell, look at tools such as SpecFlow or Cucumber or FIT to get some examples), on the unit level the description is usually not written down in a literal way, but rather it is translated and written only in form of source code. Still, the structure of GIVEN-WHEN-THEN is useful when thinking about behaviors required from an object or objects, as we saw when we talked about starting from Statement rather than code. I like to put the structure explicitly in my Statements – I find that it helps make them more readable10. So most of my unit-level Statements follow this template:
 1 [Fact]
 2 public void Should__BEHAVIOR__()
 3 {
 4   //GIVEN
 5   ...context...
 6
 7   //WHEN
 8   ...trigger...
 9
10   //THEN
11   ...assertions etc....
12 }
Sometimes the WHEN and THEN sections are not so easily separable – then I join them, like in case of the following Statement specifying that an object throws an exception when asked to store null:
 1 [Fact]
 2 public void ShouldThrowExceptionWhenAskedToStoreNull()
 3 {
 4   //GIVEN
 5   var safeList = new SafeList();
 6
 7   //WHEN - THEN
 8   Assert.Throws<Exception>(
 9     () => safeList.Store(null)
10   );
11 }
By thinking in terms of these three parts of behavior, we may arrive at different circumstances (GIVEN) at which the behavior takes place, or additional ones that are needed. The same goes for triggers (WHEN) and effects (THEN). If anything like this comes to our mind, we add it to the TODO list to revisit it later.
TODO list… again!
As I wrote earlier, a TODO list is a repository for our deferred work. This includes anything that comes to our mind when writing or thinking about a Statement but is not a part of the current Statement we are writing. On one hand, we don’t want to forget it, on the other - we don’t want it to haunt us and distract us from our current task, so we write it down as soon as possible and continue with our current task. When we’are finished with it, we take another item from TODO list and start working on it.
Imagine we’re writing a piece of logic that allows users access when they are employees of a zoo, but denies access if they are merely guests of the zoo. Then, after starting writing a Statement we realize that employees can be guests as well – for example, they might choose to visit the zoo with their families during their vacation. Still, the two previous rules hold, so to avoid being distracted by this third scenario, we can quickly add it as an item to the TODO list (like “TODO: what if someone is an employee, but comes to the zoo as a guest?”) and finish the current Statement. When we’re finished, you can always come back to the list of deferred items and pick the next item to work on.
There are two important questions related to TODO lists: “what exactly should we add as a TODO list item?” and “How to efficiently manage the TODO list?”. We will take care of these two questions now.
What to put on a TODO list?
Everything that we need addressed but is out of the scope of the current Statement. Those items may be related to implementing unimplemented methods, to add whole functionalities (such items are usually broken further into more fine-grained sub-tasks as soon as we start implementing them), they might be reminders to take a better look at something (e.g. “investigate what is this component’s policy for logging errors”) or questions about the domain that need to get answered. If we tend to get carried away too much in coding and miss our lunch, we can even add a reminder (“TODO: eat lunch!”). I have never encountered a case where I needed to share this TODO list with anyone else, so I tend to treat it as my sketchbook. I recommend the same to you - the list is yours!
How to pick items from a TODO list?
Which item to choose from a TODO list when we have several of them? I have no clear rule, although I tend to take into account the following factors:
- Risk – if what I learn by implementing or discussing a particular item from the list can have a big impact on the design or behavior of the system, I tend to pick such items first. An example of such item is when I start implementing validation of a request that reaches my application and want to return different error depending on which part of the request is wrong. Then, during the development, I may discover that more than one part of the request can be wrong at the same time and I have to answer a question: which error code should be returned in such a case? Or maybe the return codes should be accumulated for all validations and then returned as a list?
- Difficulty – depending on my mental condition (how tired I am, how much noise is currently around my desk etc.), I tend to pick items with difficulty that best matches this condition. For example, after finishing an item that requires a lot of thinking and figuring things out, I tend to take on some small and easy items to feel the wind blowing in my sails and to rest a little bit.
- Completeness – in simplest words, when I finish test-driving an “if” case, I usually pick up the “else” next. For example, after I finish implementing a Statement saying that something should return true for values less than 50, then the next item to pick up is the “greater or equal to 50” case. Usually, when I start test-driving a class, I take items related to this class until I run out of them, then go on to another one.
Of course, a TODO list is just one source of such TODO items. Typically, when searching for items to do, I examine the following sources of items in the following order:
- compiler failures,
- False statements,
- My TODO list.
Where to put a TODO list?
I encountered two ways of maintaining a TODO list. The first one is on a sheet of paper. The drawback is that every time I need to add something to the list, I need to take my hands off the keyboard, grab a pen or a pencil and then get back to coding. Also, the only way a TODO item written on a sheet of paper can tell me which place in my code it is related to, is (obviously) by its text. The good thing about paper is that it is by far one of the best tools for sketching, so when my TODO item is best stored as a diagram or a drawing (which doesn’t happen too often, but sometimes does) , I use pen and paper.
The second alternative is to use a TODO list functionality built-in into an IDE. Most IDEs, such as Visual Studio (and Resharper plugin has an enhanced version), Xamarin Studio, IntelliJ or Eclipse-based IDEs have such functionality. The rules are simple – I insert special comments (e.q. //TODO do something) in the code and a special view in my IDE aggregates them for me, allowing me to navigate to each item later. This is my primary way of maintaining a TODO list, because:
- They don’t force me to take my hands off my keyboard to add an item to the list.
- I can put a TODO item in a certain place in the code where it makes sense and then navigate back to it later with a click of a mouse. This, apart from other advantages, allows writing shorter notes than if I had to do it on paper. For example, a TODO item saying “TODO: what if it throws an exception?” looks out of place on a sheet of paper, but when added as a comment to my code in the right place, it’s sufficient.
- Many TODO lists automatically add items for certain things that happen in the code. E.g. in C#, when I’m yet to implement a method that was automatically generated by the IDE, its body usually consists of a line that throws a
NotImplementedExceptionexception. Guess what –NotImplementedExceptionoccurrences are added to the TODO list automatically, so I don’t have to manually add items to the TODO list for implementing the methods where they occur.
The TODO list maintained in the source code has one minor drawback - we have to remember to clear the list when we finish working with it or we may end up pushing the TODO items to the source control repository along with the rest of the source code. Such leftover TODO items may accumulate in the code, effectively reducing the ability to navigate through the items that were only added by a specific developer. There are several strategies for dealing with this:
- For greenfield projects, I found it relatively easy to set up a static analysis check that runs when the code is built and doesn’t allow the automatic build to pass unless all TODO items are removed. This helps ensure that whenever a change is pushed to a version control system, it’s stripped of the unaddressed TODO items.
- In some other cases, it’s possible to use a strategy of removing all TODO items from a project before starting working with it. Sometimes it may lead to conflicts between people when TODO items are used for something else than a TDD task list and someone for whatever reason wants them to stay in the code longer. Even though I’m of opinion that such cases of leaving TODO items for longer should be extremely rare at best, however, others may have different opinions.
- Most modern IDEs offer support markers other than
//TODOfor placing items on a TODO list, for example,//BUG. In such a case, I can use the//BUGmarker to mark just my items and then I can filter other items out based on that marker. Bug markers are commonly not intended to be left in the code, so it’s much less risky for them to accumulate. - As a last resort technique, I can usually define custom markers that are placed on TODO list and, again, use filters to see only the items that were defined by me (plus usually
NotImplementedExceptions).
TDD process expanded with a TODO list
In one of the previous chapters, I introduced you to the basic TDD process that contained three steps: write false Statement you wish was true, change the production code so that the Statement is true and then refactor the code. TODO list adds new steps to this process leading to the following expanded list:
- Examine TODO list and pick an item that makes the most sense to implement next.
- Write false Statement you wish was true.
- See it reported as false for the right reason.
- Change the production code to make the Statement true and make sure all already true Statements remain true.
- Cross off the item from the TODO list.
- Repeat steps 1-5 until no item is left on the TODO list.
Of course, we can (and should) add new items to the TODO list as we make progress with the existing ones and at the beginning of each cycle the list should be re-evaluated to choose the most important item to implement next, also taking into account the things that were added during the previous cycle.
Potential issues with TODO lists
There are also some issues one may run into when using TODO lists. I already mentioned the biggest of them - that I often saw people add TODO items for means other than to support TDD and they never went back to these items. Some people joke that a TODO comment left in the code means “There was a time when I wanted to do …”. Anyway, such items may pollute our TDD-related TODO list with so much cruft that your items are barely findable.
Another downside is that when you work with multiple workspaces/solutions, your IDE will gather TODO items only from a single solution/workspace, so there may be times when several TODO lists will need to be maintained – one per workspace or solution. Fortunately, this isn’t usually a big deal.
What is the scope of a unit-level Statement in TDD?
In previous chapters, I described how tests form a kind of executable Specification consisting of many Statements. If so, then some fundamental questions regarding these Statements need to be raised, e.g.:
- What goes into a single Statement?
- How do I know that I need to write another Statement instead of expanding the existing one?
- When I see a Statement, how do I know whether it is too big, too small, or just enough?
This can be summarized as one more general question: what should be the scope of a single Statement?
Scope and level
The software we write can be viewed in terms of structure and functionality. Functionality is about the features – things a piece of software does and does not, given certain circumstances. Structure is how this functionality is organized and divided between many subelements, e.g. subsystems, services, components, classes, methods, etc.
A structural element can easily handle several functionalities (either by itself or in cooperation with other elements). For example, many lists implement retrieving added items as well as some kind of searching or sorting. On the other hand, a single feature can easily span several structural elements (e.g. paying for a product in an online store will likely span at least several classes and probably touch a database).
Thus, when deciding what should go into a single Statement, we have to consider both structure and functionality and make the following decisions:
- structure – do we specify what a class should do, or what the whole component should do, or maybe a Statement should be about the whole system? I will refer to such structural decision as “level”.
- functionality – should a single Statement specify everything that structural element does, or maybe only a part of it? If only a part, then which part and how big should that part be? I will refer to such a functional decision as “functional scope”.
Our questions from the beginning of the chapter can be rephrased as:
- On what level do we specify our software?
- What should be the functional scope of a single Statement?
On what level do we specify our software?
The answer to the first question is relatively simple – we specify on multiple levels. How many levels there are and which ones we’re interested in depends very much on the specific type of application that we write and programming paradigm (e.g. in pure functional programming, we don’t have classes).
In this (and next) chapter, I focus mostly on class level (I will refer to it as unit level, since a class is a unit of behavior), i.e. every Statement is written against a public API of a specified class11.
Does that mean that we can only use a single class in our executable Statement? Let’s look at an example of a well-written Statement and try to answer this question:
 1 [Fact] public void
 2 ShouldThrowValidationExceptionWithFatalErrorLevelWhenValidatedStringIsEmpty()
 3 {
 4   //GIVEN
 5   var validation = new Validation();
 6
 7   //WHEN
 8   var exceptionThrown = Assert.Throws<CustomException>(
 9     () => validation.ApplyTo(string.Empty)
10   );
11
12   //THEN
13   Assert.True(exceptionThrown.IsFatalError);
14 }
Ok, so let’s see… how many real classes take part in this Statement? Three: a string, an exception, and the validation. So even though this is a Statement written against the public API of Validation class, the API itself demands using objects of additional classes.
What should be the functional scope of a single Statement?
The short answer to this question is behavior. Putting it together with the previous section, we can say that each unit-level Statement specifies a single behavior of a class written against the public API of that class. I like how Liz Keogh says that a unit-level Statement shows one example of how a class is valuable to its users. Also, Amir Kolsky and Scott Bain say that each Statement should “introduce a behavioral distinction not existing before”.
What exactly is a behavior? If you read this book from the beginning, you’ve probably seen a lot of Statements that specify behaviors. Let me show you another one, though.
Let’s consider an example of a class representing a condition for deciding whether some kind of queue is full or not. A single bahavior we can specify is that the condition is met when it is notified three times of something being queued on a queue (so from a bigger-picture point of view, it’s an observer of the queue):
 1 [Fact] public void
 2 ShouldBeMetWhenNotifiedThreeTimesOfItemQueued()
 3 {
 4   //GIVEN
 5   var condition = new FullQueueCondition();
 6   condition.NotifyItemQueued();
 7   condition.NotifyItemQueued();
 8   condition.NotifyItemQueued();
 9
10   //WHEN
11   var isMet = condition.IsMet();
12
13   //THEN
14   Assert.True(isMet);
15 }
The first thing to note is that two methods are called on the condition object: NotifyItemQueued() (three times) and IsMet() (once). I consider this example educative because I have seen people misunderstand the unit level as “specifying a single method”. Sure, there is usually a single method triggering the behavior (in this case it’s isMet(), placed in the //WHEN section), but sometimes, more calls are necessary to set up a preconditions for a given behavior (hence the three Queued() calls placed in the //GIVEN section).
The second thing to note is that the Statement only says what happens when the condition object is notified three times – this is the specified behavior. What about the scenario where the condition is only notified two times and when asked afterward, should say it isn’t met? This is a separate behavior and should be described by a separate Statement. The ideal to which we strive is characterized by three rules by Amir Kolsky and cited by Ken Pugh in his book Lean-Agile Acceptance Test-Driven Development:
- A Statement should turn false for a well-defined reason.
- No other Statement should turn false for the same reason.
- A Statement should not turn false for any other reason.
While it’s impossible to achieve it in a literal sense (e.g. all Statements specifying the FullQueueCondition behaviors must call a constructor, so when I put a throw new Exception() inside it, all Statements will turn false), however, we want to keep as close to this goal as possible. This way, each Statement will introduce that “behavioral distinction” I mentioned before, i.e. it will show a new way the class can be valuable to its users.
Most of the time, I specify behaviors using the “GIVEN-WHEN-THEN” thinking framework. A behavior is triggered (WHEN) in some kind of context (GIVEN) and there are always some kind of results (THEN) of that behavior.
Failing to adhere to the three rules
The three rules I mentioned are derived from experience. Let’s see what happens if we don’t follow one of them.
Our next example is about some kind of buffer size rule. This rule is asked whether the buffer can handle a string of specified length and answers “yes” if this string is at most three-elements long. The writer of a Statement for this class decided to violate the rules we talked about and wrote something like this:
 1 [Fact] public void
 2 ShouldReportItCanHandleStringWithLengthOf3ButNotOf4AndNotNullString()
 3 {
 4   //GIVEN
 5   var bufferSizeRule = new BufferSizeRule();
 6
 7   //WHEN
 8   var resultForLengthOf3
 9     = bufferSizeRule.CanHandle(Any.StringOfLength(3));
10   //THEN
11   Assert.True(resultForLengthOf3);
12
13   //WHEN - again?
14   var resultForLengthOf4
15     = bufferSizeRule.CanHandle(Any.StringOfLength(4))
16   //THEN - again?
17   Assert.False(resultForLengthOf4);
18
19   //WHEN - again??
20   var resultForNull = bufferSizeRule.CanHandle(null);
21   //THEN - again??
22   Assert.False(resultForNull);
23 }
Note that it specifies three behaviors:
- Acceptance of a string of allowed size.
- Refusal of handling a string of size above the allowed limit.
- A special case of a null string.
As such, the Statement breaks rules: 1 (A Statement should turn false for a well-defined reason) and 3 (A Statement should not turn false for any other reason). In fact, there are three reasons that can make our Statement false.
There are several reasons to avoid writing Statements like this. Some of them are:
- Most xUnit frameworks stop executing a Statement on first assertion failure. If the first assertion fails in the above Statement, we won’t know whether the rest of the behaviors work fine until we fix the first one.
- Readability tends to be worse as well as the documentation value of our Specification (the names of such Statements tend to be far from helpful).
- Failure isolation is worse – when a Statement turns false, we’d prefer to know exactly which behavior was broken. Statements such as the one above don’t give us this advantage.
- Throughout a single Statement, we usually work with the same object. When we trigger multiple behaviors on it, we can’t be sure how triggering one behavior impacts subsequent behaviors. If we have e.g. four behaviors in a single Statement, we can’t be sure how the three earlier ones impact the last one. In the example above, we could get away with this, since the specified object returned its result based only on the input of a specific method (i.e. it did not contain any mutable state). Imagine, however, what could happen if we triggered multiple behaviors on a single list. Would we be sure that it does not contain any leftover element after we added some items, then deleted some, then sorted the list and deleted even more?
How many assertions do I need?
A single assertion by definition checks a single specified condition. If a single Statement is about a single behavior, then what about assertions? Does “single behavior” mean I can only have a single assertion per Statement? That was mostly the case for the Statements you have already seen throughout this book, but not for all.
To tell you the truth, there is a straightforward answer to this question – a rule that says: “have a single assertion per test”. What is important to remember is that it applies to “logical assertions”, as Robert C. Martin indicated12.
Before we go further, I’d like to introduce a distinction. A “physical assertion” is a single AssertXXXXX() call. A “logical assertion” is one or more physical assertions that together specify one logical condition. To further illustrate this distinction, I’d like to give you two examples of logical assertions.
Logical assertion – example #1
A good example would be an assertion that specifies that all items in a list are unique (i.e. the list contains no duplicates). XUnit.net does not have such an assertion by default, but we can imagine we have written something like that and called it AssertHasUniqueItems(). Here’s some code that uses this assertion:
1 //some hypothetical code for getting the list:
2 var list = GetList();
3
4 //invoking the assertion:
5 AssertHasUniqueItems(list);
Note that it’s a single logical assertion, specifying a well-defined condition. If we peek into the implementation however, we will find the following code:
 1 public static void AssertHasUniqueItems<T>(List<T> list)
 2 {
 3   for(var i = 0 ; i < list.Count ; i++)
 4   {
 5     for(var j = 0 ; j < list.Count ; j++)
 6     {
 7       if(i != j)
 8       {
 9         Assert.NotEqual(list[i], list[j]);
10       }
11     }
12   }
13 }
Which already executes several physical assertions. If we knew the exact number of elements in collection, we could even use three Assert.NotEqual() assertions instead of AssertHasUniqueItems():
1 //some hypothetical code for getting the collection:
2 var list = GetLastThreeElements();
3
4 //invoking the assertions:
5 Assert.NotEqual(list[0], list[1]);
6 Assert.NotEqual(list[0], list[2]);
7 Assert.NotEqual(list[1], list[2]);
Is it still a single assertion? Physically no, but logically – yes. There is still one logical thing these assertions specify and that is the uniqueness of the items in the list.
Logical assertion – example #2
Another example of a logical assertion is one that specifies exceptions: Assert.Throws(). We already encountered one like this in this chapter. Here is the code again:
 1 [Fact] public void
 2 ShouldThrowValidationExceptionWithFatalErrorLevelWhenValidatedStringIsEmpty()
 3 {
 4   //GIVEN
 5   var validation = new Validation();
 6
 7   //WHEN
 8   var exceptionThrown = Assert.Throws<CustomException>(
 9     () => validation.ApplyTo(string.Empty)
10   );
11
12   //THEN
13   Assert.True(exceptionThrown.IsFatalError);
14 }
Note that in this case, there are two physical assertions (Assert.Throws() and Assert.True()), but one intent – to specify the exception that should be thrown. We may as well extract these two physical assertions into a single one with a meaningful name:
 1 [Fact] public void
 2 ShouldThrowValidationExceptionWithFatalErrorLevelWhenValidatedStringIsEmpty()
 3 {
 4   //GIVEN
 5   var validation = new Validation();
 6
 7   //WHEN - THEN
 8   AssertFatalErrorIsThrownWhen(
 9     () => validation.ApplyTo(string.Empty)
10   );
11 }
So every time we have several physical assertions that can be (or are) extracted into a single assertion method with a meaningful name, I consider them a single logical assertion. There is always a gray area in what can be considered a “meaningful name” (but let’s agree that AssertAllConditionsAreMet() is not a meaningful name, ok?). The rule of thumb is that this name should express our intent better and clearer than the bunch of assertions it hides. If we look again at the example of AssertHasUniqueItems() this assertion does a better job of expressing our intent than a set of three Assert.NotEqual().
Summary
In this chapter, we tried to find out how much should go into a single Statement. We examined the notions of level and functional scope to end up with a conclusion that a Statement should cover a single behavior. We backed this statement by three rules by Amir Kolsky and looked at an example of what could happen when we don’t follow one of them. Finally, we discussed how the notion of “single Statement per behavior” is related to “single assertion per Statement”.
Developing a TDD style and Constrained Non-Determinism
In one of the first chapters, I introduced to you the idea of an anonymous values generator. I showed you the Any class which I use for generating such values. Throughout the chapters that followed, I have used it quite extensively in many of the Statements I wrote.
The time has come to explain a little bit more about the underlying principles of using anonymous values in Statements. Along the way, we’ll also examine developing a style of TDD.
A style?
Yep. Why am I wasting your time writing about style instead of giving you the hardcore technical details? Here’s my answer: before I started writing this tutorial, I read four or five books solely on TDD and maybe two others that contained chapters on TDD. All of this added up to about two or three thousands of paper pages, plus numerous posts on many blogs. And you know what I noticed? No two authors use the same set of techniques for test-driving their code! I mean, sometimes, when you look at the techniques they suggest, two authorities contradict each other. As each authority has their followers, it isn’t uncommon to observe and take part in discussions about whether this or that technique is better than a competing one or which technique is “a smell”13 and leads to trouble in the long run.
I’ve done a lot of this, too. I also tried to understand how come people praise techniques I (thought I) KNEW were wrong and led to disaster. Over time, I came to understand that this is not a “technique A vs. technique B” debate. There are certain sets of techniques that work together and symbiotically enhance each other. Choosing one technique leaves us with issues we have to resolve by adopting other techniques. This is how a style is developed.
Developing a style starts with a set of problems to solve and an underlying set of principles we consider important. These principles lead us to adopt our first technique, which makes us adopt another one and, ultimately, a coherent style emerges. Using Constrained Non-Determinism as an example, I will try to show you how part of a style gets derived from a technique that is derived from a principle.
Principle: Tests As Specification
As I already stressed, I strongly believe that tests should constitute an executable specification. Thus, they should not only pass input values to an object and assert on the output, they should also convey to their reader the rules according to which objects and functions work. The following toy example shows a Statement where it isn’t explicitly explained what the relationship between input and output is:
 1 [Fact] public void
 2 ShouldCreateBackupFileNameContainingPassedHostname()
 3 {
 4   //GIVEN
 5   var fileNamePattern = new BackupFileNamePattern();
 6
 7   //WHEN
 8   var name = fileNamePattern.ApplyTo("MY_HOSTNAME");
 9
10   //THEN
11   Assert.Equal("backup_MY_HOSTNAME.zip", name);
12 }
Although in this case the relationship can be guessed quite easily, it still isn’t explicitly stated, so in more complex scenarios it might not be as trivial to spot. Also, seeing code like that makes me ask questions like:
- Is the
"backup_"prefix always applied? What if I pass the prefix itself instead of"MY_HOSTNAME"? Will the name be"backup_backup_.zip", or just"backup_.zip"? - Is this object responsible for any validation of passed string? If I pass
"MY HOST NAME"(with spaces) will this throw an exception or just apply the formatting pattern as usual? - Last but not least, what about letter casing? Why is
"MY_HOSTNAME"written as an upper-case string? If I pass"my_HOSTNAME", will it be rejected or accepted? Or maybe it will be automatically converted to upper case?
This makes me adopt the first technique to provide my Statements with better support for the principle I follow.
First technique: Anonymous Input
I can wrap the actual value "MY_HOSTNAME" with a method and give it a name that better documents the constraints imposed on it by the specified functionality. In this case, the BackupFileNamePattern() method should accept whatever string I feed it (the object is not responsible for input validation), so I will name the wrapping method AnyString():
 1 [Fact] public void
 2 ShouldCreateBackupFileNameContainingPassedHostname()
 3 {
 4   //GIVEN
 5   var hostname = AnyString();
 6   var fileNamePattern = new BackupFileNamePattern();
 7
 8   //WHEN
 9   var name = fileNamePattern.ApplyTo(hostname);
10
11   //THEN
12   Assert.Equal("backup_MY_HOSTNAME.zip", name);
13 }
14
15 public string AnyString()
16 {
17   return "MY_HOSTNAME";
18 }
By using anonymous input, I provided better documentation of the input value. Here, I wrote AnyString(), but of course, there can be a situation where I use more constrained data, e.g. I would invent a method called AnyAlphaNumericString() if I needed a string that doesn’t contain any characters other than letters and digits.
Now that the Statement itself is freed from the knowledge of the concrete value of hostname variable, the concrete value of "backup_MY_HOSTNAME.zip" in the assertion looks kind of weird. That’s because, there is still no clear indication of the kind of relationship between input and output and whether there is any at all (as it currently is, the Statement suggests that the result of the ApplyTo() is the same for any hostname value). This leads us to another technique.
Second technique: Derived Values
To better document the relationship between input and output, we have to simply derive the expected value we assert on from the input value. Here is the same Statement with the assertion changed:
 1 [Fact] public void
 2 ShouldCreateBackupFileNameContainingPassedHostname()
 3 {
 4   //GIVEN
 5   var hostname = AnyString();
 6   var fileNamePattern = new BackupFileNamePattern();
 7
 8   //WHEN
 9   var name = fileNamePattern.ApplyTo(hostname);
10
11   //THEN
12   Assert.Equal($"backup_{hostname}.zip", name);
13 }
14 public string AnyString()
15 {
16   return "MY_HOSTNAME";
17 }
This looks more like a part of a specification, because we are documenting the format of the backup file name and show which part of the format is variable and which part is fixed. This is something you would probably find documented in a paper specification for the application you are writing – it would probably contain a sentence saying: “The format of a backup file should be backup_H.zip, where H is the current local hostname”. What we used here was a derived value.
Derived values are about defining expected output in terms of the input that was passed to provide a clear indication on what kind of “transformation” the production code is required to perform on its input.
Third technique: Distinct Generated Values
Let’s assume that sometime after our initial version is shipped, we are asked to change the backup feature so that it stores backed up data separately for each user that invokes this functionality. As the customer does not want to have any name conflicts between files created by different users, we are asked to add the name of the user doing a backup to the backup file name. Thus, the new format is backup_H_U.zip, where H is still the hostname and U is the user name. Our Statement for the pattern must change as well to include this information. Of course, we are trying to use the anonymous input again as a proven technique and we end up with:
 1 [Fact] public void
 2 ShouldCreateBackupFileNameContainingPassedHostnameAndUserName()
 3 {
 4   //GIVEN
 5   var hostname = AnyString();
 6   var userName = AnyString();
 7   var fileNamePattern = new BackupFileNamePattern();
 8
 9   //WHEN
10   var name = fileNamePattern.ApplyTo(hostname, userName);
11
12   //THEN
13   Assert.Equal($"backup_{hostname}_{userName}.zip", name);
14 }
15
16 public string AnyString()
17 {
18   return "MY_HOSTNAME";
19 }
Now, we can see that there is something wrong with this Statement. AnyString() is used twice and each time it returns the same value, which means that evaluating the Statement does not give us any guarantee, that both arguments of the ApplyTo() method are used and that they are used in the correct places. For example, the Statement will be considered true when user name value is used in place of a hostname by the ApplyTo() method. This means that if we still want to use the anonymous input effectively without running into false positives14, we have to make the two values distinct, e.g. like this:
 1 [Fact] public void
 2 ShouldCreateBackupFileNameContainingPassedHostnameAndUserName()
 3 {
 4   //GIVEN
 5   var hostname = AnyString1();
 6   var userName = AnyString2(); //different value
 7   var fileNamePattern = new BackupFileNamePattern();
 8
 9   //WHEN
10   var name = fileNamePattern.ApplyTo(hostname, userName);
11
12   //THEN
13   Assert.Equal($"backup_{hostname}_{userName}.zip", name);
14 }
15
16 public string AnyString1()
17 {
18   return "MY_HOSTNAME";
19 }
20
21 public string AnyString2()
22 {
23   return "MY_USER_NAME";
24 }
We solved the problem (for now) by introducing another helper method. However, as you can see, this is not a very scalable solution. Thus, let’s try to reduce the number of helper methods for string generation to one and make it return a different value each time:
 1 [Fact] public void
 2 ShouldCreateBackupFileNameContainingPassedHostnameAndUserName()
 3 {
 4   //GIVEN
 5   var hostname = AnyString();
 6   var userName = AnyString();
 7   var fileNamePattern = new BackupFileNamePattern();
 8
 9   //WHEN
10   var name = fileNamePattern.ApplyTo(hostname, userName);
11
12   //THEN
13   Assert.Equal($"backup_{hostname}_{userName}.zip", name);
14 }
15
16 public string AnyString()
17 {
18   return Guid.NewGuid().ToString();
19 }
This time, the AnyString() method returns a GUID instead of a human-readable text. Generating a new GUID each time gives us a fairly strong guarantee that each value would be distinct. The string not being human-readable (contrary to something like "MY_HOSTNAME") may leave you worried that maybe we are losing something, but hey, didn’t we say AnyString()?
Distinct generated values means that each time we generate an anonymous value, it’s different (if possible) than the previous one and each such value is generated automatically using some kind of heuristics.
Fourth technique: Constant Specification
Let’s consider another modification that we are requested to make – this time, the backup file name needs to contain the version number of our application as well. Remembering that we want to use the derived values technique, we will not hardcode the version number into our Statement. Instead, we will use a constant that’s already defined somewhere else in the application’s production code (this way we also avoid duplication of this version number across the application). Let’s imagine this version number is stored as a constant called Number in Version class. The Statement updated for the new requirements looks like this:
 1 [Fact] public void
 2 ShouldCreateBackupFileNameContainingPassedHostnameAndUserNameAndVersion()
 3 {
 4   //GIVEN
 5   var hostname = AnyString();
 6   var userName = AnyString();
 7   var fileNamePattern = new BackupFileNamePattern();
 8
 9   //WHEN
10   var name = fileNamePattern.ApplyTo(hostname, userName);
11
12   //THEN
13   Assert.Equal(
14     $"backup_{hostname}_{userName}_{Version.Number}.zip", name);
15 }
16
17 public string AnyString()
18 {
19   return Guid.NewGuid().ToString();
20 }
Again, rather than a literal value of something like 5.0, I used the Version.Number constant which holds the value. This allowed me to use a derived value in the assertion but left me a little worried about whether the Version.Number itself is correct – after all, I used the production code constant for the creation of expected value. If I accidentally modified this constant in my code to an invalid value, the Statement would still be considered true, even though the behavior itself would be wrong.
To keep everyone happy, I usually solve this dilemma by writing a single Statement just for the constant to specify what the value should be:
1 public class VersionSpecification
2 {
3  [Fact] public void
4  ShouldContainNumberEqualTo1_0()
5  {
6    Assert.Equal("1.0", Version.Number);
7  }
8 }
By doing so, I made sure that there is a Statement that will turn false whenever I accidentally change the value of Version.Number. This way, I don’t have to worry about it in the rest of the Specification. As long as this Statement holds, the rest can use the constant from the production code without worries.
Summary of the example
By showing you this example, I tried to demonstrate how a style can evolve from the principles we believe in and the constraints we encounter when applying those principles. I did so for two reasons:
- To introduce to you a set of techniques (although it would be more accurate to use the word “patterns”) I use and recommend. Giving an example was the best way of describing them fluently and logically that I could think of.
- To help you better communicate with people that are using different styles. Instead of just throwing “you are doing it wrong” at them, consider understanding their principles and how their techniques of choice support those principles.
Now, let’s take a quick summary of all the techniques introduced in the backup file name example:
- Derived Values
- I define my expected output in terms of the input to document the relationship between input and output.
- Anonymous Input
- When I want to document the fact that a particular value is not relevant for the current Statement, I use a special method that produces the value for me. I name this method after the equivalence class that I need it to belong to (e.g.
Any.AlphaNumericString()) and this way, I make my Statement agnostic of what particular value is used. - Distinct Generated Values
- When using anonymous input, I generate a distinct value each time (in case of types that have very few values, like boolean, try at least not to generate the same value twice in a row) to make the Statement more reliable.
- Constant Specification
- I write a separate Statement for a constant to specify what its value should be. This way, I can use the constant instead of its literal value in all the other Statements to create a Derived Value without the risk that changing the value of the constant would not be detected by my executable Specification.
Constrained non-determinism
When we combine anonymous input with distinct generated values, we get something that is called Constrained Non-Determinism. This is a term coined by Mark Seemann and means three things:
- Values are anonymous i.e. we don’t know the actual value we are using.
- The values are generated in as distinct as possible sequence (which means that, whenever possible, no two values generated one after another hold the same value)
- The non-determinism in generation of the values is constrained, which means that the algorithms for generating values are carefully picked to provide values that belong to a specific equivalence class and that are not “evil” (e.g. when generating “any integer”, we’d rather not allow generating ‘0’ as it is usually a special-case-value that often deserves a separate Statement).
There are multiple ways to implement constrained non-determinism. Mark Seemann himself has invented the AutoFixture library for C# that is freely available to download. Here is the shortest possible snippet to generate an anonymous integer using AutoFixture:
1 Fixture fixture = new Fixture();
2 var anonymousInteger = fixture.Create<int>();
I, on the other hand, follow Amir Kolsky and Scott Bain, who recommend using Any class as seen in the previous chapters of this book. Any takes a slightly different approach than AutoFixture (although it uses AutoFixture internally). My implementation of Any class is available to download as well.
Summary
I hope that this chapter gave you some understanding of how different TDD styles came into existence and why I use some of the techniques I do (and how these techniques are not just a series of random choices). In the next chapters, I will try to introduce some more techniques to help you grow a bag of neat tricks – a coherent style15.
Specifying functional boundaries and conditions
Sometimes, an anonymous value is not enough
In the last chapter, I described how anonymous values are useful when we specify a behavior that should be the same no matter what arguments we pass to the constructor or invoked methods. An example would be pushing an integer onto a stack and popping it back to see whether it’s the same item we pushed – the behavior is consistent for whatever number we push and pop:
 1 [Fact] public void
 2 ShouldPopLastPushedItem()
 3 {
 4   //GIVEN
 5   var lastPushedItem = Any.Integer();
 6   var stack = new Stack<int>();
 7   stack.Push(Any.Integer());
 8   stack.Push(Any.Integer());
 9   stack.Push(lastPushedItem);
10
11   //WHEN
12   var poppedItem = stack.Pop();
13
14   //THEN
15   Assert.Equal(lastPushedItem, poppedItem);
16 }
In this case, the values of the first two integer numbers pushed on the stack do not matter – the described relationship between input and output is independent of the actual values we use. As we saw in the last chapter, this is the typical case where we would apply Constrained Non-Determinism.
Sometimes, however, specified objects exhibit different behaviors based on what is passed to their constructors or methods or what they get by calling other objects. For example:
- in our application, we may have a licensing policy where a feature is allowed to be used only when the license is valid, and denied after it has expired. In such a case, the behavior before the expiry date is different than after – the expiry date is the functional behavior boundary.
- Some shops are open from 10 AM to 6 PM, so if we had a query in our application whether the shop is currently open, we would expect it to be answered differently based on what the current time is. Again, the open and closed dates are functional behavior boundaries.
- An algorithm calculating the absolute value of an integer number returns the same number for inputs greater than or equal to
0but negated input for negative numbers. Thus,0marks the functional boundary in this case.
In such cases, we need to carefully choose our input values to gain a sufficient confidence level while avoiding overspecifying the behaviors with too many Statements (which usually introduces penalties in both Specification run time and maintenance). Scott and Amir build on the proven practices from the testing community16 and give us some advice on how to pick the values. I’ll describe these guidelines (slightly modified in several places) in three parts:
- specifying exceptions to the rules – where behavior is the same for every input values except one or more explicitly specified values,
- specifying boundaries
- specifying ranges – where there are more boundaries than one.
Exceptions to the rule
There are times when a Statement is true for every value except one (or several) explicitly specified. My approach varies a bit depending on the set of possible values and the number of exceptions. I’m going to give you three examples to help you understand these variations better.
Example 1: a single exception from a large set of values
In some countries, some digits are avoided e.g. in floor numbers in some hospitals and hotels due to some local superstitions or just sounding similar to another word that has a very negative meaning. One example of this is /tetraphobia/17, which leads to skipping the digit 4, as in some languages, it sounds similar to the word “death”. In other words, any number containing 4 is avoided and when you enter the building, you might not find a fourth floor (or fourteenth). Let’s imagine we have several such rules for our hotels in different parts of the world and we want the software to tell us if a certain digit is allowed by local superstitions. One of these rules is to be implemented by a class called Tetraphobia:
1 public class Tetraphobia : LocalSuperstition
2 {
3   public bool Allows(char number)
4   {
5     throw new NotImplementedException("not implemented yet");
6   }
7 }
It implements the LocalSuperstition interface which has an Allows() method, so for the sake of compile-correctness, we had to create the class and the method. Now that we have it, we want to test-drive the implementation. What Statements do we write?
Obviously we need a Statement that says what happens when we pass a disallowed digit:
 1 [Fact] public void
 2 ShouldReject4()
 3 {
 4   //GIVEN
 5   var tetraphobia = new Tetraphobia();
 6
 7   //WHEN
 8   var isFourAccepted = tetraphobia.Allows('4');
 9
10   //THEN
11   Assert.False(isFourAccepted);
12 }
Note that we use the specific value for which the exceptional behavior takes place. Still, it may be a very good idea to extract 4 into a constant. In one of the previous chapters, I described a technique called Constant Specification, where we write an explicit Statement about the value of the named constant and use the named constant itself everywhere else instead of its literal value. So why did I not use this technique this time? The only reason is that this might have looked a little bit silly with such an extremely trivial example. In reality, I should have used the named constant. Let’s do this exercise now and see what happens.
 1 [Fact] public void
 2 ShouldRejectSuperstitiousValue()
 3 {
 4   //GIVEN
 5   var tetraphobia = new Tetraphobia();
 6
 7   //WHEN
 8   var isSuperstitiousValueAccepted =
 9     tetraphobia.Allows(Tetraphobia.SuperstitiousValue);
10
11   //THEN
12   Assert.False(isSuperstitiousValueAccepted);
13 }
When we do that, we have to document the named constant with the following Statement:
1 [Fact] public void
2 ShouldReturn4AsSuperstitiousValue()
3 {
4   Assert.Equal('4', Tetraphobia.SuperstitiousValue);
5 }
Time for a Statement that describes the behavior for all non-exceptional values. This time, we are going to use a method of the Any class named Any.OtherThan(), that generates any value other than the one specified (and produces nice, readable code as a side effect):
 1 [Fact] public void
 2 ShouldAcceptNonSuperstitiousValue()
 3 {
 4   //GIVEN
 5   var tetraphobia = new Tetraphobia();
 6
 7   //WHEN
 8   var isNonSuperstitiousValueAccepted =
 9     tetraphobia.Allows(Any.OtherThan(Tetraphobia.SuperstitiousValue);
10
11   //THEN
12   Assert.True(isNonSuperstitiousValueAccepted);
13 }
and that’s it – I don’t usually write more Statements in such cases. There are so many possible input values that it would not be rational to specify all of them. Drawing from Kent Beck’s famous comment from Stack Overflow18, I think that our job is not to write as many Statements as we can, but as little as possible to truly document the system and give us a desired level of confidence.
Example 2: a single exception from a small set of values
The situation is different, however, when the exceptional value is chosen from a small set – this is often the case where the input value type is an enumeration. Let’s go back to an example from one of our previous chapters, where we specified that there is some kind of reporting feature and it can be accessed by either an administrator role or by an auditor role. Let’s modify this example for now and say that only administrators are allowed to access the reporting feature:
 1 [Fact] public void
 2 ShouldGrantAdministratorsAccessToReporting()
 3 {
 4  //GIVEN
 5  var access = new Access();
 6
 7  //WHEN
 8  var accessGranted
 9      = access.ToReportingIsGrantedTo(Roles.Admin);
10
11  //THEN
12  Assert.True(accessGranted);
13 }
The approach to this part is no different than what I did in the first example – I wrote a Statement for the single exceptional value. Time to think about the other Statement – the one that specifies what should happen for the rest of the roles. I’d like to describe two ways this task can be tackled.
The first way is to do it like in the previous example – pick a value different than the exceptional one. This time we will use Any.OtherThan() method, which is suited for such a case:
 1 [Fact] public void
 2 ShouldDenyAnyRoleOtherThanAdministratorAccessToReporting()
 3 {
 4  //GIVEN
 5  var access = new Access();
 6
 7  //WHEN
 8  var accessGranted
 9      = access.ToReportingIsGrantedTo(Any.OtherThan(Roles.Admin));
10
11  //THEN
12  Assert.False(accessGranted);
13 }
This approach has two advantages:
- Only one Statement is executed for the “access denied” case, so there is no significant run time penalty.
- In case we expand our enum in the future, we don’t have to modify this Statement – the added enum member will get a chance to be picked up.
However, there is also one disadvantage – we can’t be sure the newly added enum member is used in this Statement. In the previous example, we didn’t care that much about the values that were used, because:
-
charrange was quite large so specifying the behaviors for all the values could prove troublesome and inefficient given our desired confidence level, -
charis a fixed set of values – we can’t expandcharas we expand enums, so there is no need to worry about the future.
So what if there are only two more roles except Roles.Admin, e.g. Auditor and CasualUser? In such cases, I sometimes write a Statement that’s executed against all the non-exceptional values, using xUnit.net’s [Theory] attribute that allows me to execute the same Statement code with different sets of arguments. An example here would be:
 1 [Theory]
 2 [InlineData(Roles.Auditor)]
 3 [InlineData(Roles.CasualUser)]
 4 public void
 5 ShouldDenyAnyRoleOtherThanAdministratorAccessToReporting(Roles role)
 6 {
 7  //GIVEN
 8  var access = new Access();
 9
10  //WHEN
11  var accessGranted
12      = access.ToReportingIsGrantedTo(role);
13
14  //THEN
15  Assert.False(accessGranted);
16 }
The Statement above is executed for both Roles.Auditor and Roles.CasualUser. The downside of this approach is that each time we expand an enumeration, we need to go back here and update the Statement. As I tend to forget such things, I try to keep at most one Statement in the system depending on the enum – if I find more than one place where I vary my behavior based on values of a particular enumeration, I change the design to replace enum with polymorphism. Statements in TDD can be used as a tool to detect design issues and I’ll provide a longer discussion on this in a later chapter.
Example 3: More than one exception
The previous two examples assume there is only one exception to the rule. However, this concept can be extended to more values, as long as it is a finished, discrete set. If multiple exceptional values produce the same behavior, I usually try to cover them all by using the mentioned [Theory] feature of xUnit.net. I’ll demonstrate it by taking the previous example of granting access and assuming that this time, both administrators and auditors are allowed to use the feature. A Statement for behavior would look like this:
 1 [Theory]
 2 [InlineData(Roles.Admin)]
 3 [InlineData(Roles.Auditor)]
 4 public void
 5 ShouldAllowAccessToReportingBy(Roles role)
 6 {
 7  //GIVEN
 8  var access = new Access();
 9
10  //WHEN
11  var accessGranted
12      = access.ToReportingIsGrantedTo(role);
13
14  //THEN
15  Assert.False(accessGranted);
16 }
In the last example, I used this approach for the non-exceptional values, saying that this is what I sometimes do. However, when specifying multiple exceptions to the rule, this is my default approach – the nature of the exceptional values is that they are strictly specified, so I want them all to be included in my Specification.
This time, I’m not showing you the Statement for non-exceptional values as it follows the approach I outlined in the previous example.
Rules valid within boundaries
Sometimes, a behavior varies around a boundary. A simple example would be a rule on how to determine whether someone is an adult or not. One is usually considered an adult after reaching a certain age, let’s say, of 18. Pretending we operate at the granule of years (not taking months into account), the rule is:
- When one’s age in years is less than 18, they are considered not an adult.
- When one’s age in years is at least 18, they are considered an adult.
As you can see, there is a boundary between the two behaviors. The “right edge” of this boundary is 18. Why do I say “right edge”? That is because the boundary always has two edges, which, by the way, also means it has a length. If we assume we are talking about the mentioned adult age rule and that our numerical domain is that of integer numbers, we can as well use 17 instead of 18 as edge value and say that:
- When one’s age in years is at most 17, they are considered not an adult.
- When one’s age in years is more than 17, they are considered an adult.
So a boundary is not a single number – it always has a length – the length between last value of the previous behavior and the first value of the next behavior. In the case of our example, the length between 17 (left edge – last non-adult age) and 18 (right edge – first adult value) is 1.
Now, imagine that we are not talking about integer values anymore, but we treat the time as what it is – a continuum. Then the right edge value would still be 18 years. But what about the left edge? It would not be possible for it to stay 17 years, as the rule would apply to e.g. 17 years and 1 day as well. So what is the correct right edge value and the correct length of the boundary? Would the left edge need to be 17 years and 11 months? Or 17 years, 11 months, 365/366 days (we have the leap year issue here)? Or maybe 17 years, 11 months, 365/366 days, 23 hours, 59 minutes, etc.? This is harder to answer and depends heavily on the context – it must be answered for each particular case based on the domain and the business needs – this way we know what kind of precision is expected of us.
In our Specification, we have to document the boundary length somehow. This brings an interesting question: how to describe the boundary length with Statements? To illustrate this, I want to show you two Statements describing the mentioned adult age calculation expressed using the granule of years (so we leave months, days, etc. out).
The first Statement is for values smaller than 18 and we want to specify that for the left edge value (i.e. 17), but calculated relative to the right edge value (i.e. instead of writing 17, we write 18-1):
 1 [Fact] public void
 2 ShouldNotBeSuccessfulForAgeLessThan18()
 3 {
 4   //GIVEN
 5   var detection = new AdultAgeDetection();
 6   var notAnAdult = 18 - 1; //more on this later
 7
 8   //WHEN
 9   var isSuccessful = detection.PerformFor(notAnAdult);
10
11   //THEN
12   Assert.False(isSuccessful);
13 }
And the next Statement for values greater than or equal to 18 and we want to use the right edge value:
 1 [Fact] public void
 2 ShouldBeSuccessfulForAgeGreaterThanOrEqualTo18()
 3 {
 4   //GIVEN
 5   var detection = new AdultAgeDetection();
 6   var adult = 18;
 7
 8   //WHEN
 9   var isSuccessful = detection.PerformFor(adult);
10
11   //THEN
12   Assert.True(isSuccessful);
13 }
There are two things to note about these examples. The first one is that I didn’t use any kind of Any methods. I use Any in cases where I don’t have a boundary or when I consider no value from an equivalence class better than others in any particular way. When I specify boundaries, however, instead of using methods like Any.IntegerGreaterOrEqualTo(18), I use the edge values as I find that they more strictly define the boundary and drive the right implementation. Also, explicitly specifying the behaviors for the edge values allows me to document the boundary length.
The second thing to note is the usage of literal constant 18 in the example above. In one of the previous chapters, I described a technique called Constant Specification which is about writing an explicit Statement about the value of the named constant and use the named constant everywhere else instead of its literal value. So why didn’t I use this technique this time?
The only reason is that this might have looked a little bit silly with such an extremely trivial example as detecting adult age. In reality, I should have used the named constant in both Statements and it would show the boundary length even more clearly. Let’s perform this exercise now and see what happens.
First, let’s document the named constant with the following Statement:
1 [Fact] public void
2 ShouldIncludeMinimumAdultAgeEqualTo18()
3 {
4   Assert.Equal(18, Age.MinimumAdult);
5 }
Now we’ve got everything we need to rewrite the two Statements we wrote earlier. The first would look like this:
 1 [Fact] public void
 2 ShouldNotBeSuccessfulForLessThanMinimumAdultAge()
 3 {
 4   //GIVEN
 5   var detection = new AdultAgeDetection();
 6   var notAnAdultYet = Age.MinimumAdult - 1;
 7
 8   //WHEN
 9   var isSuccessful = detection.PerformFor(notAnAdultYet);
10
11   //THEN
12   Assert.False(isSuccessful);
13 }
And the next Statement for values greater than or equal to 18 would look like this:
 1 [Fact] public void
 2 ShouldBeSuccessfulForAgeGreaterThanOrEqualToMinimumAdultAge()
 3 {
 4   //GIVEN
 5   var detection = new AdultAgeDetection();
 6   var adultAge = Age.MinimumAdult;
 7
 8   //WHEN
 9   var isSuccessful = detection.PerformFor(adultAge);
10
11   //THEN
12   Assert.True(isSuccessful);
13 }
As you can see, the first Statement contains the following expression:
1 Age.MinimumAdult - 1
where 1 is the exact length of the boundary. As I mentioned earlier, the example is so trivial that it may look silly and funny, however, in real-life scenarios, this is a technique I apply anytime, anywhere.
Boundaries may look like they apply only to numeric input, but they occur at many other places. There are boundaries associated with date/time (e.g. the adult age calculation would be this kind of case if we didn’t stop at counting years but instead considered time as a continuum – the decision would need to be made whether we need precision in seconds or maybe in ticks), or strings (e.g. validation of user name where it must be at least 2 characters, or password that must contain at least 2 special characters). They also apply to regular expressions. For example, for a simple regex \d+, we would surely specify for at least three values: an empty string, a single digit, and a single non-digit.
Combination of boundaries – ranges
The previous examples focused on a single boundary. So, what about a situation when there are more, i.e. a behavior is valid within a range?
Example – driving license
Let’s consider the following example: we live in a country where a citizen can get a driving license only after their 18th birthday, but before 65th (the government decided that people after 65 may have worse sight and that it’s safer not to give them new driving licenses). Let’s assume that we are trying to develop a class that answers the question of whether we can apply for a driving license and the values returned by this query is as follows:
- Age < 18 – returns enum value
QueryResults.TooYoung - 18 <= age <= 65 – returns enum value
QueryResults.AllowedToApply - Age > 65 – returns enum value
QueryResults.TooOld
Now, remember I wrote that I specify the behaviors with boundaries by using the edge values? This approach, when applied to the situation I just described, would give me the following Statements:
- Age = 17, should yield result
QueryResults.TooYoung - Age = 18, should yield result
QueryResults.AllowedToApply - Age = 65, should yield result
QueryResults.AllowedToApply - Age = 66, should yield result
QueryResults.TooOld
thus, I would describe the behavior where the query should return AllowedToApply value twice. This is not a big issue if it helps me document the boundaries.
The first Statement says what should happen up to the age of 17:
 1 [Fact]
 2 public void ShouldRespondThatAgeLessThan18IsTooYoung()
 3 {
 4   //GIVEN
 5   var query = new DrivingLicenseQuery();
 6
 7   //WHEN
 8   var result = query.ExecuteFor(18-1);
 9
10   //THEN
11   Assert.Equal(QueryResults.TooYoung, result);
12 }
The second Statement tells us that the range of 18 – 65 is where a citizen is allowed to apply for a driving license. I write it as a theory (again using the [InlineData()] attribute of xUnit.net) because this range has two boundaries around which the behavior changes:
 1 [Theory]
 2 [InlineData(18, QueryResults.AllowedToApply)]
 3 [InlineData(65, QueryResults.AllowedToApply)]
 4 public void ShouldRespondThatDrivingLicenseCanBeAppliedForInRangeOf18To65(
 5   int age, QueryResults expectedResult
 6 )
 7 {
 8   //GIVEN
 9   var query = new DrivingLicenseQuery();
10
11   //WHEN
12   var result = query.ExecuteFor(age);
13
14   //THEN
15   Assert.Equal(expectedResult, result);
16 }
The last Statement specifies what should be the response when someone is older than 65:
 1 [Fact]
 2 public void ShouldRespondThatAgeMoreThan65IsTooOld()
 3 {
 4   //GIVEN
 5   var query = new DrivingLicenseQuery();
 6
 7   //WHEN
 8   var result = query.ExecuteFor(65+1);
 9
10   //THEN
11   Assert.Equal(QueryResults.TooOld, result);
12 }
Note that I used 18-1 and 65+1 instead of 17 and 66 to show that 18 and 65 are the boundary values and that the lengths of the boundaries are, in both cases, 1. Of course, I should’ve used constants in places of 18 and 65 (maybe something like MinimumApplicantAge and MaximumApplicantAge) – I’ll leave that as an exercise to the reader.
Example – setting an alarm
In the previous example, we were quite lucky because the specified logic was purely functional (i.e. it returned different results based on different inputs). Thanks to this, when writing out the theory for the age range of 18-65, we could parameterize input values together with expected results. This is not always the case. For example, let’s imagine that we have a Clock class that allows us to schedule an alarm. The class allows us to set the hour safely between 0 and 24, otherwise, it throws an exception.
This time, I have to write two parameterized Statements – one where a value is returned (for valid cases) and one where the exception is thrown (for invalid cases). The first would look like this:
 1 [Theory]
 2 [InlineData(Hours.Min)]
 3 [InlineData(Hours.Max)]
 4 public void
 5 ShouldBeAbleToSetHourBetweenMinAndMax(int inputHour)
 6 {
 7   //GIVEN
 8   var clock = new Clock();
 9   clock.SetAlarmHour(inputHour);
10
11   //WHEN
12   var setHour = clock.GetAlarmHour();
13
14   //THEN
15   Assert.Equal(inputHour, setHour);
16 }
and the second:
 1 [Theory]
 2 [InlineData(Hours.Min-1)]
 3 [InlineData(Hours.Max+1)]
 4 public void
 5 ShouldThrowOutOfRangeExceptionWhenTryingToSetAlarmHourOutsideValidRange(
 6   int inputHour)
 7 {
 8   //GIVEN
 9   var clock = new Clock();
10
11   //WHEN - THEN
12   Assert.Throws<OutOfRangeException>(
13     ()=> clock.SetAlarmHour(inputHour)
14   );
15 }
Other than that, I used the same approach as the last time.
Summary
In this chapter, I described specifying functional boundaries with a minimum amount of code and Statements, so that the Specification is more maintainable and runs faster. There is one more kind of situation left: when we have compound conditions (e.g. a password must be at least 10 characters and contain at least 2 special characters) – we’ll get back to those when we introduce mock objects.
Driving the implementation from Specification
As one of the last topics of the core TDD techniques that don’t require us to delve into the object-oriented design world, I’d like to show you three techniques for turning a false Statement true. The names of the techniques come from a book by Kent Beck, Test-Driven Development: By Example and are:
- Type the obvious implementation
- Fake it (`til you make it)
- Triangulate
Don’t worry if these names don’t tell you anything, the techniques are not that difficult to grasp and I will try to give an example of each of them.
Type the obvious implementation
The first technique simply says: when you know the correct and final implementation to turn a Statement true, then just type it. If the implementation is obvious, this approach makes a lot of sense - after all, the number of Statements required to specify (and test) a functionality should reflect our desired level of confidence. If this level is very high, we can just type the correct code in response to a single Statement. Let’s see it in action on a trivial example of adding two numbers:
 1 [Fact] public void
 2 ShouldAddTwoNumbersTogether()
 3 {
 4   //GIVEN
 5   var addition = new Addition();
 6
 7   //WHEN
 8   var sum = addition.Of(3,5);
 9
10   //THEN
11   Assert.Equal(8, sum);
12 }
You may remember that in one of the previous chapters I wrote that we usually should write the simplest production code that would make the Statement true. The mentioned approach would encourage us to just return 8 from the Of() method because it would be sufficient to make the Statement true. Instead of doing that, however, we may decide that the logic is so obvious, that we can just type it in its final form:
1 public class Addition
2 {
3   public int Of(int a, int b)
4   {
5     return a + b;
6   }
7 }
and that’s it. Note that I didn’t use Constrained Non-Determinism in the Statement, because using it kind of enforces using the “type the obvious implementation” approach. This is also one of the reasons that many Statements I wrote so far in the previous chapters were implemented by typing the correct implementation. Just to illustrate it, let’s take a look at how the above Statement would look if I used Constrained Non-Determinism:
 1 [Fact] public void
 2 ShouldAddTwoNumbersTogether()
 3 {
 4   //GIVEN
 5   var a = Any.Integer();
 6   var b = Any.Integer();
 7   var addition = new Addition();
 8
 9   //WHEN
10   var sum = addition.Of(a,b);
11
12   //THEN
13   Assert.Equal(a + b, sum);
14 }
The most obvious implementation that would make this Statement true is the correct implementation – I can’t get away with returning a constant value as I could when I didn’t use Constrained Non-Determinism. This is because this time I just don’t know what the expected result is as it is strictly dependent on the input values which I don’t know as well.
Fake it (‘til you make it)
The second technique made me smile when I first learned about it. I don’t recall myself ever using it in real production code, yet I find it so interesting that I want to show it to you anyway. It is so simple you will not regret these few minutes even if just for broadening your horizons.
Let’s assume we already have a false Statement written and are about to make it true by writing production code. At this moment, we apply fake it (‘till you make it) in two steps:
- We start with a “fake it” step. Here, we turn a false Statement true by using the most obvious implementation possible, even if it’s not the correct implementation (hence the name of the step - we “fake” the real implementation to “cheat” the Statement). Usually, returning a literal constant is enough at the beginning.
- Then we proceed with the “make it” step - we rely on our sense of duplication between the Statement and (fake) implementation to gradually transform both into their more general forms that eliminate this duplication. Usually, we achieve this by changing constants into variables, variables into parameters, etc.
An example would be handy just about now, so let’s apply fake it… to the same addition example as in the type the obvious implementation section. The Statement looks the same as before:
 1 [Fact] public void
 2 ShouldAddTwoNumbersTogether()
 3 {
 4   //GIVEN
 5   var addition = new Addition();
 6
 7   //WHEN
 8   var sum = addition.Of(3, 5);
 9
10   //THEN
11   Assert.Equal(8, sum);
12 }
For the implementation, however, we are going to use the most obvious code that will turn the Statement true. As mentioned, this most obvious implementation is almost always returning a constant:
1 public class Addition
2 {
3   public int Of(int a, int b)
4   {
5     return 8; //we faked the real implementation
6   }
7 }
The Statement turns true (green) now, even though the implementation is obviously wrong. Now is the time to remove duplication between the Statement and the production code.
First, let’s note that the number 8 is duplicated between Statement and implementation – the implementation returns it and the Statement asserts on it. To reduce this duplication, let’s break the 8 in the implementation into an addition:
1 public class Addition
2 {
3   public int Of(int a, int b)
4   {
5     return 3 + 5;
6   }
7 }
Note the smart trick I did. I changed the duplication between implementation and expected result of the Statement to duplication between implementation and input values of the Statement. I changed the production code to use
1 return 3 + 5;
exactly because the Statement used these two values like this:
1 var sum = addition.Of(3, 5);
This kind of duplication is different from the previous one in that it can be removed using parameters (this applies not only to input parameters of a method but to anything we have access to before triggering specified behavior – constructor parameters, fields, etc. in contrast to result which we normally don’t know until we invoke the behavior). The duplication of number 3 can be eliminated by changing the production code to use the value passed from the Statement. So this:
1 public class Addition
2 {
3   public int Of(int a, int b)
4   {
5     return 3 + 5;
6   }
7 }
Is transformed into this:
1 public class Addition
2 {
3   public int Of(int a, int b)
4   {
5     return a + 5;
6   }
7 }
This way we eliminated the duplication of number 3 - we used a method parameter to transfer the value of 3 from Statement to the Of() implementation, so we have it in a single place now. After this transformation, we only have the number 5 left duplicated, so let’s transform it the same way we transformed 3:
1 public class Addition
2 {
3   public int Of(int a, int b)
4   {
5     return a + b;
6   }
7 }
And that’s it - we arrived at the correct implementation. I used a trivial example, since I don’t want to spend too much time on this, but you can find more advanced ones in Kent Beck’s book if you like.
Triangulate
Triangulation is considered the most conservative technique of the described trio, because following it involves the tiniest possible steps to arrive at the right solution. The term Triangulation seems mysterious at first - at least it was to me, especially that it didn’t bring anything related to software engineering to my mind. The name was taken from radar triangulation where outputs from at least two radars must be used to determine the position of a unit. Also, in radar triangulation, the position is measured indirectly, by combining the following data: range (not position!) between two radars, measurement done by each radar and the positions of the radars (which we know, because we are the ones who put the radars there). From this data, we can derive a triangle, so we can use trigonometry to calculate the position of the third point of the triangle, which is the desired position of the unit (two remaining points are the positions of radars). Such measurement is indirect in nature, because we don’t measure the position directly, but calculate it from other helper measurements.
These two characteristics: indirect measurement and using at least two sources of information are at the core of TDD triangulation. Here’s how it can be translated from radars to code:
- Indirect measurement: in code, it means we derive the internal implementation and design of a module from several known examples of its desired externally visible behavior by looking at what varies in these examples and changing the production code so that this variability is handled generically. For example, variability might lead us from changing a constant to a variable, because several different examples use different input values.
- Using at least two sources of information: in code, it means we start with the simplest possible implementation of behavior and make it more general only when we have two or more different examples of this behavior (i.e. Statements that describe the desired functionality for several different inputs). Then new examples can be added and generalization can be done again. This process is repeated until we reach the desired implementation. Robert C. Martin developed a maxim on this, saying that “As the tests get more specific, the code gets more generic”.
Usually, when TDD is showcased on simple examples, triangulation is the primary technique used, so many novices mistakenly believe TDD is all about triangulation.
I consider it an important technique because:
- Many TDD practitioners use it and demonstrate it, so I assume you will see it sooner or later and most likely have questions regarding it.
- It allows us to arrive at the right implementation by taking very tiny steps (tiniest than any you have seen so far in this book) and I find it very useful when I’m uncertain about how the correct implementation and design should look like.
Example 1 - adding numbers
Before I show you a more advanced example of triangulation, I would like to get back to our toy example of adding two integer numbers. This will allow us to see how triangulation differs from the other two techniques mentioned earlier.
For writing the examples, we will use the xUnit.net’s feature of parameterized Statements, i.e. theories - this will allow us to give many examples of the desired functionality without duplicating the code.
The first example looks like this:
 1 [Theory]
 2 [InlineData(0,0,0)]
 3 public void ShouldAddTwoNumbersTogether(
 4   int addend1,
 5   int addend2,
 6   int expectedSum)
 7 {
 8   //GIVEN
 9   var addition = new Addition();
10
11   //WHEN
12   var sum = addition.Of(addend1, addend2);
13
14   //THEN
15   Assert.Equal(expectedSum, sum);
16 }
Note that we parameterized not only the input values but also the expected result (expectedSum). The first example specifies that 0 + 0 = 0.
The implementation, similarly to fake it (‘till you make it) is, for now, to just return a constant:
1 public class Addition
2 {
3   public int Of(int a, int b)
4   {
5     return 0;
6   }
7 }
Now, contrary to fake it… technique, we don’t try to remove duplication between the Statement and the code. Instead, we add another example of the same rule. What do I mean by “the same rule”? Well, we need to consider our axes of variability. In the addition operation, two things can vary - either the first addend, or the second - thus, we have two axes of variability. For our second example, we need to keep one of them unchanged while changing the other. Let’s say that we decide to keep the second input value the same as in the previous example (which is 0) and change the first value to 1. So this single example:
1 [Theory]
2 [InlineData(0,0,0)]
Becomes a set of two examples:
1 [Theory]
2 [InlineData(0,0,0)]
3 [InlineData(1,0,1)] //NEW!
Again, note that the second input value stays the same in both examples and the first one varies. The expected result needs to be different as well.
As for the implementation, we still try to make the Statement true by using as dumb implementation as possible:
1 public class Addition
2 {
3   public int Of(int a, int b)
4   {
5     if(a == 1) return 1;
6     return 0;
7   }
8 }
We already have two examples, so if we see a repeating pattern, we may try to generalize it. Let’s assume, however, that we don’t have an idea on how to generalize the implementation yet, so let’s add a third example:
1 [Theory]
2 [InlineData(0,0,0)]
3 [InlineData(1,0,1)]
4 [InlineData(2,0,2)]
And the implementation is expanded to:
1 public class Addition
2 {
3   public int Of(int a, int b)
4   {
5     if(a == 2) return 2;
6     if(a == 1) return 1;
7     return 0;
8   }
9 }
Now, looking at this code, we can notice a pattern - for every input values so far, we return the value of the first one: for 1 we return 1, for 2 we return 2, for 0 we return 0. Thus, we can generalize this implementation. Let’s generalize only the part related to the handling number 2 to see whether the direction is right:
1 public class Addition
2 {
3   public int Of(int a, int b)
4   {
5     if(a == 2) return a; //changed from 2 to a
6     if(a == 1) return 1;
7     return 0;
8   }
9 }
The examples should still be true at this point, so we haven’t broken the existing code. Time to change the second if statement:
1 public class Addition
2 {
3   public int Of(int a, int b)
4   {
5     if(a == 2) return a;
6     if(a == 1) return a; //changed from 1 to a
7     return 0;
8   }
9 }
We still have the green bar, so the next step would be to generalize the return 0 part to return a:
1 public class Addition
2 {
3   public int Of(int a, int b)
4   {
5     if(a == 2) return a;
6     if(a == 1) return a;
7     return a; //changed from 0 to a
8   }
9 }
The examples should still be true. By the way, triangulation doesn’t force us to take as tiny steps as in this case, however, I wanted to show you that it makes it possible. The ability to take smaller steps when needed is something I value a lot when I use TDD. Anyway, we can notice that each of the conditions ends with the same result, so we don’t need the conditions at all. We can remove them and leave only:
1 public class Addition
2 {
3   public int Of(int a, int b)
4   {
5     return a;
6   }
7 }
Thus, we have generalized the first axis of variability, which is the first addend. Time to vary the second one, by leaving the first addend unchanged. To the following existing examples:
1 [Theory]
2 [InlineData(0,0,0)] //0+0=0
3 [InlineData(1,0,1)] //1+0=1
4 [InlineData(2,0,2)] //2+0=2
We add the following one:
1 [InlineData(2,1,3)] //2+1=3
Note that we already used the value of 2 for the first addend in one of the previous examples, so this time we decide to freeze it and vary the second addend, which has so far always been 0. The implementation would be something like this:
 1 public class Addition
 2 {
 3   public int Of(int a, int b)
 4   {
 5     if(b == 1)
 6     {
 7       return a + 1;
 8     }
 9     else
10     {
11       return a;
12     }
13   }
14 }
We already have two examples for the variation of the second addend, so we could generalize. Let’s say, however, we don’t see the pattern yet. We add another example for a different value of second addend:
1 [Theory]
2 [InlineData(0,0,0)] //0+0=0
3 [InlineData(1,0,1)] //1+0=1
4 [InlineData(2,0,2)] //2+0=2
5 [InlineData(2,1,3)] //2+1=3
6 [InlineData(2,2,4)] //2+2=4
So, we added 2+2=4. Again, the implementation should be as naive as possible:
 1 public class Addition
 2 {
 3   public int Of(int a, int b)
 4   {
 5     if(b == 1)
 6     {
 7       return a + 1;
 8     }
 9     else if(b == 2)
10     {
11       return a + 2;
12     }
13     else
14     {
15       return a;
16     }
17   }
18 }
Now we can see the pattern more clearly. Whatever value of b we pass to the Of() method, it gets added to a. Let’s try to generalize, this time using a little bigger step:
 1 public class Addition
 2 {
 3   public int Of(int a, int b)
 4   {
 5     if(b == 1)
 6     {
 7       return a + b; //changed from 1 to b
 8     }
 9     else if(b == 2)
10     {
11       return a + b; //changed from 2 to b
12     }
13     else
14     {
15       return a + b; //added "+ b"
16     }
17   }
18 }
Again, this step was bigger, because we modified three places in a single change. Remember triangulation allows us to choose the size of the step, so this time I chose a bigger one because I felt more confident. Anyway, we can see that the result for each branch is exactly the same: a + b, so we can remove the conditions altogether and get:
1 public class Addition
2 {
3   public int Of(int a, int b)
4   {
5     return a + b;
6   }
7 }
and there we go - we have successfully triangulated the addition function. Now, I understand that it must have felt extremely over-the-top for you to derive an obvious addition this way. Remember I did this exercise only to show you the mechanics, not to provide a solid case for triangulation usefulness.
Example 2 - LED display
I don’t blame you if the first example did little to convince you that triangulation can be useful. After all, that was calculating a sum of two integers! The next example is going to be something less obvious. I would like to warn you, however, that I will take my time to describe the problem and will show you only part of the solution, so if you have enough of triangulation already, just skip this example and get back to it later.
Now that we’re through with the disclaimer, here goes the description.
Imagine we need to write a class that produces a 7-segment LED display ASCII art. In real life, such displays are used to display digits:

An example of an ASCII art that is expected from our class looks like this:
1 .-.
2 |.|
3 .-.
4 |.|
5 .-.
Note that there are three kinds of symbols:
-
.means either space (there is no segment there) or a segment that is not lit. -
-means a lit horizontal segment -
|means a lit vertical segment
The functionality we need to implement should allow one to not only display numbers but to light any combination of segments at will. So, we can decide to not light any segment, thus getting the following output:
1 ...
2 ...
3 ...
4 ...
5 ...
Or to light only the upper segment, which leads to the following output:
1 .-.
2 ...
3 ...
4 ...
5 ...
How do we tell our class to light this or that segment? We pass it a string of segment names. The segments are named A, B, C, D, E, F, G and the mapping of each name to a specific segment can be visualized as:
1 .A.
2 F.B
3 .G.
4 E.C
5 .D.
So to achieve the described earlier output where only the upper segment is lit, we need to pass the input consisting of "A". If we want to light all segments, we pass "ABCDEFG". If we want to keep all segments turned off, we pass "" (or a C# equivalent: string.Empty).
The last thing I need to say before we begin is that for the sake of this exercise, we focus only on the valid input (e.g. we assume we won’t get inputs such as “AAAA”, or “abc” or “ZXVN”). Of course, in real projects, invalid input cases should be specified as well.
Time for the first Statement. For starters, I’m going to specify the case of empty input that results in all segments turned off:
 1 [Theory]
 2 [InlineData("", new [] {
 3   "...",
 4   "...",
 5   "...",
 6   "...",
 7   "...",
 8 })]
 9 public void ShouldConvertInputToAsciiArtLedDisplay(
10   string input, string[] expectedOutput
11 )
12 {
13   //GIVEN
14   var asciiArts = new LedAsciiArts();
15
16   //WHEN
17   var asciiArtString = asciiArts.ConvertToLedArt(input);
18
19   //THEN
20   Assert.Equal(expectedOutput, asciiArtString);
21 }
Again, as I described in the previous example, on the production code side, we do the easiest thing just to make this example true. In our case, this would be:
 1 public string[] ConvertToLedArt(string input)
 2 {
 3   return new [] {
 4     "...",
 5     "...",
 6     "...",
 7     "...",
 8     "...",
 9   };
10 }
The example is now implemented. Of course, this is not the final implementation of the whole conversion logic. This is why we need to choose the next example to specify. This choice will determine which axis of change we will pursue first. I decided to specify the uppermost segment (i.e. the A segment) - we already have an example that says when this segment is turned off, now we need one that will say what should happen when I turn it on. I will reuse the same Statement body and just add another InlineData attribute to execute the Statement for the new set of input and expected output:
1 [InlineData("A", new [] {
2   ".-.", // note the '-' character
3   "...",
4   "...",
5   "...",
6   "...",
7 })]
This time, I’m passing "A" as the input and expect to receive almost the same output as before, only that this time the first line reads “.-.” instead of “...”.
I implement this example using, again, the most naive and easiest to write code. The result is:
 1 public string[] ConvertToLedArt(string input)
 2 {
 3   if(input == "A"))
 4   {
 5     return new [] {
 6       ".-.",
 7       "...",
 8       "...",
 9       "...",
10       "...",
11     };
12   }
13   else
14   {
15     return new [] {
16       "...",
17       "...",
18       "...",
19       "...",
20       "...",
21     };
22   }
23 }
The implementation is pretty dumb, but now that we have two examples, we can spot a pattern. Note that, depending on the input string, two possible results can be returned. All of the rows are the same except the first row, which, so far, is the only one that depends on the value of input. Thus, we can generalize the production code by extracting the duplication into something like this:
 1 public string[] ConvertToLedArt(string input)
 2 {
 3     return new [] {
 4       (input == "A") ? ".-." : "...",
 5       "...",
 6       "...",
 7       "...",
 8       "...",
 9     };
10 }
Note that I changed the code so that only the first row depends on the input. This isn’t over, however. When looking at the condition for the first row:
1 (input == "A") ? ".-." : "..."
we can further note that it’s only the middle character that changes depending on what we pass. Both the left-most and the right-most character of the first row are always .. Thus, let’s generalize even further, to end up with something like this:
 1 public string[] ConvertToLedArt(string input)
 2 {
 3     return new [] {
 4       "." + ((input == "A") ? "-" : ".") + ".",
 5       "...",
 6       "...",
 7       "...",
 8       "...",
 9     };
10 }
Now, if we look closer at the expression:
1 ((input == "A") ? "-" : ".")
We may note that its responsibility is to determine whether the value of the current segment based on the input. We can use this knowledge to extract it into a method with an intent-revealing name. The method body is:
1 public string DetermineSegmentValue(
2   string input,
3   string turnOnToken,
4   string turnOnValue)
5 {
6   return ((input == turnOnToken) ? turnOnValue : ".");
7 }
After this extraction, our ConvertToLedArt method becomes:
 1 public string[] ConvertToLedArt(string input)
 2 {
 3     return new [] {
 4       "." + DetermineSegmentValue(input, "A", "-") + ".",
 5       "...",
 6       "...",
 7       "...",
 8       "...",
 9     };
10 }
And we’re done triangulating the A segment.
Additional conclusions from the LED display example
The fact that I’m done triangulating along one axis of variability does not mean I can’t do triangulation along other axes. For example, when we look again at the code of the DetermineSegmentValue() method:
1 public string DetermineSegmentValue(
2   string input,
3   string turnOnToken,
4   string turnOnValue)
5 {
6   return ((input == turnOnToken) ? turnOnValue : ".");
7 }
We can clearly see that the method is detecting a token by doing a direct string comparison: input == turnOnToken. This will fail e.g. if I pass "AB", so we probably need to triangulate along this axis to arrive at the correct implementation. I won’t show the steps here, but the final result of this triangulation would be something like:
1 public string DetermineSegmentValue(
2   string input,
3   string turnOnToken,
4   string turnOnValue)
5 {
6   return ((input.Contains(turnOnToken) ? turnOnValue : ".");
7 }
And after we do it, the DetermineSegmentValue method will be something we will be able to use to implement lighting other segments - no need to discover it again using triangulation for every segment. So, assuming this method is in its final form, when I write an example for the B segment, I will make it true by using the DetermineSegmentValue() method right from the start instead of putting an if first and then generalizing. The implementation will the look like this:
 1 public string[] ConvertToLedArt(string input)
 2 {
 3     return new [] {
 4       "." + DetermineSegmentValue(input, "A", "-") + ".",
 5       ".." + DetermineSegmentValue(input, "B", "|"),
 6       "...",
 7       "...",
 8       "...",
 9     };
10 }
So note that this time, I used the type the obvious implementation approach - this is because, due to previous triangulation, this step became obvious.
The two lessons from this are:
- When I stop triangulating along one axis, I may still need to triangulate along the others.
- Triangulation allows me to take smaller steps when I need to and when I don’t, I use another approach. There are many things I don’t triangulate.
I hope that, by showing you this example, I made a more compelling case for triangulation. I’d like to stop here, leaving the rest of this exercise for the reader.
Summary
In this lengthy chapter, I tried to demonstrate three techniques for going from a false Statement to a true one:
- Type the obvious implementation
- Fake it (`til you make it)
- Triangulate
I hope this was an easy-to-digest introduction and if you want to know more, be sure to check Kent Beck’s book, where he uses these techniques extensively on several small exercises.