Chapter 9 | Chat Bot Demo Using Firebase

Defining “Chat Bot Demo”

I’ve already taken a few stabs at writing this chapter before I ended up scratching it and restarting.
The reason for this is because I have been unsure about how complex I wanted to make it.
On one hand, it could be very simple. Instead of actually making the chat bot, we could just do some visual tricks to make it appear as if there was a chat bot demo in our Demo view. For example, we could have an image of a Slack channel with no message. After a few seconds, we change the image to a Slack channel with a message from a user to the chat bot. After a few more seconds, we could switch the image to a Slack channel with a response from the chat bot. We then could repeat this process. In total, it would create the visual appearance of a chat bot demo.
On the other hand, we could create a fully-functioning chat bot and embed it into the Demo view. This would require writing code to configure our own server and interact with a database to store information about the user and respond with a suggested article (matching the claims of the landing page text).
As I was pondering on how complex the latter option would be, I realized that thinking through it was actually a great way to explain the current state of our application.
The State of Our Application
By big picture, I mean where our current React app fits in the client/server architecture of web applications.
Earlier, we have discussed that React applications use data and instruct the DOM with what should be rendered. This all happens client-side.
On the server-side, there is a server that hosts our application and serves it to the browser. The server can fetch data from a database and send it to our React application where we can use it within components.
In our application, we have only written client-side *code. We created our React application and used Webpack to take our app, apply Babel to do preprocessing, and spit out the final product. In *package.json, we configured *webpack-dev-server *(which we installed via npm) to run on the following command:
npm startwebpack-dev-server hosts our final application and serves it to the browser. We then can enter the following address in our browser to see our application:
http://localhost:8080/React Router controls which view is active and updates the URL accordingly.
All of this to say, we have not configured a server for ourselves to host our application and serve it to the browser. We also have not had to use data from a database.
The Functionality of Our Chat Bot Demo
With the state of our current application in mind, you may be able to see why I was unsure about whether to make a more complex chat bot demo that would require writing server-side code and interact with a database. I am concerned that a complex chat bot would be crammed and rushed to fit into this chapter. On the other hand, mere visual tricks seem to be a lame way to wrap up this book.
So, what are we going to do about our chat bot demo?
I am going to land in-between a fully-functioning chat bot and just changing the images. Let’s walk through the functionality of our application together.
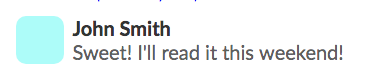
First, we are going to add house components for a user message (UserMessage) and a chat bot message (ChatBotMessage). Both of these components will be nested within our SlackChannel component. Therefore, the SlackChannel component will be bumped up from a house component (as it currently is just an image) to a block component (as it will nest our new components).
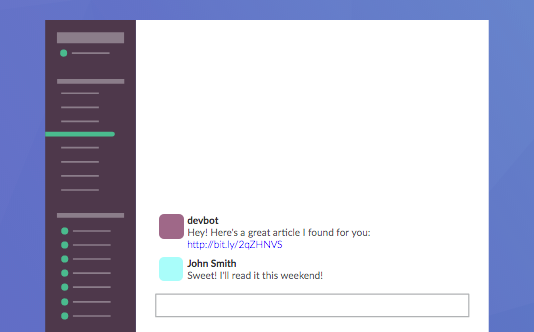
A mockup for the SlackChannel component with the new UserMessage and ChatBotMessage components can be seen below:
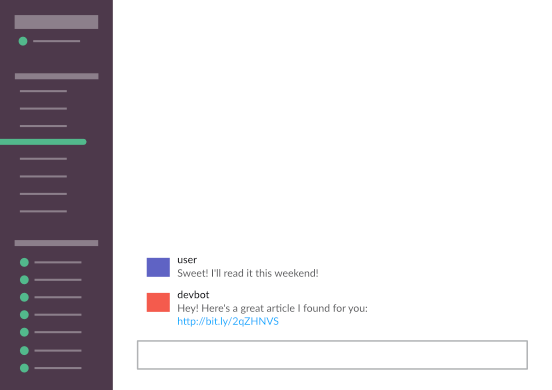
Because the SlackChannel component is used in the LandingPage village and the Demo village, we will use conditional rendering so the UserMessage and ChatBotMessage components only render for the Demo village.
Although we want the Demo village to ultimately render SlackChannel block with the UserMessage and ChatBotMessage houses as seen in the mockup above, we want to reveal them in a specific order.
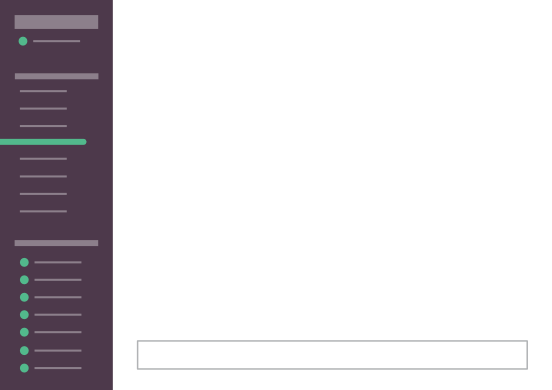
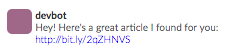
We will time the revealing through lifecycle hooks and control what is being rendered using more conditional rendering. When the SlackChannel component mounts, we will have just a blank Slack Channel image:
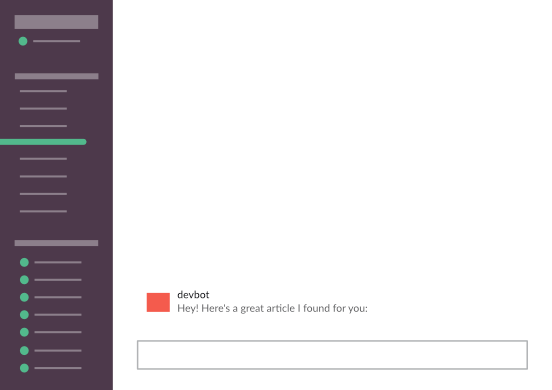
1 second after this mounts, we will render the ChatBotMessage component:
1 second after that, we will render the final UserMessage component:
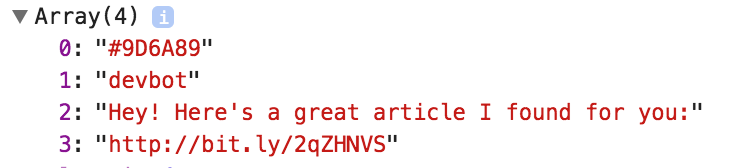
While we won’t be creating our own server, we will use a cloud-based database called Firebase. Firebase will store the information used to populate the UserMessage and ChatBotMessage components. Specifically, the usernames, avatar colors, message texts, and the article link will be stored and retrieved from Firebase to populate the components instead of us manually passing down props.
If this seems a bit fuzzy, don’t fret. We are going to explain this in plenty of detail when we begin the coding. You only need to understand the basic gist.
Additionally, we are going to spend a lot of time understanding Firebase before any of the coding for the chat bot demo.
Understanding Firebase

Firebase is a backend as a service. In short, it takes care of a lot of backend development for you (authorization, databases, etc.). In our use case, it can provide a cloud-based database for storing and syncing data without having to write our own backend code. It will do a lot of the traditional setup and coding for a database behind the scenes. This will allow us to get the feel of using a data from a database in a React application without being overwhelming.
With that being said, it’s not as if Firebase is just a temporary thing that we will use for learning purposes that you wouldn’t use in the real-world. Firebase is a valid alternative to traditional databases and can be used for full-scale, dynamic web applications.
Let’s get started with learning Firebase. To learn Firebase, we will create a Tile Background Changer Mini-App via Codepen.
Setup for Tile Background Changer Mini-App
Firs things first, go ahead and fork my template which contains all the HTML, CSS, and proper React settings.
| Then, rename it **Tile Background Changer | Firebase Demo using React**. |
Functionality of the Tile Background Changer Mini-App

Let’s go over what we want this mini-app to do.
We are going to one component called Tile nested 3 times within an App component. Each time to Tile component is nested, we will pass the class down as a prop. This allows us to reuse 1 component 3 times yet having a different class for each for styling purposes.
Each tile’s background color will be controlled using inline JSX styling. We will initialize the state and have a property called color (which will be changing hence why we are using state) that will have an initial value of the hex code for white (#FFFFFF).
The Tile component’s JSX will render three elements. One element will be the tile with the color defined by state. Another element will be a text box that will contain the current color’s hex code. The final element will be the actual text for the hex code.
Here is the visual of the initial tiles (before any events):

On the click of each tile, we are going to have an event handler that will read a certain hex code that we will have stored in a Firebase database. The value of the hex code from the database will be set as the new color in the state. This will cause the background color of the tile to change and the hex code text underneath the tile like so:
Here’s the final app which we will make together
React Components Setup
First, we need a component for our app that will nest the tile components:
1     //App
2     class App extends React.Component {
3       render() {
4         return (
5           <div className="container">
6           </div>
7         )
8       }
9     }
Next, let’s add the ReactDOM portion:
1     //"inject" to DOM
2     ReactDOM.render(
3       <App/>,
4       document.getElementById('app')
5     );
Piece of cake!
Now, let’s define the shell of our Tile component:
 1     class Tile extends React.Component {
 2
 3     render() {
 4         return (
 5           <div className={this.props.class}>
 6             <div className="color-text-box">
 7               <div className="color-text">
 8               </div>
 9             </div>
10           </div>
11         )
12       }
13     }
As previously mentioned, we want this component to render the tile (tile-1, tile-2, or tile-3 depending on the class prop we will pass down), a box to contain the text of the current color (color-text-box), and the actual text of the current color (color-text). The elements are nested for styling purposes.
Next, let’s nest this component in our App component and define a prop called initialColor with a hex code for the color white:
 1     //App
 2     class App extends React.Component {
 3       render() {
 4         return (
 5           <div className="container">
 6             <Tile class={"tile-1"}/>
 7           </div>
 8         )
 9       }
10     }
We have 3 more steps remaining to complete our first tile component:
Initialize a state with a property called color and assign it the value of the #FFFFFF
Use inline JSX styling so the background of the tile-1 element is set to the color property defined in the previous step
Inject the text of the color property within the color-text element
For the first step, we can add the following:
 1     class Tile extends React.Component {
 2
 3     **state = {color: #FFFFFF};**
 4
 5     render() {
 6         return (
 7           <div className="{this.props.class}">
 8             <div className="color-text-box">
 9               <div className="color-text">
10               </div>
11             </div>
12           </div>
13         )
14       }
15     }
Because the property color is assigned the value of the initialColor prop, we did color: this.props.initialColor.
To complete the next step, we add the following code for the inline JSX styling:
 1     class Tile extends React.Component {
 2
 3       state = {color: #FFFFFF};
 4
 5     render() {
 6         return (
 7           <div style=**{{background: this.state.color}}** className={this.props.\
 8 class}>
 9             <div className="color-text-box">
10               <div className="color-text">
11               </div>
12             </div>
13           </div>
14         )
15       }
16     }
Last but not least, we can inject the color property like so:
 1     class Tile extends React.Component {
 2
 3       state = {color: #FFFFFF};
 4
 5     render() {
 6         return (
 7           <div style={{background: this.state.color}} className="{this.props.cla\
 8 ss}">
 9             <div className="color-text-box">
10               <div className="color-text">
11                 **{this.state.color}**
12               </div>
13             </div>
14           </div>
15         )
16       }
17     }
We should now see the following:

To add two more tiles, we will reuse our Tile component with a different class prop:
 1     //App
 2     class App extends React.Component {
 3       render() {
 4         return (
 5           <div className="container">
 6             <Tile class={"tile-1"}/>
 7             <Tile class={"tile-2"}/>
 8             <Tile class={"tile-3"}/>
 9           </div>
10         )
11       }
12     }

Awesome! Before we start adding event handlers, we need to setup our database in Firebase.
Creating a New Firebase Project
Head over to Firebase and select Get Started.
You’ll be brought to the following dashboard:
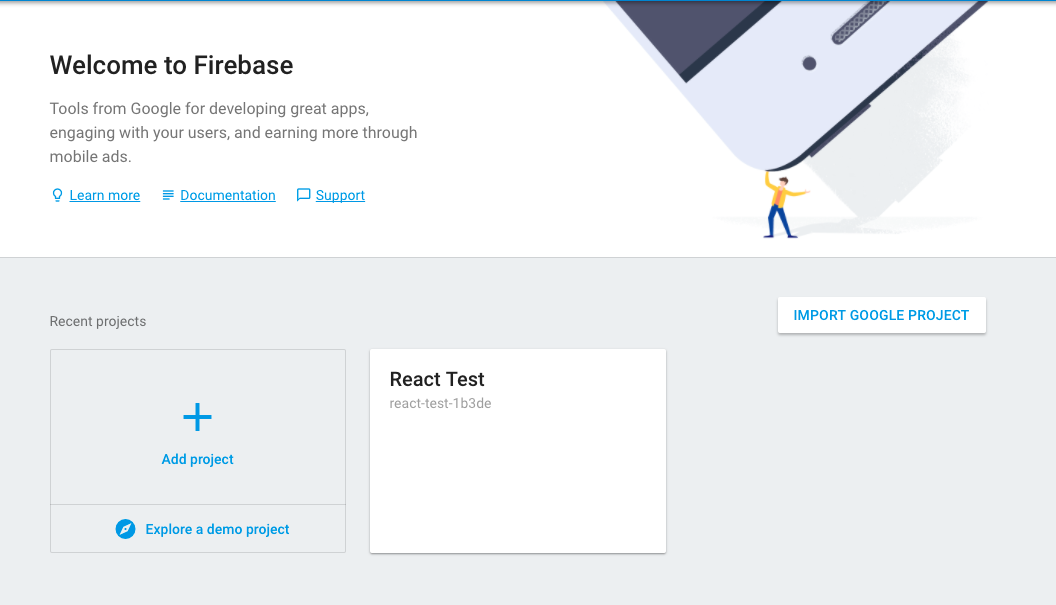
Click Add project and name it React Test as you can see I have already done.
It will take you to a page with a lot going on:
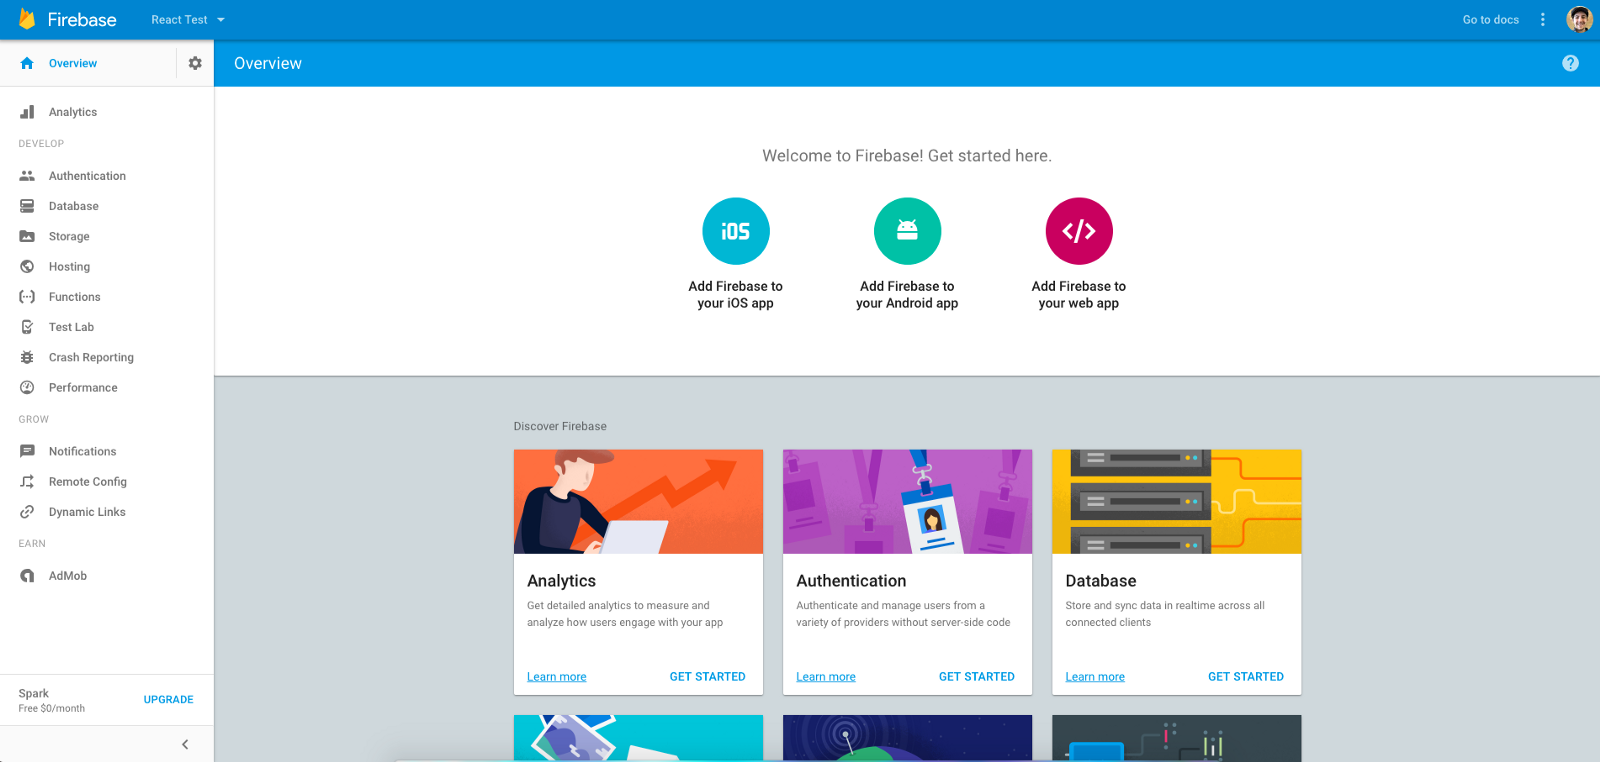
Resist the urge to go off and explore and select Database on the left.
Before we doing anything further, we need to understand how structuring of data works.
The Structure of Data in Firebase
If you are familiar with SQL databases, you might expect to see our data structured in tables and rows. However, Firebase stores its data as JSON objects. Data in Firebase is then structured like a JSON tree.
An easy place to go to explain this is the package.json in our react-landing-page project:
 1     {
 2       "name": "react-landing-page",
 3       "version": "1.0.0",
 4       "description": "",
 5       "main": "index.js",
 6       "scripts": {
 7         "start": "webpack-dev-server"
 8       },
 9       "author": "",
10       "license": "ISC",
11       "dependencies": {
12         "react": "^15.5.4",
13         "react-dom": "^15.5.4",
14         "react-grid-system": "^2.9.1",
15         "react-router-dom": "^4.1.1"
16       },
17       "devDependencies": {
18         "babel-core": "^6.24.1",
19         "babel-loader": "^7.0.0",
20         "babel-preset-env": "^1.5.1",
21         "babel-preset-react": "^6.24.1",
22         "html-webpack-plugin": "^2.28.0",
23         "node-sass": "^4.5.3",
24         "sass-loader": "^6.0.5",
25         "webpack": "^2.6.0",
26         "webpack-dev-server": "^2.4.5"
27       }
28     }
Here, we have data about our project structured in the format of name and value. One example being:
1     "name": "react-landing-page"
2
3     //name: value
Sometimes, data needs to be nested under a node like with scripts, dependencies, and devDependencies in our package.json. One example being:
1     "scripts": {
2       "start": "webpack-dev-server"
3     }
4
5     //node
6       //name: value
The node is simply a name that can be used to access a collection of names and values.
Here’s another example of a JSON tree to represent some data that might be needed for an application:
 1     {
 2       "users": {
 3         "alovelace": {
 4           "name": "Ada Lovelace",
 5           "role": "Developer",
 6         },
 7         "ghopper": { ... },
 8         "eclarke": { ... }
 9       }
10     }
Not too bad, huh?
The only other important information to provide is that we can have 32 levels of nesting nodes. However, you want to keep the structured data as flat (least amount of nesting) as you possibly can. Reason being, if you request access one node, you also get access to all the children. Therefore, accessing a node with a lot of children can hurt performance.
This is something to keep in mind for large applications and it’s always good to have good practice regardless. But to be totally honest, this won’t be a major concern for our mini-app or chat bot demo.
Constructing Our Database
Now that we get how data is structured in Firebase, let’s go ahead and add some data.
Go to Firebase and we should be in the Database view:
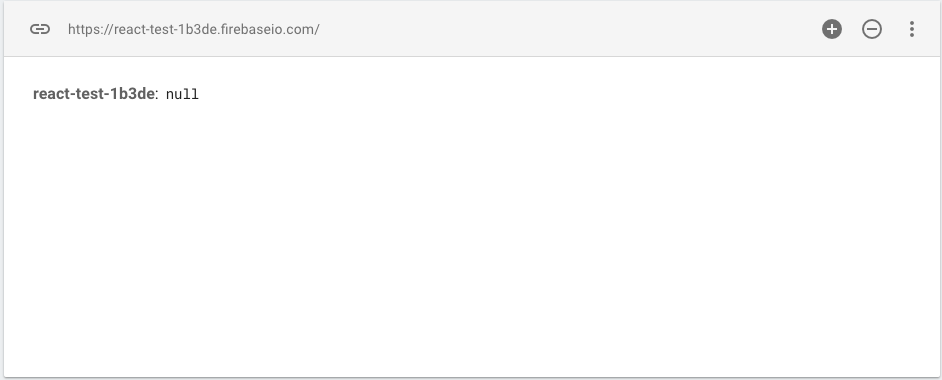
Here, we can create our JSON tree through this nice user interface.
Hover over the react-test and click +.
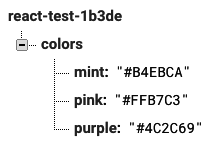
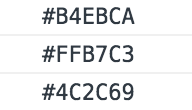
We first need to add a node called colors. Just type this in the name and then hit the **+ **so that we now see:
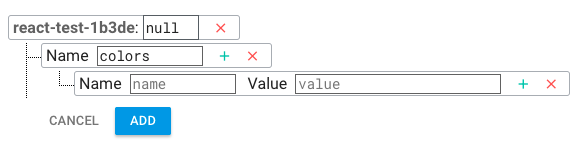
Now, we can add name/value pairs for our colors node. The name will be the name of the color and the value will be the hex code.
We will use the following name and pairs. Note that you should enter them as they are and quotes should not be added:
1     mint: #B4EBCA
2     pink: #FFB7C3
3     purple: #4C2C69
We should have the following after entering them in:
Cool!
Configuring Our Database
This sounds like a painful step, however, it’s very simple.
Click on Overview on the left-hand menu so that you see the following view:
Click Add firebase to your web app.
This brings up the following popup:
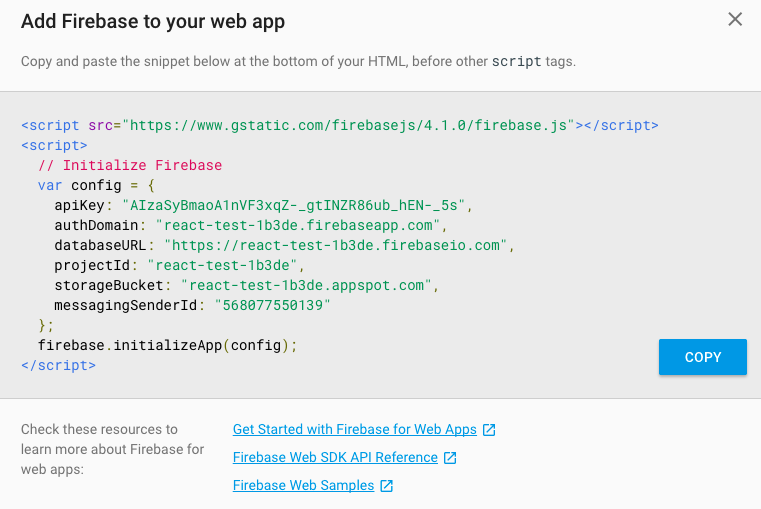
We can use this info to add the configuration in our Tile Background Changer pen.
First, copy just the URL between the first script tag:
https://www.gstatic.com/firebasejs/4.1.0/firebase.jsAdd this as an external resource in your pen like so:
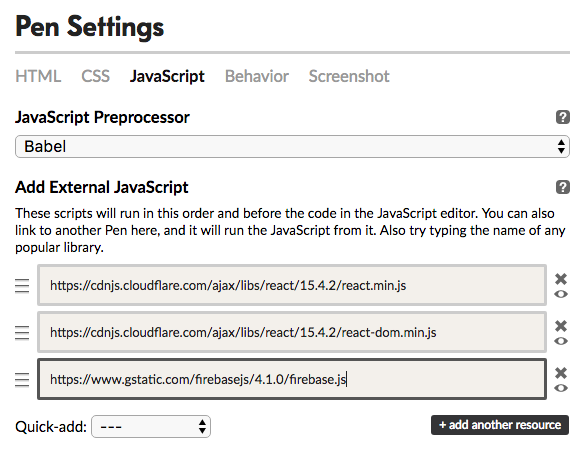
Save and close.
Next, add the following code to the top of your JS column:
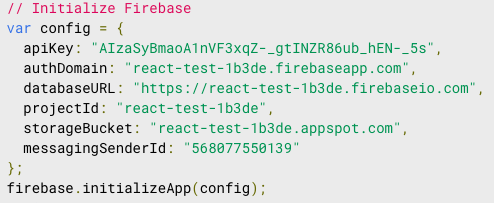
I made a slight change to changed var to const since it’s good practice to make this an immutable variable (we don’t want to mutate anything in this variable).
We have now successfully configured our pen with our Firebase project.
Reading Data
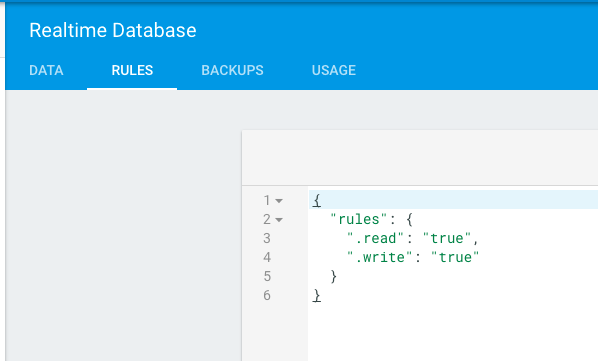
By default, reading and writing data is blocked unless a user is authenticated. We are not worried about authentication so let’s change that.
Click Database on the left-hand menu and then select the Rules tab. Here, let’s make read and write available without authentication:
With that out of the way, we now need to establish a reference to our database like so:
1     //config here
2
3     const database = firebase.database();
4
5     //App component here
Specifically, we want to reference the *colors *node from our database. Therefore, let’s add another variable:
1     //config here
2
3     const database = firebase.database();
4     const colors = database.ref('colors');
5
6     //App component here
Now, we have the variables set to reference what we need from the database.
Let’s test to see if we can access the hex code values defined within our colors. To test this, we will try to log the data to the console when the App component mounts.
First, we can add a lifecycle hook to do something when the App component mounts:
 1     //App
 2     class App extends React.Component {
 3
 4       componentDidMount () {
 5
 6       }
 7
 8       render() {
 9         return (
10           <div className="container">
11             <Tile class={"tile-1"}/>
12             <Tile class={"tile-2"}/>
13             <Tile class={"tile-3"}/>
14           </div>
15         )
16       }
17     }
Next, we will add some code that is saying: “I’m going to try out this database reference to the colors node. If there’s a value there, then I want to take a snapshot of the the node and display it to the console.”
1     componentDidMount () {
2       colors.on('value', function(snapshot) {
3         console.log(snapshot.val())
4       });
5     }
If you go into your developer tools and then the console tab, we should see that the data object for the colors node is being logged:

Note that the snapshot parameter is a predefined thing when using Firebase to make it easy for us to access the value of the node being reference.
Cool! Now, let’s try to print out the hex code for each color in this object like so:
1     componentDidMount () {
2         colors.on('value', function(snapshot) {
3           console.log(snapshot.val().mint)
4           console.log(snapshot.val().pink)
5           console.log(snapshot.val().purple)
6         });
7       }
We should now see the following in the console:
Perfect! We don’t need this lifecycle hook so you can go ahead and remove it.
Adding Event Handler
Now that we understand how to access our Firebase data, we will do the following in each tile:
Add an event handler to be called on the click of the tile element
Have the event handler get a random color (any of the 3 hex codes in our database)
Have the event handler then update the color property in the state of the tile component with the random color
First, we add the shell of the event handler:
 1     class Tile extends React.Component {
 2
 3     state = {color: this.props.initialColor};
 4
 5     updateTile() {
 6
 7     }
 8
 9     render() {
10         return (
11           <div style={{background: this.state.color}} className="{this.props.cla\
12 ss}">
13             <div className="color-text-box">
14               <div className="color-text">
15                 {this.state.color}
16               </div>
17             </div>
18           </div>
19         )
20       }
21     }
Then, let’s call this on the click of the div element with the className of tile-1:
 1     class Tile extends React.Component {
 2
 3       state = {color: this.props.initialColor};
 4
 5       updateTile() {
 6
 7       }
 8
 9     render() {
10         return (
11           <div
12           onClick={this.updateTile.bind(this)}**
13           style={{background: this.state.color}}
14           className="tile-1">
15             <div className="color-text-box">
16               <div className="color-text">
17                 {this.state.color}
18               </div>
19             </div>
20           </div>
21         )
22       }
23     }
After that, let’s add code that will have the event handler choose a random color from our database:
 1     updateTile() {
 2         //get random number between 1 and 3
 3         const random = Math.floor((Math.random() * 3) + 1);
 4
 5         //empty variable for selectedColor
 6         let selectedColor;
 7
 8         //retrieve color depending on random number
 9         colors.on('value', function(snapshot) {
10           if(random === 1) {
11             selectedColor = snapshot.val().mint;
12           } else if (random === 2) {
13             selectedColor = snapshot.val().pink;
14           } else {
15             selectedColor = snapshot.val().purple;
16           }
17         });
18       }
In the code above, we get a random number between 1 and 3. If it is 1, then we select mint from Firebase. If it is 2, we select pink. Lastly, if it is 3, then we select purple.
The final piece is to use setState to update the color property that is controlling the background of the tile to be the value of the selectedColor variable:
 1     updateTile() {
 2         //get random number between 1 and 3
 3         const random = Math.floor((Math.random() * 3) + 1);
 4
 5         //empty variable for selectedColor
 6         let selectedColor;
 7
 8         //retrieve color depending on random number
 9         colors.on('value', function(snapshot) {
10           if(random === 1) {
11             selectedColor = snapshot.val().mint;
12           } else if (random === 2) {
13             selectedColor = snapshot.val().pink;
14           } else {
15             selectedColor = snapshot.val().purple;
16           }
17         });
18
19         //setState of color property to selected color
20         this.setState({color: selectedColor});
21       }
We can now click on the first tile and see the following occur:
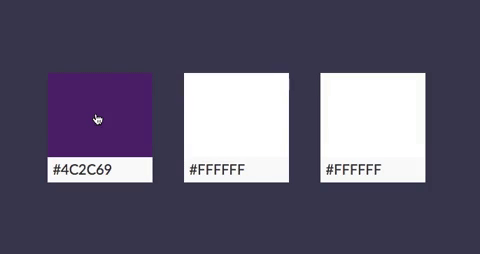
So cool! However, you have noticed that the tile was blank on the first click.
What happened?
Well, the following code has to wait until Firebase returns the requested value:
 1     //retrieve color depending on random number
 2         colors.on('value', function(snapshot) {
 3           if(random === 1) {
 4             selectedColor = snapshot.val().mint;
 5           } else if (random === 2) {
 6             selectedColor = snapshot.val().pink;
 7           } else {
 8             selectedColor = snapshot.val().purple;
 9           }
10         });
Therefore, selectedColor most likely has no value by the time this line arrives:
this.setState({color: selectedColor});Because of this, the newly set state assigns a color of blank.
How do we fix this?
We can use a promise. Let’s update our code then I will explain:
 1     let promise = new Promise((resolve, reject) => {
 2           colors.on('value', function(snapshot) {
 3             if(random === 1) {
 4               selectedColor = snapshot.val().mint;
 5             } else if (random === 2) {
 6               selectedColor = snapshot.val().pink;
 7             } else {
 8               selectedColor = snapshot.val().purple;
 9             }
10             resolve(selectedColor);
11           });
12     });
13
14     promise.then((resolvedColor) => {
15           this.setState({color: resolvedColor});
16     });
Now, we are essentially saying: “Okay this.setState I know you want to update the color with the value we fetch from Firebase. However, it’s going to take time. I promise that once we can resolve this *then *you can go ahead and update the color with the fetched value.”
A promise is used when a line of code is waiting on something to resolve. We can make the line of code that is waiting run *after *the code that it is waiting to complete is resolved.
resolve(selectedColor) passes the new (resolved) selectedColor value to the function within promise.then(…). this.setState then uses that parameter for the new value of the color property. Because this.setState waits until the Firebase value is fetched, we will no longer have the color property being updated to a blank value.
For a more in-depth explanation of promise, check out the MDN documentation.
Final pen: http://bit.ly/2skjKkm
Recapping Our Chat Bot Demo Functionality

Now that we’ve gotten a hold on Firebase, we will go ahead and move back into our chat bot demo.
Let’s recap. Here’s what we have to do for our chat bot demo.
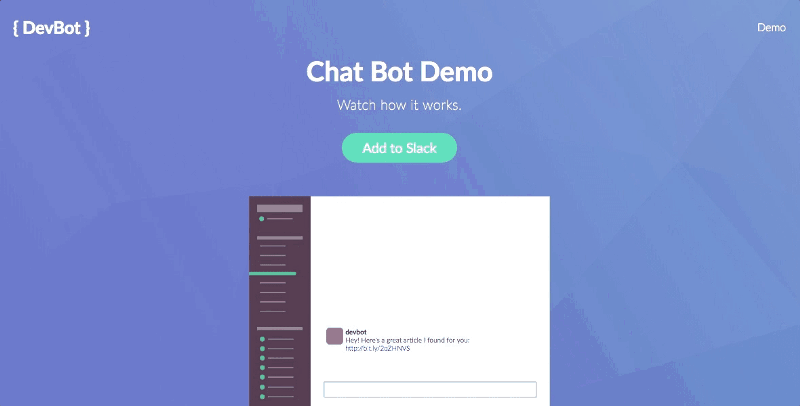
We need to bump the SlackChannel component from a house component to a block component. It will nest 2 components, UserMessage and ChatBotMessage, that will ultimately render as:
We want the message components to be revealed one after another. We also only want the message components only to be rendered in the Demo village and not the Landing Page village.
Let’s get to work!
Constructing the Chat Bot Demo Database

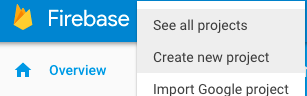
First, we need to create a new Firebase project. Go to Overview in Firebase, click the down arrow next to the name of the current project, and select Create new project:
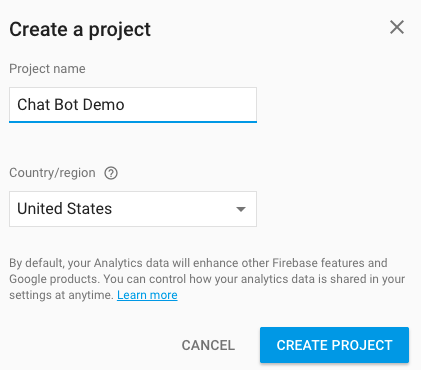
Name it Chat Bot Demo and then select Create project:
When that is finished, click Database on the left-hand side and then click the Rules tab. Once again, we want to allow reading and writing without requiring authentication:
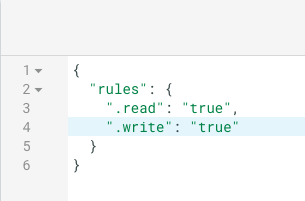
Hit Publish when finished updating.
Click on the Data tab and try making the following data tree yourself:
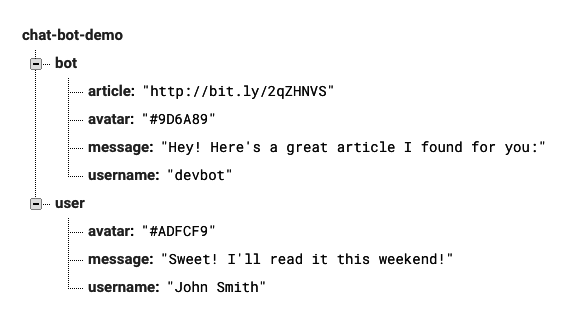
In both nodes, there is a color that will be used to style the avatar square, a message, and username. The bot node has an additional article link. Again, we will use this data to populate the components so they render as the following:
Installing Firebase via npm
Now that we have constructed the database for our chat bot demo, let’s open Atom and pick up where we left off in our react-landing-page project.
Also, cd into the root of the project in command line.
When you’re ready, let’s install firebase as a dependency:
npm install --save firebaseCool beans.
Setting Up Our Message Components
Let’s create 2 new component files that will go under our houses folder, User Message.js and Chat Bot Message.js.
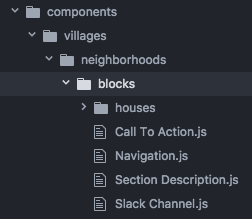
Before we add some code to these, go ahead and drag and drop the Slack Channel.js file under the Blocks folder since it will now be a block component.
To start off, let’s add the basic setup to User Message.js:
 1     import React from 'react';
 2     import ReactDOM from 'react-dom';
 3
 4     class UserMessage extends React.Component {
 5
 6       constructor(){
 7         super()
 8         this.state = {avatar: "", username: "", message: ""}
 9       }
10
11     }
12
13     render() {
14         return (
15           <div className="user-message">
16             <div style={{background: this.state.avatar}} className="user-avatar"\
17 ></div>
18             <div className="username">{this.state.username}</div>
19             <div className="message">{this.state.message}</div>
20           </div>
21         )
22       }
23     }
24
25     module.exports = UserMessage;
In the code above, we have a state that has the initial values of the avatar, username, and message properties set as nothing. We will retrieve the data for these properties from Firebase and update the state with that data.
The injecting of the state has been handled. The avatar data is a hex code that will control the background color of the avatar box. The username data will be used to display the username. The message data will be used to display a message. All of this forms our user-message element which will ultimately render as:
An important note is that I’ve made a slight change on how the state is initialized. I’ve done this for best practice purposes.
1     constructor(){
2         super()
3         this.state = {
4           avatar: "",
5           username: "",
6           message: ""
7         }
8     }
The constructor method will handle initialization of our component class. Since our component class is a child of the React.component class:
class UserMessage extends React.Componentwe need to call the constructor of that parent class using:
1     constructor(){
2         super()
3         //...
4     }
Now, we can initialize the state so that it can be accessed by doing this.state.___ so we do:
1     constructor(){
2         super()
3         this.state = {avatar: "", username: "", message: ""}
4       }
We will be making a lot of updates to this file, but for now that’s enough for the basic setup.
Let’s move on to the Chat Bot Message.js:
 1     import React from 'react';
 2     import ReactDOM from 'react-dom';
 3
 4     class ChatBotMessage extends React.Component {
 5
 6     constructor(){
 7         super()
 8         this.state = {avatar: "", username: "", message: "", article: ""}
 9       }
10
11     }
12
13     render() {
14         return (
15           <div className="bot-message">
16             <div style={{background: this.state.avatar}} className="bot-avatar">\
17 </div>
18             <div className="username">{this.state.username}</div>
19             <div className="message">{this.state.message}</div>
20             <a href={this.state.article}>
21               <span className="article">{this.state.article}</span>
22             </a>
23           </div>
24         )
25       }
26     }
27
28     module.exports = ChatBotMessage;
Most of this code is just like the UserMessage component except that we have an additional piece of data to fetch from Firebase called article which needs to also be used to render an article link. In addition, there’s a few different class names for styling purposes.
We want this to eventually render as:
Again, there’s much to add but that is good enough for the initial setup.
Configuring Firebase
Now that we have created the database, installed Firebase via npm, and setup our house components, we now need to get the configuration code.
Again, we go to the **Overview **view in the Firebase console.
Then, select Add Firebase to your web app and copy the configuration code which will be something similar to this:
1     var config = {
2         apiKey: "AIzaSyA1JBmMSIg7X_lSEHr3vh7sEc_p83hB4g4",
3         authDomain: "chat-bot-demo.firebaseapp.com",
4         databaseURL: "https://chat-bot-demo.firebaseio.com",
5         projectId: "chat-bot-demo",
6         storageBucket: "chat-bot-demo.appspot.com",
7         messagingSenderId: "740047634033"
8       };
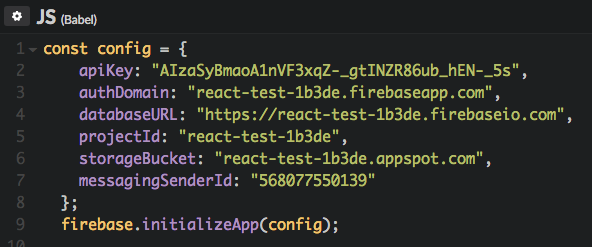
In this file, let’s paste that code at the top of User Message.js, change the variable to const, and change the variable name to FirebaseConfig:
 1     import React from 'react';
 2     import ReactDOM from 'react-dom';
 3
 4     const config = {
 5         apiKey: "AIzaSyA1JBmMSIg7X_lSEHr3vh7sEc_p83hB4g4",
 6         authDomain: "chat-bot-demo.firebaseapp.com",
 7         databaseURL: "[https://chat-bot-demo.firebaseio.com](https://chat-bot-de\
 8 mo.firebaseio.com)",
 9         projectId: "chat-bot-demo",
10         storageBucket: "chat-bot-demo.appspot.com",
11         messagingSenderId: "740047634033"
12       };
13
14     firebase.initializeApp(config);
15
16     //UserMessage component stuff
We also have to add the import for the firebase which was installed via npm:
1     import React from 'react';
2     import ReactDOM from 'react-dom';
3     import * as firebase from "firebase";
Note: We only need the configuration code to appear once in our application. Therefore, we will just keep it in the *User Message.js *but there’s a few ways we could have done this.
Retrieving Data from Firebase
Now that we have our new message components and Firebase initialized, let’s write the code to fetch the Firebase data to update the states of these components.
Let’s continue in User Message.js.
First, let’s add the reference to our Firebase database. Specifically, we want to refer to the user node which contains avatar, username, and message:
1     //imports and Firebase config here
2
3     const database = firebase.database();
4     const user = database.ref('user');
5
6     //component here
Next, let’s add a lifecycle where we will fetch the Firebase data:
 1     class UserMessage extends React.Component {
 2       constructor(){
 3         super()
 4         this.state = {avatar: "", username: "", message: ""}
 5       }
 6
 7       componentDidMount() {
 8         let firebaseAvatar;
 9         let firebaseUsername;
10         let firebaseMessage;
11       }
12
13       //more stuff
14
15     }
In this lifecycle (when the component has mounted), we have defined three variables that will store the fetched data.
In our Tile Background Changer pen, we needed to use a *promise *when retrieving our Firebase data:
 1     //fetch data
 2     let promise = new Promise((resolve, reject) => {
 3           colors.on('value', function(snapshot) {
 4             if(random === 1) {
 5               selectedColor = snapshot.val().mint;
 6             } else if (random === 2) {
 7               selectedColor = snapshot.val().pink;
 8             } else {
 9               selectedColor = snapshot.val().purple;
10             }
11             resolve(selectedColor);
12           });
13     });
14
15     //then do something with it (update the state)
16
17     promise.then((resolvedColor) => {
18       this.setState({color: resolvedColor});
19     });
We did this since we want to wait for the state to update until we have *resolved *fetching the Firebase data.
Therefore, let’s add the following promise to our file:
 1     class UserMessage extends React.Component {
 2       constructor(){
 3         super()
 4         this.state = {avatar: "", username: "", message: ""}
 5       }
 6
 7       componentDidMount() {
 8         let firebaseAvatar;
 9         let firebaseUsername;
10         let firebaseMessage;
11
12         let promise1 = new Promise((resolve, reject) => {
13           user.on('value', function(snapshot) {
14             firebaseAvatar = snapshot.val().avatar;
15             resolve(firebaseAvatar);
16           });
17         });
18       }
19
20       //more stuff
21
22     }
In this promise, we are going to get a snapshot of the Firebase database at the reference we specified and get the avatar value. The value will be stored in firebaseAvatar.
Unlike our pen, we have multiple values to fetch. Therefore, we need a separate promise for each value that needed to be fetched (hence why it is named promise1).
We will add the other promises before we do the promise.then stuff since there’s a way to do it for all our promises at once.
Here’s the remaining promises:
 1     //promise 1 here
 2
 3     let promise2 = new Promise((resolve, reject) => {
 4           user.on('value', function(snapshot) {
 5             firebaseUsername = snapshot.val().username;
 6             resolve(firebaseUsername);
 7           });
 8         });
 9
10     let promise3 = new Promise((resolve, reject) => {
11           user.on('value', function(snapshot) {
12             firebaseMessage = snapshot.val().message;
13             resolve(firebaseMessage);
14           });
15         });
Perfect! Next, we want to take all of the resolved data and update our state. To do that, we can do the following:
1     Promise.all([promise1, promise2, promise3]).then(values => {
2       this.setState({
3         avatar: values[0],
4         username: values[1],
5         message: values[2]
6       })
7     });
In the code above, we are saying: “Take all of our promises and store the resolved values into an array. Use those values in the array to update our state properties.”
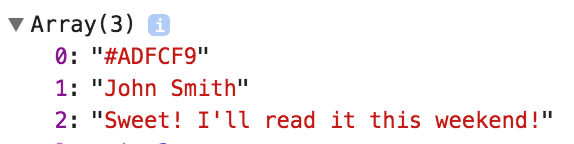
To see how this works, log *values *to the console:
1     Promise.all([promise1, promise2, promise3]).then(values => {
2       this.setState({
3         avatar: values[0],
4         username: values[1],
5         message: values[2]
6       })
7       console.log(values);
8     });
We will now see the values array and understand how we used them to update our state:
Awesome!
Let’s move on to Chat Bot Message.js.
We will start by adding the firebase import and the database references:
1     import * as firebase from "firebase";
2
3     const database = firebase.database();
4     const bot = database.ref('bot');
We can then add the lifecycle and promises code just like the previous file, except we have the additional data to fetch for the article:
 1     componentDidMount() {
 2         let firebaseAvatar;
 3         let firebaseUsername;
 4         let firebaseMessage;
 5         let firebaseArticle;
 6
 7     let promise1 = new Promise((resolve, reject) => {
 8           bot.on('value', function(snapshot) {
 9             firebaseAvatar = snapshot.val().avatar;
10             resolve(firebaseAvatar);
11           });
12         });
13
14     let promise2 = new Promise((resolve, reject) => {
15           bot.on('value', function(snapshot) {
16             firebaseUsername = snapshot.val().username;
17             resolve(firebaseUsername);
18           });
19         });
20
21     let promise3 = new Promise((resolve, reject) => {
22           bot.on('value', function(snapshot) {
23             firebaseMessage = snapshot.val().message;
24             resolve(firebaseMessage);
25           });
26         });
27
28     let promise4 = new Promise((resolve, reject) => {
29           bot.on('value', function(snapshot) {
30             firebaseArticle = snapshot.val().article;
31             resolve(firebaseArticle);
32           });
33         });
34
35     Promise.all([promise1, promise2, promise3, promise4]).then(values => {
36           this.setState({avatar: values[0], username: values[1], message: values\
37 [2], article: values[3]})
38         });
39       }
All the differences between the previous file can be seen in bold.
We can also log the resolved values to make sure it’s working:
1     Promise.all([promise1, promise2, promise3, promise4]).then(values => {
2           this.setState({
3             avatar: values[0],
4             username: values[1],
5             message: values[2],
6             article: values[3]
7           })
8          console.log(values);
9     });
Perfect!
Updating Our SlackChannel Component
To test our code, first, we need to update the Slack Channel.js file.
We need to nest these new message components like so:
 1     import React from 'react';
 2     import ReactDOM from 'react-dom';
 3     import { Container, Row, Col } from 'react-grid-system';
 4     import UserMessage from './houses/User Message.js';
 5     import ChatBotMessage from './houses/Chat Bot Message.js';
 6
 7     class SlackChannel extends React.Component {
 8       render() {
 9         return (
10           <Col lg={12}>
11             <img className="slack-channel" src="./images/Slack Channel.svg"/>
12             <UserMessage/>
13             <ChatBotMessage/>
14           </Col>
15         )
16       }
17     }
18
19     module.exports = SlackChannel;
Then, let’s update our CSS with the code that you can find here.
If you haven’t already, cd into the project directory and run npm start.
Then, go to the local host.
We should now see the following:
Excellent!
A couple issues to note.
One issue is that we only want these messages to appear on the Demo view but they are appearing on the LandingPage view as well. In addition, we mentioned that we wanted to have these messages be revealed in order.
For all these reasons, it’s time to add some conditional rendering.
Adding Conditional Rendering
*Slack Channel.js *currently contains:
 1     import React from 'react';
 2     import ReactDOM from 'react-dom';
 3     import { Container, Row, Col } from 'react-grid-system';
 4     import UserMessage from './houses/User Message.js';
 5     import ChatBotMessage from './houses/Chat Bot Message.js';
 6
 7     class SlackChannel extends React.Component {
 8       render() {
 9         return (
10           <Col lg={12}>
11             <img className="slack-channel" src="./images/Slack Channel.svg"/>
12             <UserMessage/>
13             <ChatBotMessage/>
14           </Col>
15         )
16       }
17     }
18
19     module.exports = SlackChannel;
We want to use conditional rendering to control whether UserMessage and ChatBotMessage render or not. We only want them to render on the Demo village, however, both the LandingPage village and the Demo village make use of the Header containing the SlackChannel.
In order to control this, we will pass a prop (called messages) down to the Header component nested in both Landing Page.js and Demo.js:
Landing Page.js
 1     import React from 'react';
 2     import ReactDOM from 'react-dom';
 3
 4     import Header from './neighborhoods/Header.js';
 5     import SectionA from './neighborhoods/Section A.js';
 6     import SectionB from './neighborhoods/Section B.js';
 7     import SectionC from './neighborhoods/Section C.js';
 8     import Footer from './neighborhoods/Footer.js';
 9
10     class LandingPage extends React.Component {
11       render() {
12         return (
13           <div className="landing-page">
14             <Header messages={false} title={"Developer Bot for Slack"} subtitle=\
15 {"One article to one random person in your Slack group. Once a day."}/>
16             <SectionA/>
17             <SectionB/>
18             <SectionC title={"Developer Bot for Slack"} subtitle={"One article t\
19 o one random person in your Slack group. Once a day."}/>
20             <Footer/>
21           </div>
22         )
23       }
24     }
25
26     module.exports = LandingPage;
Demo.js
 1     import React from 'react';
 2     import ReactDOM from 'react-dom';
 3
 4     import Header from './neighborhoods/Header.js';
 5     import Footer from './neighborhoods/Footer.js';
 6
 7     class Demo extends React.Component {
 8       render() {
 9         return (
10           <div className="demo">
11             <Header messages={true} title={"Chat Bot Demo"} subtitle={"Watch how\
12  it works."}/>
13             <Footer/>
14           </div>
15         )
16       }
17     }
18
19     module.exports = Demo;
If the messages prop is true, the message components will render. That is why we pass down a value of false in Landing Page.js and a value of true in Demo.js.
Next, we need to pass the messages prop down to the SlackChannel component so we can use it for conditional rendering.
The next level below the LandingPage and Demo components is our Header.
In Header.js, let’s pass down the messages prop down to the SlackChannel component like so:
 1     import React from 'react';
 2     import ReactDOM from 'react-dom';
 3     import { Container, Row, Col } from 'react-grid-system';
 4     import Navigation from './blocks/Navigation.js';
 5     import CallToAction from './blocks/Call To Action.js';
 6     import SlackChannel from './blocks/Slack Channel.js';
 7
 8     class Header extends React.Component {
 9       render() {
10         return (
11           <section className="header">
12             <Container>
13               <Row>
14                 <Navigation/>
15               </Row>
16               <Row>
17                 <CallToAction title={this.props.title} subtitle={this.props.subt\
18 itle}/>
19               </Row>
20               <Row>
21                 <SlackChannel messages={this.props.messages}/>
22               </Row>
23             </Container>
24           </section>
25         )
26       }
27     }
28
29     module.exports = Header;
Now, we can apply conditional rendering in Slack Channel.js like so:
 1     import React from 'react';
 2     import ReactDOM from 'react-dom';
 3     import { Container, Row, Col } from 'react-grid-system';
 4     import UserMessage from './houses/User Message.js';
 5     import ChatBotMessage from './houses/Chat Bot Message.js';
 6
 7     class SlackChannel extends React.Component {
 8       render() {
 9         //Boolean flag passed down for deciding what to render
10         const messages = this.props.messages;
11         return (
12           <Col lg={12}>
13             <img className="slack-channel" src="./images/Slack Channel.svg"/>
14             {messages ? (
15               //render messages is true (demo)
16               <div>
17                 <UserMessage/>
18                 <ChatBotMessage/>
19               </div>
20             ) : (
21               //render nothing messages is false (landing page)
22               <div></div>
23             )}
24           </Col>
25         )
26       }
27     }
28
29     module.exports = SlackChannel;
The highlighted code which we have gone over before can be read as: “If the inherited messages prop is true, then the Demo component will render these message components. Else, we render an empty div tag so only the Slack channel image appears.”
If we refresh our local host, we should see that the Landing Page view does not render these message components.
We can finally wrap up this chat bot demo by having the message components reveal in order:

Let’s start adding the code in Chat Bot Message.js to make this work.
First, we will add another property to our local state called showComponent:
1     constructor(){
2         super()
3         this.state = {avatar: "", username: "", message: "", article: "", showCo\
4 mponent: false}
5       }
This property will be our flag to control whether the message renders or not. To be clear, we are using conditional rendering with a flag in our local state and not as a passed prop in this case because:
It will be changed from false to true.
There is no higher level component that will determine how we apply conditional rendering.
The second step is to update our render function so that we can display the message depending on the value (true or false) of showComponent:
 1     render() {
 2         const showComponent = this.state.showComponent;
 3         return (
 4           <div>
 5             {showComponent ? (
 6               //render component
 7               <div className="bot-message">
 8                 <div style={{background: this.state.avatar}} className="bot-avat\
 9 ar"></div>
10                 <div className="username">{this.state.username}</div>
11                 <div className="message">{this.state.message}</div>
12                 <a href={this.state.article}>
13                   <span className="article">{this.state.article}</span>
14                 </a>
15               </div>
16             ) : (
17               //render nothing
18               <div></div>
19             )}
20           </div>
21         )
22       }
We’ve already discussed this type of logic so let’s go to our final step.
We are going to have our update state in the componentDidMount lifecycle hook after 1.5 seconds. We will use a setTimeout to control the timing:
 1     componentDidMount() {
 2         let firebaseAvatar;
 3         let firebaseUsername;
 4         let firebaseMessage;
 5         let firebaseArticle;
 6
 7         //promise stuff here
 8
 9         setTimeout(() => {
10           this.setState({showComponent: true});
11         }, 1500)
12     }
After 1.5 seconds (1500), we will change showComponent to true. This will cause the bot message to render.
The User Message.js file will have the same exact updates with one minor difference. The *setTimeout *duration will be specified to be 3000. Meaning, it will wait 3 seconds after the component mounts:
1     setTimeout(() => {
2       this.setState({showComponent: true});
3     }, 3000)
This will cause it to be rendered after the ChatBotMessage.
Reload the local host and you should now see that we have a functioning chat bot.
Finally! We have finished all of the major coding for this book!
Give yourself a pat on the back. You did it!
Since this has been a long and I will dedicate an entire chapter to concluding thoughts. Let’s end it here.