5 How can I compare 2 PDFs on the commandline?
5.1 Answer
What you want can be achieved with using ImageMagick’s compare command.
And this will work on all important operating system platforms: Windows, Mac OS X, Linux and various Unix variations.
The basic command is very simple:

|
First, please note: this only works well for PDFs which use the same page/media size. |
The comparison is done pixel by pixel between the two input PDFs. In order to get the pixels, the pages are rendered to raster images first, by default using a resolution of 72 ppi (pixels per inch). The resulting file is an image showing the “diff” like this:
- Each pixel that is identical on each input file becomes white.
- Each pixel that is different between the two input files is painted in red.
- The ‘source’ file (the first one named in the command) will, for context, be used to provide a gray-scale background to the diff output.
The above command outputs a PDF file, delta.pdf.
Should you prefer a PNG image or a JPEG image instead of a PDF, simply change the suffix of the ‘delta’ filename:
In some cases the default resolution of 72 ppi used to render the PDF pages may be insufficient to uncover subtle differences. Or, on the contrary, it may over-emphasize differences which are triggered by extremely minimal shifts of individual characters or lines of text caused by some computational rounding of real numbers.
So, if you want to increase the resolution, add the -density NNN parameter to the commandline.
To get 720 ppi images, use this:
|
|
Note, increasing the density/resolution of the output files also increases processing time and output file formats accordingly. A 10-fold increase in density leads to a 100-fold increase in the number of total pixels that need to be compared and processed. |
All of the above examples do only work for 1-page PDF files.
For multi-page PDFs you need to add a [N] notation to the file name, where N is the zero-based page number (page 1 is noted as [0], page 2 as [1], page 3 as [2], and so forth).
The following compares page 4 of file1.pdf with page 18 of file2.pdf:
If you do not want the gray-scale background created from the source file, use a modified command:
This modification changes the output to purly red/white: all pixels which are identical between the two base files are red, identical pixels are white.
In case you do not like the red and white default colors to visualize the pixel differences, you can add the following commandline parameters:
-
-highlight-color blue(change default color for pixel differences from ‘red’ to ‘blue’) -
-lowlight-color yellow(change default color for identical pixels from ‘white’ to ‘yellow’)
or any other color combination you desire.
Allowed names for colors include #RRGGBB values for RGB shades.
|
|
Note, ImageMagick’s To process PDFs, ImageMagick needs to resort to Ghostscript as its ‘delegate’ program for processing PDF input.
Ghostscript gets called behind the curtains by To see the exact commandline parameters that ImageMagick uses for Ghostscript call, just add a |
Examples
I’m using this very same method for example to discover minimal page display differences when font substitution in PDF processing comes into play.
It can easily be the case, that there is no visible difference between two PDFs, though they are extremely different in MD5 hashes, file sizes or internal PDF code structure.
In this case the delta1.pdf output PDF page from the above command would become all-white.
You could automatically discover this condition, so you only have to visually investigate the non-white PDFs by deleting the all-white ones automatically.
To give you a more visual impression about the way this comparison works, I’ve constructed a few different input files. I used Ghostscript to do this. (The exact commands I used are documented at the end of this chapter.)
Example 1
The following image shows two PDF pages side by side. Most people will notice from a quick look the differences between these two pages:
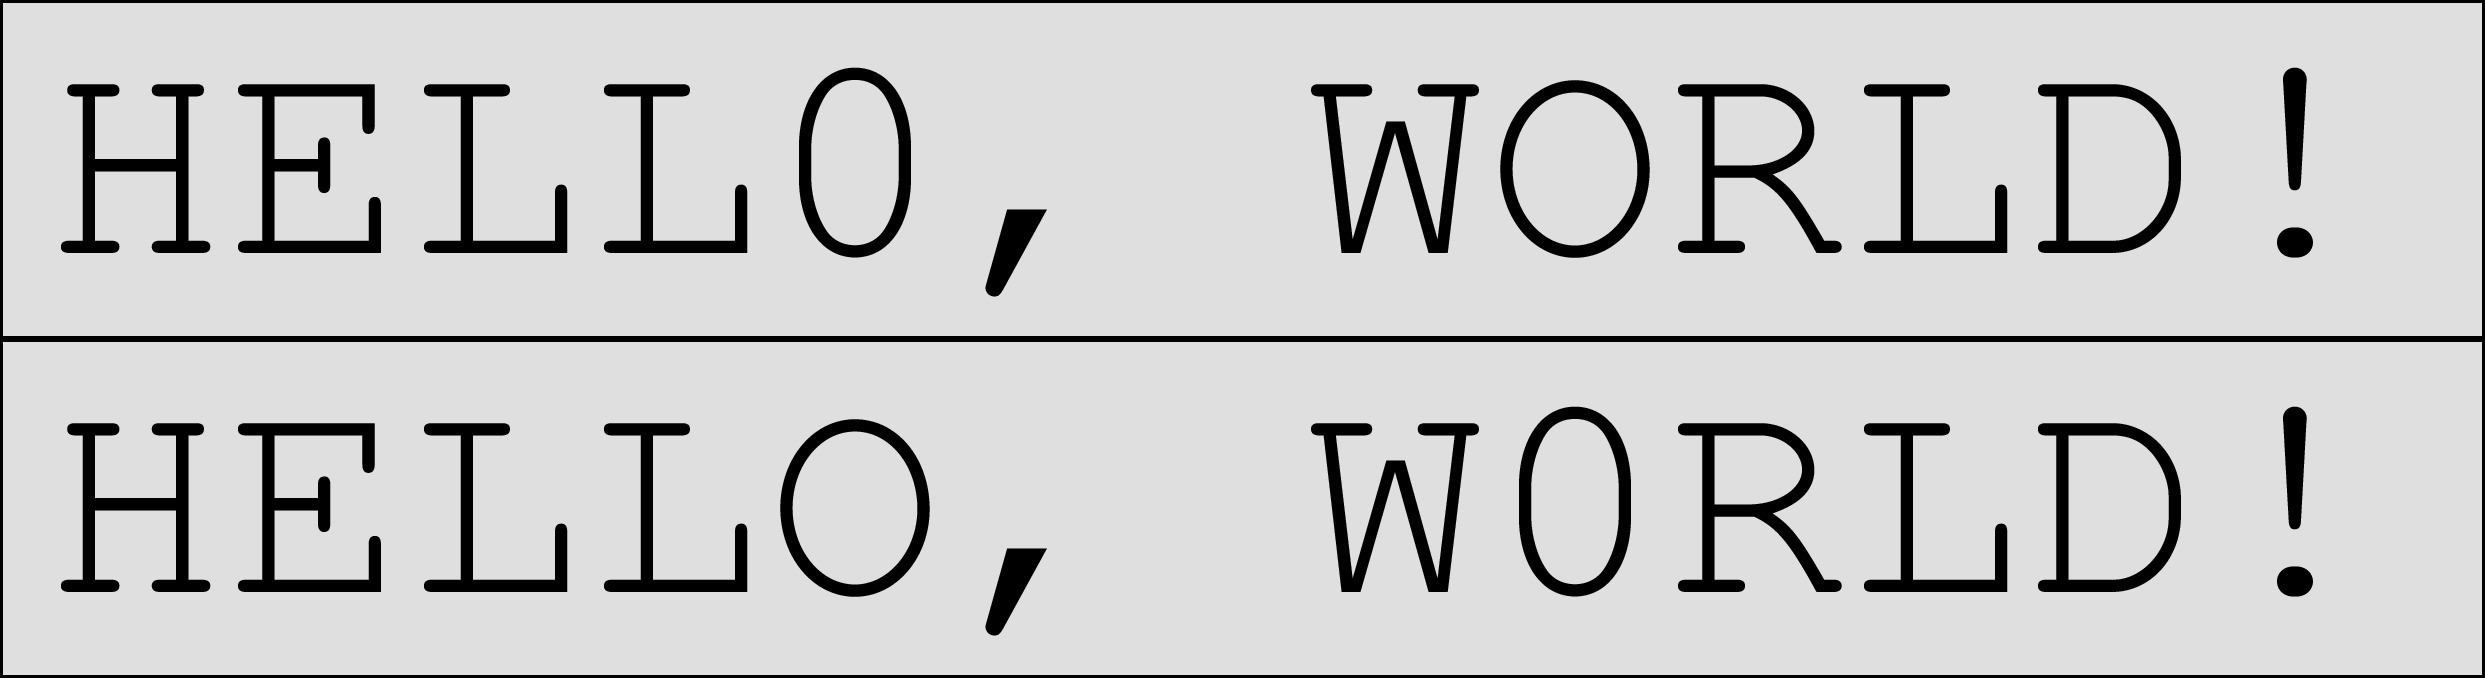
Two PDF pages which do differ – differences can be spotted by looking twice…
Now use the following commands to create a few different visualization of the ‘deltas’:
The resulting ‘delta’ images are shown in the following picture.
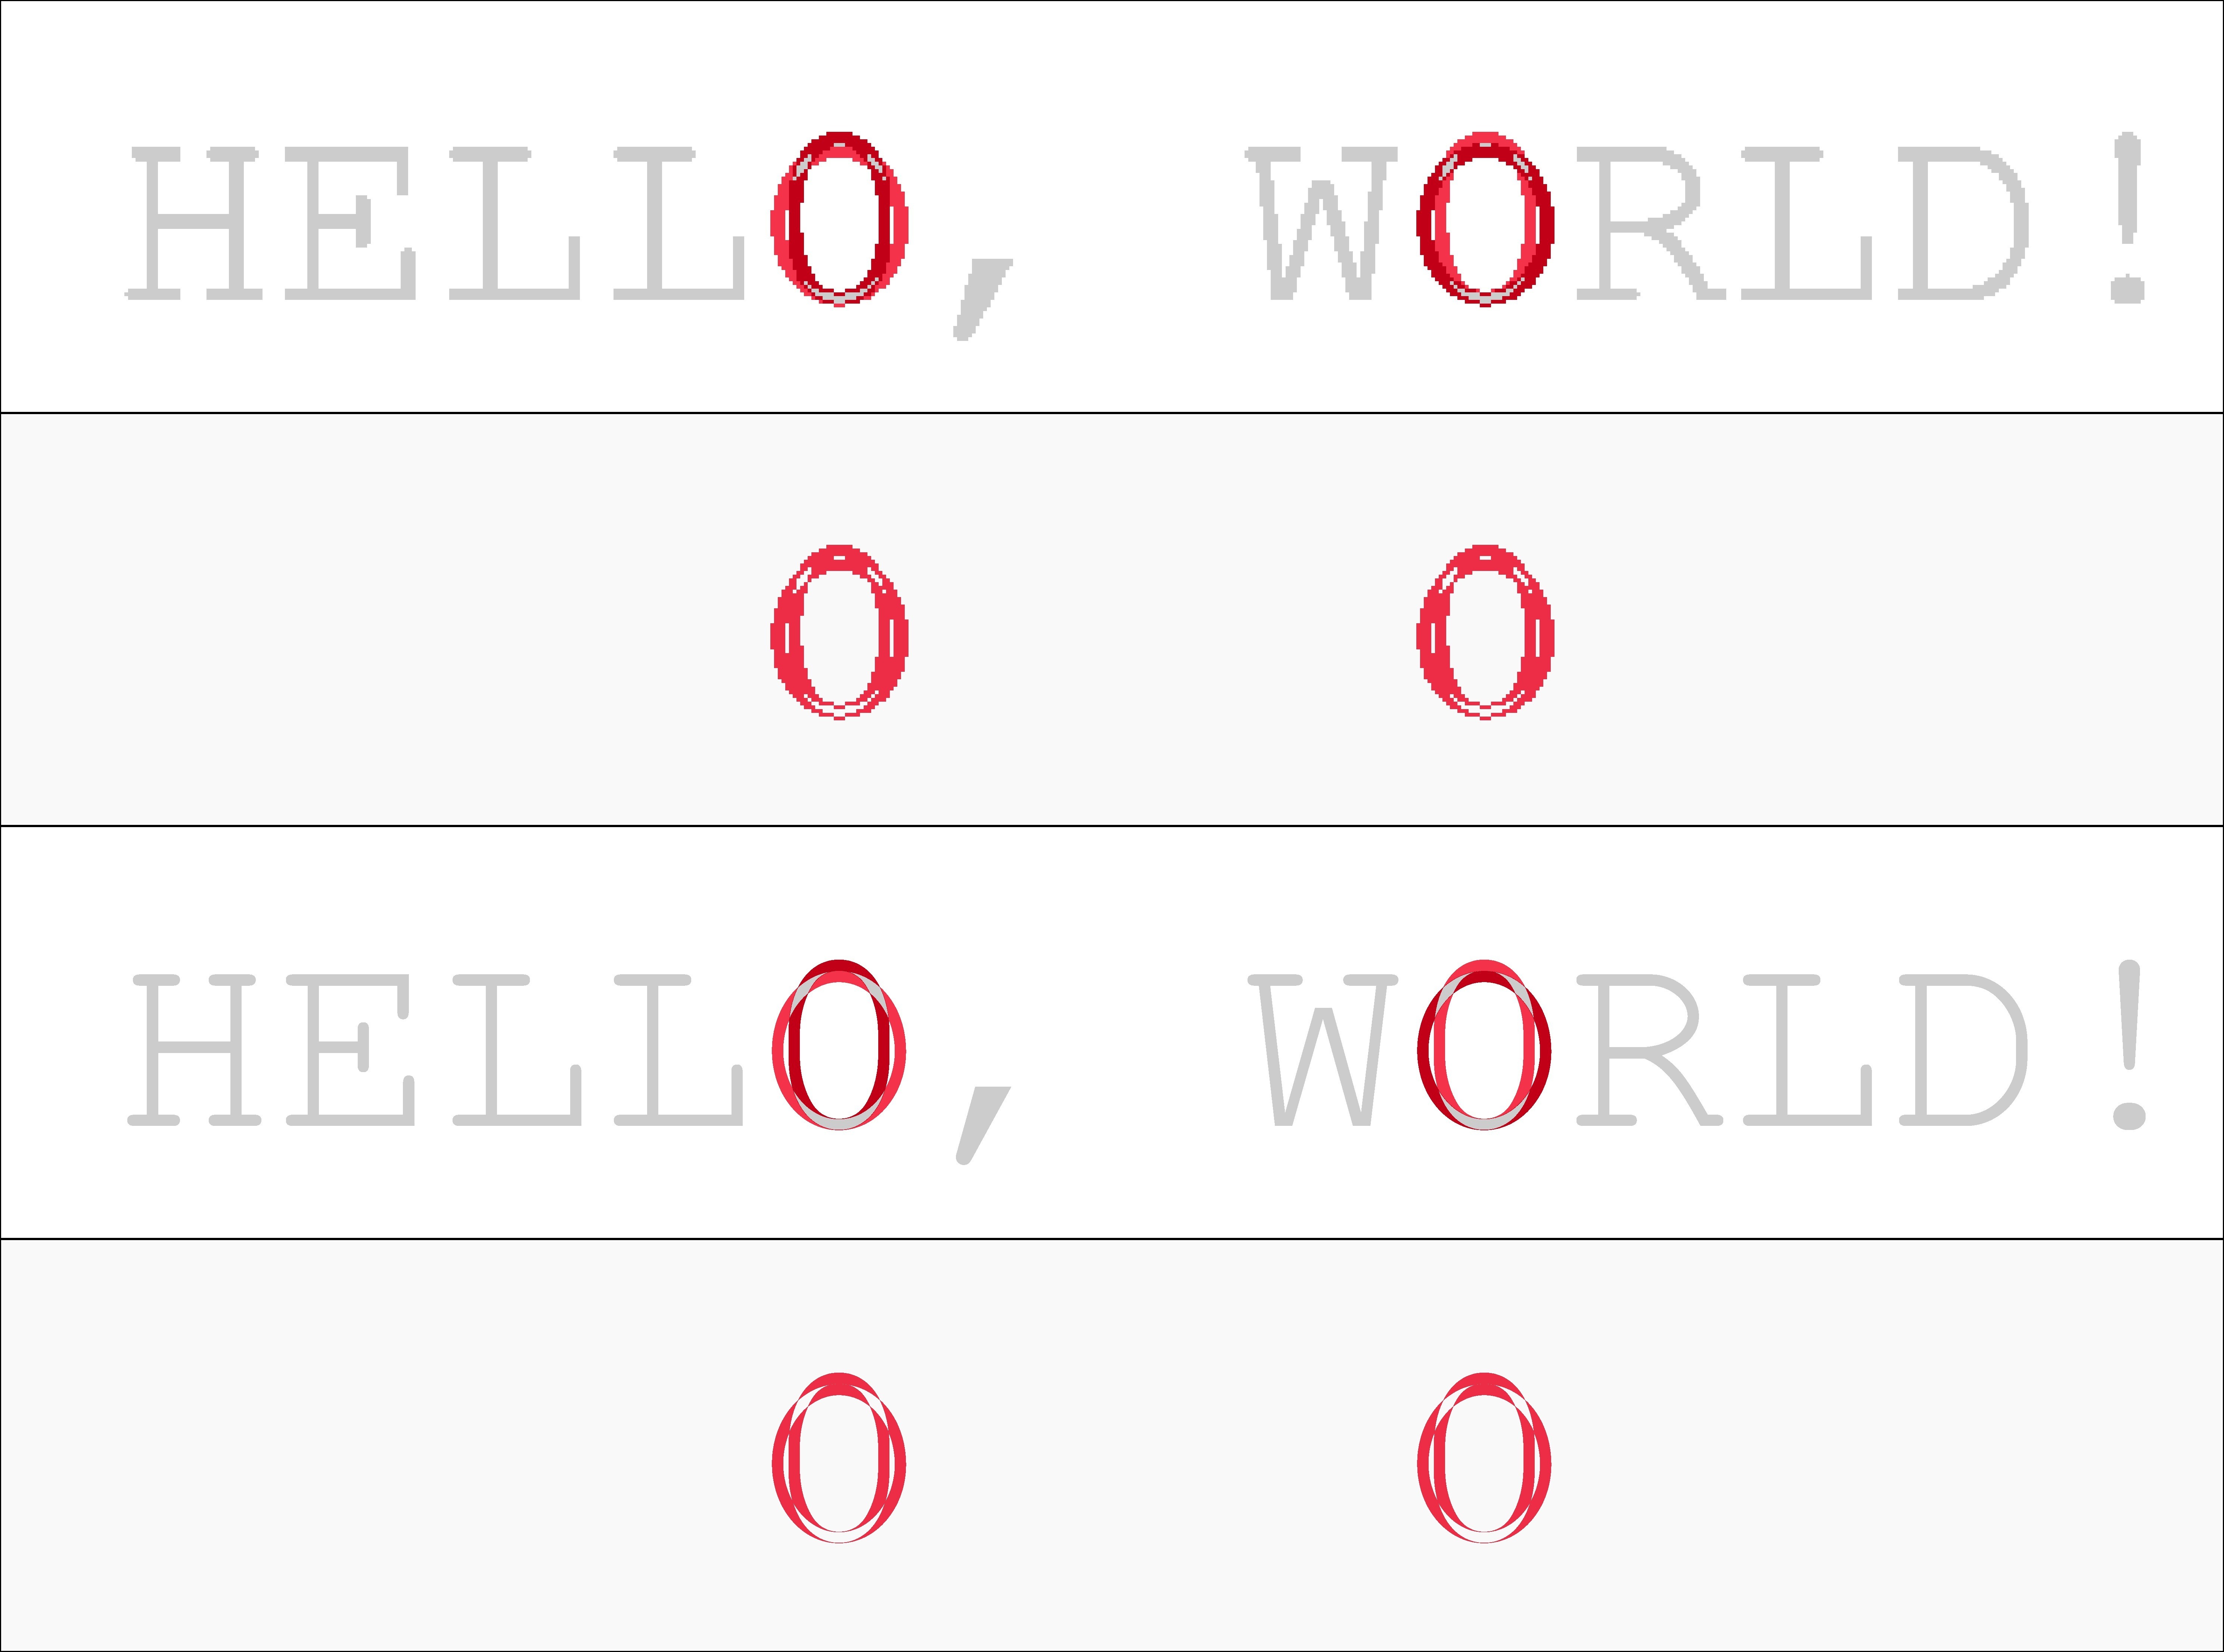
Four different visualizations of differences. The top two use a 72 ppi resolution, the bottom two a 720 ppi resolution. The 2nd and the 4th do not show a grayscale context background, but only white and red pixels.
As you can easily see, the 72 ppi-based comparison of the two input PDFs shows a clearly visible ‘pixelization’ of the results (top two images). Zoom in to see this in more detail. The 720 ppi version appears to come out much more smoothly. However, for this specific case 72 ppi would be ‘good enough’ to discover that in the two PDFs there was used a ‘0’ (number zero) instead of an ‘O’ (capital letter ‘o’) at two different spots.
Example 2
The following image shows two other PDF pages side by side. Hardly anybody will be able to spot the differences between these, but some people will:
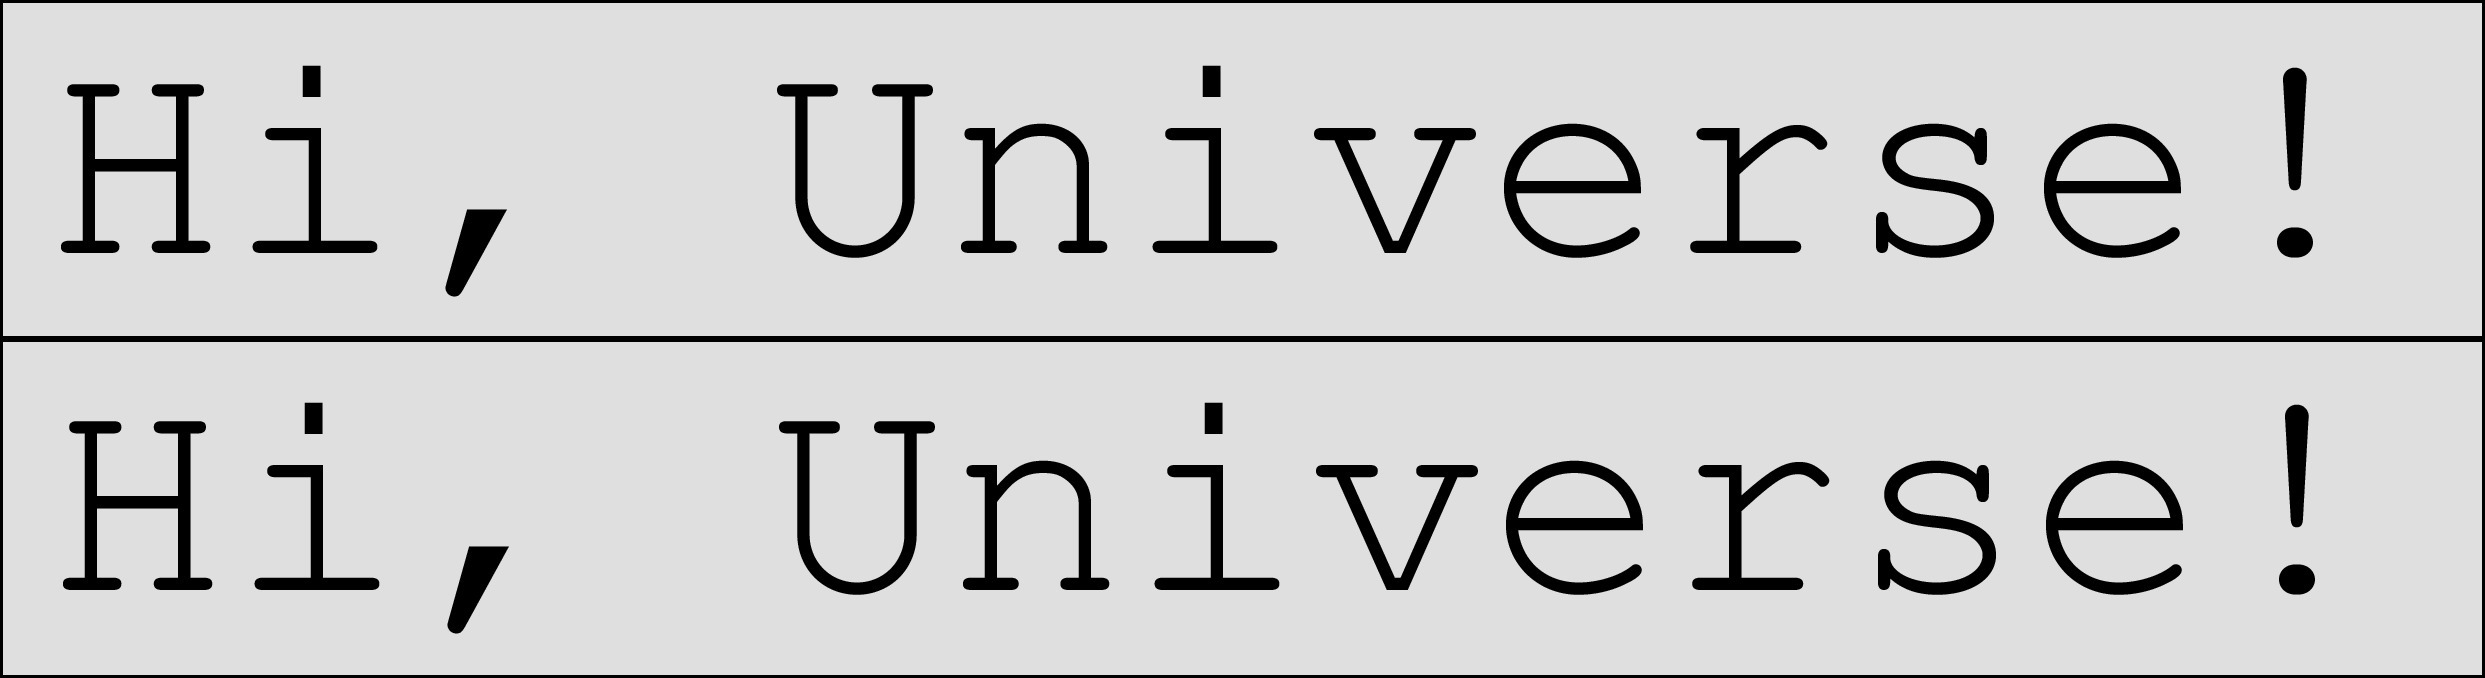
Two PDF pages which do differ – differences can only be be spotted by looking very closely.
Now use the following commands to create a few different visualization of the ‘deltas’:
The resulting differences are shown in the following picture.
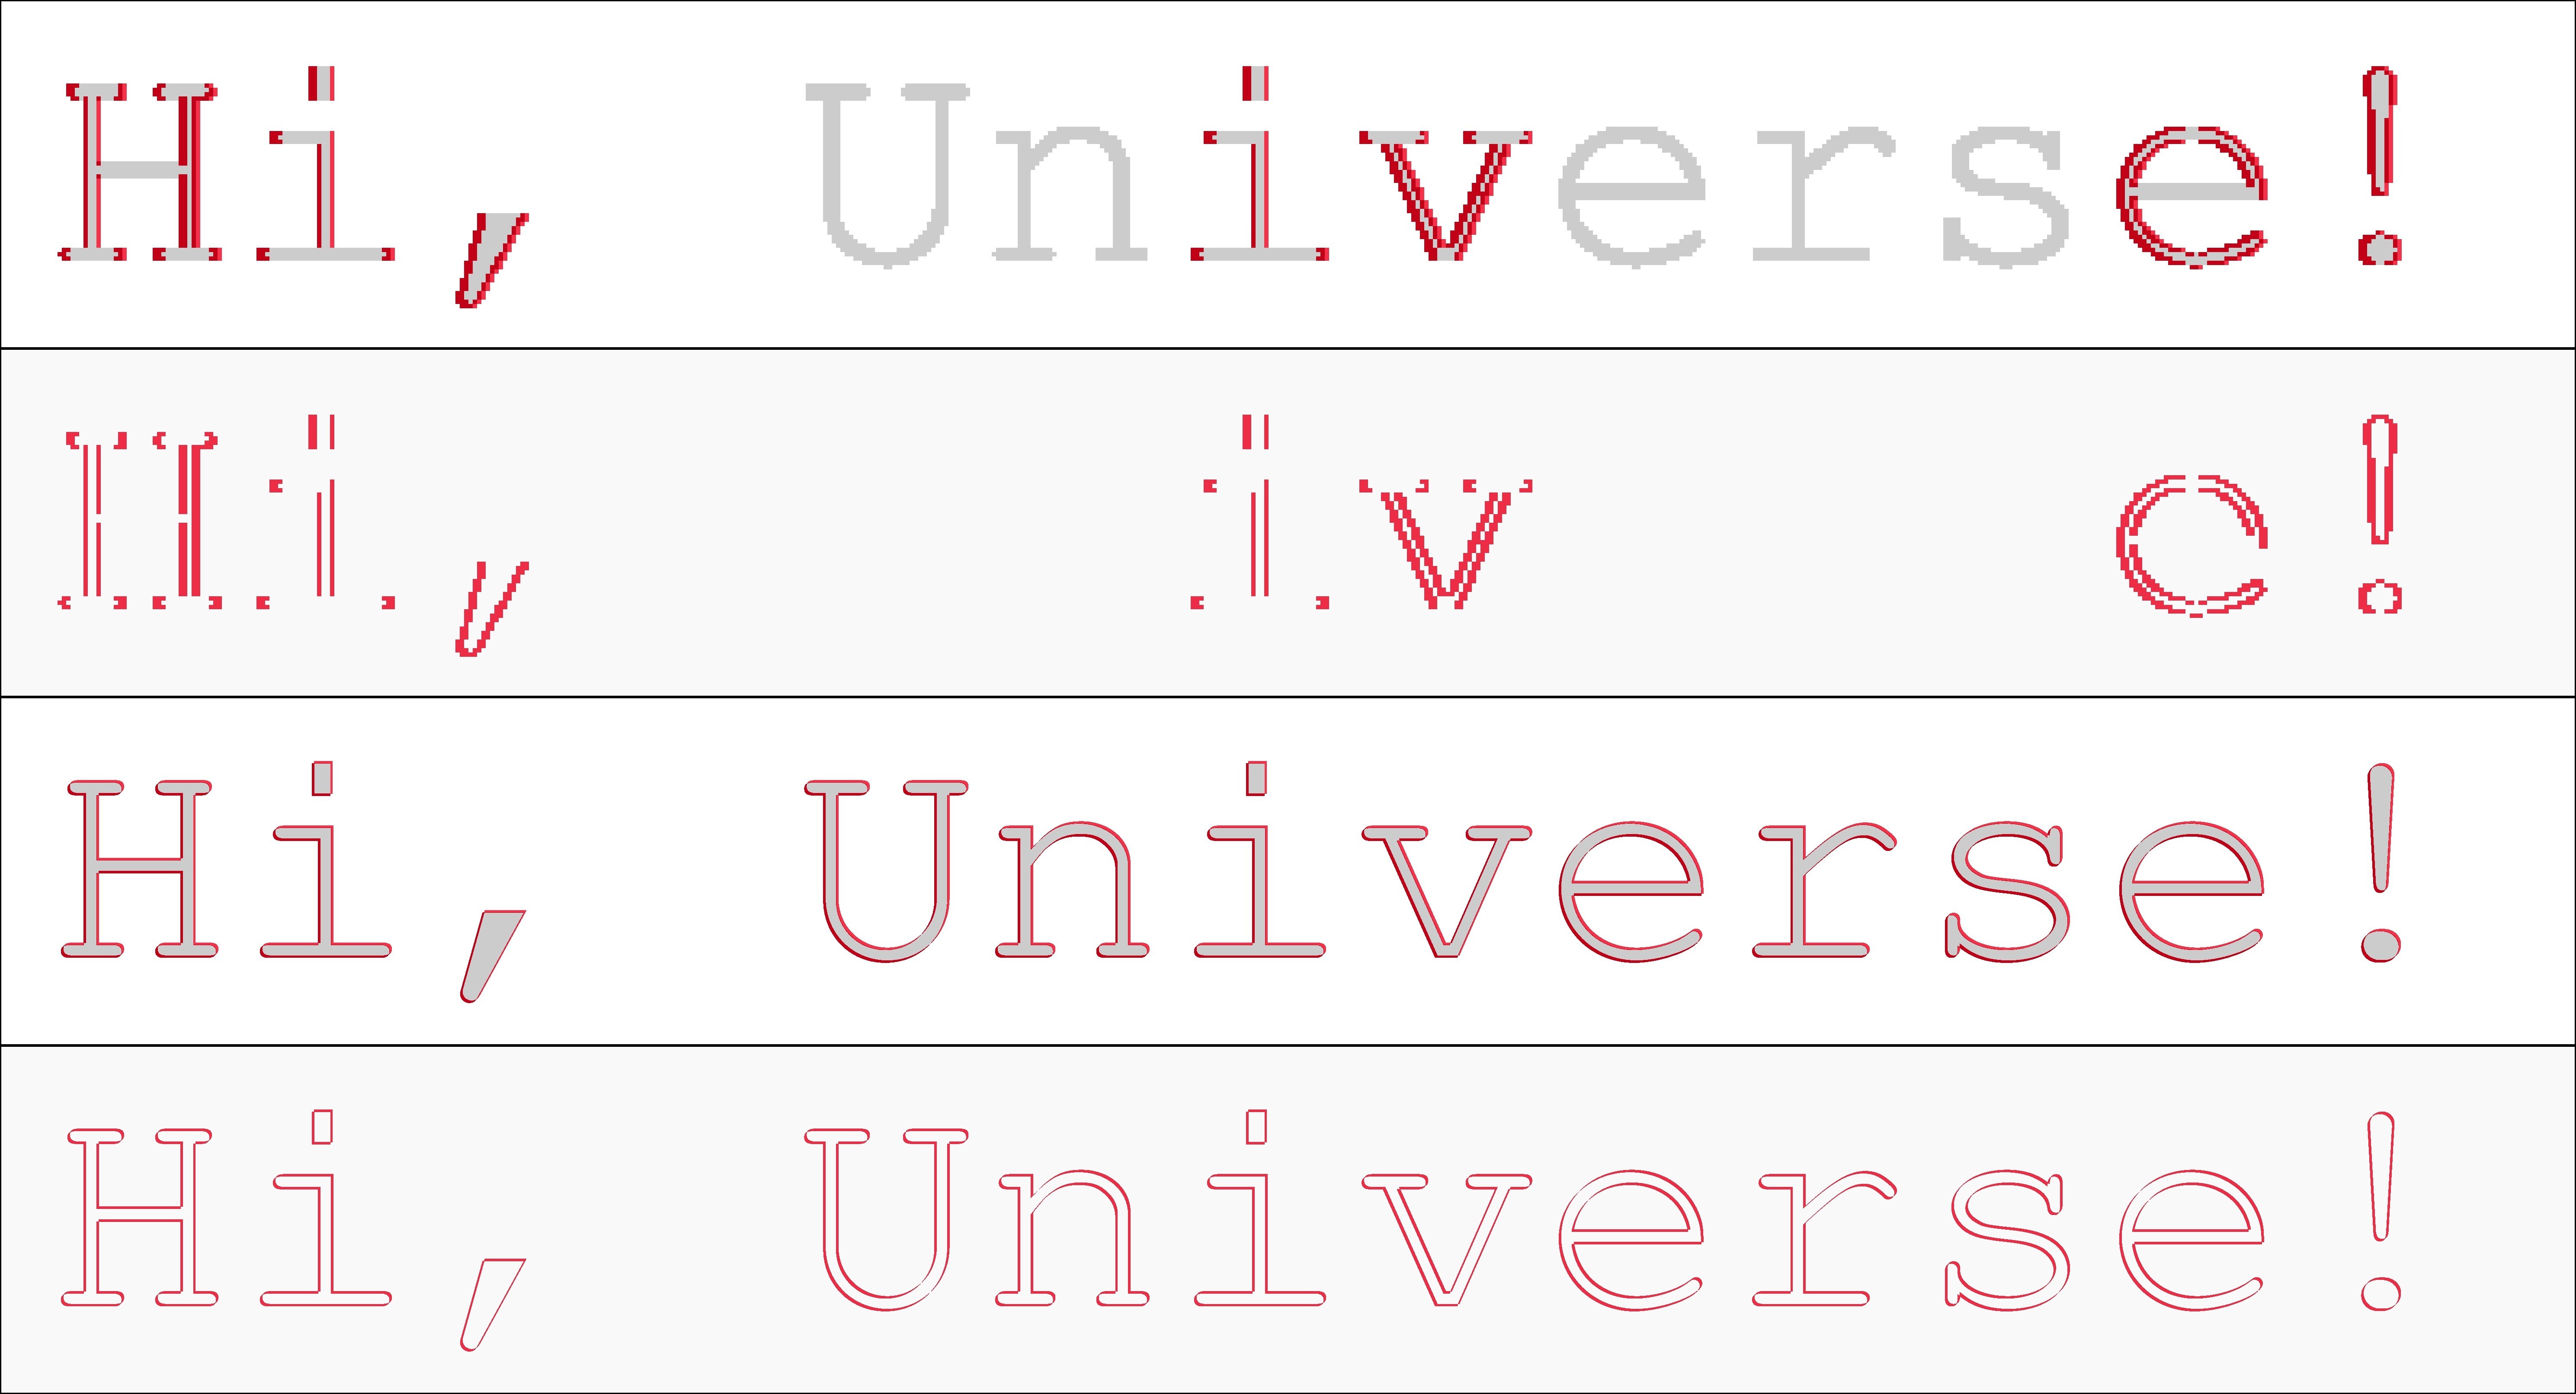
Four different ways to visualize the differences between the last two input files. Again a 72 ppi resolution for the top two and a 720 ppi resolution for the bottom ones. The 1st and the 3rd do show a grayscale context background, the others do not. Please zoom in to spot the finer pixel differences between the different resolutions…
Again, the 72 ppi-based comparison of the two input PDFs shows a clearly visible ‘pixelization’ of the results (top two images). The 720 ppi version does show the differences much more clearly: it is just that the text is shifted slightly to the left and to the top in the case of the second input. If you zoom in enough into the 720 ppi versions, you can even count the number of pixels: the shift for each single character of the text is constistenlty 5 pixels to the right and 5 pixels to the top. The 72 ppi version cannot bring out this subtle difference so clearly: at this resolution the shift is only 1/2 pixel to the right and 1/2 pixel to the top. This means that for some characters there is no shift occuring at all, and other characters move by a full pixel in either direction. This becomes clearly visible in the fact that some characters do not look changed at all while others clearly do.
Example 3
The following image shows two other PDF documents. Can you spot the difference?
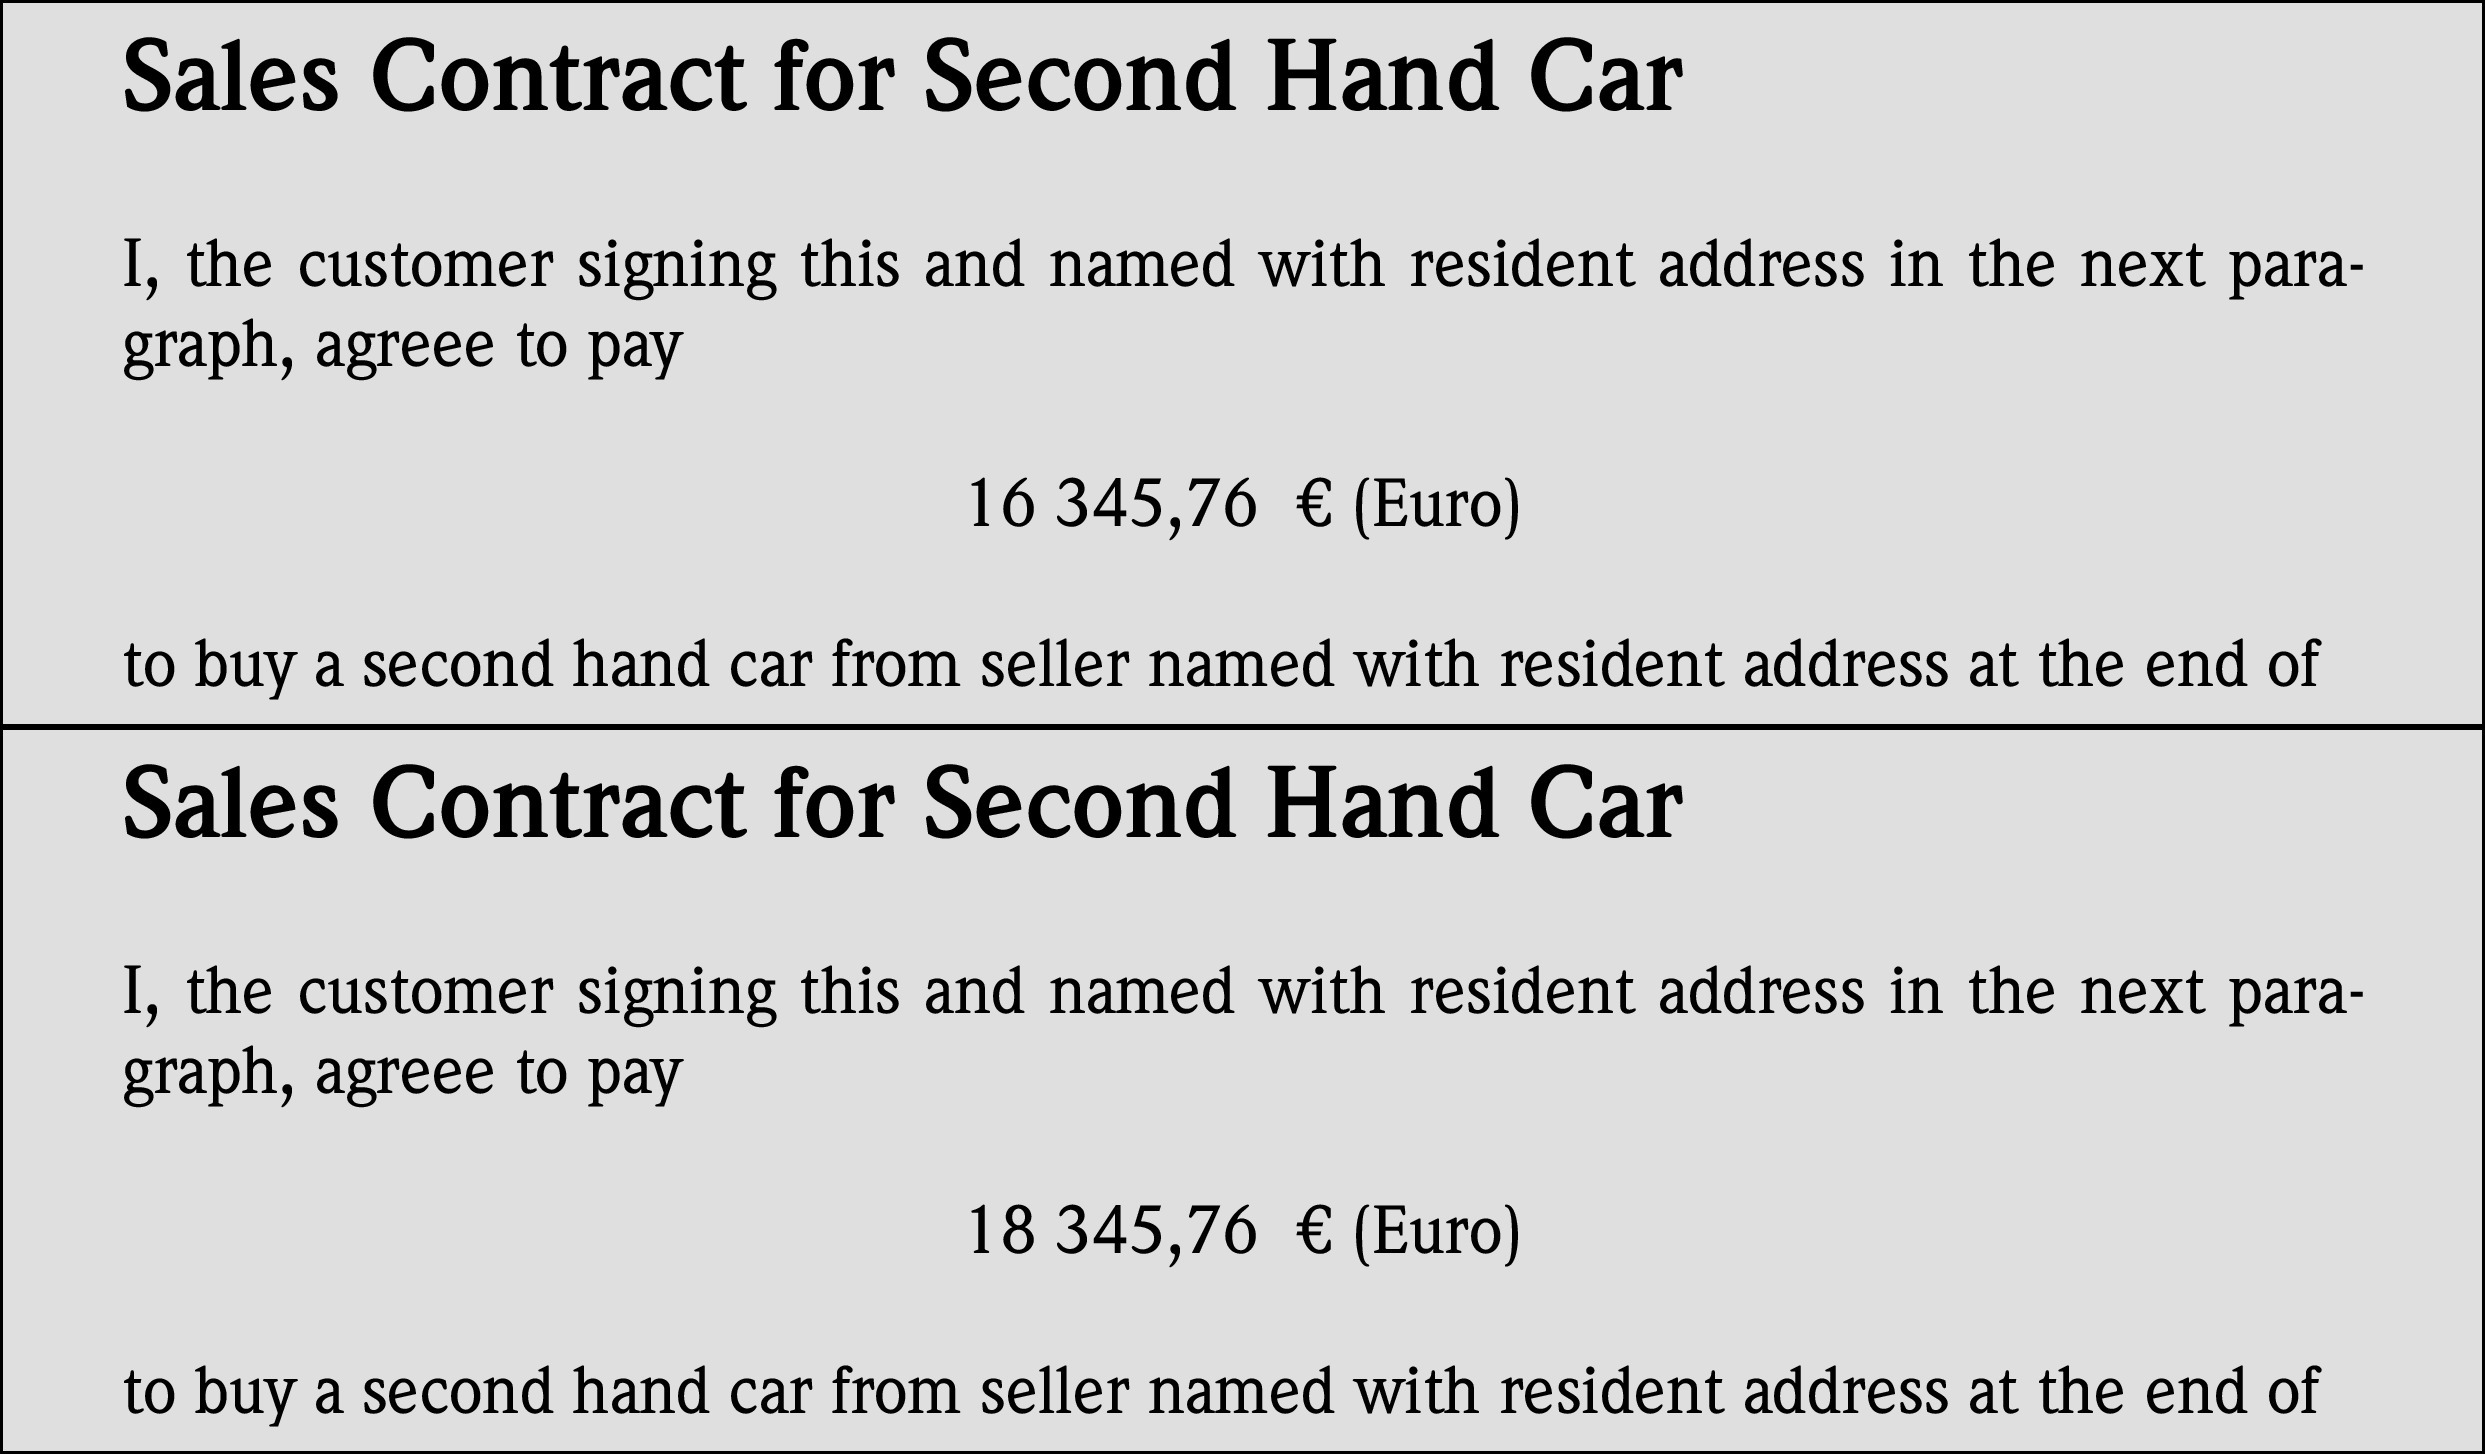
Two PDF documents which do differ. Try to spot the difference!
Creating visualizations in red/white pixels will give the following results.
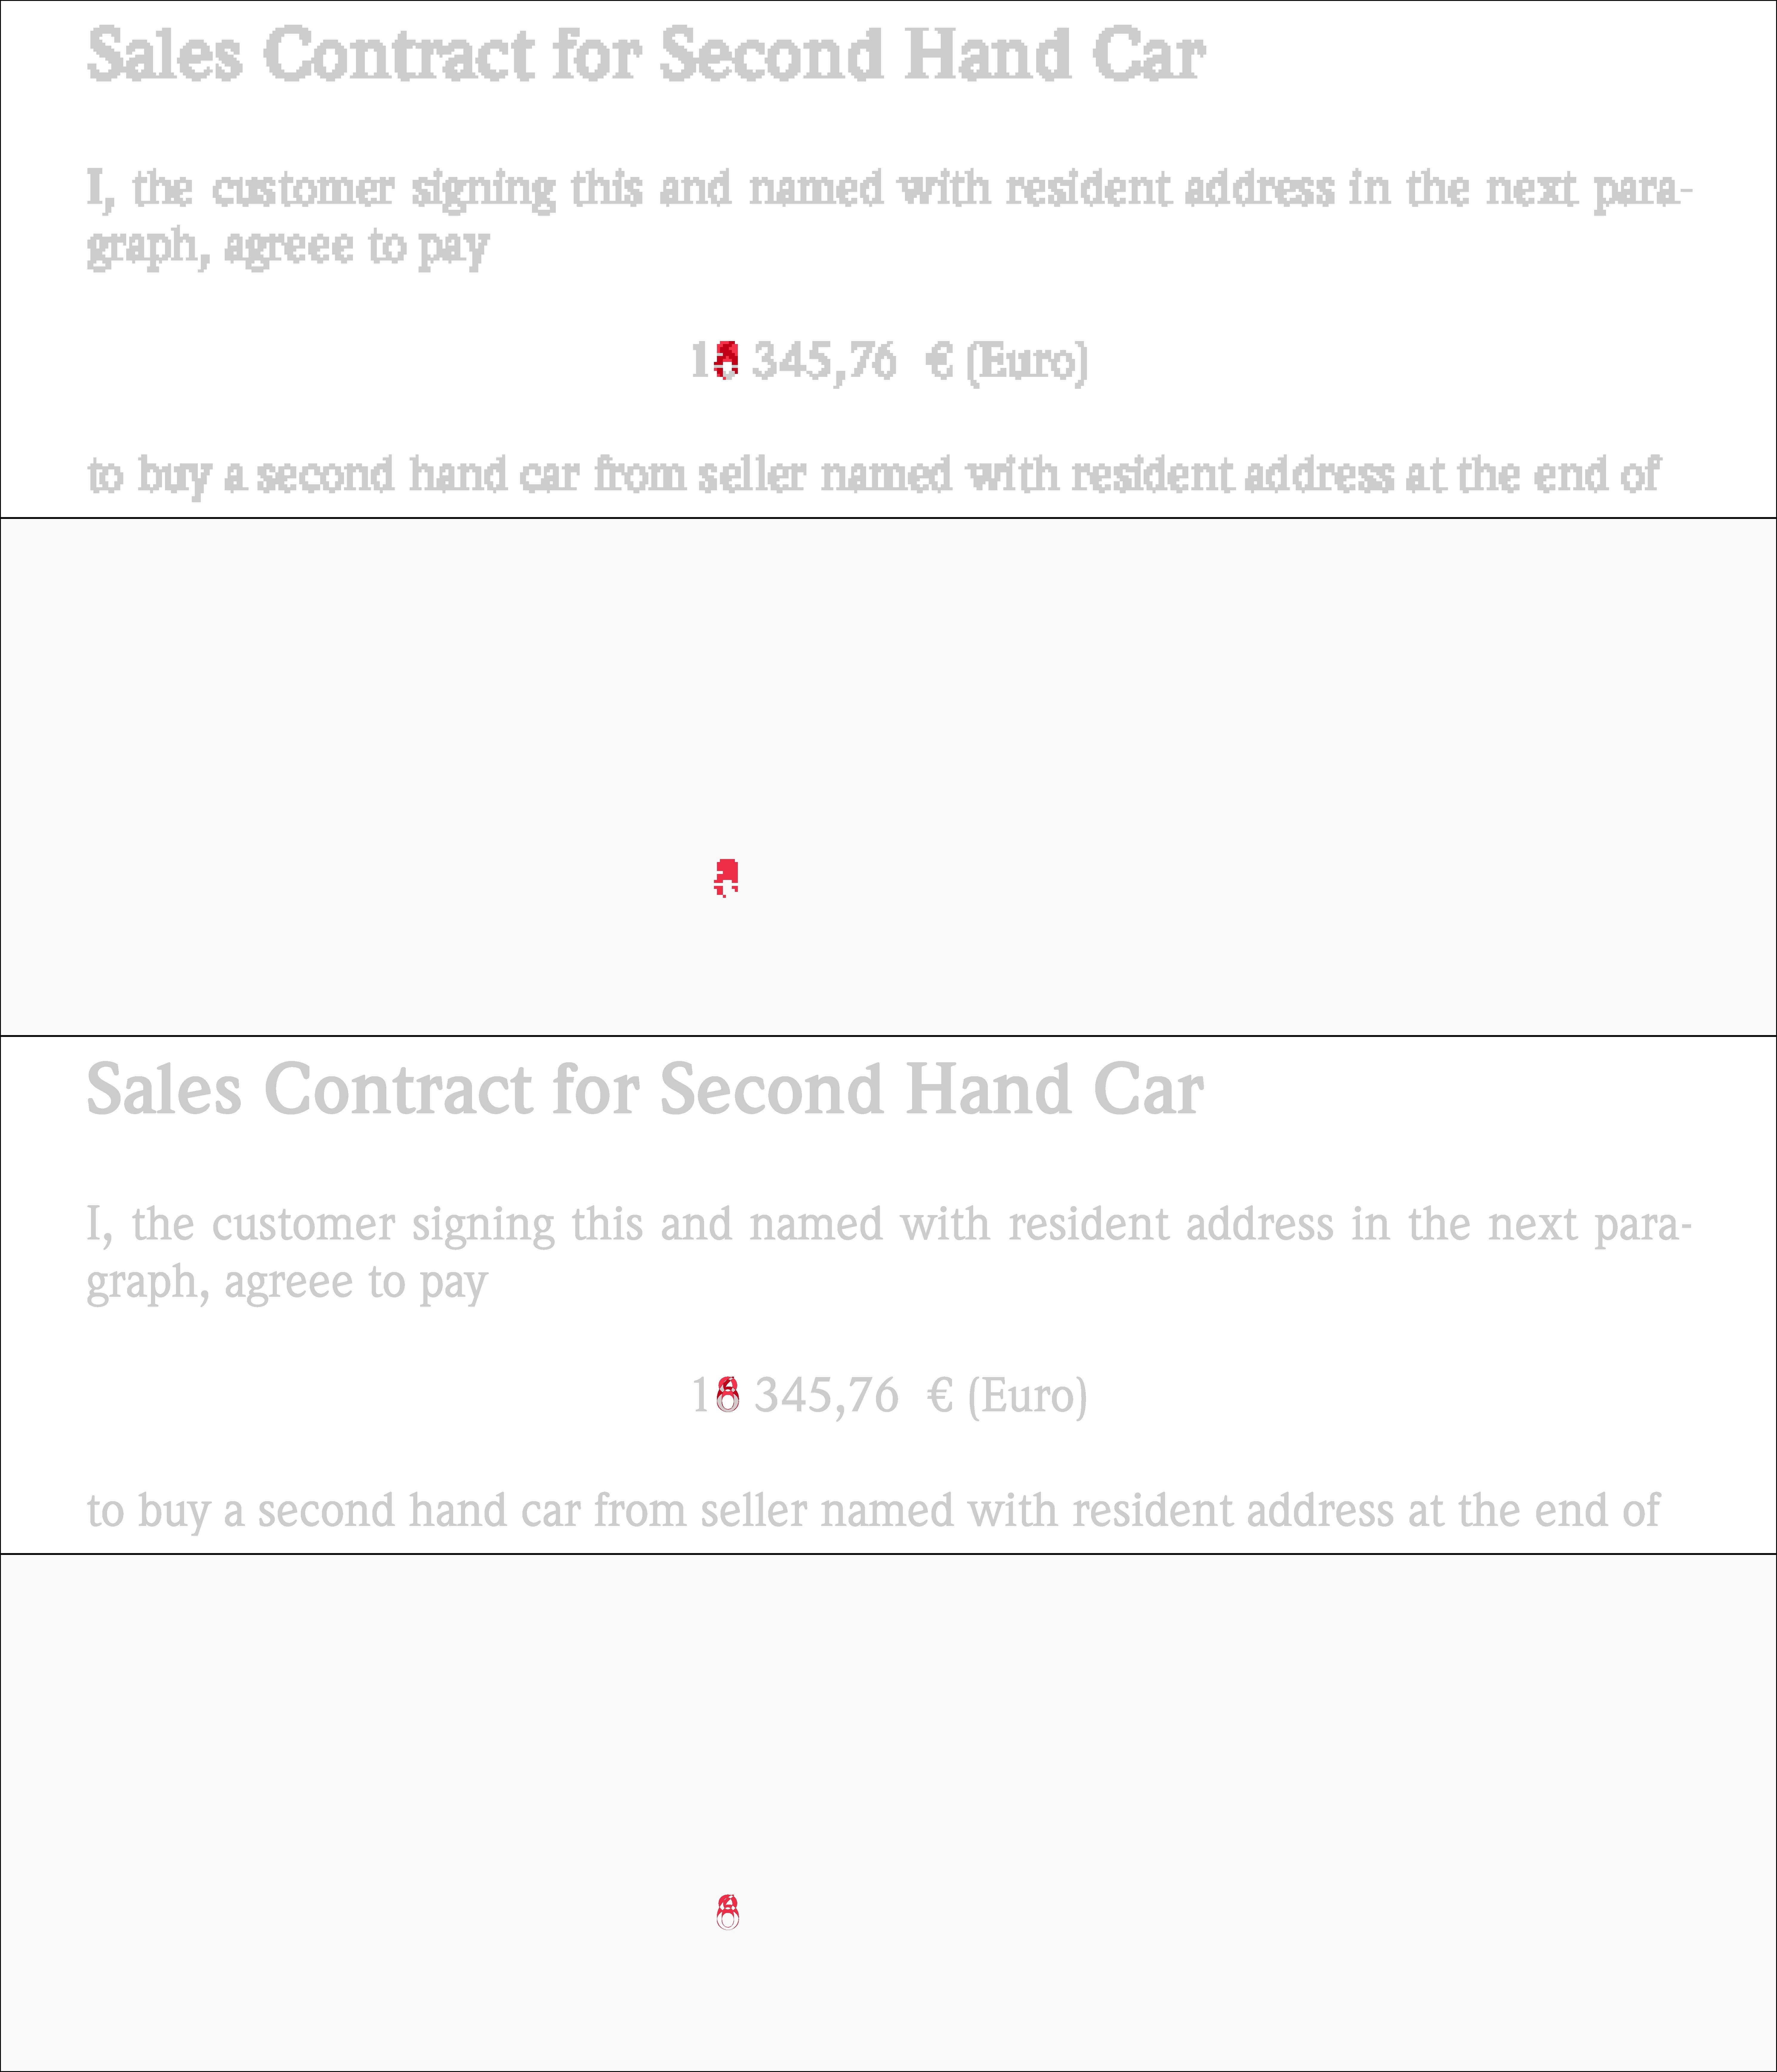
Four different ways to visualize the differences between the last two input files. Again a 72 ppi resolution for the top two and a 720 ppi resolution for the bottom ones. The 1st and the 3rd do show a grayscale context background, the others do not…
If you have access to the original delta files and zoom in on no. 3 you can clearly see that the second document contains a changed prize: going up by 2.000 $US by change the original ‘6’ to an ‘8’.
Update
For those of you who want to reproduce the commands shown above, you’d also need access to the same source files I used. That’s easy: I used Ghostscript to create these example input PDFs. Here are the commands for this: