I 100 Tipps and Tricks
1 Downloading the tools
My own preferred work environments are Linux and Mac OS X. However, most of the methods explained in the following chapters can be applied to Windows too. Readers will benefit most from this book if they reproduce and play with some of the example commandlines given. To do that they should install the following tools.
1.1 Windows
These are the preferred download sites. They are the ones which are offered by the respective developers themselves. Do not ever use any other, third-party download links, unless you really know what you do!
- Download Ghostscript:
http://downloads.ghostscript.com/public/
Currently available are installer files for Windows:- gs914w32.exe (for all Windows OS 32bit, but also works on Windows 64 bit)
- gs914w64.exe (does not work on Windows 32bit – but Ghostscript developers warn anyway: the 64bit version may even run slower on 64bit than does the 32bit version on 64bit Windows!)
- Keep your eyes open for newer versions appearing in that directory!
- Download GhostPCL:
http://downloads.ghostscript.com/public/binaries/
Currently available are pre-compiled 32-bit binaries for Windows embedded in a *.zip file:- ghostpcl-9.14-win32.zip
- Keep your eyes open for newer versions appearing in that directory!
- Download GhostXPS:
http://downloads.ghostscript.com/public/binaries/
Currently available are pre-compiled 32-bit binaries for Windows embedded in a *.zip file:- 32-bit Version: ghostxps-9.14-win32.zip
- Keep your eyes open for newer versions appearing in that directory!
- Download XPDF-Utils (CLI tools: pdffonts, pdfinfo, pdfimages, pdftotext, pdftops…)
http://www.foolabs.com/xpdf/download.html
Current file version:-
xpdfbin-win-3.03.zip
The .zip contains pre-compiled binaries for Windows. It’s not an installer: just unpack anywhere you want, modify the %PATH% variable to find the binaries and start them from an CMD window.
You may want to additionally add one or more of the *‘Language Support Packages’. - Keep your eyes open for newer versions appearing in that directory!
-
xpdfbin-win-3.03.zip
- Download qpdf:
32-bit Version: http://sourceforge.net/projects/qpdf/files/qpdf/5.1.1/qpdf-5.1.1-bin-mingw32.zip
64-bit Version: http://sourceforge.net/projects/qpdf/files/qpdf/5.1.1/qpdf-5.1.1-bin-mingw64.zip
64-bit Version: http://sourceforge.net/projects/qpdf/files/qpdf/5.1.1/qpdf-5.1.1-bin-msvc64.zip - Download pdftk:
http://www.pdflabs.com/tools/pdftk-the-pdf-toolkit/pdftk_server-2.02-win-setup.exe - Download ImageMagick:
http://www.imagemagick.org/download/binaries/ (make sure to select the correct and most current download for your system)

|
A Warning Note about Downloading from SourceforgeSourceforge.net used to be a resource that was very useful for the Open Source community. However, in recent years the site has become more and more overloaded with ads. Some of the more recent stories on the Internet even suggest that the site may be poisoned with links that lead you to third party ‘drive-by’ malware download sites. Unfortunately, some of the tools advertised in this eBook (such as :-( |
1.2 Mac OS X
My recommendation is to use the ‘MacPorts’ framework for installing additional software packages:
After you have put MacPorts in place, open a Terminal.app window and start installing the packages by typing:
Be aware that this may take a while.
Ghostscript depends on additional packages for its functionality, like libpng, jpeg, tiff, zlib and more.
The same applies for the other tools.
The port command downloads, compiles and installs all these dependencies automatically, so this may take quite a while…
1.3 Linux
Debian, Ubuntu, …
You can run this command in a terminal window:
Or you use the package manager of your choice to find and install the packages…
RedHat, Fedora
Command in a terminal window:
Slackware
Command in a terminal window:
1.4 Documentation
2 How can I convert PCL to PDF?
2.1 Answer
No, it’s not possible with Ghostscript itself…
But yes!, it’s very well possible with another cool piece of workhorse software from the same barn: its name ist GhostPCL.
Ghostscript developers in recent years integrated their sister products GhostXPS, GhostPCL and GhostSVG into their main Ghostscript source code tree, which switched from Subversion to Git some time ago. The complete family of products is now called GhostPDL. So all of these additional functionalities (load, render and convert XPS, PCL and SVG) are now available from there.
Previously, though GhostPCL was available as a source code tarball, it was hardly to be found on the ‘net. The major Linux distributions (Debian, Ubuntu, Redhat, Fedora, OpenSUSE,…) don’t provide packages for their users either. On MacPorts it is missing too.
This means you have to build the programs yourself from the sources.
You could even compile the so-called language switching binary, pspcl6.
This binary, in theory, can consume PCL, PDF and PostScript and convert this input to a host of other formats.
Just run make ls-product in the top level Ghostscript source directory in order to build it.
The resulting binary will end up in the ./language-switch/obj/ subdirectory. Run make ls-install in order to install it.
|
|
WARNING: While it worked for me whenever I needed it, Ghostscript developers recommend to stop using the language switching binary (since it’s ‘almost non-supported’ as they say, and it will possibly go away in the future). Instead they recommend to use the explicit binaries:
|
So for ‘converting PCL code to PDF format’ as the request reads, you could use the pcl6 command line utility, the PCL consuming sister product to Ghostscript’s gs (Linux, Unix, Mac OS X) and gswin32c.exe/gswin64c.exe (Windows) which are PostScript and PDF input consumers.
Sample commandline (Windows):
Sample Commandline (Linux, Unix, Mac OS X):
Explanation
-o output.pdf- The
-oparameter determines the location of the output. In this case it will be the file output.pdf in the current directory (since we did not specify any path prefix for the filename). At the same time, using-osaves us from typing-dBATCH -dNOPAUSE -dSAFER, because-oimplicitly does also set these parameters. -sDEVICE=pdfwrite- This parameter determines which kind of output to generate. In our current case it will be PDF. If you wanted to produce a multipage grayscale TIFF with CCITT compression, you would change that to
-sDEVICE=tiffg4(don’t forget to modify the output file name accordingly too:-o output.tif). -f input.pcl- This parameter determines which file to read as input. In this case it is the file input.pcl in the current directory.
Update: The Ghostscript website now at least for Windows users offers pre-compiled 32-bit binaries for GhostPCL and GhostXPS.
- http://downloads.ghostscript.com/public/binaries/ghostpcl-9.14-win32.zip
- http://downloads.ghostscript.com/public/binaries/ghostxps-9.14-win32.zip
See also the hints in *'[How can I convert XPS to PDF?](#convert-xps-to-pdf)'*.
TODO! Hint about the GhostPCL licensing. Esp. important: hint about the URW fonts which are not GPL (they require commercial licensing for commercial use).
3 How can I to convert XPS to PDF?
3.1 Answer
Ghostscript developers in recent years have integrated a sister product named GhostXPS into their main Ghostscript source code tree, which is based on Git now. (They have also included two other products, named GhostPCL and GhostSVG.) The complete family of products is now called GhostPDL. So all of these additional functionalities (load, render and convert XPS, PCL and SVG) are now available from one location.
Unfortunately, none of the major Linux distributions (Debian, Ubuntu, Redhat, Fedora, OpenSUSE,…) do currently provide packages for their users. On MacPorts GhostXPS is missing too, as are GhostPCL and GhostSVG.
This means you have to build the programs yourself from the sources – unless you are a Windows user. In this case you are lucky: there is a *.zip container on the Ghostscript website, which contains a pre-compiled Win32 binary (which also runs on Windows 64 bit!):
While you’re at it and build the code yourself, you could even build a so-called language switching binary.
The Makefile has targets prepared for that.
This binary can consume PCL, PDF and PostScript.
It converts these input formats to a host of other file types.
Just run make ls-product && make ls-install in the top level Ghostscript source directory in order to get it installed.
|
|
WARNING: While it worked for me whenever I needed it, Ghostscript developers recommend to stop using the language switching binary (since it’s ‘almost non-supported’ as they say, and it will possibly go away in the future). Instead they recommend to use the explicit binaries, also supported as build targets in the Makefile:
|
Sample commandline (Windows):
Sample commandline (Linux, Unix, Mac OS X):
Explanation
-o output.pdf- The
-oparameter determines the location of the output. In this case it will be the file output.pdf in the current directory (since we did not specify any path prefix for the filename). At the same time, using-osaves us from typing-dBATCH -dNOPAUSE -dSAFER, because-oimplicitly does also set these parameters. -sDEVICE=pdfwrite- This parameter determines which kind of output to generate. In our current case that’s PDF. If you wanted to produce a PostScript level 2 file, you would change that to
-sDEVICE=ps2write(don’t forget to modify the output file name accordingly too:-o output.ps). -f input.pcl- This parameter determines which file to read as input. In this case it is the file input.pcl in the current directory.
See also the hints in *['How can I convert PCL to PDF?'](#convert-pcl-to-pdf.html)*.
TODO! Hint about the GhostPCL licensing. Esp. important: hint about the URW fonts which are not GPL (they require commercial licensing for commercial use).
4 How can I unit test a Python function that draws PDF graphics?
4.1 Answer
I’m doing the same thing using a shell script on Linux that wraps
- ImageMagick’s
comparecommand - the
pdftkutility - Ghostscript (optionally)
(It would be rather easy to port this to a .bat Batch file for DOS/Windows.)
I have a few reference PDFs created by my application which are “known good”. Newly generated PDFs after code changes are compared to these reference PDFs. The comparison is done pixel by pixel and is saved as a new PDF. In this PDF, all unchanged pixels are painted in white, while all differing pixels are painted in red.
This method utilizes three different building blocks: pdftk, compare (part of ImageMagick) and Ghostscript.
pdftk
Use this command to split multipage PDF files into multiple singlepage PDFs:
compare
Use this command to create a “diff” PDF page for each of the pages:
Ghostscript
Because of automatically inserted meta data (such as the current date+time), PDF output is not working well for MD5hash-based file comparisons.
If you want to automatically discover all cases which consist of purely white pages, you could also convert to a meta-data free bitmap format using the bmp256 output device.
You can do that for the original PDFs (reference and comparison), or for the diff-PDF pages:
If the MD5sum is what you expect for an all-white page of 595x842 PostScript points, then your unit test passed.
5 How can I compare 2 PDFs on the commandline?
5.1 Answer
What you want can be achieved with using ImageMagick’s compare command.
And this will work on all important operating system platforms: Windows, Mac OS X, Linux and various Unix variations.
The basic command is very simple:

|
First, please note: this only works well for PDFs which use the same page/media size. |
The comparison is done pixel by pixel between the two input PDFs. In order to get the pixels, the pages are rendered to raster images first, by default using a resolution of 72 ppi (pixels per inch). The resulting file is an image showing the “diff” like this:
- Each pixel that is identical on each input file becomes white.
- Each pixel that is different between the two input files is painted in red.
- The ‘source’ file (the first one named in the command) will, for context, be used to provide a gray-scale background to the diff output.
The above command outputs a PDF file, delta.pdf.
Should you prefer a PNG image or a JPEG image instead of a PDF, simply change the suffix of the ‘delta’ filename:
In some cases the default resolution of 72 ppi used to render the PDF pages may be insufficient to uncover subtle differences. Or, on the contrary, it may over-emphasize differences which are triggered by extremely minimal shifts of individual characters or lines of text caused by some computational rounding of real numbers.
So, if you want to increase the resolution, add the -density NNN parameter to the commandline.
To get 720 ppi images, use this:
|
|
Note, increasing the density/resolution of the output files also increases processing time and output file formats accordingly. A 10-fold increase in density leads to a 100-fold increase in the number of total pixels that need to be compared and processed. |
All of the above examples do only work for 1-page PDF files.
For multi-page PDFs you need to add a [N] notation to the file name, where N is the zero-based page number (page 1 is noted as [0], page 2 as [1], page 3 as [2], and so forth).
The following compares page 4 of file1.pdf with page 18 of file2.pdf:
If you do not want the gray-scale background created from the source file, use a modified command:
This modification changes the output to purly red/white: all pixels which are identical between the two base files are red, identical pixels are white.
In case you do not like the red and white default colors to visualize the pixel differences, you can add the following commandline parameters:
-
-highlight-color blue(change default color for pixel differences from ‘red’ to ‘blue’) -
-lowlight-color yellow(change default color for identical pixels from ‘white’ to ‘yellow’)
or any other color combination you desire.
Allowed names for colors include #RRGGBB values for RGB shades.
|
|
Note, ImageMagick’s To process PDFs, ImageMagick needs to resort to Ghostscript as its ‘delegate’ program for processing PDF input.
Ghostscript gets called behind the curtains by To see the exact commandline parameters that ImageMagick uses for Ghostscript call, just add a |
Examples
I’m using this very same method for example to discover minimal page display differences when font substitution in PDF processing comes into play.
It can easily be the case, that there is no visible difference between two PDFs, though they are extremely different in MD5 hashes, file sizes or internal PDF code structure.
In this case the delta1.pdf output PDF page from the above command would become all-white.
You could automatically discover this condition, so you only have to visually investigate the non-white PDFs by deleting the all-white ones automatically.
To give you a more visual impression about the way this comparison works, I’ve constructed a few different input files. I used Ghostscript to do this. (The exact commands I used are documented at the end of this chapter.)
Example 1
The following image shows two PDF pages side by side. Most people will notice from a quick look the differences between these two pages:
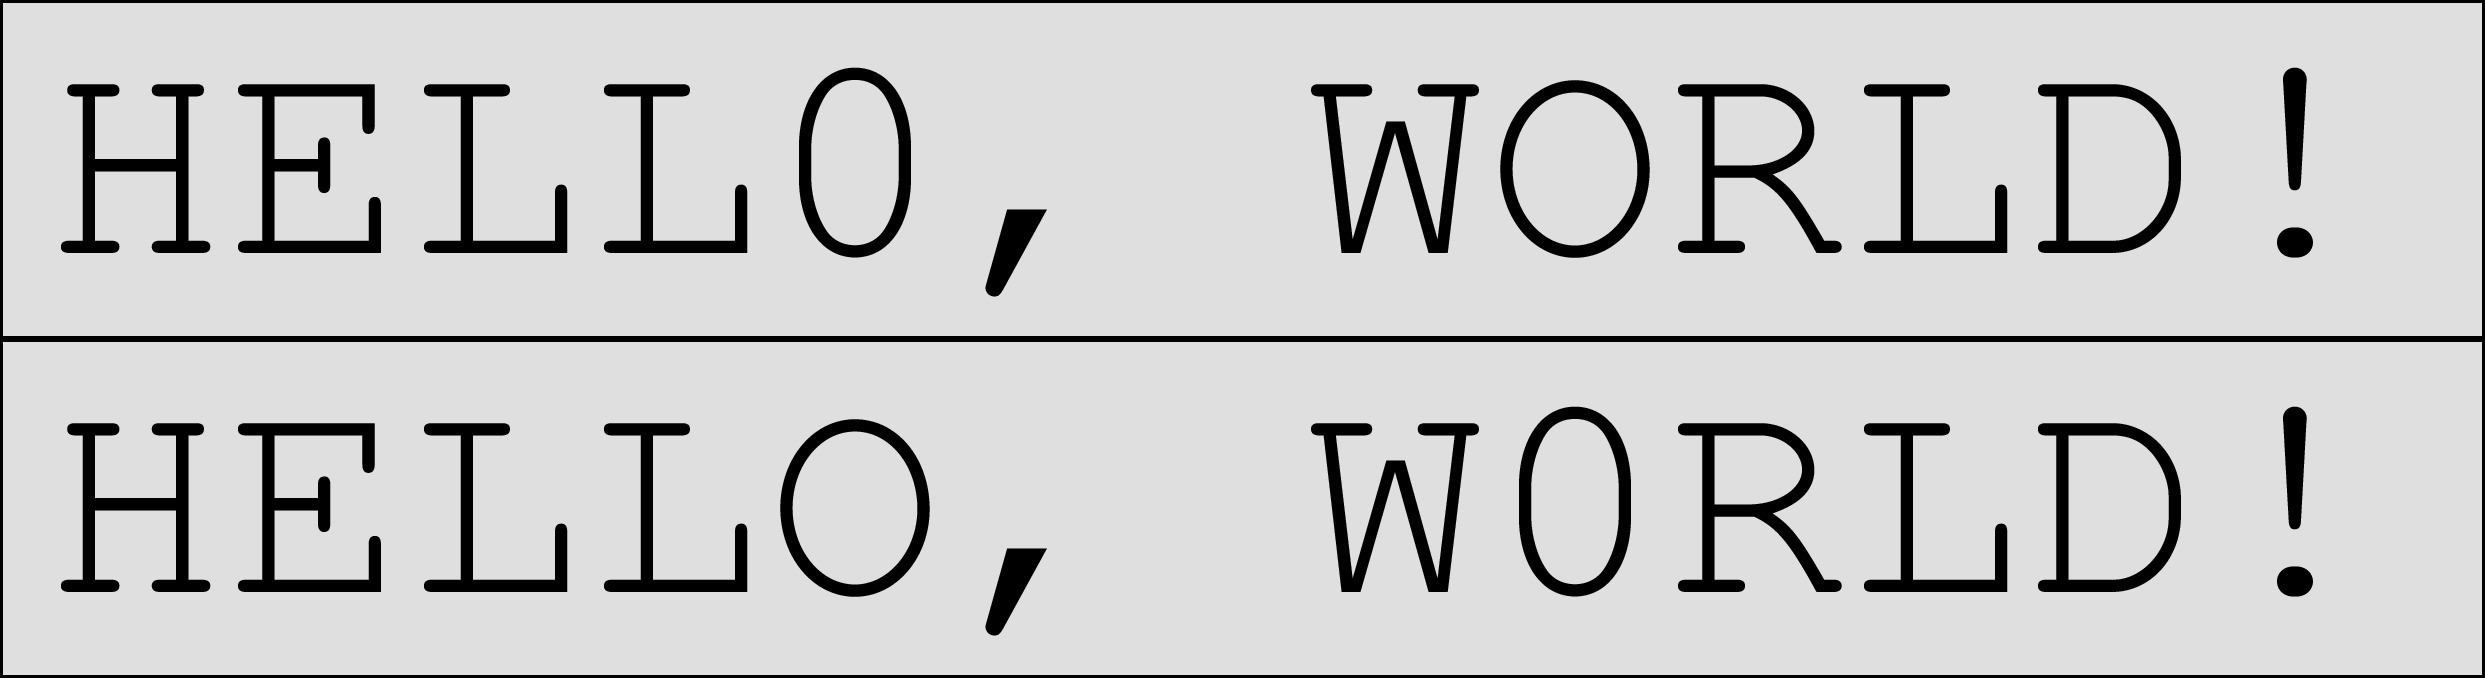
Two PDF pages which do differ – differences can be spotted by looking twice…
Now use the following commands to create a few different visualization of the ‘deltas’:
The resulting ‘delta’ images are shown in the following picture.
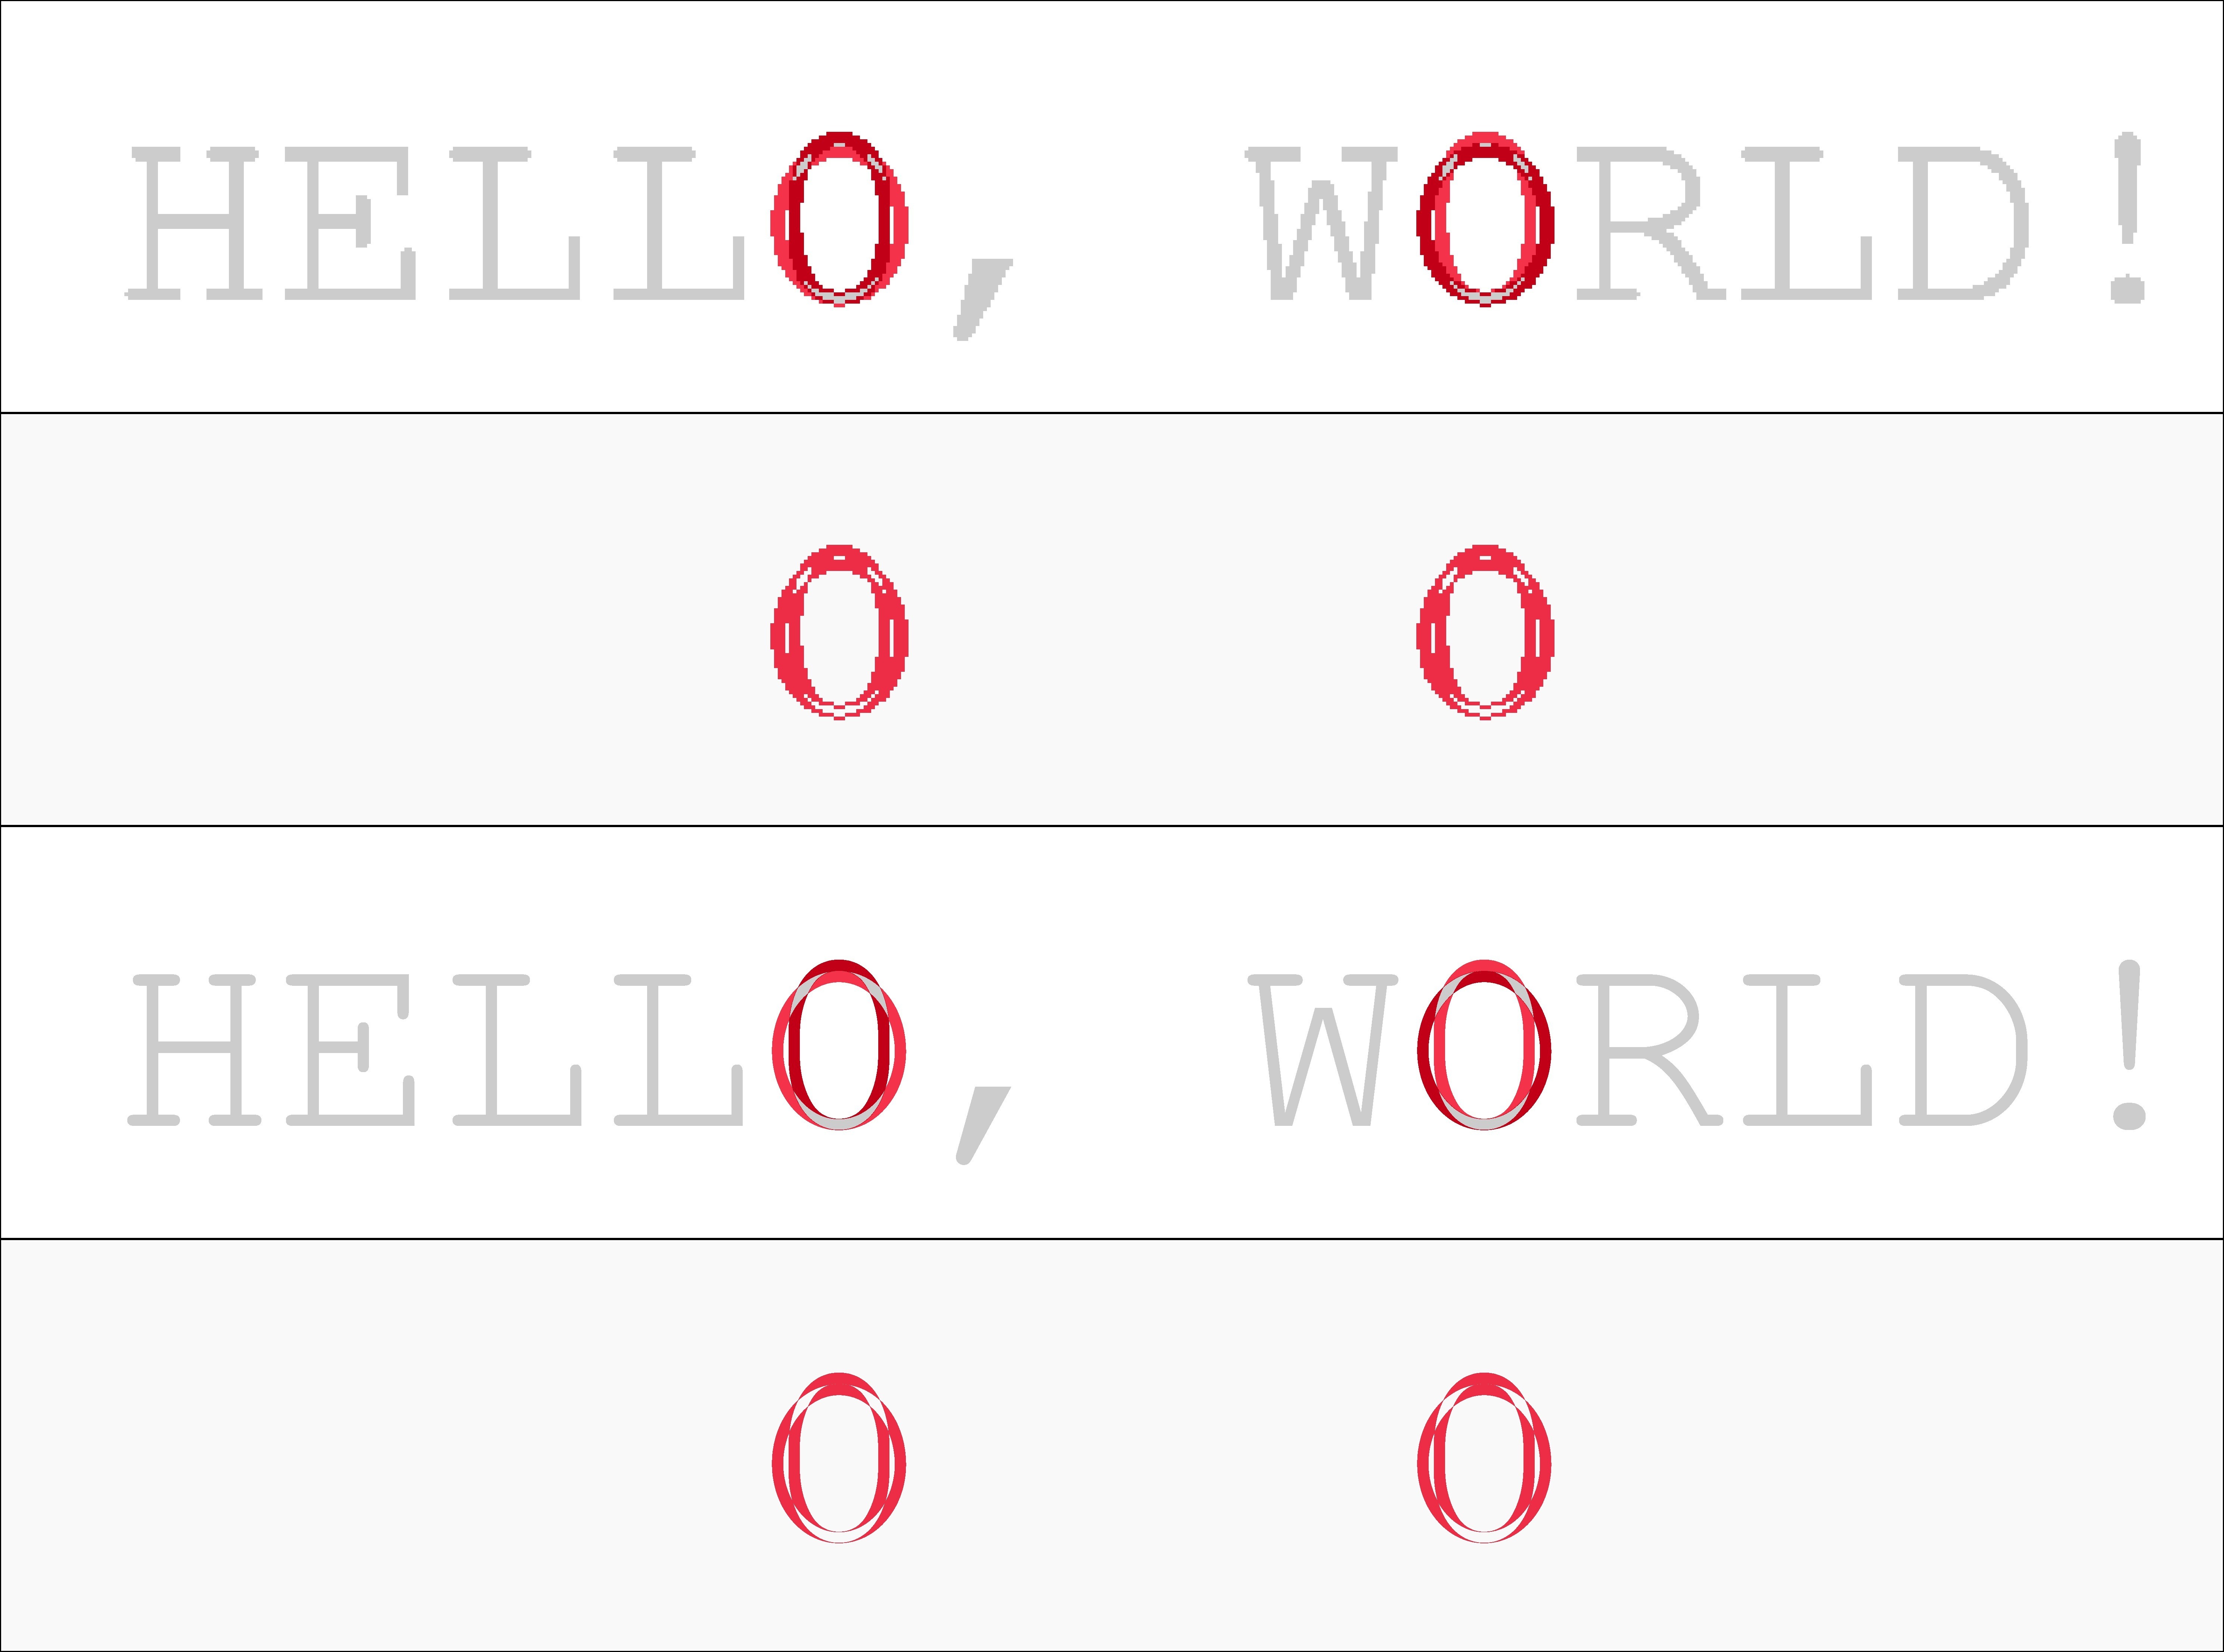
Four different visualizations of differences. The top two use a 72 ppi resolution, the bottom two a 720 ppi resolution. The 2nd and the 4th do not show a grayscale context background, but only white and red pixels.
As you can easily see, the 72 ppi-based comparison of the two input PDFs shows a clearly visible ‘pixelization’ of the results (top two images). Zoom in to see this in more detail. The 720 ppi version appears to come out much more smoothly. However, for this specific case 72 ppi would be ‘good enough’ to discover that in the two PDFs there was used a ‘0’ (number zero) instead of an ‘O’ (capital letter ‘o’) at two different spots.
Example 2
The following image shows two other PDF pages side by side. Hardly anybody will be able to spot the differences between these, but some people will:
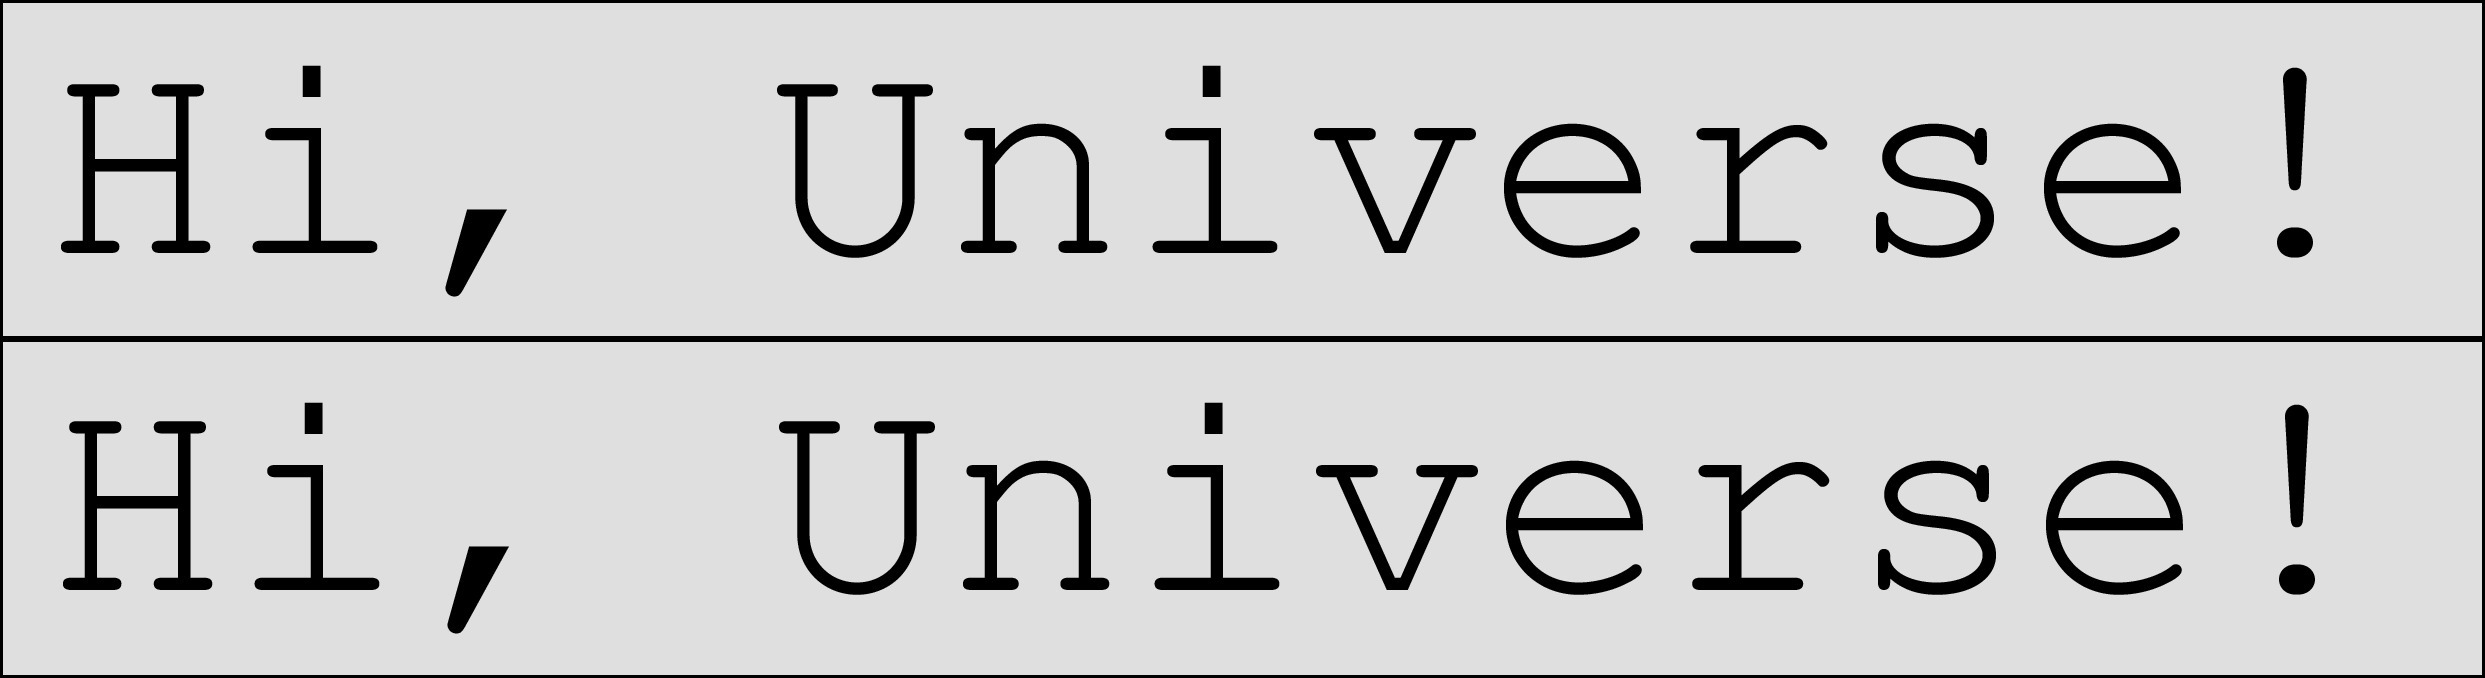
Two PDF pages which do differ – differences can only be be spotted by looking very closely.
Now use the following commands to create a few different visualization of the ‘deltas’:
The resulting differences are shown in the following picture.
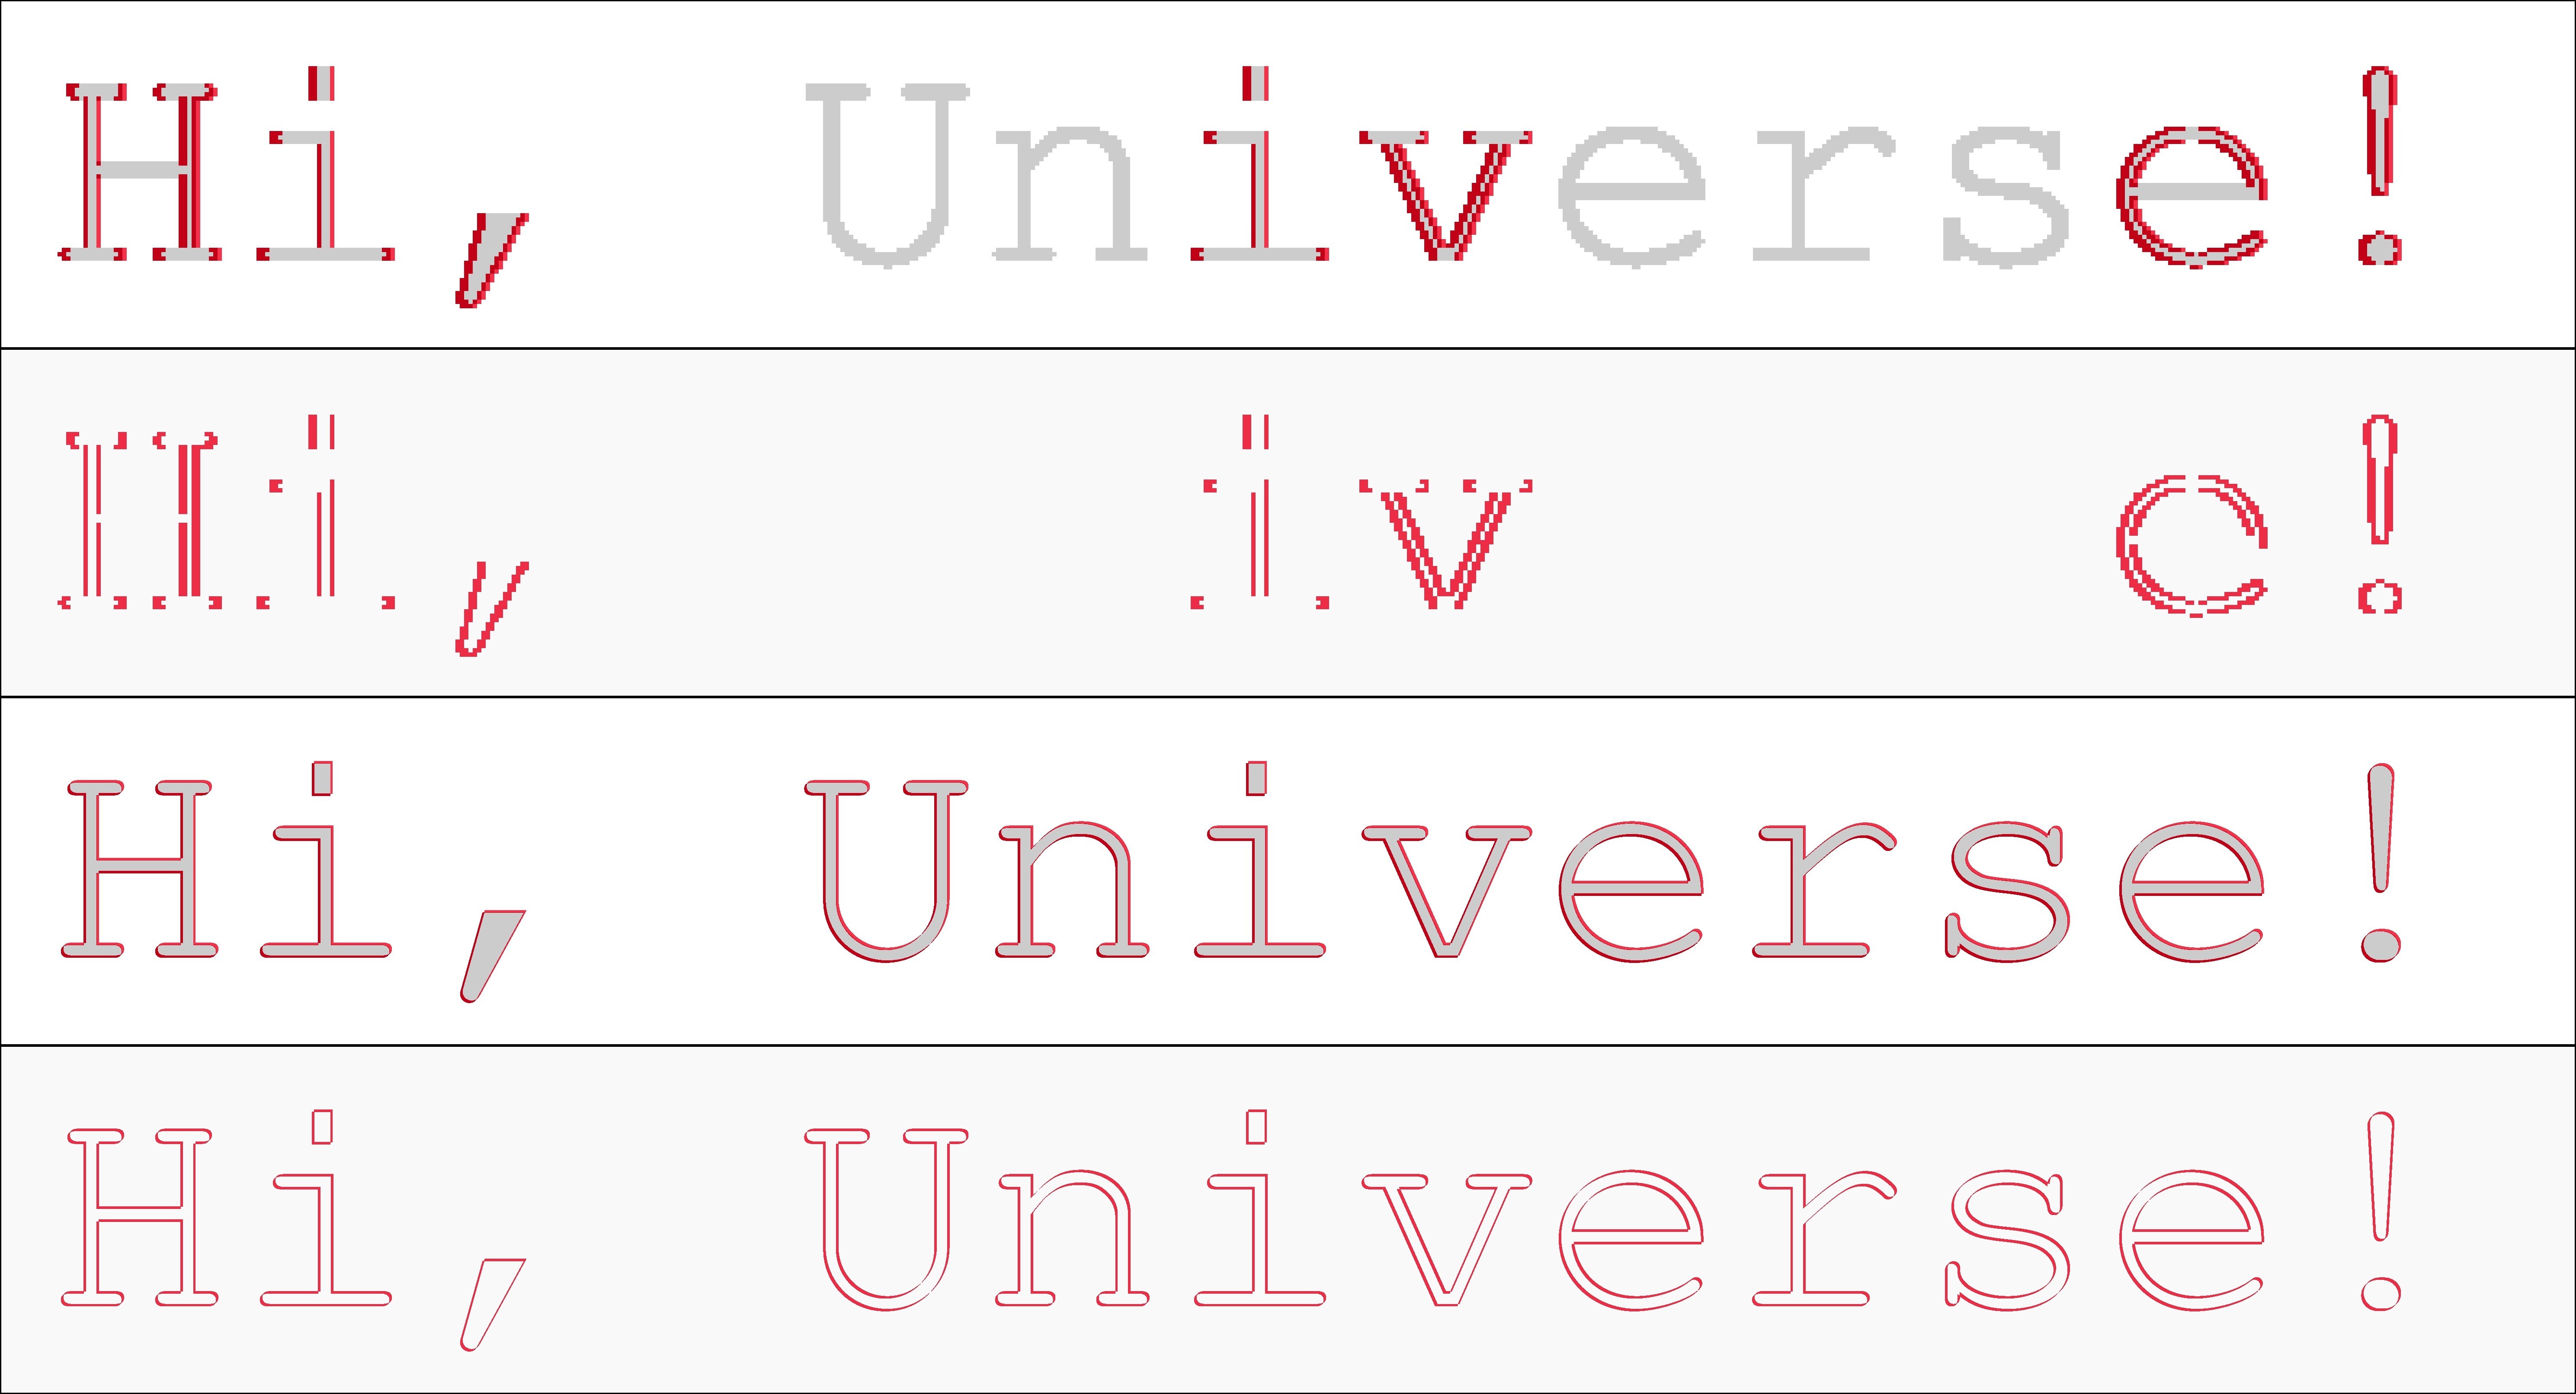
Four different ways to visualize the differences between the last two input files. Again a 72 ppi resolution for the top two and a 720 ppi resolution for the bottom ones. The 1st and the 3rd do show a grayscale context background, the others do not. Please zoom in to spot the finer pixel differences between the different resolutions…
Again, the 72 ppi-based comparison of the two input PDFs shows a clearly visible ‘pixelization’ of the results (top two images). The 720 ppi version does show the differences much more clearly: it is just that the text is shifted slightly to the left and to the top in the case of the second input. If you zoom in enough into the 720 ppi versions, you can even count the number of pixels: the shift for each single character of the text is constistenlty 5 pixels to the right and 5 pixels to the top. The 72 ppi version cannot bring out this subtle difference so clearly: at this resolution the shift is only 1/2 pixel to the right and 1/2 pixel to the top. This means that for some characters there is no shift occuring at all, and other characters move by a full pixel in either direction. This becomes clearly visible in the fact that some characters do not look changed at all while others clearly do.
Example 3
The following image shows two other PDF documents. Can you spot the difference?
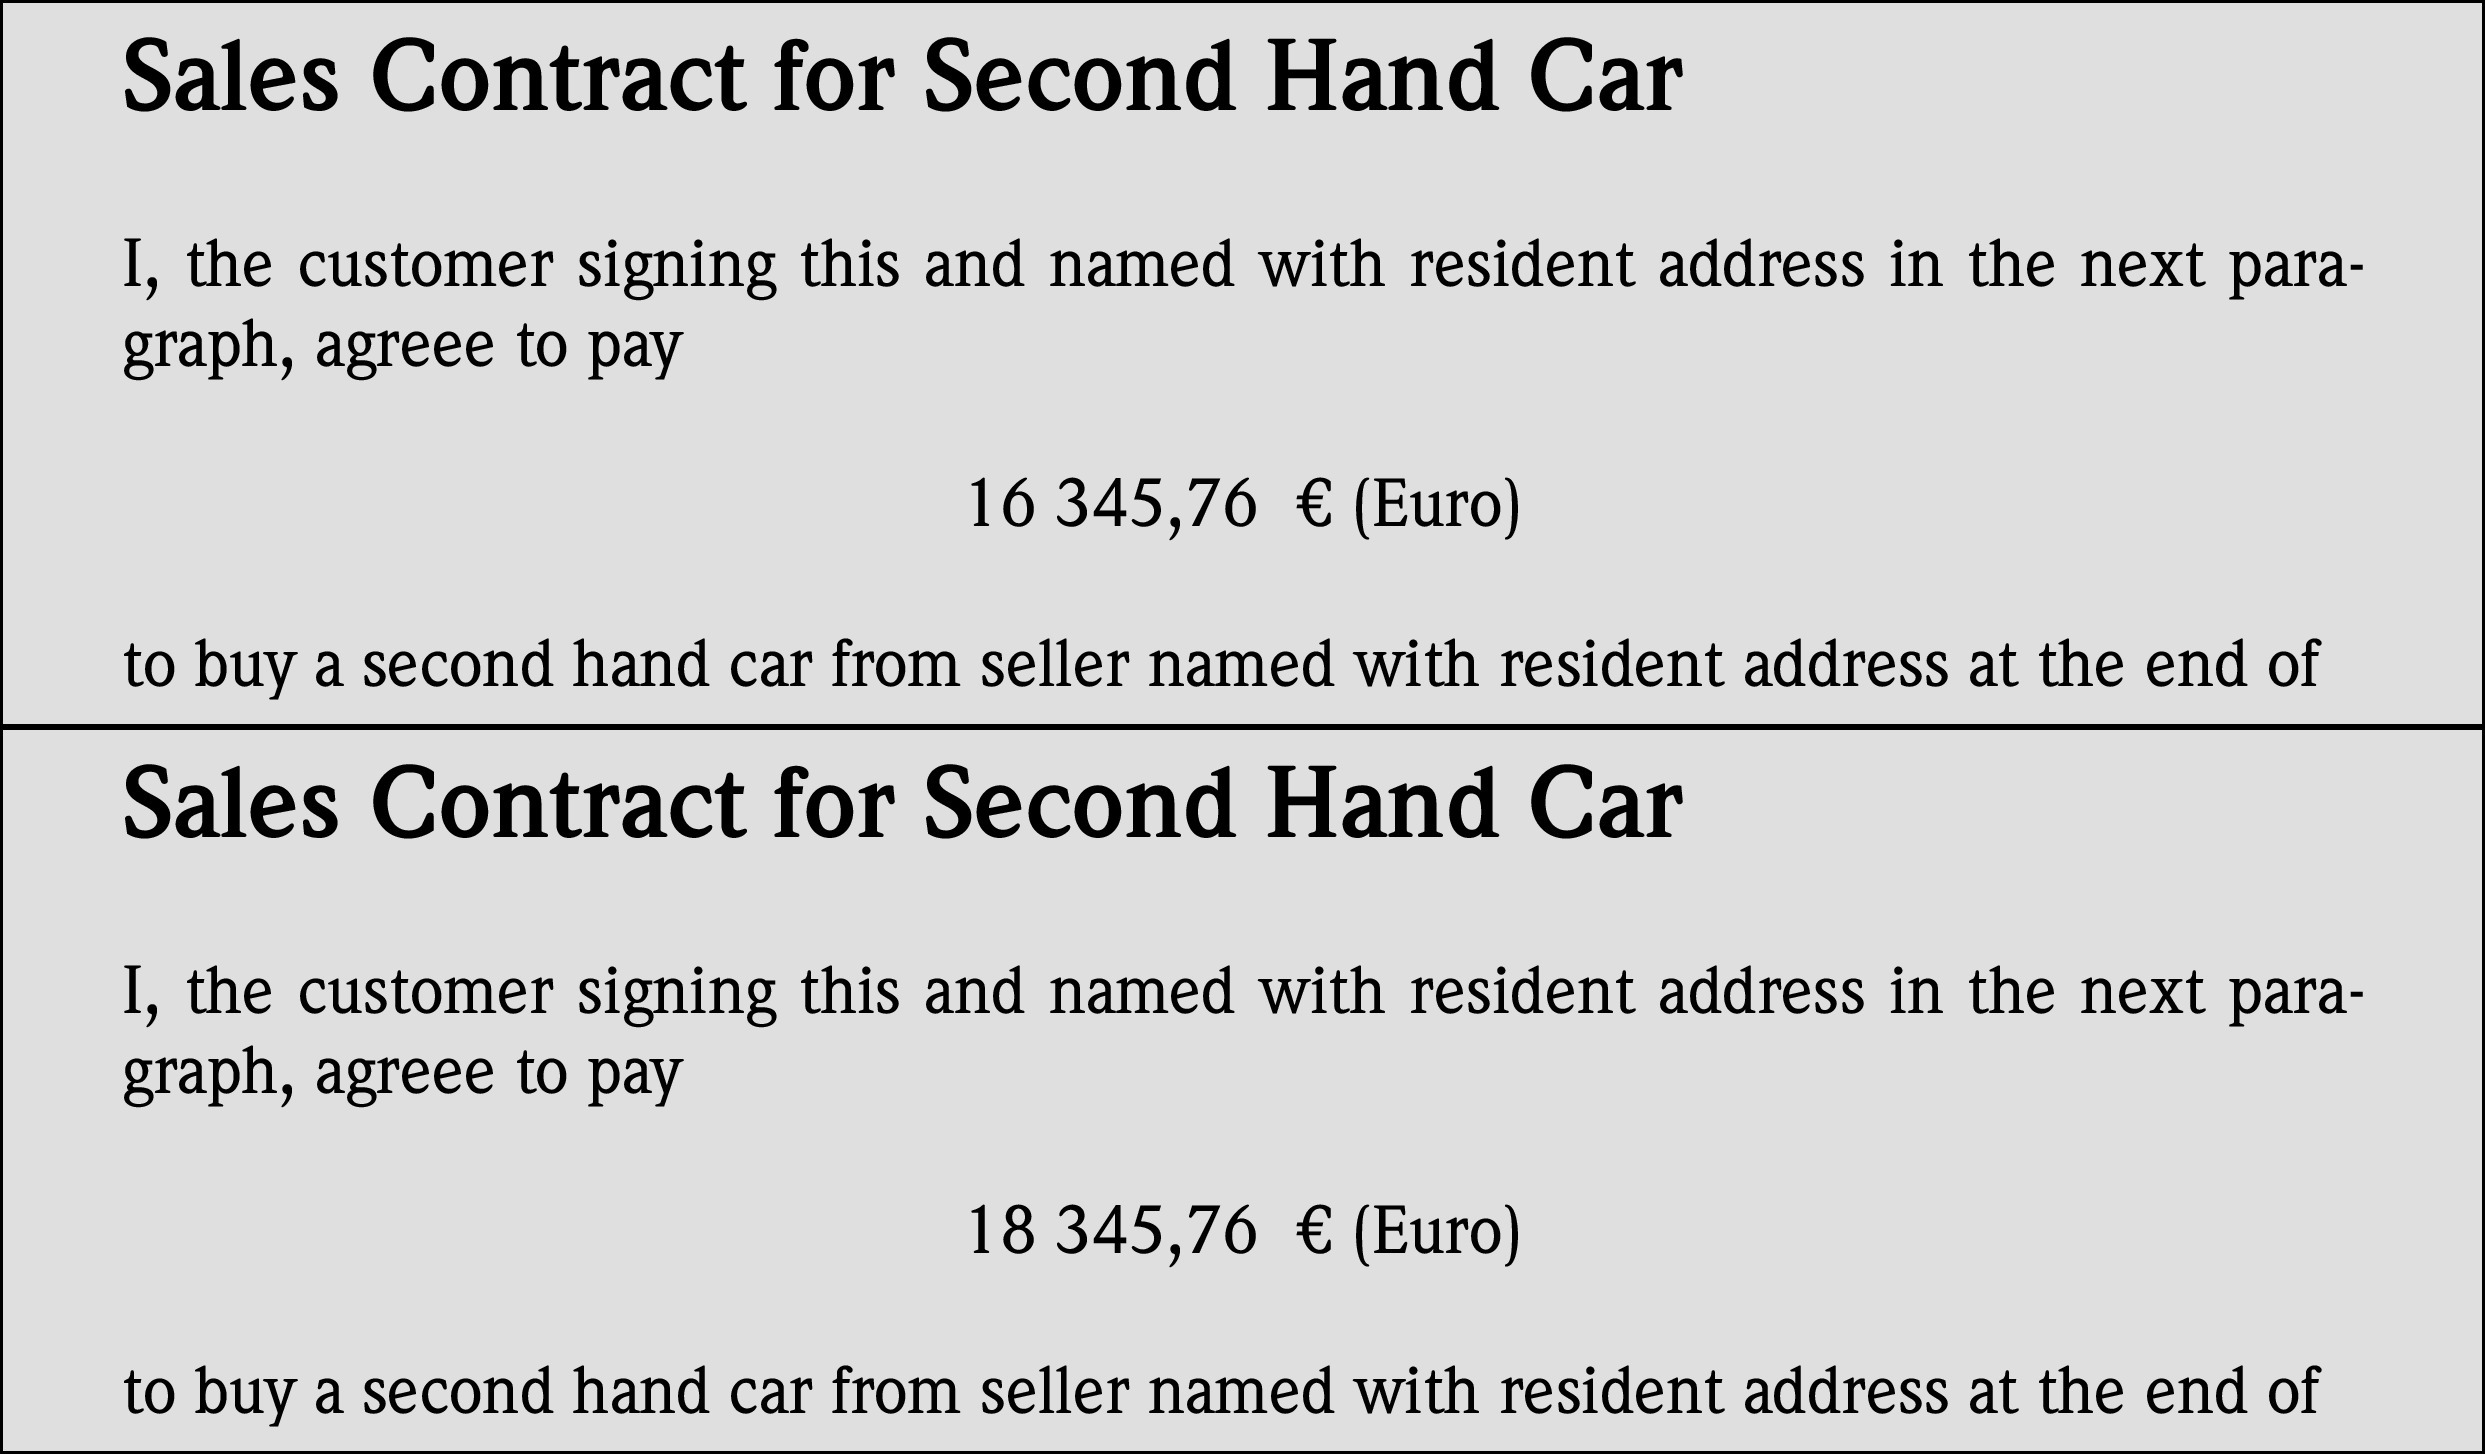
Two PDF documents which do differ. Try to spot the difference!
Creating visualizations in red/white pixels will give the following results.
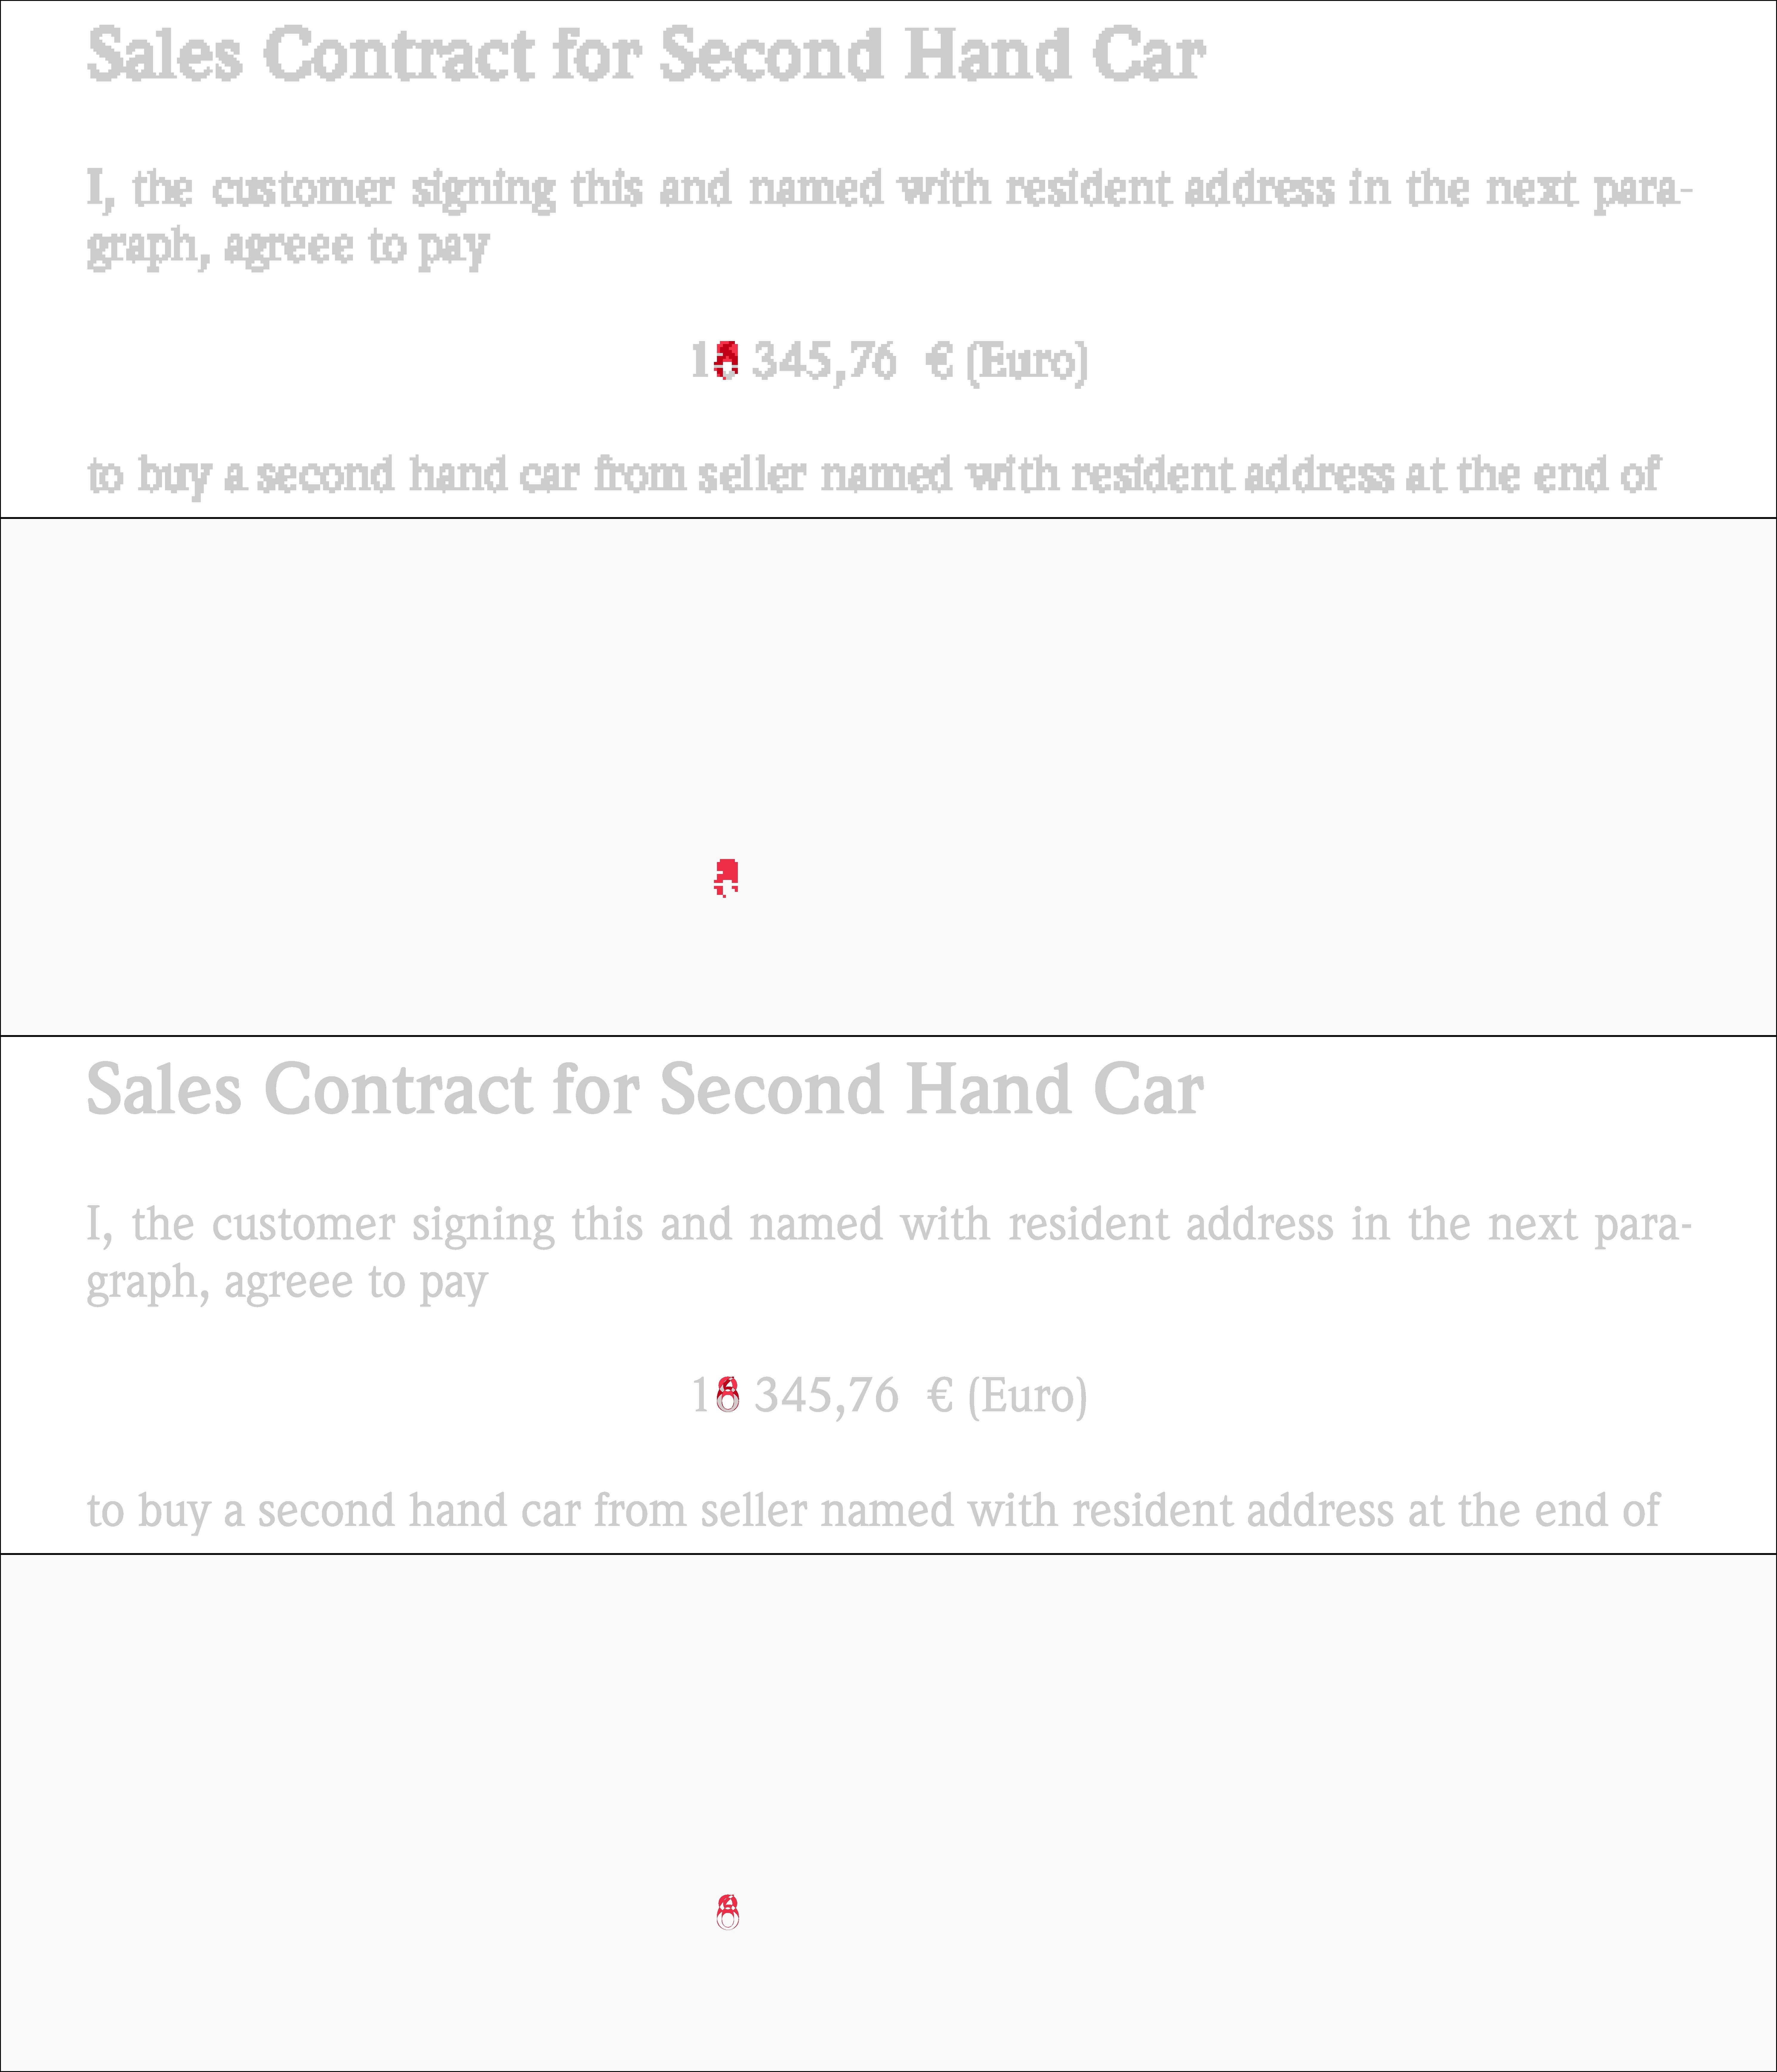
Four different ways to visualize the differences between the last two input files. Again a 72 ppi resolution for the top two and a 720 ppi resolution for the bottom ones. The 1st and the 3rd do show a grayscale context background, the others do not…
If you have access to the original delta files and zoom in on no. 3 you can clearly see that the second document contains a changed prize: going up by 2.000 $US by change the original ‘6’ to an ‘8’.
Update
For those of you who want to reproduce the commands shown above, you’d also need access to the same source files I used. That’s easy: I used Ghostscript to create these example input PDFs. Here are the commands for this:
6 How can I remove white margins from PDF pages?
6.1 Answer
I’m not too familiar with PyPDF, but I know Ghostscript will be able to do this for you. Here are links to some other answers on similar questions:
- Convert PDF 2 sides per page to 1 side per page (SuperUser.com)
- Freeware to split a pdf’s pages down the middle? (SuperUser.com)
- Cropping a PDF using Ghostscript 9.01 (StackOverflow.com)
The third answer is probably what made you say ‘I understand it will not work with every PDF file’.
It uses the pdfmark command to try and set the /CropBox into the PDF page objects.
The method of the first two answers will most likely succeed where the third one fails.
This method uses a PostScript command snippet of <</PageOffset [NNN MMM]>> setpagedevice to shift and place the PDF pages on a (smaller) media size defined by the -gNNNNxMMMM parameter (which defines device width and height in pixels).
If you understand the concept behind the first two answers, you’ll easily be able to adapt the method used there to crop margins on all 4 edges of a PDF page:
An example command to crop a letter sized PDF (8.5x11in == 612x792pt) by half an inch (==36pt) on each of the 4 edges (command is for Windows):
The resulting page size will be 7.5x10in (== 540x720pt). To do the same on Linux or Mac, use:
Update: How to determine ‘margins’ with Ghostscript
A comment asked for ‘automatic’ determination of the white margins.
You can use Ghostscript’s too for this.
Its bbox device can determine the area covered by the (virtual) ink on each page (and hence, indirectly the whitespace for each edge of the canvas).
Here is the command:
Output (example):
The bbox device renders each PDF page in memory (without writing any output to disk) and then prints the BoundingBox and HiResBoundingBox info to stderr.
You may modify this command like that to make the results more easy to parse:
Output (example):
This would tell you…
- …that the lower left corner of the content rectangle of Page 1 is at coordinates
[57 29]with the upper right corner is at[562 741] - …that the lower left corner of the content rectangle of Page 2 is at coordinates
[57 28]with the upper right corner is at[561 667]
This means:
-
Page 1 uses a whitespace of 57pt on the left edge (
72pt == 1in == 25,4mm). - Page 1 uses a whitespace of 29pt on the bottom edge.
- Page 2 uses a whitespace of 57pt on the left edge.
- Page 2 uses a whitespace of 28pt on the bottom edge.
As you can see from this simple example already, the whitespace is not exactly the same for each page. Depending on your needs (you likely want the same size for each page of a multi-page PDF, no?), you have to work out what are the minimum margins for each edge across all pages of the document.
Now what about the right and top edge whitespace? To calculate that, you need to know the original page size for each page.
The most simple way to determine this: the pdfinfo utility.
Example command for a 5 page PDF:
Output (example):
This will help you determine the required canvas size and the required (maximum) white margins of the top and right edges of each of your new PDF pages.
These calculations can all be scripted too, of course.
But if your PDFs are all of a uniq page size, or if they are 1-page documents, it all is much easier to get done…
7 Using Ghostscript to get page size
7.1 Answer 1
Unfortunately it doesn’t seem quite easy to get the (possibly different) page sizes (or *Boxes for that matter) inside a PDF with the help of Ghostscript.
But since you asked for other possibilities as well: a rather reliable way to determine the media sizes for each page (and even each one of the embedded {Trim,Media,Crop,Bleed}Boxes) is the commandline tool pdfinfo.exe.
This utility is part of the XPDF tools from http://www.foolabs.com/xpdf/download.html.
You can run the tool with the -box parameter and tell it with -f 3 to start at page 3 and with -l 8 to stop processing at page 8.
Example output
7.2 Answer 2
Meanwhile I found a different method. This one uses Ghostscript only (just as you required). No need for additional third party utilities.
This method uses a little helper program, written in PostScript, shipping with the source code of Ghostscript.
Look in the toolbin subdir for the pdf_info.ps file.
The included comments say you should run it like this in order to list fonts used, media sizes used
I did run it on a local example file, with commandline parameters that ask for the media sizes only (not the fonts used). Here is the result: