Power Up the Pi
Once we have been able to setup up the Raspberry for use, we could well find ourselves thinking ‘How can I do xxxxx?’. The following is a list of interesting things we can do to extend our Pi a little. All are written on the assumption that they are being done with the Raspbian operating system installed. There are some variations depending whether we are using the ‘Wheezy’ or ‘Jessie’ distribution of Raspbian. If you’re trying to decide which to download and use, go for Jessie. It’s the later and therefore the best supported version. There is a slight disadvantage in that there are fewer tutorials written up for it online, but that will change over time.
Static IP Address
Enabling remote access is a really useful thing. To do so we will want to assign our Raspberry Pi a static IP address.
An Internet Protocol address (IP address) is a numerical label assigned to each device (e.g., computer, printer) participating in a computer network that uses the Internet Protocol for communication.
There is a strong likelihood that our Raspberry Pi already has an IP address and it should appear a few lines above the ‘login’ prompt when you first boot up;
The My IP address... part may appear just above or around 15 lines above the login line, depending on whether we’re using the ‘Wheezy’ or ‘Jessie’ version of Debian. In this example the IP address 10.1.1.25 belongs to the Raspberry Pi.
This address will probably be a ‘dynamic’ IP address and could change each time the Pi is booted. For the purposes of using the Raspberry Pi as a web platform a database or with remote access we need to set a fixed IP address.
This description of setting up a static IP address makes the assumption that we have a device running on the network that is assigning IP addresses as required. This sounds like kind of a big deal, but in fact it is a very common service to be running on even a small home network and it will be running on the ADSL modem or similar. This function is run as a service called DHCP (Dynamic Host Configuration Protocol). You will need to have access to this device for the purposes of knowing what the allowable ranges are for a static IP address. The most likely place to find a DHCP service running in a normal domestic situation would be an an ADSL modem or router.
The Netmask
A common feature for home modems and routers that run DHCP devices is to allow the user to set up the range of allowable network addresses that can exist on the network. At a higher level you should be able to set a ‘netmask’ which will do the job for you. A netmask looks similar to an IP address, but it allows you to specify the range of addresses for ‘hosts’ (in our case computers) that can be connected to the network.
A very common netmask is 255.255.255.0 which means that the network in question can have any one of the combinations where the final number in the IP address varies. In other words with a netmask of 255.255.255.0 the IP addresses available for devices on the network 10.1.1.x range from 10.1.1.0 to 10.1.1.255 or in other words any one of 256 unique addresses.
CIDR Notation
An alternative to specifying a netmask in the format of ‘255.255.255.0’ is to use a system called Classless Inter-Domain Routing, or CIDR. The concept is that you can add a specification in the IP address itself that indicates the number of significant bits that make up the netmask.
For example, we could designate the IP address 10.1.1.17 as associated with the netmask 255.255.255.0 by using the CIDR notation of 10.1.1.17/24. This means that the first 24 bits of the IP address given are considered significant for the network routing.
Using CIDR notation allows us to do some very clever things to organise our network, but at the same time it can have the effect of freaking people out by introducing a pretty complex topic when all they want to do is get their network going :-). So for the sake of this explanation we can assume that if we wanted to specify an IP address and a netmask, it could be accomplished by either specifying each seperatly (IP address = 10.1.1.17 and netmask = 255.255.255.0) or in CIDR format (10.1.1.1/24)
Distinguish Dynamic from Static
The other service that our DHCP server will allow is the setting of a range of addresses that can be assigned dynamically. In other words we will be able to declare that the range from 10.1.1.20 to 10.1.1.255 can be dynamically assigned which leaves 10.1.1.0 to 10.1.1.19 which can be set as static addresses.
You might also be able to reserve an IP address on your modem / router. To do this you will need to know what the MAC (or hardware address) of the Raspberry Pi is. To find the hardware address on the Raspberry Pi type;
(For more information on the ifconfig command check out the Linux commands section)
This will produce an output which will look a little like the following;
00:08:C7:1B:8C:02
inet addr:10.1.1.26 Bcast:10.1.1.255 Mask:255.255.255.0
UP BROADCAST RUNNING MULTICAST MTU:1500 Metric:1
RX packets:53 errors:0 dropped:0 overruns:0 frame:0
TX packets:44 errors:0 dropped:0 overruns:0 carrier:0
collisions:0 txqueuelen:1000
RX bytes:4911 (4.7 KiB) TX bytes:4792 (4.6 KiB)
The figures 00:08:C7:1B:8C:02 are the Hardware or MAC address.
Because there are a huge range of different DHCP servers being run on different home networks, I will have to leave you with those descriptions and the advice to consult your devices manual to help you find an IP address that can be assigned as a static address. Make sure that the assigned number has not already been taken by another device. In a perfect World we would hold a list of any devices which have static addresses so that our Pi’s address does not clash with any other device.
For the sake of the upcoming projects we will assume that the address 10.1.1.17 is available.
Default Gateway
Before we start configuring we will need to find out what the default gateway is for our network. A default gateway is an IP address that a device (typically a router) will use when it is asked to go to an address that it doesn’t immediately recognise. This would most commonly occur when a computer on a home network wants to contact a computer on the Internet. The default gateway is therefore typically the address of the modem / router on your home network.
We can check to find out what our default gateway is from Windows by going to the command prompt (Start > Accessories > Command Prompt) and typing;
This should present a range of information including a section that looks a little like the following;
10.1.1.15
Subnet Mask . . . . . . . . . . . : 255.255.255.0
Default Gateway . . . . . . . . . : 10.1.1.1
The default router gateway is therefore ‘10.1.1.1’.
For Wheezy Edit the interfaces file
On the Raspberry Pi at the command line we are going to start up a text editor and edit the file that holds the configuration details for the network connections.
The file is /etc/network/interfaces. That is to say it’s the interfaces file which is in the network directory which is in the etc directory which is in the root ((/) directory.
To edit this file we are going to type in the following command;
The nano file editor will start and show the contents of the interfaces file which should look a little like the following;
We are going to change the line that tells the network interface to use eth0 (iface eth0 inet manual) to use our static address that we decided on earlier (10.1.1.17) along with information on the netmask to use and the default gateway. So replace the line…
… with the following lines (and don’t forget to put YOUR address, netmask and gateway in the file, not necessarily the ones below);
10.1.1.17
netmask 255.255.255.0
gateway 10.1.1.1
Once you have finished press ctrl-x to tell nano you’re finished and it will prompt you to confirm saving the file. Check your changes over and then press ‘y’ to save the file (if it’s correct). It will then prompt you for the file-name to save the file as. Press return to accept the default of the current name and you’re done!
To allow the changes to become operative we can type in;
This will reboot the Raspberry Pi and we should see the (by now familiar) scroll of text and when it finishes rebooting you should see;
10.1.1.17
Raspbian GNU/Linux 7 raspberrypi tty1
raspberrypi login:
Which tells us that the changes have been successful (bearing in mind that the IP address above should be the one you have chosen, not necessarily the one we have been using as an example).
For Jessie Edit the dhcpcd.conf file
On the Raspberry Pi at the command line we are going to start up a text editor and edit the file that holds the configuration details for the network connections.
The file is /etc/dhcpcd.conf. That is to say it’s the dhcpcd.conf file which is in the etc directory which is in the root (/) directory.
To edit this file we are going to type in the following command;
The nano file editor will start and show the contents of the dhcpcd.conf file which should look a little like the following;
for dhcpcd.
# See dhcpcd.conf(5) for details.
# Allow users of this group to interact with dhcpcd via the control socket.
#controlgroup wheel
# Inform the DHCP server of our hostname for DDNS.
hostname
# Use the hardware address of the interface for the Client ID.
clientid
# or
# Use the same DUID + IAID as set in DHCPv6 for DHCPv4 ClientID per RFC4361.
#duid
# Persist interface configuration when dhcpcd exits.
persistent
# Rapid commit support.
# Safe to enable by default because it requires the equivalent option set
# on the server to actually work.
option rapid_commit
# A list of options to request from the DHCP server.
option domain_name_servers, domain_name, domain_search, host_name
option classless_static_routes
# Most distributions have NTP support.
option ntp_servers
# Respect the network MTU.
# Some interface drivers reset when changing the MTU so disabled by default.
#option interface_mtu
# A ServerID is required by RFC2131.
require dhcp_server_identifier
# Generate Stable Private IPv6 Addresses instead of hardware based ones
slaac private
# A hook script is provided to lookup the hostname if not set by the DHCP
# server, but it should not be run by default.
nohook lookup-hostname
We are going to add the information that tells the network interface to use eth0 at our static address that we decided on earlier (10.1.1.17) along with information on the netmask to use (in CIDR format) and the default gateway of our router. To do this we will add the following lines to the end of the information in the dhcpcd.conf file;
Here we can see the IP address and netmask (static ip_address=10.1.1.17/24), the gateway address for our router (static routers=10.1.1.1) and the address where the computer can also find DNS information (static domain_name_servers=10.1.1.1).
Once you have finished press ctrl-x to tell nano you’re finished and it will prompt you to confirm saving the file. Check your changes over and then press ‘y’ to save the file (if it’s correct). It will then prompt you for the file-name to save the file as. Press return to accept the default of the current name and you’re done!
To allow the changes to become operative we can type in;
This will reboot the Raspberry Pi and we should see the (by now familiar) scroll of text and when it finishes rebooting you should see;
10.1.1.17
Raspbian GNU/Linux 7 raspberrypi tty1
raspberrypi login:
Which tells us that the changes have been successful (bearing in mind that the IP address above should be the one you have chosen, not necessarily the one we have been using as an example).
Remote access
To allow us to work on our Raspberry Pi from our normal desktop we can give ourselves the ability to connect to the Pi from another computer. The will mean that we don’t need to have the keyboard / mouse or video connected to the Raspberry Pi and we can physically place it somewhere else and still work on it without problem. This process is called ‘remotely accessing’ our computer .
To do this we need to install an application on our windows desktop which will act as a ‘client’ in the process and have software on our Raspberry Pi to act as the ‘server’. There are a couple of different ways that we can accomplish this task. One way is to give us access to the Pi desktop GUI from a remote computer (so we can use the Raspberry Pi desktop in the same way that we could when working connected with mouse, keyboard and monitor) using a program called RealVNC and the other way is to get access to the command line (where all we do is type in our commands (like when we first log into the Pi using Jessie Lite)) via what’s called SSH access.
Which you choose to use depends on how you feel about using the device. If you’re more comfortable with a GUI environment, then RealVNC will be the solution. This has the disadvantage of using more computing resources on the Raspberry Pi so if you are considering working it fairly hard, then SSH access may be a better option.
Remote access via RealVNC
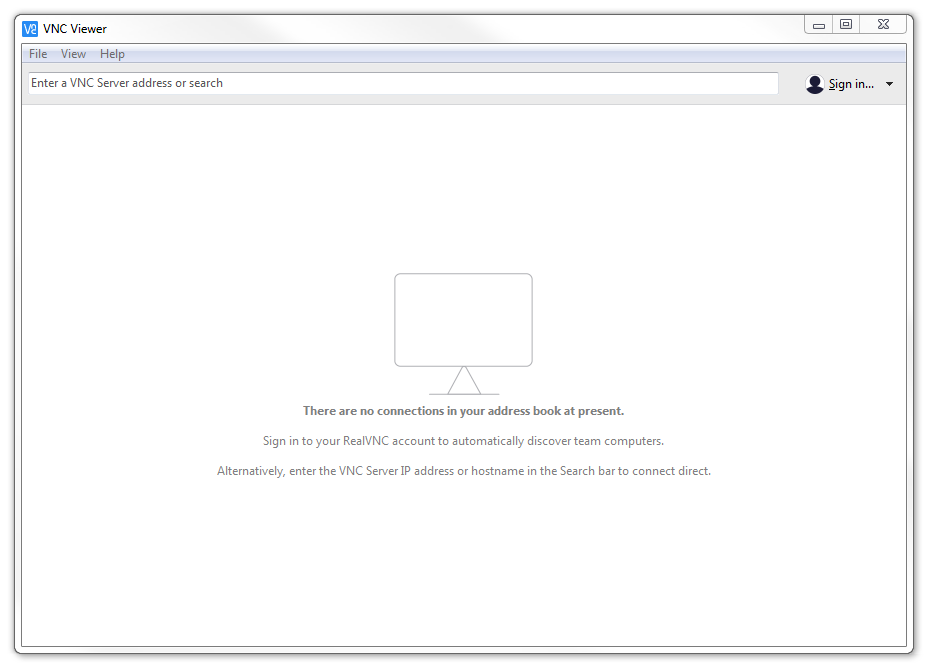
The software we will install is called RealVNC. It is free for non-commercial use (on up to 5 remote computers) and implements a service called Virtual Network Computing. The description here is for a local network connection, not via a cloud service. We need to set up the VNC Viewer app on the client (the Windows desktop machine), but the server (the Raspberry Pi) already has it installed (unless you are using a pre-2017 version of Raspbian).
Setting up the Client (Windows)
To install RealVNC for windows, go to the RealVNC downloads page and select the appropriate version for your operating system.
The installation process is really simple and will leave you with a viewer window ready to go.
At this point we will work on setting up the Raspberry Pi!
Setting up the Server (Raspberry Pi)
VNC Connect is included with Raspbian by default but you still have to enable it.
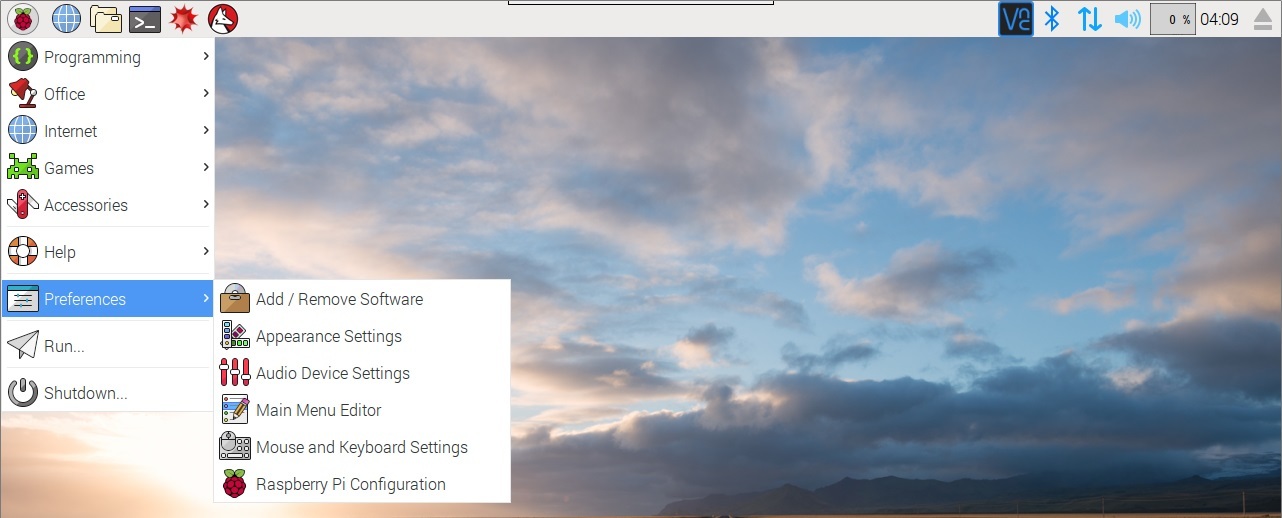
From the desktop GUI select ‘Menu’ > ‘Preferences’ > ‘Raspberry Pi Configuration’;
Then select the ‘Interfaces’ tab and make sure VNC is set to Enabled before clicking on ‘OK’;

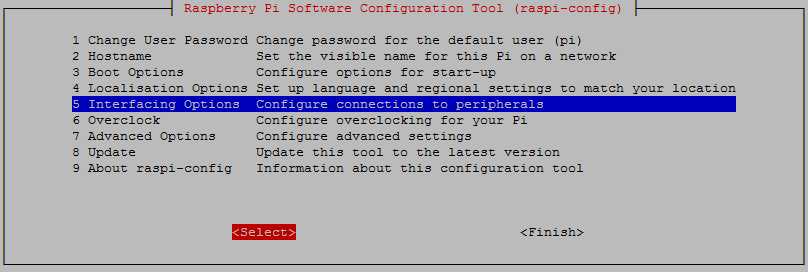
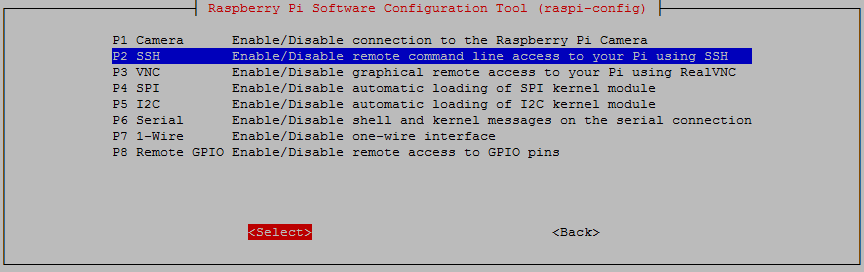
You can also enable remote access via the command line buy running sudo raspi-config. Then select ‘5 Interfacing Options’ from the main menu.
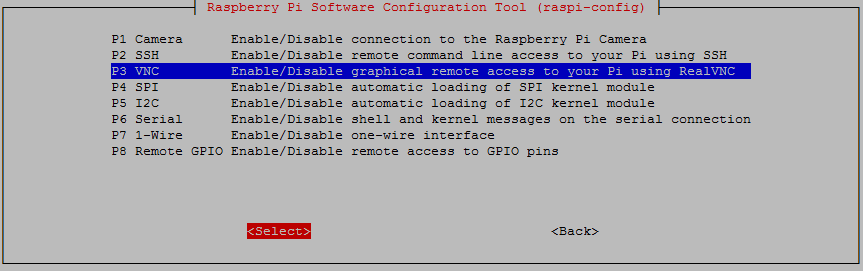
From here we select ‘P3 VNC’
Either way that you enable it, VNC will now start automatically every-time the Pi starts.
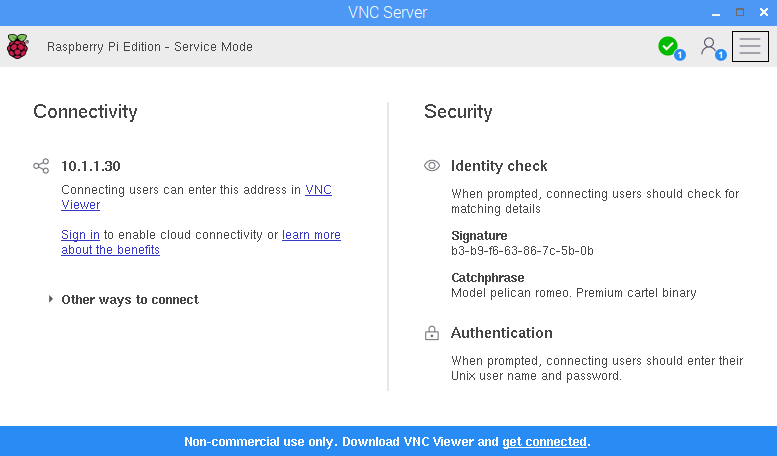
At this point we will have a RealVNC icon on our task bar.

If we click on the icon it will show us the details required for the connection and in particular, the IP address of the Pi (10.1.1.30 in this example, but your address will most likely be quite different).
Connecting with RealVNC
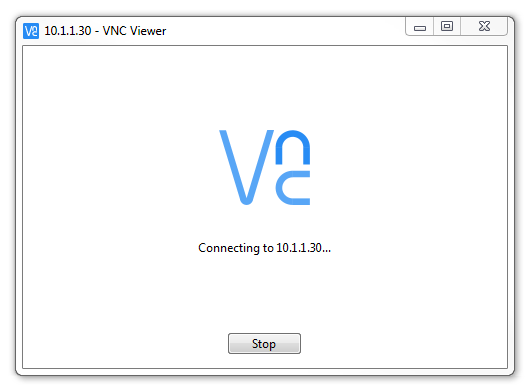
Once you have your Pi’s IP address, enter it in the VNC Viewers window and press return.
A dialogue box will start up advising that the connection process is under way.
You will receive a warning saying that the computer hasn’t seen this server before and are we sure this is correct?
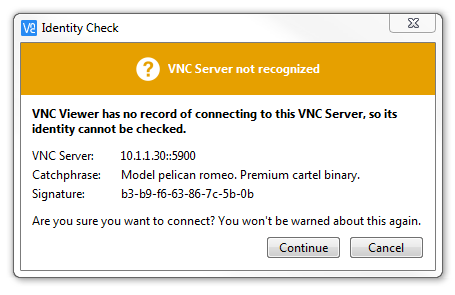
Assuming that it is, click continue.

To authenticate the connection, enter your username and password (here the default user ‘pi’ is being used (the default password is ‘raspberry’)). Click on ‘OK and the connection will be made.
A window will open showing the graphical desktop.
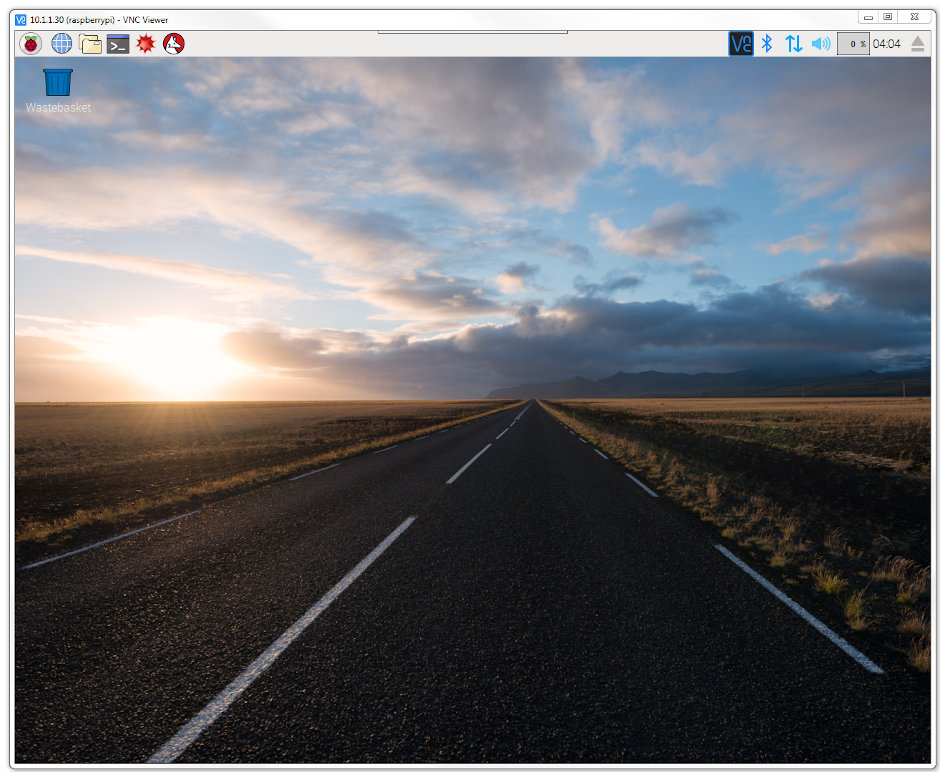
Take a moment to interact with the connection and confirm that everything is working as anticipated.
Remote access via SSH
Secure Shell (SSH) is a network protocol that allows secure data communication, remote command-line login, remote command execution, and other secure network services between two networked computers. It connects, via a secure channel over an insecure network, a server and a client running SSH server and SSH client programs, respectively (there’s the client-server model again).
In our case the SSH program on the server is running sshd and on the Windows machine we will use a program called ‘PuTTY’.
Setting up the Server (Raspberry Pi)
SSH is already installed on Raspbian, but it needs to be enabled before it can be used.
To check that it is there and working type the following from the command line;
The Pi should respond with the message that the program sshd is active (running).
(/lib/systemd/system/ssh.service; enabled)
Active: active (running) since Tue 2017-04-25 03:30:16 UTC; 1h 28min ago
Main PID: 2135 (sshd)
CGroup: /system.slice/ssh.service
└─2135 /usr/sbin/sshd -D
If it isn’t, run the following command;
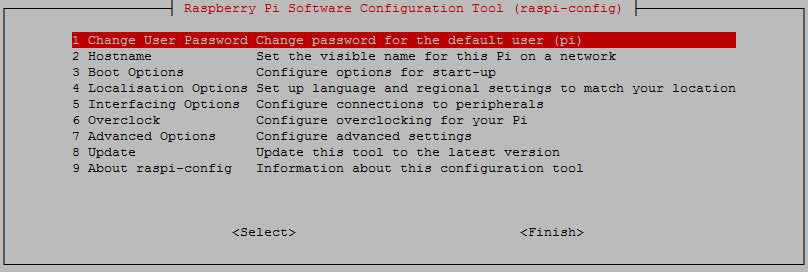
Use the up and down arrow keys to move the highlighted section to the selection you want to make then press tab to highlight the <Select> option (or <Finish> if you’ve finished).
To enable SSH select ‘5 Interfacing Options’ from the main menu.
From here we select ‘P2 SSH’
And we should be done!
Setting up the Client (Windows)
The client software we will use is called ‘Putty’. It is open source and available for download from here.
On the download page there are a range of options available for use. The best option for us is most likely under the ‘For Windows on Intel x86’ heading and we should just download the ‘putty.exe’ program.
Save the file somewhere logical as it is a stand-alone program that will run when you double click on it (you can make life easier by placing a short-cut on the desktop).
Once we have the file saved, run the program by double clicking on it and it will start without problem.
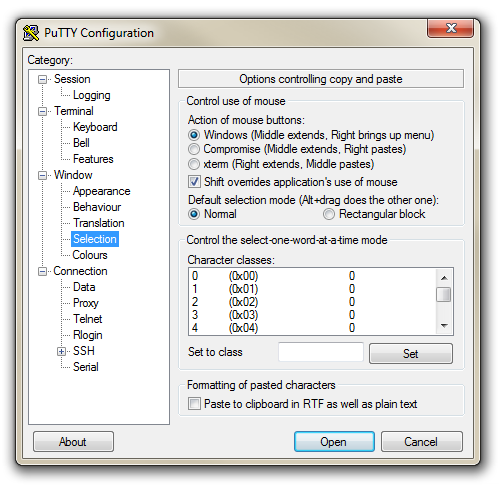
The first thing we will set-up for our connection is the way that the program recognises how the mouse works. In the ‘Window’ Category on the left of the PuTTY Configuration box, click on the ‘Selection’ option. On this page we want to change the ‘Action of mouse’ option from the default of ‘Compromise (Middle extends, Right paste)’ to ‘Windows (Middle extends, Right brings up menu)’. This keeps the standard Windows mouse actions the same when you use PuTTY.
Now select the ‘Session’ Category on the left hand menu. Here we want to enter our static IP address that we set up earlier (10.1.1.8 in the example that we have been following, but use your one) and because we would like to access this connection on a frequent basis we can enter a name for it as a saved session (In the scree-shot below it is imaginatively called ‘Raspberry Pi’). Then click on ‘Save’.
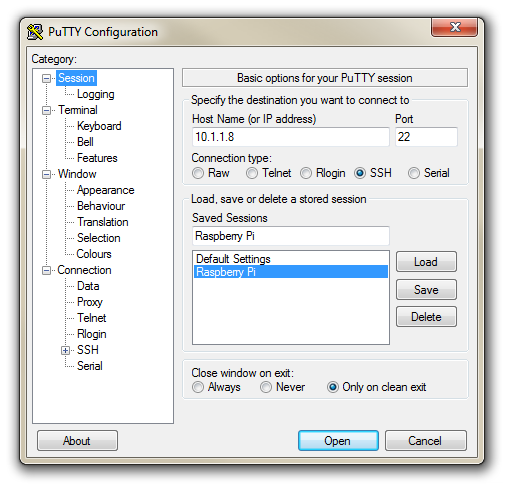
Now we can select our raspberry Pi Session (per the screen-shot above) and click on the ‘Open’ button.
The first thing you will be greeted with is a window asking if you trust the host that you’re trying to connect to.
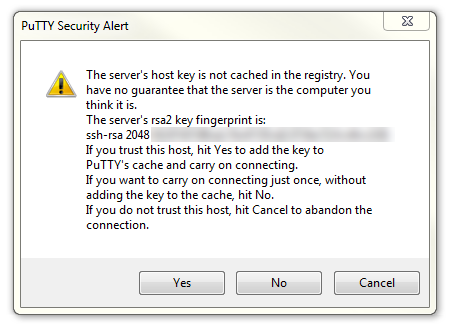
In this case it is a pretty safe bet to click on the ‘Yes’ button to confirm that we know and trust the connection.
Once this is done, a new terminal window will be shown with a prompt to login as: . Here we can enter our user name (‘pi’) and then our password (if it’s still the default it is ‘raspberry’).
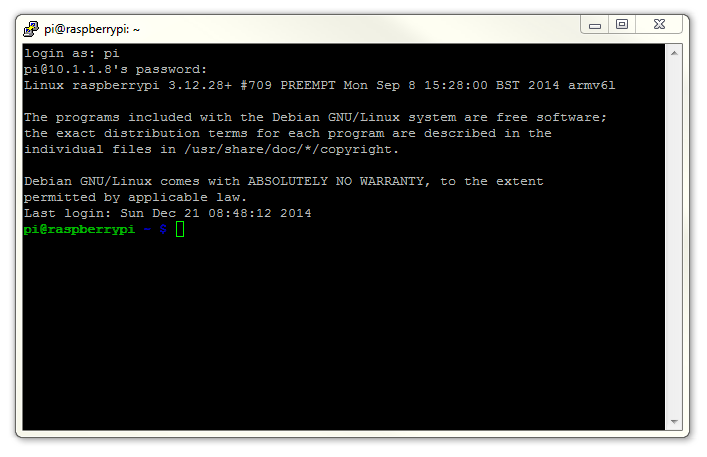
There you have it. A command line connection via SSH. Well done.
As I mentioned at the end of the section on remotely accessing the Raspberry Pi’s GUI, if this is the first time that you’ve done something like this it can be a very liberating feeling. To complete the feeling of freedom let’s set up a wireless network connection.
Setting up a WiFi Network Connection
Our set-up of the Raspberry Pi will allow us to carry out all the (computer interface) interactions via a remote desktop. However, the Raspberry Pi is making that remote connection via a fixed network cable. It could be argued that the minimum number of connections that we need to run to our machine the better. The most obvious solution to this conundrum is to enable a wireless connection.
It should be noted that enabling a wireless network will not be a requirement for everyone and as such, I would only recommend it if you need to. It means that you will need to purchase a USB WiFi dongle and correctly configure it which as it turns out can be something of an exercise. In my own experience, I found that choosing the right wireless adapter was the key to making the job simple enough to be able to recommend it to new users. Not all WiFi adapters are well supported and if you are unfamiliar with the process of installing drivers or compiling code, then I would recommend that you opt for an adapter that is supported and will work ‘out of the box’. There is an excellent page on elinux.org which lists different adapters and their requirements. I eventually opted for the Edimax EW-7811Un which literally ‘just worked’ and I would recommend it to others for it’s ease of use and relatively low cost (approximately $15 US).

To install the wireless adapter we should start with the Pi powered off and install it into a convenient USB connection. When we turn the power on we will see the normal range of messages scroll by, but if we’re observant we will note that there are a few additional lines concerning a USB device. These lines will most likely scroll past, but once the device has finished powering up and we have logged in we can type in…
… which will show us a range of messages about drivers that are loaded to support discovered hardware.
Somewhere in that list (hopefully towards the end) will be a series of messages that describe the USB connectors and what is connected to them. In particular we could see a group that looks a little like the following;
[3.382731] usb 1-1.2: new high-speed USB device number 4 using dwc_otg
[3.494250] usb 1-1.2: New USB device found, idVendor=7392, idProduct=7811
[3.507749] usb 1-1.2: New USB device strings: Mfr=1, Product=2, SerialNumber=3
[3.520230] usb 1-1.2: Product: 802.11n WLAN Adapter
[3.542690] usb 1-1.2: Manufacturer: Realtek
[3.560641] usb 1-1.2: SerialNumber: 00345767831a5e
That is our USB adapter which is plugged into USB slot 2 (which is the ‘2’ in usb 1-1.2:). The manufacturer is listed as ‘Realtek’ as this is the manufacturer of the chip-set in the adapter that Edimax uses.
Instructions for Using Wheezy
In the same way that we would edit the /etc/network/interfaces file to set up a static IP address we will now edit it with the command…
This time we will edit the interfaces file so that it looks like the following;
10.1.1.17
netmask 255.255.255.0
gateway 10.1.1.1
wpa-ssid "homenetwork"
wpa-psk "h0mepassw0rd"
Here we have reverted the eth0 interface (the wired network connection) to have it’s network connection assigned dynamically (iface eth0 inet manual).
Instructions for Using Jessie
If we’re using Debian Jessie, we need to edit two files. The first is the file wpa_supplicant/wpa_supplicant.conf at /etc/wpa_supplicant/wpa_supplicant.conf. This looks like the following;
Use the nano command as follows;
We need to add the ssid (the wireless network name) and the password for the wifi network here so that the file looks as follows (using your ssid and password of course);
In the same way that we would edit the /etc/dhcpcd.conf file to set up a static IP address for our physical connection (eth0) we will now edit it with the command…
This time we will add the details for the wlan0 connection to the end of the file. Those details (assuming we will use the 10.1.1.17 IP address) should look like the following;
Our wireless lan (wlan0) is now designated to be a static IP address (with the details that we had previously assigned to our wired connection) and we have added the ‘ssid’ (the network name) of the network that we are going to connect to and the password for the network.
Make the changes operative
To allow the changes to become operative we can type in;
Once we have rebooted, we can check the status of our network interfaces by typing in;
This will display the configuration for our wired Ethernet port, our ‘Local Loopback’ (which is a fancy way of saying a network connection for the machine that you’re using, that doesn’t require an actual network (ignore it in the mean time)) and the wlan0 connection which should look a little like this;
80:1f:02:f4:21:85
inet addr:10.1.1.17 Bcast:10.1.1.255 Mask:255.255.255.0
UP BROADCAST RUNNING MULTICAST MTU:1500 Metric:1
RX packets:213 errors:0 dropped:90 overruns:0 frame:0
TX packets:54 errors:0 dropped:0 overruns:0 carrier:0
collisions:0 txqueuelen:1000
RX bytes:88729 (86.6 KiB) TX bytes:6467 (6.3 KiB)
This would indicate that our wireless connection has been assigned the static address that we were looking for (10.1.1.17).
We should be able to test our connection by connecting to the Pi via SSH and ‘PuTTY’ on the Windows desktop.
In theory you are now the proud owner of a computer that can be operated entirely separate from all connections except power.
External USB Storage
Because the Raspberry Pi uses a MicroSD card as its primary method for storing data and holding the operating system, this can be slightly limiting in terms of volumes available or we could want a storage area to place backup information on the Pi.
To overcome these limitations in a simple way we can add additional storage via a USB stick. To do this via the GUI would be a relatively simple task, but to make a USB drive usable in a persistent way (to make sure we have full control of the process) we will manage the set-up via the command line.
The following guide will be carried out using Raspbian Jessie.
To make the space available on a USB drive available we need to ‘mount’ the storage onto our file system. Think of this as a similar process to adding an extension to your house. To make the extension accessible we need to add it so that it meets the current house’s structure at some point. In our case we will mount our new storage in the /mnt directory. This is one of the places that is traditionally used for mounting additional storage on Linux systems.
Before we make a start it is good practice to ensure that we have updated our systems operating system and packages using apt-get update and apt-get upgrade as follows;
Preparing our storage
The first thing we need to do is to plug in our USB drive. We need to find out what device name is has been assigned so that we can mount it properly. To do this we can run the fdisk command to list out the various partitions that the operating system can see.
In the listing that follows we should be able to identify the device we are wanting to mount by factoring in a bit of knowledge of the type of device it is. In the case here the device was labelled as a 32GB drive. The obvious candidate is the following (from the sudo fdisk -l command);
We can see that the 29.5GB partition is designated as device /dev/sda1. But more interestingly, the device type is formatted as W95 FAT32 (LBA). This is where we put out thinking caps on a bit as we need to understand that not all file systems are created equally. In particular the W95 FAT32 (LBA) type (which is very popular on USB sticks) does not support permissions and will not make a good candidate for a file system. Therefore we will format the sda1 partition with a new file system. In this particular case we will use the ‘ext4’ file system.
The first step in preparing our storage is to change the formatting on the device using the fdisk command. We can start the interactive process as follows;
That will provide a warning that the process will start, but that they will only become operative when we write the changes to disk;
From our previous use of fdisk we know that the device /dev/sda has only a single partition (sda1). Therefore when we select t to change the device type it automatically selects partition 1 and asks for the hex code of the type to change to. At this point we could also list all the possible types, but if we want to examine our options, feel free to check them out in the fdisk section, or alternatively we can just select the hex code for the ‘Linux’ type which is ‘83’;
Once done and if we’re completely happy we can write the changes to disk;
We will get a message that while the changes have been made in the file system table, in order for them to become operative the system needs to be rebooted (and the file systems loaded);
Once the system has rebooted and we’re logged in as the ‘pi’ user again we can use the mkfs command to change the file system on the /dev/sda1 partition. We specify the type of file system when executing the command and in this case we are going to apply the ‘ext4’ file system. This is one of the later file systems and while it could be successfully argued that it might be imperfect for a USB flash drive it might be good for a USB removable hard drive. Whatever the case, it is not a bad option;
We will get a warning that the partition already has a file system;
Be aware that this destroys the data on the USB drive and if we had something on the drive that we wanted to retain, this would be the last opportunity to stop;
…and after a short while…
The information above also includes a vital piece of data that we are going to want later when we make the drive automatically mount when we boot the Pi. Namely the Filesystem UUID. Above it is listed as ‘61222dc4-b10b-482c’ (the value may be longer or shorter than this one). Make a note of it for later use.
Mounting the drive
The storage that is associated with the partition /dev/sda1 will be the device that we will mount onto our mount point. For the purposes of the exercise we will create a directory called /mnt/usbdata which will be the mount point. We will want to do this as an administrative user (the ‘pi’ user doesn’t have sufficient permissions), so we will use the sudo prefix while executing the mkdir (make directory) command like so;
If we list the contents of the /mnt directory with ls -l we can see the results of our directory creation efforts;
Which will show us the contents of the /mnt directory something like this;
Now we can mount the device to the directory /mnt/usbdata using the mount command as follows;
The permissions for the /mnt/usbdata directory need to be altered to allow our user ‘pi’ to have ownership of it with the command chown and we have to set the permissions for the directory so that the owner (‘pi’) and the owning group (also called ‘pi’) have full access. We use the change mode command (chmod to do this). We will set the access rights for all others to ‘read’ and ‘execute’. The commands are as follows;
To ensure that the default permission settings for the ‘pi’ user and group is set for all future files in our directory we can use the setfacl command (set file access control lists) as follows;
If we execute the ls -l /mnt command again we can see the changes we’re applied (the + symbol is as a result of the access control list being applied);
At this point we have successfully mounted the drive and we can use it as a brand new extension to our storage. The only problem will be when we reboot the Pi it will no longer be mounted and we would need to go through the mounting procedure again. The next section will fix that
Auto-mounting on boot
To mount the drive automatically on boot we are going to edit the /etc/fstab file and include a command to mount the drive that will be read every time the system boots up.
There are several different ways that this portion of the setup can go. Because we have gone through the process of assigning appropriate defaults for our directory in terms of permissions and users we should be able to simply add the appropriate mounting information to the bottom of our fstab file. This is the point when we recall the UUID that we recorded from earlier (61222dc4-b10b-482c). Remember: You need to add YOUR UUID, not this one.
So add the following line to the end of the file;
It tells the computer that the device with the UUID of 61222dc4-b10b-482c is to be mounted to the directory /mnt/usbdata with an ext4 file system. We could have specified the device partition (/dev/sda1) but that could mean that a different device could be plugged in that would be recognised and mounted at that position. The nofail reference means that it will not report errors if the computer fails to recognise the drive when booting up (i.e. if it isn’t plugged in) and the defaults settings picks up the user and permissions settings that we have already specified.
We should now have a consistent setup for mounting extra storage in the form of a USB storage device.
Reconnecting to the network automatically
I have found with experience that in spite of my best intentions, sometimes when setting up a Raspberry Pi to maintain a WiFi connection, if it disconnects for whatever reason it may not reconnect automatically.
To solve this problem we’re going to write a short script that automatically reconnects our Pi to a WiFi network. The script will check to see if the Pi is connected to our local network and, if it’s off-line, will restart the wireless network interface. We’ll use a cron job to schedule the execution of this script at a regular interval.
Let’s write a script
First, we’ll need to check if the Pi is connected to the network. This is where we’ll try to ping an IP address on our local network (perhaps our gateway address?). If the ping command succeeds in getting a response from the IP address, we have network connectivity. If the command fails, we’ll turn off our wireless interface (wlan0) and then turn it back on (yes, the timeless solution of turning it off and on).
The script looks a little like this;
#!/bin/bash

# The IP address of our gateway on our local router
GATEWAY=10.1.1.1

# Send two pings, with the output going to /dev/null
ping -c2 ${GATEWAY} > /dev/null

# Check to see if the returned value from ping ($?)
# is not 0 and then act to restart wlan0 if necessary
if [ $? != 0 ]
then
    # Restart wlan0 (the wireless interface)
    ifconfig wlan0 down
    ifconfig wlan0 up
fi
Use nano to create the script, name it something like wifistart.sh, and save it in /usr/local/bin. We also need to make sure it’s executable by running chmod (using sudo) as follows;
Lets run our script on a regular schedule
To make our WiFi checking script run automatically, we’ll schedule a cron job using crontab;
… and add this line to the bottom:
This runs the script every 5 minutes with sudo permissions, writing its output to /dev/null so it doesn’t spam syslog.
Let’s test it
To test that the script works as expected, we will want to take down the wlan0 interface and wait for the script to bring it back up. Before taking down wlan0, we might want to adjust the interval in crontab to 1 minute. And fair warning, when we disconnect wlan0, we will lose that network interface, so we will need to either have a local keyboard / monitor connected, have another network interface set up or be really comfortable that we’ve got everything set up right first time.
To take down wlan0 to confirm the script works, run:
After waiting for 5 (or 1) minutes, we could try ssh-ing back into the Raspberry Pi or if we’re keen we could have a ping command running on another server checking the interface to show when it stops and when it (hopefully) starts again. Assuming everything works, our Pi should reconnect seamlessly.
Checking Operating System and Hardware
As we work with our Raspberry Pis and put them into good use, there is a possibility that we might lose track of what Operating System (OS) is installed or indeed what version of Raspberry Pi is being used. The good news is that we can check this out remotely with these simple commands.
Operating System
This check is carried out from the command line while logged into the Pi and lets us check the file os-release which has a wealth of information.
For an installation of Raspbian ‘Jessie’ the returned information might look as follows;
For Raspbian ‘Buster’ the returned information might look as follows;
Conversely, if we’re looking for more Debian specific information (remembering that Raspbian is derived from Debian) we can use the following command;
For Raspbian ‘Jessie’ the returned information might look as follows;
For Raspbian ‘Buster’ the returned information might look as follows;
Hardware
Each hardware version of the Raspberry Pi can be determined by the hardware revision code in the cpuinfo file. We can check this by executing the following command from the command line;
If we run that command on a Pi 2 Model B v1.1 board the following will be returned;
The Revision code for each board can be checked against a look-up table that details the various versions. The following table has been sourced from the good folks at elinux.org.
| Revision | Release Date | Model | PCB Revision | Memory | Notes |
|---|---|---|---|---|---|
| Beta | Q1 2012 | B (Beta) | ? | 256 MB | Beta Board |
| 0002 | Q1 2012 | B | 1.0 | 256 MB | Nil |
| 0003 | Q3 2012 | B (ECN0001) | 1.0 | 256 MB | Fuses mod and D14 removed |
| 0004 | Q3 2012 | B | 2.0 | 256 MB | (Mfg by Sony) |
| 0005 | Q4 2012 | B | 2.0 | 256 MB | (Mfg by Qisda) |
| 0006 | Q4 2012 | B | 2.0 | 256 MB | (Mfg by Egoman) |
| 0007 | Q1 2013 | A | 2.0 | 256 MB | (Mfg by Egoman) |
| 0008 | Q1 2013 | A | 2.0 | 256 MB | (Mfg by Sony) |
| 0009 | Q1 2013 | A | 2.0 | 256 MB | (Mfg by Qisda) |
| 000d | Q4 2012 | B | 2.0 | 512 MB | (Mfg by Egoman) |
| 000e | Q4 2012 | B | 2.0 | 512 MB | (Mfg by Sony) |
| 000f | Q4 2012 | B | 2.0 | 512 MB | (Mfg by Qisda) |
| 0010 | Q3 2014 | B+ | 1.0 | 512 MB | (Mfg by Sony) |
| 0011 | Q2 2014 | Compute Module | 1.0 | 512 MB | (Mfg by Sony) |
| 0012 | Q4 2014 | A+ | 1.1 | 256 MB | (Mfg by Sony) |
| 0013 | Q1 2015 | B+ | 1.2 | 512 MB | (Mfg by Embest) |
| 0014 | Q2 2014 | Compute Module | 1.0 | 512 MB | (Mfg by Embest) |
| 0015 | ? | A+ | 1.1 | 256 MB / 512 MB | (Mfg by Embest) |
| a01040 | Unknown | 2 Model B | 1.0 | 1 GB | Unknown |
| a01041 | Q1 2015 | 2 Model B | 1.1 | 1 GB | (Mfg by Sony) |
| a21041 | Q1 2015 | 2 Model B | 1.1 | 1 GB | (Mfg by Embest) |
| a22042 | Q3 2016 | 2 Model B (with BCM2837) | 1.2 | 1 GB | (Mfg by Embest) |
| 900021 | Q3 2016 | A+ | 1.1 | 512 MB | (Mfg by Sony) |
| 900092 | Q4 2015 | Zero | 1.2 | 512 MB | (Mfg by Sony) |
| 900093 | Q2 2016 | Zero | 1.3 | 512 MB | (Mfg by Sony) |
| 920093 | Q4 2016? | Zero | 1.3 | 512 MB | (Mfg by Embest) |
| a02082 | Q1 2016 | 3 Model B | 1.2 | 1 GB | (Mfg by Sony) |
| a22082 | Q1 2016 | 3 Model B | 1.2 | 1 GB | (Mfg by Embest) |
| a32082 | Q4 2016 | 3 Model B | 1.2 | 1 GB | (Mfg by Sony Japan) |
| a020d3 | Q1 2018 | 3 Model B+ | 1.3 | 1 GB | (Mfg by Sony) |
| 9020e0 | Q4 2018 | 3 Model A+ | 1.0 | 512 MB | (Mfg by Sony) |
| a02100 | Q1 2019 | Compute Module 3+ | 1.0 | 1 GB | (Mfg by Sony) |
| a03111 | Q2 2019 | 4 Model B | 1.1 | 1 GB | (Mfg by Sony) |
| b03111 | Q2 2019 | 4 Model B | 1.1 | 2 GB | (Mfg by Sony) |
| c03111 | Q2 2019 | 4 Model B | 1.1 | 4 GB | (Mfg by Sony) |
To get the information above in a simple way, later versions of Raspbian can access the information by running the following command;
This will output something similar to the following for a Raspberry Pi 3;
Configuring the Pi Zero W to work from scratch without a monitor
Get standard image
Install the disk image onto a microSD card using Disk Imager in much the same way that we have done previously.
Configure the card
Enable ssh by creating a new file on the microSD card called ssh. Simply right click on the folder and go ‘Create new text document’. The file will have the suffix .txt, but this won’t matter. This allows ssh to be enabled on first boot.
Create a file called wpa_supplicant.conf on the microSD card in the directory that opens by default on Windows explorer (this is the ‘boot’ directory). This should have the contents below (using your own information for SSID and password);
Once this is complete, insert the microSD card into the Pi and power it up.
It will take 30 seconds or so to resize the card and get an IP address assigned to it. Once that much time has passed by you can ssh into your Pi.
If this is the only Raspberry Pi on your network you can ssh in using the following command;
If you have more than one Pi on the network, it can be a bit confusing to determine which one you have ssh-d into. To confirm you could toggle the activity light on and off.
We need to be root to execute the command (just using sudo in front of the command won’t be enough). Switch to the root user by typing the following
The command prompt will indicate that we are now the root user thusly;
Then we can turn the LED on by writing a ‘1’ to the ‘led0’ brightness file with the following command;
If we want to turn it off we write a ‘0’ like so;
Just keep an eye on your Pi and when you see the LED turning off and on you know that you’re on the right one :-).
Turn the activity light on or off
The main board on the Raspberry Pi has power and activity LEDs to indicate when power has been applied (red) and when the on-board SD card is being accessed (green). These are situated on the opposite end of the board to the Ethernet connector on the B models. They can however be on different sides of the display ribbon connector depending on which B model.

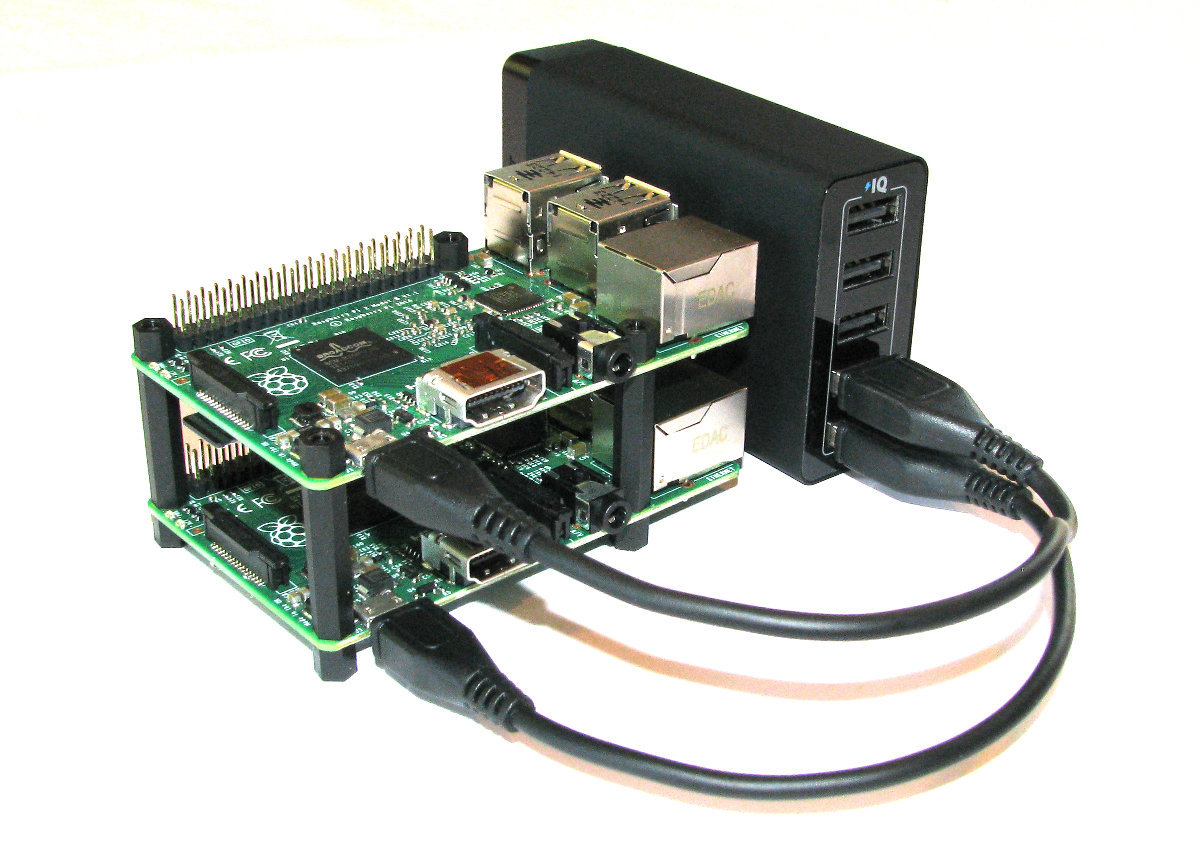
Embarrassingly, I have found that when running multiple Raspberry Pi’s I have forgotten which ones are running which software or operating system (This is what I get for writing books on monitoring, Ghost, ownCloud etc). This is exacerbated by mounting the Pis in an open stack configuration similar to the following (Imagine it as a slightly higher stack).
What to do then when faced with a stack o’ Pi and difficulty in telling which is which?
The good news is that we can log into each and force the activity LED to illuminate and hence identify each device.
Cut to the chase and just do it
The first thing we need to do is to set the trigger for the activity LED to GPIO mode;
Then we can turn the LED on by writing a ‘1’ to the ‘led0’ brightness file with the following command;
If we want to turn it off we write a ‘0’ like so;
And to return it to the state where it indicates activity on the SD card we use mmc0 which is shorthand for multi media card 0 (or the SD card);
The explanation of how it works
The /sys directory exists as an interface between the kernel-space and the user-space. As such it is an implementation of the system file system (sysfs). The /sys/class subdirectory is exported by the kernel at runtime and presents devices on the system as a ‘class’ in the sense that it abstracts out the detailed implementation that might otherwise be exposed (the example used in the ‘makelinux’ description of classes is that a driver might see a SCSI or ATA disk, but as a class they are all just ‘disks’).
The following is a highly abridged hierarchy of the /sys/class directory where we can see the range of classes and their respective links.
The leds class contains directories for ‘led0’ and ‘led1’.
Inside this directory are the trigger file which determines which kernel modules activity will flash the led and the brightness file that will determine the brightness (duh!) of the led.
If we cat the trigger file we can see that there is a range of different things that can be used as the trigger to illuminate the led.
The multimedia card (mmc0) is set as the default.
The led can only have two levels of brightness; ‘on’ or ‘off’. This corresponds to a ‘0’ or a ‘1’ respectively. To illuminate our led all we have to do therefore is to signal the brightness file that it has the value ‘1’ (per the example above).
To revert to control of the brightness we echo the device responsible for controlling the led to the trigger file. In this case for the activity led it is the ‘mmc0’ device.
The Commands
Commands on Linux operating systems are either built-in or external commands. Built-in commands are part of the shell. External commands are either executables (programs written in a programming language and then compiled into an executable binary) or shell scripts.
A command consists of a command name usually followed by one or more sequences of characters that include options and/or arguments. Each of these strings is separated by white space. The general syntax for commands is;
commandname [options] [arguments]
The square brackets indicate that the enclosed items are optional. Commands typically have a few options and utilise arguments. However, there are some commands that do not accept arguments, and a few with no options.
As an example we can run the ls command with no options or arguments as follows;
The ls command will list the contents of a directory and in this case the command and the output would be expected to look something like the following;
Options
An option (also referred to as a switch or a flag) is a single-letter code, or sometimes a single word or set of words, that modifies the behaviour of a command. When multiple single-letter options are used, all the letters are placed adjacent to each other (not separated by spaces) and can be in any order. The set of options must usually be preceded by a single hyphen, again with no intervening space.
So again using ls if we introduce the option -l we can show the total files in the directory and subdirectories, the names of the files in the current directory, their permissions, the number of subdirectories in directories listed, the size of the file, and the date of last modification.
The command we execute therefore looks like this;
And so the command (with the -l option) and the output would look like the following;
26
drwxr-xr-x 2 pi pi 4096 Feb 20 08:07 Desktop
drwxrwxr-x 2 pi pi 4096 Jan 27 08:34 python_games
Here we can see quite a radical change in the formatting and content of the returned information.
Arguments
An argument (also called a command line argument) is a file name or other data that is provided to a command in order for the command to use it as an input.
Using ls again we can specify that we wish to list the contents of the python_games directory (which we could see when we ran ls) by using the name of the directory as the argument as follows;
The command (with the python_games argument) and the output would look like the following (actually I removed quite a few files to make it a bit more readable);
Putting it all together
And as our final example we can combine our command (ls) with both an option (-l) and an argument (python_games) as follows;
Hopefully by this stage, the output shouldn’t come as too much surprise, although again I have pruned some of the files for readabilities sake;
1800
-rw-rw-r-- 1 pi pi 9731 Jan 27 08:34 4row_arrow.png
-rw-rw-r-- 1 pi pi 7463 Jan 27 08:34 4row_black.png
-rw-rw-r-- 1 pi pi 8666 Jan 27 08:34 4row_board.png
-rw-rw-r-- 1 pi pi 18933 Jan 27 08:34 4row_computerwinner.png
-rw-rw-r-- 1 pi pi 25412 Jan 27 08:34 4row_humanwinner.png
-rw-rw-r-- 1 pi pi 8562 Jan 27 08:34 4row_red.png
-rw-rw-r-- 1 pi pi 14661 Jan 27 08:34 tetrisc.mid
-rw-rw-r-- 1 pi pi 15759 Jan 27 08:34 tetrominoforidiots.py
-rw-rw-r-- 1 pi pi 18679 Jan 27 08:34 tetromino.py
-rw-rw-r-- 1 pi pi 9771 Jan 27 08:34 Tree_Short.png
-rw-rw-r-- 1 pi pi 11546 Jan 27 08:34 Tree_Tall.png
-rw-rw-r-- 1 pi pi 10378 Jan 27 08:34 Tree_Ugly.png
-rw-rw-r-- 1 pi pi 8443 Jan 27 08:34 Wall_Block_Tall.png
-rw-rw-r-- 1 pi pi 6011 Jan 27 08:34 Wood_Block_Tall.png
-rw-rw-r-- 1 pi pi 8118 Jan 27 08:34 wormy.py
apt-get
The apt-get command is a program, that is used with Debian based Linux distributions to install, remove or upgrade software packages. It’s a vital tool for installing and managing software and should be used on a regular basis to ensure that software is up to date and security patching requirements are met.
There are a plethora of uses for apt-get, but we will consider the basics that will allow us to get by. These will include;
- Updating the database of available applications (
apt-get update) - Upgrading the applications on the system (
apt-get upgrade) - Installing an application (
apt-get install *package-name*) - Un-installing an application (
apt-get remove *package-name*)
The apt-get command
The apt part of apt-get stands for ‘advanced packaging tool’. The program is a process for managing software packages installed on Linux machines, or more specifically Debian based Linux machines (Since those based on ‘redhat’ typically use their rpm (red hat package management (or more lately the recursively named ‘rpm package management’) system). As Raspbian is based on Debian, so the examples we will be using are based on apt-get.
APT simplifies the process of managing software on Unix-like computer systems by automating the retrieval, configuration and installation of software packages. This was historically a process best described as ‘dependency hell’ where the requirements for different packages could mean a manual installation of a simple software application could lead a user into a sink-hole of despair.
In common apt-get usage we will be prefixing the command with sudo to give ourselves the appropriate permissions;
apt-get update
This will resynchronize our local list of packages files, updating information about new and recently changed packages. If an apt-get upgrade (see below) is planned, an apt-get update should always be performed first.
Once the command is executed, the computer will delve into the internet to source the lists of current packages and download them so that we will see a list of software sources similar to the following appear;
[490 B]
Get:2 http://archive.raspberrypi.org wheezy Release.gpg [473 B]
Hit http://raspberrypi.collabora.com wheezy Release
Get:3 http://mirrordirector.raspbian.org wheezy Release [14.4 kB]
Get:4 http://archive.raspberrypi.org wheezy Release [17.6 kB]
Hit http://raspberrypi.collabora.com wheezy/rpi armhf Packages
Get:5 http://mirrordirector.raspbian.org wheezy/main armhf Packages [6,904 kB]
Get:6 http://archive.raspberrypi.org wheezy/main armhf Packages [130 kB]
Ign http://raspberrypi.collabora.com wheezy/rpi Translation-en
Ign http://mirrordirector.raspbian.org wheezy/contrib Translation-en
Ign http://mirrordirector.raspbian.org wheezy/main Translation-en
Ign http://mirrordirector.raspbian.org wheezy/non-free Translation-en
Ign http://mirrordirector.raspbian.org wheezy/rpi Translation-en
Fetched 7,140 kB in 35s (200 kB/s)
Reading package lists... Done
apt-get upgrade
The apt-get upgrade command will install the newest versions of all packages currently installed on the system. If a package is currently installed and a new version is available, it will be retrieved and upgraded. Any new versions of current packages that cannot be upgraded without changing the install status of another package will be left as they are.
As mentioned above, an apt-get update should always be performed first so that apt-get upgrade knows which new versions of packages are available.
Once the command is executed, the computer will consider its installed applications against the databases list of the most up to date packages and it will prompt us with a message that will let us know how many packages are available for upgrade, how much data will need to be downloaded and what impact this will have on our local storage. At this point we get to decide whether or not we want to continue;
6 upgraded, 0 newly installed, 0 to remove and 0 not upgraded.
Need to get 10.7 MB of archives.
After this operation, 556 kB disk space will be freed.
Do you want to continue [Y/n]?
Once we say yes (‘Y’) the upgrade kicks off and we will see a list of the packages as they are downloaded unpacked and installed (what follows is an edited example);
continue [Y/n]? y
Get:1 http://archive.raspberrypi.org/debian/wheezy/main libsdl1.2debian
armhf 1.2.15-5+rpi1 [205 kB]
Get:2 http://archive.raspberrypi.org/debian/wheezy/main raspi-config all
20150131-5 [13.3 kB]
Get:3 http://mirrordirector.raspbian.org/raspbian/ wheezy/main libsqlite3-0
armhf 3.7.13-1+deb7u2 [414 kB]
Fetched 10.7 MB in 31s (343 kB/s)
Preconfiguring packages ...
(Reading database ... 80703 files and directories currently installed.)
Preparing to replace cups-common 1.5.3-5+deb7u5
(using .../cups-common_1.5.3-5+deb7u6_all.deb) ...
Unpacking replacement cups-common ...
Preparing to replace cups-bsd 1.5.3-5+deb7u5
(using .../cups-bsd_1.5.3-5+deb7u6_armhf.deb) ...
Unpacking replacement cups-bsd ...
Preparing to replace php5-gd 5.4.39-0+deb7u2
(using .../php5-gd_5.4.41-0+deb7u1_armhf.deb) ...
Unpacking replacement php5-gd ...
Processing triggers for man-db ...
Setting up libssl1.0.0:armhf (1.0.1e-2+rvt+deb7u17) ...
Setting up libsqlite3-0:armhf (3.7.13-1+deb7u2) ...
Setting up cups-common (1.5.3-5+deb7u6) ...
Setting up cups-client (1.5.3-5+deb7u6) ...
There can often be alerts as the process identifies different issues that it thinks the system might strike (different aliases, runtime levels or missing fully qualified domain names). This is not necessarily a sign of problems so much as an indication that the process had to take certain configurations into account when upgrading and these are worth noting. Whenever there is any doubt about what has occurred, Google will be your friend :-).
apt-get install
The apt-get install command installs or upgrades one (or more) packages. All additional (dependency) packages required will also be retrieved and installed.
If we want to install multiple packages we can simply list each package separated by a space after the command as follows;
apt-get remove
The apt-get remove command removes one (or more) packages.
chmod
The chmod command allows us to set or modify a file’s permissions. Because Linux is built as a multi-user system there are typically multiple different users with differing permissions for which files they can read / write or execute. chmod allows us to limit access to authorised users to do things like editing web files while general users can only read the files.
-
chmod[options] mode files : Change access permissions of one or more files & directories
For example, the following command (which would most likely be prefixed with sudo) sets the permissions for the /var/www directory so that the user can read from, write to and change into the directory. Group owners can also read from, write to and change into the directory. All others can read from and change into the directory, but they cannot create or delete a file within it;
This might allow normal users to browse web pages on a server, but prevent them from editing those pages (which is probably a good thing).
The chmod command
The chmod command allows us to change the permissions for which user is allowed to do what (read, write or execute) to files and directories. It does this by changing the ‘mode’ (hence chmod = change file mode) of the file where we can make the assumption that ‘mode’ = permissions.
Every file on the computer has an associated set of permissions. Permissions tell the operating system what can be done with that file and by whom. There are three things you can (or can’t) do with a given file:
- read it,
- write (modify) it and
- execute it.
Linux permissions specify what the owning user can do, what the members of the owning group can do and what other users can do with the file. For any given user, we need three bits to specify access permissions: the first to denote read (r) access, the second to denote (w) access and the third to denote execute (x) access.
We also have three levels of ownership: ‘user’, ‘group’ and ‘others’ so we need a triplet (three sets of three) for each, resulting in nine bits.
The following diagram shows how this grouping of permissions can be represented on a Linux system where the user, group and others had full read, write and execute permissions;

If we had a file with more complex permissions where the user could read, write and execute, the group could read and write, but all other users could only read it would look as follows;

This description of permissions is workable, but we will need to be aware that the permissions are also represented as 3 bit values (where each bit is a ‘1’ or a ‘0’ (where a ‘1’ is yes you can, or ‘0’ is no you can’t)) or as the equivalent octal value.

The full range of possible values for these permission combinations is as follows;
Another interesting thing to note is that permissions take a different slant for directories.
- read determines if a user can view the directory’s contents, i.e. execute
lsin it. - write determines if a user can create new files or delete file in the directory. (Note here that this essentially means that a user with write access to a directory can delete files in the directory even if he/she doesn’t have write permissions for the file! So be careful.)
- execute determines if the user can cd into the directory.
We can check the check the permissions of files using the ls -l command which will list files in a long format as follows;
This command will list the details of the file foo.txt that is in the /tmp directory as follows
1 pi pi-group 20 Jul 10 13:14 foo.txt
The permissions on the file, the user and the group owner can be found as follows;
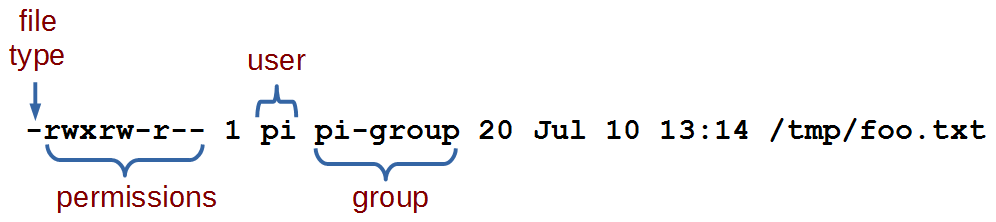
From this information we can see that the file’s user (‘pi’) has permissions to read, write and execute the file. The group owner (‘pi-group’) can read and write to the file and all other users can read the file.
Options
The main option that is worth remembering is the -R option that will Recursively apply permissions on the files in the specified directory and its sub-directories.
The following command will change the permissions for all the files in the /srv/foo directory and in all the directories that are under it;
Arguments
Simplistically (in other words it can be more complicated, but we’re simplifying it) there are two main ways that chmod is used. In either symbolic mode where the permissions are changed using symbols associated with read, write and execute as well as symbols for the user (u), the group owner (g), others (o) and all users (a). Or in numeric mode where we use the octal values for permission combinations.
Symbolic Mode
In symbolic mode we can change the permissions of a file with the following syntax:
-
chmod[who][op][permissions] filename
Where who can be the user (u), the group owner (g) and / or others (o). The operator (op) is either + to add a permission, - to remove a permission or = to explicitly set permissions. The permissions themselves are either readable (r), writeable (w), or executable (x).
For example the following command adds executable permissions (x) to the user (u) for the file /tmp/foo.txt;
This command removes writing (w) and executing (x) permissions from the group owner (g) and all others (o) for the same file;
Note that removing the execute permission from a directory will prevent you from being able to list its contents (although root will override this). If you accidentally remove the execute permission from a directory, you can use the +X argument to instruct chmod to only apply the execute permission to directories.
Numeric Mode
In numeric mode we can explicitly state the permissions using the octal values, so this form of the command is fairly common.
For example, the following command will change the permissions on the file foo.txt so that the user can read, write and execute it, the group owner can read and write it and all others can read it;
Examples
To change the permissions in your home directory to remove reading and executing permissions from the group owner and all other users;
To make a script executable by the user;
Windows marks all files as executable by default. If you copy a file or directory from a Windows system (or even a Windows-formatted disk) to your Linux system, you should ideally strip the unnecessary execute permissions from all copied files unless you specifically need to retain it. Note of course we still need it on all //directories// so that we can access their contents! Here’s how we can achieve this in one command:
This instructs chmod to remove the execute permission for each file and directory, and then immediately set execute again if working on a directory.
chown
The chown command changes the user and/or group ownership of given files. Because Linux is built as a multi-user system there are typically multiple different users (not necessarily actual people, but daemons or other programs who may run as their own user) responsible for maintaining clear permission boundaries that separate services to prevent corruption or maintain security or privacy. This allows us to limit access to authorised users to do things like editing web files.
-
chown[options] newowner files : Change the ownership of one or more files & directories
For example, if we want to make the user www-data the owner of the directory www (in the /var directory) and we want to pass the group ownership of that directory to the group www-data we would run the following command;
There is a good likelihood that we would need to prefixed the command with sudo to run it as root depending on which user we were when we executed it.
The chown command
The chown command changes the user and/or group ownership of given files (hence chown = change owner).
It is used to help specify exactly who or what group can access certain files. There are several different options, but only one that could be deemed important enough to try and remember. There are also a number of different ways to assign ownership depending if we’re trying to assign a single user and / or group permissions. For more information on modifying permissions see chmod.
Options
The main option that is worth remembering is the -R option that will Recursively apply permissions on the files in the specified directory and its sub-directories.
The following command will change the owner to the user ‘apache’ for the /var/www directory and all the directories that are under it;
Arguments
The object that has its ownership changed can be a file or a directory and its contents.
One of the clever things about assigning permissions using chown is the way that user and group ownership can be applied in the same command (if desired).
If only a user name is given, that user is made the owner of each given file, and the files’ group is not changed.
If the owner is followed by a colon and a group name (with no space in between them) the group ownership of the files is changed as well. In the following example the user apache and the group apache-group are given ownership of the files in the /var/www directory;
If a colon but no group name follows the user name, that user is made the owner of the files and the group of the files is changed to that user’s initial login group. So if the apache users initial login group was apache-group then the following command would accomplish the same thing as the previous example;
If the colon and group are given, but the owner is omitted, only the group of the files is changed.
Examples
To change the ownership of the file /home/pi/foo.txt to the UID 3456 and the group ownership to GID 4321.
fdisk
fdisk is a command designed to manage disk partitions. This means that it allows us to view, create, resize, delete, change, copy and move partitions on a hard drive.
While we will outline some of the functions of fdisk here we will restrict the description to allow an understanding of what fdisk can show us and if you are wanting to change your partitions I recommend that you seek specific advice before doing so.
-
fdisk[options] [device] : manipulate partition tables.
The only command / option combination that we will look at in depth incorporates the -l option to list the disk partition tables.
The program will then present the information that it has on the existing partitions;
The information above shows that we have two different storage devices connected to the system. /dev/mmcblk0 and /dev/sda. There is a great deal of information presented about the disks themselves in addition to information on how they are partitioned.
We can see that the device (disk) /dev/mmcblk0 has two partitions set on it. We’re told that the disk has 7.4 GiB of storage (The ‘i’ in GiB is an indication that the storage size is reported using factors of 1024 rather than 1000 (which would be a GB). Do not panic, this is normal.). The information on sectors, is a way of representing storage capacity and is something of a hold over from when storage was always a spinning disk of something (up to recently we would also be talking about cylinders and blocks).
/dev/mmcblk0 is reported to be divided into two partitions (/dev/mmcblk0p1 and /dev/mmcblk0p2). The storage allocated to each partition is allocated to specific sectors which correspond to a particular size. The Id of the partition corresponds to system indicators or ‘types’ for the partitions. The type is also represented by a human readable name. The various `Types include (but are not limited to);
Yes, there are conservatively a metric meaga-load of types there. For our very simplistic overview of fdisk we shouldn’t be too concerned about the variety. There are quite a few specialised and some semi-historical types there so in the ‘Just Enough’ way of thinking we can expect to see some Type ‘7’, ‘b’ and ‘c’ on removable media and ‘82’ / ‘83’ for standard storage (be prepared for some flexibility there).
The fdisk command
Hard disks (or more commonly nowadays with a wide range of options available, ‘storage’ devices) can be divided into one or more logical disks called partitions. These divisions are described in the ‘partition table’ found in sector 0 of a disk. The table lists information about the start and end of each partition, information about its type, and whether it is marked bootable or not. the fdisk command allows us to edit the partition table and as such it has the potential to significantly affect the operation of the storage medium. As a result, the fdisk command is only executable by a user with administrator privileges and we risk losing data on the disk if you execute the command incorrectly.
Partitions can be different sizes, and different partitions may have different filesystems on them, so a single disk can be used for many purposes. Traditional hard drives have a structure defined by the terms of cylinders, heads, and sectors. Modern drives use logical block addressing (LBA) which renders this structure largely irrelevant however, the standard allocation unit for partitioning purposes is usually still the cylinder.
Linux needs a minimum of one partition to support its root file system. It can also take advantage of swap files and/or swap partitions, but as a swap partition is more efficient we will usually have a second Linux partition dedicated as for swap.
On Intel compatible hardware, the Basic Input / Output System (BIOS) that boots the computer can often only access the first 1024 cylinders of the disk. As a result there can often be a third partition of a few MB (typically mounted on /boot), to store the kernel image and a few auxiliary files used while booting.
fdisk allows us to view, create, resize, delete, change, copy and move partitions on a hard drive. It is an essential tool for creating space for new partitions, organising space for new drives, re-organising old drives and copying or moving data to new disks. While fdisk can manipulate the partition table, this does not make the space available for use. To do this we need to format the partition with a specific filesystem using mkfs.
As already described in the original example we can view our partition details with the -l option.
To go further down the rabbit hole of manipulating partitions is something that I am hesitant to describe because it may provide the impression that it is a trivial task that anyone should try. It is not something that should be avoided, but it is something that we should learn about and practise in a safe environment before attempting it for the first time. This can be done in a controlled way using the interactive commands but without saving the changes.
Once we have identified the device that we want to partition, we can start fdisk as a command driven interactive utility with the fdisk command and the device;
The response is a welcome message and a warning;
Pressing ‘m’ will show the range of possible commands;
To add a new partition we would press ‘n’ which will ask what type of partition we want to set up;
Making the assumption (in this case) that we will add a primary partition we can enter ‘p’ and we are asked which partition number we want to create;
Then we are asked where the first sector of our partition should start from;
Then we are asked what the last sector will be;
Once complete, fdisk will tell us the details of the partition that it has set up;
If this was our desired result we might write the changes and the configuration would be stored in the partition table. Again, this is something to be studied and understood before trying for real.
ifconfig
The ifconfig command can be used to view the configuration of, or to configure a network interface. Networking is a fundamental function of modern computers. ifconfig allows us to configure the network interfaces to allow that connection.
-
ifconfig[arguments] [interface]
or
-
ifconfig[arguments] interface [options]
Used with no ‘interface’ declared ifconfig will display information about all the operational network interfaces. For example running;
… produces something similar to the following on a simple Raspberry Pi.
76:12:45:56:47:53
UP BROADCAST MULTICAST MTU:1500 Metric:1
RX packets:0 errors:0 dropped:0 overruns:0 frame:0
TX packets:0 errors:0 dropped:0 overruns:0 carrier:0
collisions:0 txqueuelen:1000
RX bytes:0 (0.0 B) TX bytes:0 (0.0 B)
lo Link encap:Local Loopback
inet addr:127.0.0.1 Mask:255.0.0.0
UP LOOPBACK RUNNING MTU:65536 Metric:1
RX packets:0 errors:0 dropped:0 overruns:0 frame:0
TX packets:0 errors:0 dropped:0 overruns:0 carrier:0
collisions:0 txqueuelen:0
RX bytes:0 (0.0 B) TX bytes:0 (0.0 B)
wlan0 Link encap:Ethernet HWaddr 09:87:65:54:43:32
inet addr:10.1.1.8 Bcast:10.1.1.255 Mask:255.255.255.0
UP BROADCAST RUNNING MULTICAST MTU:1500 Metric:1
RX packets:3978 errors:0 dropped:898 overruns:0 frame:0
TX packets:347 errors:0 dropped:0 overruns:0 carrier:0
collisions:0 txqueuelen:1000
RX bytes:859773 (839.6 KiB) TX bytes:39625 (38.6 KiB)
The output above is broken into three sections; eth0, lo and wlan0.
-
eth0is the first Ethernet interface and in our case represents the RJ45 network port on the Raspberry Pi (in this specific case on a B+ model). If we had more than one Ethernet interface, they would be namedeth1,eth2, etc. -
lois the loopback interface. This is a special network interface that the system uses to communicate with itself. You can notice that it has the IP address 127.0.0.1 assigned to it. This is described as designating the ‘localhost’. -
wlan0is the name of the first wireless network interface on the computer. This reflects a wireless USB adapter (if installed). Any additional wireless interfaces would be namedwlan1,wlan2, etc.
The ifconfig command
The ifconfig command is used to read and manage a servers network interface configuration (hence ifconfig = interface configuration).
We can use the ifconfig command to display the current network configuration information, set up an ip address, netmask or broadcast address on an network interface, create an alias for network interface, set up hardware addresses and enable or disable network interfaces.
To view the details of a specific interface we can specify that interface as an argument;
Which will produce something similar to the following;
(8.4 MiB) TX bytes:879127 (858.5 KiB)
The configuration details being displayed above can be interpreted as follows;
-
Link encap:Ethernet- This tells us that the interface is an Ethernet related device. -
HWaddr b8:27:eb:2c:bc:62- This is the hardware address or Media Access Control (MAC) address which is unique to each Ethernet card. Kind of like a serial number. -
inet addr:10.1.1.8- indicates the interfaces IP address. -
Bcast:10.1.1.255- denotes the interfaces broadcast address -
Mask:255.255.255.0- is the network mask for that interface. -
UP- Indicates that the kernel modules for the Ethernet interface have been loaded. -
BROADCAST- Tells us that the Ethernet device supports broadcasting (used to obtain IP address via DHCP). -
RUNNING- Lets us know that the interface is ready to accept data. -
MULTICAST- Indicates that the Ethernet interface supports multicasting. -
MTU:1500- Short for for Maximum Transmission Unit is the size of each packet received by the Ethernet card. -
Metric:1- The value for the Metric of an interface decides the priority of the device (to designate which of more than one devices should be used for routing packets). -
RX packets:119833 errors:0 dropped:0 overruns:0 frame:0andTX packets:8279 errors:0 dropped:0 overruns:0 carrier:0- Show the total number of packets received and transmitted with their respective errors, number of dropped packets and overruns respectively. -
collisions:0- Shows the number of packets which are colliding while traversing the network. -
txqueuelen:1000- Tells us the length of the transmit queue of the device. -
RX bytes:8895891 (8.4 MiB)andTX bytes:879127 (858.5 KiB)- Indicates the total amount of data that has passed through the Ethernet interface in transmit and receive.
Options
The main option that would be used with ifconfig is -a which will will display all of the interfaces on the interfaces available (ones that are ‘up’ (active) and ‘down’ (shut down). The default use of the ifconfig command without any arguments or options will display only the active interfaces.
Arguments
We can disable an interface (turn it down) by specifying the interface name and using the suffix ‘down’ as follows;
Or we can make it active (bring it up) by specifying the interface name and using the suffix ‘up’ as follows;
To assign a IP address to a specific interface we can specify the interface name and use the IP address as the suffix;
To add a netmask to a a specific interface we can specify the interface name and use the netmask argument followed by the netmask value;
To assign an IP address and a netmask at the same time we can combine the arguments into the same command;
Test yourself
- List all the network interfaces on your server.
- Why might it be a bad idea to turn down a network interface while working on a server remotely?
- Display the information about a specific interface, turn it down, display the information about it again then turn it up. What differences do you see?
ls
The ls command lists the contents of a directory and can show the properties of those objects it lists. It is one of the fundamental commands for knowing what files are where and the properties of those files.
-
ls[options] directory : List the files in a particular directory
For example: If we execute the ls command with the -l option to show the properties of the listings in long format and with the argument /var so that it lists the content of the /var directory…
… we should see the following;
102440
drwxr-xr-x 2 root root 4096 Mar 7 06:25 backups
drwxr-xr-x 12 root root 4096 Feb 20 08:33 cache
drwxr-xr-x 43 root root 4096 Feb 20 08:33 lib
drwxrwsr-x 2 root uucp 4096 Jan 11 00:02 local
lrwxrwxrwx 1 root root 9 Feb 15 11:23 lock -> /run/lock
drwxr-xr-x 11 root root 4096 Jul 7 06:25 log
drwxrwsr-x 2 root mail 4096 Feb 15 11:23 mail
drwxr-xr-x 2 root root 4096 Feb 15 11:23 opt
lrwxrwxrwx 1 root root 4 Feb 15 11:23 run -> /run
drwxr-xr-x 4 root root 4096 Feb 15 11:26 spool
-rw------- 1 root root 104857600 Feb 16 14:03 swap
drwxrwxrwt 2 root root 4096 Jan 11 00:02 tmp
drwxrwxr-x 2 www-data www-data 4096 Feb 20 08:21 www
The ls command
The ls command will be one of the first commands that someone starting with Linux will use. It is used to list the contents of a directory (hence ls = list). It has a large number of options for displaying listings and their properties in different ways. The arguments used are normally the name of the directory or file that we want to show the contents of.
By default the ls command will show the contents of the current directory that the user is in and just the names of the files that it sees in the directory. So if we execute the ls command on its own from the pi users home directory (where we would be after booting up the Raspberry Pi), this is the command we would use;
… and we should see the following;
This shows two directories (Desktop and python_games) that are in pi’s home directory, but there are no details about the directories themselves. To get more information we need to include some options.
Options
There are a very large number of options available to use with the ls command. For a full listing type man ls on the command line. Some of the most commonly used are;
-
-lgives us a long listing (as explained above) -
-ashows us aLL the files in the directory, including hidden files -
-sshows us the size of the files (in blocks, not bytes) -
-hshows the size in “human readable format” (ie: 4K, 16M, 1G etc). (must be used in conjunction with the -s option). -
-Ssorts by file Size -
-tsorts by modification time -
-rreverses order while sorting
A useful combination of options could be a long listing (-l) that shows all (-a) the files with the file size being reported in human readable (-h) block size (-s).
… will produce something like the following;
4.0K drwxr-xr-x 13 pi pi 4.0K May 7 11:46 .
4.0K drwxr-xr-x 3 root root 4.0K May 7 10:20 ..
4.0K -rw-r--r-- 1 pi pi 69 May 7 11:46 .asoundrc
4.0K -rw------- 1 pi pi 854 Jul 8 12:55 .bash_history
4.0K -rw-r--r-- 1 pi pi 3.2K May 7 10:20 .bashrc
4.0K drwxr-xr-x 4 pi pi 4.0K May 7 11:46 .cache
4.0K drwxr-xr-x 7 pi pi 4.0K May 7 11:46 .config
4.0K drwxr-xr-x 2 pi pi 4.0K May 7 11:46 Desktop
4.0K drwxr-xr-x 2 pi pi 4.0K May 7 11:46 .fontconfig
4.0K drwxr-xr-x 2 pi pi 4.0K May 7 11:46 .gstreamer-0.10
4.0K drwx------ 3 pi pi 4.0K May 7 11:46 .local
4.0K -rw-r--r-- 1 pi pi 675 May 7 10:20 .profile
4.0K drwxrwxr-x 2 pi pi 4.0K Jan 27 21:34 python_games
4.0K drwxr-xr-x 3 pi pi 4.0K May 7 11:46 .themes
Arguments
The default argument (if none is included) is to list the contents of the directory that the user is currently in. Otherwise we can specify the directory to list. This might seem like a simple task, but there are a few tricks that can make using ls really versatile.
The simplest example of using a specific directory for an argument is to specify the location with the full address. For example, if we wanted to list the contents of the /var directory (and it doesn’t matter which directory we run this command from) we simply type;
… will produce the following;
local lock log mail opt run spool swap tmp www
We can also use some of the relative addressing characters to shortcut our listing. We can list the home directory by using the tilde (ls ~) and the parent directory by using two full stops (ls ..).
The asterisk (*) can be used as a wildcard to list files with similar names. E.g. to list all the png file in a directory we can use ls *.png.
If we just want to know the details of a specific file we can use its name explicitly. For example if we wanted to know the details of the swap file in /var we would use the following command;
… which will produce the following;
1 root root 104857600 May 7 11:29 /var/swap
Examples
List all the configuration (.conf) files in the /etc directory;
… which will produce the following;
mkdir
The mkdir command creates directories. It is one of the fundamental file management commands in Linux.
-
mkdir[options] directory : Create a directory
The mkdir command is used to create directories or folders. It’s a fairly simple command with a few options for additional functionality to allow paths and permissions to be set when creating.
At its simplest, the following command will create a directory called foobar in the current working directory;
We can check on the creation by listing the files using ls with the -l option as follows;
Which should show something like the following;
The read/write/execute descriptors for the permissions of the directories are prefixed by an d (for directory) and in some terminals the colour of the text showing the directory will be fifferent from that of other types of files (let’s not forget that while we call a directory a directory because of it’s function, it is really a type of file).
The ‘mkdir’ command
The mkdir command is used to create directories which are used as containers for files and subdirectories. Directories created by mkdir are automatically created with two hidden directories, one representing the directory just created (and shown as a single dot (.)) and the other representing its parent directory (and represented by two dots (..)). These hidden directories can be seen by using the ls command with the -a option (ls -a).
Directories can be removed with the rm and rmdir commands.
Options
The mkdir command has a small number of options and the two most likely to be used on anything approaching a regular basis would be;
-
-pcreates the specified parent directories for a new directory if they do not already exist -
-mcontrols the permission mode of new directories (in the same way aschmod)
For example to create the nested directories foo/bar/foobar in the current working directory we would execute the following;
Without the -p option we would need to create each layer seperatly.
To create a directory with a specific set of read, write and execute permissions we can use the -m option with the same mode arguments as used with the chmod command. For example the following command will create the foobar directory where the owner has read and write permissions, the group has read permission and other users have no permissions, the following would be used;
If we subsequently check those permissions with ls -l we will see the following;
Arguments
The normal set of addressing options are available to make the process of creating the right directories more flexible and extensible.